MemberPress-Mitgliederprofile verwandeln einfache Mitgliederkonten in personalisierte Schaufenster, die Ihre Mitgliedergemeinschaft zum Leben erwecken. MemberPress-Profile werden mit vorgefertigten, anpassbaren Layouts und dynamischen Inhaltsblöcken geliefert.
Dieses Dokument zeigt Ihnen, wie Sie MembePress-Profile erstellen und diese zum Aufbau Ihrer Communities nutzen können.
ClubDirectory™ Video-Anleitung
Verständnis von Mitgliederprofilen
MemberPress ClubSuite™. ist ein Mitglied Vernetzung und Community-Paket die den ClubDirectory™ und ClubCircles™. Add-ons.
Profile der Mitglieder sind eine Funktion des ClubDirectory™ Add-ons, zusammen mit Mitgliederverzeichnisse. Um sie auf Ihrer Website zu verwenden, müssen Sie Installieren Sie das MemberPress ClubDirectory™ Add-on und konfigurieren Sie die globale Profileinstellungen.
Mitgliederprofile dienen als individuelle Mitgliederpräsentation innerhalb Ihres Community-Ökosystems. Jedes Profil bietet einen eigenen Bereich, in dem Mitglieder Informationen austauschen, sich mit anderen verbinden und ihr Engagement demonstrieren können. Profile generieren automatisch eindeutige URLs für jedes Mitglied, sodass sie leicht zu teilen und zu entdecken sind.
Das Profilsystem berücksichtigt Ihre Mitgliedschaftshierarchie und Zugangskontrollen. Sie können verschiedene Sichtbarkeitsstufen konfigurieren, um sicherzustellen, dass die Mitglieder nur die Informationen sehen, die für ihre Mitgliedschaftsstufe relevant sind. Diese granulare Kontrolle wahrt die Privatsphäre und fördert gleichzeitig das Engagement.
Gut gestaltete Profile ermutigen die Mitglieder, ihre Angaben zu vervollständigen und sich aktiv zu beteiligen. Sie können die vorgefertigten MemberPress-Profilmuster verwenden oder Ihre Designs mit profilspezifischen Gutenberg-Blöcken erstellen.
Erstellen von Profilen
Profile dienen als Master-Vorlagen, die festlegen, wie Mitgliederprofile aussehen und funktionieren. Sie bestimmen das visuelle Styling, die verfügbaren Funktionen, Informationsfelder und Interaktionsmöglichkeiten.
Jedes Profil enthält also Layout-Design, verfügbare Felder, Anzeigebereiche und Gestaltungsoptionen.
Sie können erstellen verschiedene Profile für verschiedene Mitgliedsstufen, wobei Premium-Mitglieder erweiterte Funktionen erhalten. Wenn Benutzer sich für mehrere Profile qualifizieren, MemberPress zeigt das Profil mit der höchsten Prioritätsnummer an. Mit dieser Einstellung können Sie Hinzufügen von Funktionen zu den Profilen der Nutzer auf der Grundlage ihrer Mitgliedsstufe. Wenn ein Mitglied beispielsweise auf eine höhere Mitgliedsstufe aufsteigt, ändert sich sein Profiltyp automatisch, wodurch er sofort erweiterte Funktionen erhält.
MemberPress erstellt automatisch die Standard Profil genannt “Benutzerprofil”, das für alle Benutzer gilt. Sie können diesen Standard-Profiltyp so verwenden, wie er ist, ihn an Ihre Bedürfnisse anpassen oder zusätzliche benutzerdefinierte Profile hinzufügen.
An ein zusätzliches benutzerdefiniertes Profil erstellenfolgen Sie diesen Schritten:
- Navigieren Sie zu Dashboard > ClubSuite™ > Profile.
- Klicken Sie auf Neu hinzufügen.
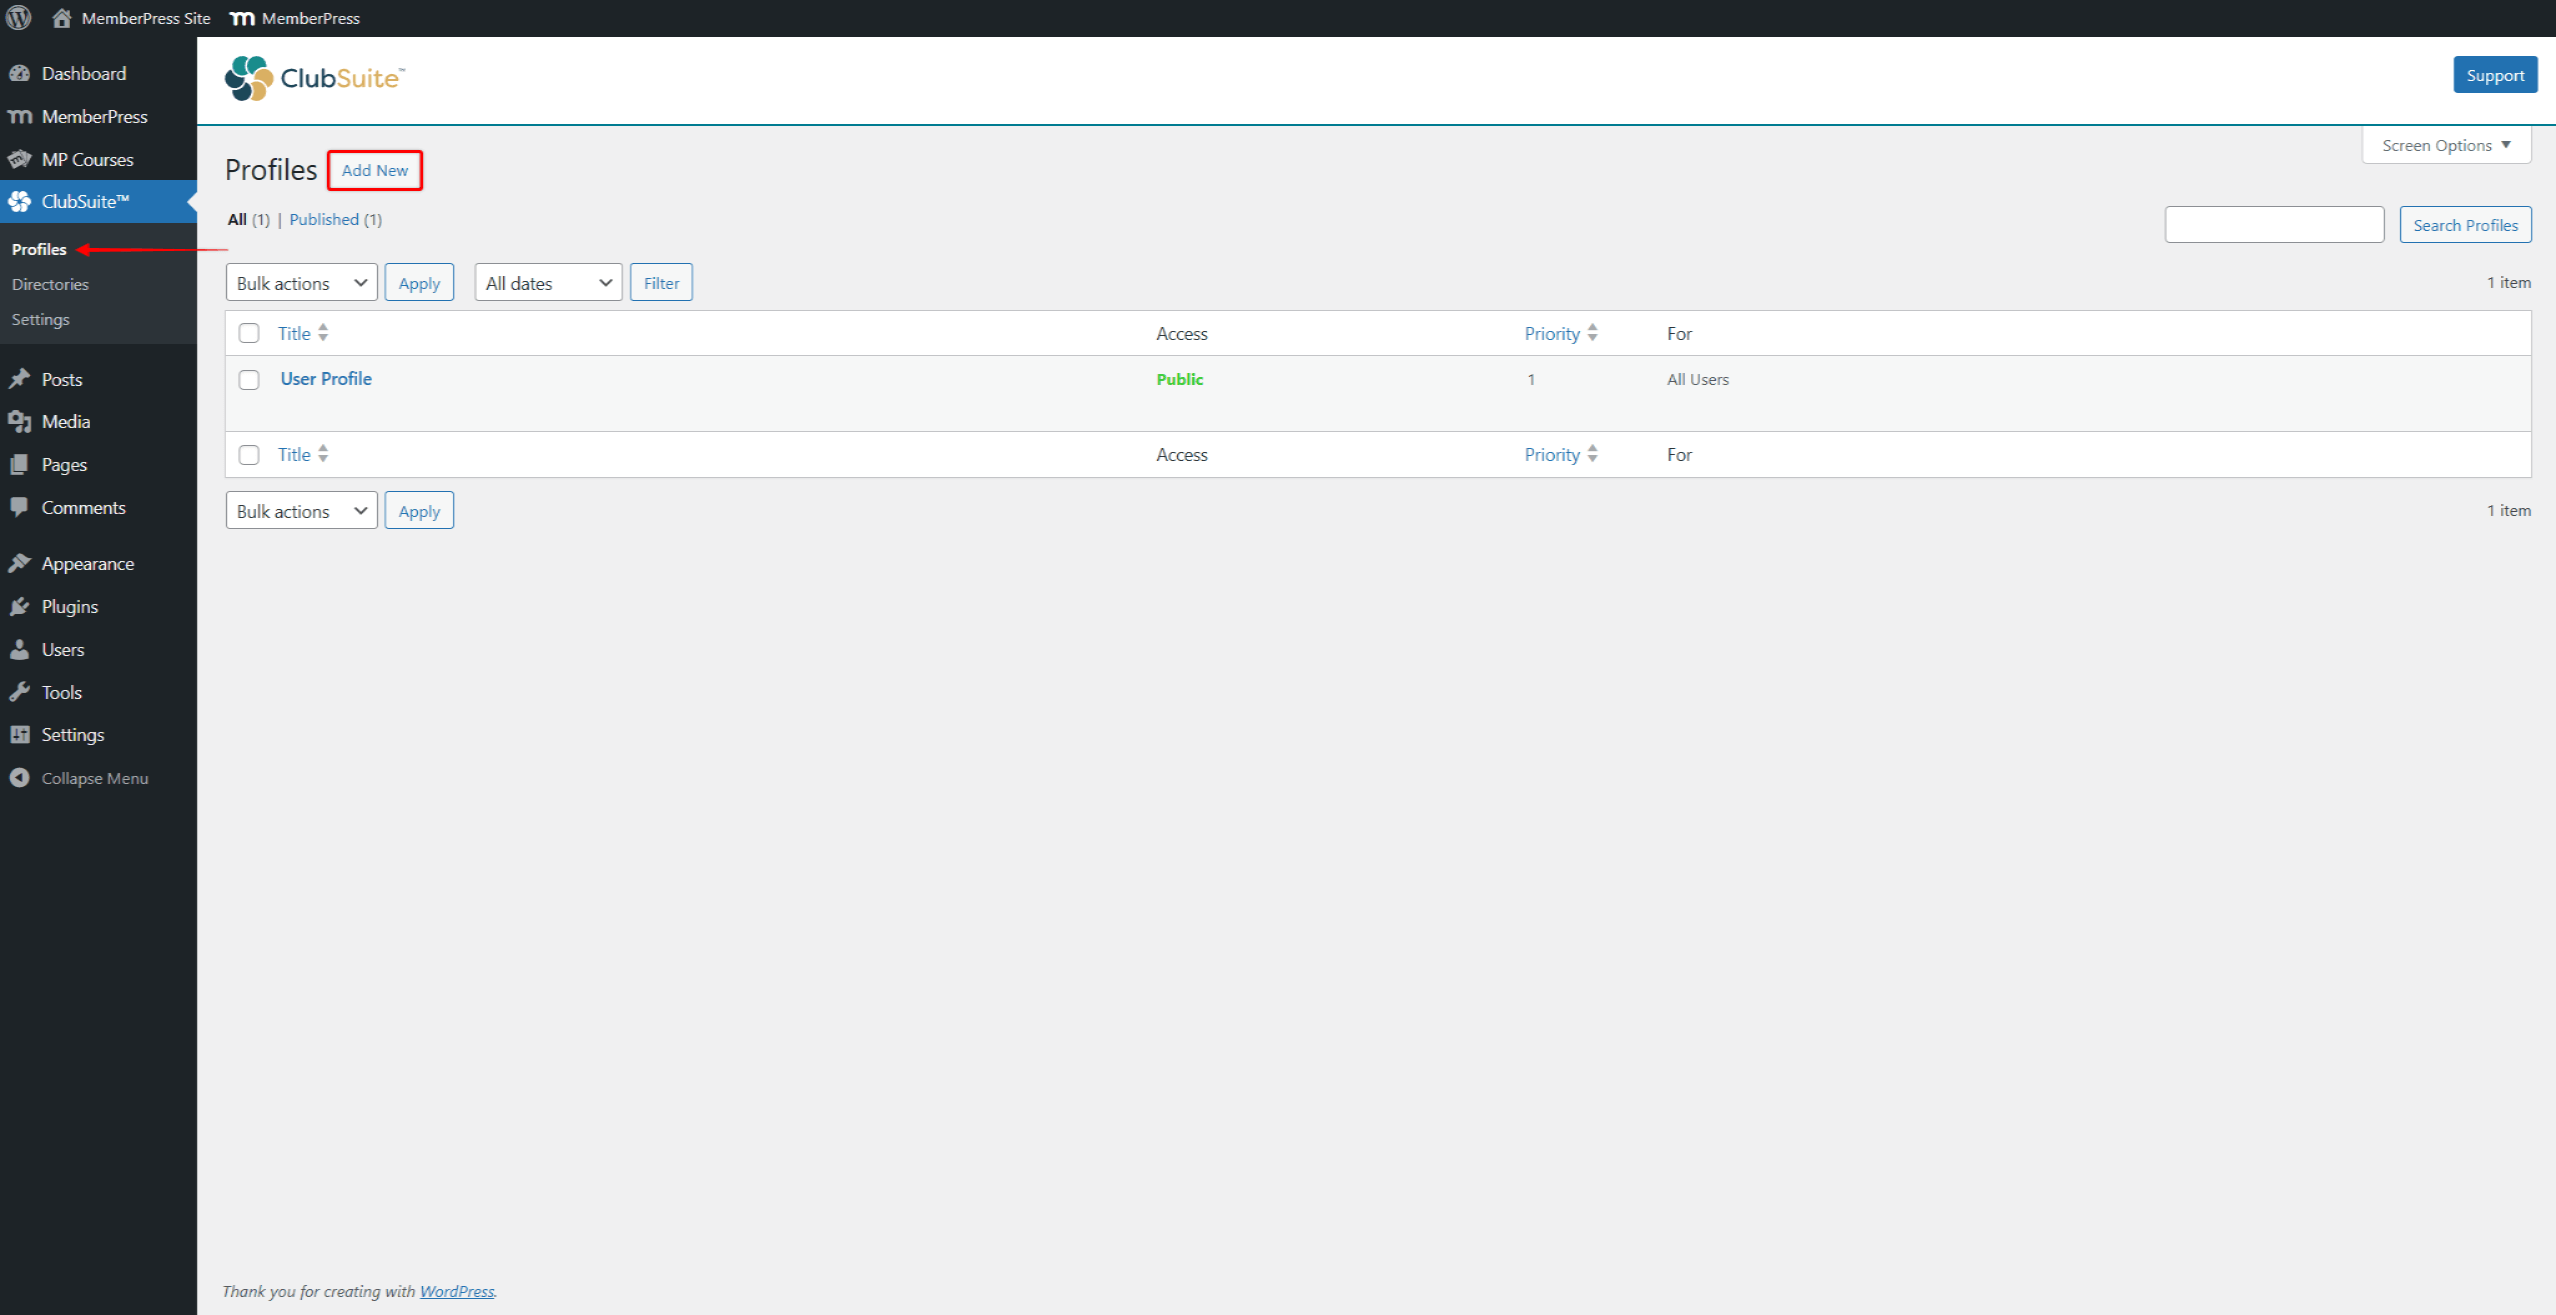
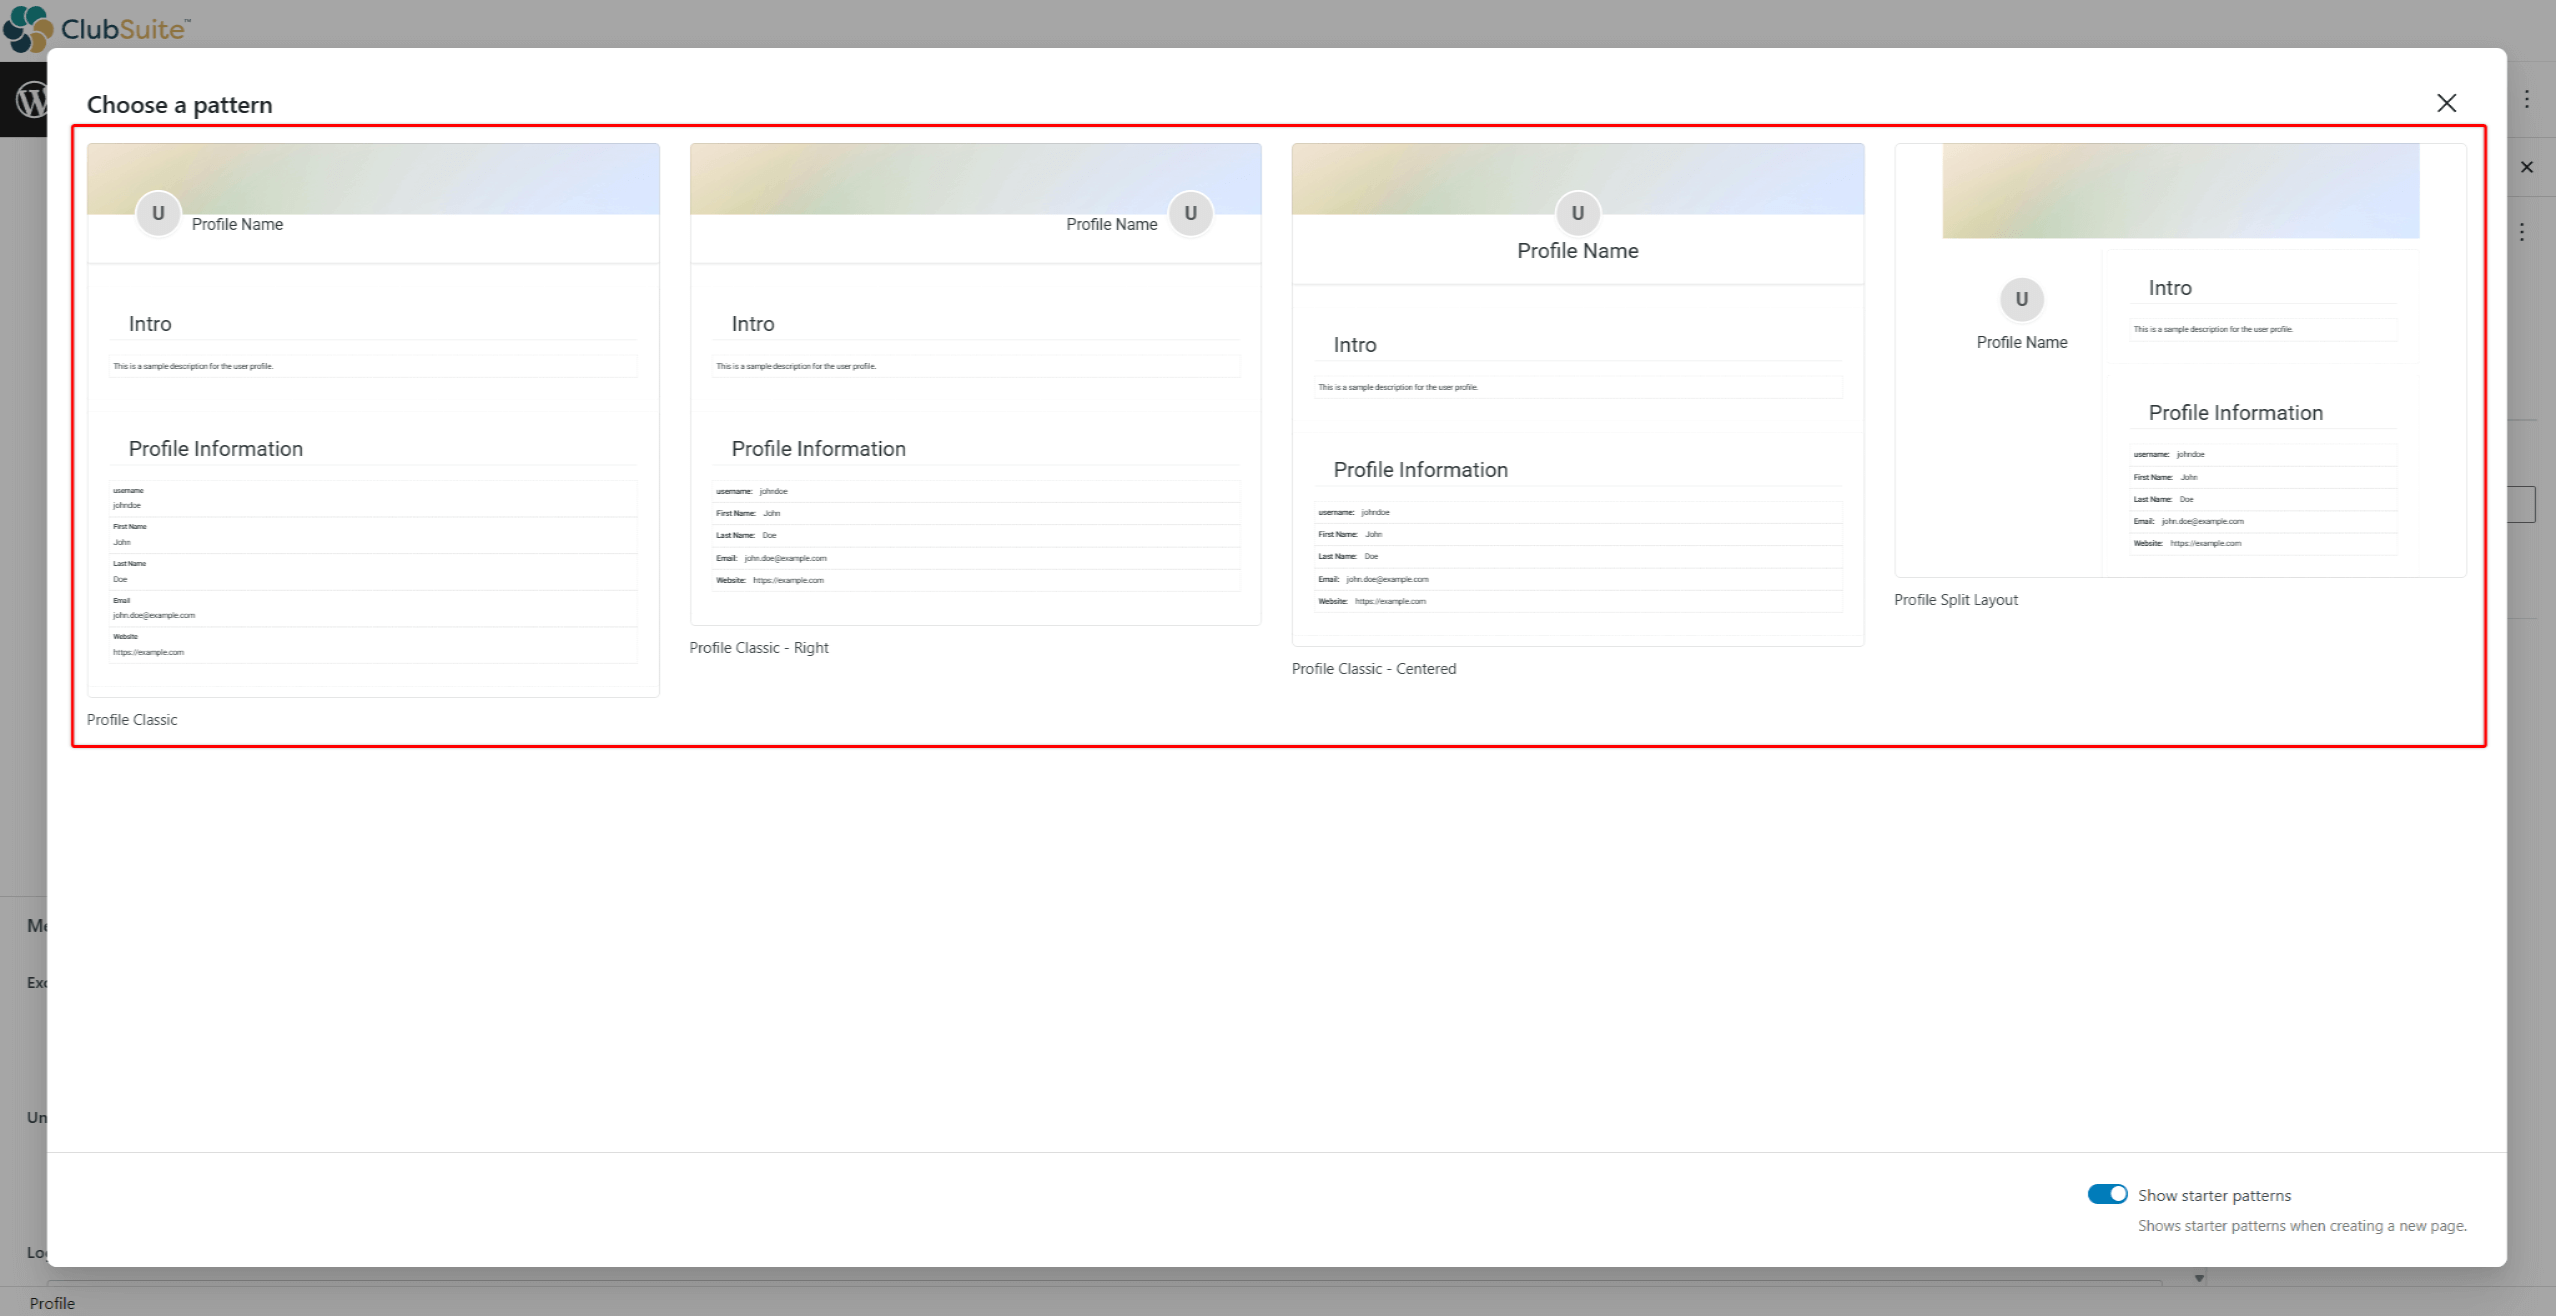
- Wählen Sie eine der verfügbaren vorgefertigte Muster (Starter Patterns), oder Schließen Sie das Musterauswahlfenster (X-Symbol), um ein benutzerdefiniertes Design erstellen.
- Eingabe einer Titel (Name) die der Verwendung des Profils entspricht, das Sie erstellen (z. B. “Pro Member Profile”).
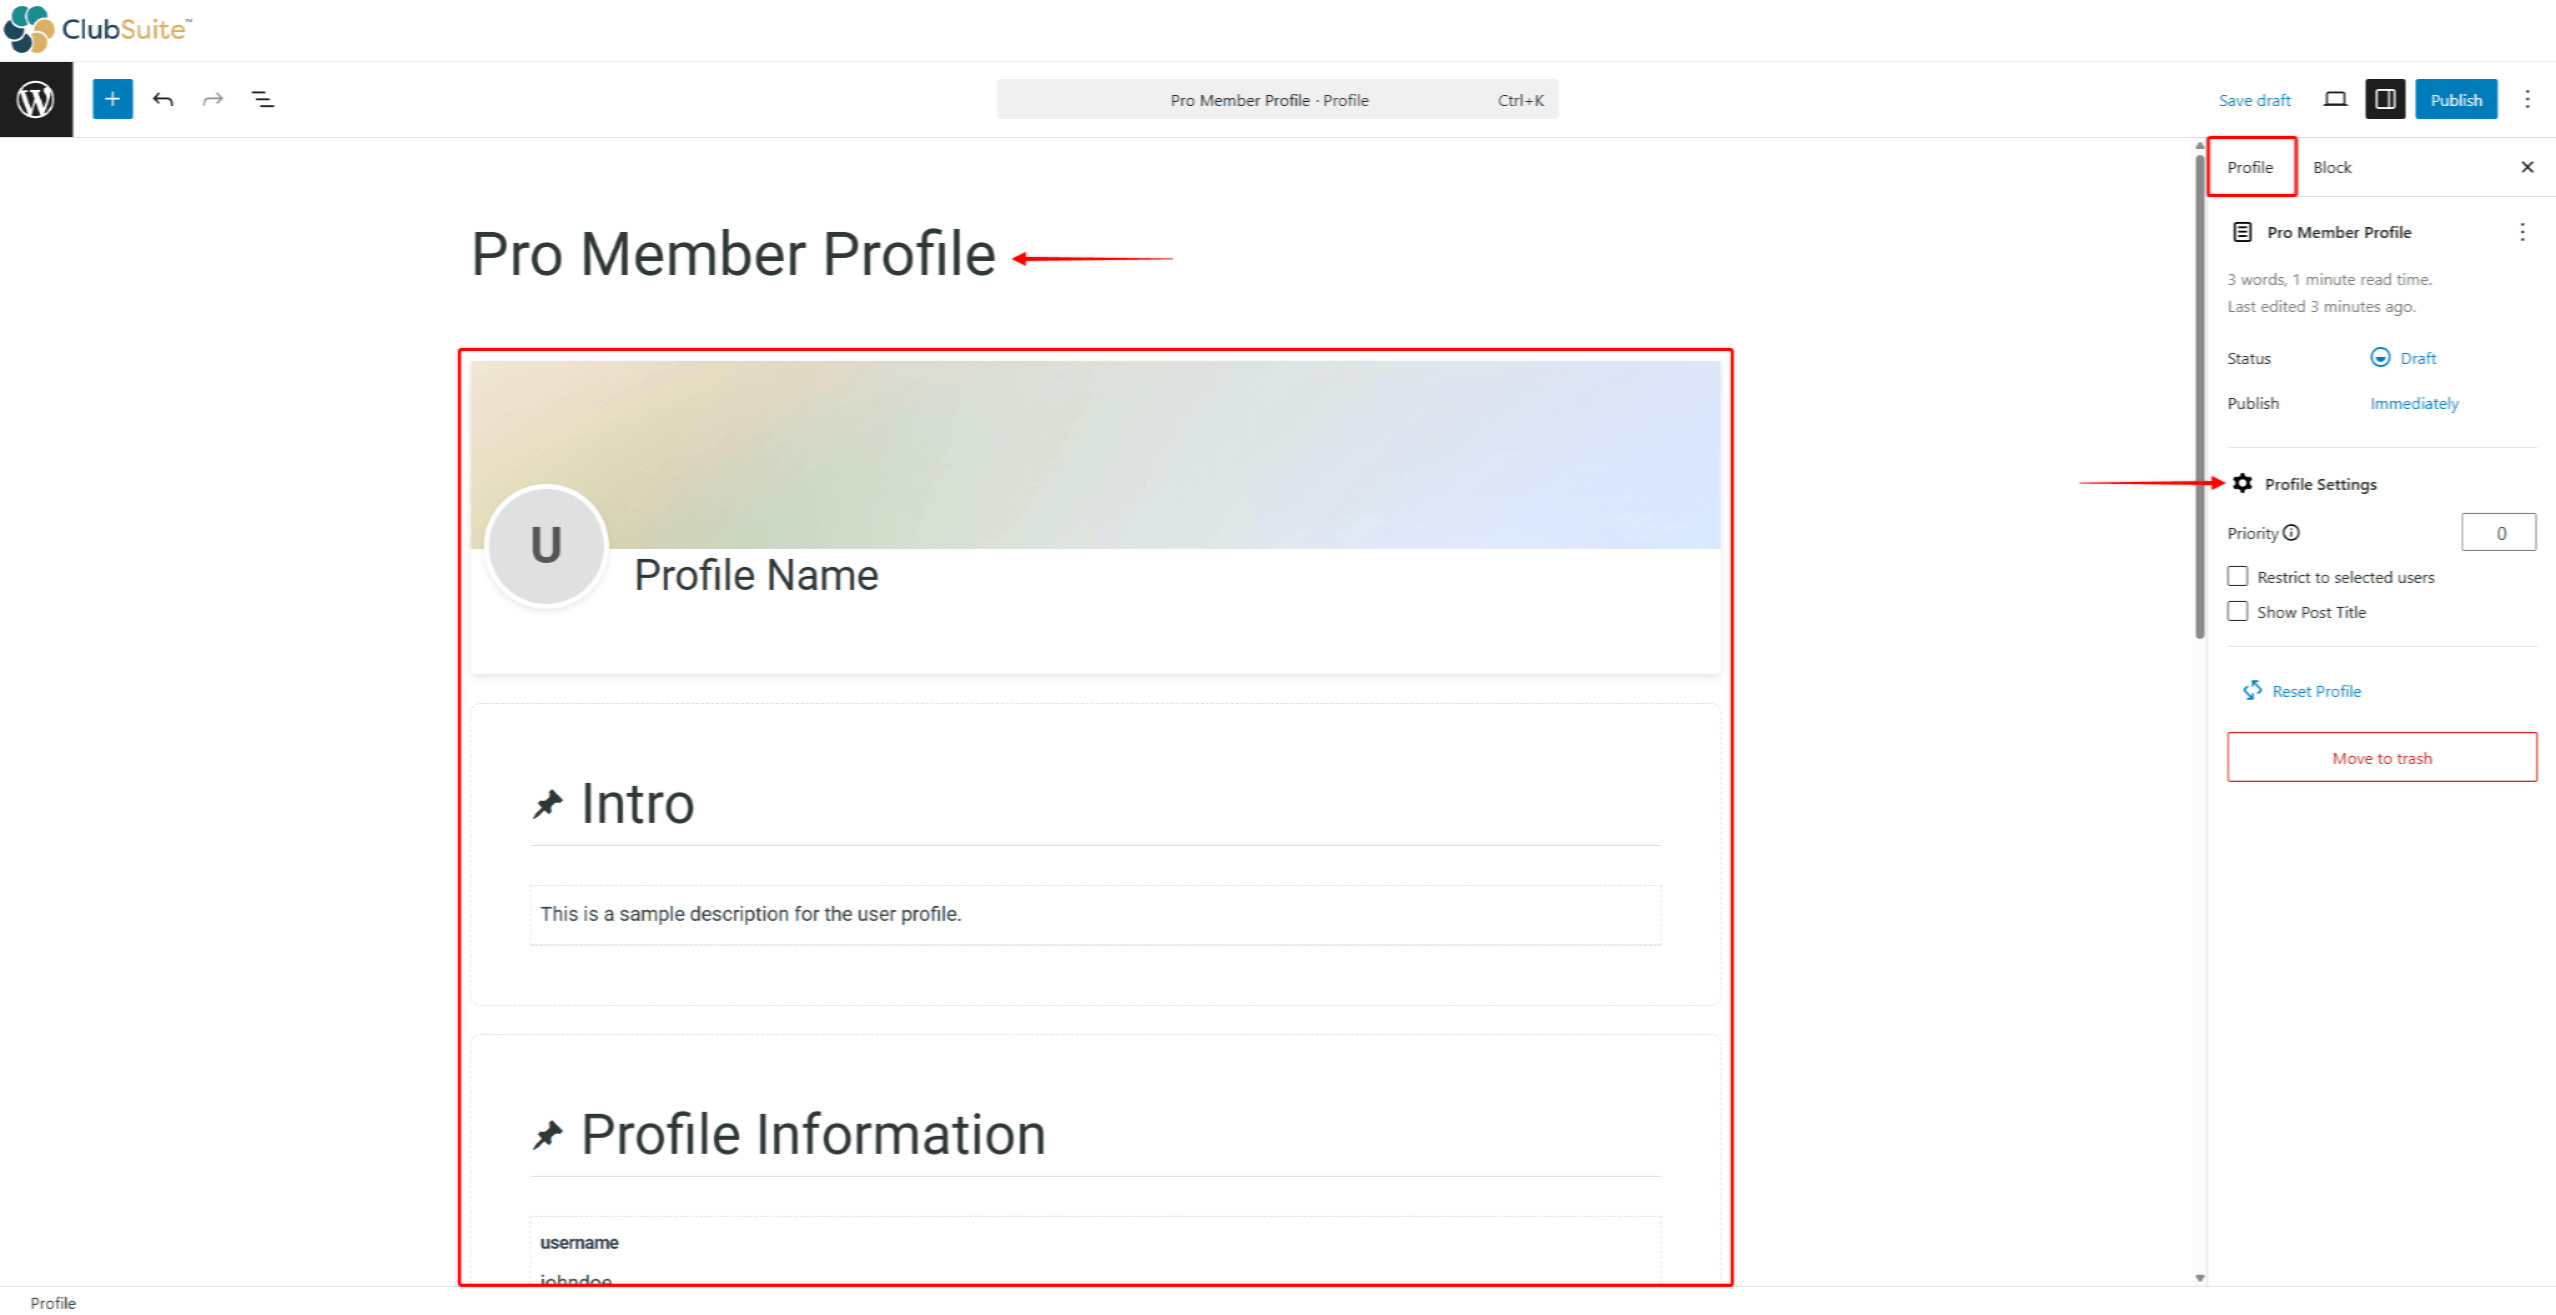
- Gestaltung das Benutzerprofil. Sie können Profilblöcke ebenso wie jeden anderen Gutenberg-Block verwenden, um Profile zu gestalten.
- Konfigurieren Sie auf der rechten Seite die Profil-Einstellungen:
- Priorität: Profile verwenden Prioritäten, wenn Mitglieder mehreren Profilen entsprechen. In diesem Fall wendet das System das Profil mit der höchsten Prioritätsnummer an und verhindert so Konflikte.
- Auf ausgewählte Benutzer beschränken: ein Profil einer bestimmten Benutzergruppe zuweisen;
- Beitragstitel anzeigen: Wenn Sie diese Option aktivieren, wird der Profiltitel angezeigt.
- Klicken Sie auf die veröffentlichen. um das Profil zu speichern.
Sie können so viele Profile wie nötig erstellen.
Gestaltung von Mitgliederprofilen
Die Gestaltung von Profilen sollte auf Ihrem Geschäftsmodell basieren und für die Besonderheiten der Gemeinschaften auf Ihrer Website relevant sein. Außerdem sollten Sie ein ausgewogenes Verhältnis zwischen Informationsdichte und visueller Attraktivität schaffen.
Positionieren Sie die wichtigsten Informationen so, dass sie hervorstechen und von den Benutzern leicht wahrgenommen werden können. Verwenden Sie größere Schriftarten für die wichtigsten Details und gruppieren Sie verwandte Inhalte in Abschnitten.
Sorgen Sie für Konsistenz mit einheitlichen Schriftarten, einheitlichen Abständen, durchdachten Markenfarben und einheitlichen Fotogrößen. Testen Sie Profile auf verschiedenen Bildschirmen, um sicherzustellen, dass die Profile auf allen Geräten gut funktionieren.
Sie können MemberPress-Profile entwerfen unter Verwendung der Gutenberg-Editor und alle Gutenberg-Blöcke (profilspezifische Blöcke und Blöcke von Dritten).
Außerdem können Sie vorgefertigte Profil-Startbilder. Diese Muster sind Entwürfe bestehend aus mehreren Blöcken die Sie Importieren und Anpassen mit einem Klick für Ihre Bedürfnisse.
Verwendung von Profilstartermustern
MemberPress enthält vier vorgefertigte Profilmuster als Ausgangspunkte:
- Profil Klassisch;
- Profil Classic - Rechts;
- Profil Klassisch - Zentriert;
- Profil teilen Layout .
Patterns sind Gruppen von Profilblöcken. Sie können Profilblöcke hinzufügen oder entfernen, beliebige zusätzliche Gutenberg-Blöcke hinzufügen und jeden Block an Ihre Marke anpassen.
Arbeiten mit Profilblöcken
Die Profilblöcke sind einzelne Komponenten, mit denen Sie Ihre Mitgliederprofile mit dem Standard-Editor (Gutenberg) gestalten können.
Jeder MemberPress-Profilblock wird zur Anzeige von mitgliedsspezifischen Daten auf den Profilseiten der Benutzer verwendet und verfügt über umfangreiche Anpassungsoptionen:
- Hinzufügen und Gestalten eines Profilkopfes mit dem Profil-Header-Block (enthält Profilbild und Profil Abdeckung Blöcke);
- Gruppieren von Profildaten in einzelne Abschnitte mit Profilschnittblöcke;
- Erlauben Sie Nutzern das Hochladen ihres Profilbildes mit dem Profilbild-Block (separat oder innerhalb der Profil-Header-Block);
- Erlauben Sie den Nutzern, ihr Titelbild mit der Option Profilabdeckung Block (Verwendung einzeln oder innerhalb der Profil-Header-Block);
- Fügen Sie die Profil Name Block um den Mitgliedern die Möglichkeit zu geben, den Namen, der in ihrem Profil angezeigt werden soll, hinzuzufügen;
- Sie können einzelne Daten (z. B. E-Mail, Telefonnummer, benutzerdefinierte Felder usw.) in den Profilen der Benutzer anzeigen, indem Sie Profil Benutzerfeld Blöcke;
- Fügen Sie ein beliebiges Symbol zu Ihren Profilen hinzu mit Profil-Symbole Blöcke.
Zuweisung von Profilen zu Mitgliedschaften
Standardmäßig sind die Profile nicht eingeschränkt und können daher für alle Mitglieder verwendet werden. Wenn Sie jedoch mehrere Profiltypen verwenden, sollten Sie jedes Profil einer bestimmten Benutzerrolle oder Mitgliedschaft zuordnen
Profile werden zugewiesen:
- Zu einem Profil navigieren die Sie entwerfen möchten, und starten Sie die Herausgeber.
- Klicken Sie auf der rechten Seite auf das Feld Registerkarte Profil.
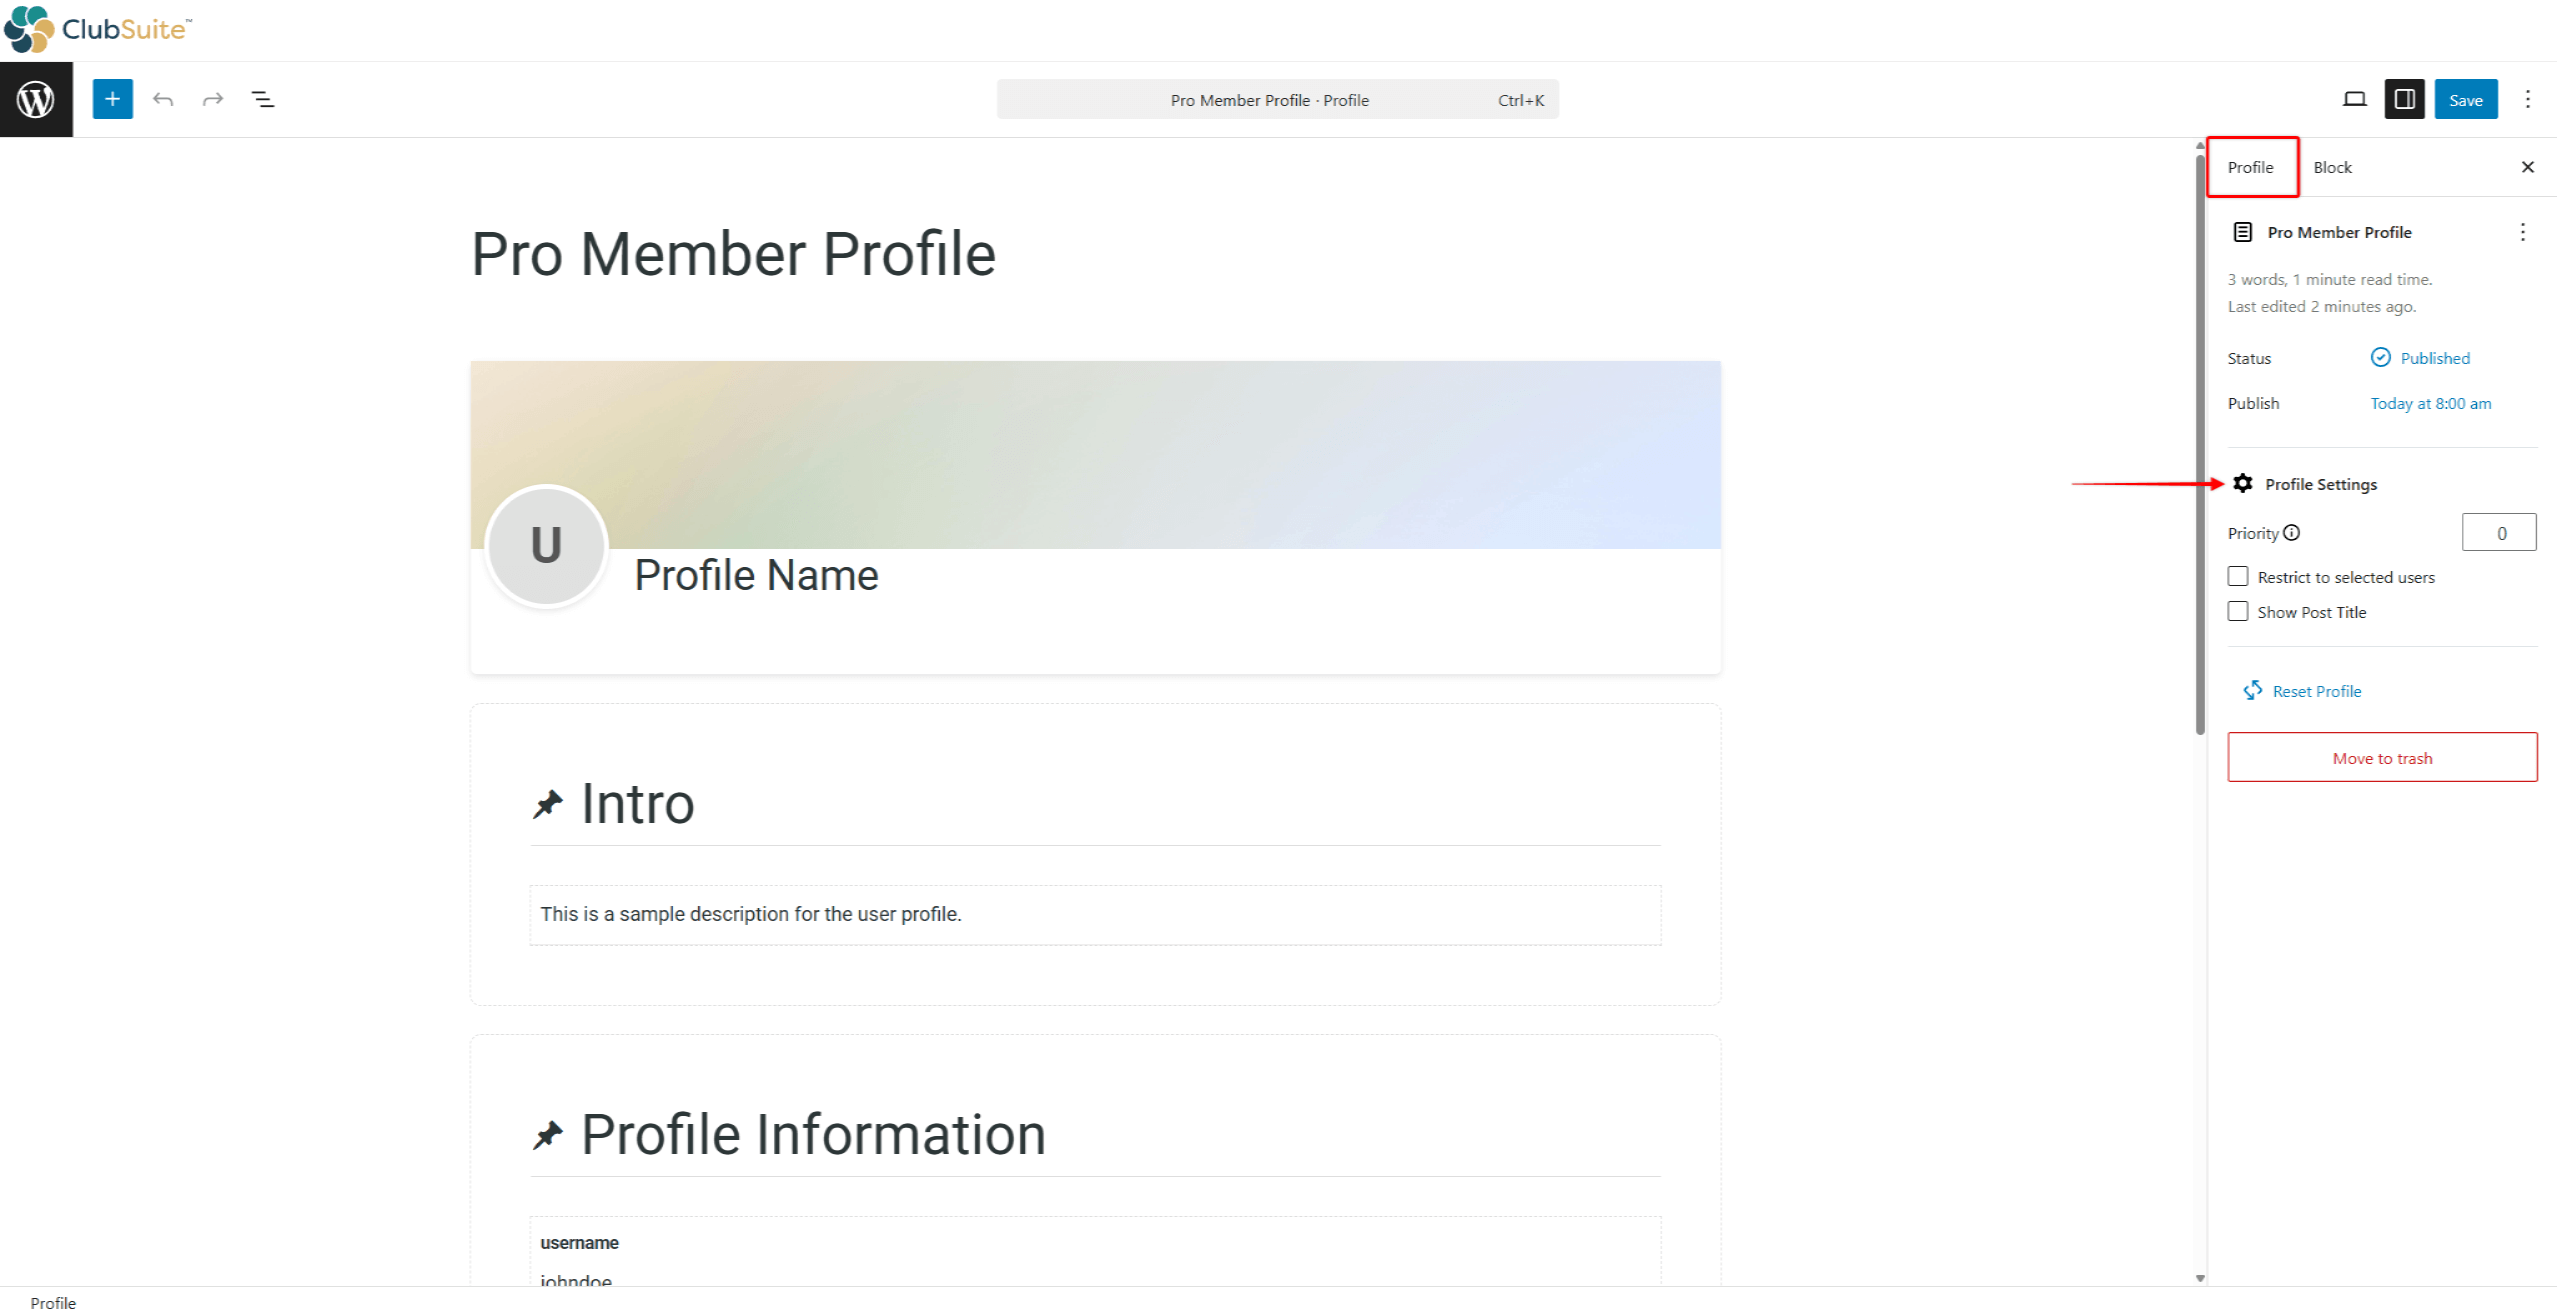
- Scrollen Sie nach unten zu Profil-Einstellungen und klicken auf das Auf ausgewählte Benutzer beschränken Kontrollkästchen.
- Wählen Sie die Einschränkungsmethode:
- mit der Rolle - Benutzer mit einer bestimmten WordPress-Benutzerrolle (Abonnent, Autor, Administrator, usw.);
- mit einer Mitgliedschaft - Benutzer mit einem aktiven Abonnement für die jeweilige MemberPress-Mitgliedschaft;
- mit jeder Mitgliedschaft - Benutzer mit einem aktiven Abonnement für eine MemberPress-Mitgliedschaft;
- ohne Mitgliedschaft - Benutzer, die keine aktiven Abonnements haben.
- Im Falle von mit der Rolle Einschränkung, auch wählen Sie die spezifische Rolle aus. Ähnlich verhält es sich mit der mit einer Mitgliedschaft Einschränkung, müssen Sie eine der Mitgliedschaften aus der Liste auswählen.
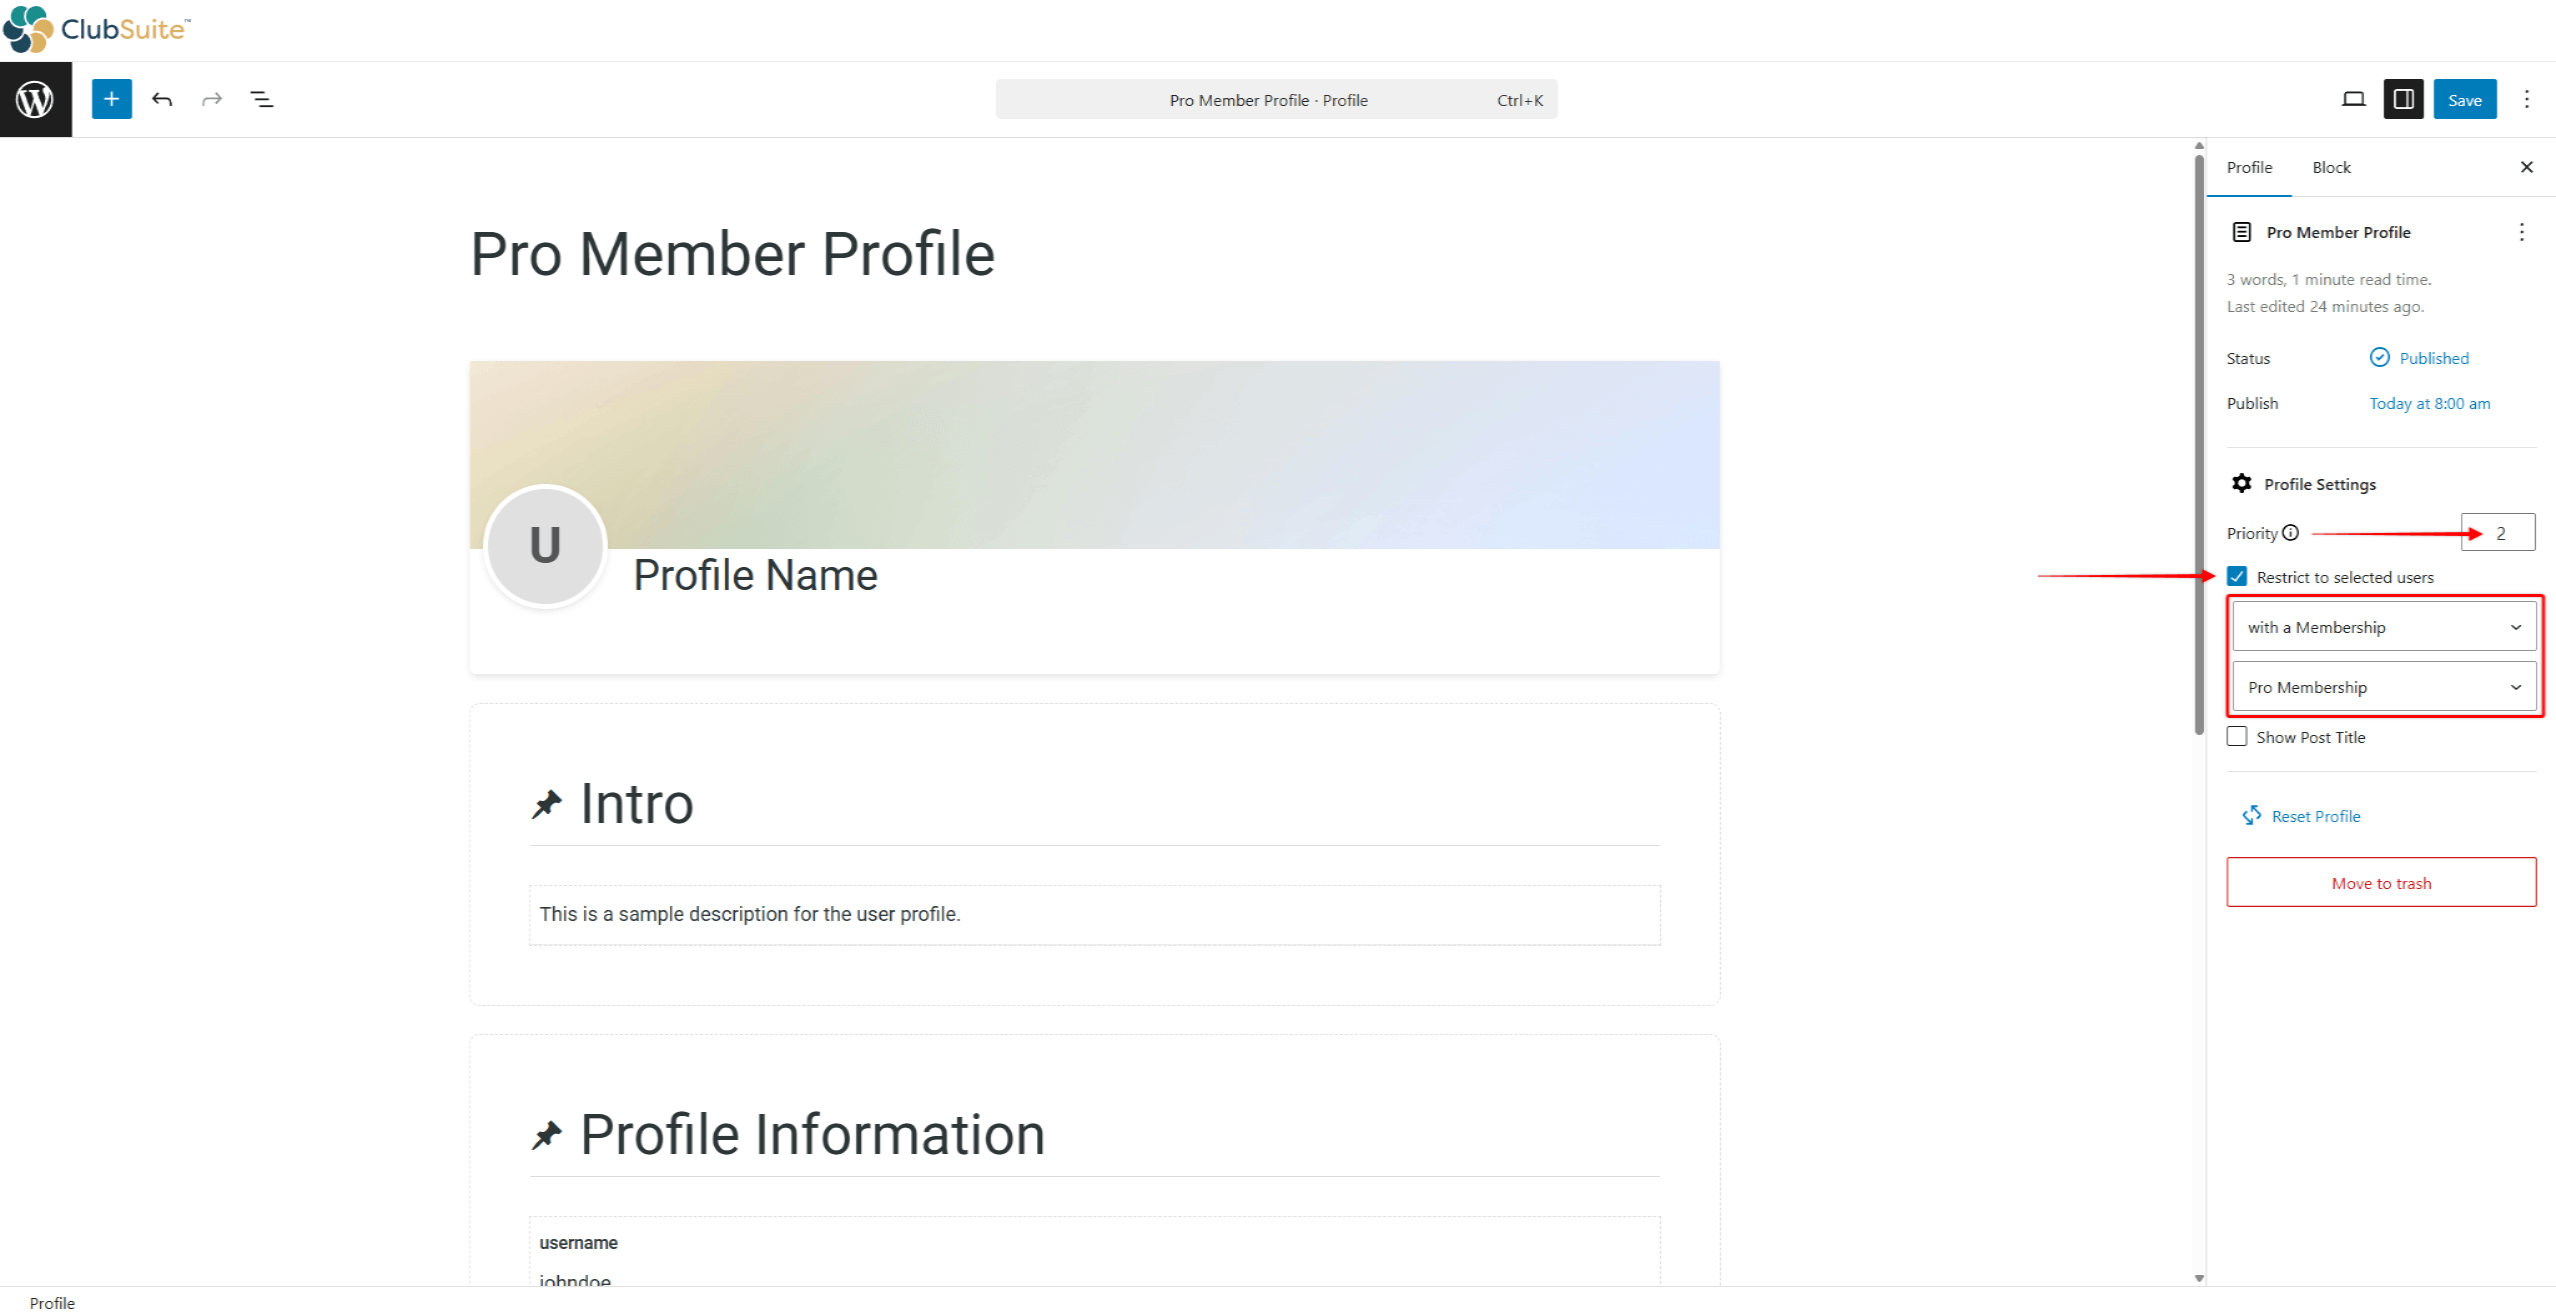
- Setzen Sie die Priorität Nummer für dieses Profil, wenn Sie mehrere Profile auf Ihrer Website verwenden.
Profilinhalte moderieren
Um die Mitglieder bei der Erstellung aussagekräftiger Profile zu unterstützen, stellen Sie Richtlinien zur Verfügung und implementieren strategische Vorgaben, einschließlich Platzhaltertext, Standardbilder und Beispielinhalte.
Wenn die Profilmoderation aktiviert ist, überprüfen Sie Uploads umgehend und halten dabei einheitliche Standards ein und geben konstruktives Feedback:
- Navigieren Sie zum Profil-Einstellungen Seite (Dashboard > ClubSuite™ > Einstellungen > Profile Registerkarte).
- Unter den reservierten Seiten & Moderation Abschnitt, schalten Sie die Option Genehmigung von Profil- und Titelbildern durch den Administrator erforderlich Option.
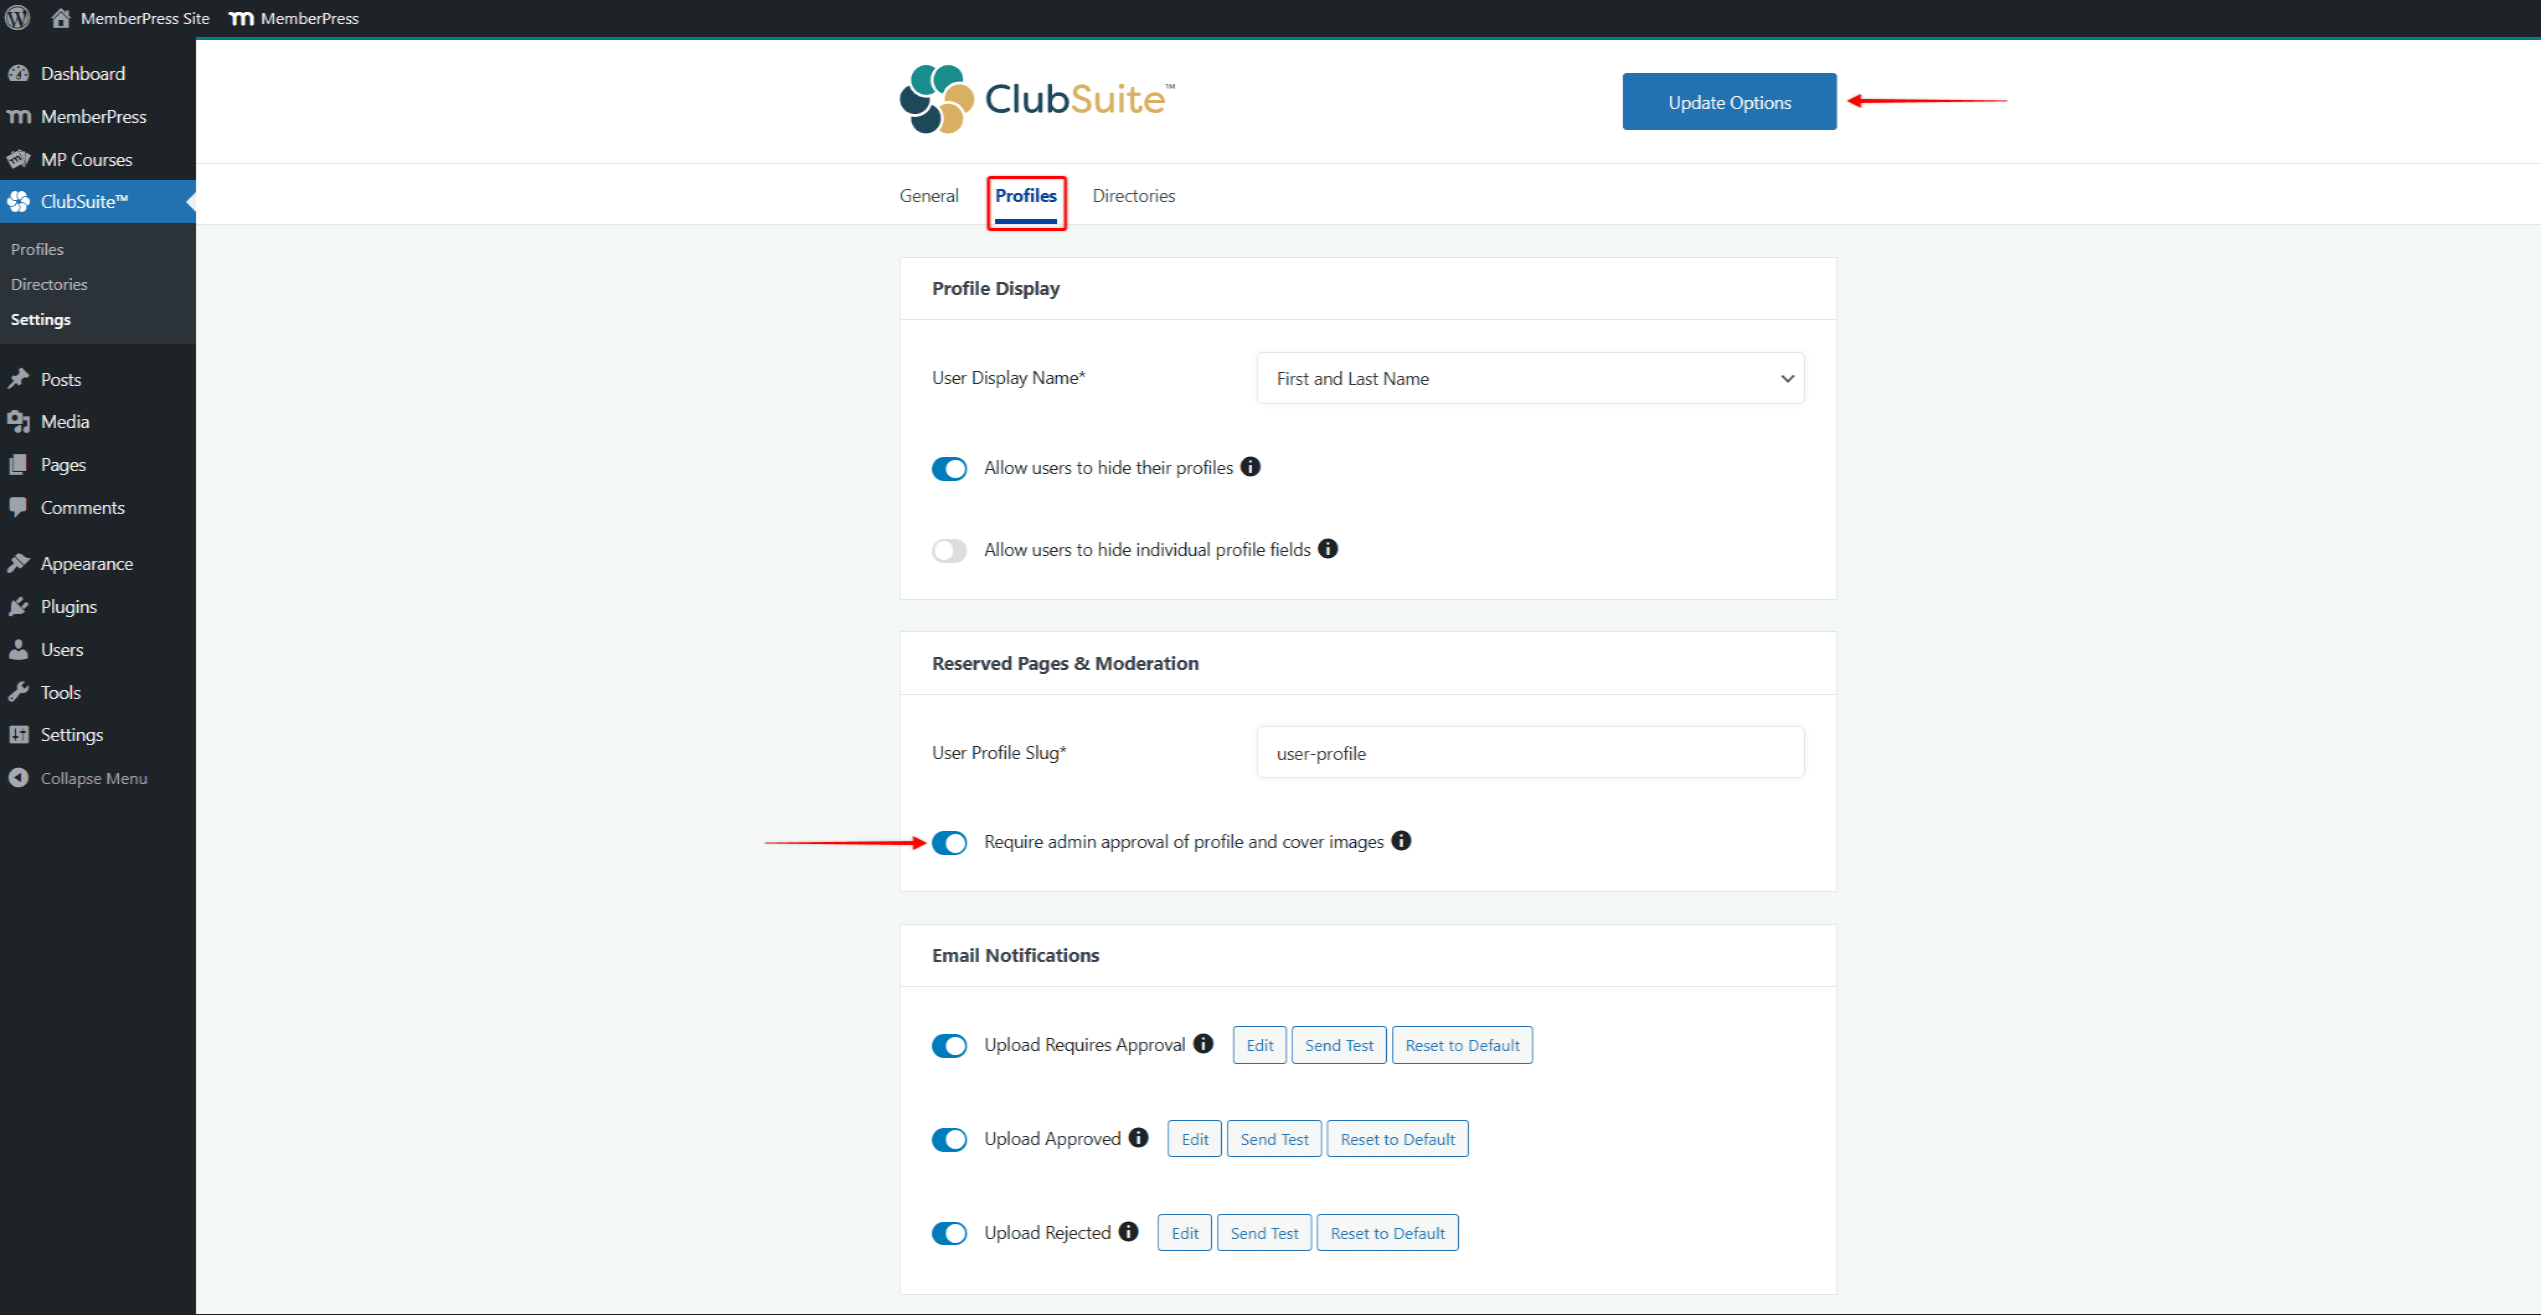
- Klicken Sie auf Optionen aktualisieren.
Jetzt sehen Sie eine neue Uploads genehmigen Option unter Dashboard > ClubSuite™.
Verwaltung der Genehmigungswarteschlange
Wenn Sie die Moderation aktivieren, können Sie Qualitätsstandards aufrechterhalten und unangemessene Inhalte entfernen:
- Navigieren Sie zu Dashboard > ClubSuite™ > Uploads genehmigen.
- Überprüfung ausstehender Uploads:
- Thumbnail-Vorschau
- Name des Mitglieds
- Zeitstempel des Uploads
- Bildtyp
- Für jeden Upload:
- Klicken Sie auf Genehmigen Sie um das Bild zu veröffentlichen;
- Klicken Sie auf Ablehnen abzulehnen und das Mitglied zu benachrichtigen;
- Klicken Sie auf Volle Größe anzeigen um Details zu prüfen.
Genehmigte Bilder erscheinen sofort auf den Profilen.


