MemberPress est entièrement compatible avec l'éditeur de blocs par défaut de WordPress (Gutenberg). De plus, vous pouvez utiliser les règles de MemberPress pour protéger les blocs Gutenberg sur les articles et les pages WordPress conçus avec l'éditeur Gutenberg. De cette façon, vous pouvez cacher les blocs Gutenberg avec votre contenu premium, le rendant disponible uniquement aux membres actifs.
Ce document explique comment protéger les blocs Gutenberg avec MemberPress en utilisant la protection au niveau du bloc ou le bloc de contenu protégé. Ces outils vous aident à créer des pages où certains contenus sont gratuits tandis que d'autres nécessitent des adhésions spécifiques.
Pourquoi protéger les blocs Gutenberg ?
La protection au niveau des blocs vous permet de contrôler l'accès à des blocs individuels plutôt qu'à des articles ou des pages entiers. Cela signifie que vous pouvez :
- Montrer le contenu de l'aperçu à tout le monde tout en protégeant les sections premium ;
- Masquez les blocs Gutenberg et créez différents niveaux de contenu au sein d'une même page ;
- Mélangez les contenus gratuits et payants ;
- Afficher des informations spécifiques aux membres dans les messages généraux.
Contrairement à protéger les messages entiers avec MemberPress RulesLa protection des blocs individuels permet aux visiteurs d'accéder à la page. Dans le même temps, vous pouvez masquer les blocs Gutenberg pour garder le contenu premium caché en fonction de l'adhésion de l'utilisateur.
En outre, en plus de masquer le contenu, vous pouvez afficher un formulaire de connexion ou un message personnalisé pour inviter les utilisateurs à s'enregistrer.
Blocs Gutenberg et règles MemberPress
Lorsque vous protégez les blocs Gutenberg, vous pouvez contrôler les parties du contenu auxquelles les visiteurs et les membres peuvent accéder. Ainsi, vous pouvez créer des expériences de contenu flexibles avec des sections gratuites et premium.
MemberPress Règles définissent qui peut accéder à un contenu spécifique et ce qui se passe lorsque des utilisateurs non autorisés tentent de le visualiser. Ces règles fonctionnent avec la protection au niveau du bloc et le bloc Contenu protégé pour contrôler l'accès à votre contenu.
Utilisation des règles MemberPress
Quand en utilisant les règles MemberPressil est essentiel de mentionner qu'ils contiennent deux composants principaux :
- Conditions d'accès - Qui peut voir le contenu (membres, rôles, capacités ou membres spécifiques) ;
- Actions non autorisées - Que se passe-t-il lorsque quelqu'un qui n'a pas d'accès tente de consulter le contenu ?
Ainsi, pour protéger le contenu avec MemberPress, vous devez créer des règles.
Création de règles partielles MemberPress
Les partiel Le type de règles MemberPress est le plus efficace pour protéger des blocs spécifiques. Ces règles peuvent être appliquées à plusieurs blocs Gutenberg et à d'autres contenus sur l'ensemble du site.
Suivez les étapes suivantes pour créer une règle partielle:
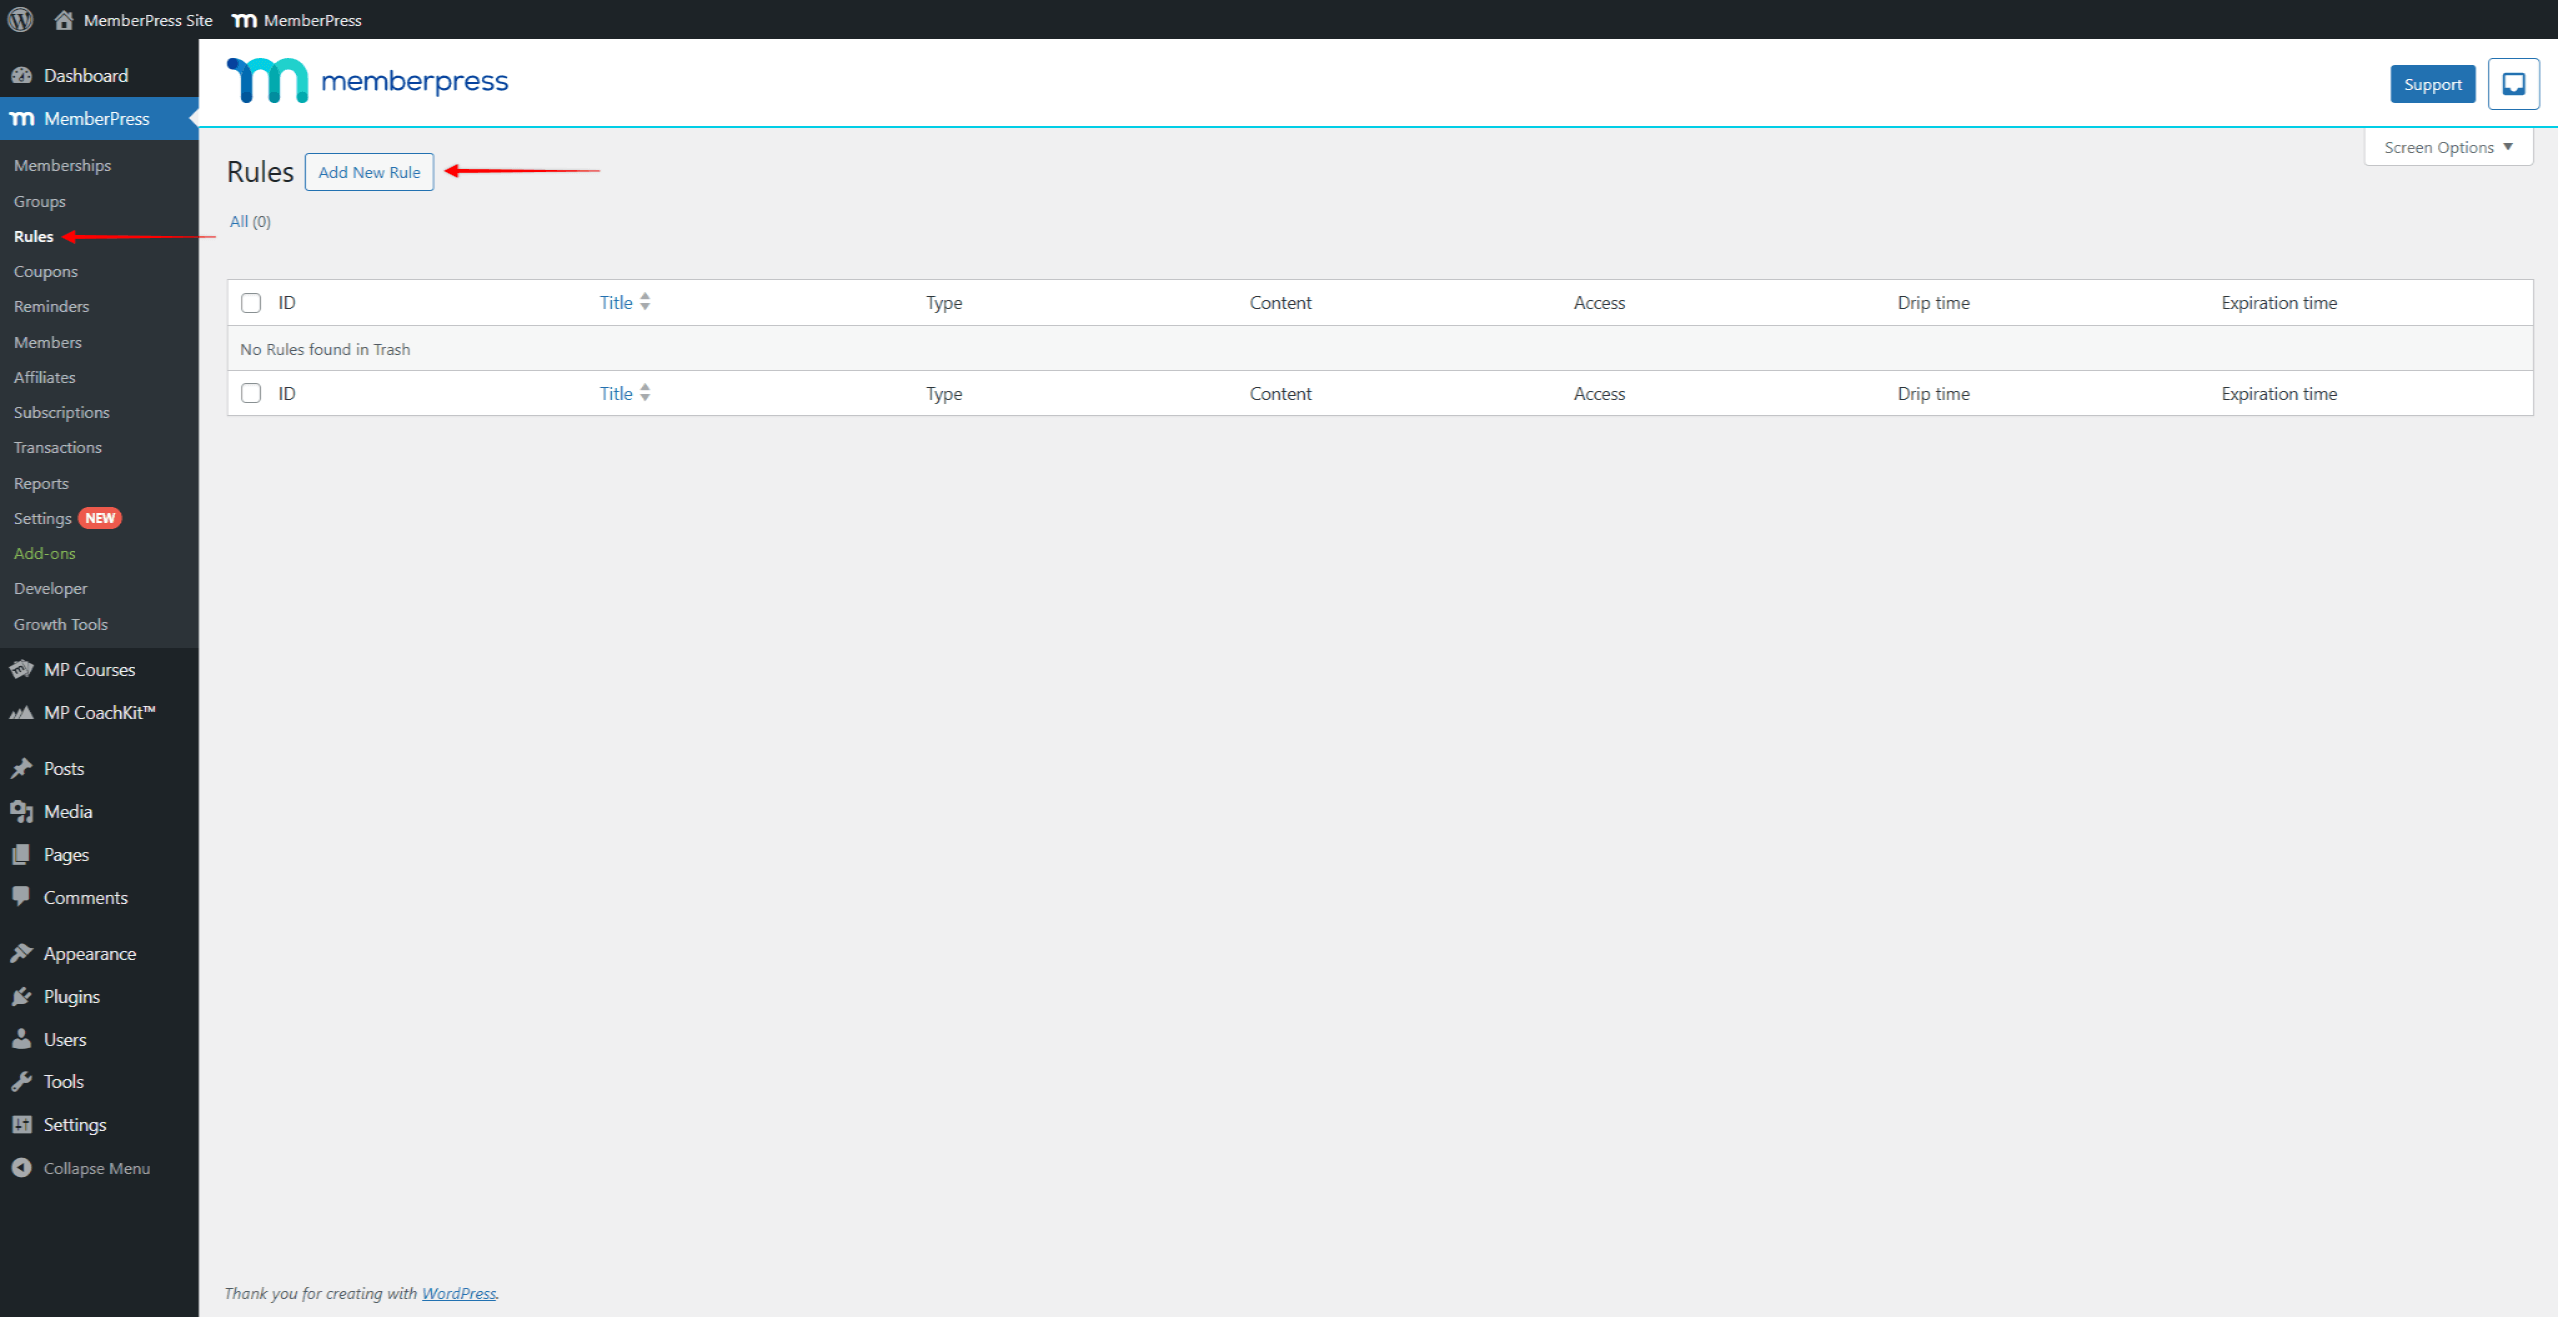
- Naviguez jusqu'à Tableau de bord > MemberPress > Règleset cliquez sur le bouton Ajouter une nouvelle règle (bouton). Le formulaire de création de nouvelles règles s'ouvre alors.
- Sous Contenu et accès, cliquez sur le bouton Contenu protégé et sélectionnez l'option Partiel type de règle.
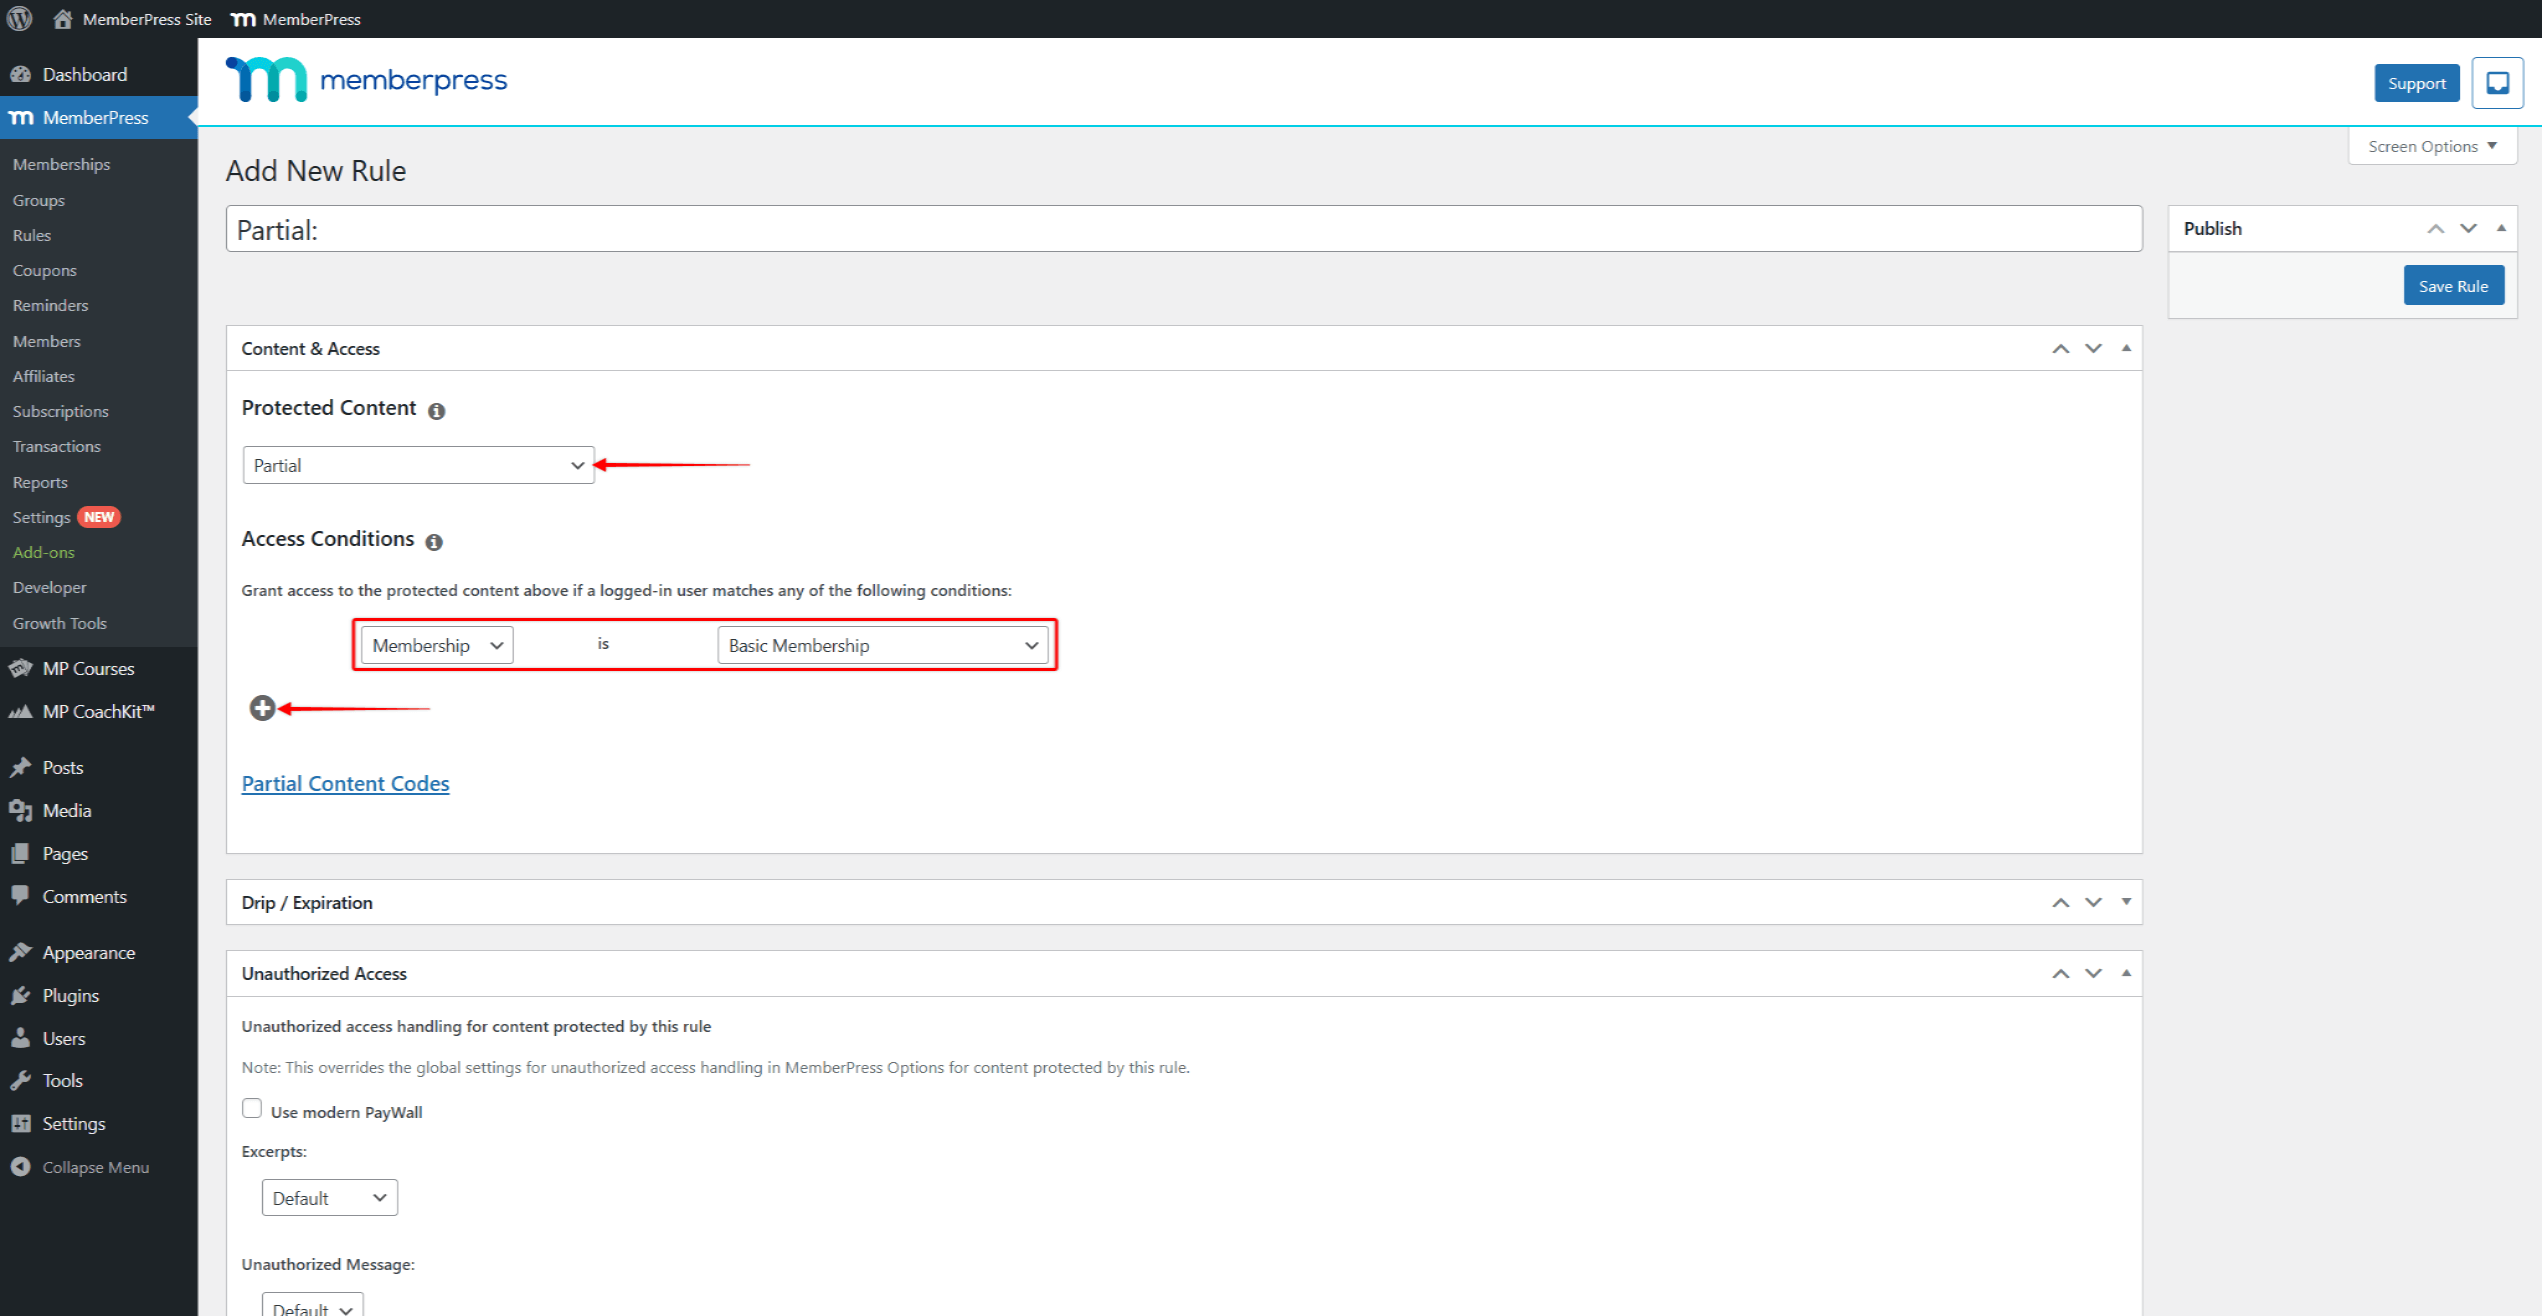
- Maintenant, sous Conditions d'accès, définissez la condition comme suit L'adhésionet sélectionner dont l'adhésion est requise pour accéder à cette page. Vous pouvez cliquer sur le bouton + icône sous Conditions d'accès pour ajouter plusieurs conditions.
- Cliquez sur le bouton Sauvegarder la règle pour enregistrer votre règle partielle.
L'application de cette règle à n'importe quel contenu de votre site web en limitera l'accès aux seuls membres ayant souscrit à l'adhésion définie.
Protéger les blocs Gutenberg à l'aide de la protection au niveau du bloc
La fonction de protection du contenu apparaît automatiquement dans les paramètres de chaque bloc Gutenberg lorsque le plugin MemberPress est activé. Ces paramètres au niveau du bloc vous permettent de protéger directement n'importe quel bloc individuel.
Pour activer la protection au niveau du bloc, suivez les étapes suivantes :
- Sélectionner un bloc que vous souhaitez protéger (texte, image, titre, etc.).
- Naviguez jusqu'à la page Réglages des blocs sur le côté droit.
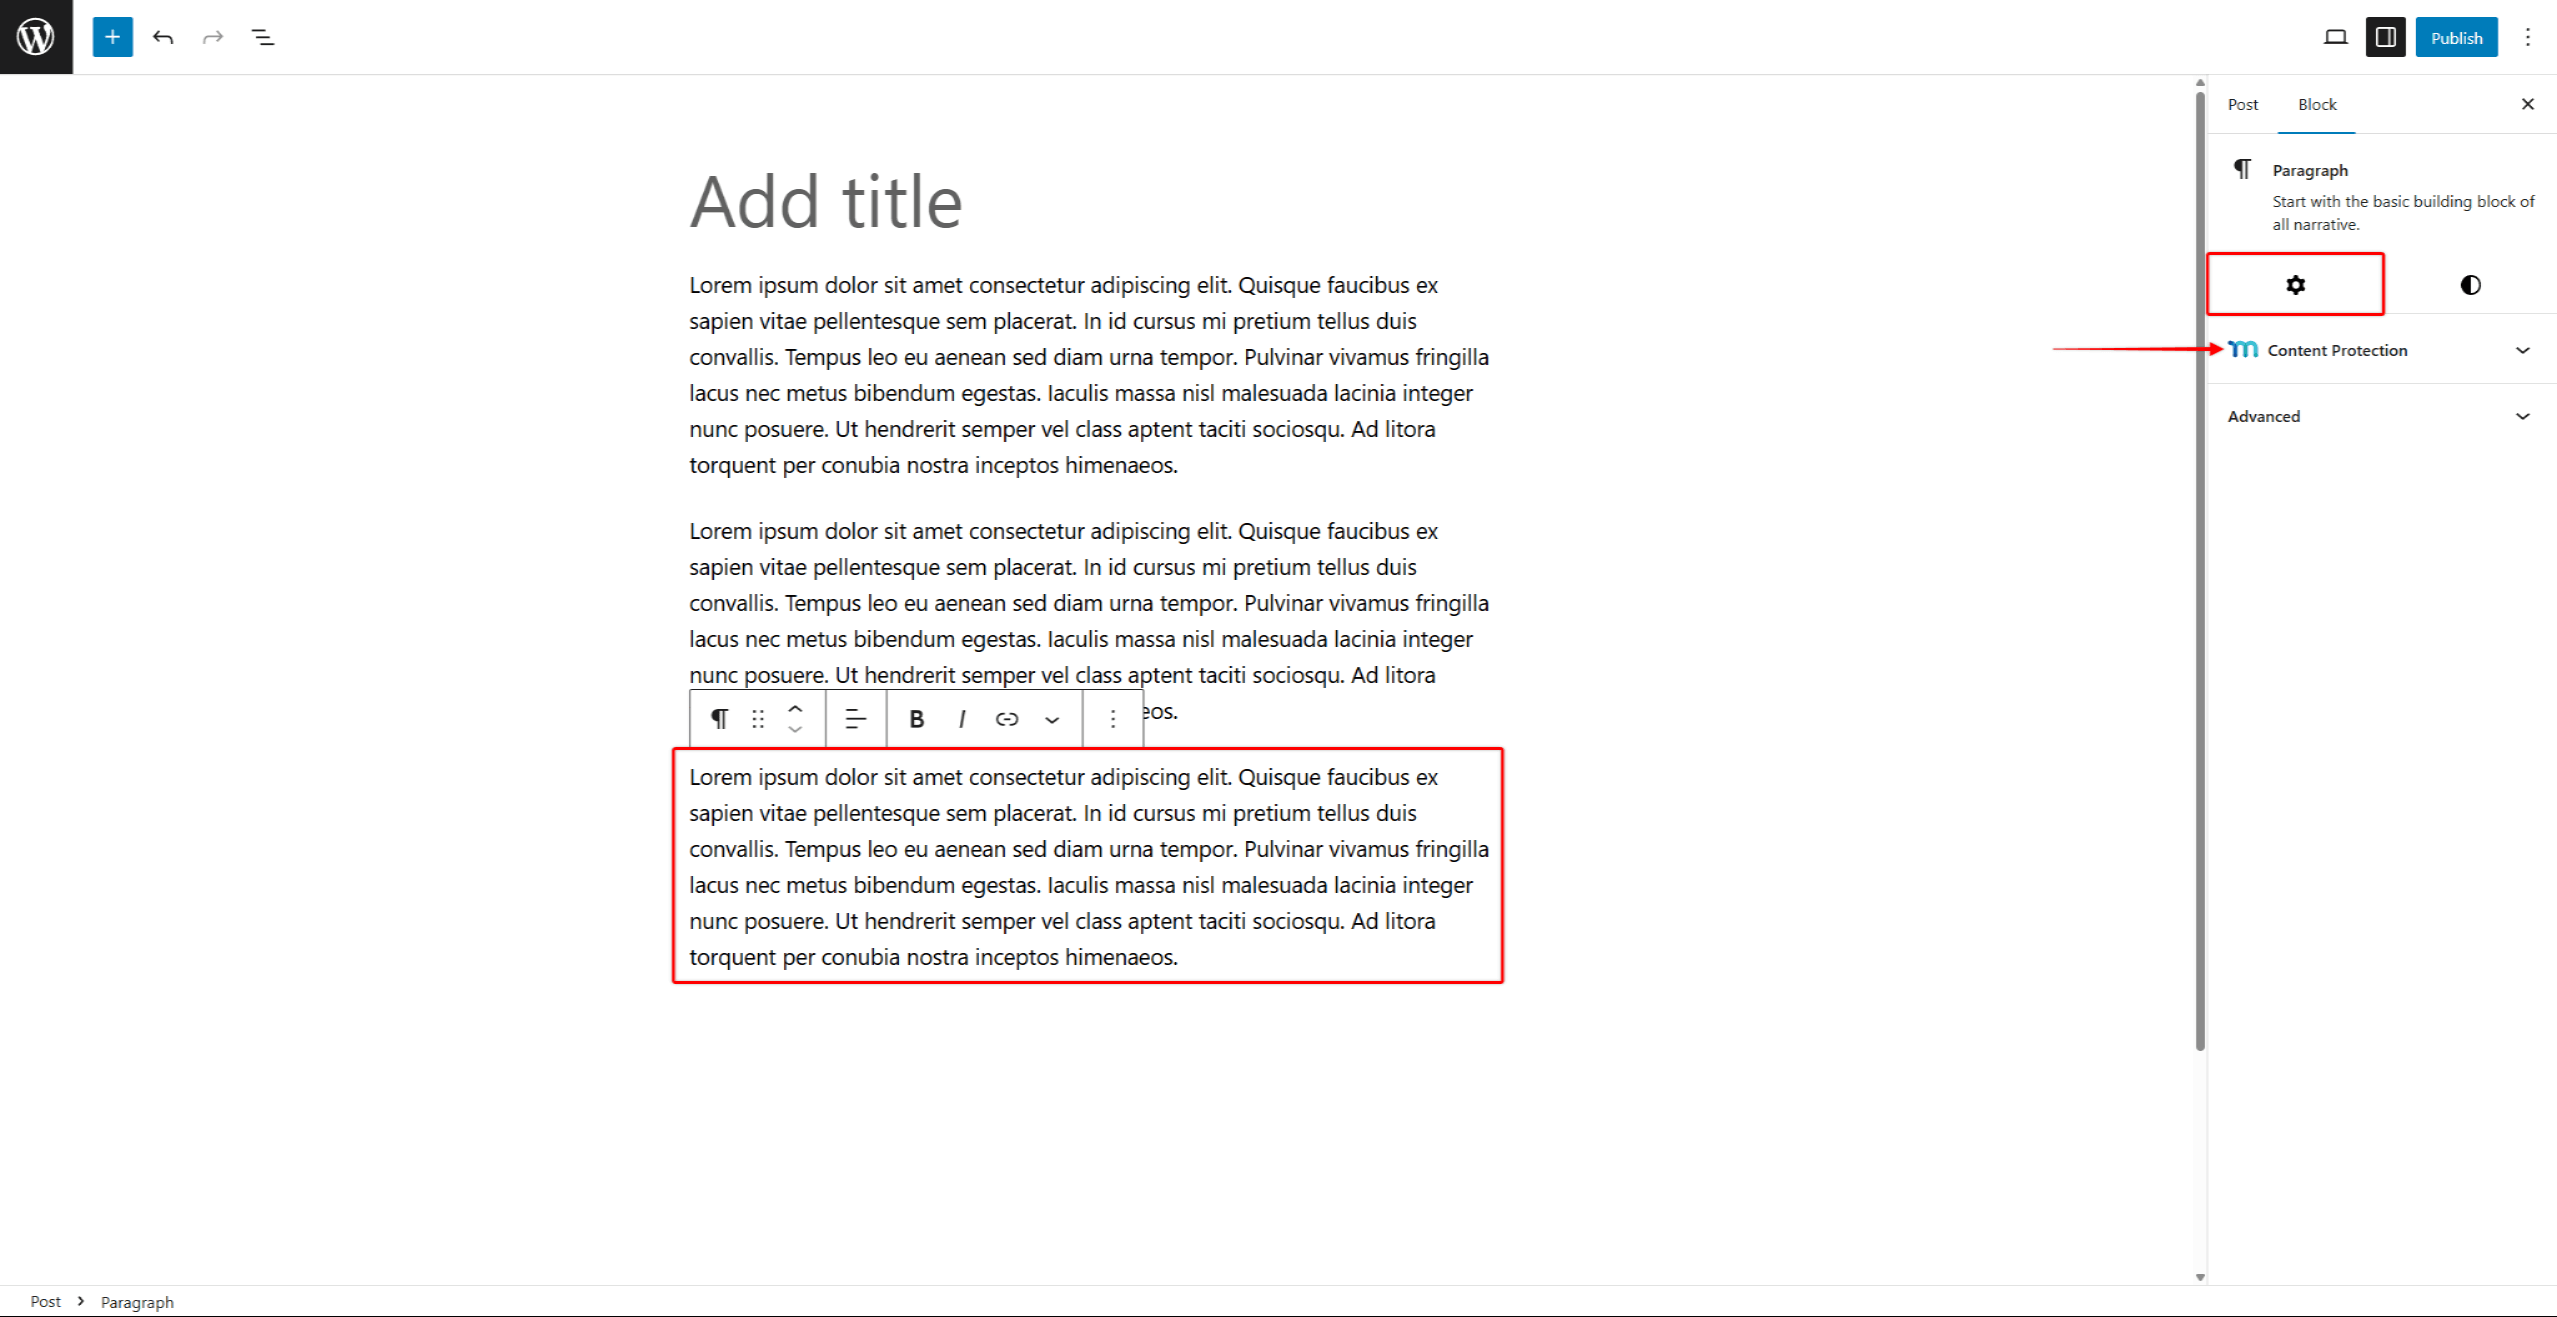
- Recherchez et développez le Protection du contenu section.
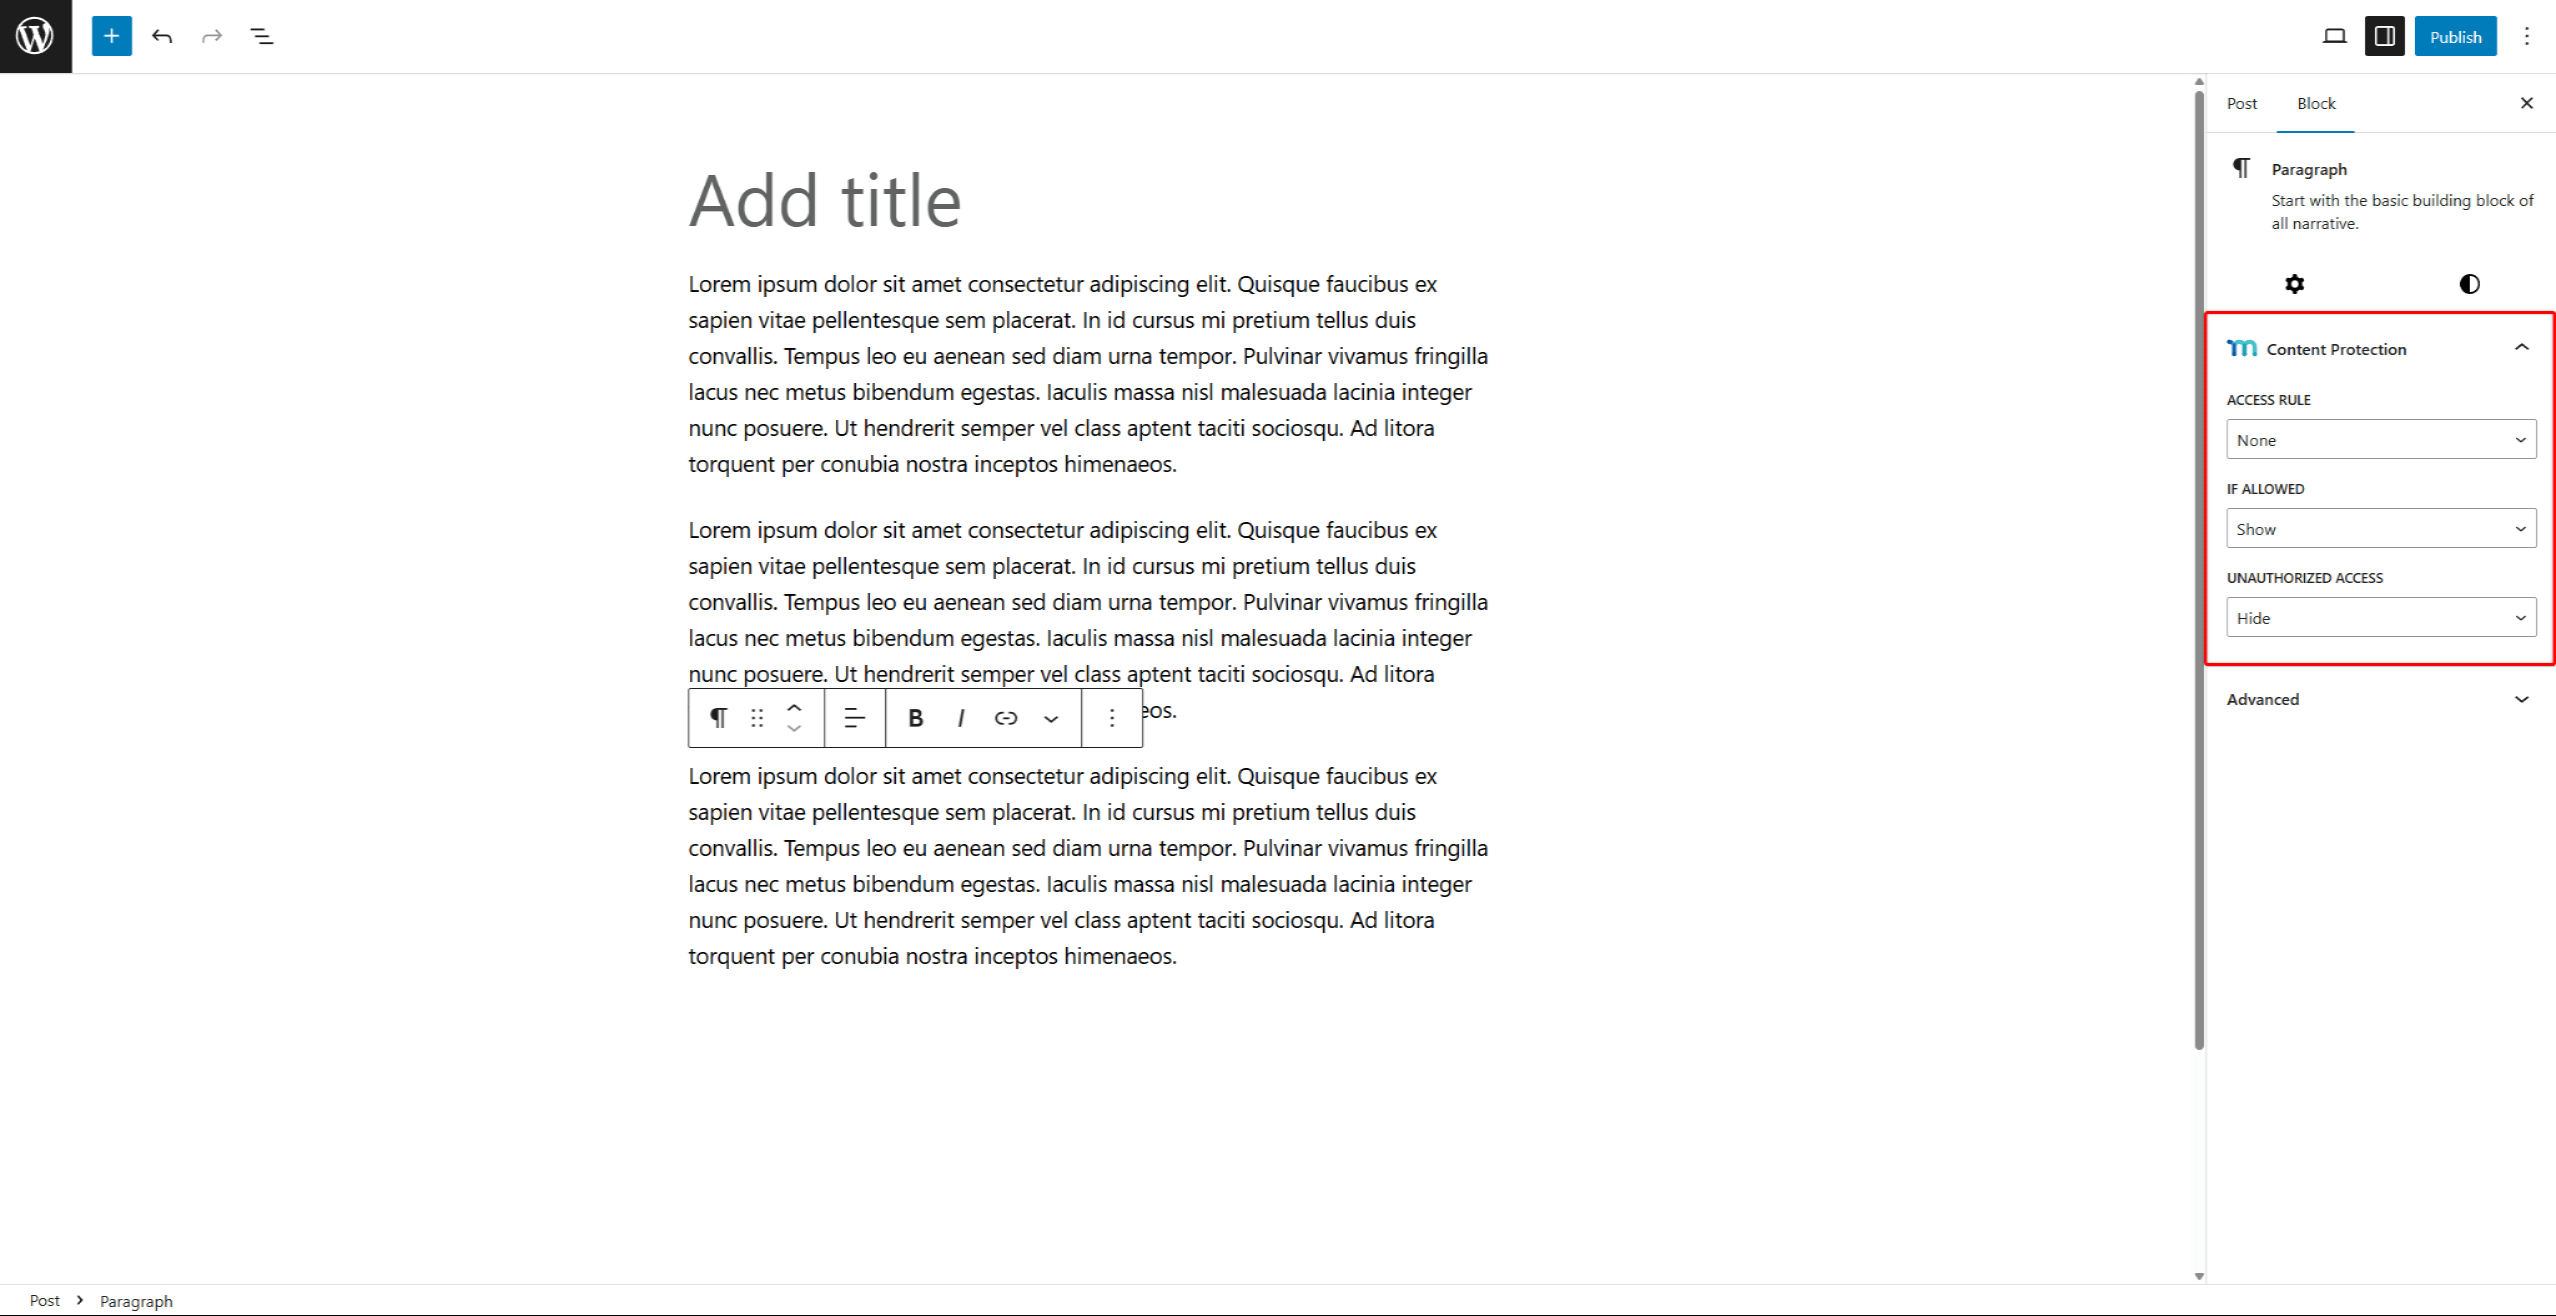
- Cliquez sur le bouton Règle d'accès et commencez à taper le nom de la règle MemberPress dont vous avez besoin. Cliquez sur la règle pour l'appliquer au bloc.
- Dans le cadre de la Si autorisé dans le menu déroulant, vous pouvez choisir Afficher ou Cacher le bloc. Choisir Afficher pour permettre aux membres autorisés d'accéder et restreindre le contenu du bloc pour les autres utilisateurs. Inversement, si vous choisissez Hide, vous pouvez masquer les blocs Gutenberg pour les membres autorisés. et les rendre visible pour tous les autres.
- Dans le cadre de la Accès non autorisé choisissez ce que les utilisateurs non autorisés doivent voir à la place du contenu protégé :
- Cacher - Rendre invisible l'ensemble du bloc protégé et tout le contenu qu'il contient ;
- Défaut - Appliquer les paramètres d'accès non autorisé par défaut que vous avez définis pour MemberPress
- Message d'affichage - Cette option permet de masquer le contenu et d'afficher votre message personnalisé à la place. Vous obtiendrez le message supplémentaire Message non autorisé pour ajouter votre message.
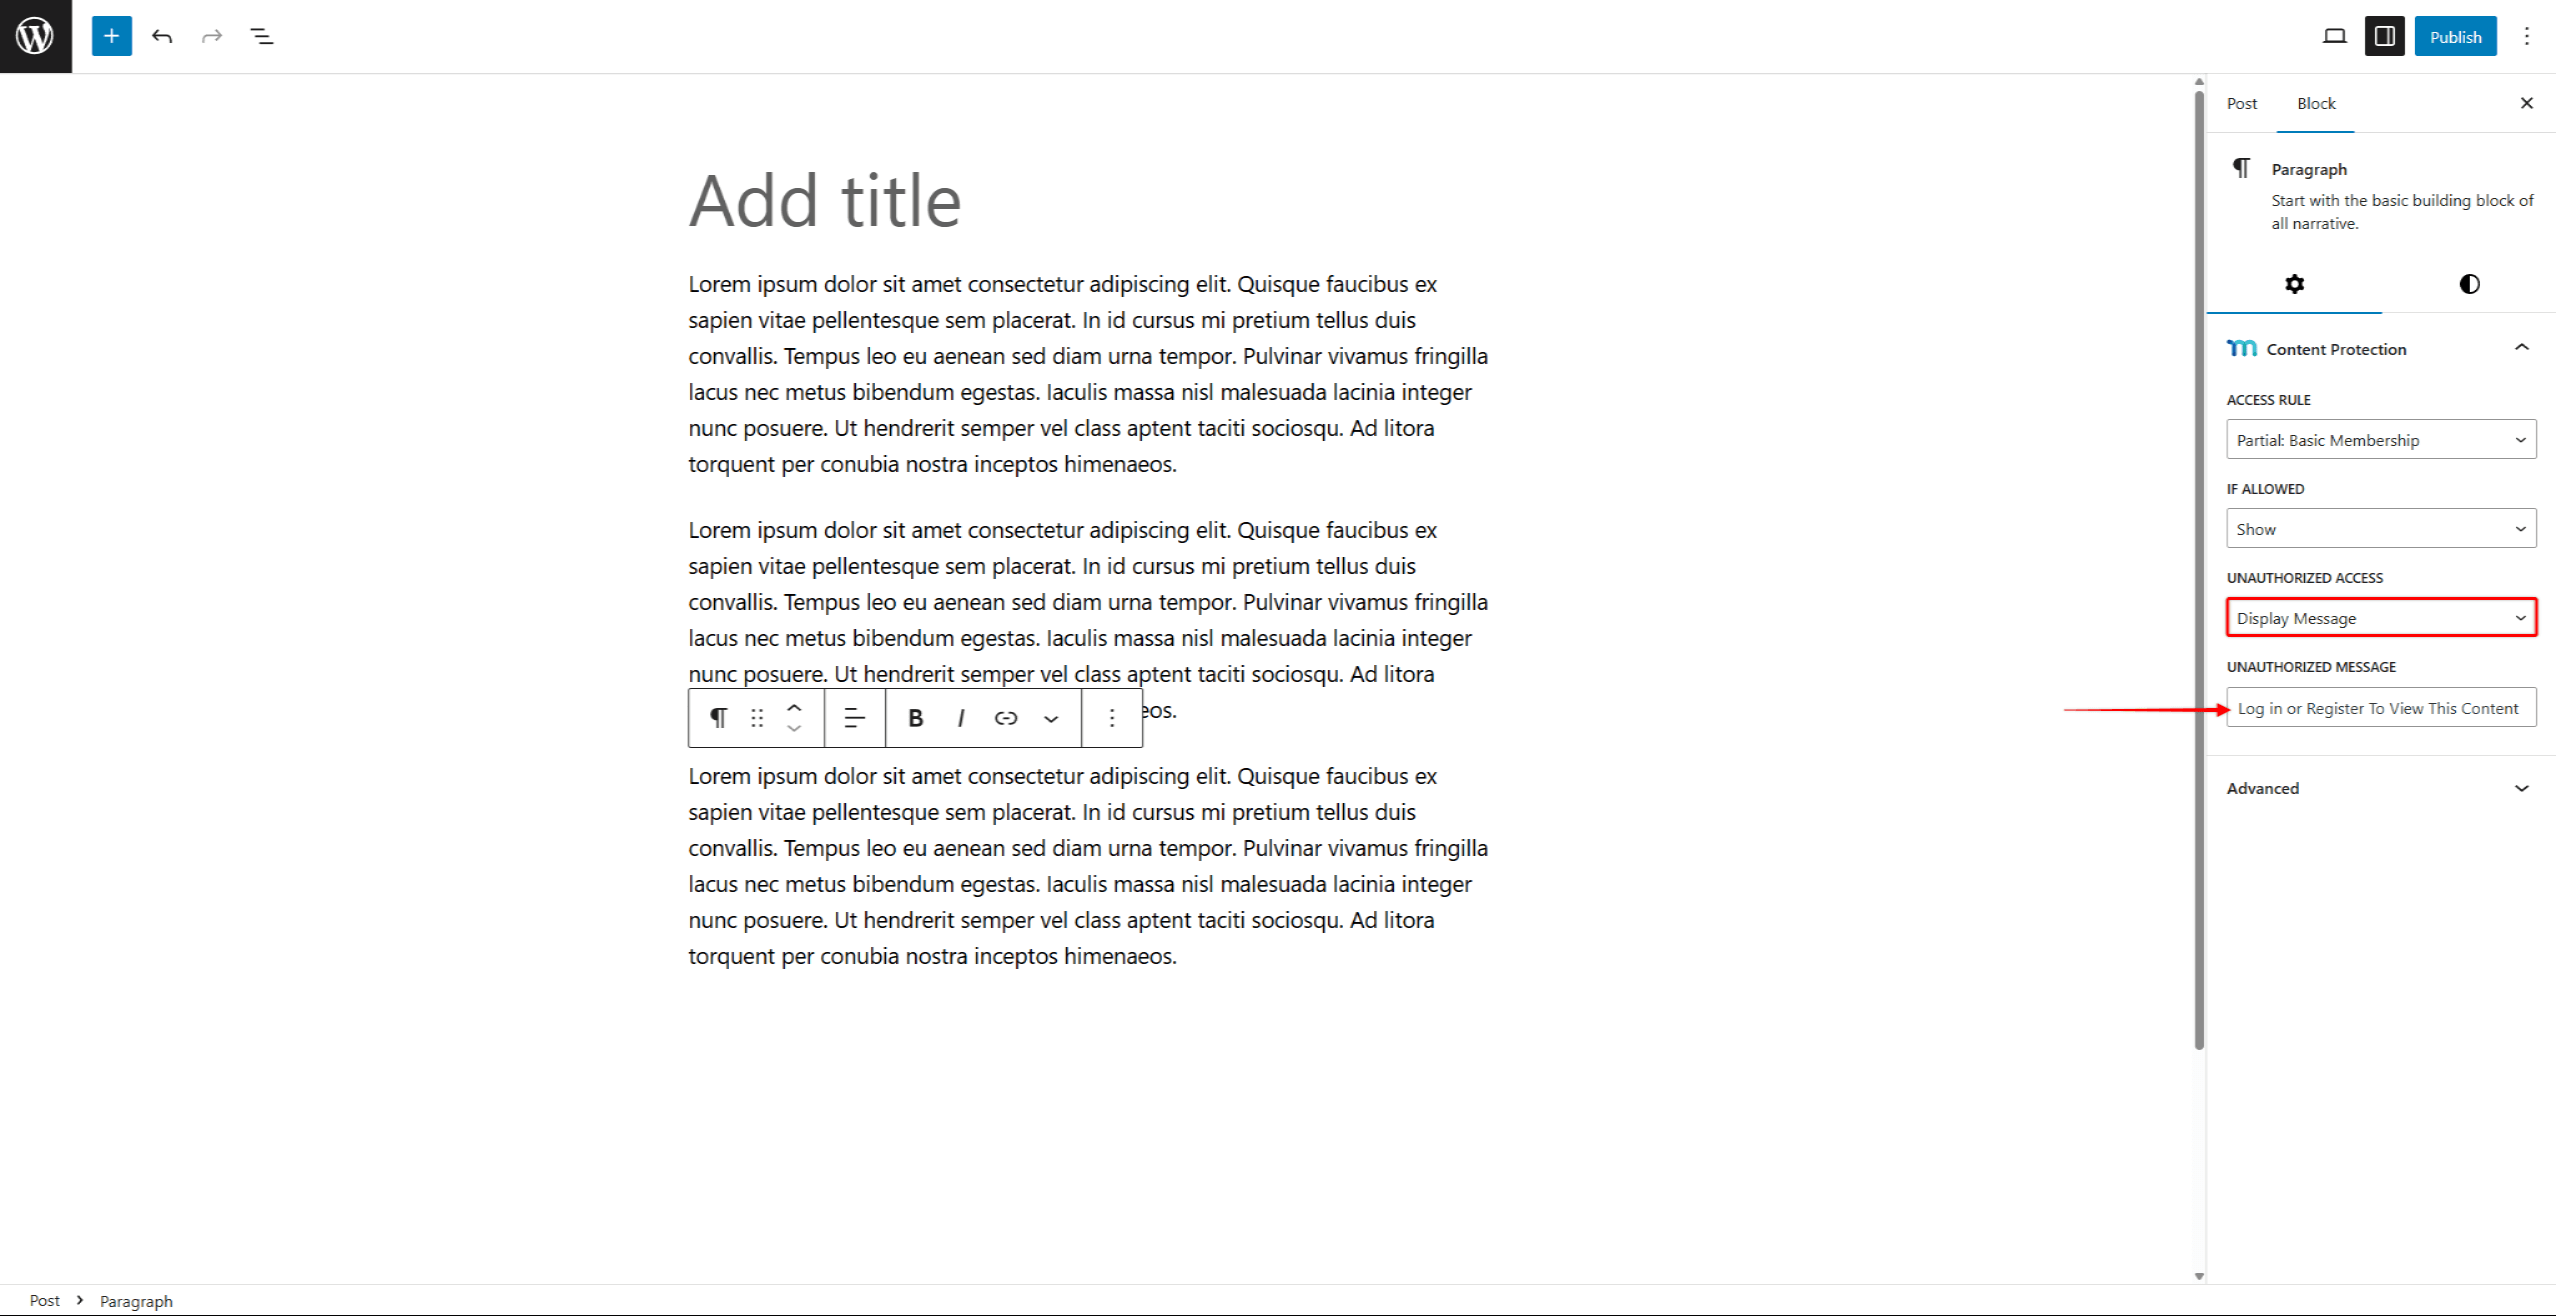
- Enregistrer les modifications en enregistrant les mises à jour des messages (bouton "Mettre à jour" ou "Publier").
Protéger les blocs Gutenberg à l'aide du bloc de contenu protégé
Le bloc de contenu protégé fonctionne comme un conteneur qui enveloppe d'autres blocs avec la protection des membres. Vous pouvez ajouter n'importe quel bloc Gutenberg à un bloc de contenu protégé. De plus, le nombre de blocs que vous pouvez ajouter est illimité.
Le bloc Contenu protégé peut être ajouté dans l'éditeur Gutenberg comme n'importe quel autre bloc :
- Naviguez jusqu'à l'article, la page ou la zone de widget souhaité(e)et cliquez sur Editer pour lancer l'éditeur Gutenberg.
- Cliquez sur le bouton Ajouter un bloc (icône +) dans l'éditeur.
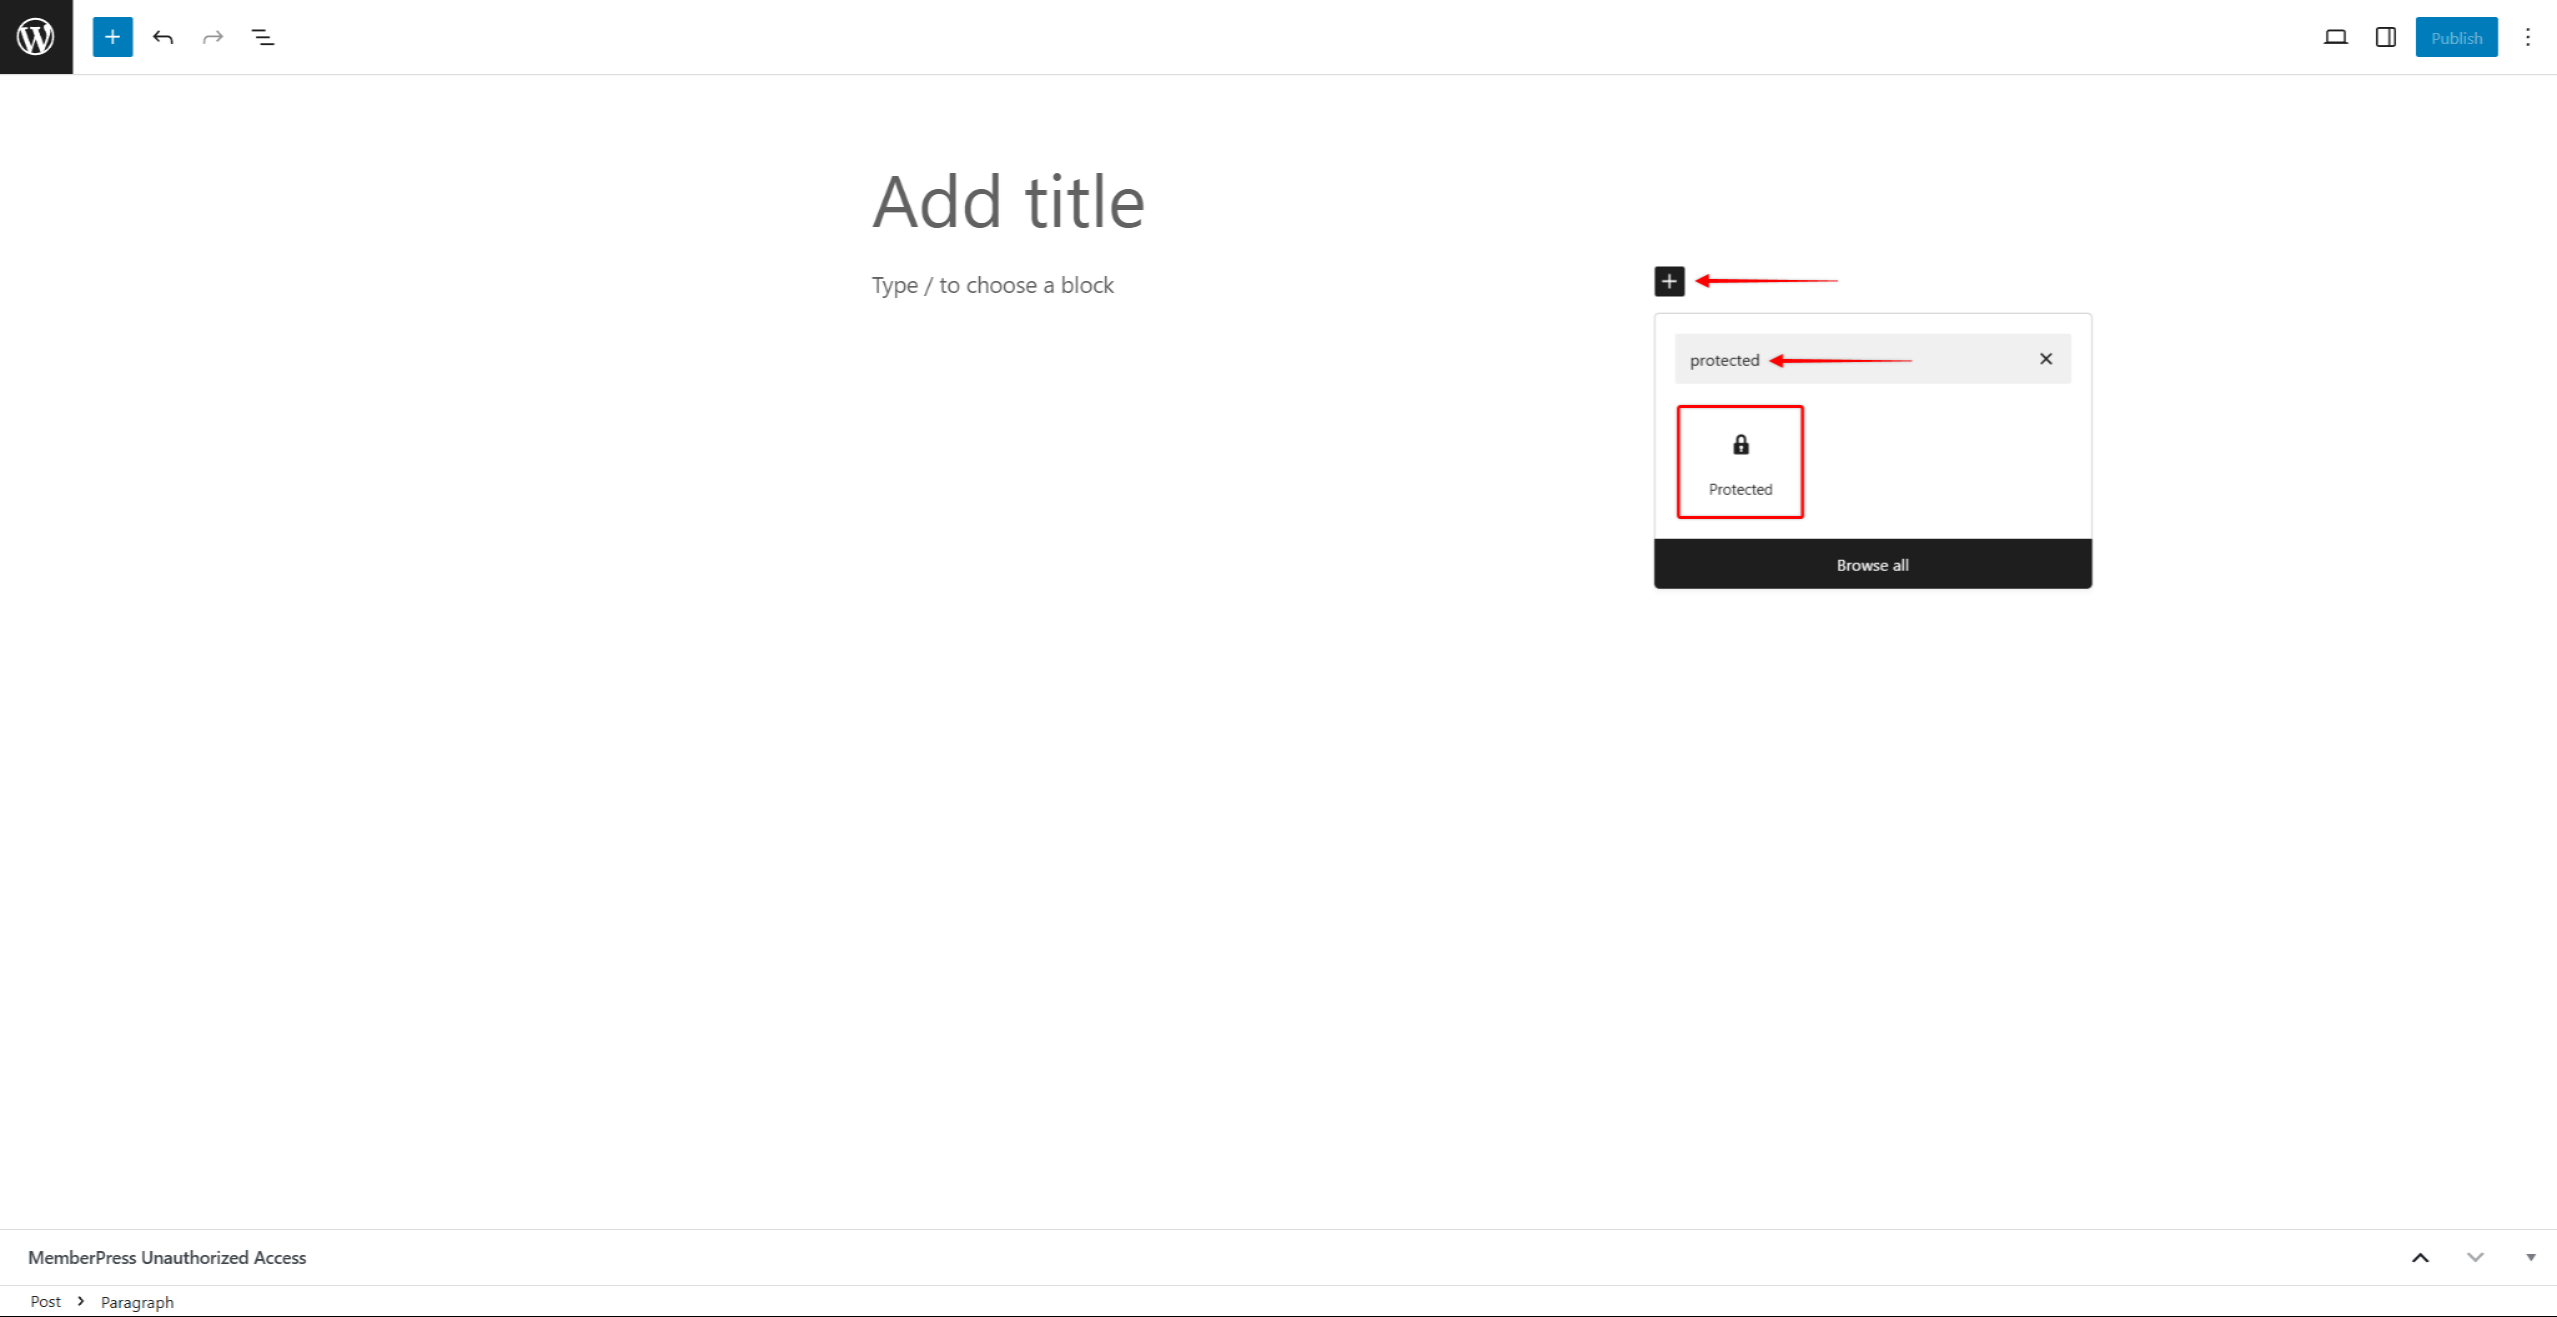
- Recherche du bloc nommé Protégé et sélectionnez-le. Vous pouvez maintenant ajouter les blocs que vous souhaitez protéger à l'intérieur du bloc de contenu protégé.
- Cliquez à l'intérieur du bloc Contenu protégé zone.
- Cliquez sur le bouton Ajouter un bloc bouton (icône +) dans le bloc Contenu protégé.

- Ajouter des blocs que vous souhaitez protéger (paragraphes, images, vidéos, titres, listes). Vous pouvez peut ajouter plusieurs blocs à l'intérieur d'un bloc de contenu protégé.
- Concevoir le contenu protégét. Vous pouvez mettre en forme et styliser chaque bloc ajouté comme d'habitude (en utilisant les paramètres disponibles du bloc).
- Économiser les changements de poste.
Paramètres de blocage des contenus protégés
Ensuite, vous devez configurer les paramètres du bloc :
- Sélectionnez l'option Bloc de contenu protégé.
- Dans le cadre de la Réglages des blocs trouver le panneau Règle d'accès section.

- Choisir une règle MemberPress dans la liste déroulante.
- Sous Si autoriséSélectionnez si le contenu protégé doit être montré ou caché.
- Ensuite, développez le Accès non autorisé panneau.

- Dans le cadre de la Action non autorisée choisissez ce que les utilisateurs non autorisés doivent voir à la place du contenu protégé :
- Cacher seulement - masquer l'ensemble du bloc protégé et tout le contenu ajouté à l'intérieur ;
- Afficher le message - masquer le contenu et afficher un message personnalisé à la place.
- Afficher le formulaire de connexion - masquer le contenu protégé et afficher le formulaire de connexion MemberPress ;
- Afficher le formulaire de connexion et le message - masquer le contenu protégé et afficher le formulaire de connexion MemberPress et un message personnalisé.
- Vous verrez l'ajout de Message non autorisé si vous choisissez l'option Afficher le message ou le Afficher le formulaire de connexion et le message option. Ajouter le message personnalisé qui doit être affiché aux utilisateurs non autorisés dans ce champ.
- Enregistrer les modifications en enregistrant les mises à jour des messages (bouton "Mettre à jour" ou "Publier").
Protection au niveau du bloc vs. bloc de contenu protégé
Chaque méthode de protection offre des avantages distincts en fonction de votre stratégie de contenu et de vos besoins techniques.
Avantages de la protection du contenu au niveau du bloc :
- Contrôle granulaire: Protéger des blocs individuels avec précision sans affecter le contenu environnant. Cela permet d'imposer des restrictions de contenu très spécifiques dans des mises en page complexes.
- Expérience de l'éditeur du nettoyeur: Aucun bloc n'encombre l'interface de l'éditeur. Chaque bloc gère ses propres paramètres de protection de manière indépendante.
- Options de mise en page flexibles: Mélangez facilement des blocs protégés et non protégés sans modifier la mise en page ou la conception de votre contenu.
- Une mise en œuvre simple: Appliquez la protection directement aux blocs existants sans ajouter de nouveaux types de blocs ni modifier la structure de votre contenu.
Avantages du bloc de contenu protégé :
- Gestion du groupe: Protéger plusieurs blocs liés ensemble avec une configuration à règle unique. Cela simplifie la gestion lors de la protection de grandes sections de contenu.
- Organisation visuelle: Les sections de contenu protégées sont clairement visibles dans l'éditeur, ce qui facilite la compréhension de la structure de votre contenu en un coup d'œil.
- Un style cohérent: Appliquer un style et un message unifiés à l'ensemble du contenu dans le conteneur protégé.
- Gestion simplifiée des règles: Gérer un ensemble de règles de protection pour plusieurs blocs au lieu de configurer chaque bloc individuellement.
Choisir la bonne méthode pour cacher les blocs Gutenberg
Utilisation protection au niveau des blocs lorsque vous avez besoin d'un contrôle précis sur des éléments individuels et que vous souhaitez conserver des mises en page d'éditeur propres. Cette méthode est la plus efficace pour protéger des paragraphes, des images ou d'autres éléments spécifiques au sein d'un contenu mixte.
Utilisation Blocs de contenu protégé lorsqu'il s'agit de protéger ensemble des sections de contenu apparentées et de simplifier la gestion des règles. Cette méthode fonctionne bien pour protéger des sections ou des chapitres entiers de vos articles qui doivent avoir des exigences d'accès unifiées. Dans ce cas, il s'agit d'une méthode plus simple que d'appliquer la même règle MemberPress à chaque bloc individuellement.
Lorsque vous choisissez l'une ou l'autre de ces méthodes, tenez compte de votre stratégie de contenu, de votre flux de travail d'édition et de vos besoins en matière de maintenance. Les deux approches utilisent le même système de règles MemberPress sous-jacent, ce qui garantit une protection cohérente quelle que soit la méthode de mise en œuvre choisie.


