Eine Datenmigration ist oft erforderlich, wenn Sie von einem anderen Mitgliedschaftssystem zu MemberPress migrieren. Dies gilt auch, wenn Sie auf eine neue Domain migrieren oder sogar, wenn Sie Abonnements auf Ihre Website importieren.
In diesem Dokument werden der Migrationsprozess und die Schritte, die Sie möglicherweise unternehmen müssen, erläutert. Diese Schritte sind für alle Migrationen erforderlich, unabhängig von dem System, von dem aus Sie migrieren.
MemberPress Einführer
Die MemberPress Importer-Zusatzmodul ermöglicht es Ihnen, MemberPress-bezogene Daten in Ihre Website zu importieren. Der Importer wird in der Regel verwendet, um Benutzer und ihre Abonnements von einer früheren Mitgliedschaftslösung zu MemberPress hinzuzufügen.
Um mit dem Import Ihrer Daten zu beginnen, müssen Sie zunächst das Importer-Add-on auf Ihrer Website installieren und aktivieren:
- Navigieren Sie zu Dashboard > MemberPress > Add-ons.
- Durchsuchen Sie die Add-ons-Liste oder verwenden Sie das Suchwerkzeug, um das Add-on Importer finden.
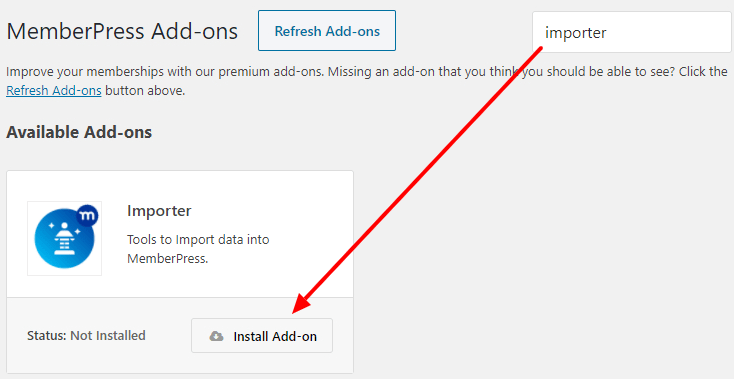
- Klicken Sie auf die Add-on installieren um das Add-on zu installieren und zu aktivieren.
Wenn der Importer installiert und aktiviert ist, sehen Sie nun diese neue Importieren im Menü MemberPress.
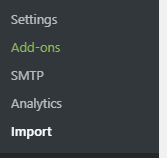
Hier können Sie mit dem Importieren Ihrer CSV-Dateien beginnen.
Erstellen Ihrer CSV-Dateien
Wenn Sie den MemberPress Importer installiert haben, können Sie Ihre ersten CSV-Dateien erstellen, um Ihre Daten zu importieren. CSV steht für "Komma-getrennte Werte, einem Standard-Tabellenkalkulationsformat.
Sie können diese Tabellenkalkulationsdateien in Excel, Numbers, Open Office oder Google Spreadsheet erstellen und bearbeiten.
Diese Dateiformatierung ist für die Migration von Daten mit dem MemberPress-Importer unerlässlich. Bitte beachten Sie, dass exportierte CSV-Dateien aus anderen Plugins und Systemen in der Regel anders formatiert sind.
Wahrscheinlich müssen Sie Ihre exportierten Dateien neu formatieren und an das MemberPress-CSV-Format anpassen.
Jede Gruppe von Daten muss mit einer separaten CSV-Datei importiert werden. Dies bedeutet, dass Sie zum Beispiel Ihre Benutzer importieren mit einer CSV-Datei. Als nächstes müssen Sie ihre Transaktionen und Abonnements importieren als separate CSV-Dateien. Das Gleiche gilt für andere Datentypen (z. B. Kupons und Regeln importieren).
Alle CSV-Dateien müssen ordnungsgemäß formatiert sein. Jeder Datentyp hat seine eigene CSV-Vorlage und eindeutige Datenelemente. Sie können die Beispiel-CSV-Vorlagendateien für einige der verschiedenen Datentypen hier herunterladen:
- WordPress Benutzer CSV-Vorlage
- CSV-Vorlage für Abonnements
- Buchungen CSV-Vorlage
- Unternehmenskonto Unterkonten CSV-Vorlage
- Coupons CSV-Vorlage
Darüber hinaus gibt es einige Konventionen, denen alle diese Dateien entsprechen müssen:
- Jede CSV-Datei muss eine Kopfzeile (erste Zeile der Datei) haben, die den Namen des Feldes enthält. Alles, was in der Spalte unter der ersten Zeile steht, wird als Wert für das in der Kopfzeile definierte Feld gekennzeichnet.
- Die Spalten der CSV-Datei müssen nicht in einer bestimmten Reihenfolge angeordnet sein. Die Datenfelder werden nicht durch die Reihenfolge, sondern durch den Namen der Überschrift bestimmt.
- Die Datei muss im UTF-8 Format.
Sobald Sie Ihre Daten in geeignete CSV-Dateien formatiert und aufbereitet haben, sollten Sie sie aus Ihrer Tabellenkalkulation exportieren.
Importieren von CSV-Dateien mit MemberPress
Um Ihre CSV-Dateien in MemberPress zu importieren, gehen Sie folgendermaßen vor:
- Navigieren Sie zu Dashboard > MemberPress > Importieren.
- Wählen Sie den Typ der zu importierenden Datei über die Dropdown-Liste.
- Klicken Sie auf die Datei auswählen Taste, und die passende CSV-Datei auswählen die Sie von Ihrem Computer importieren möchten. Wenn Sie zum Beispiel die Transaktionen eines Benutzers importieren möchten, wählen Sie hier die CSV-Datei mit den Transaktionen.
- Klicken Sie auf die Hochladen Schaltfläche unten, um die Datei zu importieren.
Ihre Daten werden nun importiert und zu Ihrer Website hinzugefügt.
Grundlegende Migrationsschritte
- Richten Sie MemberPress ein und konfigurieren Sie es zumindest mit Ihren Mitgliedschaften und Gateways. Sie sollten wahrscheinlich noch keine Regeln erstellen, um Konflikte mit Ihrem bestehenden Mitgliedschafts-Plugin zu vermeiden (wenn Sie es auf derselben Website verwenden).
- Importieren Sie Ihre Benutzer (falls nicht bereits auf Ihrer WordPress-Website vorhanden).
- Beliebig importieren wiederkehrende Abonnements oder Einmalzahlungen zugeordnet (diese Dateien sind von der in Schritt 2 importierten CSV-Datei "Benutzer" getrennt).
- Testen Sie, ob alles gut aussieht; wenn ja, erstellen Sie Regeln in MP.
- Deaktivieren Sie Ihr bisheriges Mitgliedschafts-Plugin.
- Führen Sie weitere Tests durch, um sicherzustellen, dass alles ordnungsgemäß funktioniert.
- Stellen Sie Ihre IPN- oder Webhook-URLs um - usw. - um sicherzustellen, dass Zahlungen in MemberPress ordnungsgemäß aufgezeichnet werden, um fortzufahren. Hier finden Sie Links zu Ihren Gateways mit detaillierten Anweisungen für deren Einrichtung mit MemberPress hier.
- Überprüfen Sie Ihre importierten Abonnements unter MemberPress > Registerkarte Abonnements > Gateway Spalte. Wenn Gateway Namen erscheinen als ID (z. B. pea5pn-8cz) anstelle von “Streifen" oder "PayPal,müssen Sie Benutzerabonnements reparieren. Stellen Sie sicher, dass die richtige eindeutige Gateway-ID verwendet wird.


