Das MemberPress ClubCircles™ Add-on verwandelt Ihre Mitglieder-Website in eine Community-Plattform. Es ermöglicht Mitgliedern, Circles beizutreten, Gruppen mit gemeinsamen Interessen, in denen sie sich verbinden, diskutieren und zusammenarbeiten können.
Dieses Dokument beschreibt die Installation und Konfiguration des ClubCircles™-Add-ons, das Sie beim Aufbau von Communities innerhalb Ihrer Mitgliederseite unterstützt.
Video-Anleitung
Was sind ClubCircles™?
ClubCircles™. bringt Community-Funktionen auf Ihre MemberPress-Website durch Kreise. Jeder Kreis bietet einen eigenen Bereich, in dem die Mitglieder Beiträge austauschen, Medien hochladen und sich an Diskussionen beteiligen können.
Die Kreise arbeiten mit den Profile der Mitglieder und Verzeichnisse Merkmale von ClubDirectory™., das andere Add-on innerhalb der ClubSuite™ pack. Die ClubSuite™-Add-ons ermöglichen zusammen die Schaffung eines vollständigen Ökosystems für soziale Netzwerke. Mitglieder können Circles über Verzeichnisse entdecken, denjenigen beitreten, die ihren Interessen entsprechen, und mit anderen Mitgliedern interagieren, die ihre Leidenschaften teilen.
Das System respektiert Ihre Mitgliedschaftshierarchie. Sie können konfigurieren, welche Mitgliedsstufen Kreise erstellen, Kreisen beitreten oder auf bestimmte Kreisfunktionen zugreifen können.
Voraussetzungen für ClubCircles™
Bevor Sie ClubCircles™ installieren und Ihre Communities aufbauen, sollten Sie sicherstellen, dass Ihre Website diese Anforderungen erfüllt:
- Eine aktive MemberPress-Einbau die auf Ihrer WordPress-Website läuft;
- A gültig MemberPress Wachstums- oder Skalierungslizenz die ordnungsgemäß aktiviert ist;
- Die ClubDirectory™ Add-on ist installiert und mit Mitgliederprofilen konfiguriert;
- WordPress Version 5.0 oder höher mit dem Gutenberg Editor aktiviert;
- Mindestens eine aktive Mitgliedschaft in MemberPress angelegt (nicht zwingend erforderlich für die Installation, aber notwendig für die mitgliedschaftsbasierte Circle-Zugangsverwaltung).
Die ClubCircles™-Erweiterung erfordert ClubDirectory™, da die Kreise auf Mitgliederprofilen für Benutzerdaten und Interaktion beruhen.
Installation des ClubCircles™ Add-ons
Folgen Sie diesen Schritten, um ClubCircles™ auf Ihrer Website zu installieren:
- Navigieren Sie zu Dashboard > MemberPress > Add-ons.
- Verwenden Sie die Suchfunktion, um Folgendes zu finden “ClubCircles” oder durchsuchen Sie die Liste der verfügbaren Add-ons.
- Klicken Sie auf die Add-on installieren Taste auf der ClubCircles™-Karte.
Das System lädt das Add-on automatisch herunter, installiert es und aktiviert es. Sobald die Installation abgeschlossen ist, sehen Sie die Kreise erscheinen unter der Option ClubSuite™. Menü in Ihrem WordPress-Dashboard.
Aktivieren von ReadyLaunch-Vorlagen
Darüber hinaus ist die Installation der ClubCircles™. fügt Optionen zum Aktivieren oder Deaktivieren der ReadyLaunch™-Vorlage für Kreise. Gehen Sie folgendermaßen vor, um diese Vorlage zu aktivieren:
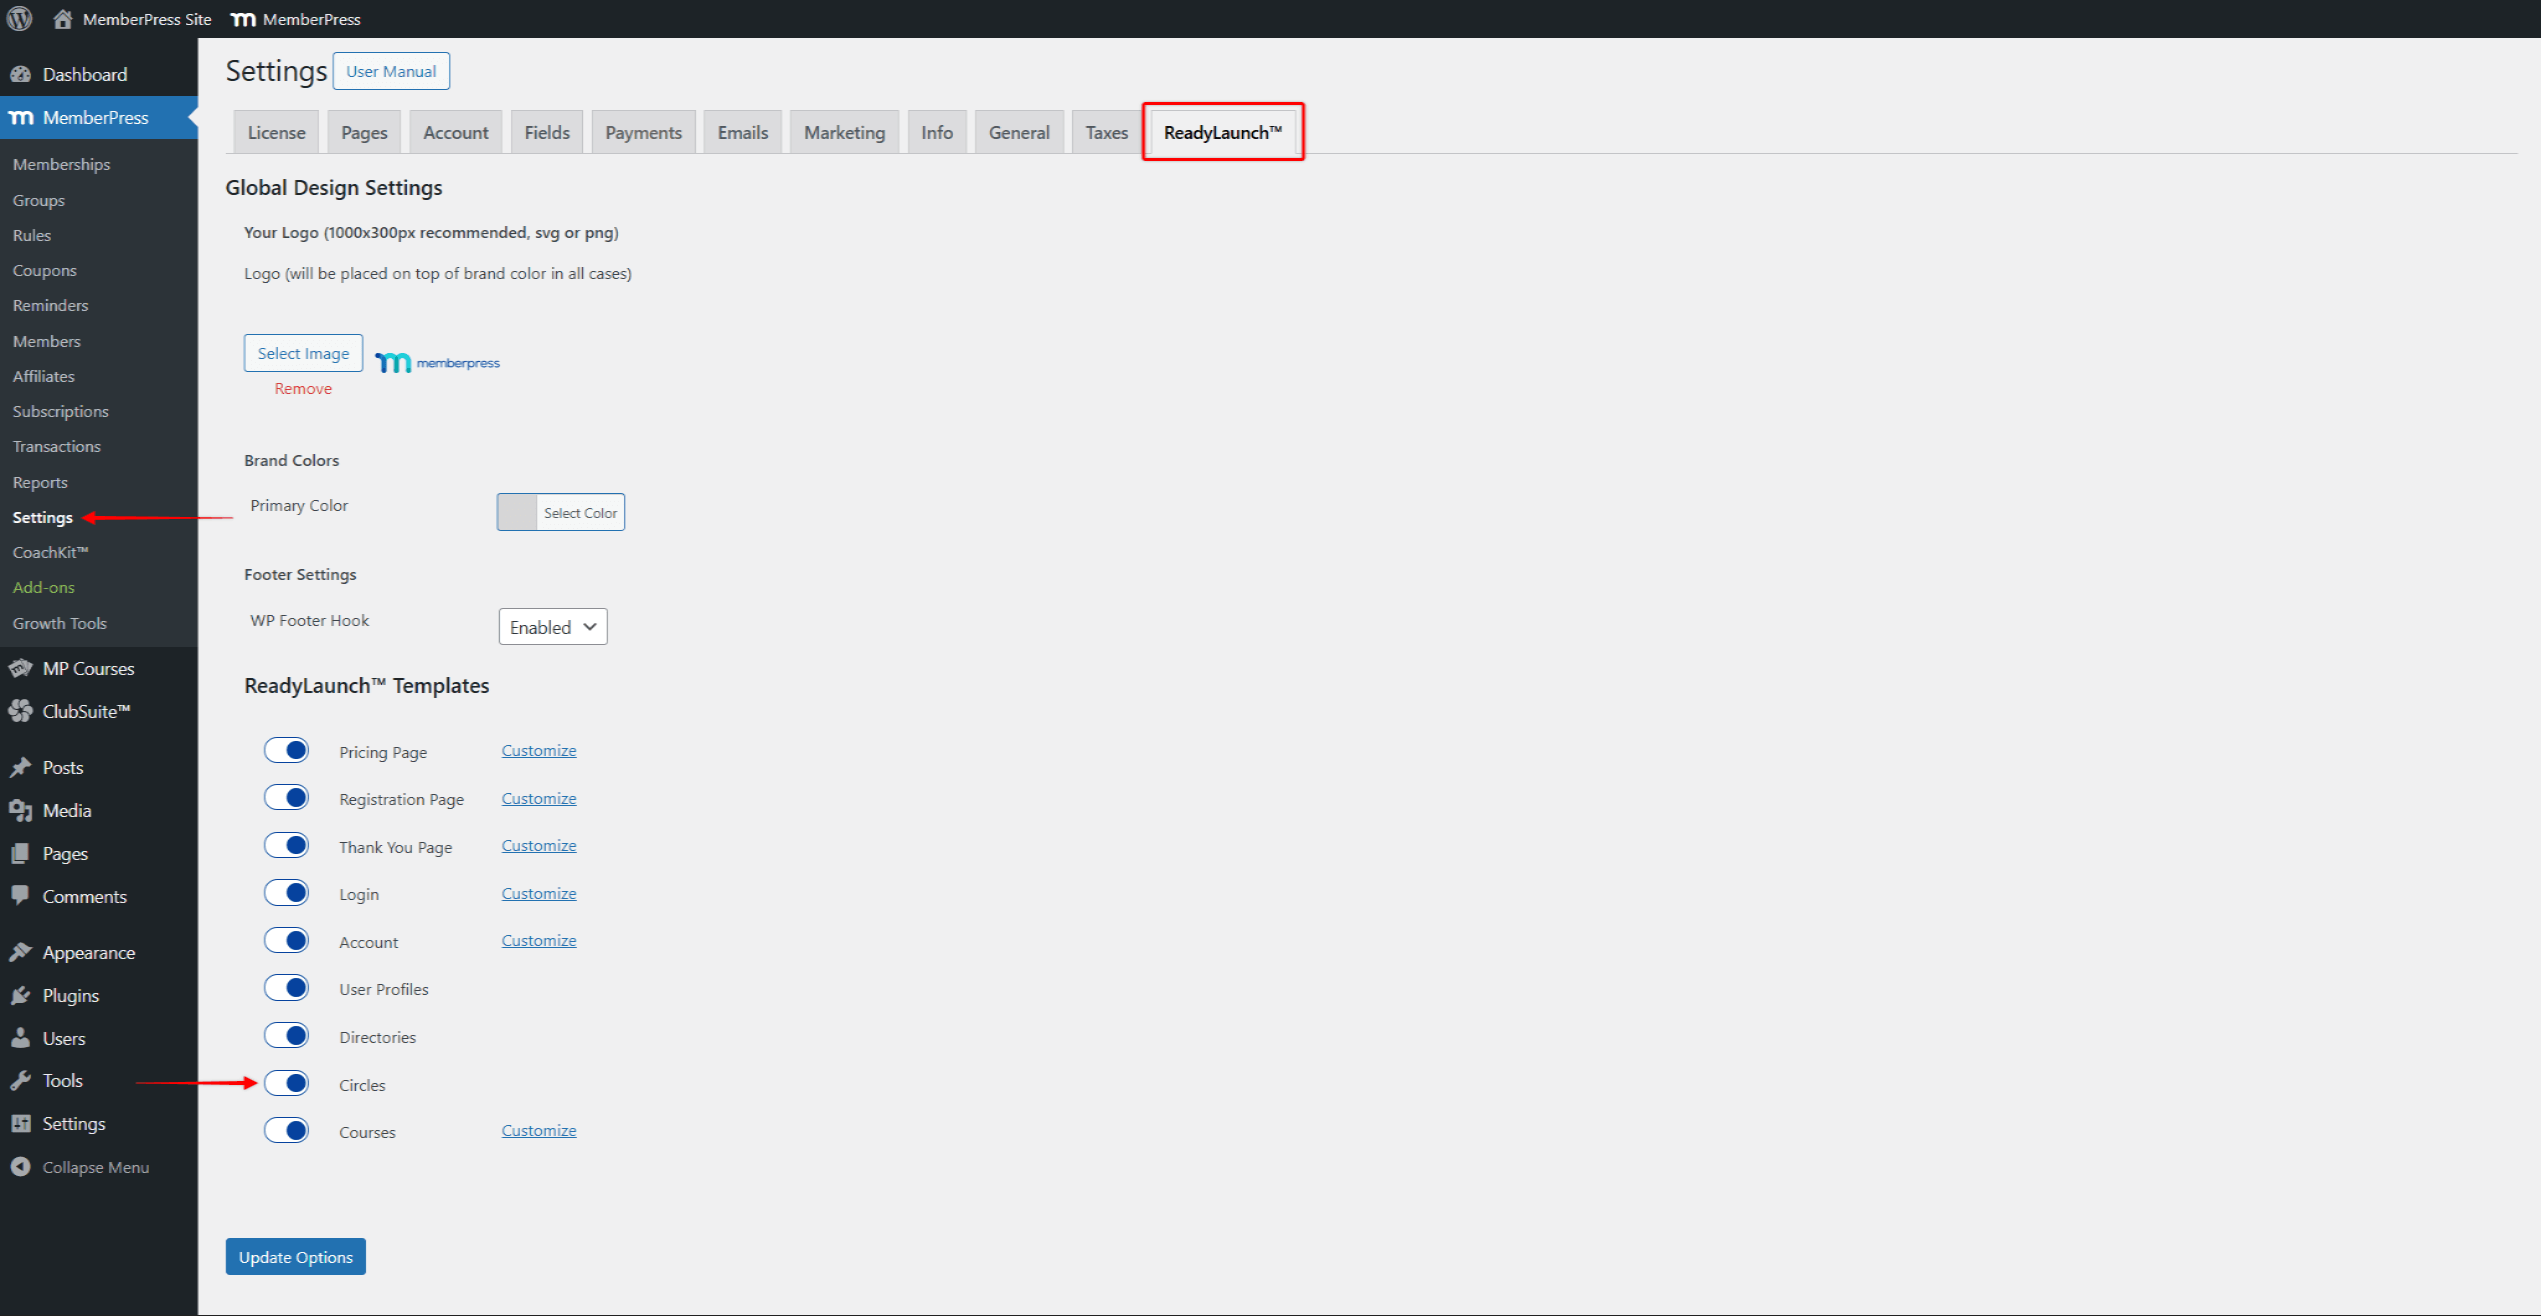
- Navigieren Sie zu Dashboard > MemberPress > Einstellungen > ReadyLaunch™ tab.
- Blättern Sie nach unten zum Abschnitt ReadyLaunch™-Vorlagen und aktivieren Sie Kreise Optionen.

- Klicken Sie auf Optionen aktualisieren um die Änderungen zu speichern.
Wenn Sie die Vorlage aktivieren, werden auch Ihre ReadyLaunch™ Globale Einstellungen zu Circles.
Verstehen der ClubSuite™-Menüstruktur
Jeder Menüabschnitt bietet Tools für die Verwaltung verschiedener Aspekte Ihrer Community-Plattform.
Nach der Installation von ClubCircles™ wird die ClubSuite™. erweitert sich das Menü um kreisspezifische Optionen:
- Kreise zeigt alle auf Ihrer Website erstellten Kreise an. Hier können Sie Kreise nach Bedarf anzeigen, bearbeiten oder löschen;
- Moderation zeigt Benutzerbeiträge und -kommentare in Circles an, die auf die Genehmigung des Administrators warten (wenn die Moderation aktiviert ist).
Konfigurieren der Kreiseinstellungen
Obwohl nicht obligatorisch, können Sie Folgendes konfigurieren Einstellungen für Kreise um die Standardeinstellungen an Ihre speziellen Bedürfnisse anzupassen. In den meisten Fällen funktionieren die Standardeinstellungen gut, ohne dass Änderungen erforderlich sind.
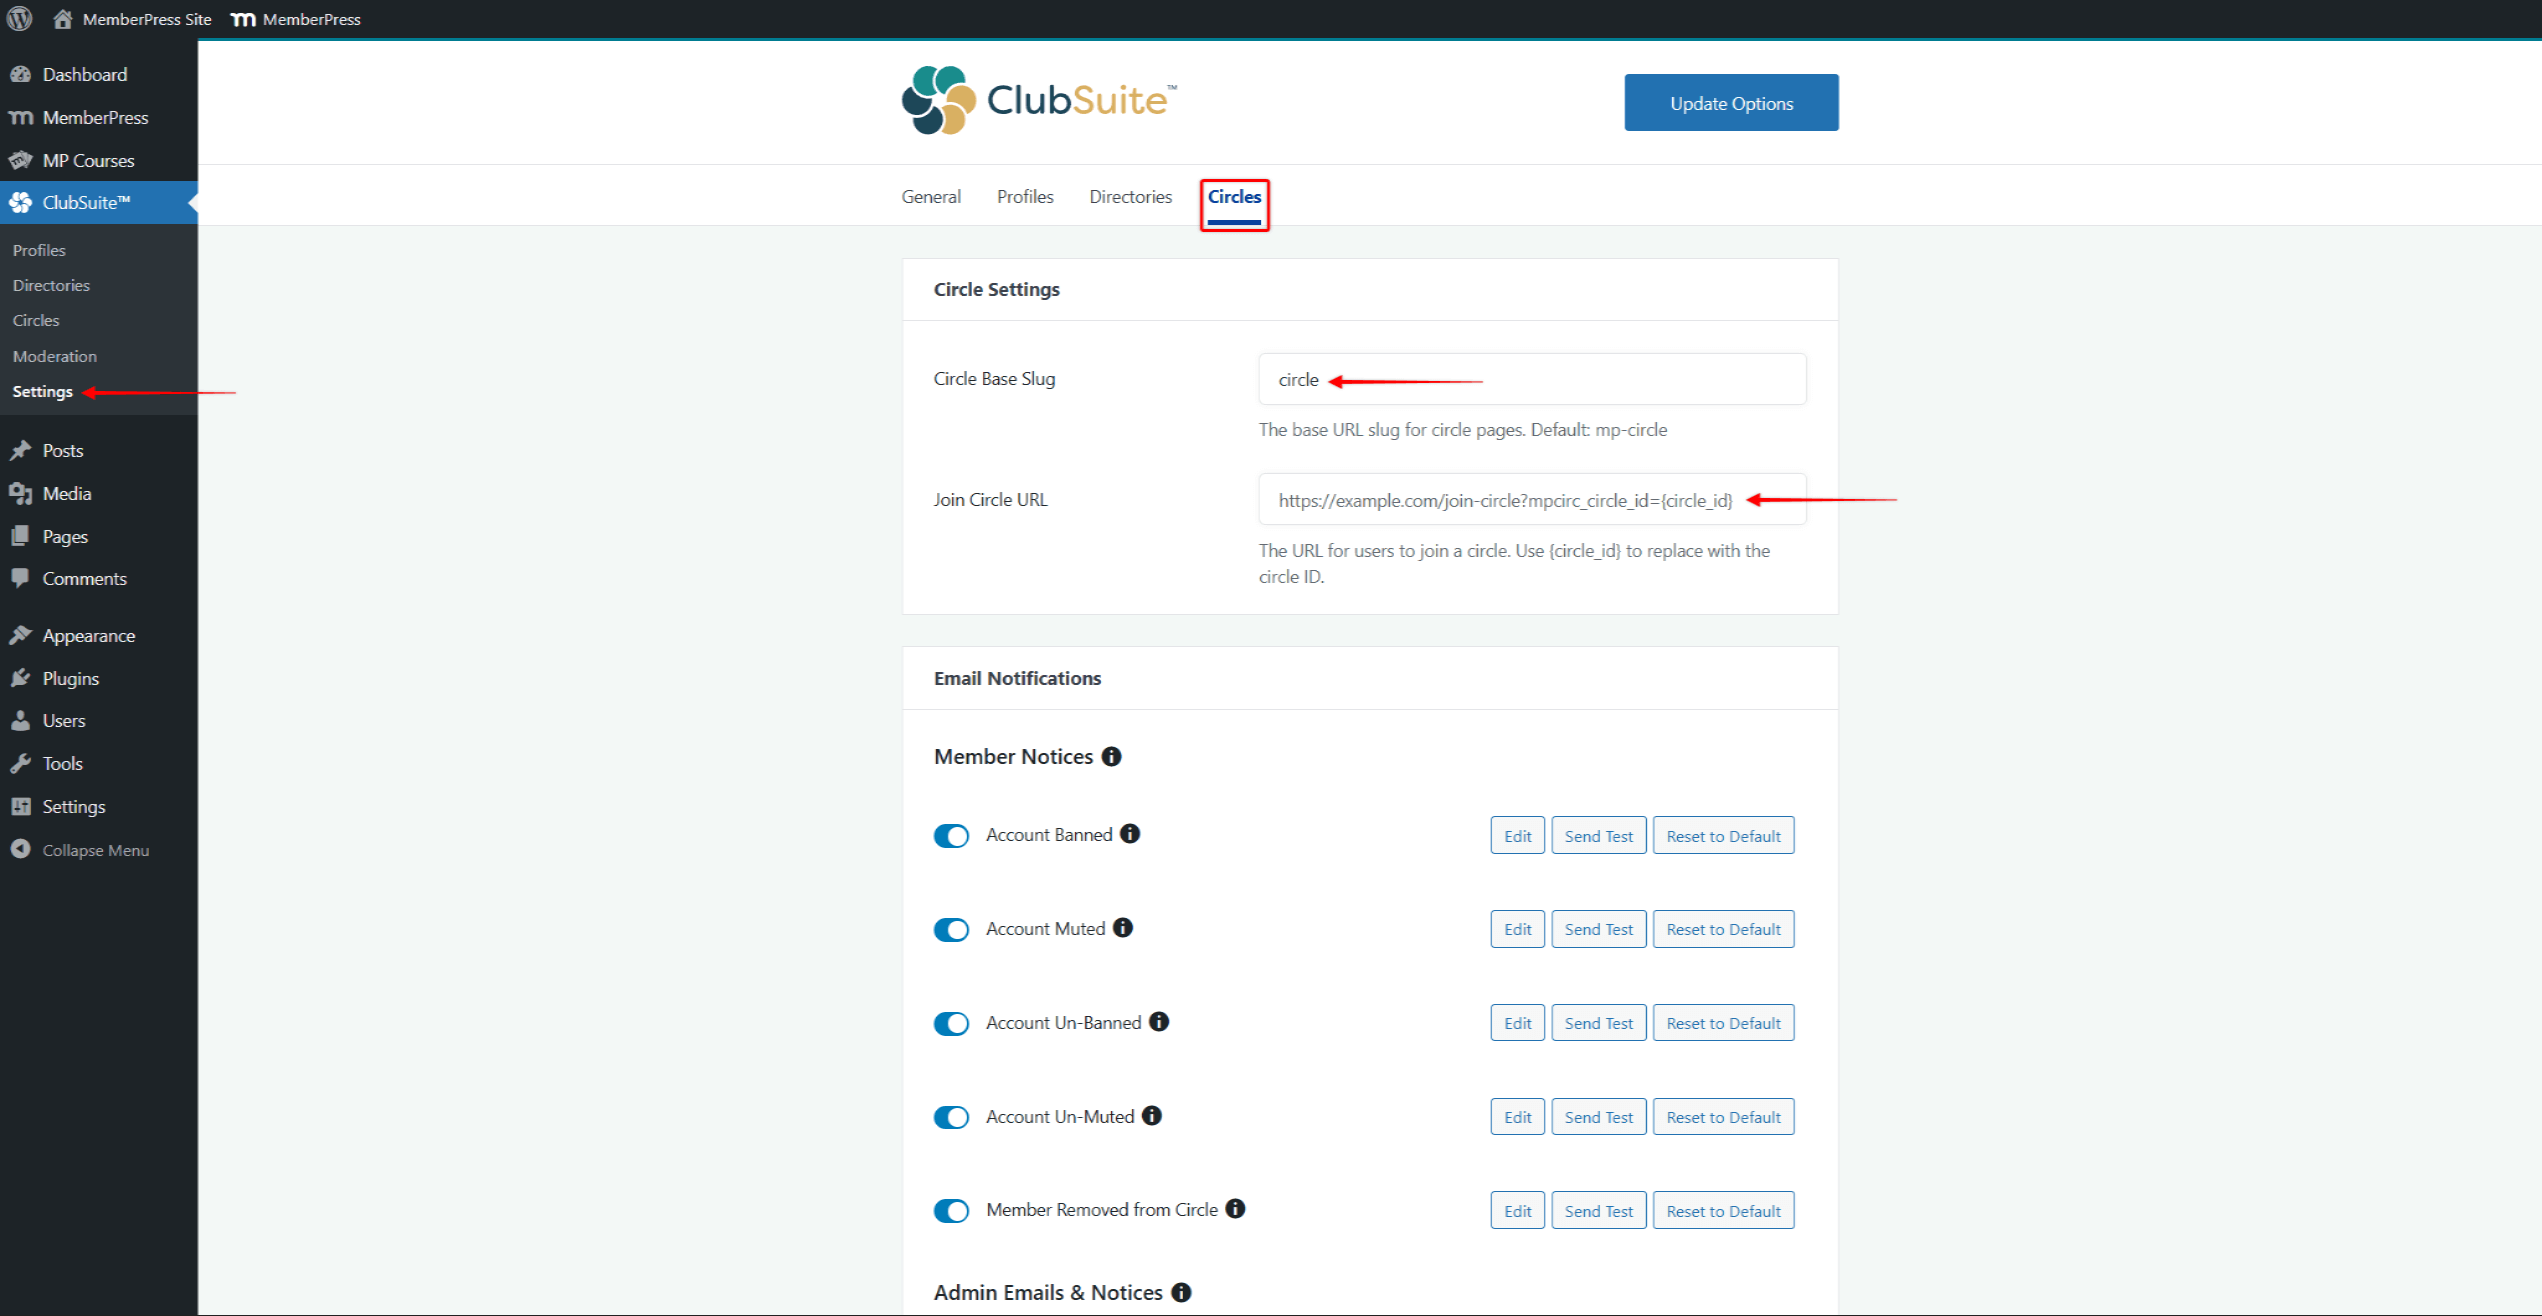
Navigieren Sie zu Dashboard > ClubSuite™ > Einstellungen > Registerkarte "Circles um zu konfigurieren, wie Kreise auf Ihrer Website funktionieren:
- Im Rahmen der Kreis-Einstellungen können Sie diese Optionen finden:
- Kreis Basis Schnecke: Sie können den Standard-Slug, der für ClubCircle™-URLs verwendet wird, ändern;
- URL des Beitrittskreises: Sie können das benutzerdefinierte URL-Format für die Links festlegen, die zum Beitritt zu Kreisen verwendet werden.

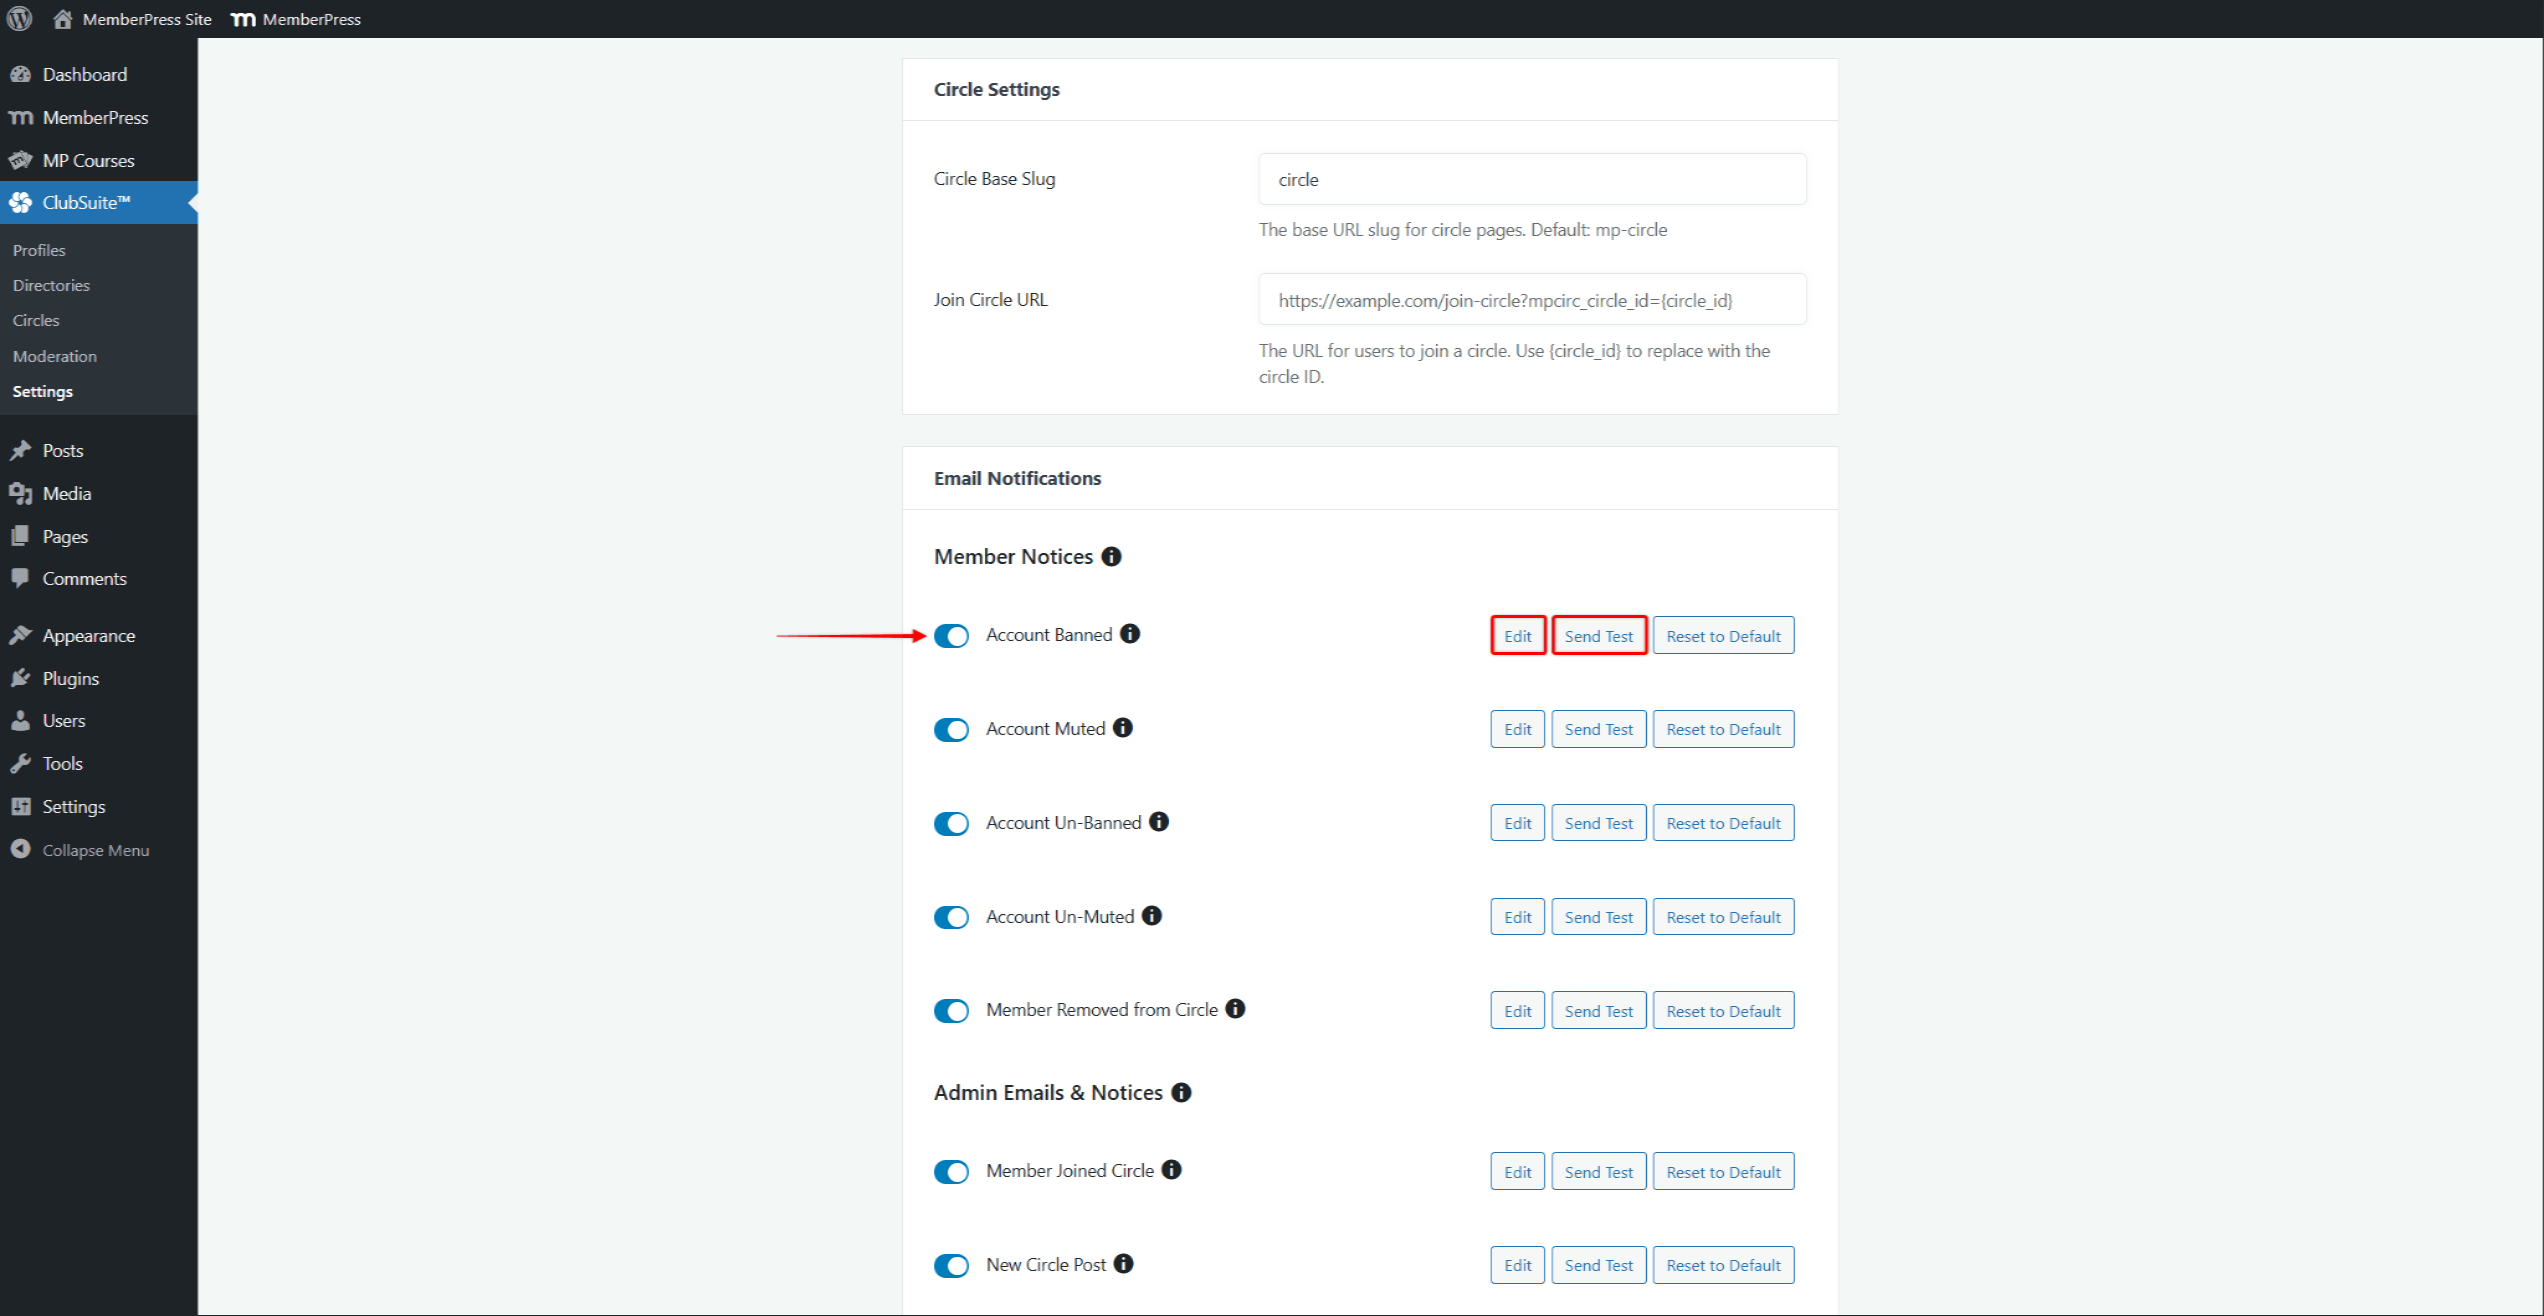
- Im Rahmen der E-Mail-Benachrichtigungenkönnen Sie Aktivieren/Deaktivieren von Kreisbenachrichtigungen. Alle Meldungsarten werden standardmäßig aktiviert. Sie können Deaktivieren Sie jede dieser Funktionen, indem Sie sie ausschalten.;

- Als nächstes können Sie den E-Mail-Inhalt für jede Benachrichtigung ändern, indem Sie auf die bearbeiten und bearbeiten Sie den Inhalt der Vorlage und den Betreff der E-Mail;
- Um jede Ihrer Benachrichtigungen zu testen, klicken Sie auf ihre Test senden um die Test-E-Mail zu versenden.
- Wenn Sie fertig sind, klicken Sie auf Optionen aktualisieren um Ihre Konfiguration zu speichern.
E-Mail-Benachrichtigungen
Kreise verfügen über E-Mail-Benachrichtigungen für Mitglieder und Administratoren. Sie können die folgenden zirkelspezifischen Mitglieder-Benachrichtigungen finden (die nur von Mitgliedern empfangen werden):
- Konto gesperrt: Wird an ein Mitglied geschickt, wenn es aus einem Kreis ausgeschlossen wird;
- Konto stummgeschaltet: Wird an ein Mitglied gesendet, wenn es in einem Kreis stummgeschaltet wird;
- Konto entbannt: Wird an ein Mitglied geschickt, wenn es aus einem Kreis ausgeschlossen wird;
- Konto ungestört: wird an ein Mitglied gesendet, wenn es in einem Kreis entstummt wird;
- Mitglied aus dem Kreis entfernt: wird an ein Mitglied gesendet, wenn es aus einem Kreis entfernt wird.
Außerdem gibt es Admin-Benachrichtigungen (die nur von Website-Administratoren empfangen werden):
- Mitglied Beitrittskreis: wird an den Kreisadministrator gesendet, wenn ein neues Mitglied dem Kreis beitritt;
- Neue Kreispost: wird an den Kreisadministrator gesendet, wenn ein neuer Beitrag erstellt wird.
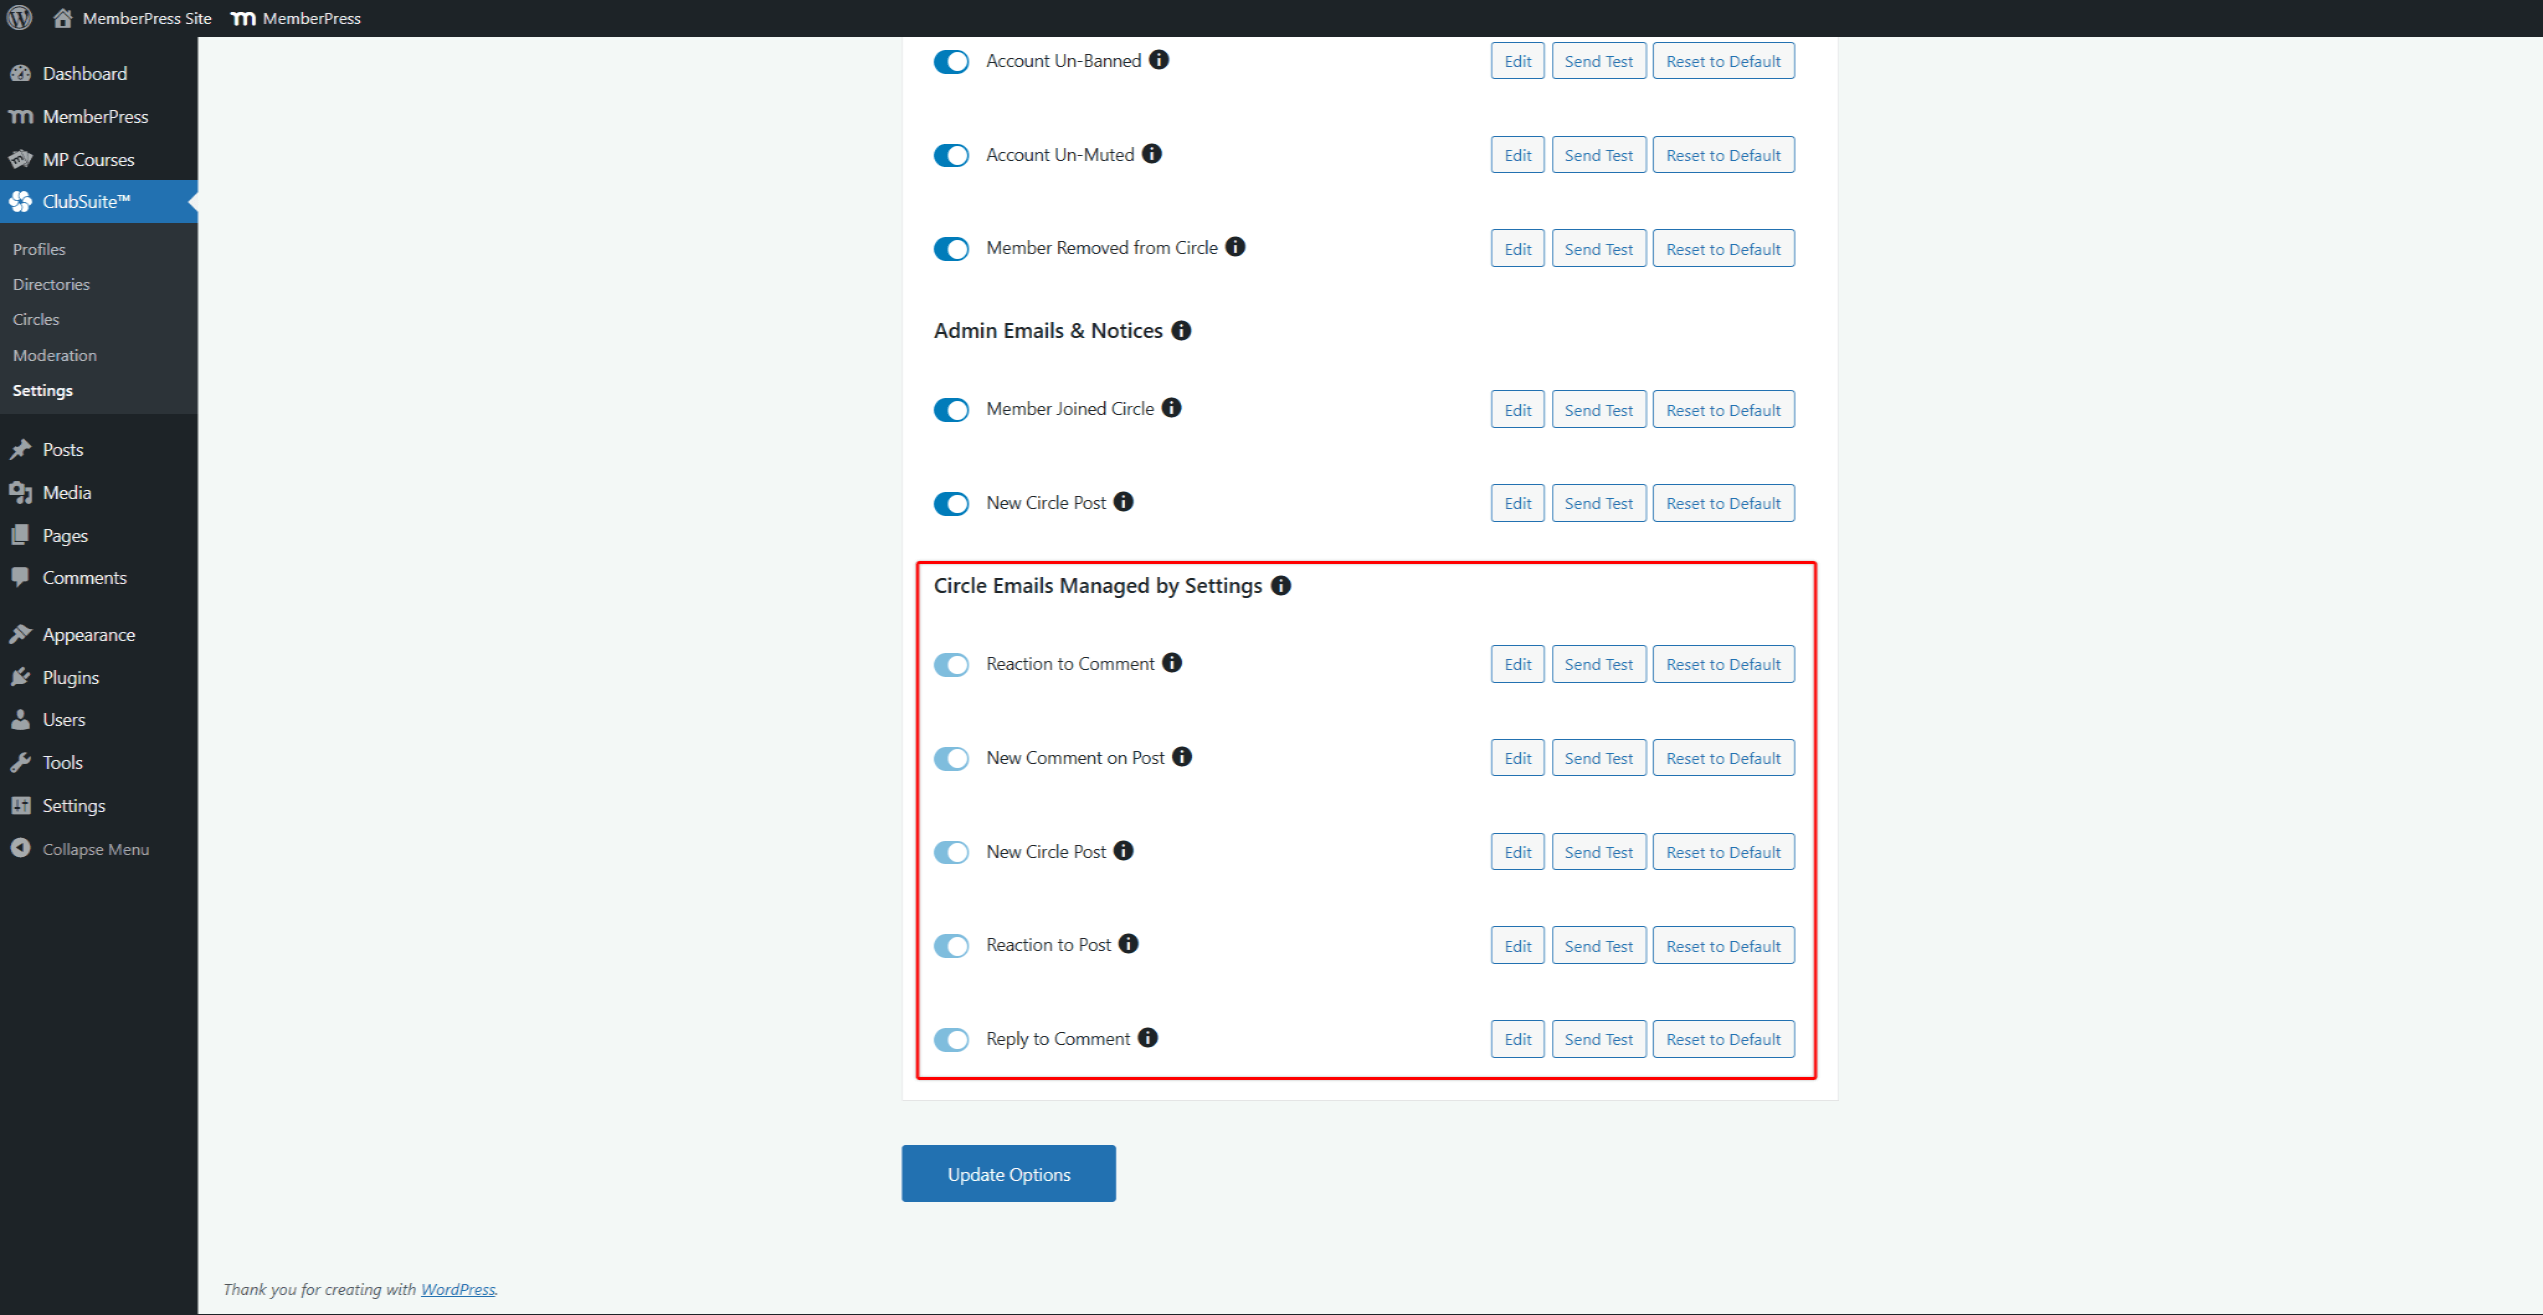
Darüber hinaus wird im Rahmen der Von Einstellungen verwaltete Kreis-E-Mails gibt es Benachrichtigungen, die sich auf die Aktivitäten der einzelnen Nutzer in Circles beziehen:
- Reaktion auf den Kommentar: Wird an das Mitglied gesendet, wenn jemand auf seine Kommentare reagiert;
- Neuer Kommentar zum Beitrag: Wird an das Mitglied gesendet, wenn ein neuer Kommentar zu seinem Beitrag veröffentlicht wird;
- Neue Kreispost: wird an das Mitglied gesendet, wenn ein neuer Beitrag erstellt wird;
- Reaktion auf den Beitrag: Wird an das Mitglied gesendet, wenn jemand auf seine Beiträge reagiert;
- Antwort auf Kommentar: Wird an das Mitglied gesendet, wenn jemand auf seinen Kommentar antwortet.

Diese Benachrichtigungen werden von jedem Benutzer individuell verwaltet. Außerdem sind die Einstellungen für jeden Kreis spezifisch. Das bedeutet, dass die Benutzer Benachrichtigungen für jeden Kreis, dem sie beitreten, separat konfigurieren können.
Bewährte Praktiken für die Kreisverwaltung
Wenn das ClubCircles™ Add-on installiert und konfiguriert ist, können Sie beginnen Kreise schaffen auf Ihrer Website. Beginnen Sie mit einer kleinen Anzahl von Zirkeltypen, um die Mitglieder nicht zu überfordern. Erstellen Sie klare Richtlinien (Regeln) über geeignete Kreisthemen und Inhalte.
Legen Sie vor dem Start Richtlinien für die Moderation fest. Dokumentieren Sie, welche Inhalte akzeptabel sind und welche Konsequenzen bei Verstößen drohen. Schulen Sie die Moderatoren konsequent, damit sie faire Standards einhalten.
Überwachen Sie die Zirkelaktivitäten regelmäßig, um Trends und Probleme zu erkennen. Archivieren Sie inaktive Kreise, damit die Gemeinschaften relevant bleiben, und feiern Sie aktive Kreise, um die Teilnahme zu fördern.


