Die MemberPress ClubDirectory™ Add-on erweitert Ihre mitgliederbasierte Website um interaktive Community-Plattformfunktionen. Es fügt Ihrer MemberPress-Website anpassbare Mitgliederprofile und Verzeichnisse hinzu und hilft Ihren Mitgliedern, sich zu verbinden und zu interagieren.
Dieses Dokument behandelt die Grundlagen des ClubDirectory™-Add-ons, einschließlich der Installation und Konfiguration von Profilen und Verzeichnissen.
Was ist ClubDirectory™?
MemberPress ClubSuite™. ist ein Mitglied Vernetzung und Community-Paket die den ClubDirectory™ und ClubCircles™. Add-ons.
Die ClubDirectory™. Add-on fügt hinzu Profile und Verzeichnisse Funktionen, die Ihre MemberPress-Website um soziale Netzwerkfunktionen erweitern.
Profile der Mitglieder sind individuelle Mitgliederseiten, auf denen persönliche Informationen, Fotos und individuelle Details angezeigt werden. Die Mitglieder können ihre Profile bearbeiten und sich dem Rest der Gemeinschaft präsentieren.
Mitgliederverzeichnisse dienen als durchsuchbare Kataloge von Gemeinschaften, die nach bestimmten Kriterien organisiert sind. Sie sammeln und zeigen automatisch Mitgliederprofile an, die auf den von Ihnen definierten Kriterien basieren, wie z.B. Mitgliedsstatus oder Benutzerrolle. Verzeichnisse werden automatisch aktualisiert, wenn Mitglieder beitreten oder austreten, so dass die Listen stets aktuell sind.
Installation des ClubDirectory™ Add-on
Die ClubDirectory™. Add-on erfordert eine aktive MemberPress-Einbau zu funktionieren. Außerdem sollten Sie vor der Installation, sicherstellen, dass MemberPress ordnungsgemäß aktiviert ist mit einer gültigen Lizenz.
Folgen Sie diesen Schritten, um das Add-on zu installieren:
- Navigieren Sie zu Dashboard > MemberPress > Add-ons.
- Suche nach dem “ClubVerzeichnis” Begriff mit Hilfe der Suchfunktion auf der Seite, oder durchsuchen Sie die Liste, um das Add-on zu finden.
- Klicken Sie auf die Add-on installieren Taste.
Das System lädt das Add-on automatisch herunter, installiert es und aktiviert es. Sobald dies abgeschlossen ist, sehen Sie ein neues ClubSuite™. Menüpunkt in Ihrem WordPress-Dashboard.
Aktivieren von ReadyLaunch-Vorlagen
Darüber hinaus ist die Installation der ClubDirectory™. fügt Optionen zum Aktivieren oder Deaktivieren hinzu ReadyLaunch™-Vorlagen für Profile und Verzeichnisse. Um diese Vorlagen zu aktivieren, führen Sie die folgenden Schritte aus:
- Navigieren Sie zu Dashboard > MemberPress > Einstellungen > ReadyLaunch™ tab.
- Blättern Sie nach unten zum Abschnitt ReadyLaunch™-Vorlagen und aktivieren Sie Benutzerprofile und Verzeichnisse Optionen.
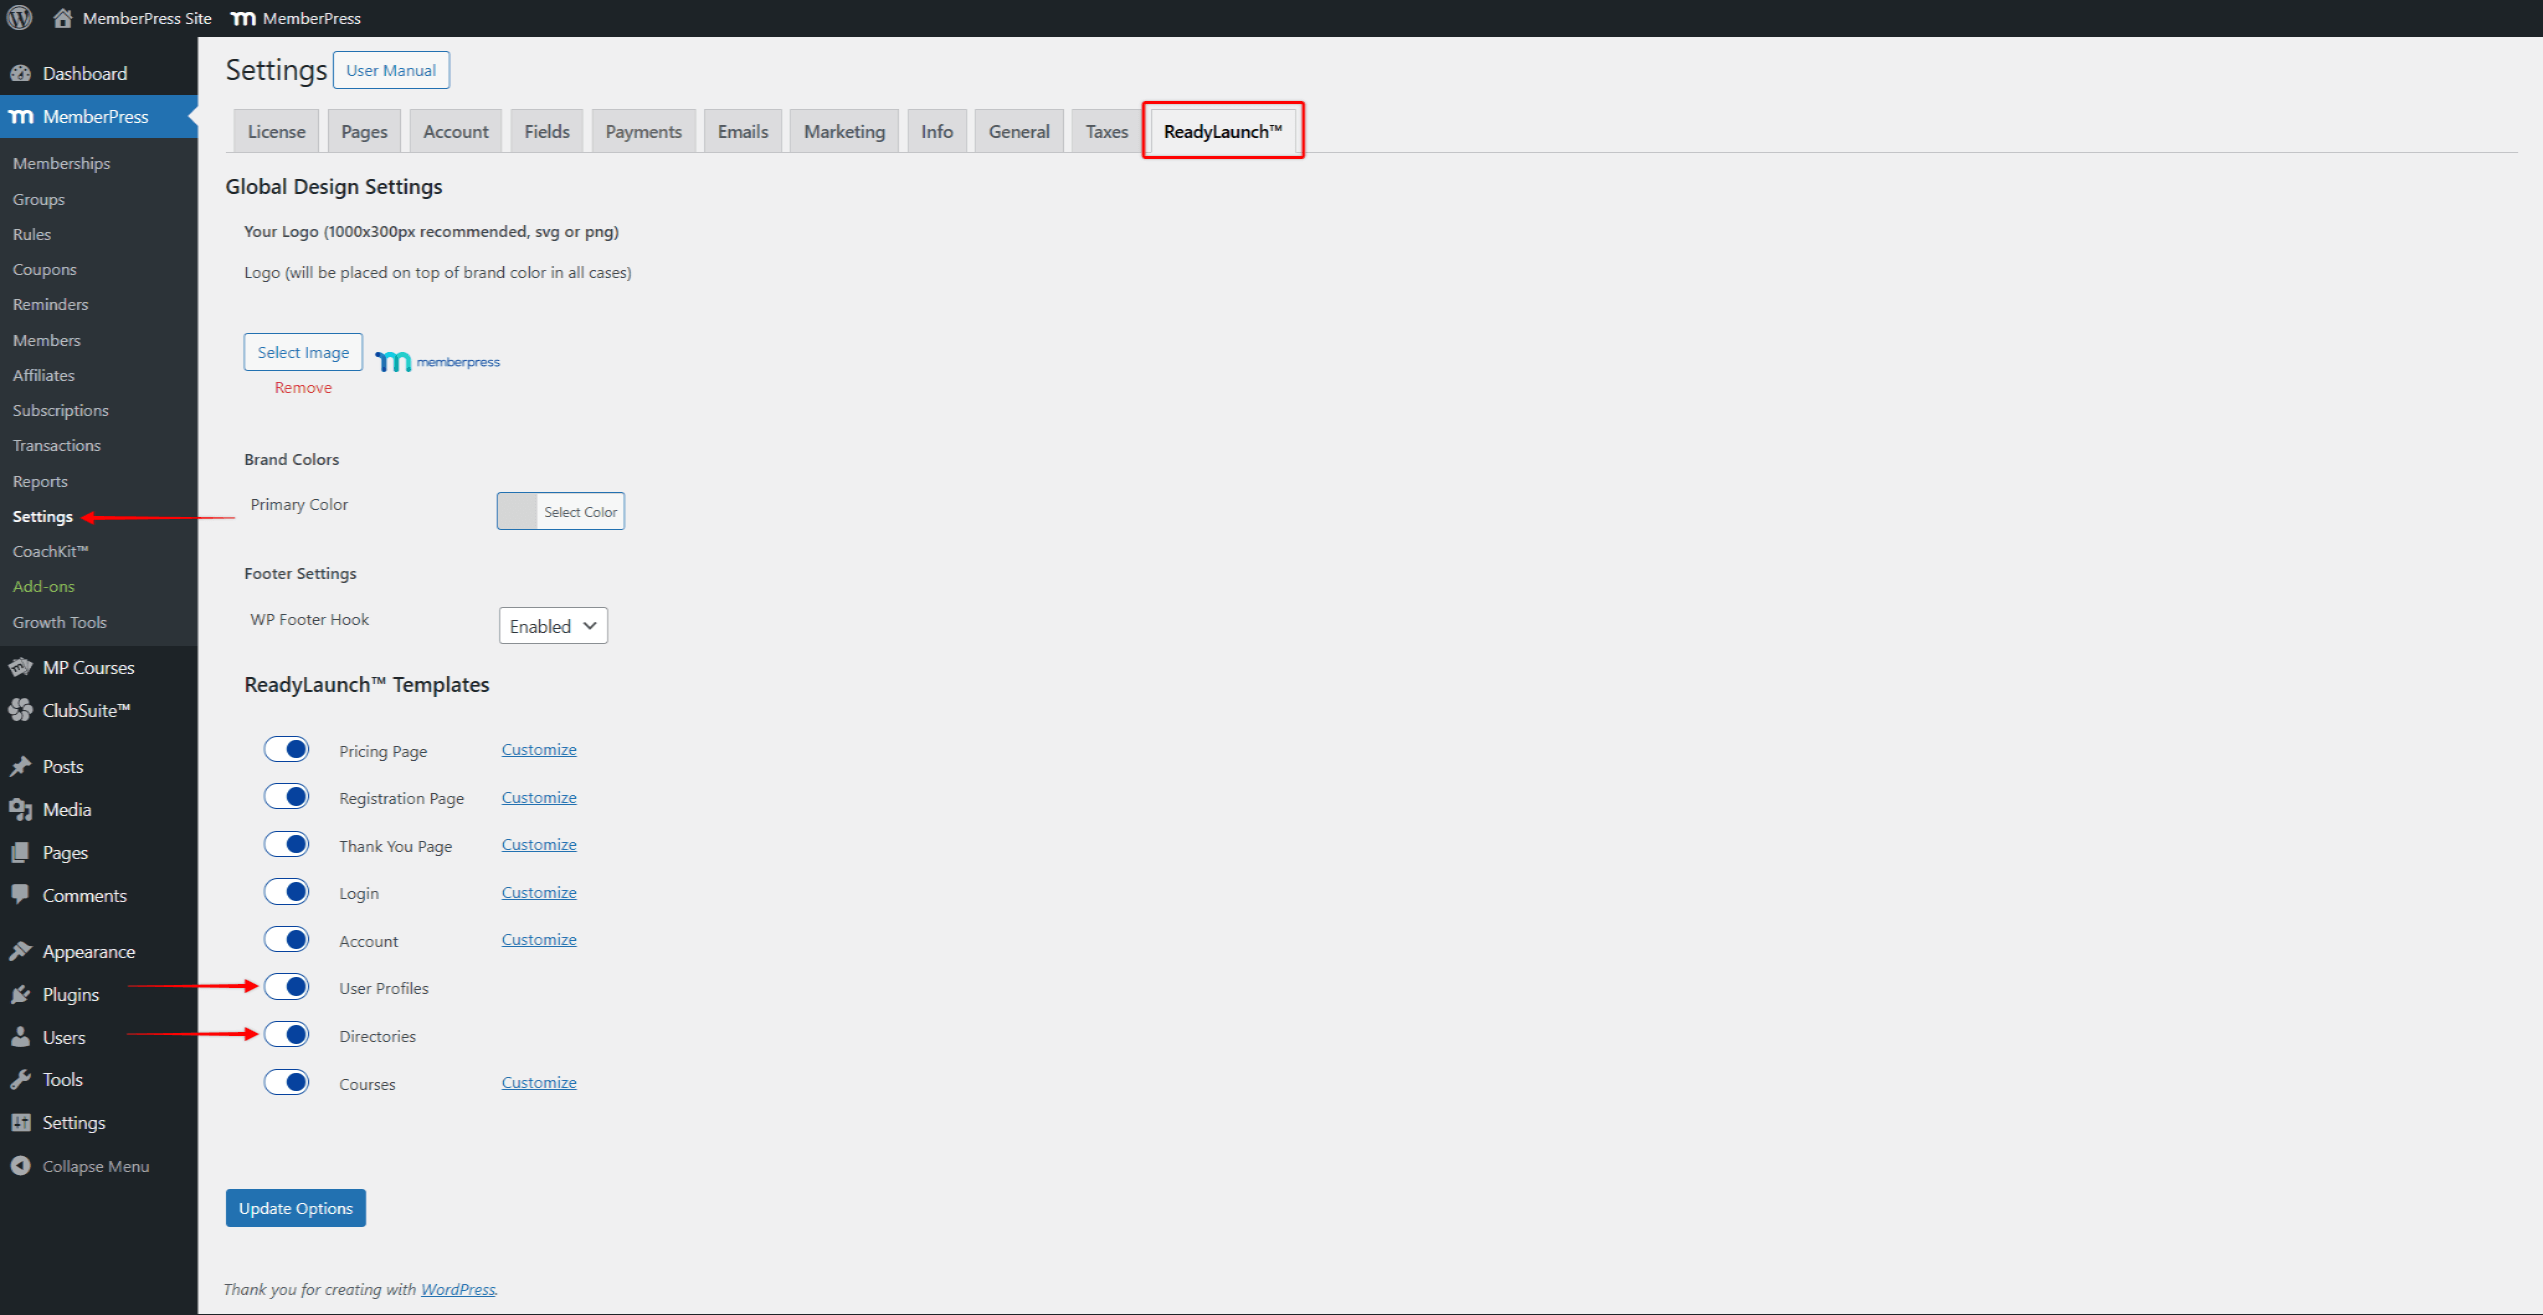
- Klicken Sie auf Optionen aktualisieren um die Änderungen zu speichern.
Wenn Sie diese Vorlagen aktivieren, können Ihre ReadyLaunch™ Globale Einstellungen wird auch auf Profile und Verzeichnisse angewendet.
Das ClubSuite™-Menü verstehen
Die ClubDirectory™. ist Teil der ClubSuite™., zusammen mit ClubCircles™.. Die ClubSuite™. dient als Kommandozentrale für die Verwaltung Ihrer Community-Plattform und Ihrer sozialen Netzwerkfunktionen.
Sobald ClubDirectory™ installiert ist, wird die ClubSuite™-Menü erscheint mit den folgenden Untermenüs:
- Profile können Sie verschiedene Layout-Optionen für Ihre Mitglieder erstellen. Erstellen Sie Basisprofile für Standardmitglieder und erweiterte Profile für Premiummitglieder, jeweils mit entsprechenden Funktionen.
- Verzeichnisse bietet Tools zur Erstellung und Verwaltung von Mitgliederlisten mit individuellen Einstellungen, Suchoptionen und Anzeigekriterien.
- Einstellungen enthalten Konfigurationsoptionen, die sich auf alle Profile und Verzeichnisse Ihrer Website auswirken.
Konfigurieren der ClubDirectory™-Einstellungen
Sobald das Add-on installiert ist, müssen Sie die Einstellungen entsprechend Ihrem Geschäftsmodell konfigurieren. Die Einstellungen sind verfügbar unter Dashboard > ClubSuite™ > Einstellungen.
Sobald Ihre Einstellungen konfiguriert sind, klicken Sie auf Optionen aktualisieren um die Änderungen zu übernehmen.
Allgemeine Einstellungen
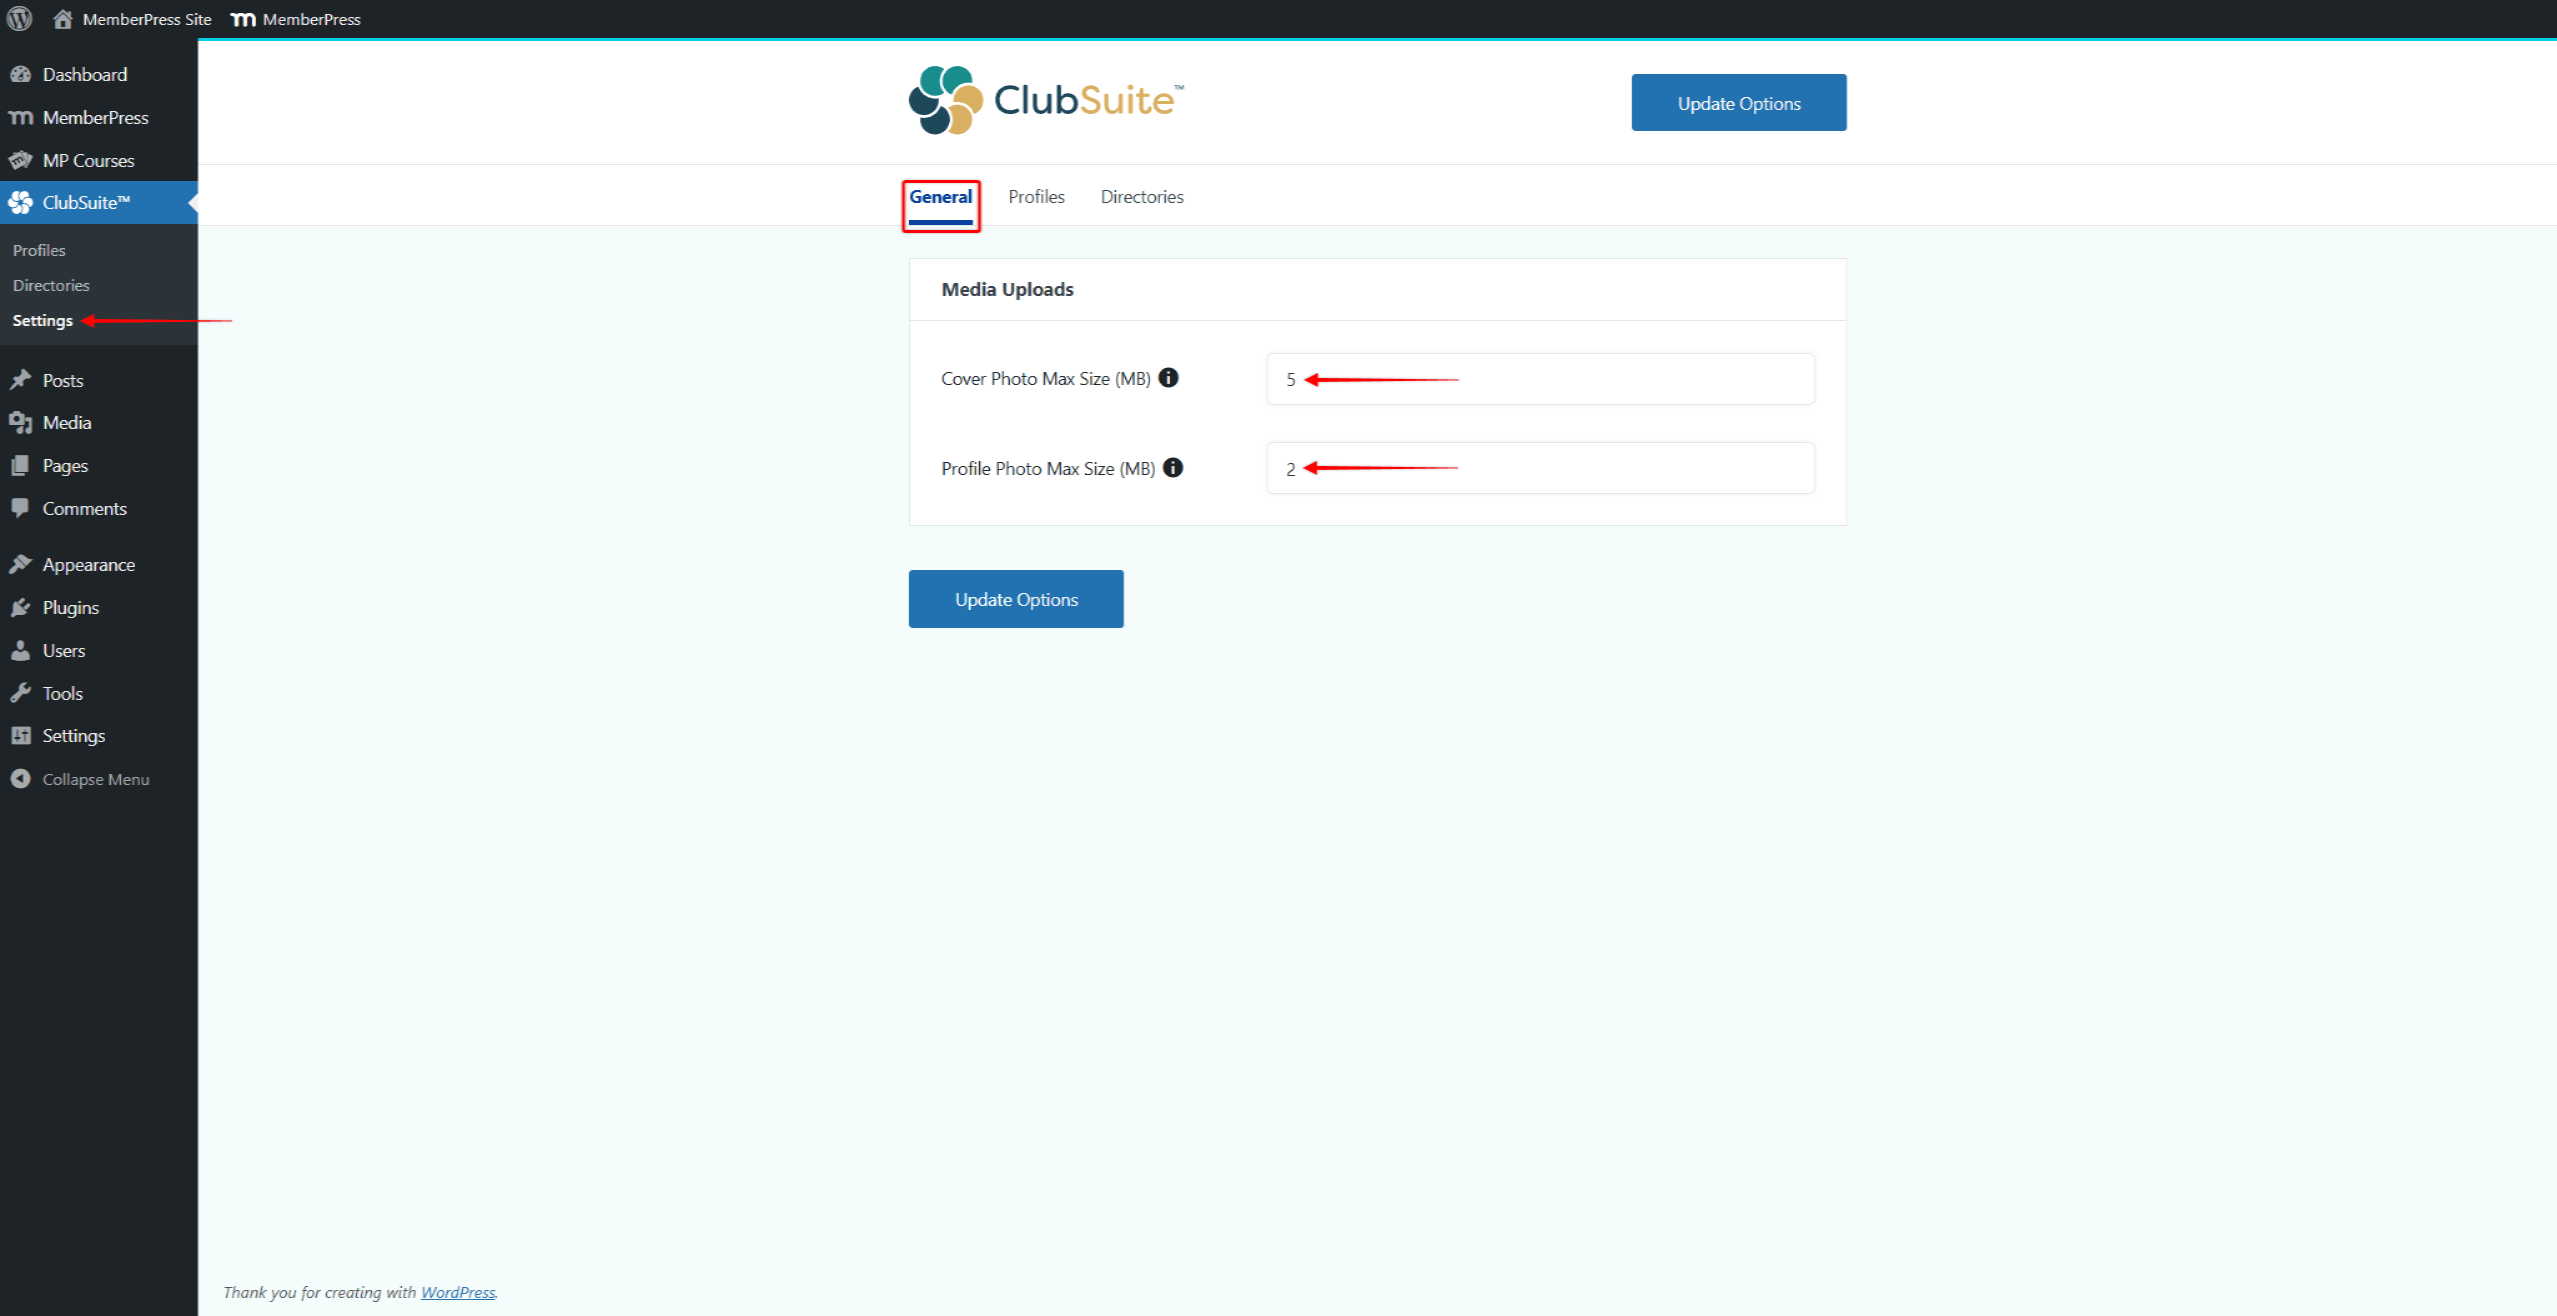
Im Rahmen der Allgemein finden Sie die Registerkarte Medien-Upload Abschnitt. Hier können Sie die Größe der Fotos begrenzen, die Benutzer in ihre Profile hochladen können:
- Navigieren Sie zu Dashboard > ClubSuite™ > Einstellungen > Registerkarte Allgemein.
- Im Rahmen der Medien-Upload konfigurieren Sie die maximal zulässigen Dateigrößen:
- Titelbild Maximale Größe (MB)Größe der Fotos, die für das Titelbanner verwendet werden, begrenzen
- Profilfoto Maximale Größe (MB)Die Größe der Fotos, die für die Profilbilder der Mitglieder verwendet werden, wird begrenzt.
- Klicken Sie auf Optionen aktualisieren.
Profil-Einstellungen
Im Rahmen der Profil finden Sie die globalen profilbezogenen Einstellungen.
- Navigieren Sie zu Dashboard > ClubSuite™ > Einstellungen > Registerkarte Profil.
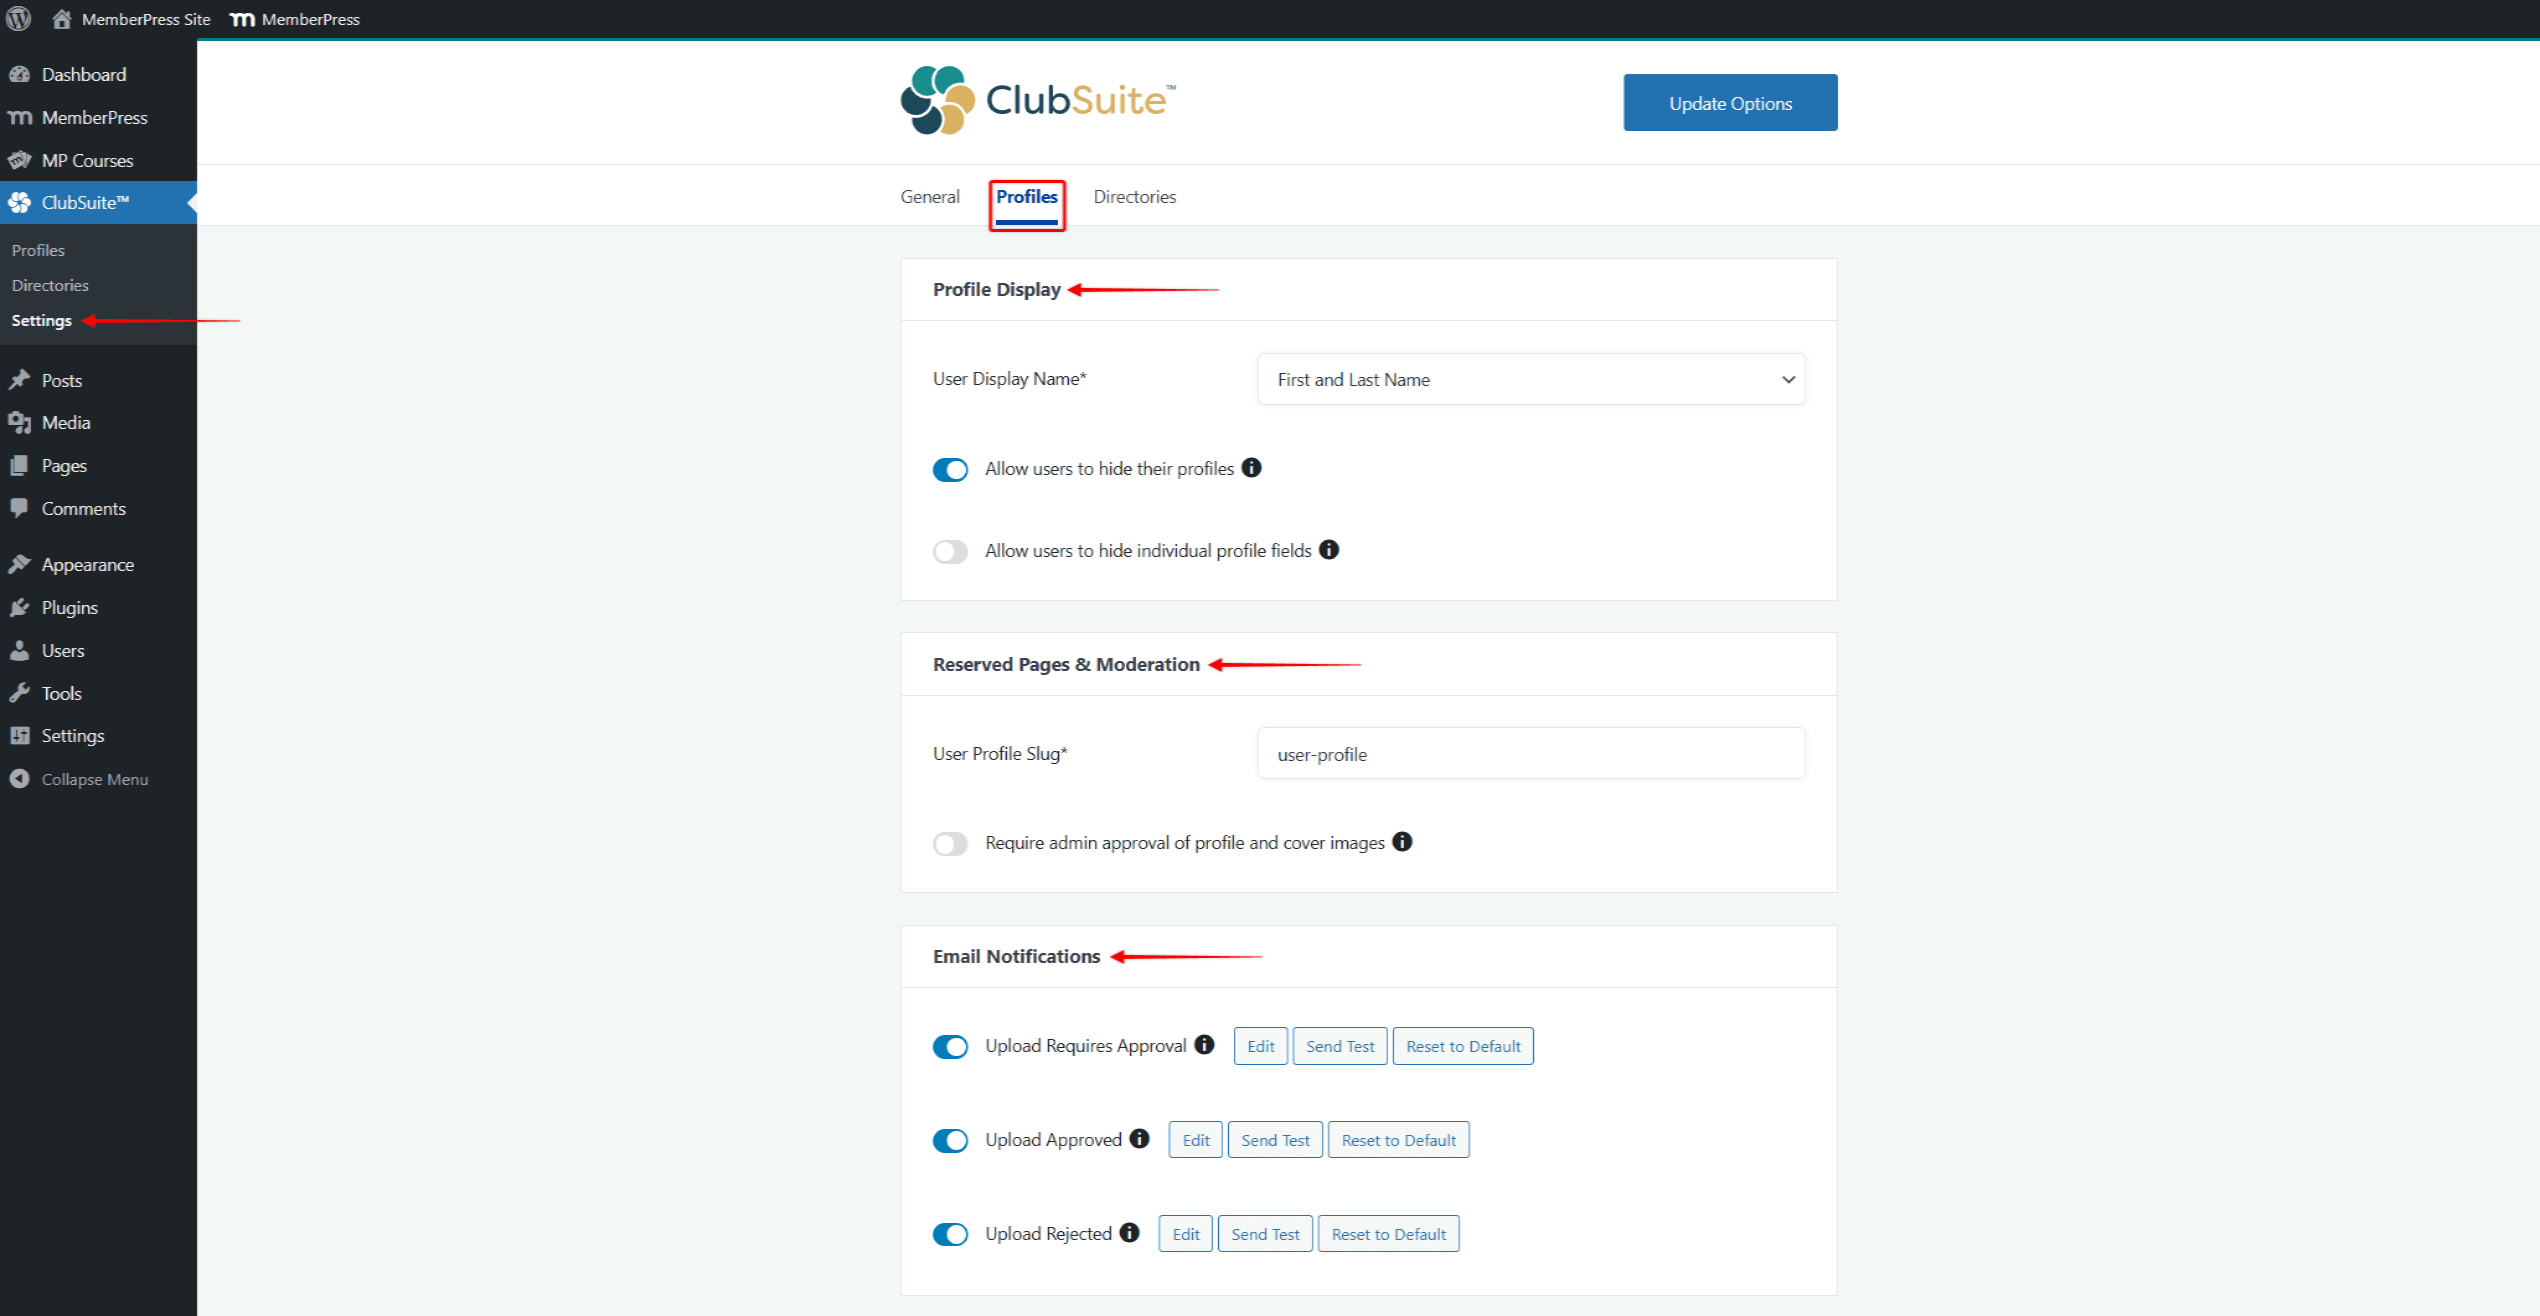
- Die Profil-Anzeige enthält Einstellungen, die sich darauf auswirken, wie die Profile der Nutzer auf Ihrer Website angezeigt werden:
- Name der BenutzeranzeigeFormat für die Anzeige des Benutzernamens wählen;
- Nutzer können ihre Profile verbergen: Wenn Sie diese Option aktivieren, können Sie Ihr Profil verbergen.
- Benutzer können einzelne Profilfelder ausblenden: Wenn Sie diese Option aktivieren, können Sie selbst bestimmen, welche Felder in Ihrem Profil angezeigt werden.
- Weiter, unter Reservierte Seiten & Moderationkönnen Sie:
- Ändern Sie die Benutzerprofil Slug verwendet, um Profil-URLs zu erzeugen;
- Aktivieren Sie die Moderation, indem Sie das Kontrollkästchen Genehmigung von Profil- und Titelbildern durch den Administrator erforderlich Option.
- Außerdem haben Profile ihre eigenen E-Mail-Benachrichtigung. So können Sie Vorlagen für die folgenden profilspezifischen E-Mails deaktivieren oder aktivieren sowie bearbeiten:
- Upload bedarf der Genehmigung - Diese E-Mail wird an den Administrator gesendet, wenn ein Benutzer ein Bild hochlädt, das die Zustimmung des Administrators erfordert;
- Upload Genehmigt - Diese E-Mail wird an einen Benutzer gesendet, wenn ein Administrator sein hochgeladenes Bild genehmigt;
- Upload Abgelehnt - diese E-Mail wird an einen Benutzer gesendet, wenn ein Administrator sein hochgeladenes Bild ablehnt.
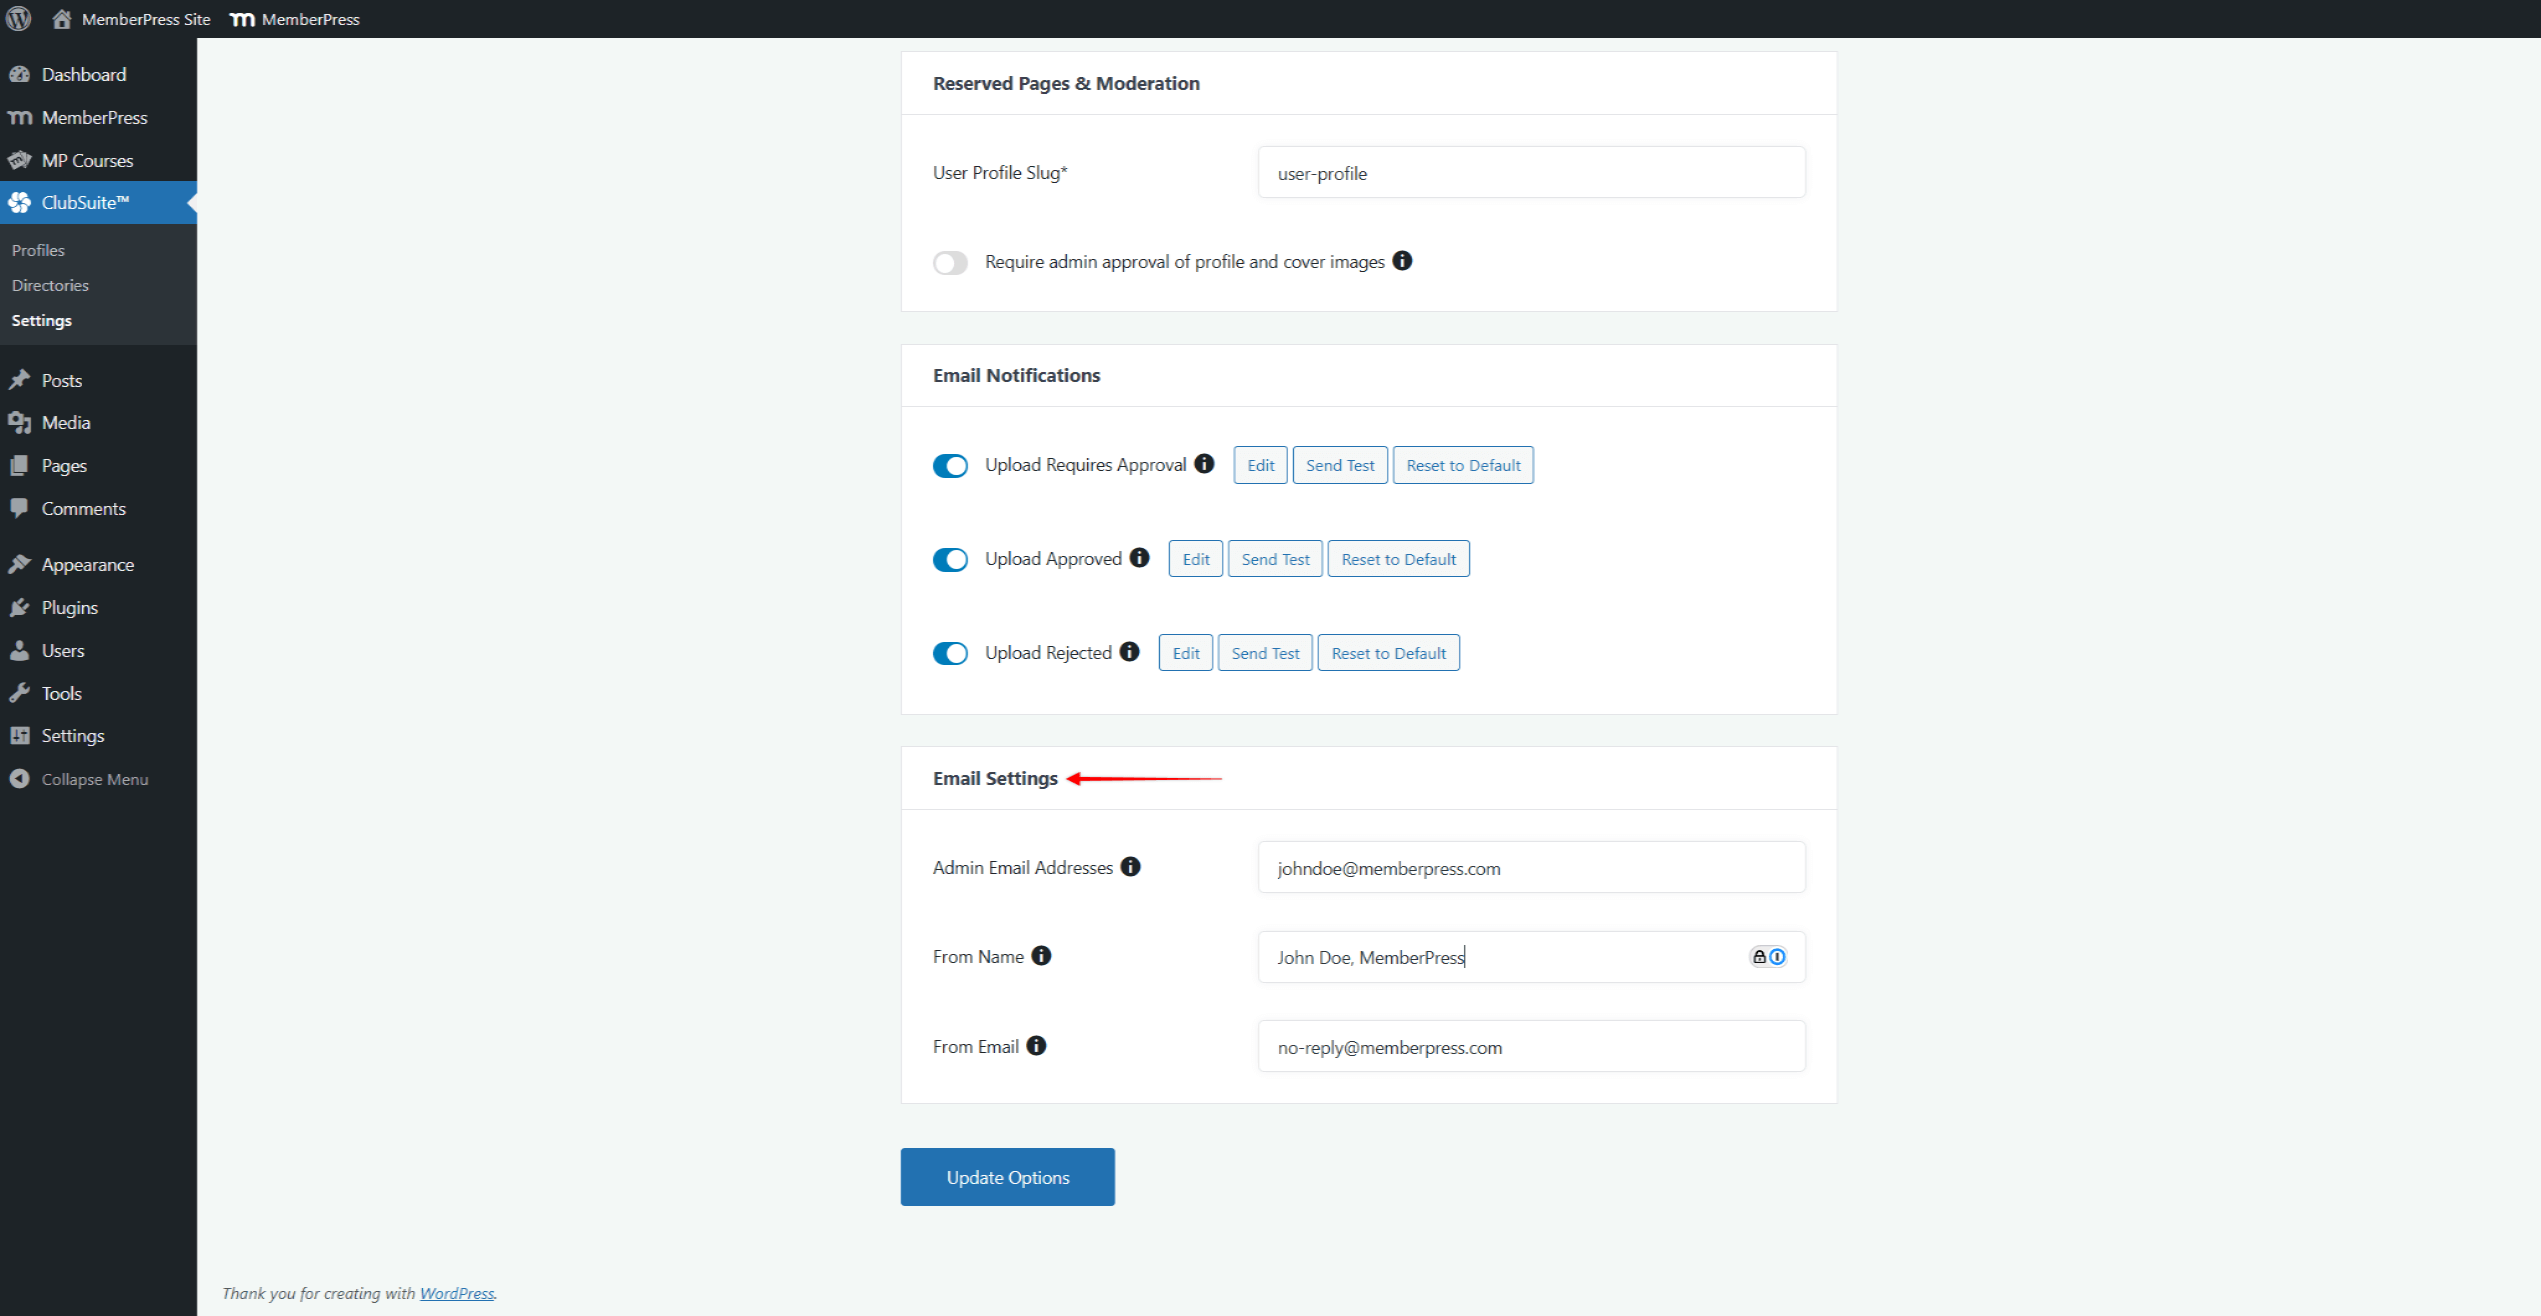
- Schließlich, unter E-Mail-Einstellungen, können Sie die Daten festlegen, die für profilspezifische E-Mails verwendet werden:
- E-Mail-Adressen der Verwaltung - Liste der E-Mail-Adressen, die Verwaltungsbenachrichtigungen erhalten sollen. Wenn mehrere Adressen hinzugefügt werden, sollten sie durch Kommas getrennt werden;
- Von Name - den Namen eines Absenders;
- Von E-Mail - eine als Absender verwendete E-Mail-Adresse.
Verzeichnis-Einstellungen
Ähnlich wie bei den Profilen finden Sie die globalen verzeichnisbezogenen Einstellungen unter dem Menüpunkt Verzeichnisse tab.
- Navigieren Sie zu Dashboard > ClubSuite™ > Einstellungen > Registerkarte „Verzeichnisse“.
- Unter den Einstellungen für die Verzeichnisanzeige können Sie den Standard-Slug für die Verzeichnis-URLs ändern. In der Rubrik Verzeichnis Base Slug können Sie den Standard-Slug (Verzeichnisse) mit einem beliebigen benutzerdefinierten Geschoss.
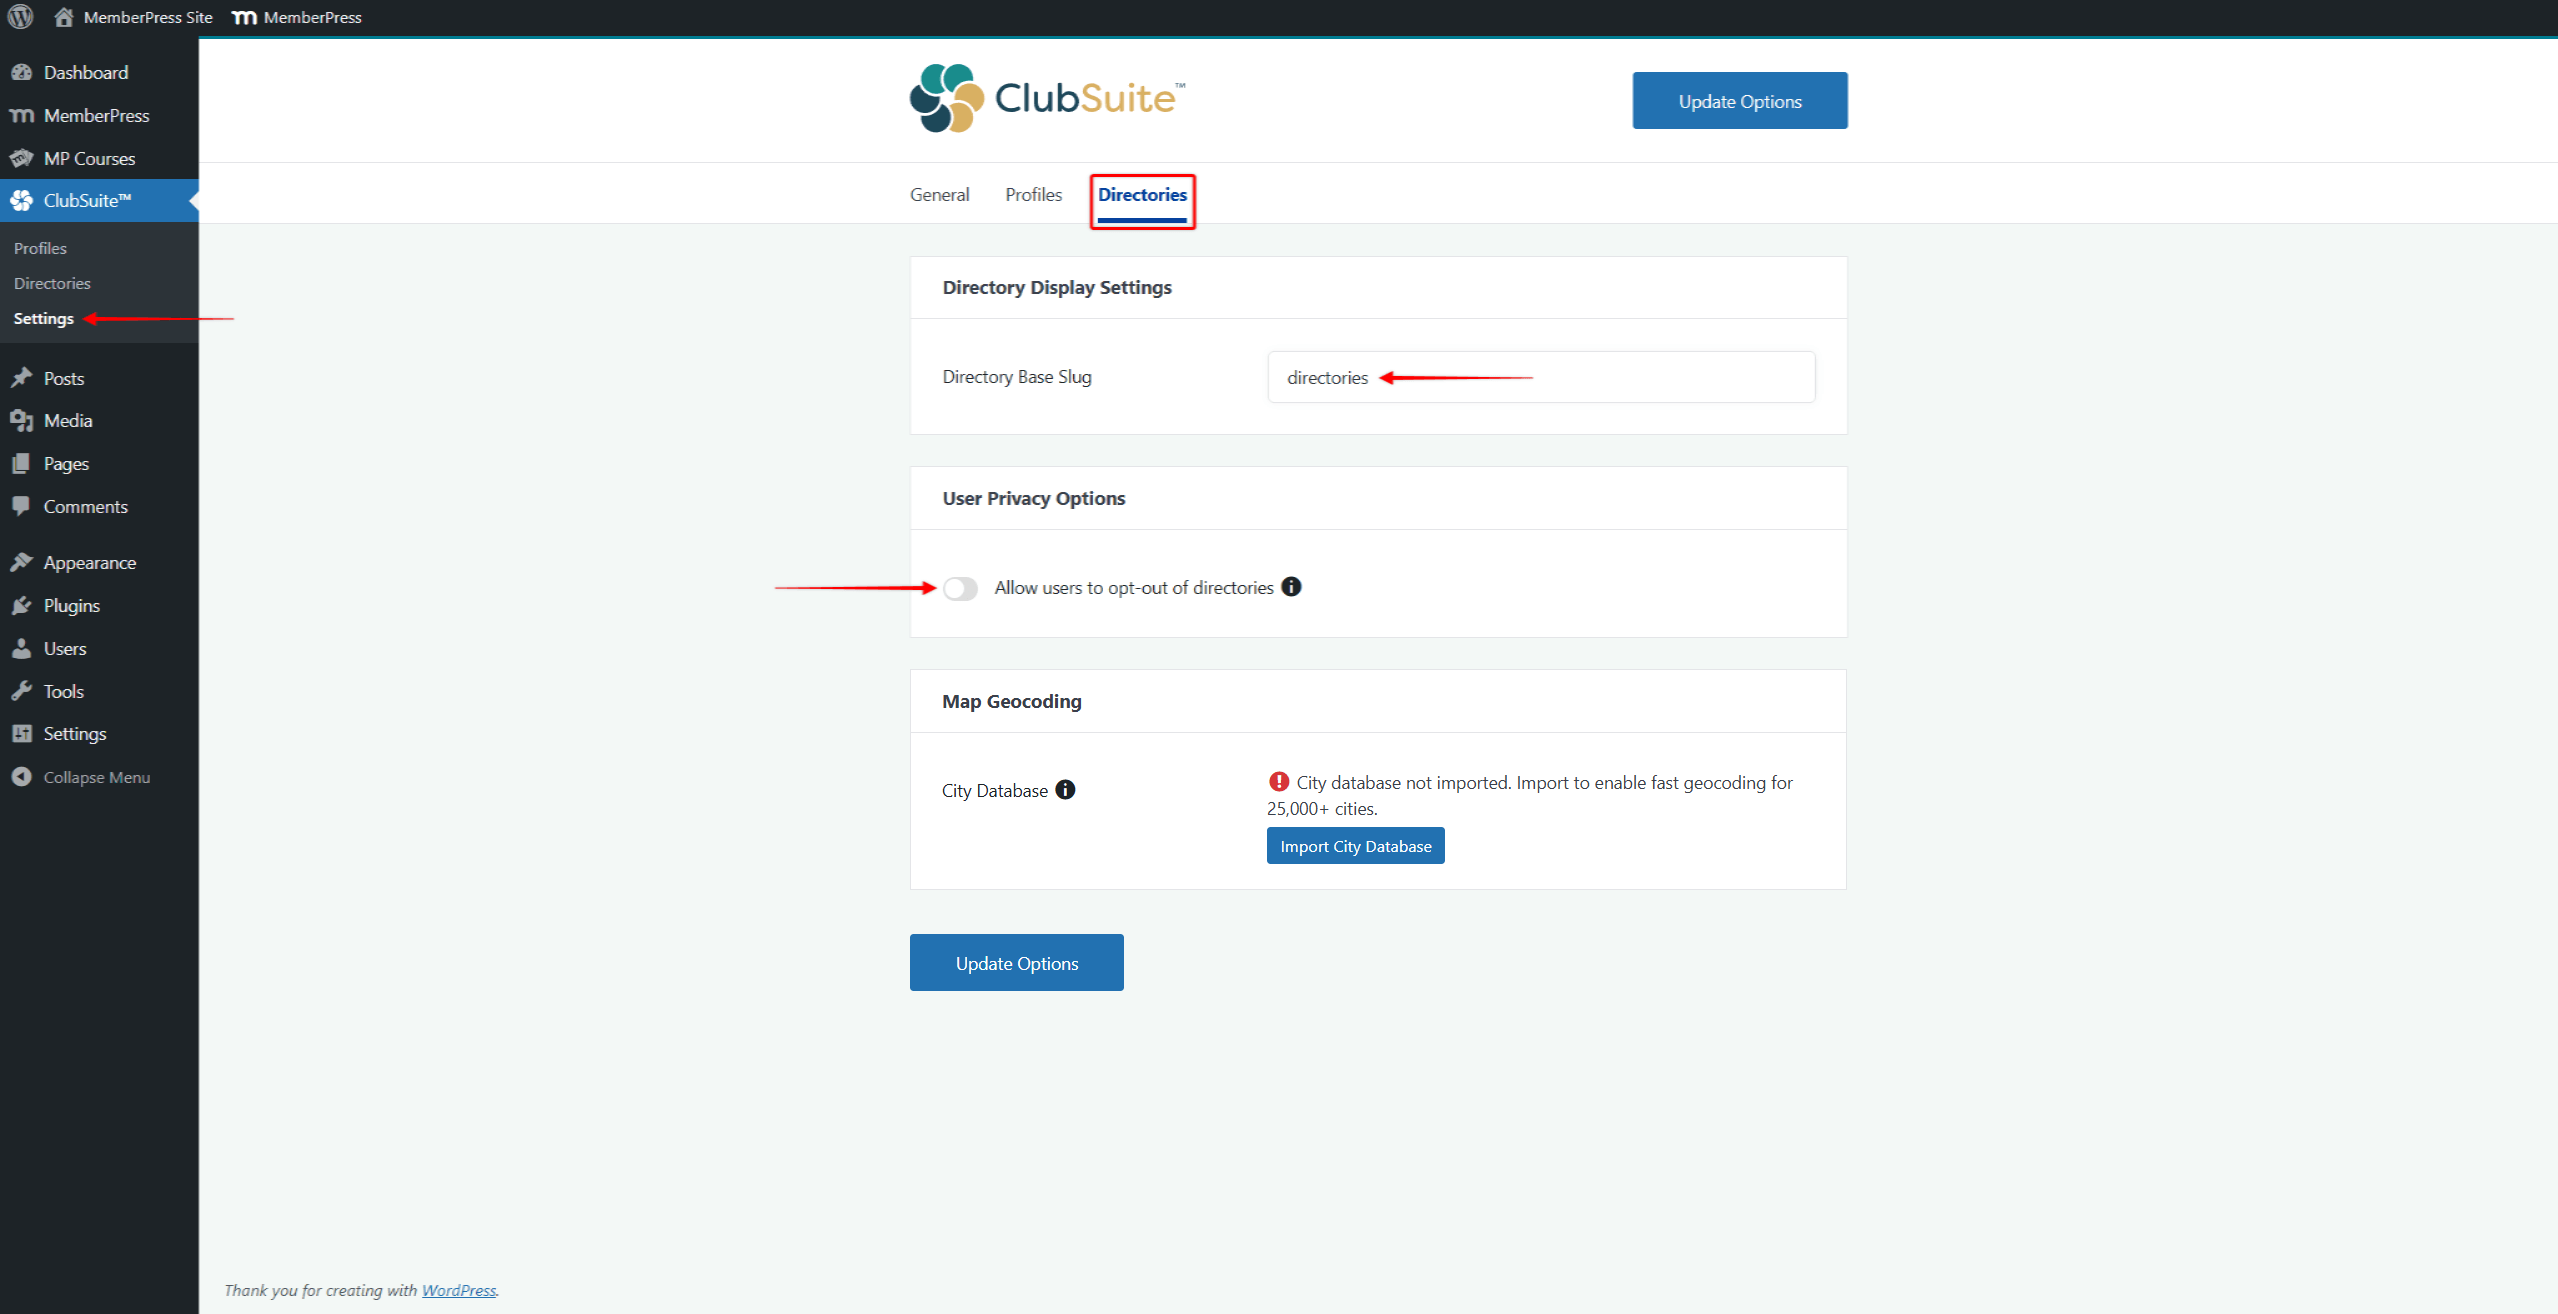
- Darüber hinaus gilt unter Datenschutzoptionen für Benutzer, können Sie die Option Benutzer können Verzeichnisse abwählen Option. Wenn eine Verzeichnis ist so eingestellt, dass kein Opt-in erforderlich ist, sind die Benutzer automatisch zu Verzeichnissen hinzugefügt, wenn sie sich registrieren für Mitgliedschaften. Wenn Sie diese Option aktivieren, können Sie sich von bestimmten Verzeichnissen ausschließen.
- Darüber hinaus können Sie Importieren Sie die globale Städtedatenbank. unter „Map Geocoding“. Die Stadtdatenbank wird für die Verzeichnis-Kartenansicht Funktion.
Karten-Geokodierung
MemberPress-Verzeichnisse umfassen die Kartenansicht Funktion, mit der Benutzer die Standorte anderer Mitglieder auf der Karte sehen können. Wenn Sie das ClubDirectory™-Plugin zum ersten Mal installieren, ist es wichtig, die globale Städte-Liste zu importieren:
- Navigieren Sie zum Verzeichnisse Registerkarte unter dem ClubSuite™-Einstellungen (Dashboard > ClubSuite™ > Einstellungen).
- Blättern Sie nach unten zum Karten-Geokodierung Abschnitt.
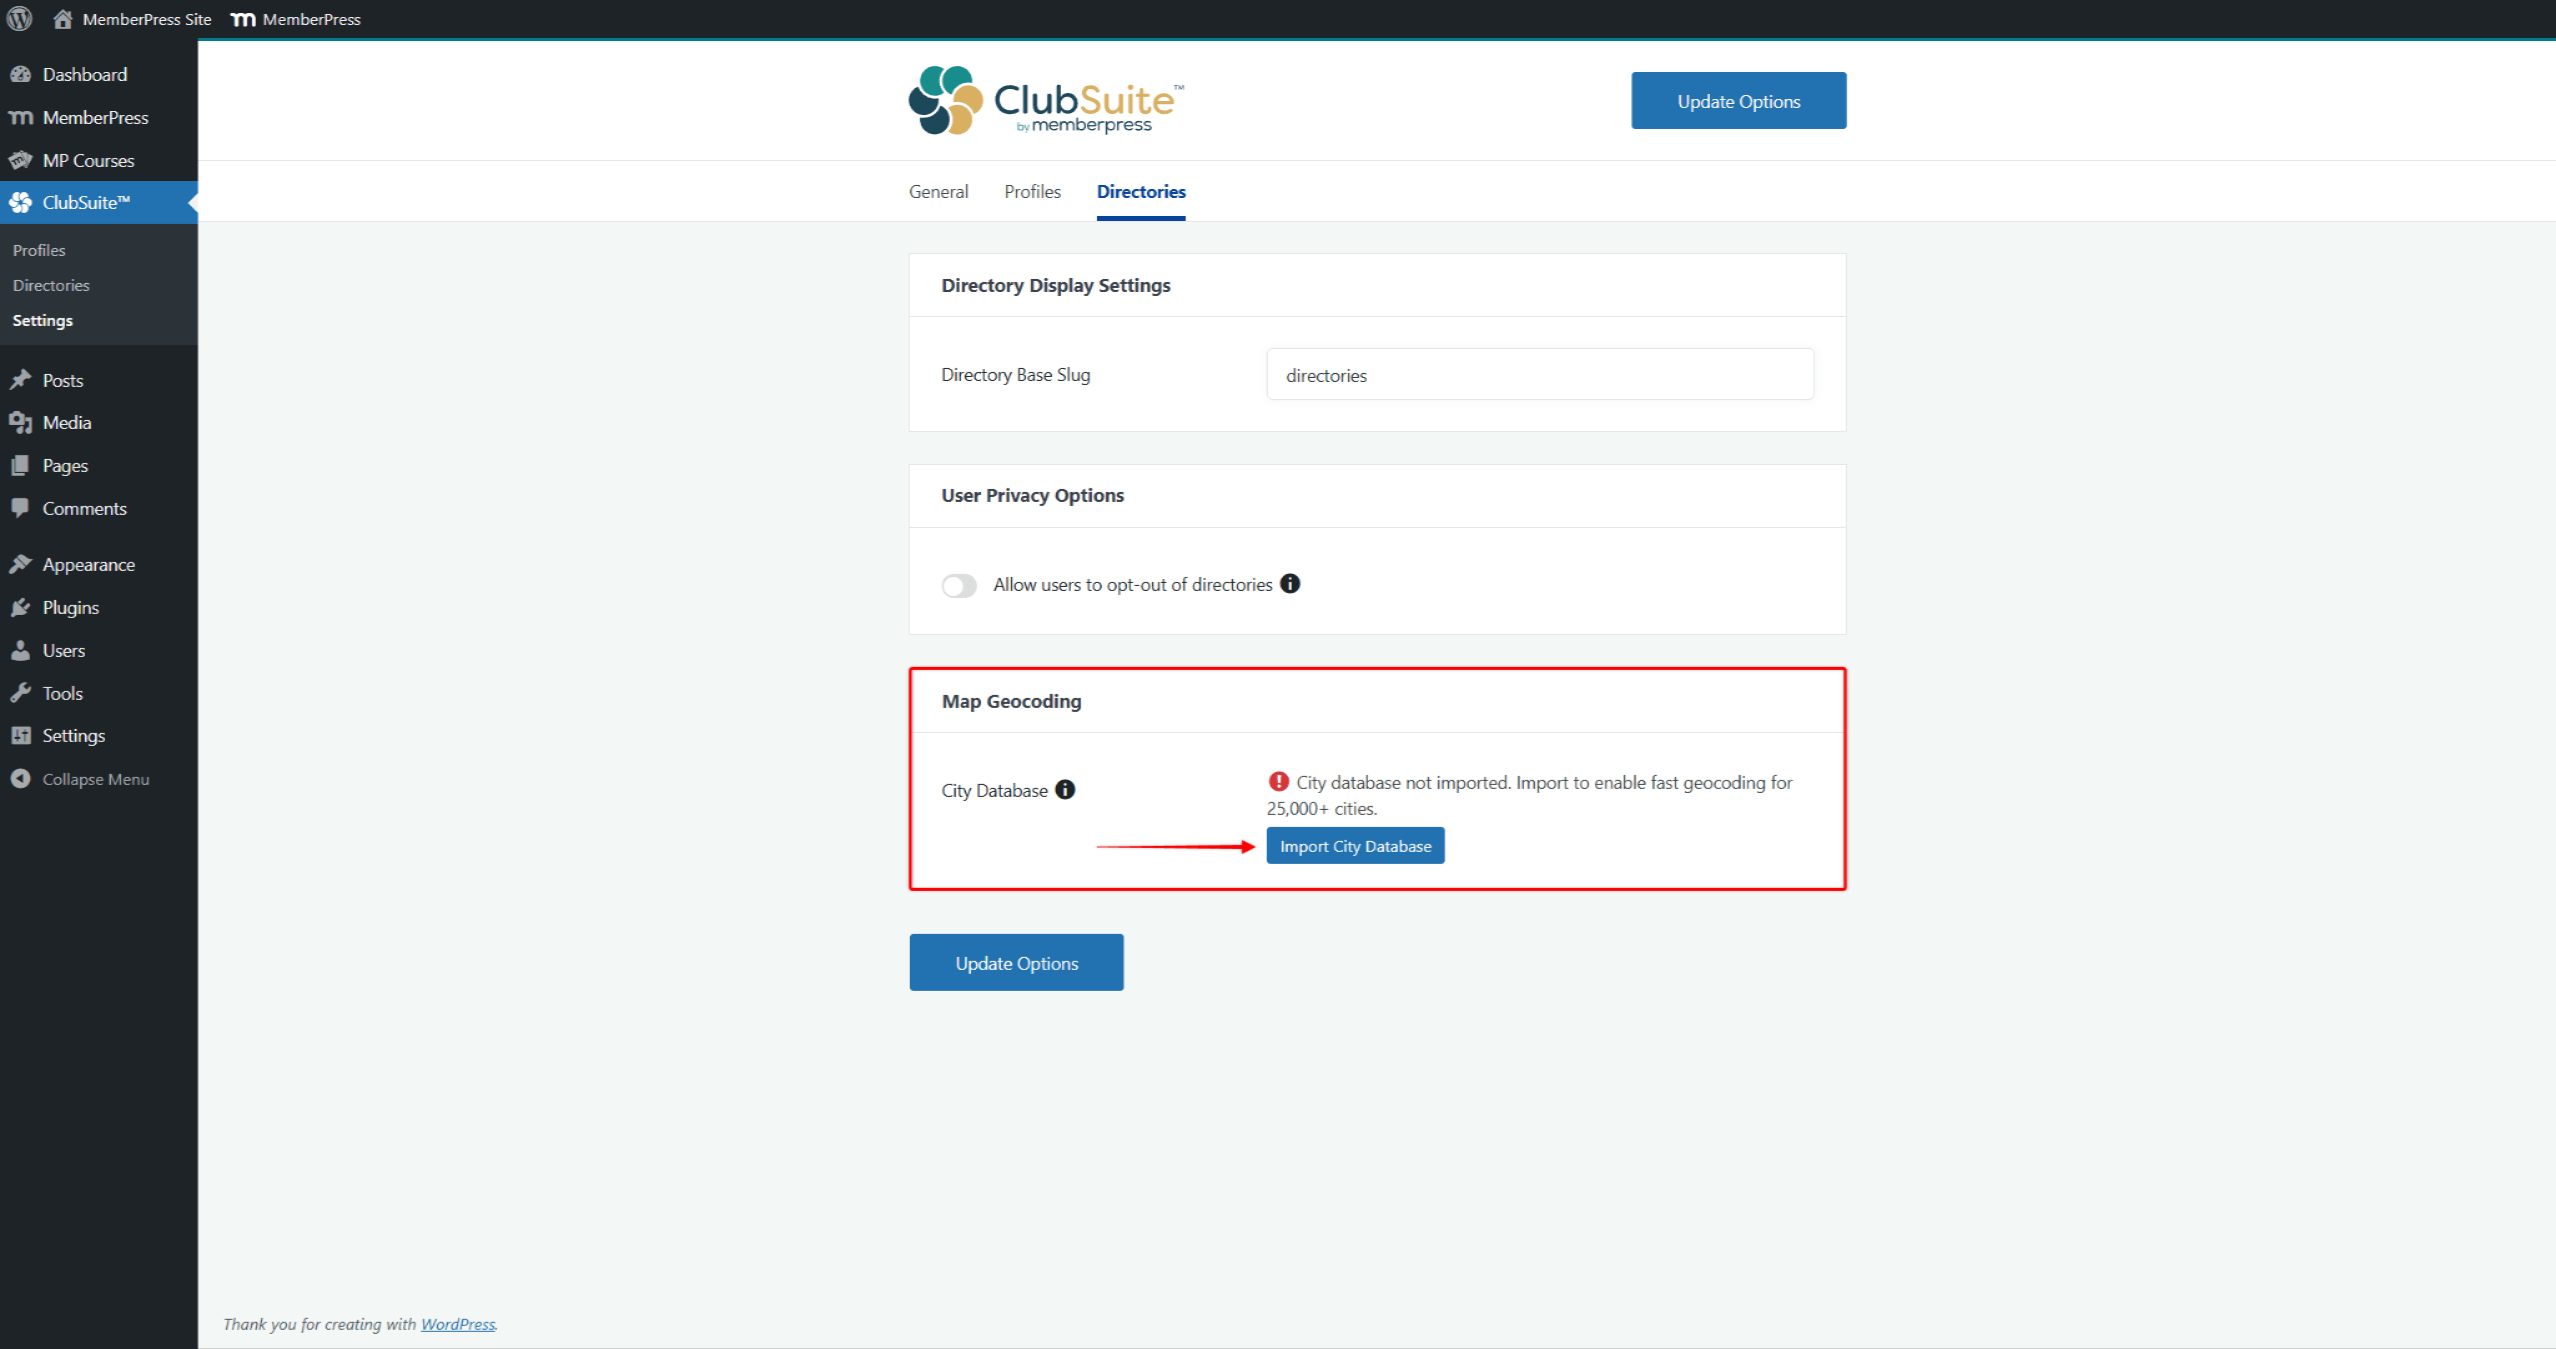
- Klicken Sie auf die Import-Stadtdatenbank Schaltfläche und bestätigen Sie anschließend die Popup-Benachrichtigung.
- Bei Erfolg wird eine Benachrichtigung mit der Anzahl der importierten Städte angezeigt.
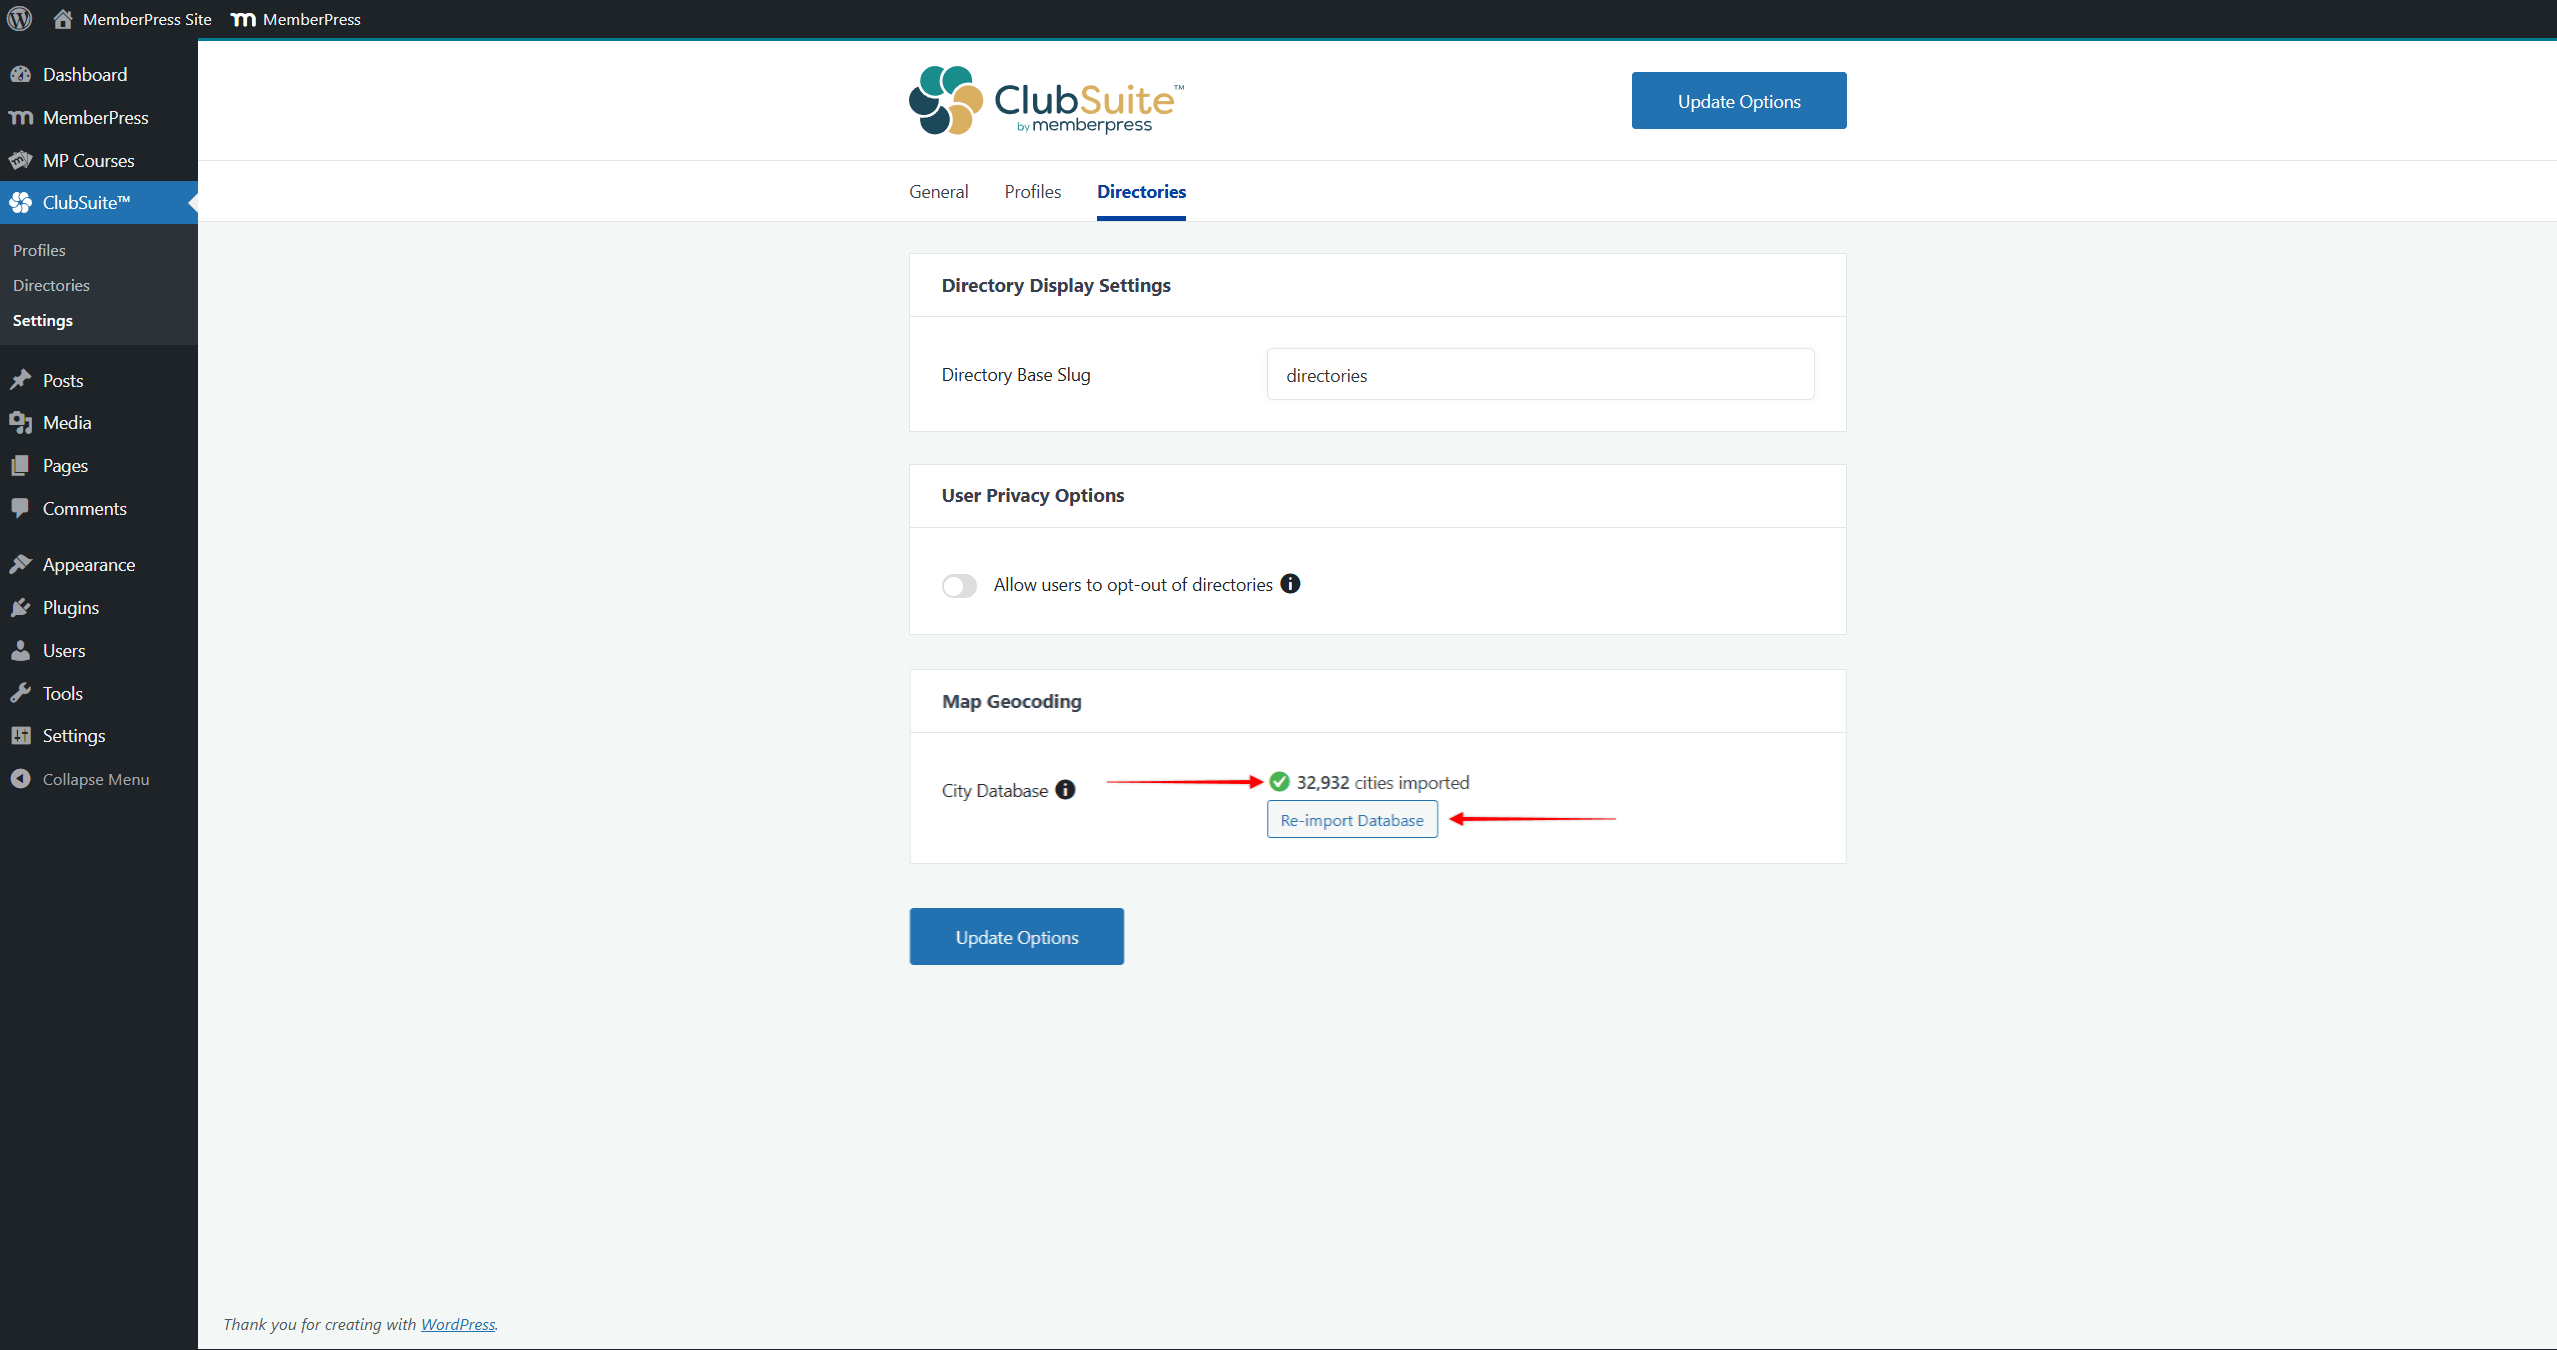
- Darüber hinaus können Sie die Stadtdatenbank jederzeit aktualisieren, indem Sie auf die Schaltfläche Datenbank erneut importieren Taste.
Durch den Import der Stadtdatenbank wird die Leistung der Kartenansicht in Ihren Verzeichnissen erheblich verbessert.
Was kommt als Nächstes?
Mit diesen Grundlagen sind Sie bereit, ansprechende Profiltypen zu entwerfen und Verzeichnisse zu erstellen, die Ihre Mitgliedergemeinschaft präsentieren.
Beginnen Sie mit einer einfachen Einrichtung durch ein Profil erstellen und ordnen sie einer Mitgliedschaft zu. Nächste, ein Verzeichnis erstellen für Mitglieder, die sich für diese Mitgliedschaft angemeldet haben. Testen Sie gründlich, indem Sie Testkonten erstellen und den gesamten Profilprozess abschließen.
Führen Sie außerdem eine konsequente Moderation bei der Freigabe von Nutzerbewertungen ein. Bieten Sie klare Anleitungen zum Ausfüllen von Profilen durch Willkommens-E-Mails oder Dokumentation. Überwachen Sie die Leistung bei wachsender Mitgliedschaft und Einstellungen nach Bedarf anpassen.


