Dê aos membros recém-registrados a melhor primeira impressão e mantenha-os regularmente envolvidos com o seu site. Aqui está o nosso protocolo de integração MemberPress.
Em minha postagem anterior sobre estratégias de retenção de membrosEm meu artigo sobre o registro de usuários, falei sobre a importância de criar um fluxo de integração intencional. O modo como você gerencia os registros de novos usuários pode ser decisivo para o seu negócio de assinaturas.
As primeiras impressões são tudo, e não fazer o suficiente para receber e gerenciar novos usuários pode resultar em uma taxa de rotatividade mais alta. Os membros saem confusos ou simplesmente não sabem como aproveitar ao máximo o seu site.
Manter novos membros é um uso mais barato e mais eficiente de seu tempo do que gastar $$$ tentando substituir membros que você adquiriu anteriormente e negligenciou.
O MemberPress está repleto de maneiras de criar uma experiência de integração tranquila para seus membros, e vou abordar todas elas aqui.
Alguns são bastante simples, mas aposto que há pelo menos um método aqui que você ainda não considerou ou talvez nem soubesse.
Depois de ler isso, você estará preparado para otimizar seu site para receber novos membros e aumentar a duração de suas assinaturas.
Vamos lá!
1. Habilitar e estilizar registros de novos usuários
A primeira parte da jornada do associado é se tornar um associado em primeiro lugar! Certifique-se de ter tudo pronto para tornar o processo de registro fácil, intuitivo e atraente.
Configurar páginas de agradecimento, conta e login
Quando você instalar e ativar o MemberPress em seu site, ele cria automaticamente as principais páginas, incluindo sua Obrigado, Contae Login completas com os códigos de acesso necessários para que funcionem imediatamente.
Você pode personalizá-los ou substituí-los, se desejar. Basta ir para MemberPress > Configurações no painel do WordPress e clique no botão Páginas.
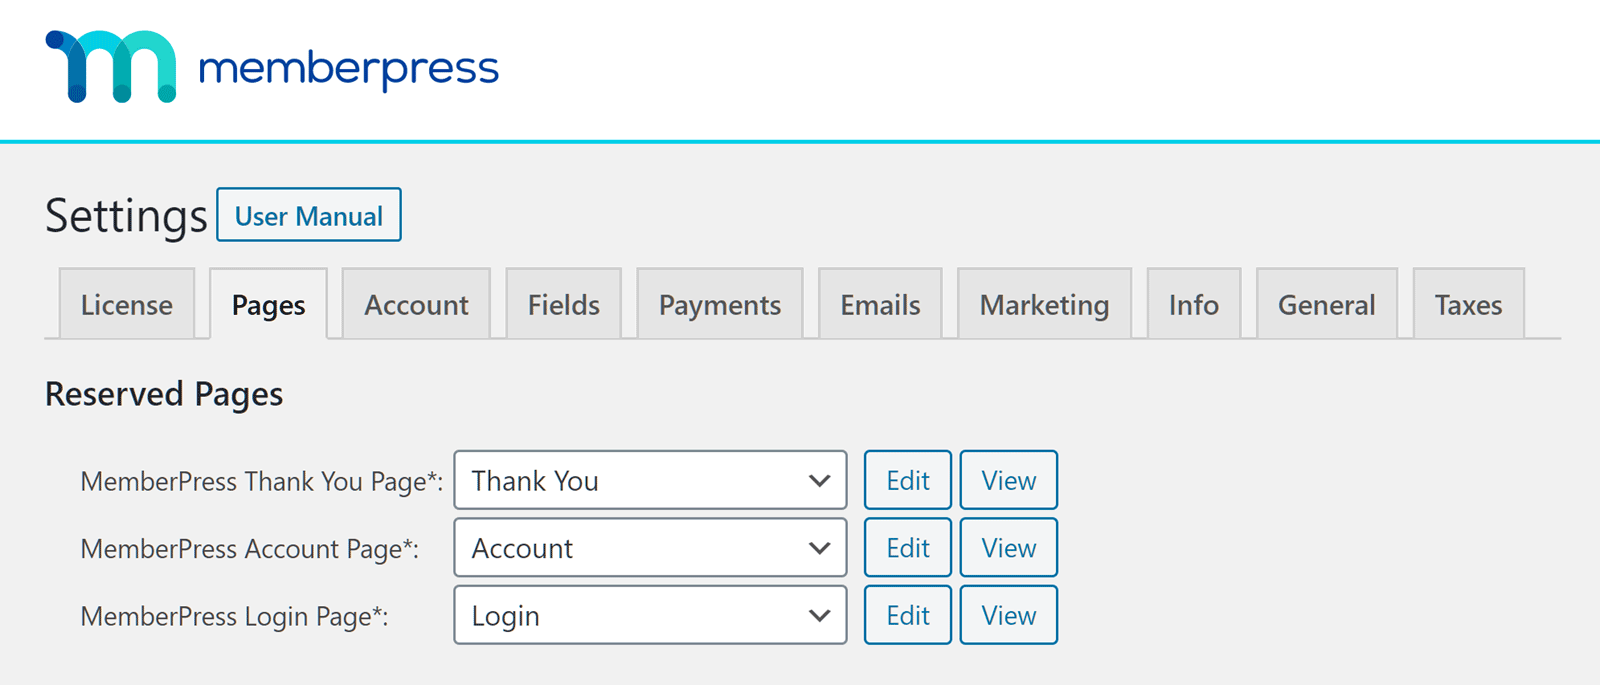
Se você quiser alterar qualquer uma das páginas de páginas existentes em seu site, clique no botão seta para baixo ao lado da página que deseja alterar e selecione a página pela qual deseja substituí-la.
Você deverá adicionar os seguintes códigos de acesso às suas novas páginas para que elas exibam as informações corretas do MemberPress:
- Página da conta contém o
mepr-accountque exibe guias para assinaturas, transações, edição de perfil e muito mais. - Página de agradecimento contém o
mepr-thank-youque mostra detalhes de confirmação de compra e pode ser personalizado para adicionar mensagens ou instruções de upsell. - Página de login contém o
mepr-login-formshortcode, which renders the login form for members.
If you want to customize MemberPress’s automatically generated page, click Editar.
I’ll cover more about how and why you might want to customize your Thank You page in section 3.
Use ReadyLaunch™ to Style Mobile-Ready Pages
If you want your pages looking polished without custom design work, you can enable ReadyLaunch™ em suas configurações do MemberPress.
This feature instantly applies a modern, mobile-responsive design to your MemberPress pages (including checkout, account, and login) so they’re styled and ready to go from day one!
Create At Least One Membership to Open Registrations
After that, you can create your first membership to give visitors a way to register as users on your membership site.
Depois de criar pelo menos uma associação, seus visitantes terão uma maneira de se registrar por meio de um formulário on-line e se tornar membros.
Add Registration Forms Anywhere On Your Site
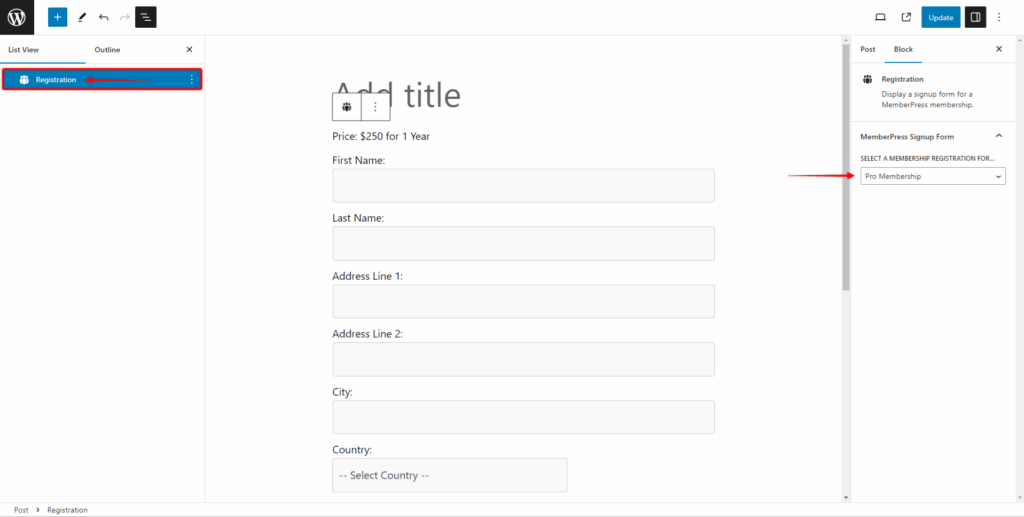
Com Blocos de Gutenberg e MemberPress você pode adicionar facilmente um formulário de registro em qualquer página de seu site WordPress.
Quando você vai para adicionar um novo bloco em sua página ou publicação, role para baixo até a seção MemberPress e selecione a seção Bloco de registro.
Em seguida, selecione a guia bloco na coluna à direita da tela e selecione a associação desejada no menu suspenso. E pronto!
You’re not limited to a single sign-up page, either. You can place registration blocks at strategic points across your site to catch visitors’ attention and encourage them to join. For example:
- At the end of blog posts, inviting readers to get premium content.
- On a sidebar or footer widget so it’s always visible while browsing.
- On your About page to connect with visitors when they’re learning about you.
- After a free resource or download, offering them the “next step” in their journey.
Além disso, se você criar várias associações com O criador de páginas integrado do MemberPress, ReadyLaunch™, você também pode adicionar facilmente sua tabela de preços com os blocos do Gutenberg!
2. Customize Registration Fields
A great way to tailor the member experience from day one is by using Custom Registration Fields.
This is your opportunity to gather information that will enable you to segment your audience and deliver personalized content down the road for better engagement and retention.
Instead of just gathering their name and email address, consider adding fields like:
- Skill level (Beginner, Intermediate, Advanced): Deliver the right starting content.
- Interests or topics: Send targeted content or course recommendations.
- Business type or role: Personalize support and upsell opportunities.
In MemberPress you can add any field and options you like!
No painel do WordPress, vá para MemberPress > Configurações > Campos to:
- Add new fields like text boxes, dropdown menus, checkboxes, or date pickers.
- Reorder fields with a simple drag-and-drop interface.
- Mark fields as required depending on your needs.
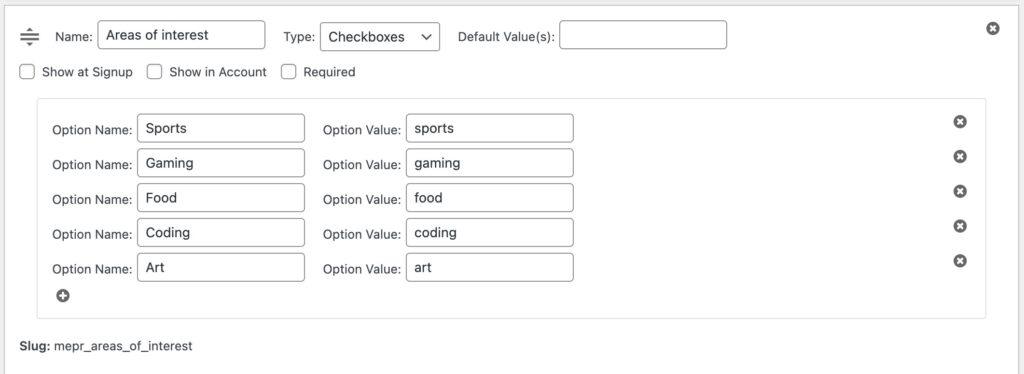
When you add a field, MemberPress automatically creates a unique slug for it. You can use this slug in:
- Integrações de terceiros (como marketing por e-mail platforms or Zapier) to segment and personalize campaigns.
- Email merge tags to include member-specific details in automated messages.
- Smart content rules to show or hide certain content based on a member’s answers.
3. Create a Custom Thank You Page
Seu Obrigado page is displayed immediately after someone registers for your site. This crucial point in the member journey is a fantastic opportunity to set the tone, guide their next steps, and keep the excitement high.
Your Thank You page is an immediate post-sign-up handshake where you confirm their purchase, reassure them they’re in the right place, and point them toward what’s next.
In Section 6, we’ll cover the Welcome Page, which appears on their first login and takes onboarding a step further.
Instead of leaving the default confirmation message, you can turn this page into a mini onboarding hub by:
- Pointing them to key resources like the member dashboard, or a dedicated welcome page (more in section 6)
- Highlighting exclusive content or perks they now have access to.
- Encouraging a first action, such as updating their profile, introducing themselves in a forum, or starting a course.
Remember, to customize your Thank You page in MemberPress:
- No painel do WordPress, vá para MemberPress > Configurações > Páginas.
- Either edit the default Thank You page or create your own and assign it here.
- Make sure it includes the
mepr-thank-youpara que os detalhes da confirmação sejam exibidos corretamente.
Lembre-se de que você pode personalizar sua mensagem de agradecimento com MemberPress Shortcodes incluindo os Slugs de campo personalizado que mencionei acima.
Ao dedicar mais atenção a essa página, você orienta o usuário a entrar mais profundamente em seu site e o ajuda a obter valor imediatamente.
4. Personalize o e-mail de boas-vindas
Por padrão, o MemberPress enviará automaticamente aos novos membros um e-mail de boas-vindas depois que eles se registrarem em seu site.
Esse e-mail de boas-vindas é gerado automaticamente quando o MemberPress é ativado. Mas você pode editar facilmente o modelo para personalizar a experiência de integração de seus novos usuários.
Você pode encontrá-lo navegando até MemberPress > Configurações e clicando no ícone E-mails guia.
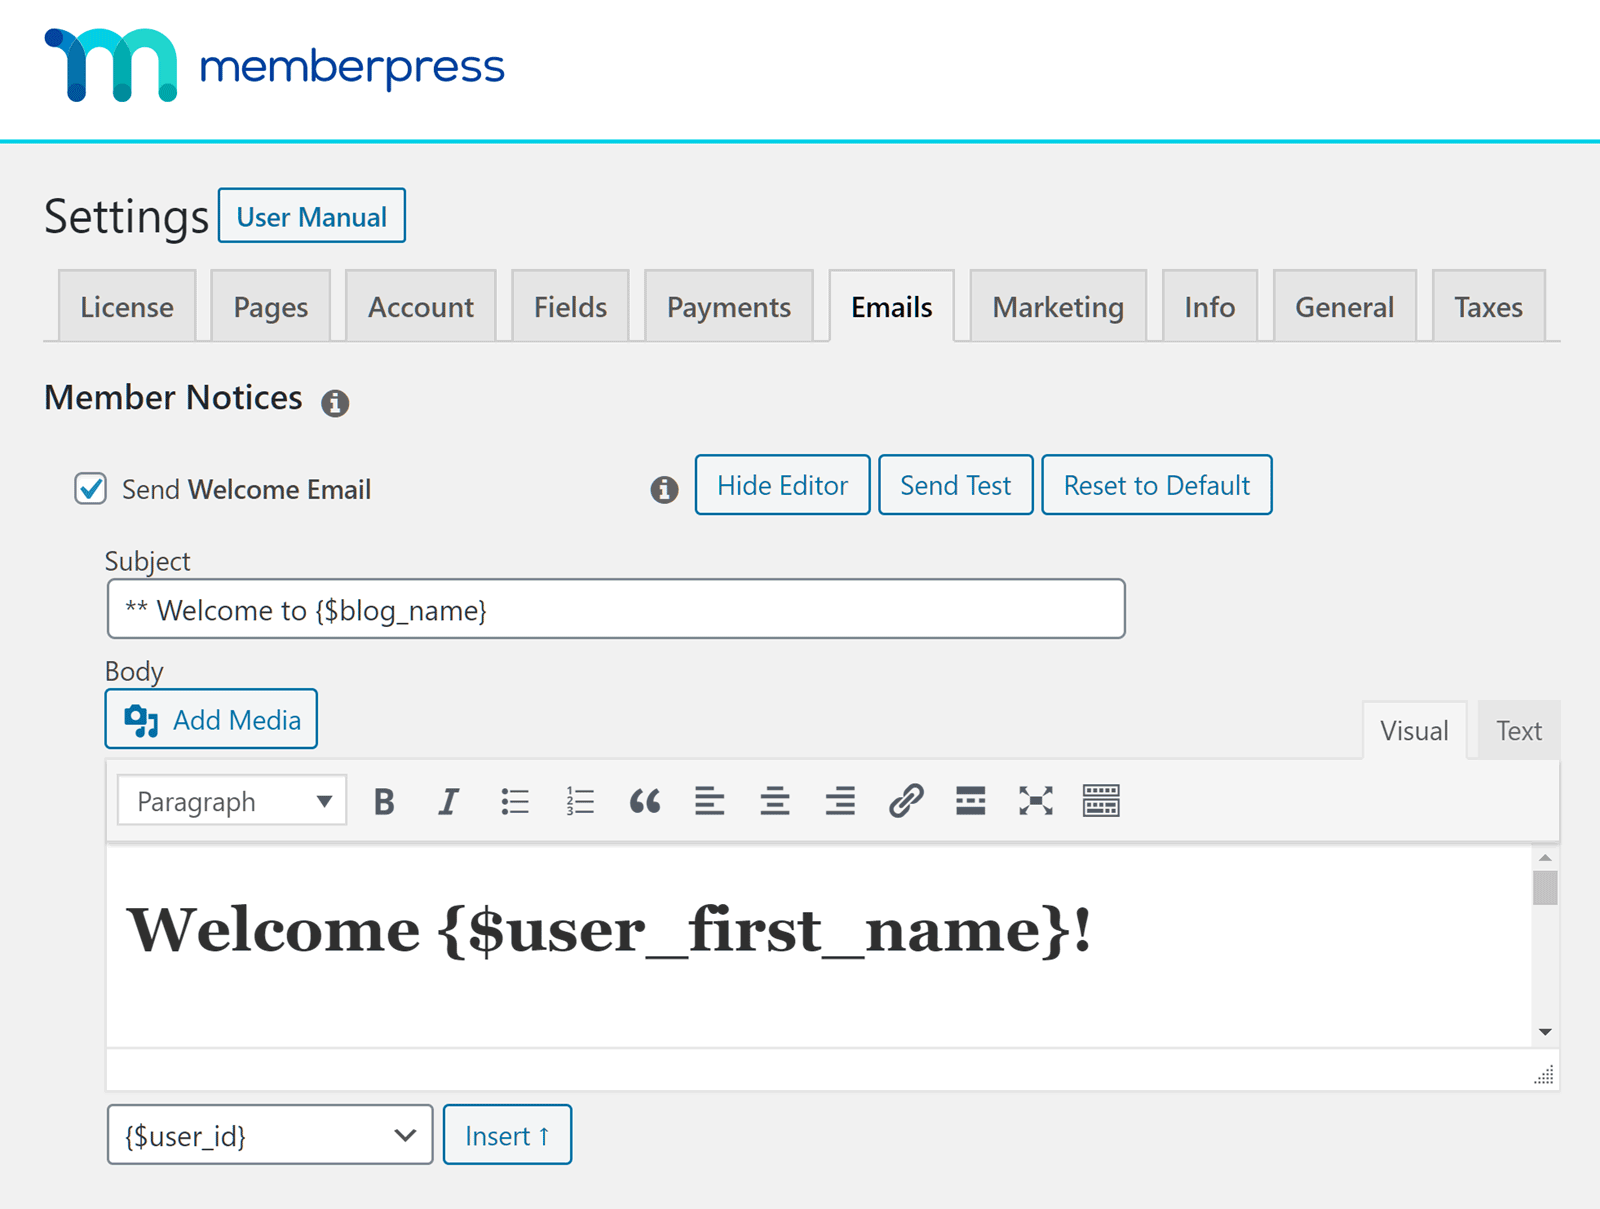
Os e-mails que você envia para dar as boas-vindas aos novos usuários, bem como os outros e-mails que o MemberPress envia, podem ser preenchido automaticamente com os detalhes pessoais do usuário, como nome, plano de associação e status de pagamento, para citar apenas alguns.
Para levar seu e-mail de boas-vindas um passo adiante, adicione um recurso de bônus, um código de desconto (com Cupons MemberPress), convites da comunidade ou links úteis para que eles tenham uma ótima experiência em seu site.
5. Faça o login sem esforço
Não afaste os novos membros tornando o processo de login um incômodo. Há algumas maneiras poderosas de facilitar o primeiro login dos membros:
Ativar o complemento de login social
Com o MemberPress, você pode oferecer aos seus membros a oportunidade de fazer login com suas contas do Google, Facebook, X ou WordPress.com com a opção Complemento de login social.
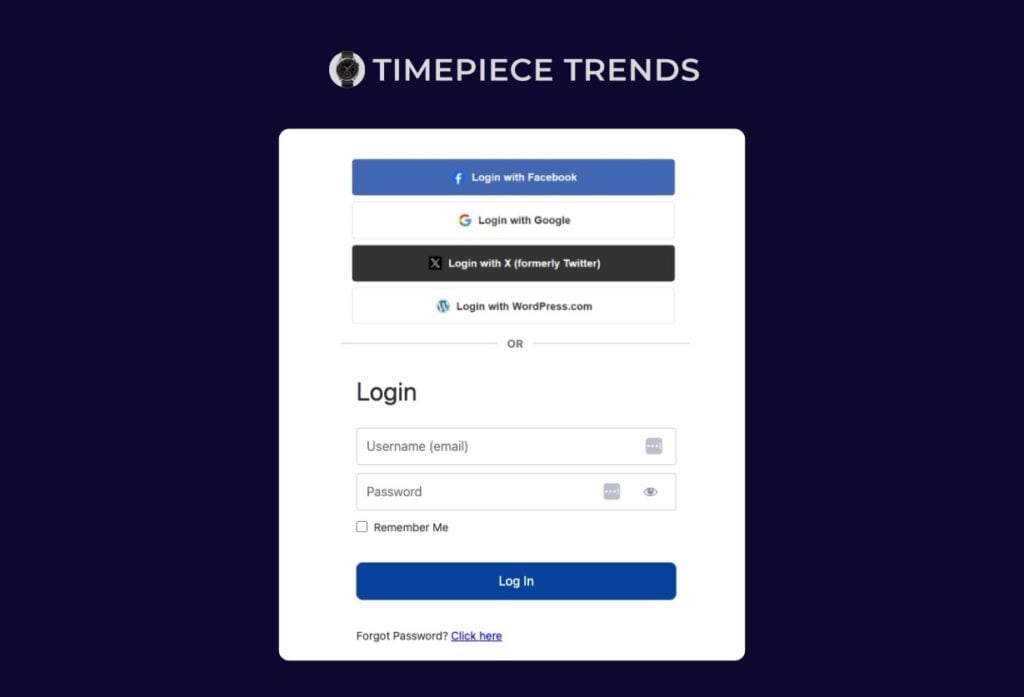
A oferta dessa opção reduz senha problemas e aumenta a confiança e a segurança em seu site.
Como parte do seu processo de integração, incentive os novos membros a conectar suas contas de mídia social ao perfil de membro para uma experiência de login mais tranquila.
6. Redirecionar os primeiros logins para uma página de boas-vindas
Depois que os membros concluírem o registro e fizerem login pela primeira vez, você terá uma oportunidade de ouro de orientá-los para as áreas mais importantes do seu site.
Em vez de colocá-los diretamente em um painel genérico ou em uma página inicial, envie-os para um página de integração dedicada que foi projetado para ajudá-los a começar imediatamente.
Em sua página de boas-vindas, você pode incluir:
- Um resumo vídeo introdutório de você ou de sua equipe.
- A "Guia "Comece aqui ou acesso a um minicurso gratuito (criado com Cursos do MemberPress) que explica como navegar em seu site.
- Links para seu conteúdo mais valiosoferramentas ou recursos.
- Um convidar para seu espaço comunitário ou fórum.
- Resposta antecipada a perguntas comuns com um breve Seção de perguntas frequentes para reduzir as solicitações de suporte antecipadas.
- Detalhes dos próximos webinars para ajudar os novos usuários a aproveitar ao máximo o seu site.
Como configurá-lo no MemberPress
- Crie sua página de integração no WordPress e adicione quaisquer vídeos, links ou conteúdo que você queira que os membros vejam.
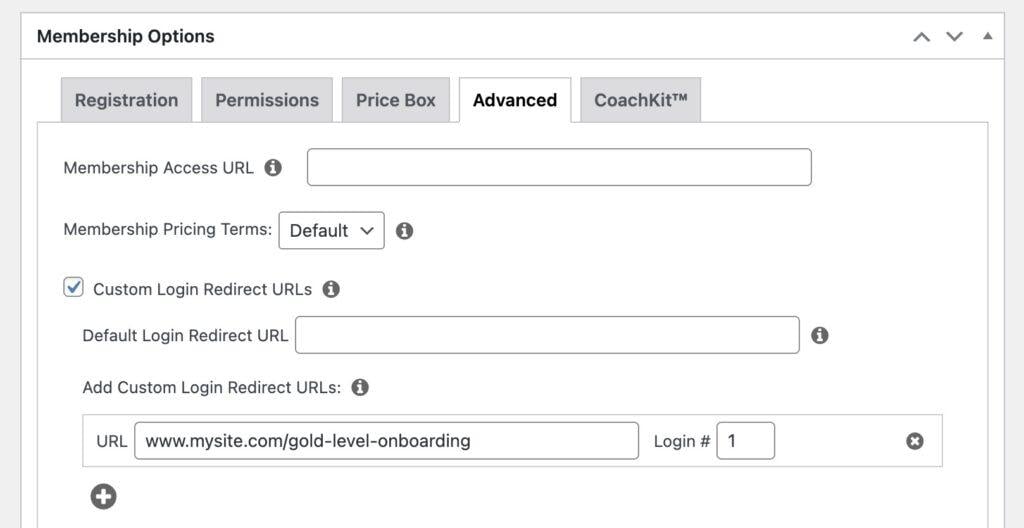
- Em seu painel do WordPress, vá para MemberPress > Associações e clique em Editar na associação que você deseja configurar.
- Role até o Avançado e adicione o URL da página de integração na guia URL de redirecionamento de login campo.
- Acertar Atualização para salvar as alterações
- Repita o procedimento com outras associações em seu site.
7. Acompanhe e gerencie os registros de usuários no MemberPress
Você pode visualizar e gerenciar novos membros a partir do painel do WordPress.
Vá para MemberPress > Membros para ver todos os usuários existentes que se inscreveram ou registraram no seu site.
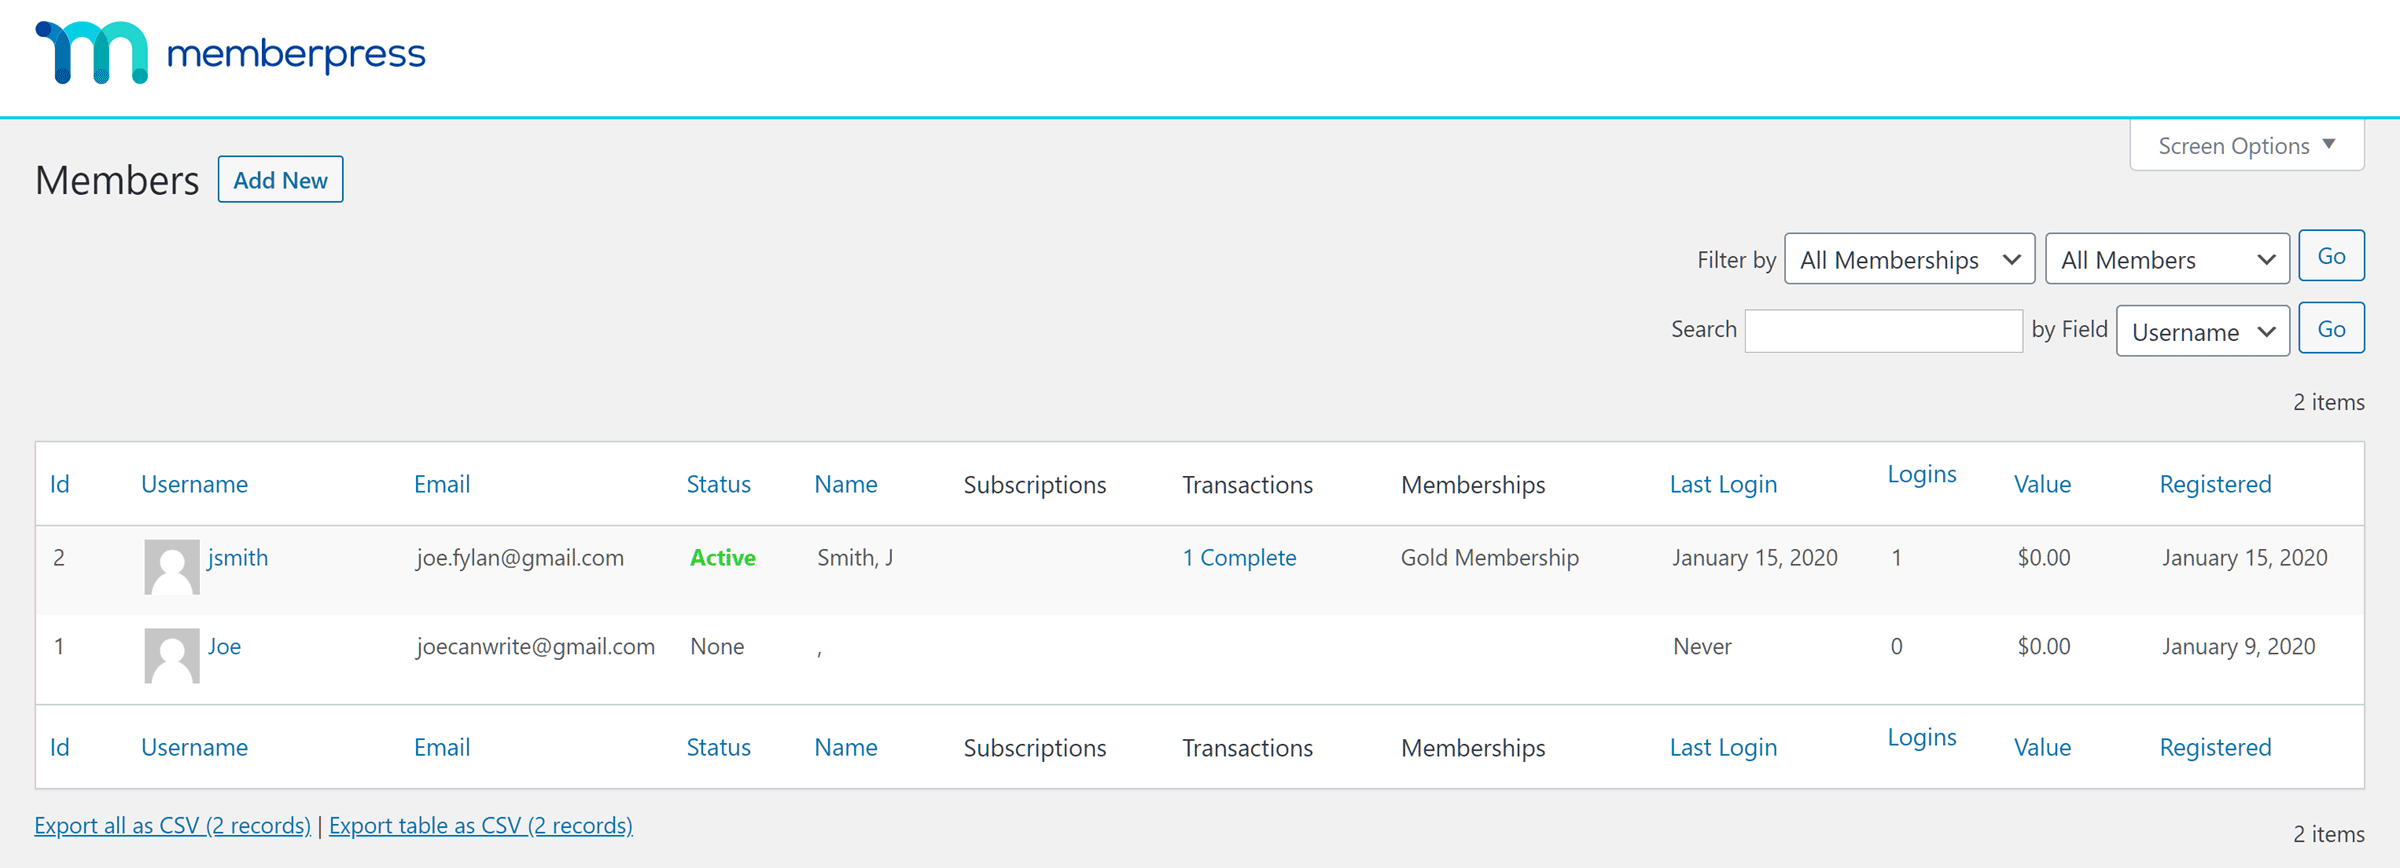
Essa tela fornece informações que podem ajudá-lo a identificar e gerenciar novos registros de usuários. Clique no botão seta para baixo no Registrado para classificar os membros do mais novo para o mais antigo e identificar facilmente os novos usuários.
Se você quiser editar os detalhes de um membro, isso também é simples. Basta passar o mouse sobre o nome de usuário do membro e clicar no ícone Editar que aparece abaixo dele. Isso permite que você visualize o perfil do usuário e edite seus detalhes, se necessário.
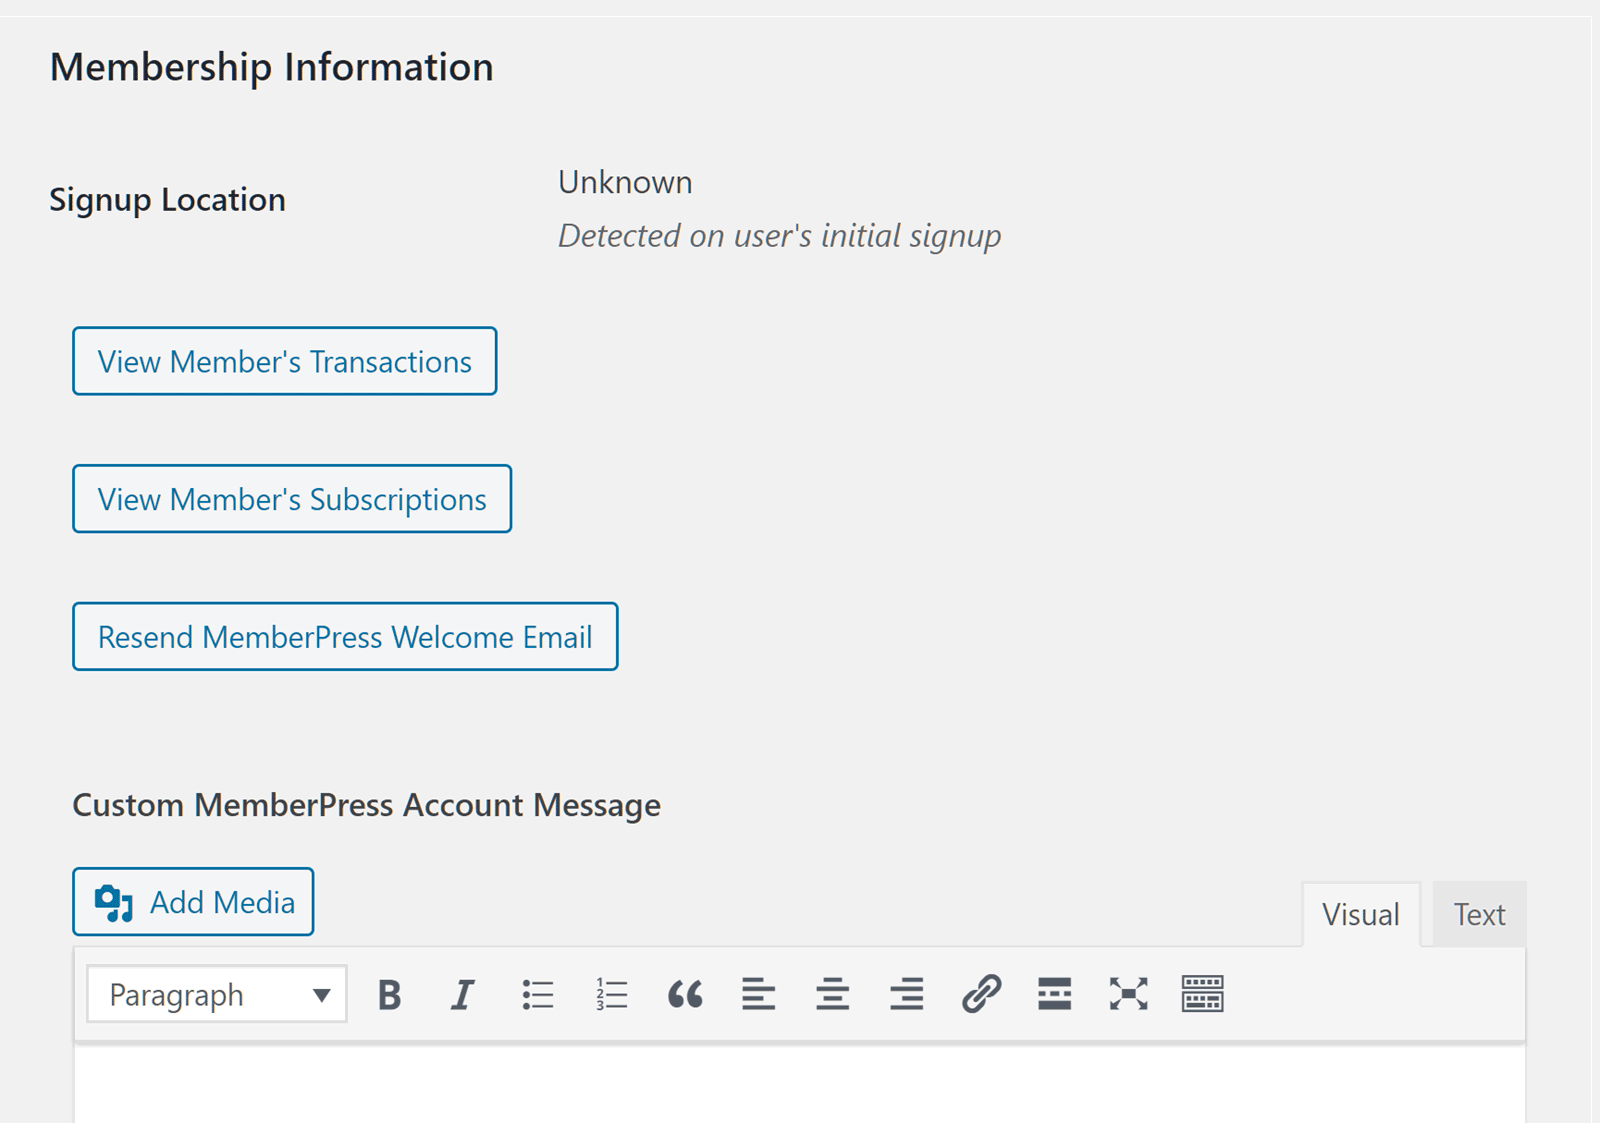
As informações de associação do usuário são exibidas na parte inferior da página padrão de detalhes do usuário do WordPress.
A partir daí, você pode encontrar links para as informações de assinatura do site de associação, além dos detalhes das transações que eles concluíram.
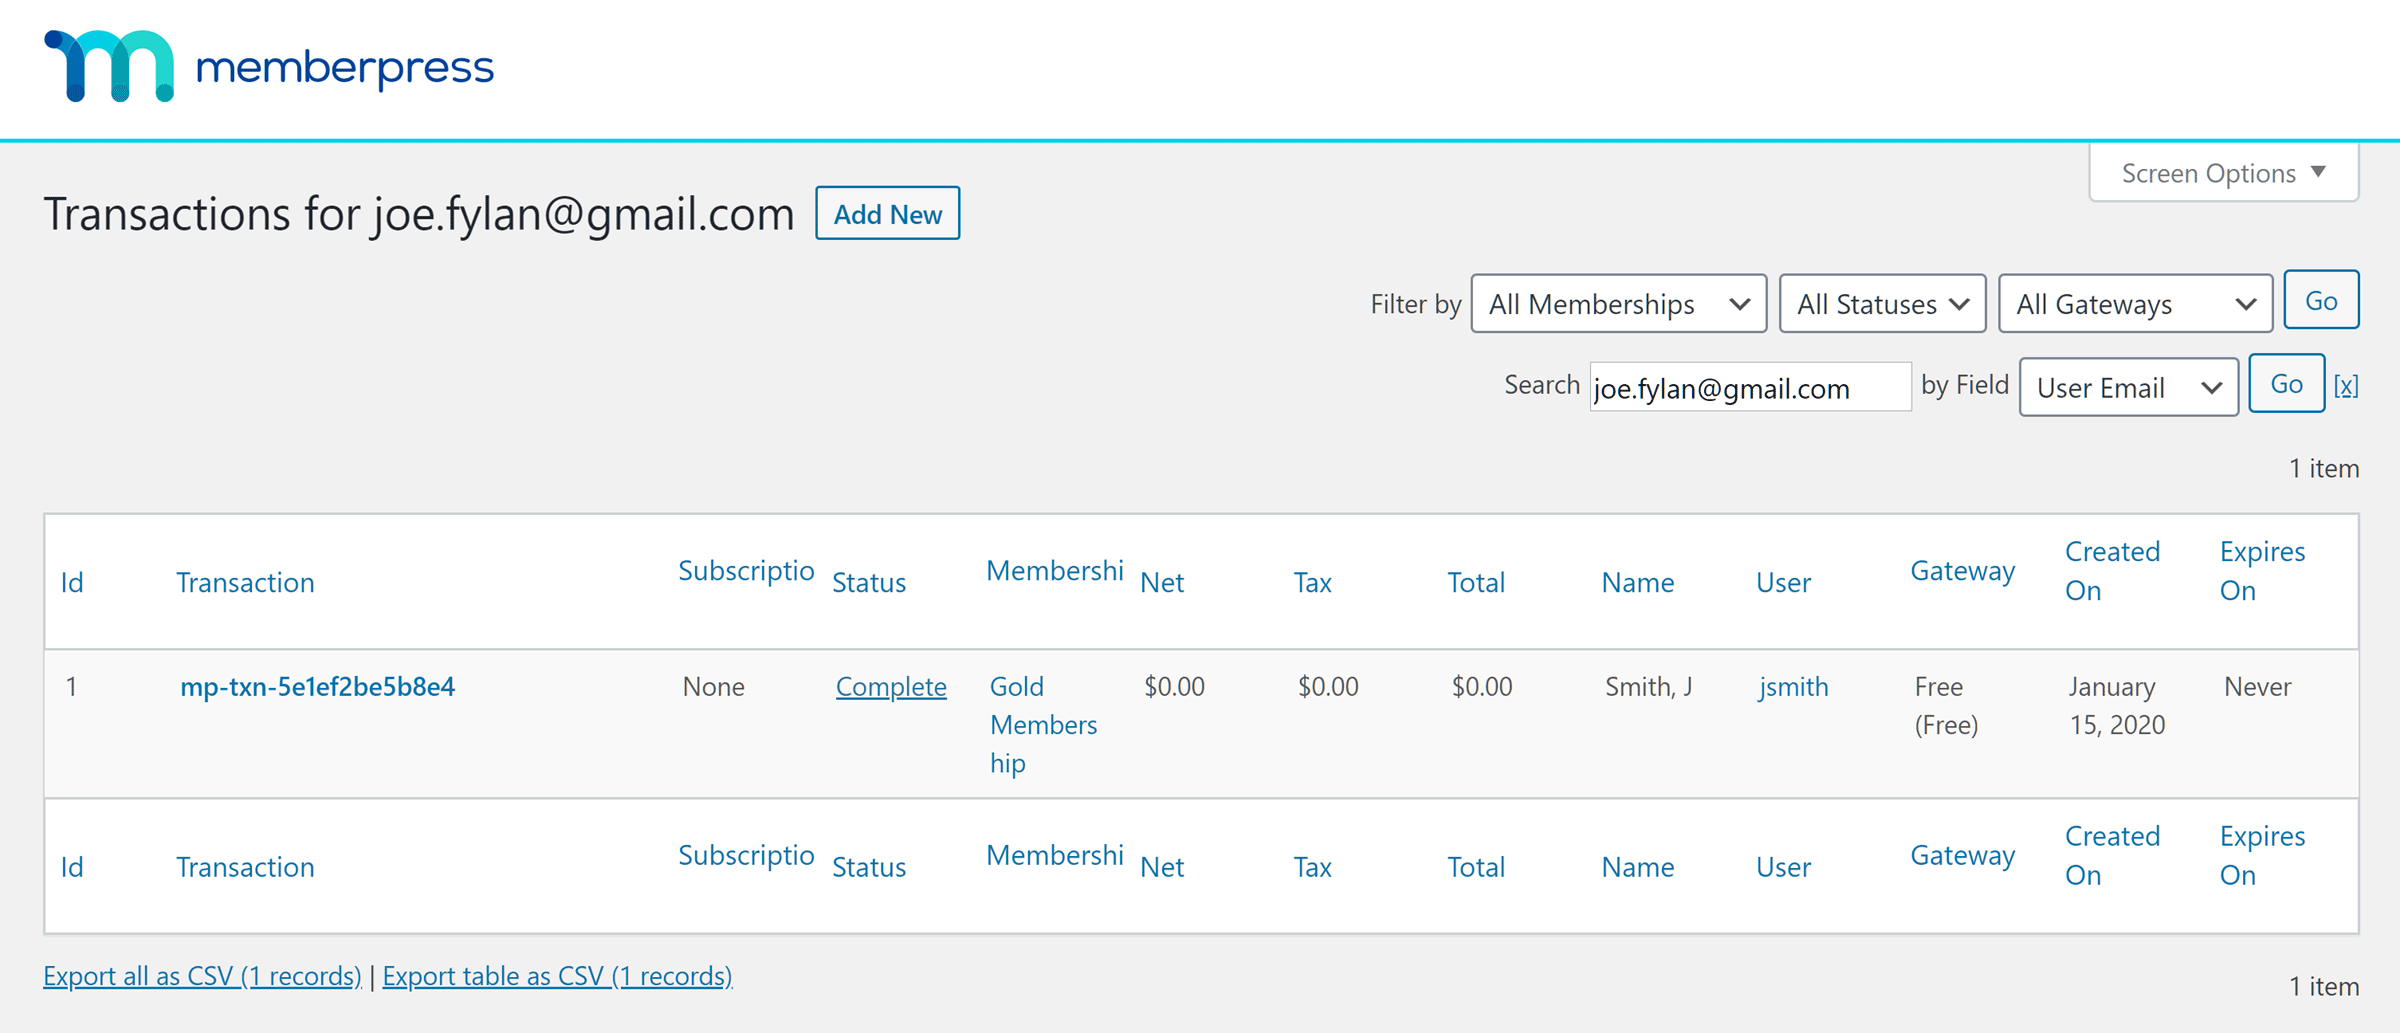
Verificar isso regularmente o ajuda a acompanhar os novos membros e a identificar qualquer pessoa que possa precisar de apoio adicional desde o início
Considerações finais
Como você pode ver, ao aproveitar os principais recursos do MemberPress, você pode melhorar seu jogo quando se trata de gerenciar novos registros de usuários em seu site de associação.
Aqui está uma recapitulação TL;DR de como fazer isso acontecer:
- Facilitar a inscrição: Páginas de registro bem elaboradas, chamadas para ação claras e sem obstáculos desnecessários.
- Coleta das informações corretas: Use campos personalizados para saber o que os membros querem e personalizar a experiência deles.
- Recebendo-os imediatamente: Uma página de agradecimento que os direciona para a primeira "vitória" em seu site.
- Acompanhamento em sua caixa de entrada: Um e-mail de boas-vindas caloroso que pareça pessoal e útil.
- Manter os logins sem dor de cabeça: Logins sociais, botões de login visíveis e nenhuma frustração com a senha.
- Estendendo o tapete vermelho no primeiro login: Uma página de boas-vindas dedicada que faz com que eles se sintam em casa.
- Registro de chegada antecipado: Acompanhe as novas inscrições para que você possa identificar e apoiar os membros que podem se afastar.
Até mesmo adicionar um ou dois desses itens ao seu fluxo de integração pode fazer uma diferença notável na retenção, mas quando você os utiliza em conjunto, cria uma experiência da qual os membros não vão querer sair!
Ainda não tem o MemberPress? Comece aqui!
Tem alguma dúvida sobre o gerenciamento de registros de novos usuários no MemberPress? Entre em contato conosco na seção de comentários abaixo.
Se você gostou deste artigo, não deixe de nos seguir em Facebook, Twitter, Instagrame LinkedIn! E não se esqueça de se inscrever no caixa abaixo.



Como os assinantes atuais criam contas para ter acesso ao conteúdo? Transferi um grupo de um site de associação anterior, mas eles não têm contas configuradas.
É possível aprovar manualmente as associações? Queremos que apenas ex-alunos da escola se registrem e precisamos verificá-los antes da aprovação. Muito obrigado!
Olá,
Tenho um cliente que deseja fornecer algum conteúdo somente para usuários registrados. O conteúdo é gratuito, MAS é muito importante que somente os usuários aprovados manualmente pelo administrador possam obter o conteúdo.
Então, há alguma maneira de enganar o MemberPress para que ele adicione uma etapa de "aprovação manual de novo usuário", em que o administrador recebe um alerta e o usuário precisa esperar para ser aprovado?
Sim, nós compraríamos a versão Pro com prazer.
Melhor,
Juli
Obrigado, Victoria. Isso é muito útil.