O MemberPress PDF Invoice add-on cria automaticamente faturas para todas as transações do MemberPress em seu site. Seus membros podem baixar as faturas diretamente de suas contas.
Este documento o orienta na instalação do complemento MemberPress PDF Invoice e na configuração de faturas em seu site.
Instalar o complemento PDF Invoice
O complemento PDF Invoice do MemberPress deve ser instalado e ativado primeiro.
Antes de começar, verifique se você tem:
- MemberPress Crescimento ou Escala plug-in instalado e ativado em seu site;
- O plug-in MemberPress é ativado com sua chave de licença ativa;
- Acesso ao seu painel do WordPress com credenciais de usuário de administrador;
- Um arquivo de logotipo para suas faturas (opcional).
Agora, para instalar o complemento, siga estas etapas:
- Navegue até Painel de controle > MemberPress > Complementos.
- Procure add-ons ou use a ferramenta de pesquisa para pesquisar o "Fatura em PDF" na lista.
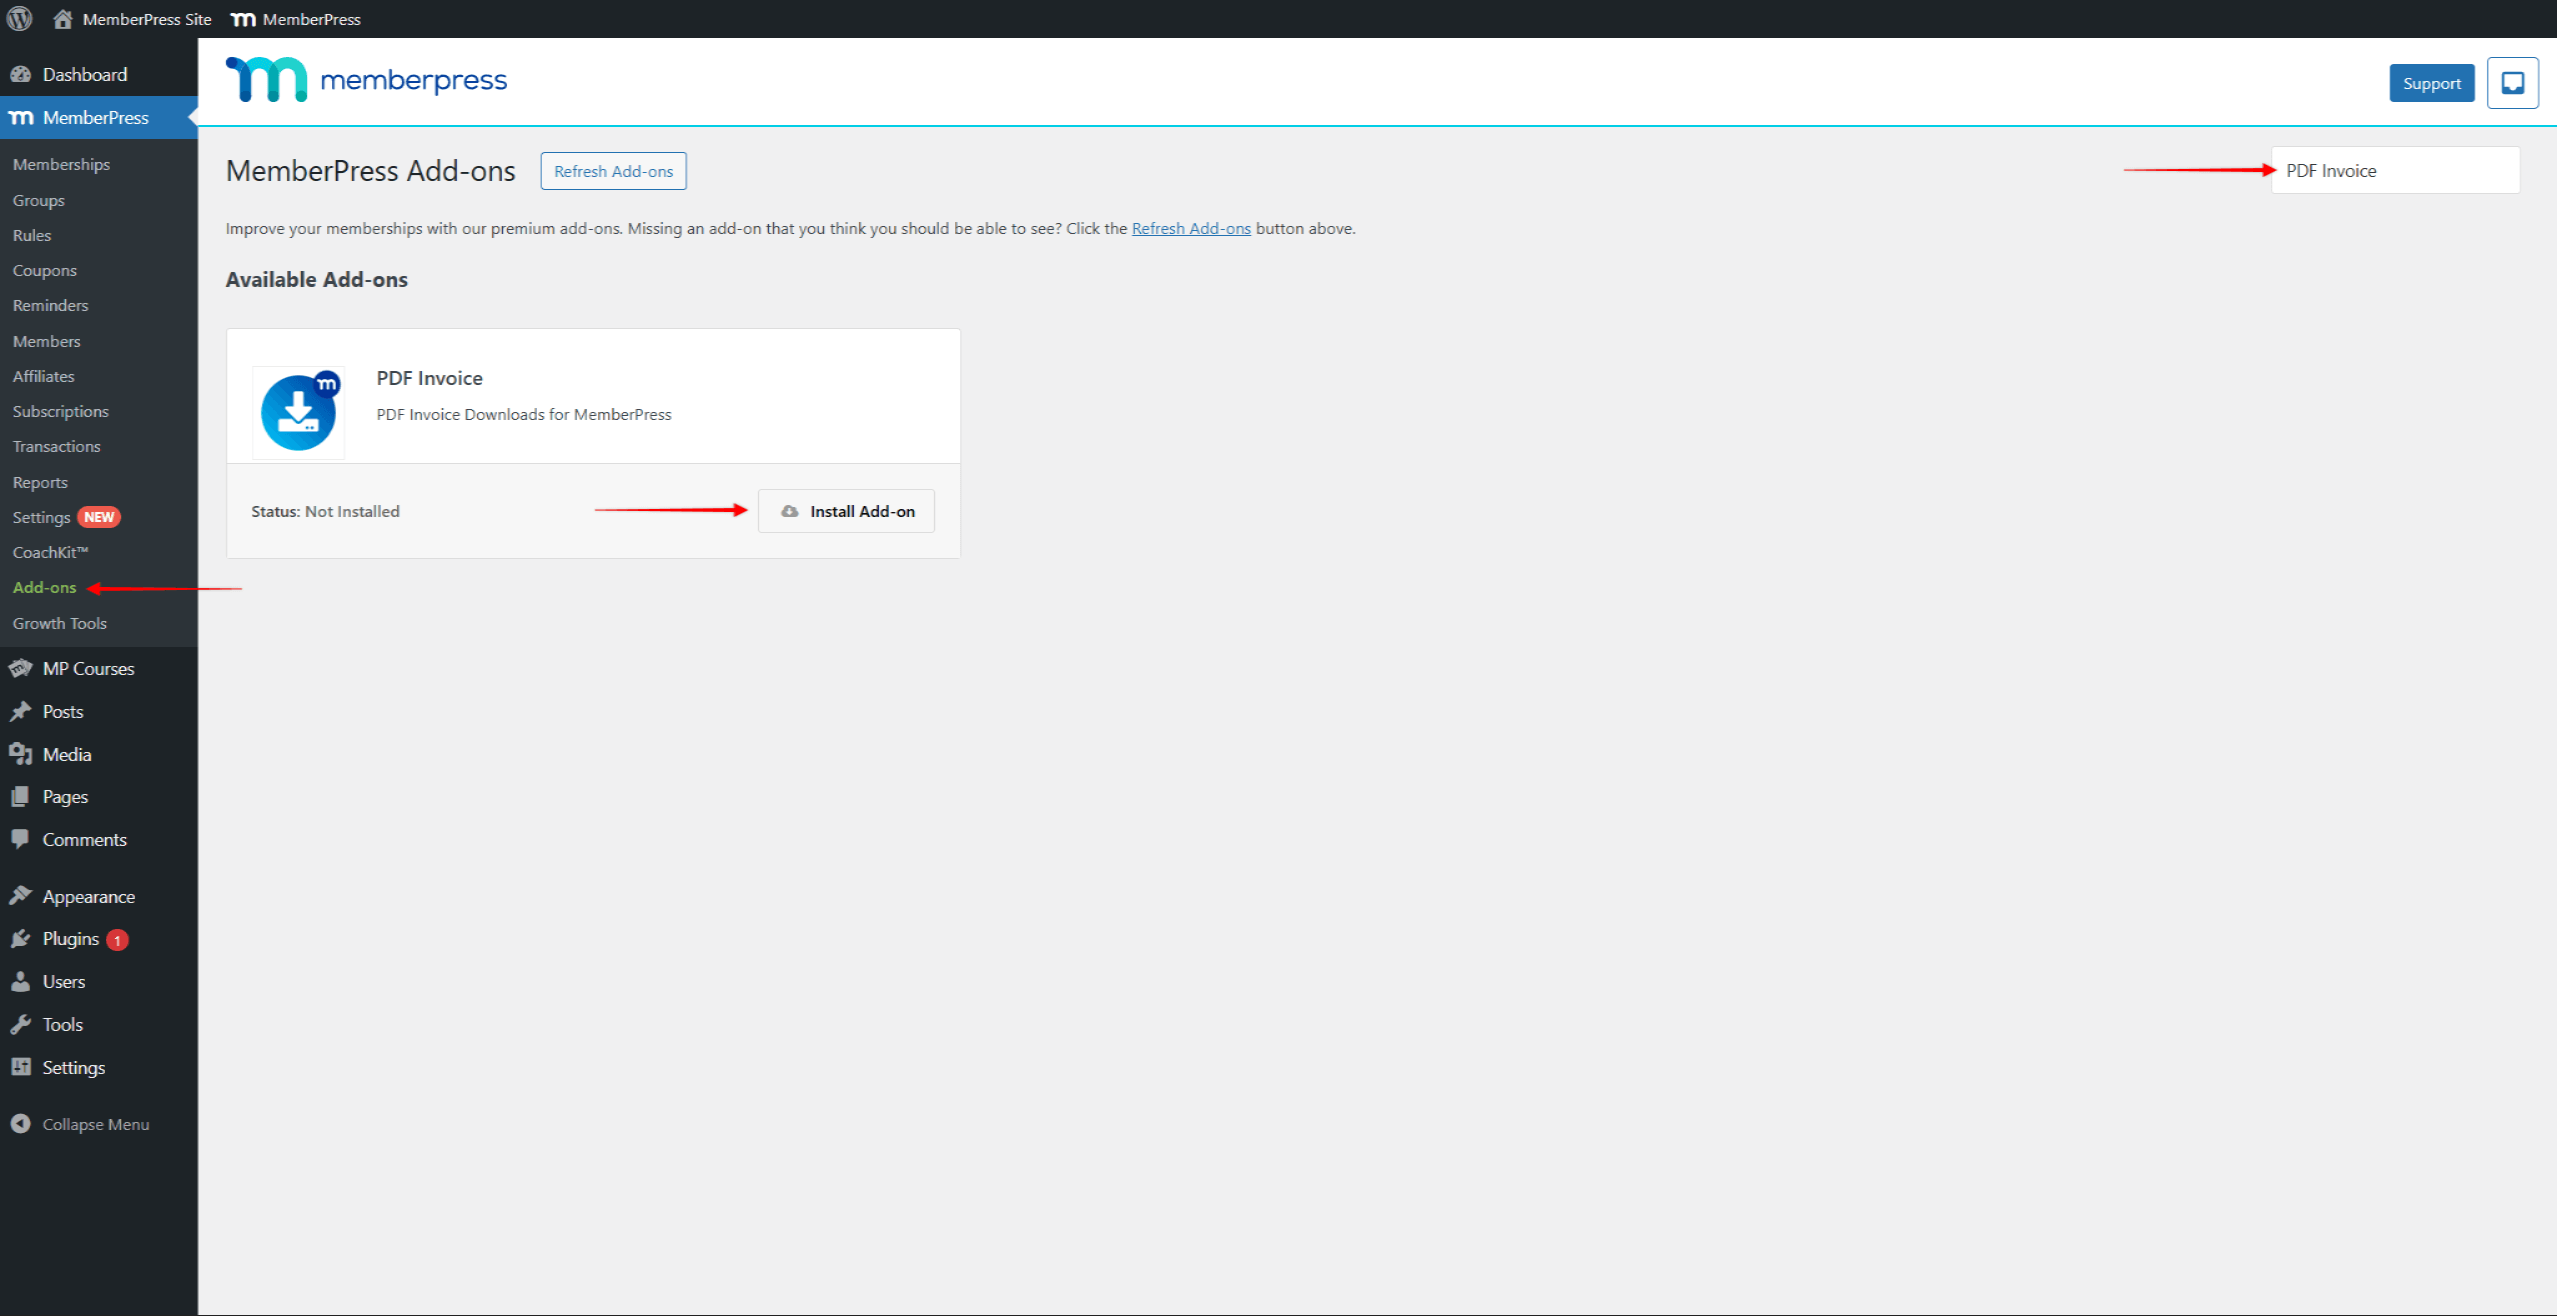
- Clique no botão Instalar o complemento botão. Isso instalará e ativará automaticamente o complemento.
Após a instalação, novas configurações relacionadas à fatura ficarão disponíveis em suas configurações do MemberPress.
Configurar suas definições de fatura em PDF
O complemento MemberPress PDF Invoice permite que você gere automaticamente faturas (recibos) para todos os pagamentos on-line e off-line processados com êxito. Além disso, ele também pode gerar automaticamente faturas pró-forma para renovações de assinaturas recorrentes adquiridas por meio do gateway off-line.
Após a ativação do complemento, você precisa configurar faturas e faturas pró-forma para que sejam geradas para transações MemberPress.
Para configurar suas faturas, você precisa adicionar suas informações comerciais e personalizar a aparência das faturas:
- Navegue até Painel de controle > MemberPress > Configurações.
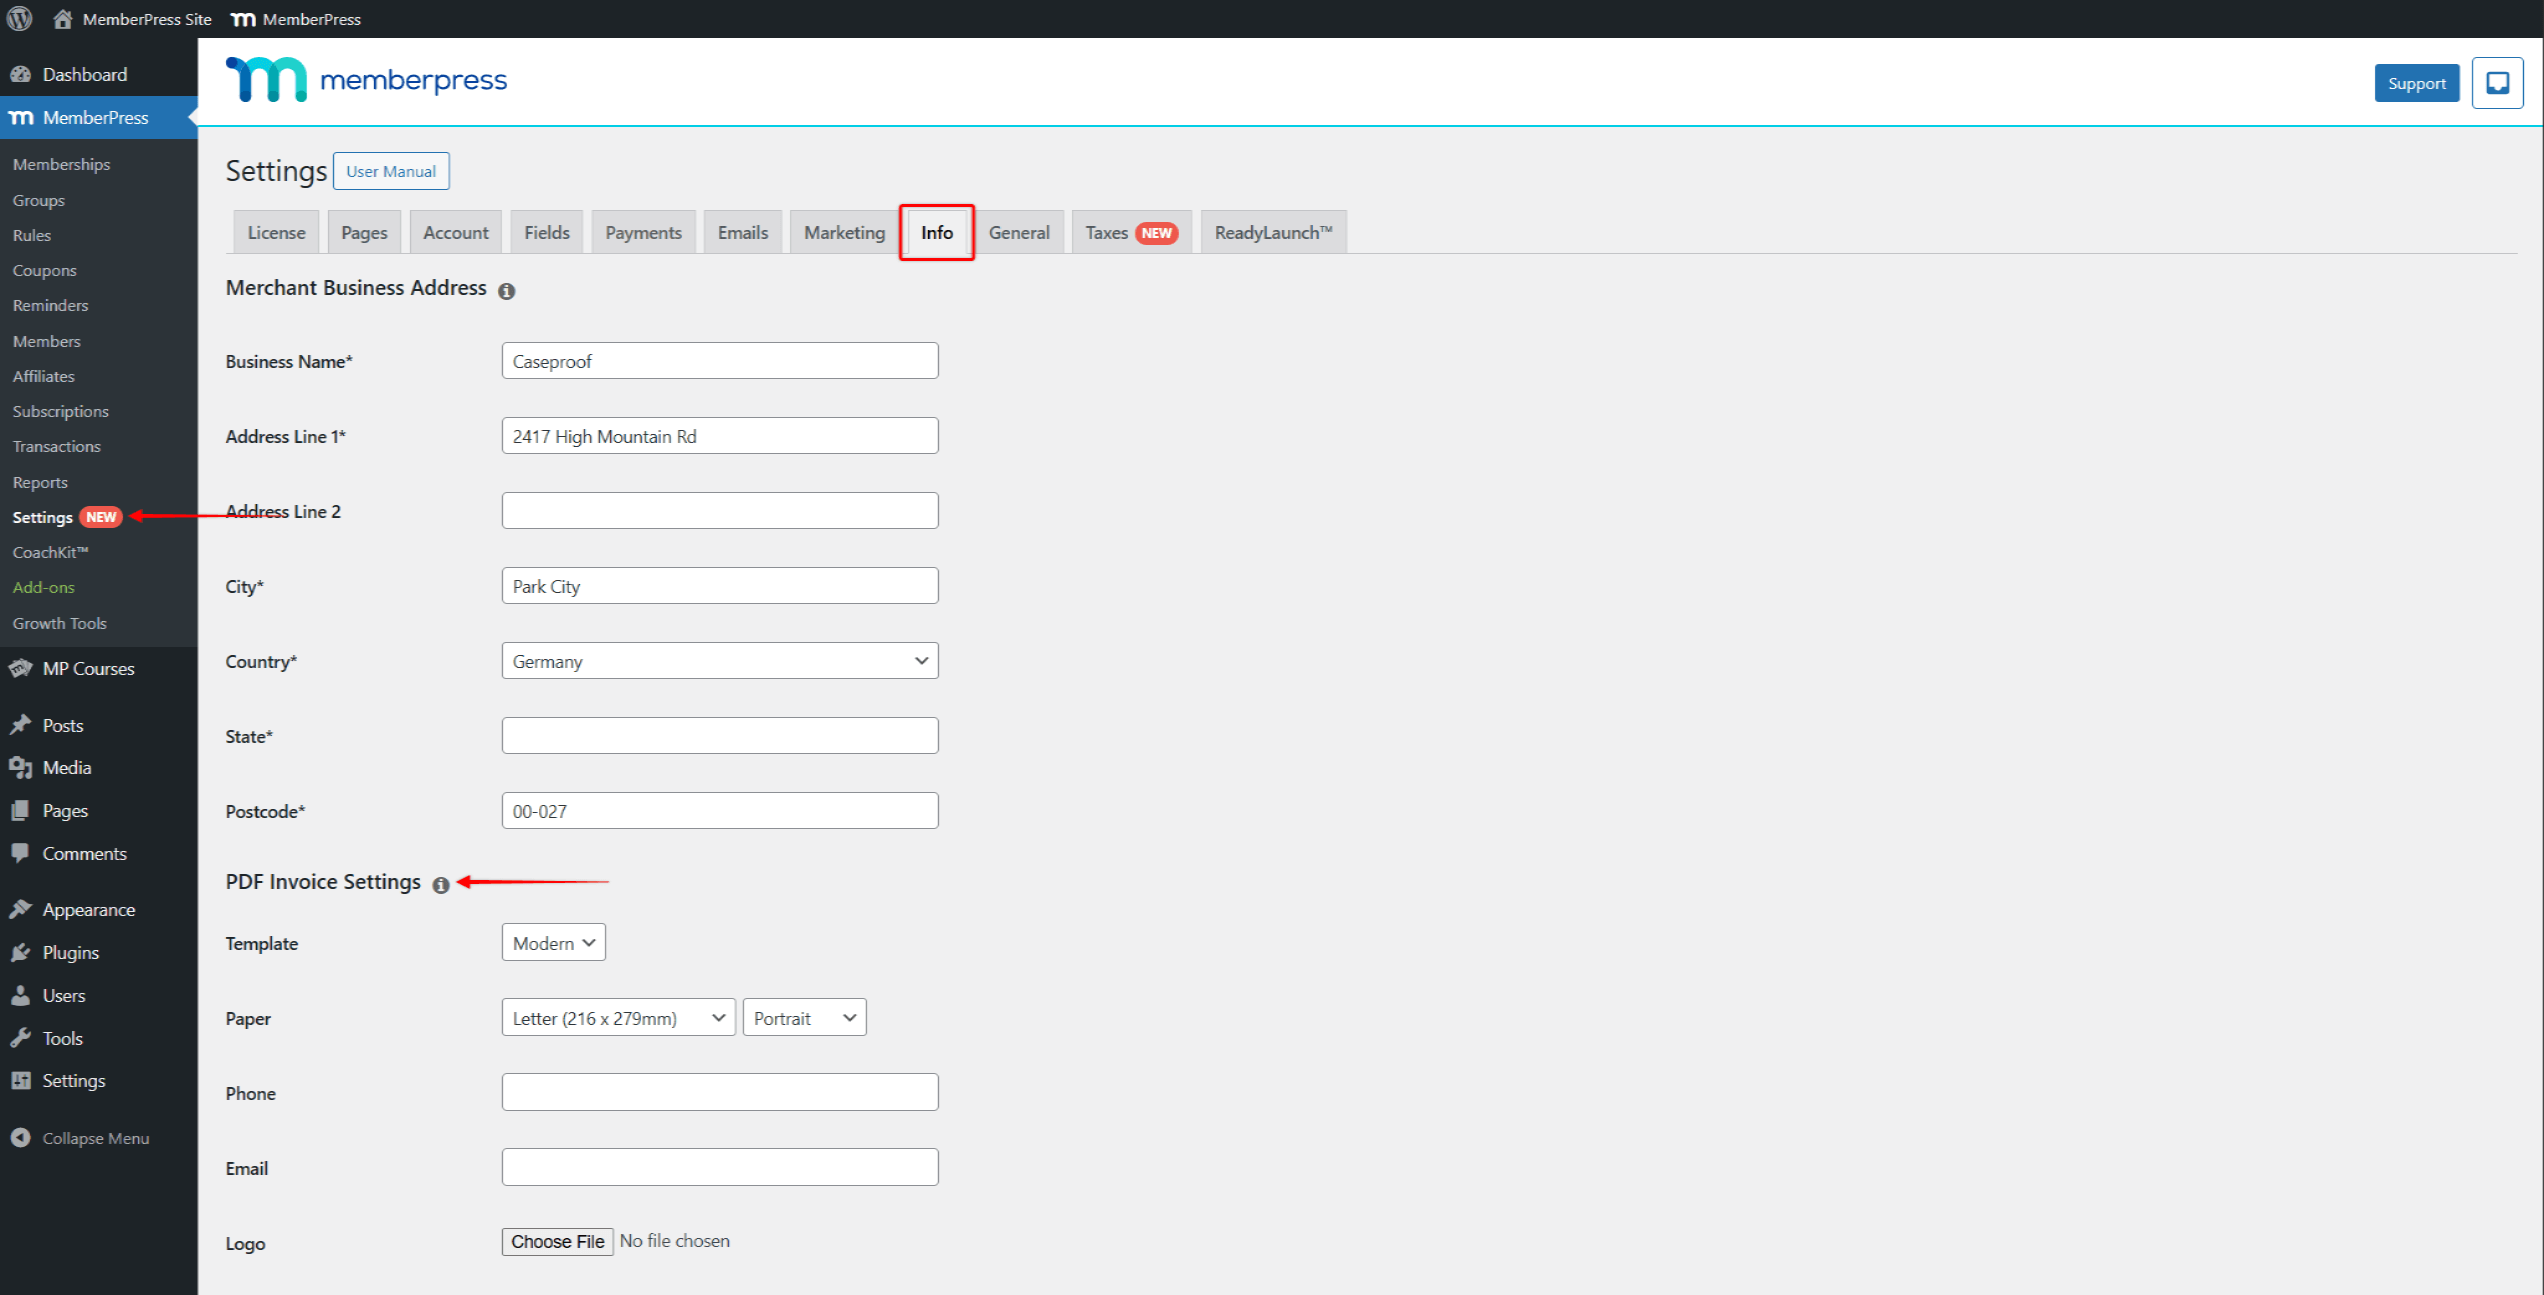
- Clique no botão Informações guia.
- Role a tela para baixo para encontrar o Configurações da fatura em PDF seção.
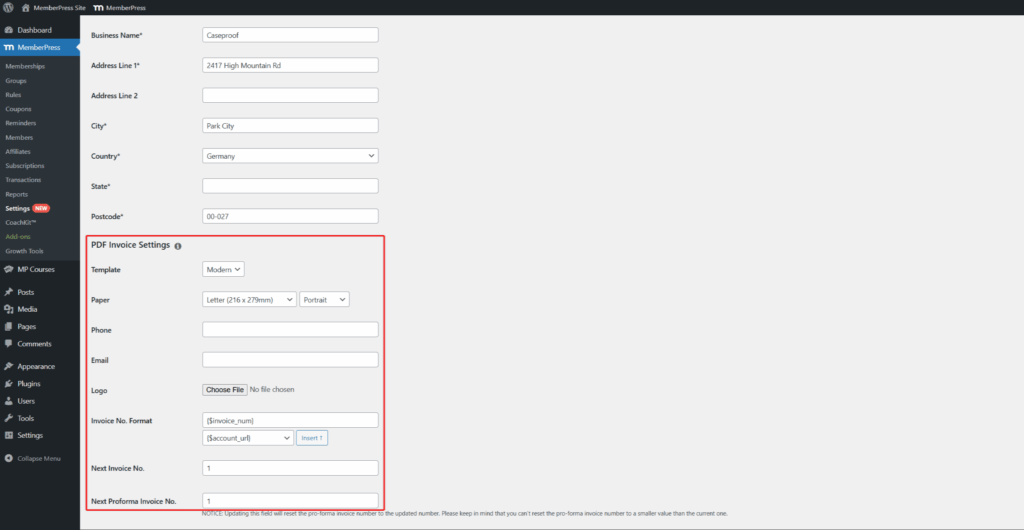
- Abaixo de Modelo: Escolha entre dois estilos:
- Simples: Um design limpo e básico
- Moderno: Um layout mais elegante
- Sob o Papel selecione a opção Tamanho e orientação da fatura;
- Em seguida, adicione as informações de contato da empresa (Telefone e E-mail) e seu Logotipo (JPG, PNG ou GIF; use uma imagem com pelo menos 400 pixels de largura).
- Opcionalmente: Você pode modificar o formato dos números de fatura editando o Formato do número da fatura opção. Essa opção é usada para definir como os números das faturas devem ser gerados. Por padrão, essa opção usará o {$invoice_num} que adicionará números consecutivos simples às suas faturas. Você pode adicionar sufixos ou prefixos a esse parâmetro, inserir parâmetros adicionais ou substituir o parâmetro completamente.
- Por fim, você precisa definir o número inicial para suas faturas (recibos) na seção Próximo número da fatura opção.
- Se você faturas pró-forma habilitadasPara definir o número inicial de suas faturas pró-forma, você também precisará definir o número inicial. Defina o número em Próxima fatura proforma nº. opção.
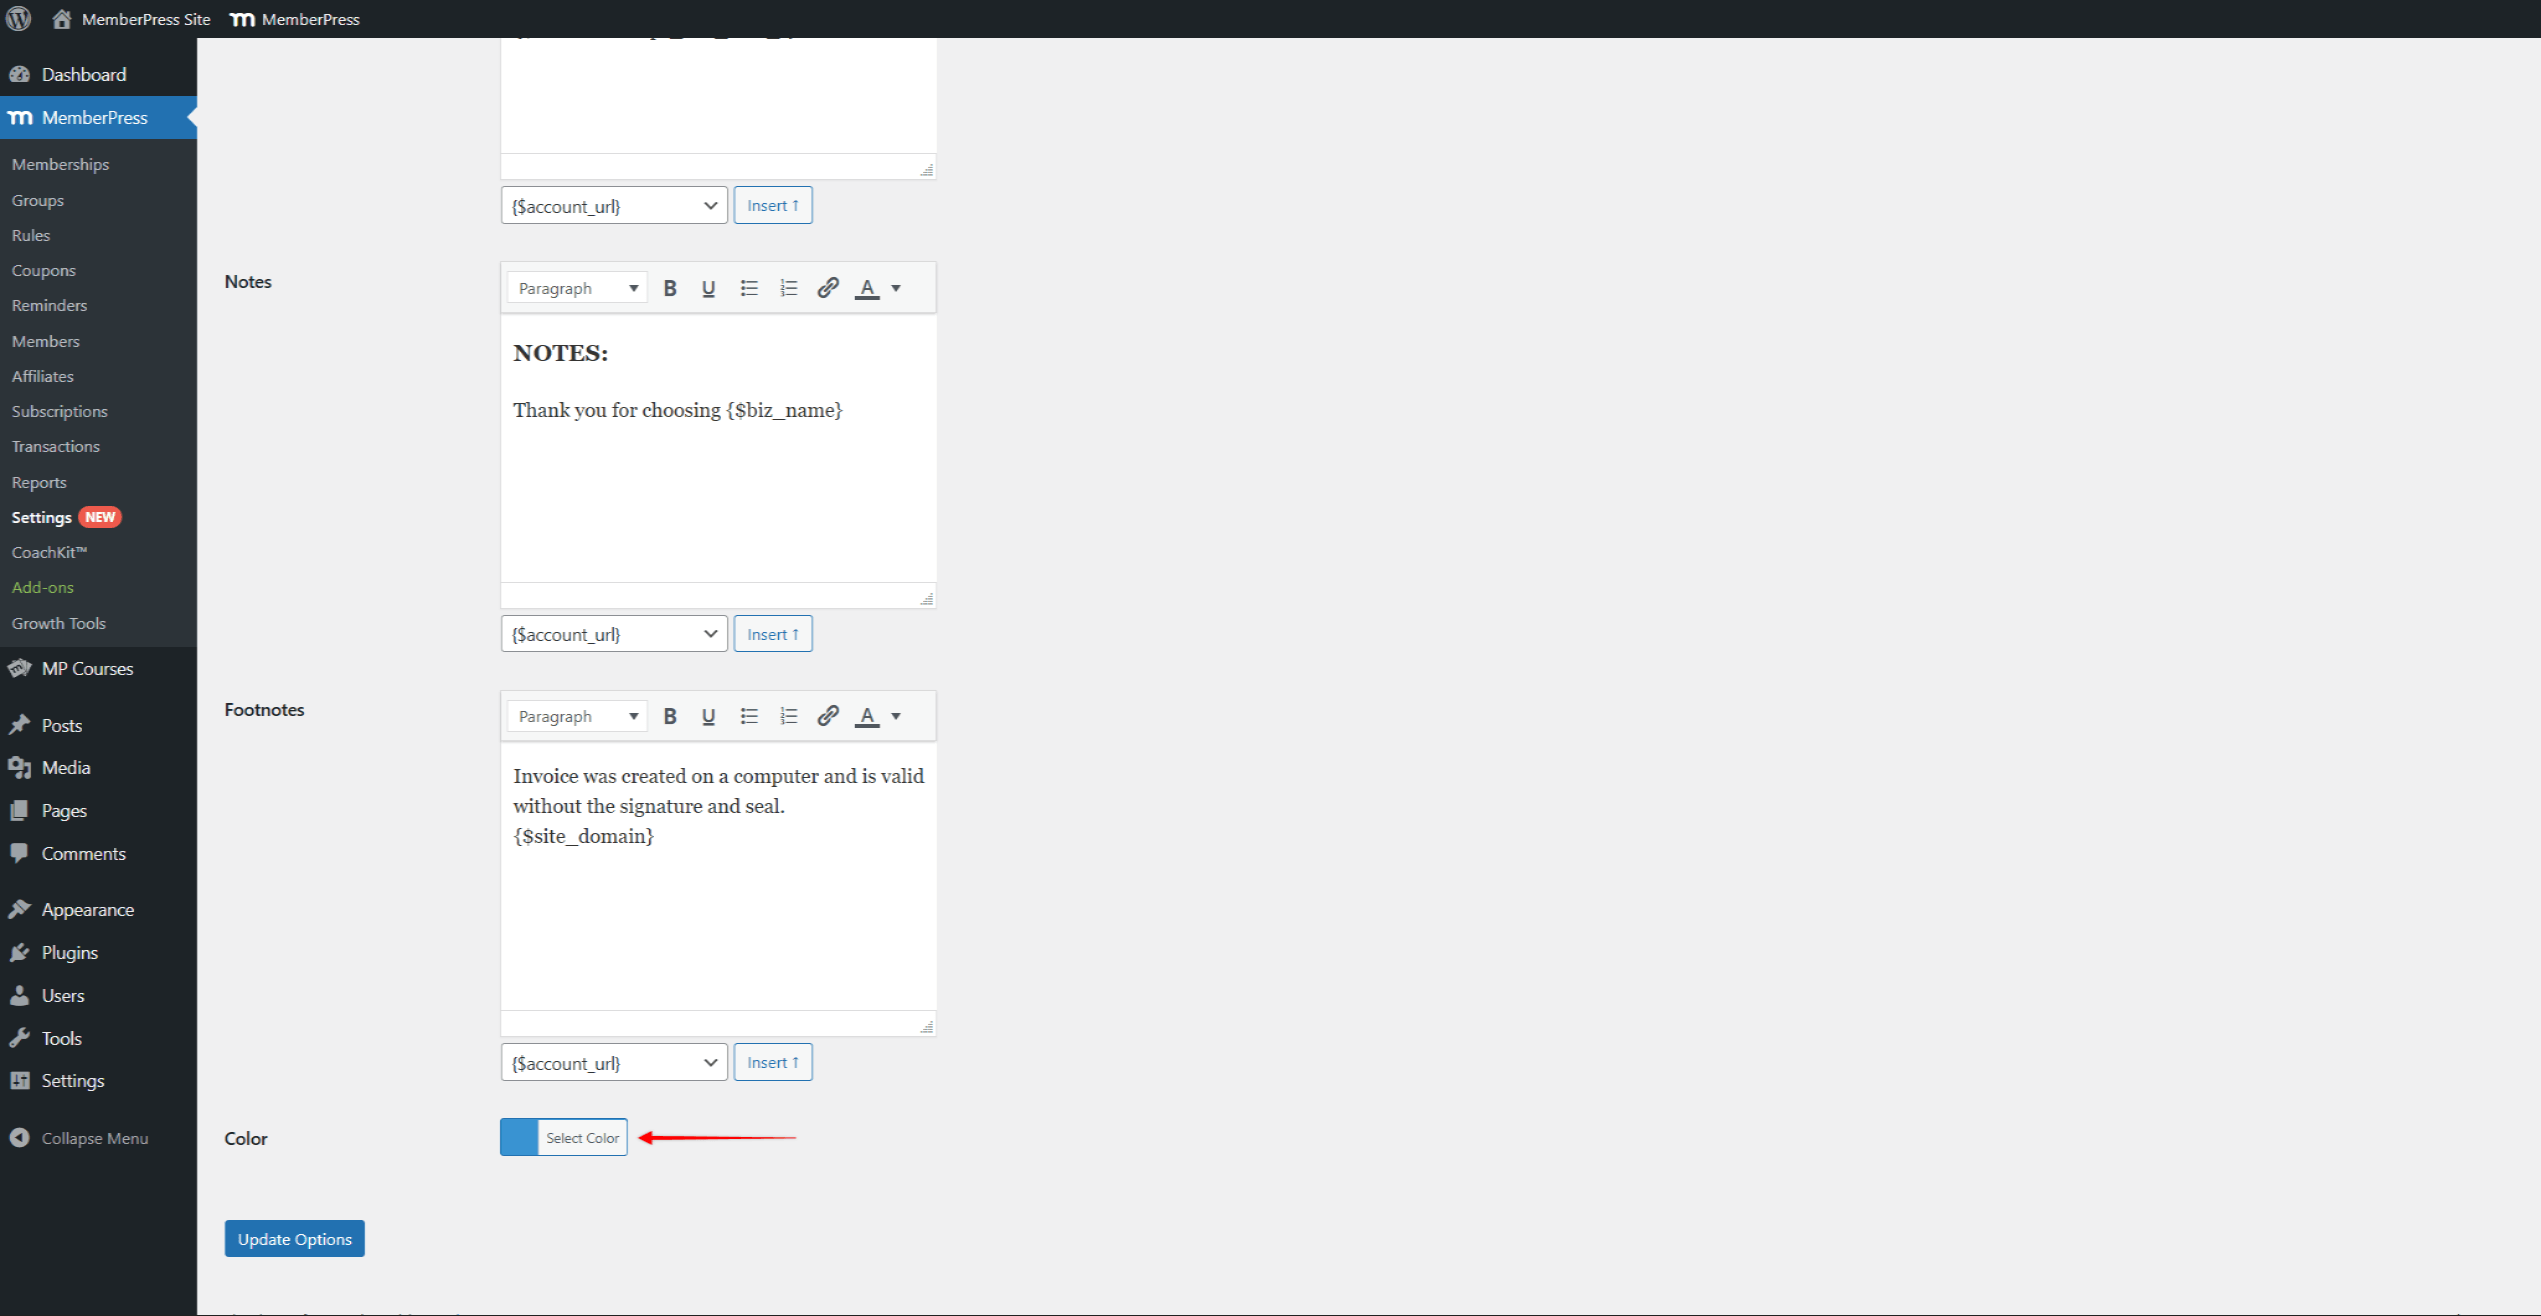
Além disso, as faturas do MemberPress são estilizadas usando uma cor de base. Para alterar a cor padrão, role para baixo até a seção Cor e escolha uma cor.
Áreas de conteúdo
Além disso, de acordo com o Configurações da fatura em PDF seção do Informações você também pode editar as áreas de conteúdo das faturas.
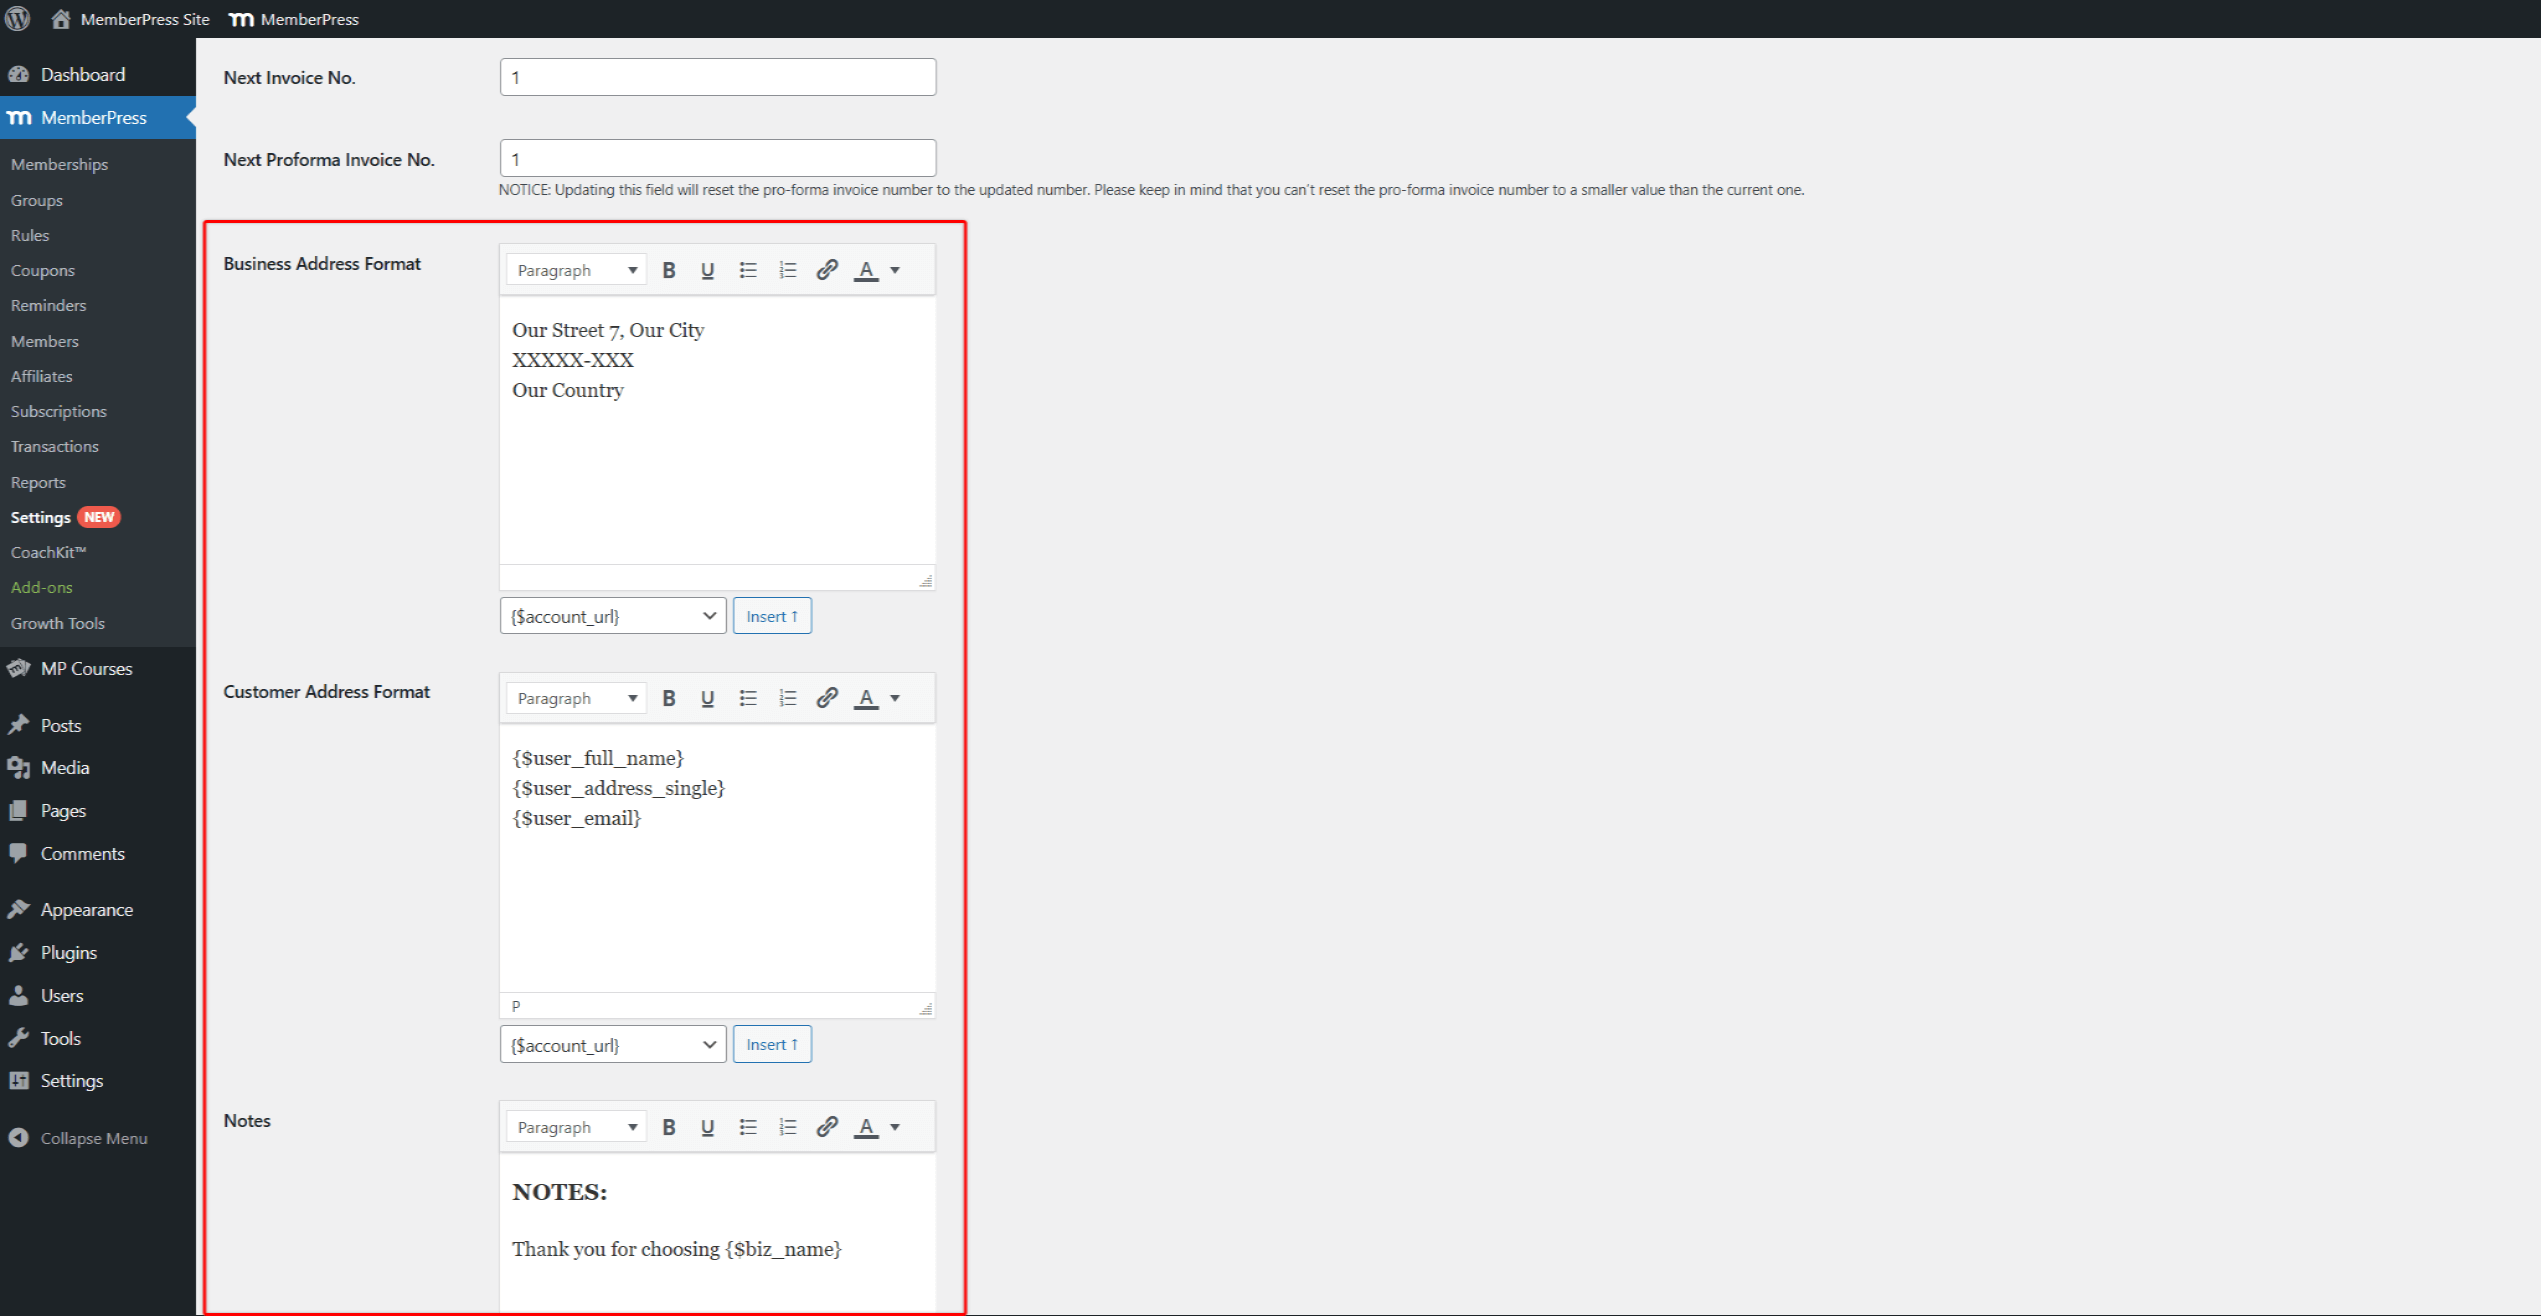
Por padrão, essas áreas são preenchidas com as informações básicas e necessárias usando parâmetros. Os parâmetros importarão automaticamente as informações da empresa e os detalhes do usuário para as faturas.
Embora não seja necessário editar essas áreas, você pode modificar as informações padrão e adicionar detalhes significativos às suas faturas.
Aqui, para cada área disponível, você pode digitar qualquer texto que deseje adicionar às faturas usando o editor de texto. Além disso, você pode adicionar outros dados existentes do MemberPress inserindo parâmetros adicionais.
Você pode editar as seguintes áreas:
- Endereço comercial: Essa área é usada para exibir os detalhes de sua empresa nas faturas. Por padrão, você encontrará os parâmetros que adicionarão seus Endereço comercial do comerciante Detalhes. Você pode adicionar qualquer texto que precisar e adicionar ou remover parâmetros.
- Endereço do cliente: Por padrão, essa área é preenchida com parâmetros que adicionarão o nome, o endereço e o e-mail do usuário às suas faturas. Se necessário, você também pode editar essa área adicionando texto ou adicionando e removendo parâmetros.
- Notas: Essa área pode ser usada para adicionar qualquer informação adicional que deva aparecer após os itens da fatura, como:
- Condições de pagamento
- Mensagens de agradecimento
- Instruções especiais
- Notas de rodapé: Essa área será exibida na parte inferior de suas faturas. Você pode usá-la para incluir:
- Avisos legais
- Informações fiscais
- Políticas de reembolso
Salvar suas configurações
Quando terminar de configurar as faturas, siga estas etapas para aplicar as alterações:
- Role até a parte inferior da página.
- Clique no botão Opções de atualização botão.
Personalização avançada de faturas em PDF
Para personalizações mais complexas dos designs de faturas, você pode Substituir os arquivos de modelo. Isso requer conhecimento técnico, mas permite a personalização completa.
Acesso a faturas
Os membros podem fazer download de faturas de todas as transações concluídas de seus Página da conta:
- Fazer login e navegue até a seção Página da conta de membro.
- Clique no botão Pagamentos guia.
- Localizar o pagamento na lista.
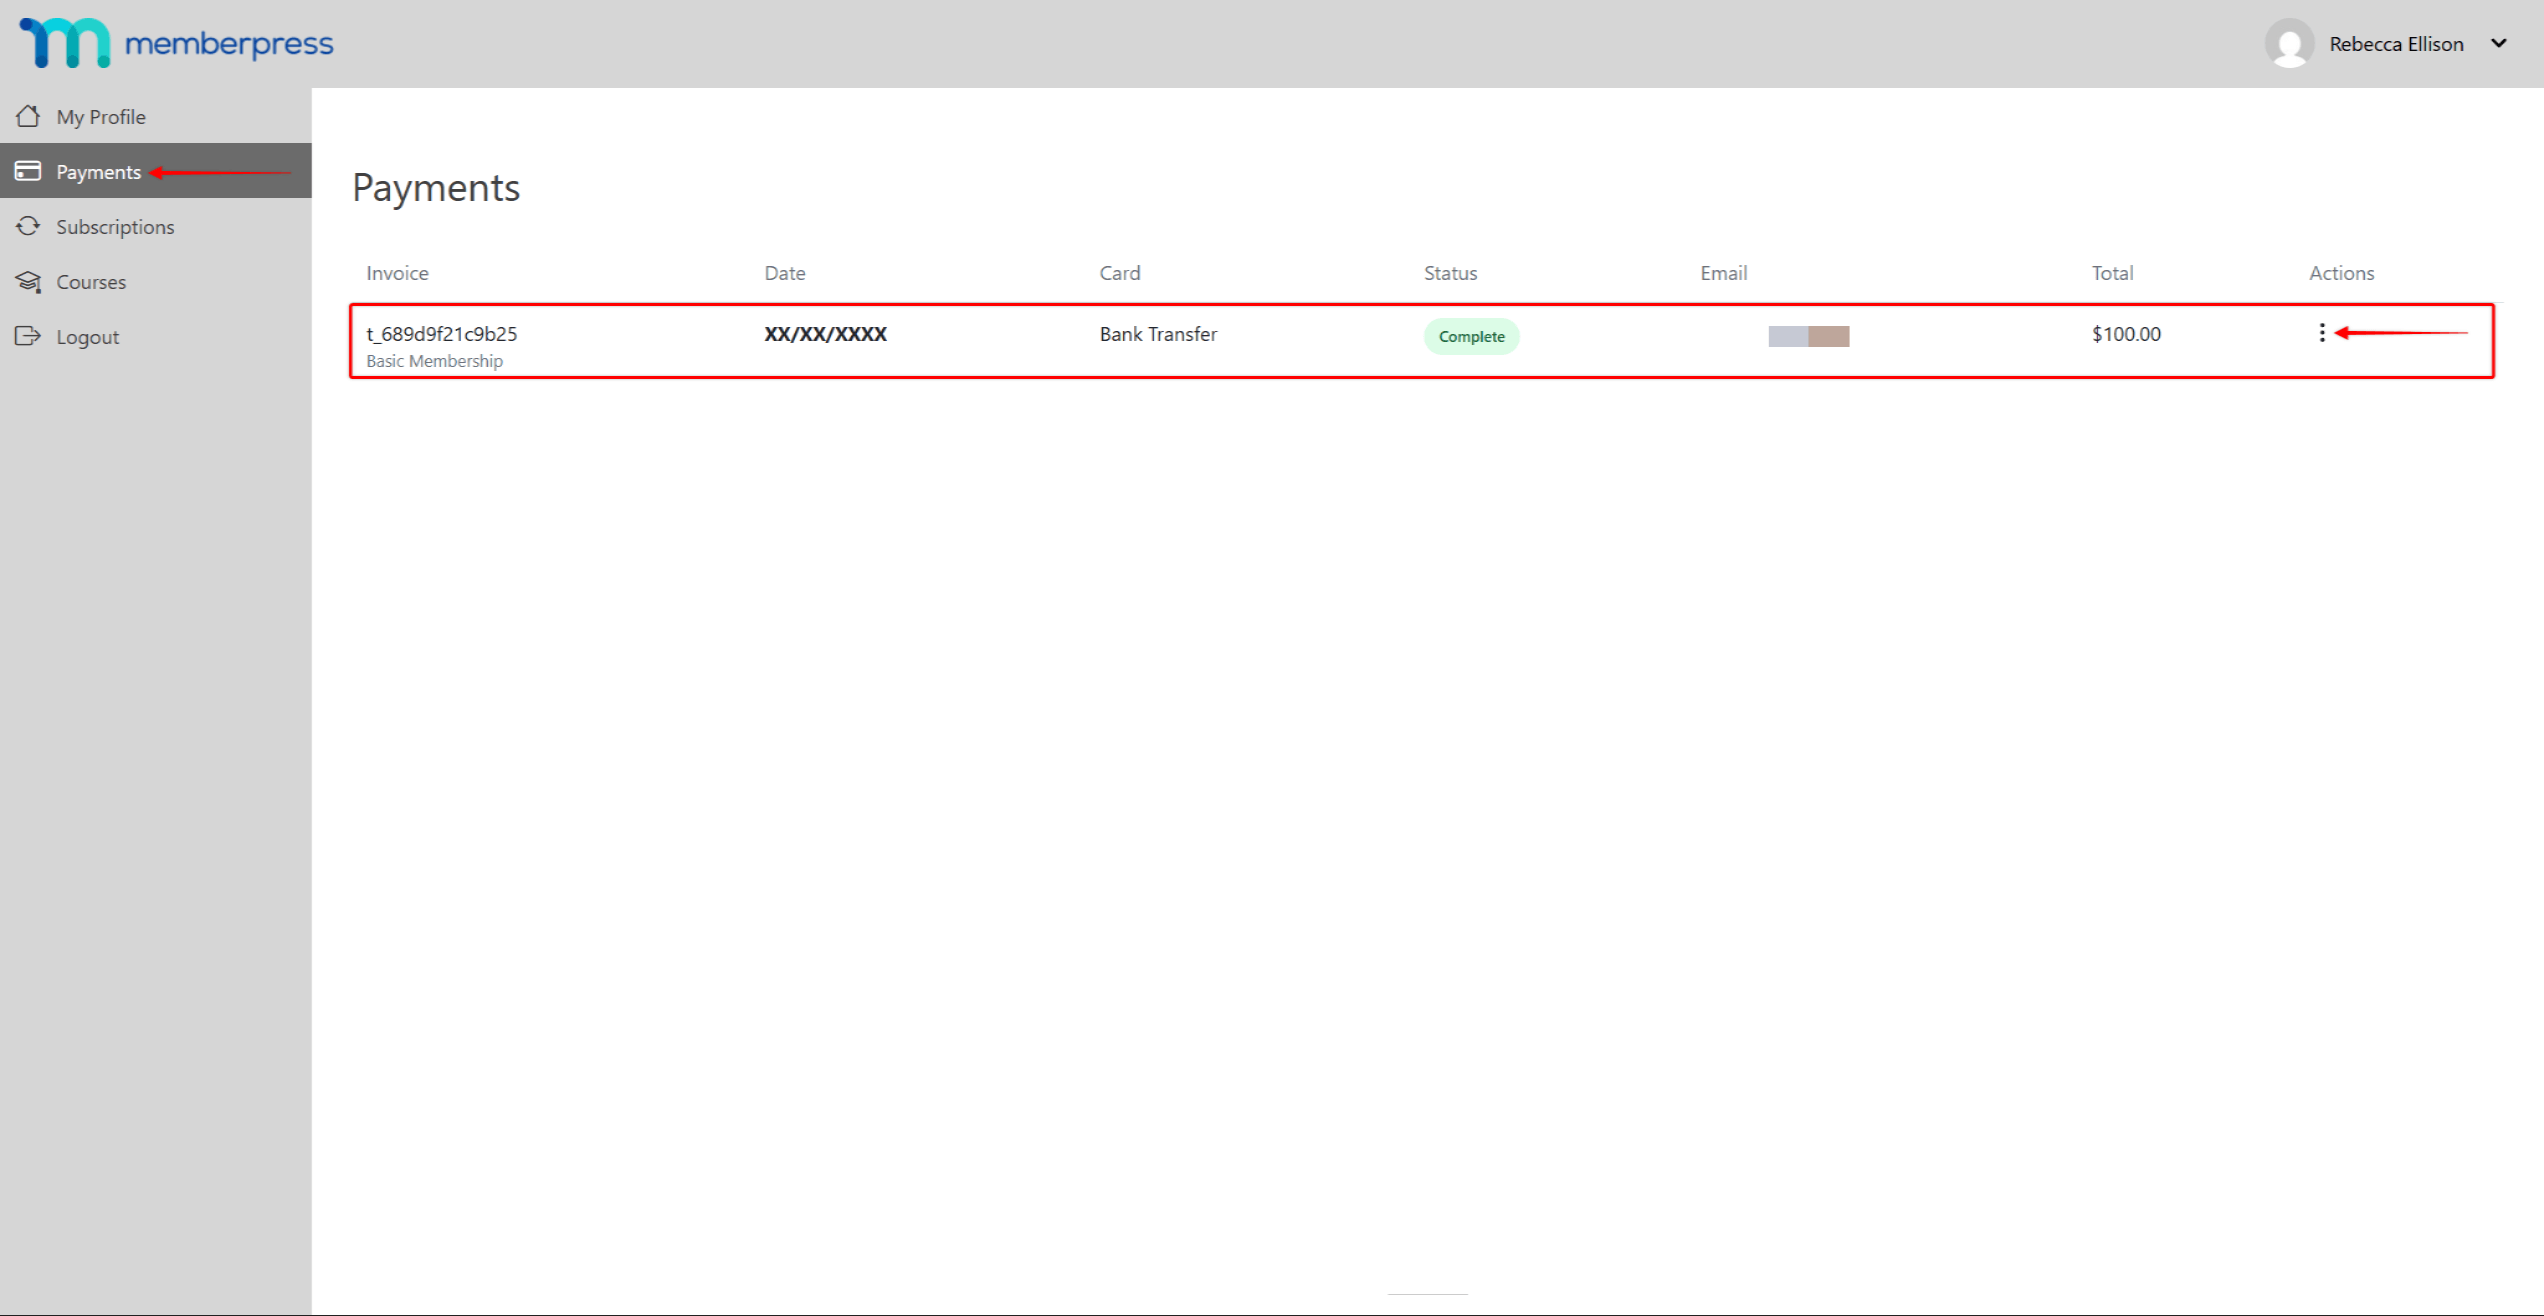
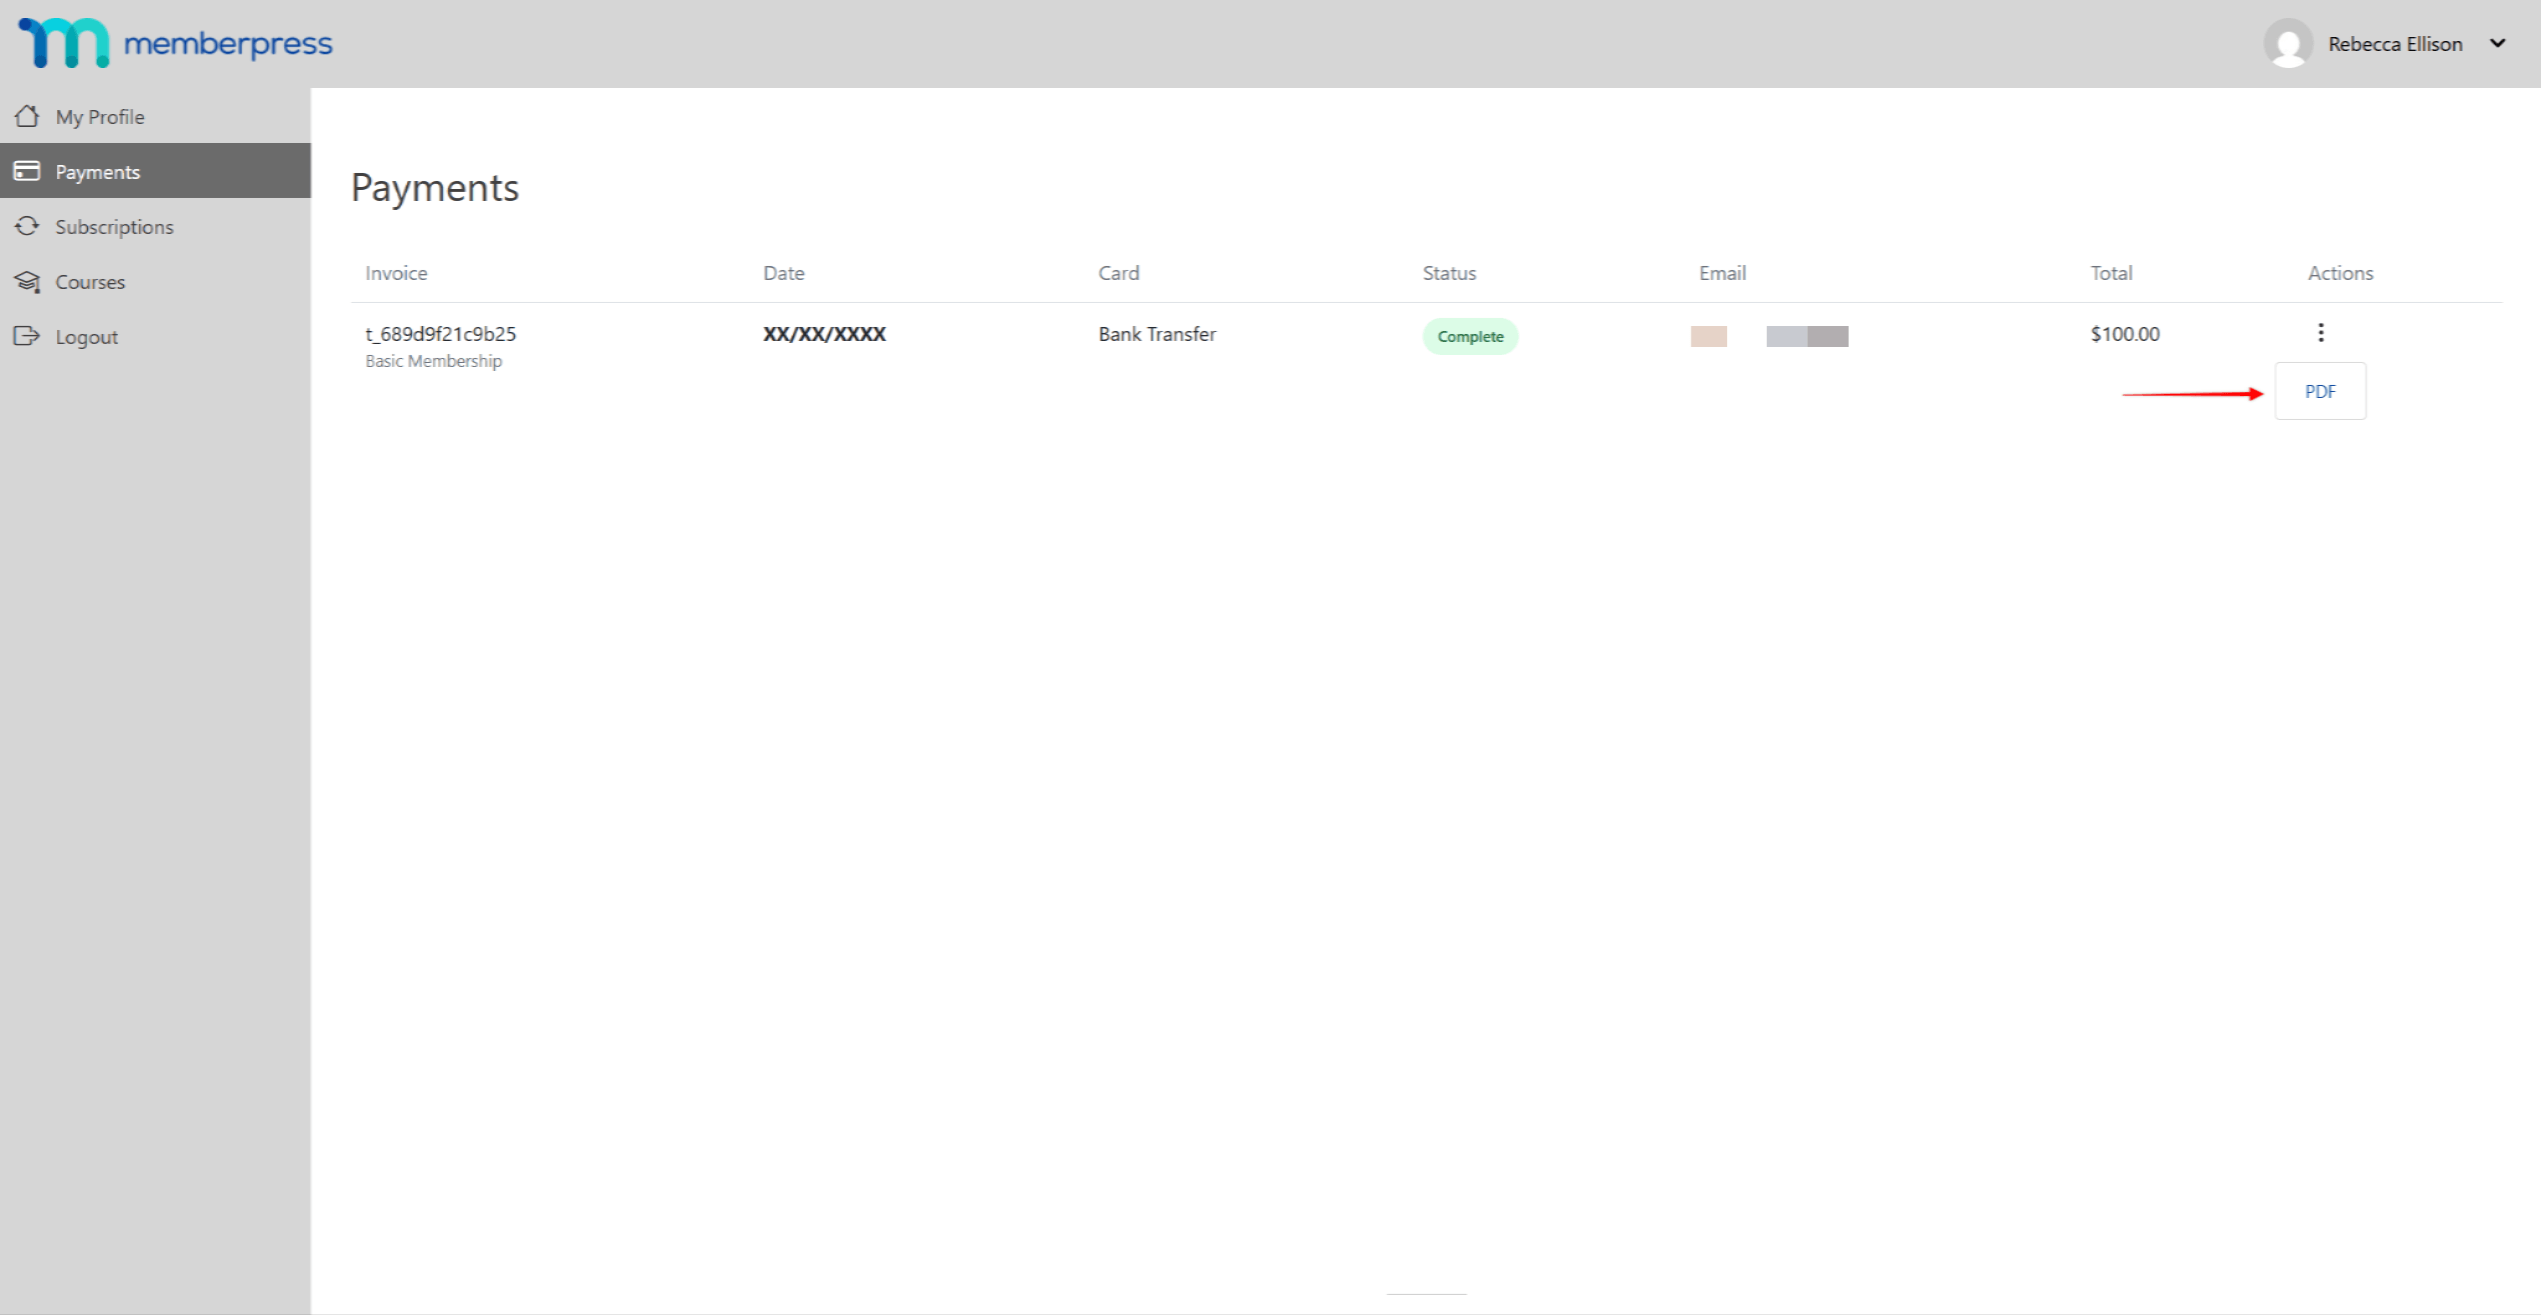
- Sob o Ações clique na coluna Ícone de 3 pontos.
- Clique no botão PDF para fazer o download do arquivo PDF da fatura.
E-mail do recibo de pagamento
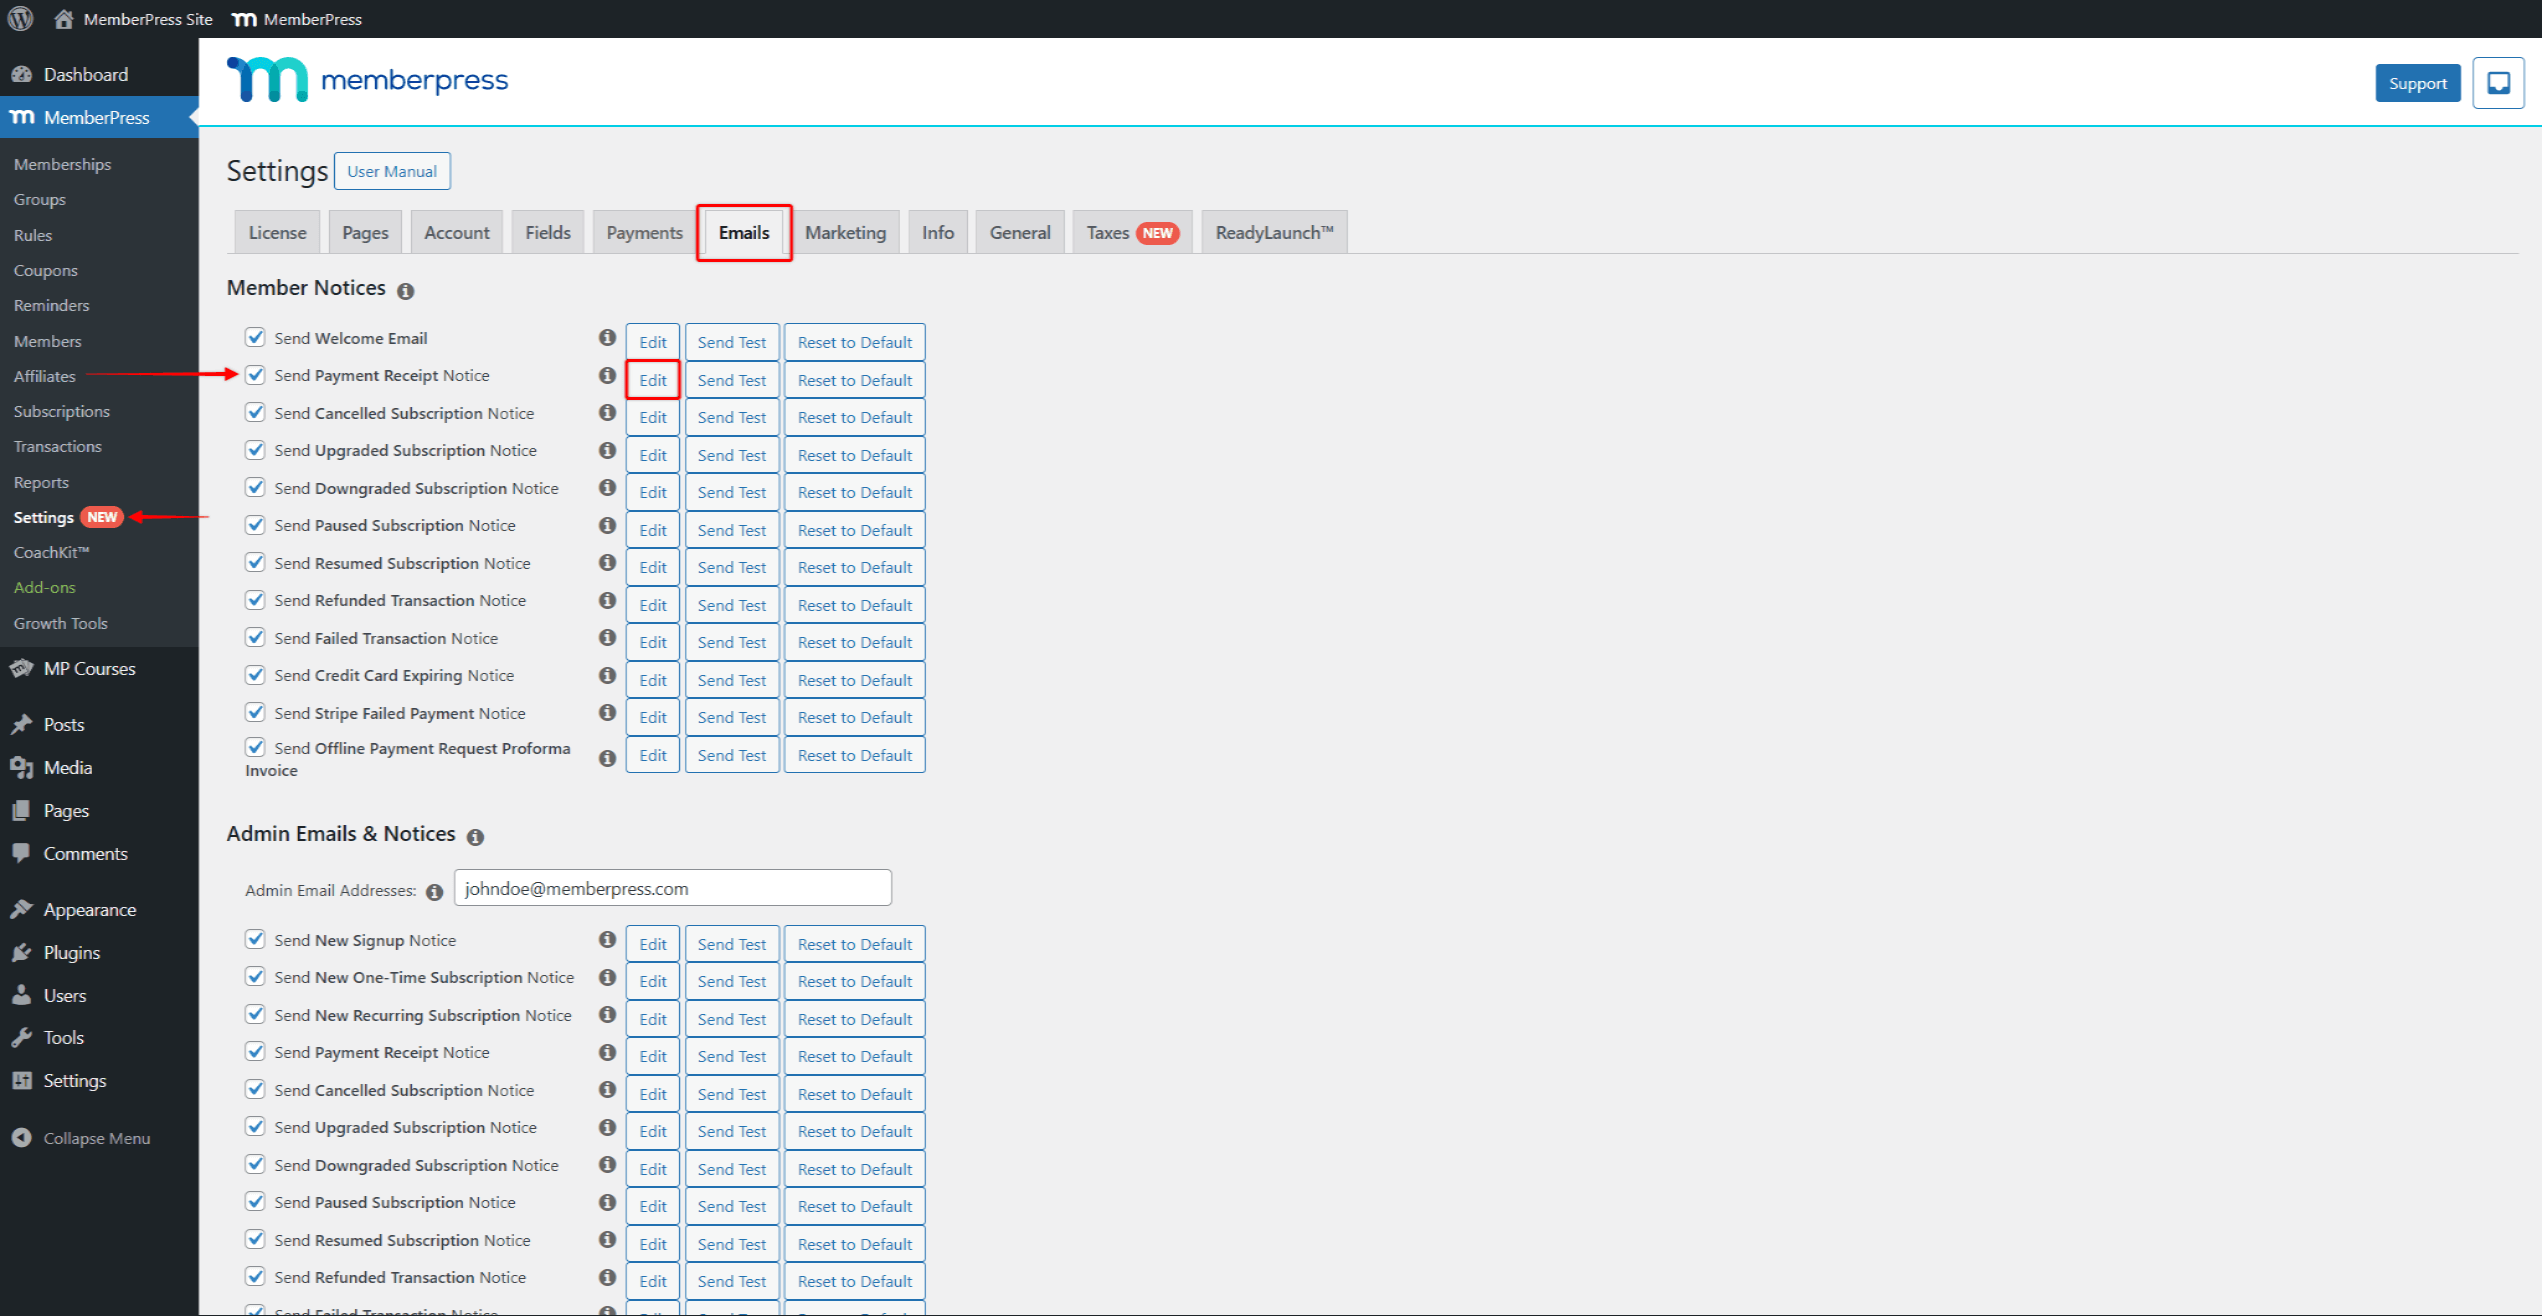
Após cada compra bem-sucedida, um a fatura será automaticamente enviada por e-mail para um membro se o O e-mail do recibo de pagamento está ativado.
Por padrão, esse e-mail será ativado na seção Avisos aos membros no Dashboard > MemberPress > Settings > aba Emails.
Aqui, você pode desativar esse e-mail, se necessário, desmarcando a caixa na frente dele. Além disso, você pode modificar o conteúdo do e-mail clicando em seu Editar botão.
Acesso a faturas como administrador
Você também pode acessar e baixar qualquer fatura por meio do backend:
- Navegue até Painel de controle > MemberPress > Transações.
- Localizar a transação você precisa, e passe o mouse sobre o nome da transação para mostrar opções adicionais.
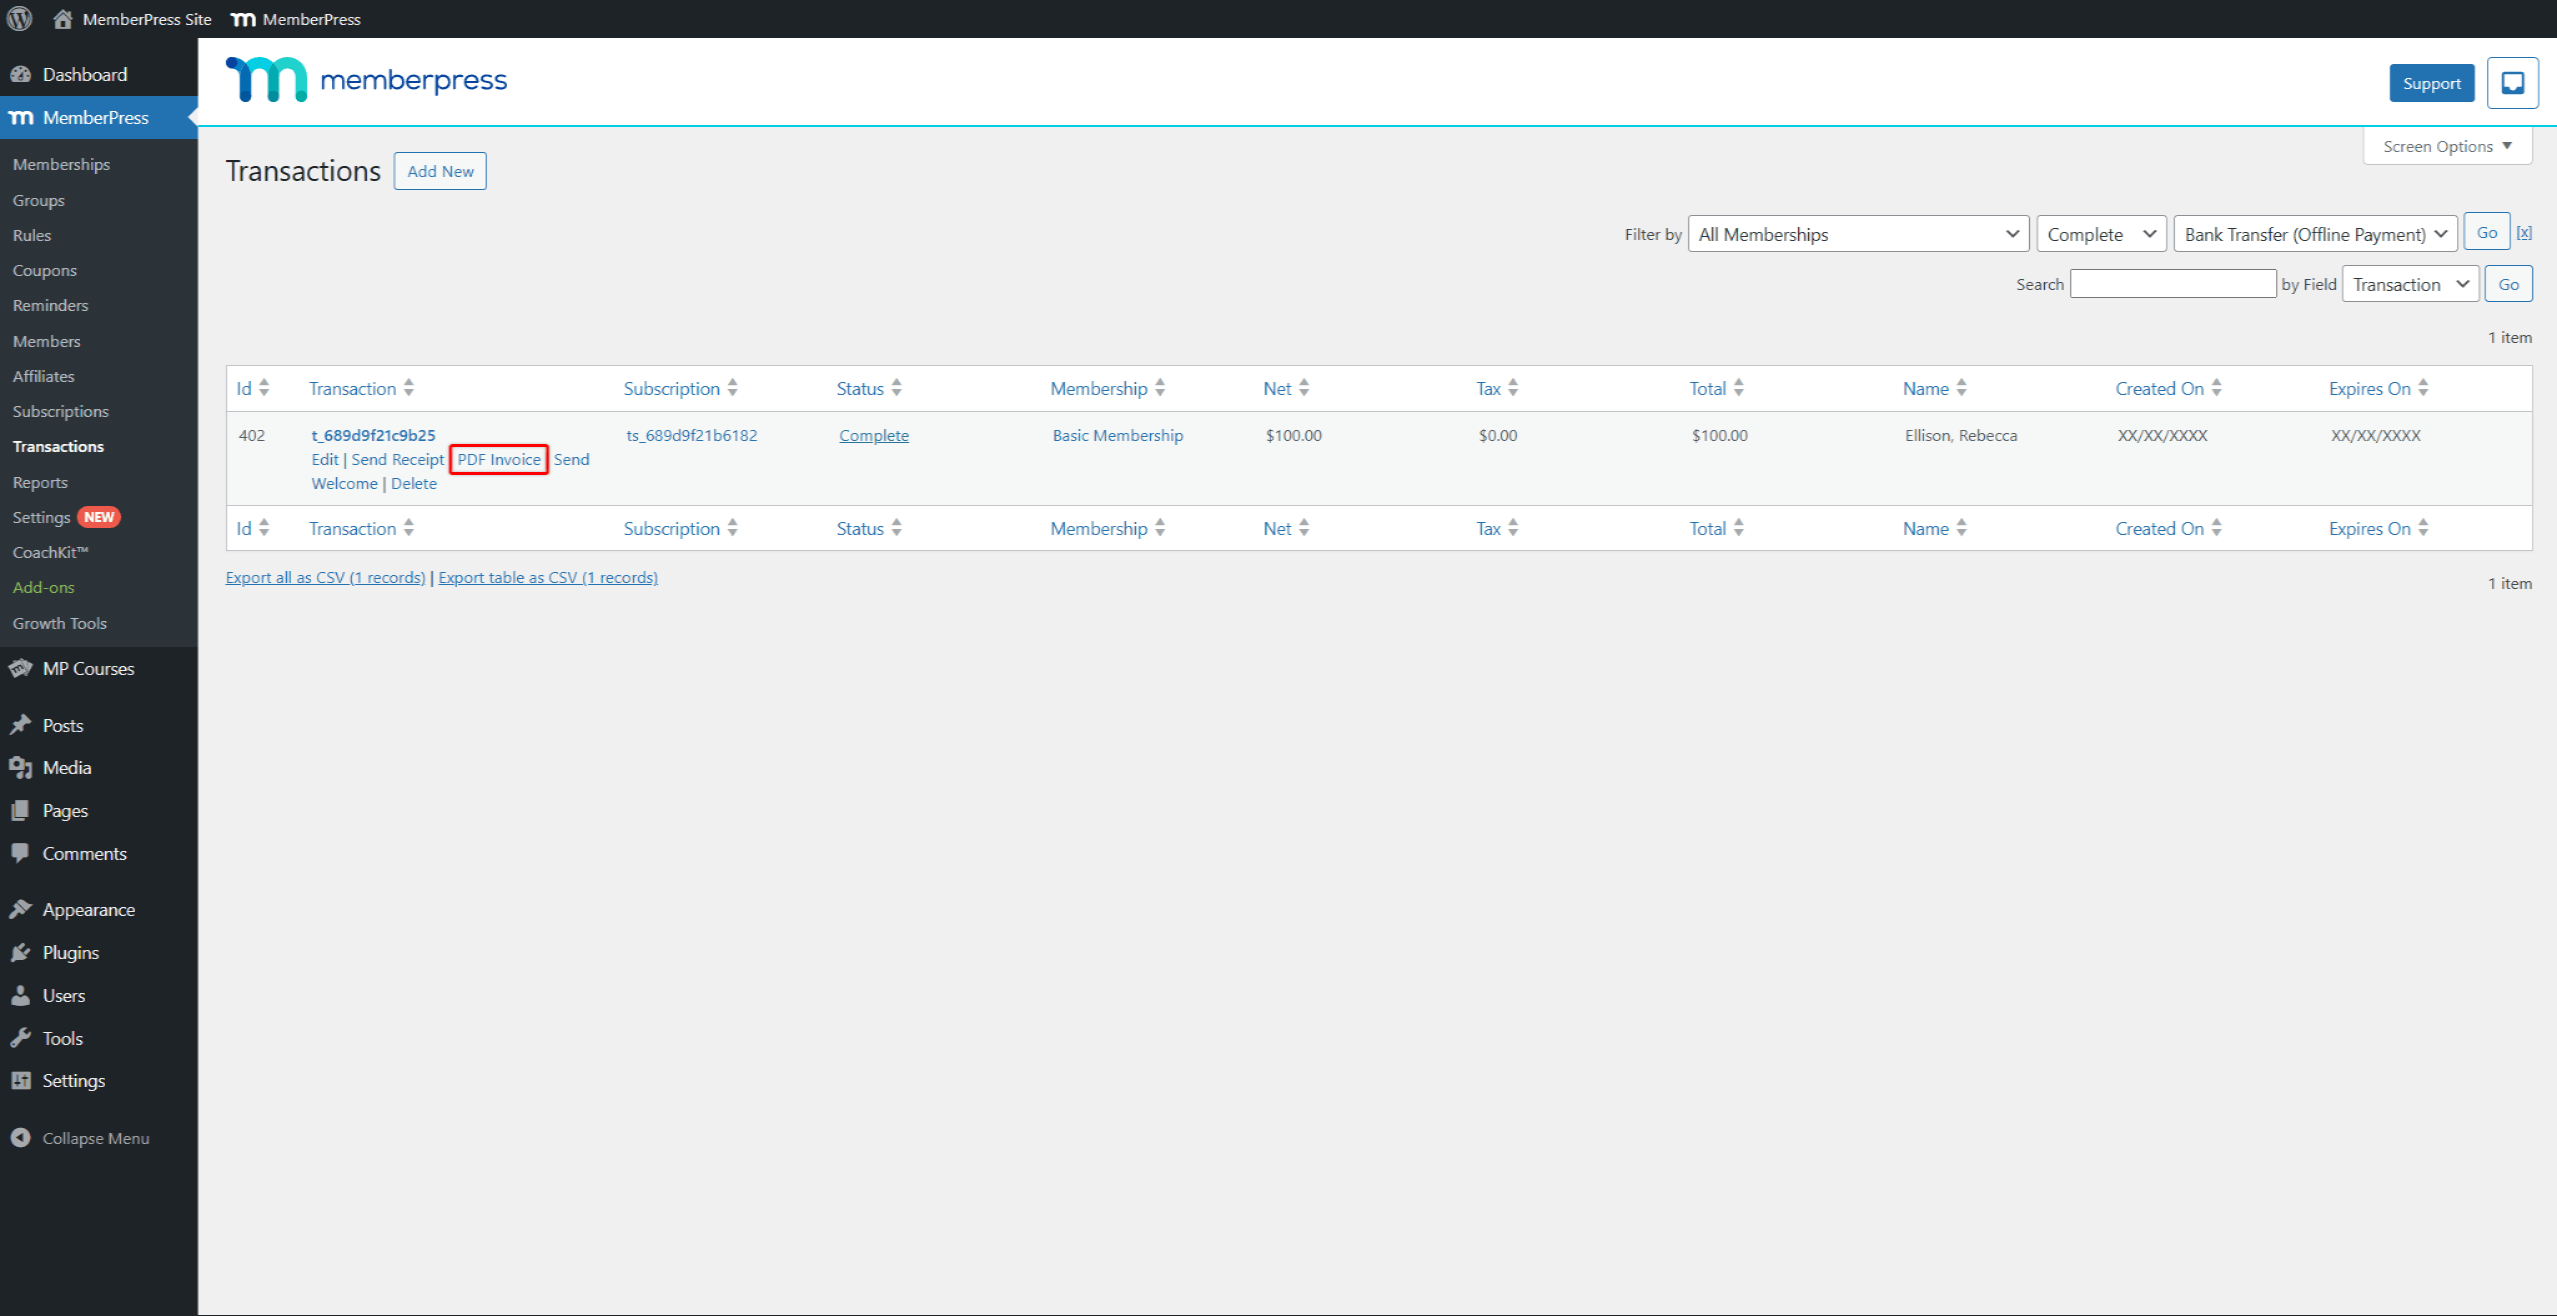
- Clique no botão Fatura em PDF link para gerar e fazer download do arquivo PDF da fatura.
Da mesma forma para os membros, Cada fatura será enviada por e-mail para o endereço de e-mail do administrador por meio do e-mail do recibo de pagamento.
Esse e-mail também será ativado por padrão na seção Admin Email & Notices (E-mail e avisos do administrador) no Dashboard > MemberPress > Settings > aba Emails.
Solução de problemas de faturas em PDF
Aqui, você encontrará algumas das situações às quais deve prestar atenção ao usar as faturas MemberPress:
- Faturas borradas: Faça upload de uma imagem de logotipo com pelo menos 400 pixels de largura.
- Números de faturas incorretos: Certifique-se de que seu número inicial seja maior do que o número de transações existentes.
- As configurações não são salvas: Clique no botão Opções de atualização e aguarde até que a página seja totalmente recarregada. Se for bem-sucedido, você verá a notificação confirmando que as configurações foram salvas.


