Os diretórios do MemberPress transformam perfis individuais de membros em vitrines dinâmicas e pesquisáveis que demonstram a força e a diversidade de sua comunidade de membros. Trata-se de uma ferramenta de listagem que organiza e exibe automaticamente os perfis dos membros. Os diretórios incentivam a exploração, a formação de redes e o envolvimento, ao mesmo tempo em que proporcionam um valor significativo aos membros atuais e atraem clientes potenciais com prova social.
Este documento aborda os conceitos básicos dos Diretórios MemberPress e como usá-los para criar comunidades em seu site.
Tutorial em vídeo do ClubDirectory™
O que são os diretórios MemberPress?
MemberPress ClubSuite™ é um membro pacote de networking e comunidade que inclui o ClubDirectory™ e ClubCircles™ Complementos.
Diretórios de membros são um recurso do complemento ClubDirectory™, juntamente com Perfis dos membros. Para usá-los em seu site, você precisa instalar o complemento MemberPress ClubDirectory™ e configurar o Configurações globais de diretórios.
Os diretórios de membros são coleções atualizadas automaticamente de perfis de membros organizados por critérios definidos por você. Isso significa que os diretórios do MemberPress refletem instantaneamente as alterações nas associações, novos registros e atualizações de perfil. Portanto, seus membros sempre verão as informações mais atualizadas sobre outros membros em seu diretório compartilhado.
Os diretórios têm várias finalidades em seu ecossistema de associação:
- facilitar o networking, ajudando os membros a encontrar colegas com interesses semelhantes;
- demonstrar o valor da afiliação por meio de mostras comunitárias;
- fornecendo prova social, incentivando novas inscrições.
Os tipos comuns de diretórios incluem galerias de todos os membros, listagens específicas de membros, diretórios geográficos e mostruários de funcionários.
A apresentação visual e a funcionalidade afetam significativamente a eficácia. Diretórios bem projetados com navegação intuitiva incentivam a exploração e o uso repetido.
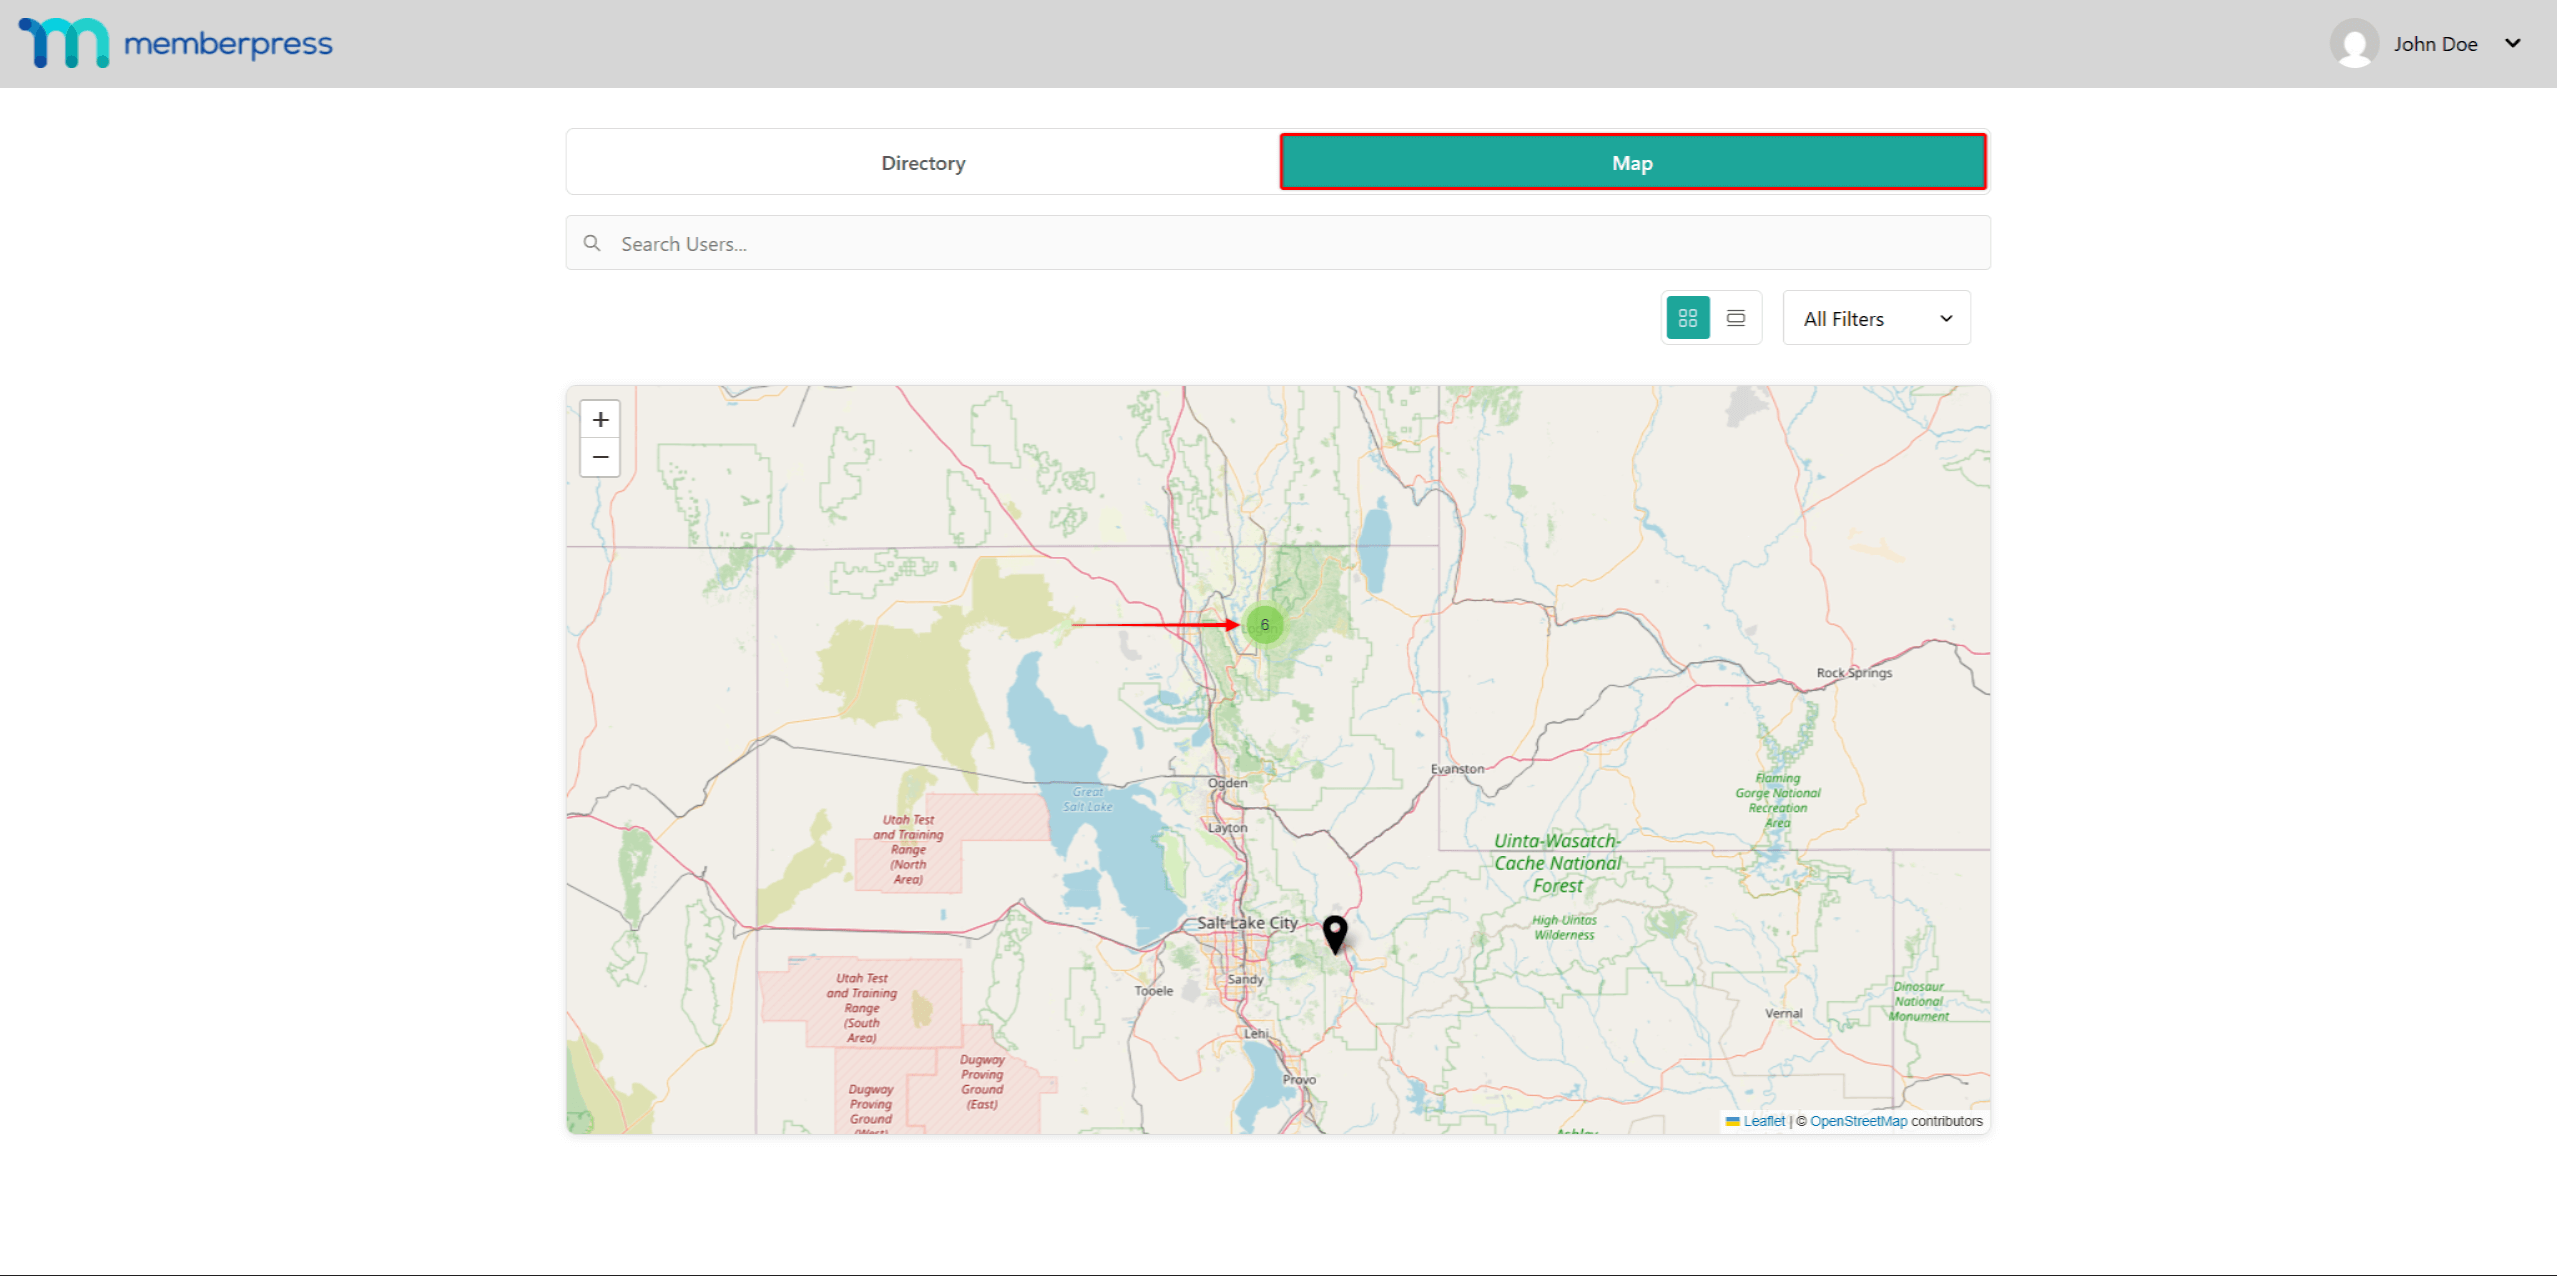
Além disso, os diretórios MemberPress incluem o recurso Map View, que permite aos usuários localizar outros membros do diretório.
Adição de membros a diretórios
O sistema automatizado de população de diretórios se mantém enquanto exibe membros relevantes. Quando novos membros se registram, o sistema avalia para quais diretórios eles se qualificam com base nos seus critérios. Os perfis qualificados aparecem automaticamente sem intervenção manual, ajudando os novos membros a se sentirem imediatamente incluídos.
As alterações de associação acionam atualizações automáticas. Quando os membros fazem upgrade, eles aparecem instantaneamente nos diretórios de novos níveis e são removidos dos níveis anteriores. Da mesma forma, as associações expiradas removem os perfis dos diretórios, garantindo que apenas os membros ativos apareçam.
Os membros devem ter tipos de perfis ativos para aparecerem nos diretórios, evitando que contas incompletas atrapalhem as listagens. As configurações de visibilidade do perfil refinam ainda mais a aparência, respeitando as preferências de privacidade e mantendo os diretórios úteis.
Criação de diretórios MemberPress
MemberPress Os diretórios podem ser projetados usando o editor padrão (Gutenberg), usando blocos específicos de diretório e outros blocos (padrão, de terceiros), conforme necessário.
Por padrão, o MemberPress criará automaticamente o diretório “All Users” (Todos os usuários), que lista todos os usuários existentes.
Você pode criar diretórios adicionais com critérios específicos:
- Navegue até Painel de controle > ClubSuite™ > Diretórios.
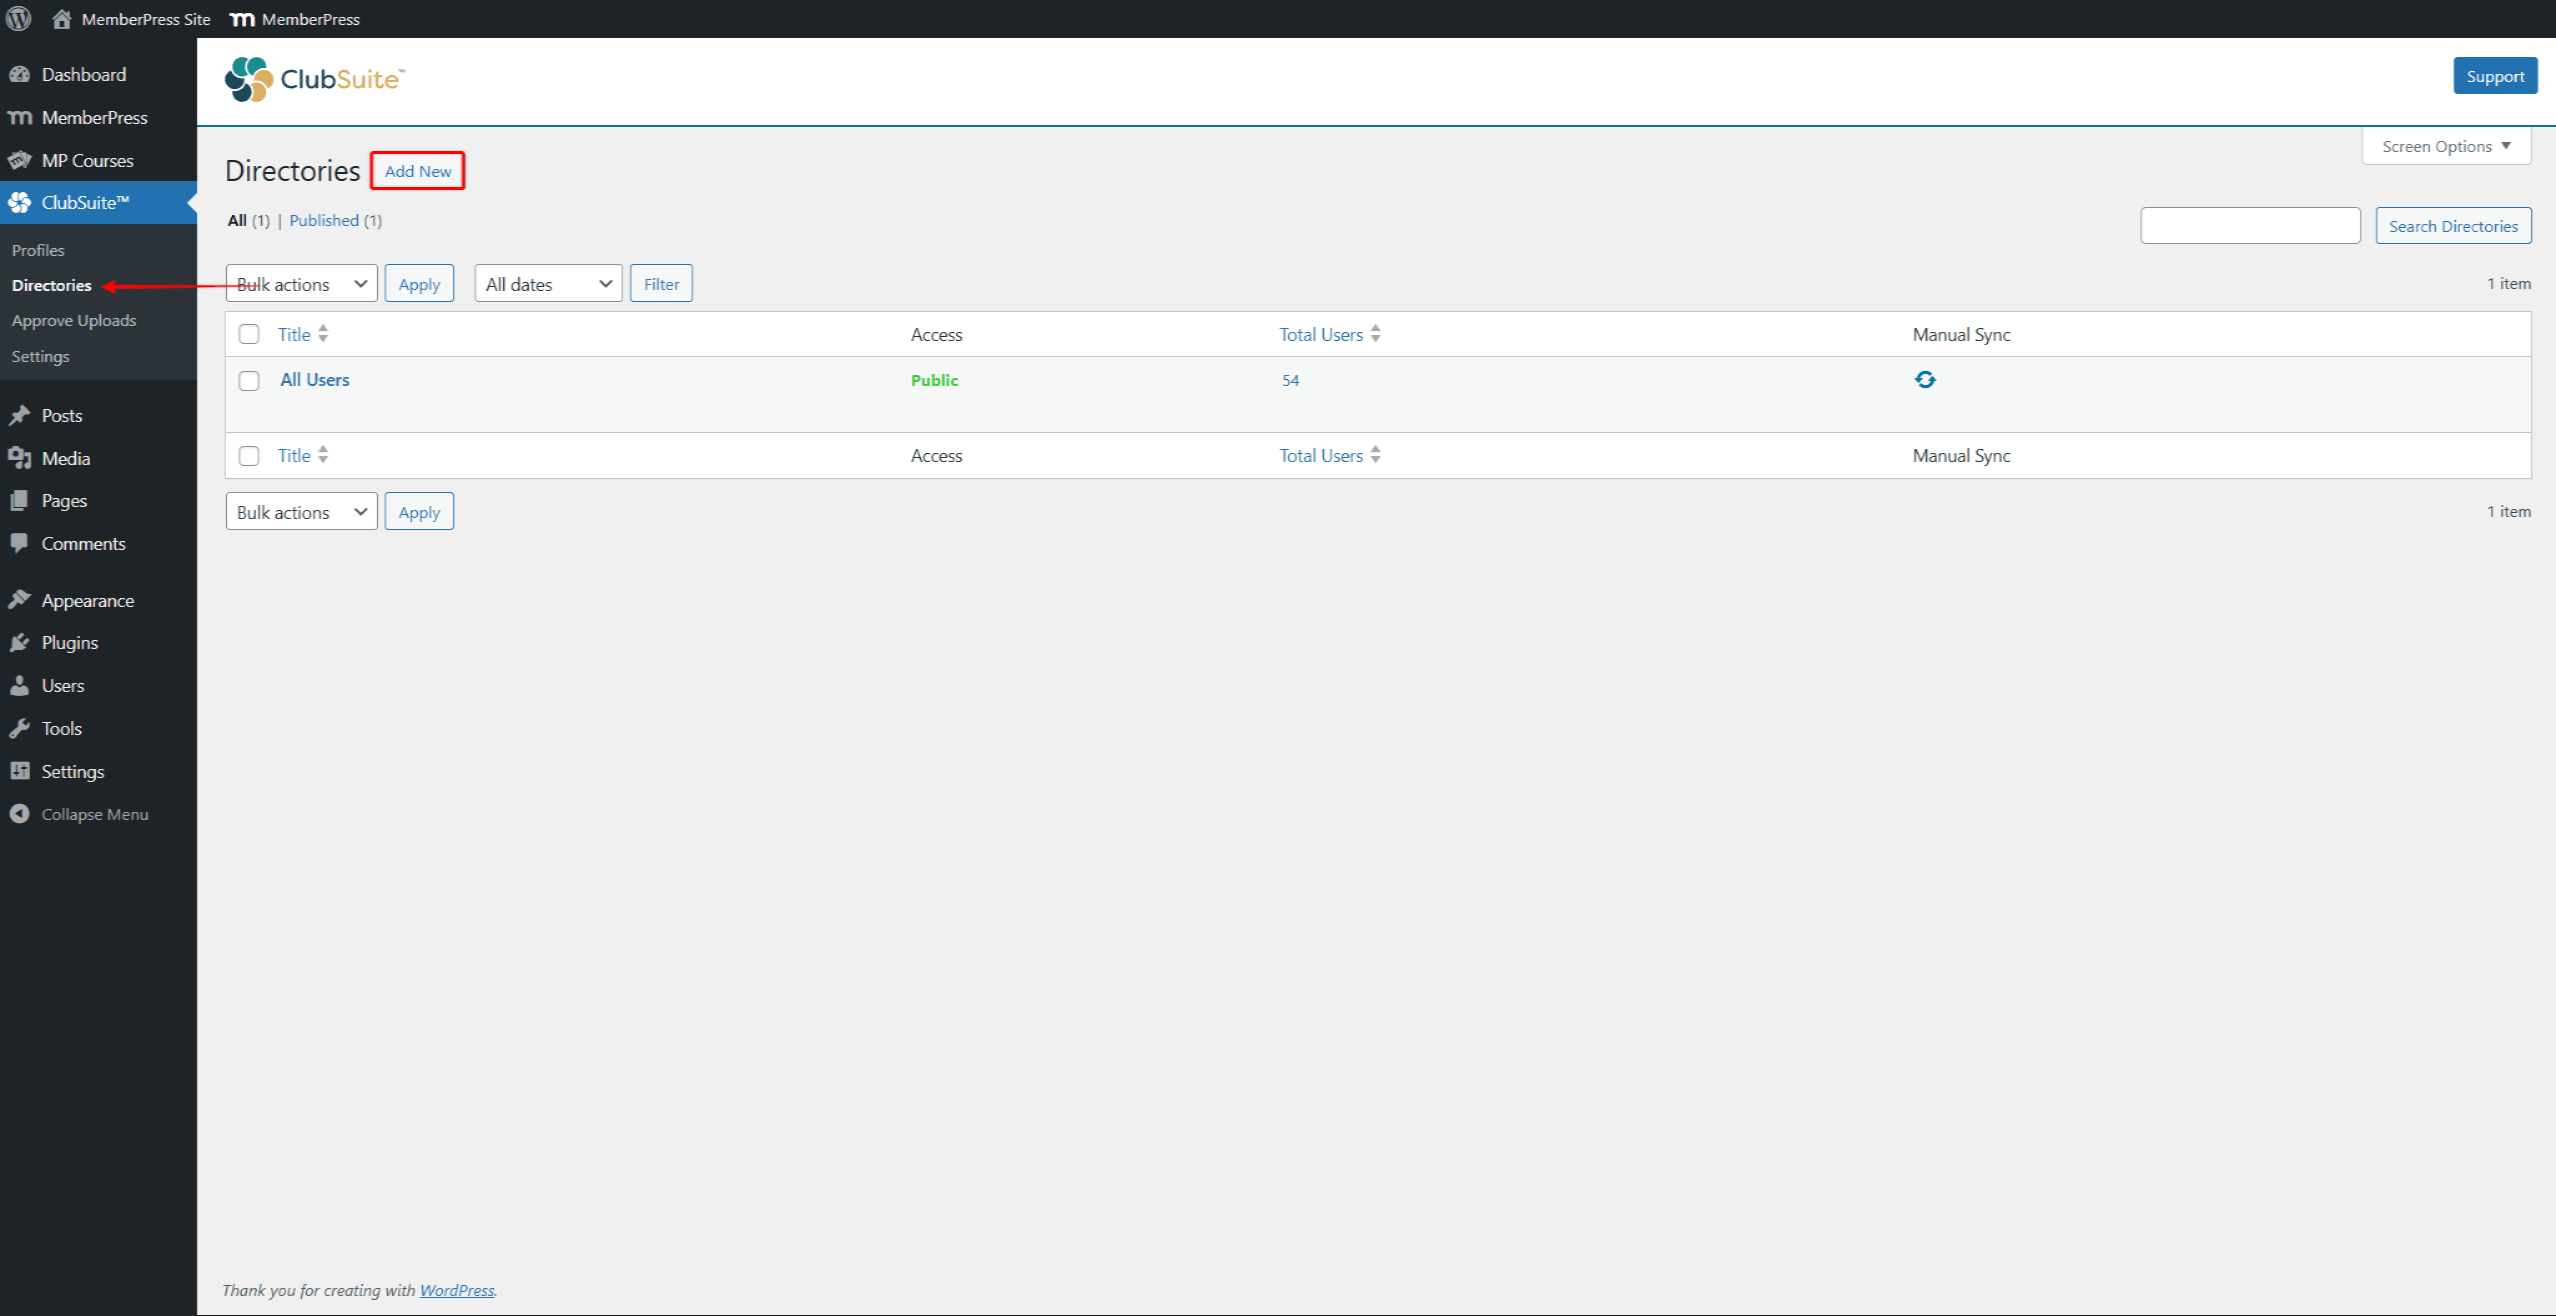
- Clique em Adicionar novo.
- Insira um diretório título (por exemplo, “Pro Member Directory”).
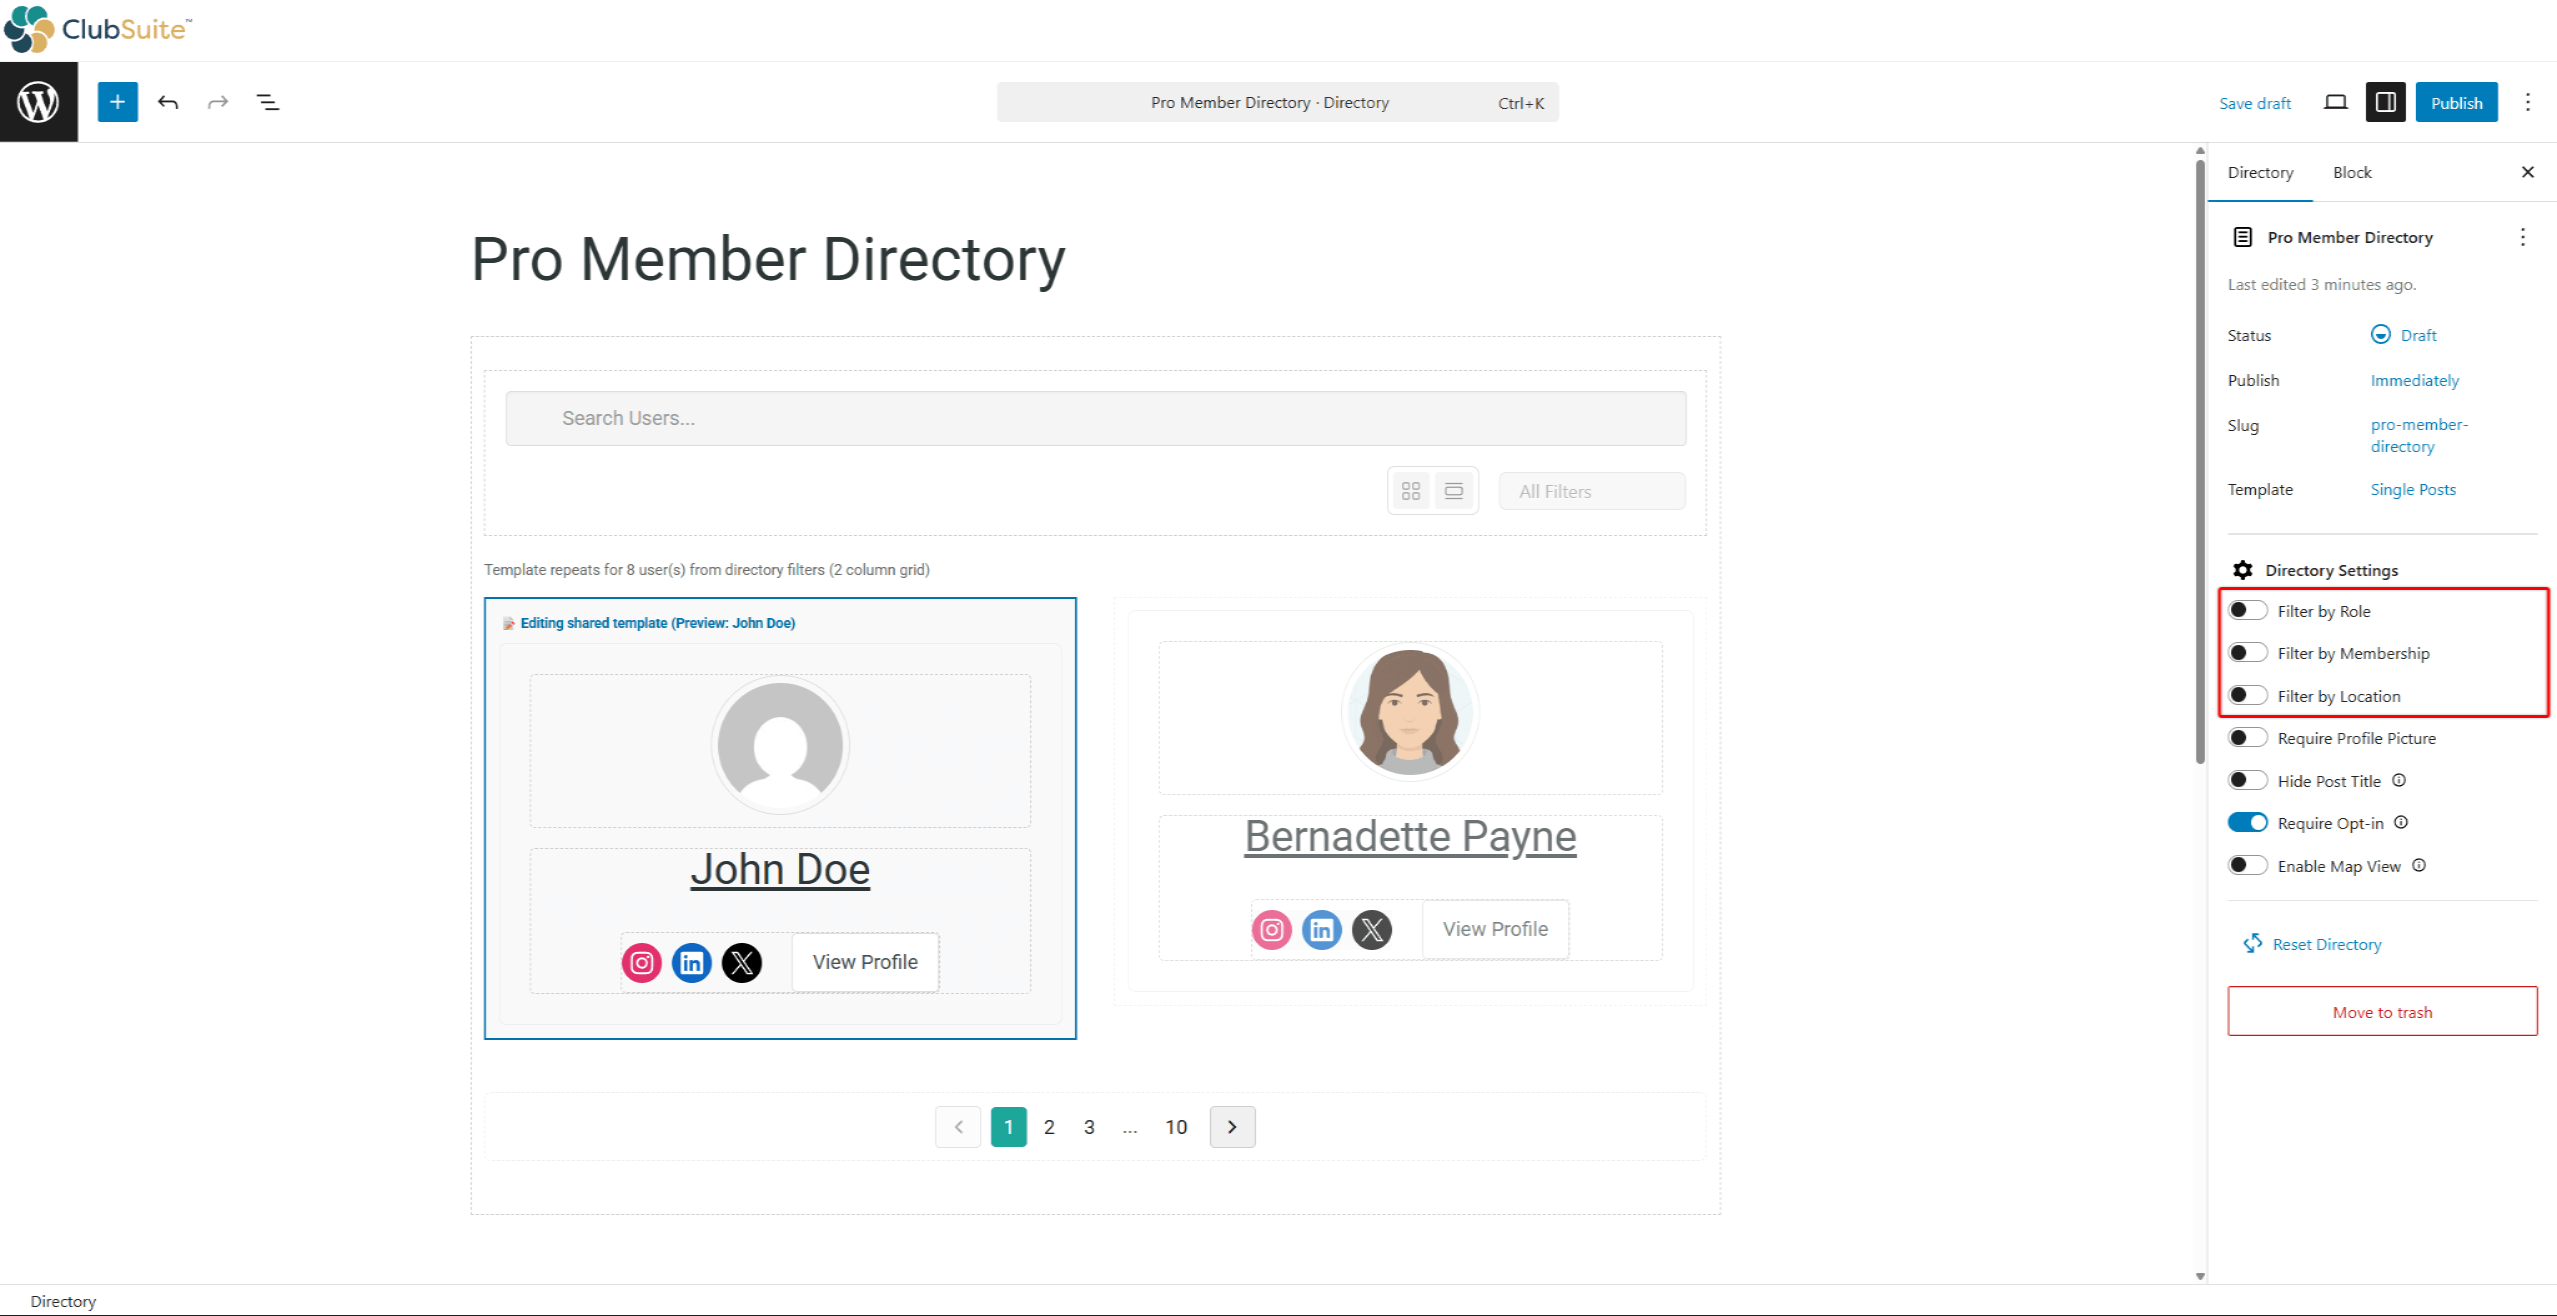
- No painel do lado direito, você pode encontrar a opção Configurações de diretório. Aqui, você pode definir uma ou várias limitações de diretório. Essas limitações (filtros) definirá o tipo de diretório:
- Filtrar por funçãoLimitar os membros desse diretório àqueles com funções de usuário específicas (uma ou mais). A ativação desse filtro permitirá que você especifique as funções de usuário permitidas para esse diretório;
- Filtrar por associaçãoLimitar os membros desse diretório àqueles inscritos em associações específicas (uma ou mais). A ativação desse filtro permitirá que você especifique as associações permitidas para esse diretório;
- Filtrar por localLimite de membros para esse diretório com base nos países dos membros (um ou mais). O MemberPress usará o país que os usuários definiram em seus perfis.
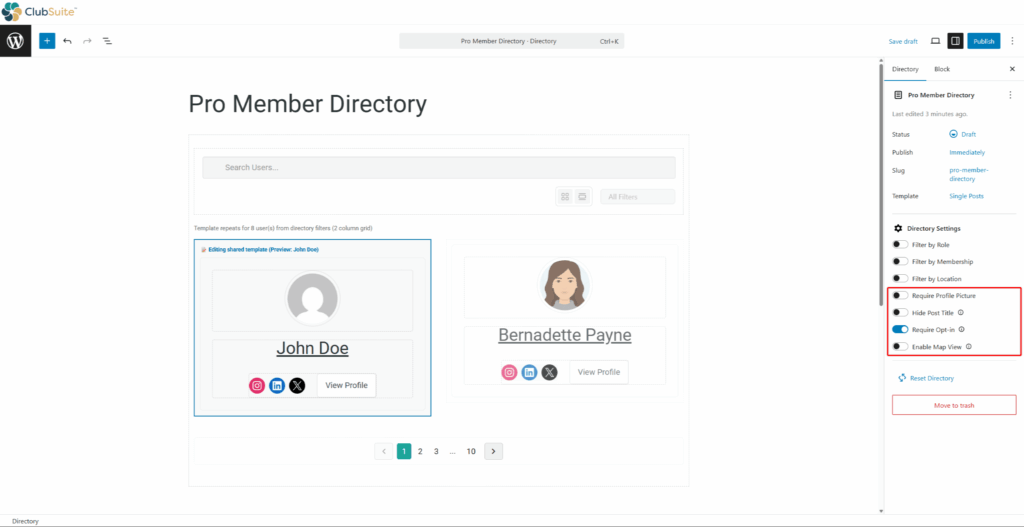
- Aqui, você pode encontrar opções adicionais:
- Solicitar foto do perfil: ativar essa opção ocultará todos os membros sem uma foto de perfil definida;
- Ocultar título: ativar essa opção ocultará o título do diretório no frontend.
- Exigir opt-inQuando ativado, os usuários não serão adicionados ao diretório automaticamente quando se inscreverem. Em vez disso, eles precisam optar por serem exibidos no diretório.
- Ativar visualização do mapa: esta opção adicionará a representação geográfica dos membros do diretório. Cada membro será exibido no mapa de acordo com o Localização exata opção definida em seu perfil.
- Privacidade de localização: isto subopção ficará visível quando a opção Ativar visualização do mapa está ativada. Ativar esta subopção irá randomizar a localização exata do usuário dentro de um raio de 16 km de sua posição real para proteger sua privacidade na visualização do mapa.
- Clique em Publicar para salvar o diretório.
Isso criará um novo diretório em seu site. O URL do diretório será gerado automaticamente. O formato padrão do URL do diretório é https://yourdomain.com/directories/directory-title/.
Criando comunidades baseadas em associação com o ClubDirectory™
Como mencionado acima, os diretórios podem ser criados para comunidades específicas com base em um ou mais critérios. Mais comumente, as comunidades são formadas em torno das associações às quais os usuários se inscrevem:
- Ao editar um diretório.
- Sob o Configurações de diretório, habilitar o Filtrar por associação opção.
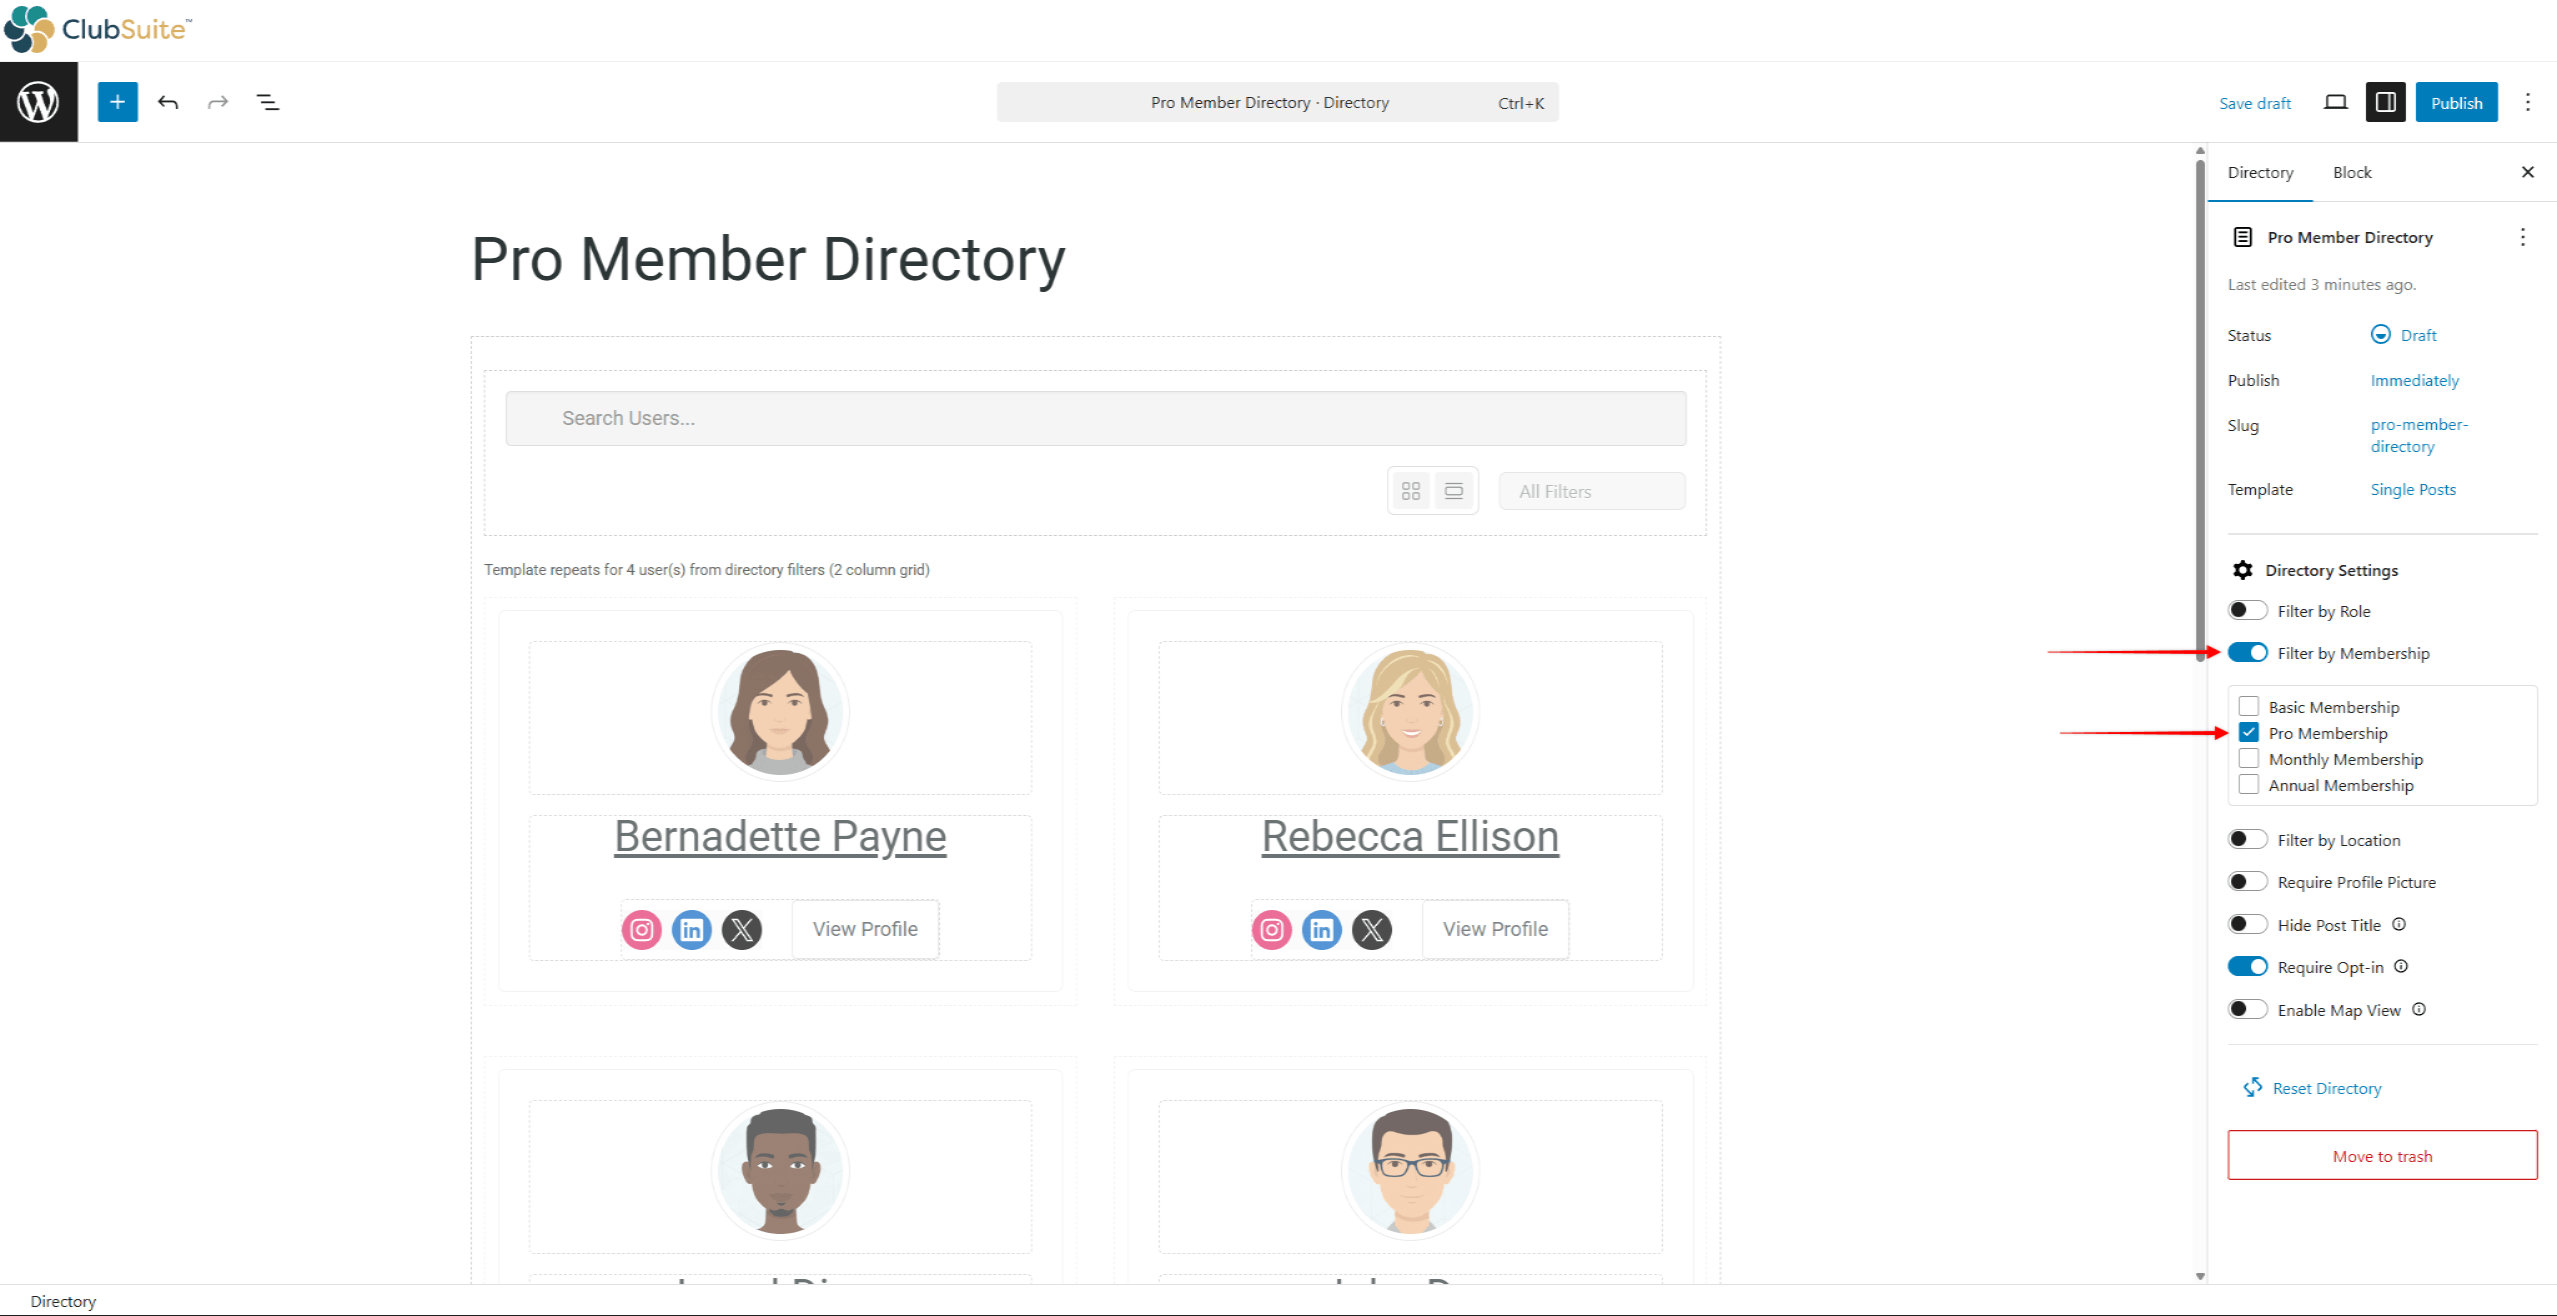
- Selecione uma ou mais associações. Isso limitará o diretório apenas aos usuários com assinaturas ativas das associações selecionadas.
- Clique em Publicar / Atualizar para salvar as alterações.
Ao combinar esse filtro com outros critérios, você pode criar comunidades mais específicas. Por exemplo:
- Combinando filtros de associação e localização - crie um diretório de membros de membros inscritos de um determinado país ou região;
- Combinação Filtros de associação e função - criar um diretório de membros de membros inscritos com funções específicas (por exemplo, os membros mais bem-sucedidos)
Configuração de blocos de diretório
Os diretórios MemberPress vêm com vários blocos específicos de diretório. Esses blocos de diretório só podem ser usados ao projetar diretórios.
O modelo de diretório padrão será carregado automaticamente ao criar um novo diretório. O modelo padrão contém Usuários do diretório, Modelo de usuário de diretório, Filtros de diretório, e Paginação do diretório blocos. Você pode configurar cada bloco de diretório e também adicionar ou remover blocos.
Bloco de usuários do diretório
Esse é o bloco de diretório principal usado para exibir os perfis dos membros. Para configurá-lo, siga estas etapas:
- Comece a editar um diretório em Painel de controle > ClubSuite™ > Diretórios.
- Clique no botão Bloco de usuários do diretório.
- Selecione o padrão Layout do diretório clicando no botão Grade ou o Lista ícone.
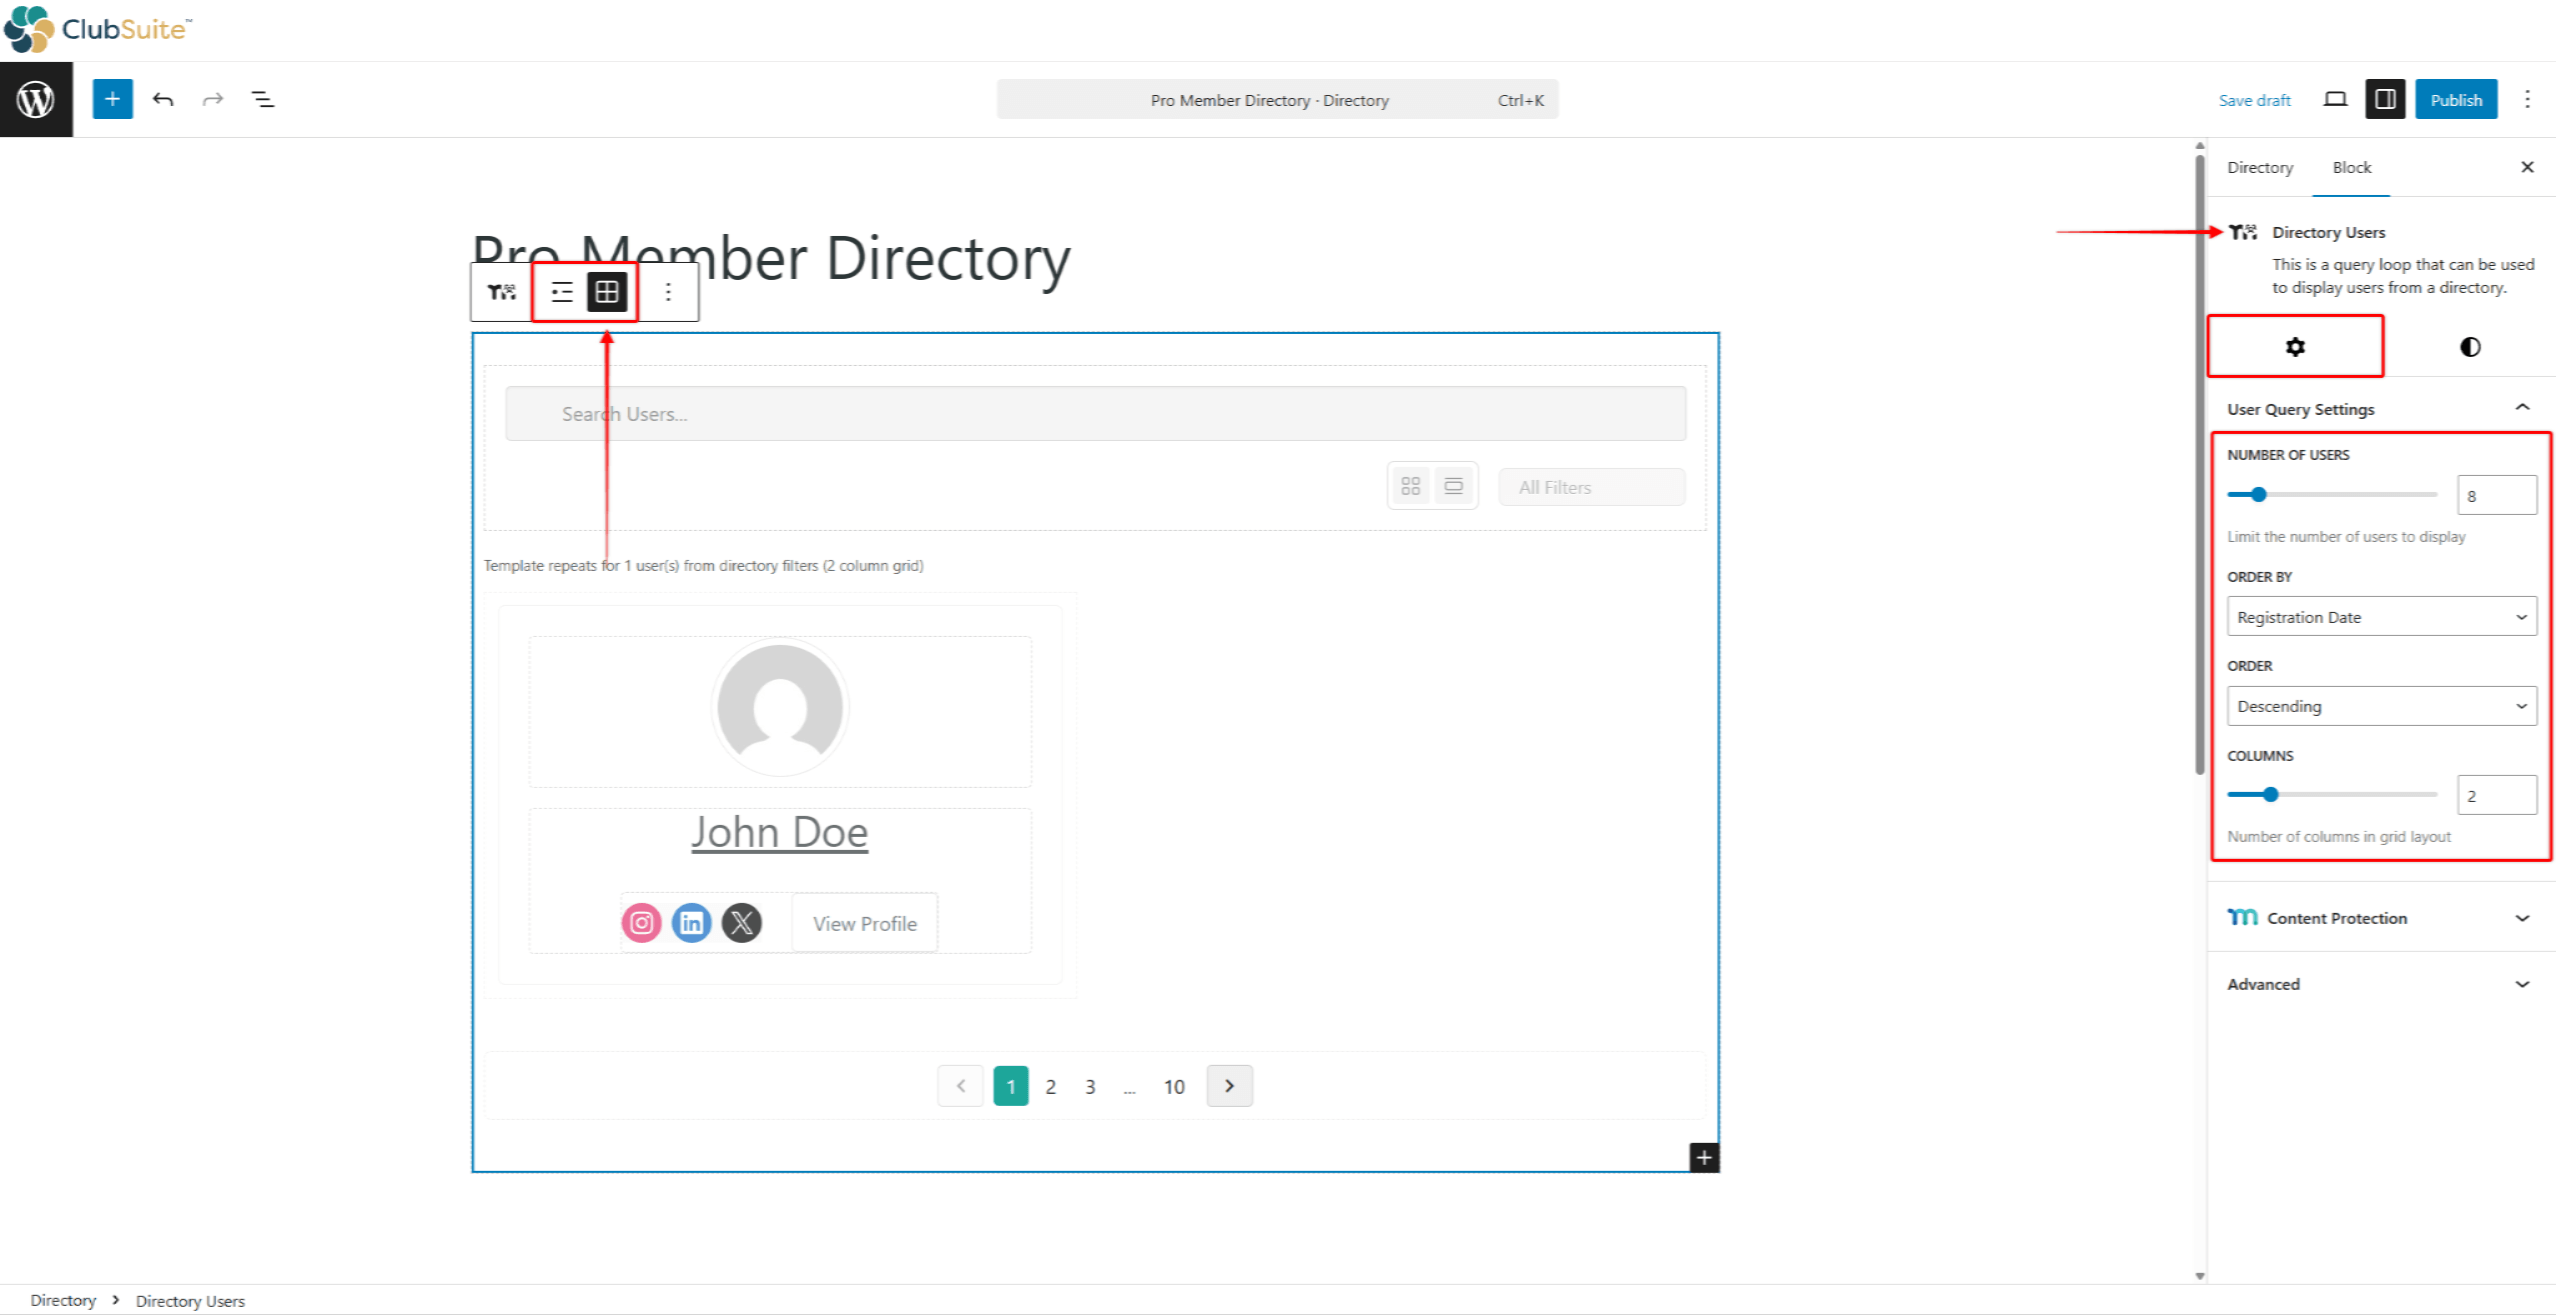
- Em seguida, no painel do lado direito, clique no ícone Configurações (ícone de engrenagem).
- Expandir o Configuração da consulta do usuário e definir as configurações:
- Número de usuários: definir o número de perfis de membros exibidos em cada página do diretório;
- Pedido por: ordena os membros com base no Data de registro, Nome de exibição (em ordem alfabética), e Login do usuário (última data de login);
- Pedido: ordem como Ascendente ou Descendente lista;
- Colunas (para Layout de grade): defina o número de colunas da grade Layout.
- Opcionalmente, na seção Estilos você pode modificar a guia cores e espaçamento usado.
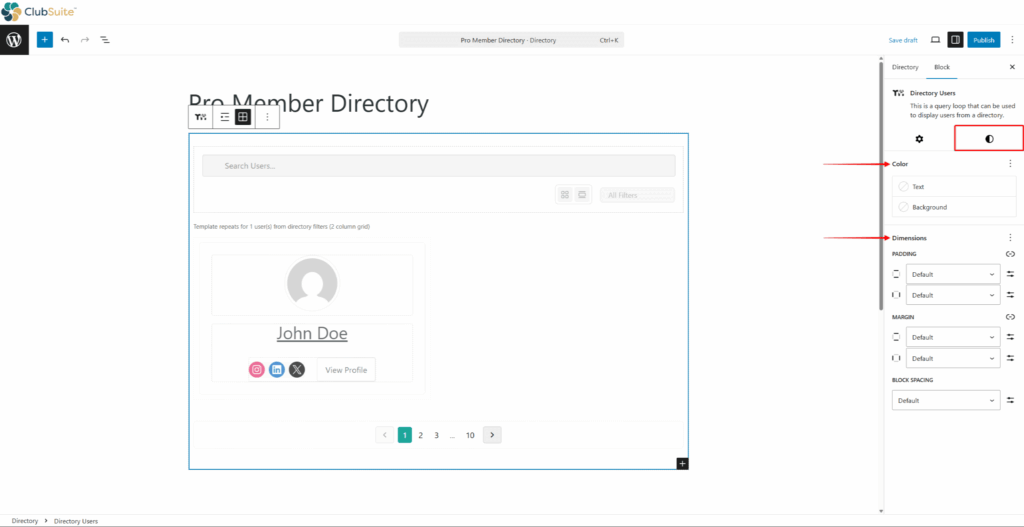
- Salve as alterações clicando em Atualizar / Publicar.
Além disso, o bloco Directory Users inclui um bloco adicional, o Bloco de modelo de usuário de diretório, que pode ser configurado separadamente.
Bloco de modelo de usuário de diretório (cartão de perfil)
O bloco de modelo de usuário do diretório define como o modelo de usuário de cada indivíduo é definido. Cartão de perfil aparece no bloco Usuários do diretório. Isso é um grupo de blocos separados específicos do usuário, em que cada bloco exibe diferentes informações relacionadas aos membros:
- Diretório Foto do usuárioFoto do perfil do usuário: esse bloco exibe a foto do perfil do usuário. Configurações de bloco disponíveis:
- Defina o Tamanho da foto;
- Ativar Link para o perfil para vincular a foto ao perfil completo do usuário.
- Nome de usuário do diretórioNome do usuário: esse bloco exibe o nome do usuário. Configurações de bloco disponíveis:
- Defina o Formato do nome para exibir o nome completo, somente o sobrenome, somente o nome ou o nome de usuário;
- Ativar Link para o perfil para vincular o nome ao perfil completo do usuário.
- Botão de perfil do diretório: esse bloco adiciona um botão vinculado ao perfil completo do usuário.
- Campos de usuário do diretórioEsse bloco permite adicionar dados de qualquer campo de usuário, inclusive seus campos personalizados. Configurações de bloco disponíveis:
- Use o Selecionar campo para escolher quais dados do campo devem ser exibidos no cartão de perfil.
- Ícones sociais do diretórioBloco de ícones: esse bloco exibe ícones de todas as plataformas de mídia social para as quais um usuário adicionou links em seu perfil de usuário. Configurações de bloco disponíveis:
- Sob o Layout você pode definir o ícone Justificativa e Orientação.
Organize os elementos com hierarquia visual e aplique um estilo consistente, incluindo planos de fundo e efeitos de foco.
Ao clicar nesse bloco, você pode modificar o cartão de perfil do membro:
- Durante a edição de um diretório, clique em qualquer cartão de perfil no Bloco de Usuários do Diretório.
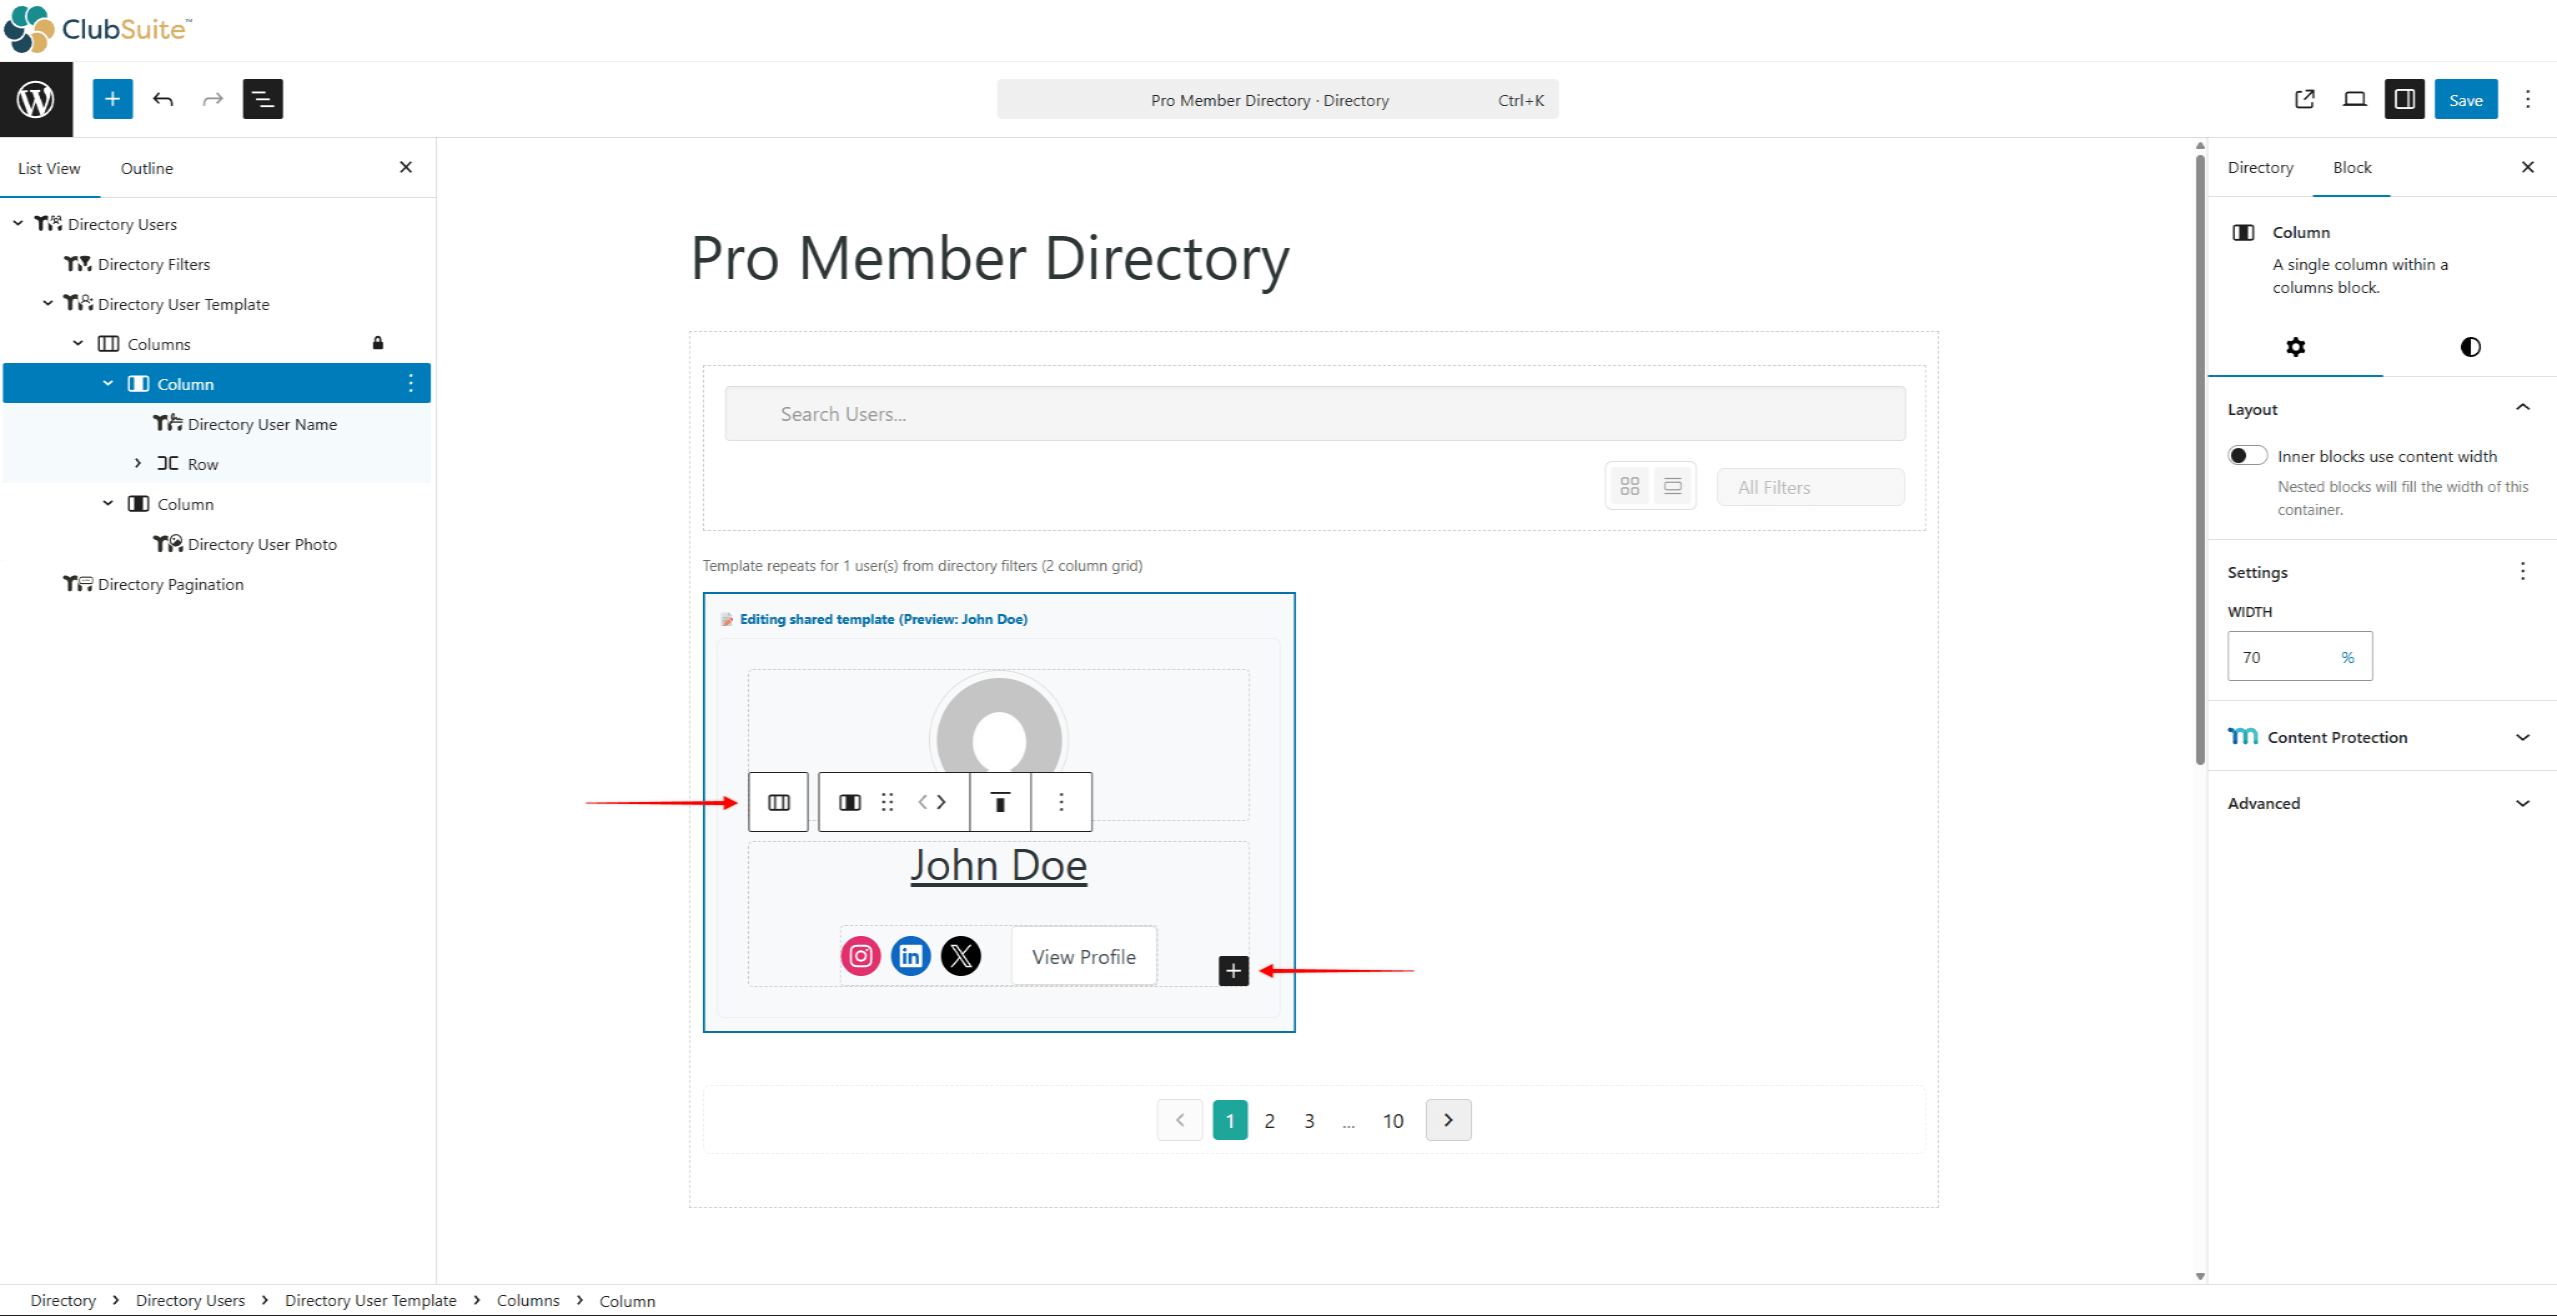
- Clique no botão bloco de colunas no interior, e o + ícone para adicionar ou remover blocos que você deseja usar.
- Próximo, configurar as configurações e o estilo de cada bloco.
- Salve as alterações clicando em Atualizar / Publicar.
Equilibre a densidade de informações com a clareza visual. O excesso de informações cria desordem, enquanto a falta delas não diferencia os membros.
Bloqueio de filtros de diretório
Os filtros ajudam os visitantes a encontrar membros específicos por meio de opções de refinamento interativas. Adicione vários tipos de filtros, incluindo:
- Localização;
- Associação;
- Função do usuário;
- Foto do perfil;
- Layout.
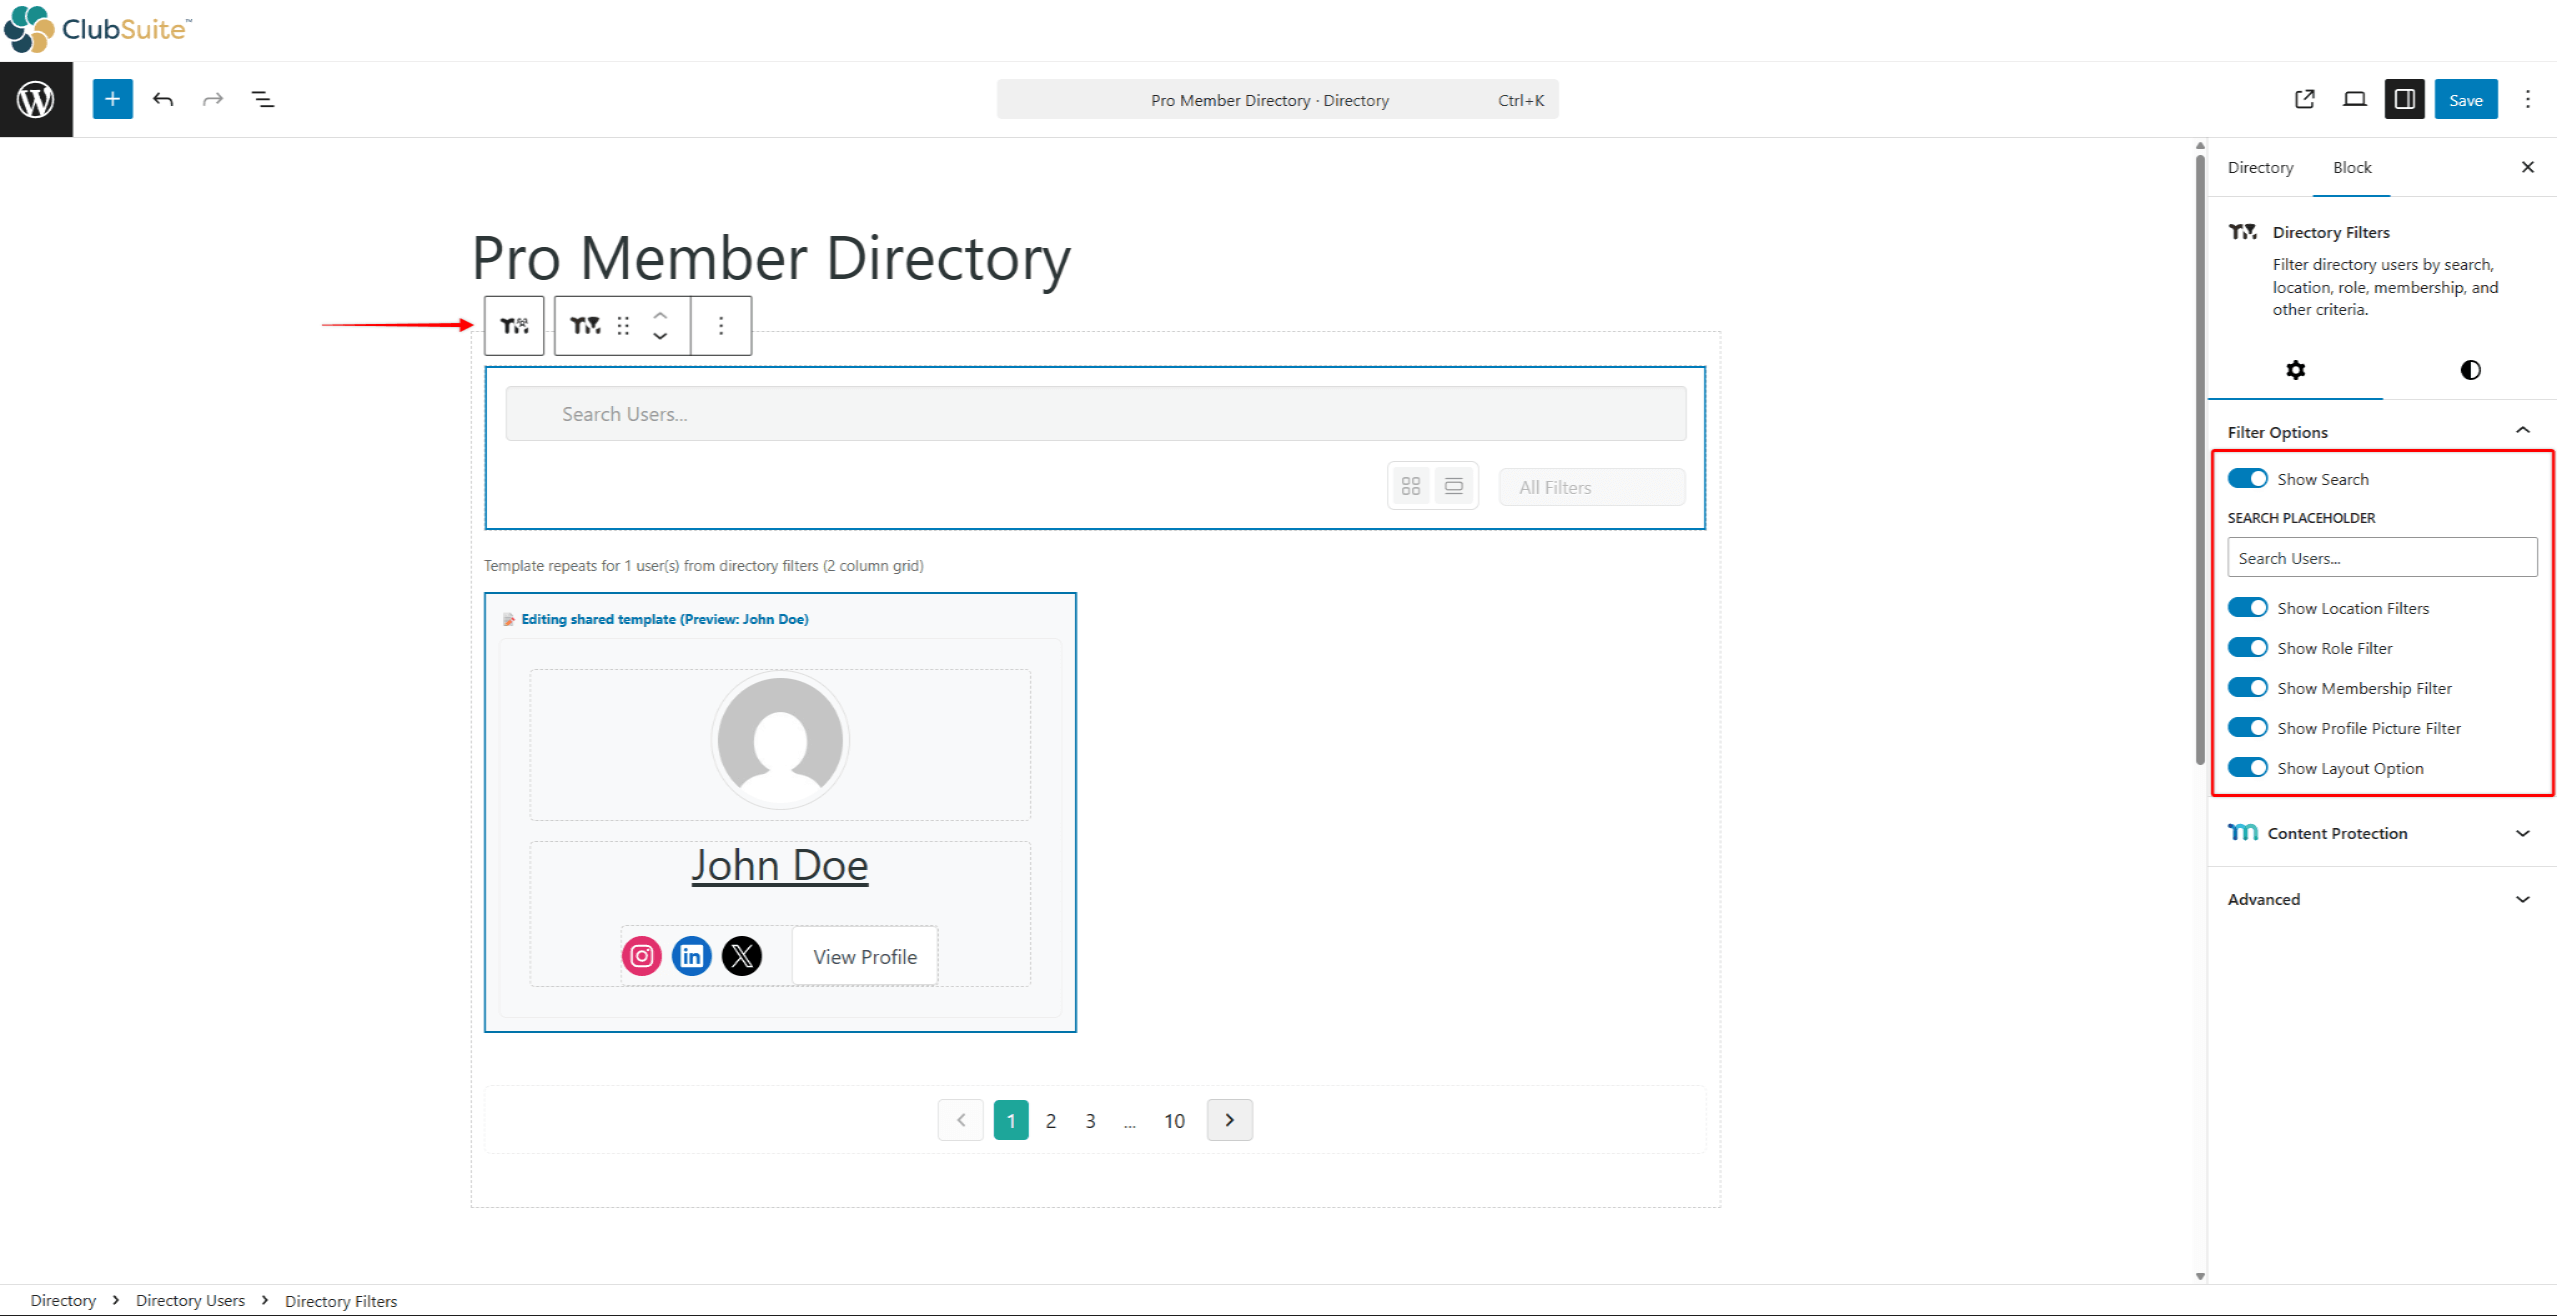
Além disso, você pode desativar Mostrar pesquisa ou ocultar a caixa de pesquisa (que é ativada por padrão). Você também pode definir um Espaço reservado para pesquisa.
Bloco de paginação de diretório
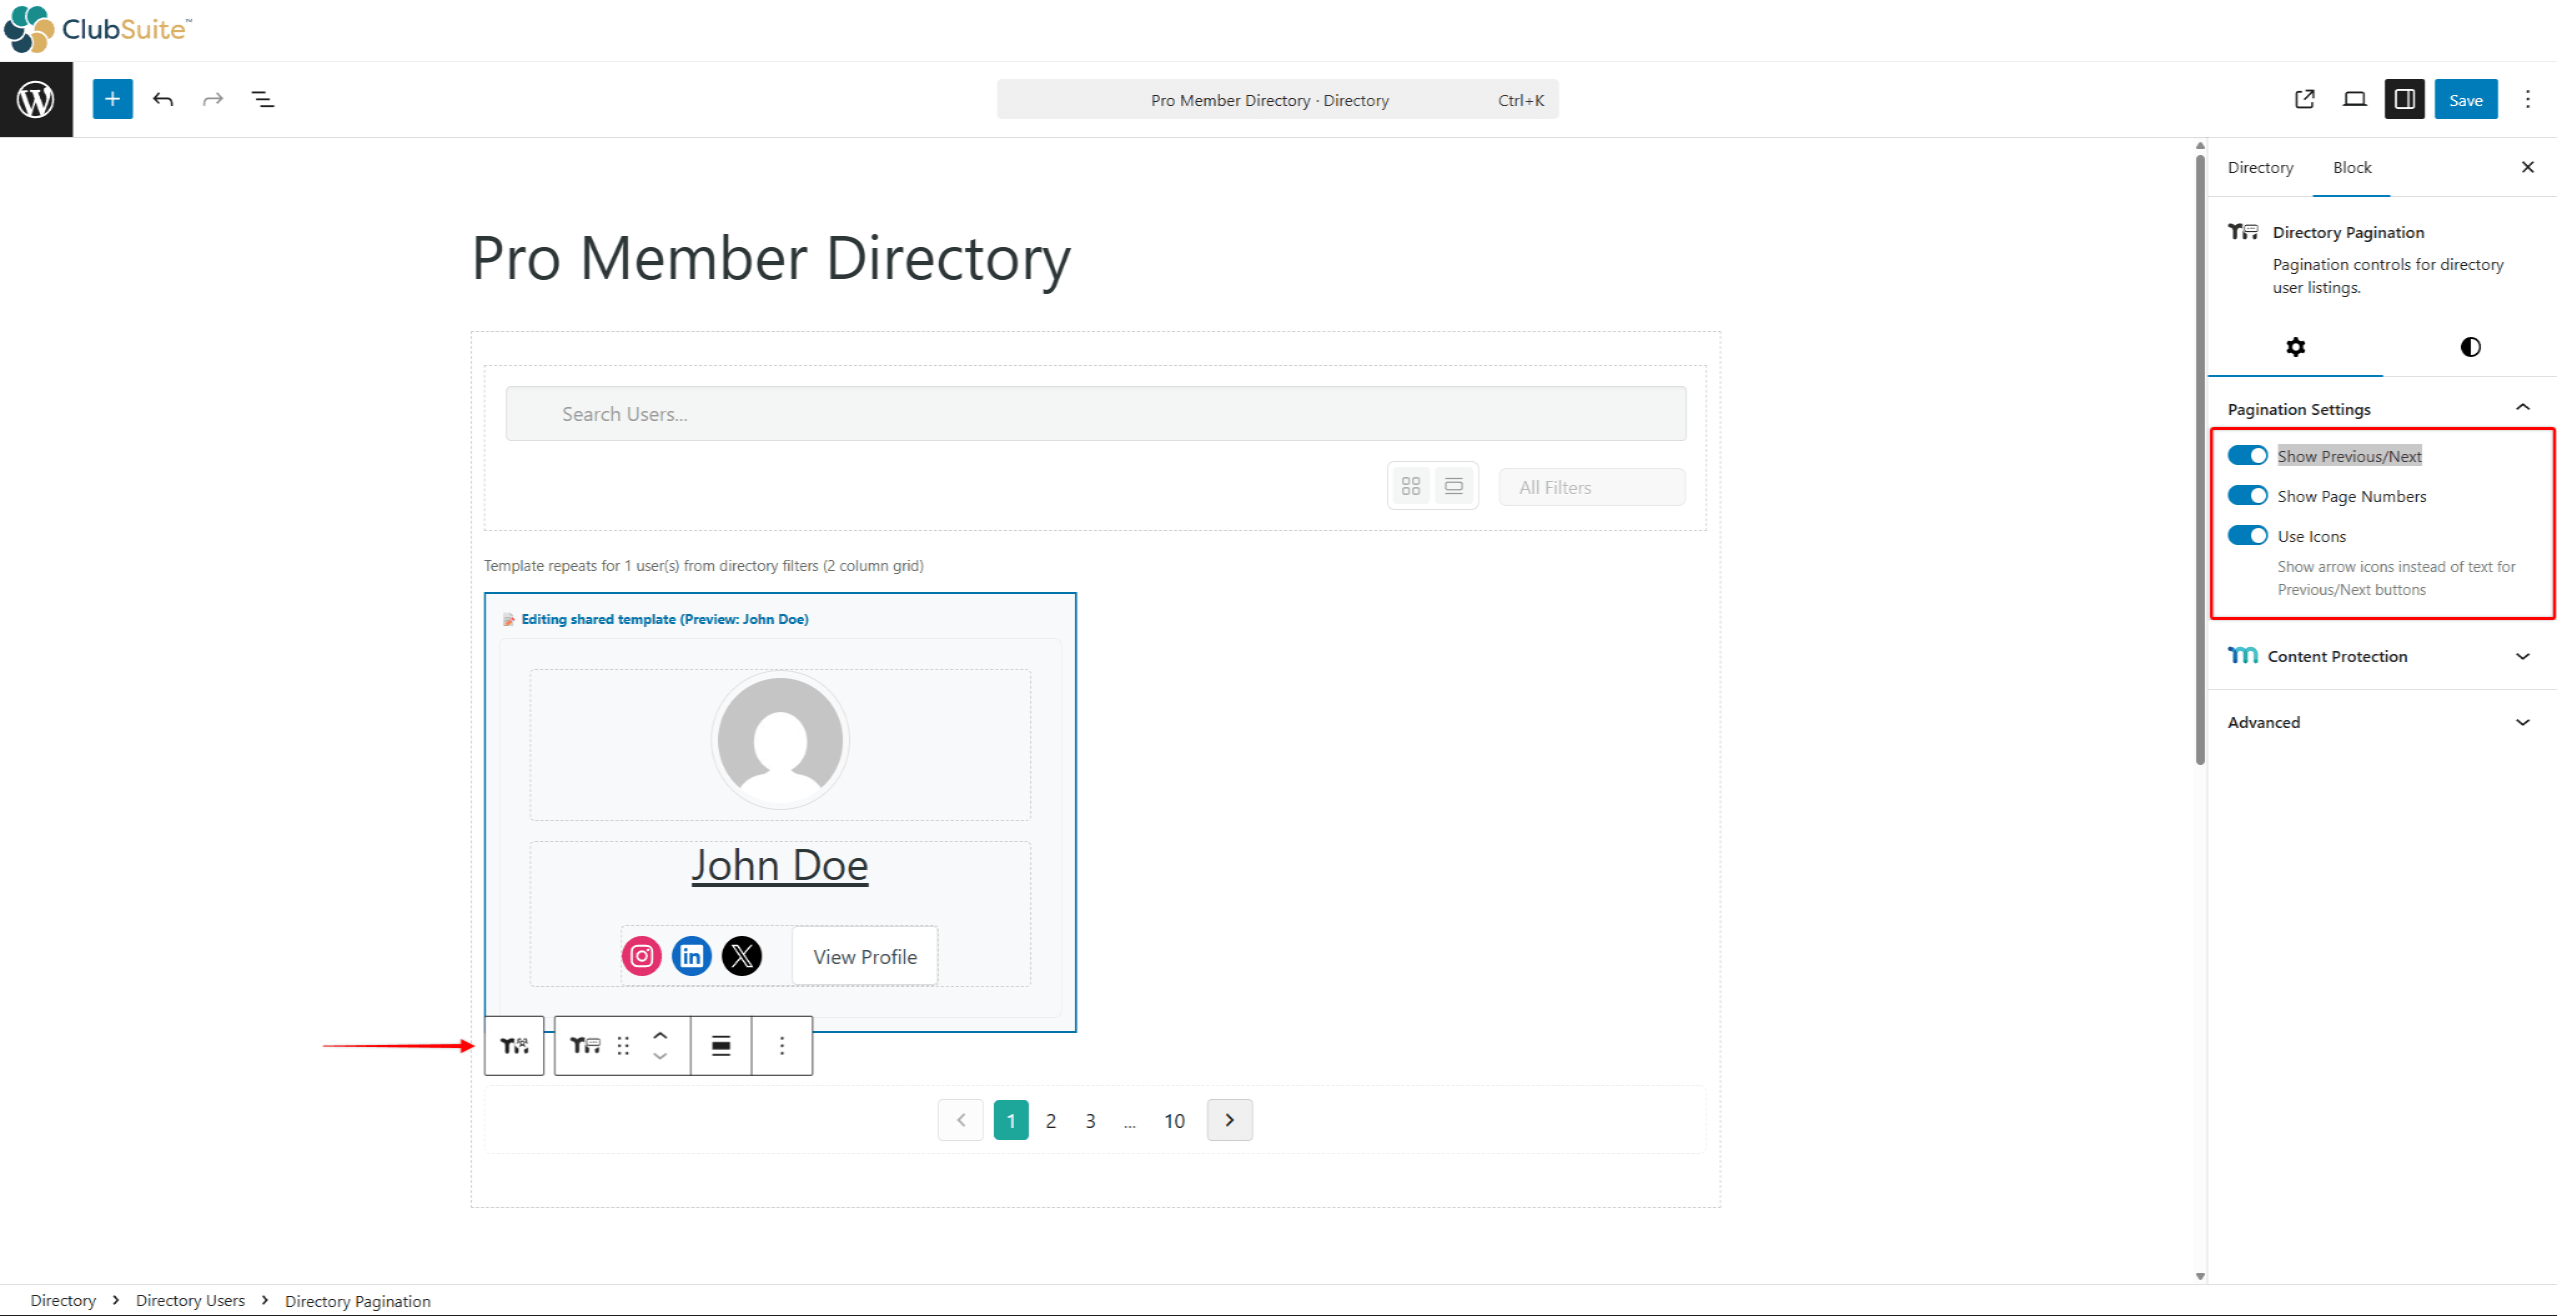
A paginação controla a navegação em várias páginas de perfil. Escolha se deseja mostrar:
- Mostrar anterior/seguinteAdicionar botões Anterior e Próximo para simplificar a navegação;
- Mostrar números de página: mostra páginas numeradas para um controle preciso;
- Usar ícones: use ícones de seta para os botões anterior/seguinte em vez de texto.
Gerenciamento de vários diretórios
Os sites bem-sucedidos se beneficiam de vários diretórios que atendem a diferentes finalidades. Desenvolva uma estratégia abrangente com um diretório principal que apresente todos os usuários, diretórios específicos para membros que destaquem cada nível e diretórios especializados para interesses ou regiões.
Mantenha a consistência do design em todos os diretórios usando layouts de cartão semelhantes, esquemas de cores consistentes, posicionamento previsível da navegação e regras universais de tipografia. Isso cria uma aparência profissional e reduz a carga cognitiva.
Otimize o desempenho limitando os itens por página, garantindo o dimensionamento adequado da imagem, implementando o carregamento lento e ativando o cache apropriado para diretórios públicos.
Adding Directories to Custom Pages Using Shortcode
The MemberPress Directory shortcode lets you add directories to custom pages built with Gutenberg or page builders (Elementor, Divi, etc.).
Finding the Directory ID
Each directory has a unique ID. This ID must be used with the shortcode to specify which directory will be displayed:
- Navegue até Painel > ClubSuite™ > Diretórios.
- Hover over the directory name.
- Note the ID number in the URL preview at the bottom of the browser.
Alternatively, hover over the directory name and click Editar. While editing a Directory, its ID appears as part of the directory URL in the address bar as post=XX.
Adding the Shortcode
The directory shortcode format is [mepr-directory id=XX]. Replace XX with the actual directory ID. For example, use [mepr-directory id=123] to display a directory with ID 123.
In Gutenberg:
- Navegue até Dashboard > Pages and open the target page.
- Clique em + (Add Block) e selecione o Código curto bloco.
- Enter the directory shortcode.
- Clique em Atualização ou Publicar para salvar.
In page builders: Use your page builder's Shotcode module to add MemberPress Directory shotcode to a page.
Por exemplo, add the Shortcode widget in Elementor or the Code module em Divi. Then paste the directory shortcode into it.
Shortcode Behavior
The embedded directory inherits all original directory settings, including filter criteria, display options, and map view settings. Changes made at Painel > ClubSuite™ > Diretórios automatically reflect on pages using the shortcode.
SEO e descoberta de diretórios
Diretórios bem otimizados tornam-se importantes geradores de tráfego. Crie títulos descritivos para as páginas, incluindo palavras-chave relevantes. Escreva meta descrições exclusivas que expliquem o valor do diretório. Acrescente conteúdo introdutório para ajudar os mecanismos de pesquisa a entender o objetivo, incluindo naturalmente palavras-chave.
A criação estratégica de links internos ajuda na descoberta. Inclua links de diretórios na navegação principal, mencione o acesso como um benefício de associação e crie links entre diretórios relacionados. Permita o compartilhamento social com imagens de visualização atraentes para incentivar os membros a compartilhar sua presença.


