La migración de datos es a menudo necesaria cuando se migra a MemberPress desde otro sistema de afiliación. Esto también se aplica si está migrando a un nuevo dominio o incluso si está importando suscripciones a su sitio web.
Este documento le explicará el proceso de migración y los pasos que deberá seguir. Estos pasos son necesarios para todas las migraciones, independientemente del sistema del que se esté migrando.
MemberPress Importador
En Complemento Importador MemberPress le permite importar datos relacionados con MemberPress a su sitio web. El importador se utiliza sobre todo para añadir usuarios y sus suscripciones a MemberPress desde una solución de afiliación anterior.
Para empezar a importar sus datos, primero debe instalar y activar el complemento Importador en su sitio web:
- Vaya a Panel de control > MemberPress > Complementos.
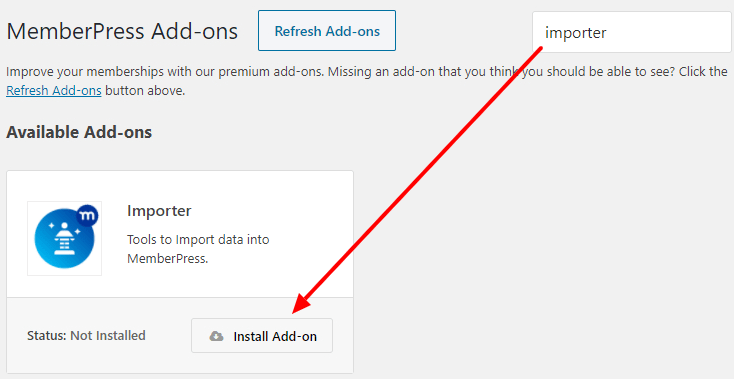
- Navegue por la lista de complementos o utilice la herramienta de búsqueda para encontrar el complemento Importador.

- Haga clic en el botón Instalar complemento para instalar y activar el complemento.
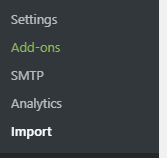
Con el Importador instalado y activado, ahora verá este nuevo Importar en el menú MemberPress.

Aquí puede empezar a importar sus archivos CSV.
Creación de archivos CSV
Con el Importador MemberPress instalado, puedes empezar a crear tus primeros archivos CSV para importar tus datos. CSV son las siglas de "valores separados por comasun formato de hoja de cálculo estándar.
Puedes crear y editar estos archivos de hoja de cálculo en Excel, Numbers, Open Office o Google Spreadsheet.
Este formato de archivo es esencial para migrar datos utilizando el Importador MemberPress. Ten en cuenta que los archivos CSV exportados desde otros plugins y sistemas suelen tener un formato diferente.
Probablemente tendrás que reformatear los archivos exportados y ajustarlos al formato CSV de MemberPress.
Cada grupo de datos debe importarse con un archivo CSV independiente. Esto significa que, por ejemplo importa tus usuarios utilizando un archivo CSV. A continuación, deberá importar sus transacciones y suscripciones como archivos CSV independientes. Lo mismo ocurre con otros tipos de datos (p. ej. importación de cupones y reglas).
Todos los archivos CSV deben tener el formato adecuado. Cada tipo de datos tiene su plantilla CSV y sus elementos de datos únicos. Puede descargar aquí los archivos de plantilla CSV de muestra para algunos de los distintos tipos de datos:
- Plantilla CSV de usuarios de WordPress
- Plantilla CSV de suscripciones
- Plantilla CSV de transacciones
- Cuenta de empresa Plantilla CSV de subcuentas
- Plantilla CSV de cupones
Además, hay algunas convenciones que todos estos archivos deben seguir:
- Cada archivo CSV debe tener una fila de encabezado (primera fila del archivo) que contenga el nombre del campo. Todo lo que aparezca en la columna de la primera fila se marcará como valor del campo definido en la cabecera.
- No es necesario que las columnas del archivo CSV estén en un orden determinado. Los campos de datos no están determinados por el orden, sino por el nombre de la cabecera.
- El archivo debe estar en UTF-8 formato.
Una vez que haya formateado y preparado sus datos en archivos CSV adecuados, deberá exportarlos desde su hoja de cálculo.
Importar archivos CSV con MemberPress
Para importar tus archivos CSV a MemberPress, sigue estos pasos:
- Vaya a Panel de control > MemberPress > Importar.
- Seleccione el tipo de archivo que desea importar utilizando el menú desplegable.
- Haga clic en el botón Elegir archivo y seleccione el archivo CSV correspondiente para importar desde su ordenador. Por ejemplo, si desea importar las transacciones de un usuario, elegirá aquí su archivo CSV de transacciones.
- Haga clic en el botón Cargar para importar el archivo.
Sus datos se importarán y se añadirán a su sitio web.
Pasos básicos de la migración
- Instale MemberPress y configúrelo con sus membresías y pasarelas al menos. Probablemente no debería crear ninguna regla todavía para evitar conflictos con su plugin de membresía existente (si se utiliza en el mismo sitio).
- Importe sus usuarios (si no está ya en su sitio WordPress).
- Importar cualquier suscripciones periódicas o pagos únicos asociados a ellos (son archivos independientes del archivo CSV de usuarios importado en el paso 2).
- Comprueba que todo se ve bien; si es así, crea Reglas en MP.
- Desactive su anterior plugin de afiliación.
- Realice más pruebas para asegurarse de que todo funciona correctamente.
- Cambie sus URL de IPN o Webhook, etc. - para asegurarse de que los pagos se registran correctamente en MemberPress. Puede encontrar enlaces a su(s) pasarela(s) con instrucciones detalladas para su configuración con MemberPress aquí.
- Revise sus suscripciones importadas en MemberPress > pestaña Suscripciones > Pasarela columna. Si el portal los nombres aparecen como ID (por ejemplo, pea5pn-8cz) en lugar de “Stripe" o "PayPal,tendrá que arreglar las suscripciones de los usuarios. Asegúrese de que se utiliza el identificador único de pasarela adecuado.


