Os Círculos do MemberPress oferecem espaços dedicados onde os membros com interesses em comum se reúnem para discutir, compartilhar e construir relacionamentos. Esses grupos comunitários aumentam o envolvimento dos associados e agregam um valor significativo às suas ofertas de associação.
Este documento mostra como criar e personalizar Círculos para construir comunidades de forma eficaz em seu site MemberPress.
Tutorial em vídeo
Entendendo os círculos no MemberPress
MemberPress ClubSuite™ é um membro pacote de networking e comunidade que inclui o ClubDirectory™ e ClubCircles™ Complementos. Uma vez que o O complemento ClubCircles™ está instalado e configurado, Se você não tiver um círculo, poderá começar a criar círculos em seu site.
Os círculos são comunidades de membros em seu site que funcionam como grupos de discussão focados. Cada Círculo se concentra em tópicos, interesses ou objetivos específicos que unem os membros. Os membros podem criar publicações, compartilhar mídia, comentar em discussões e estabelecer conexões com outras pessoas que compartilham seus interesses.
O sistema Circle se integra à sua estrutura de associação. Diferentes níveis de associação podem ter privilégios de Círculo variados, desde a participação básica até a criação avançada e recursos de moderação. Essa integração ajuda você a monetizar os recursos da comunidade e, ao mesmo tempo, oferece incentivos claros de atualização.
Os círculos aparecem em diretórios pesquisáveis onde os membros descobrem comunidades que correspondem a seus interesses. A apresentação visual e os níveis de atividade dos Círculos afetam significativamente o envolvimento dos membros e o crescimento da comunidade.
Criando círculos
Tanto os administradores quanto os membros autorizados podem criar círculos. O processo varia um pouco, dependendo de quem cria o Círculo:
- Navegue até Painel de controle > ClubSuite™ > Círculos.
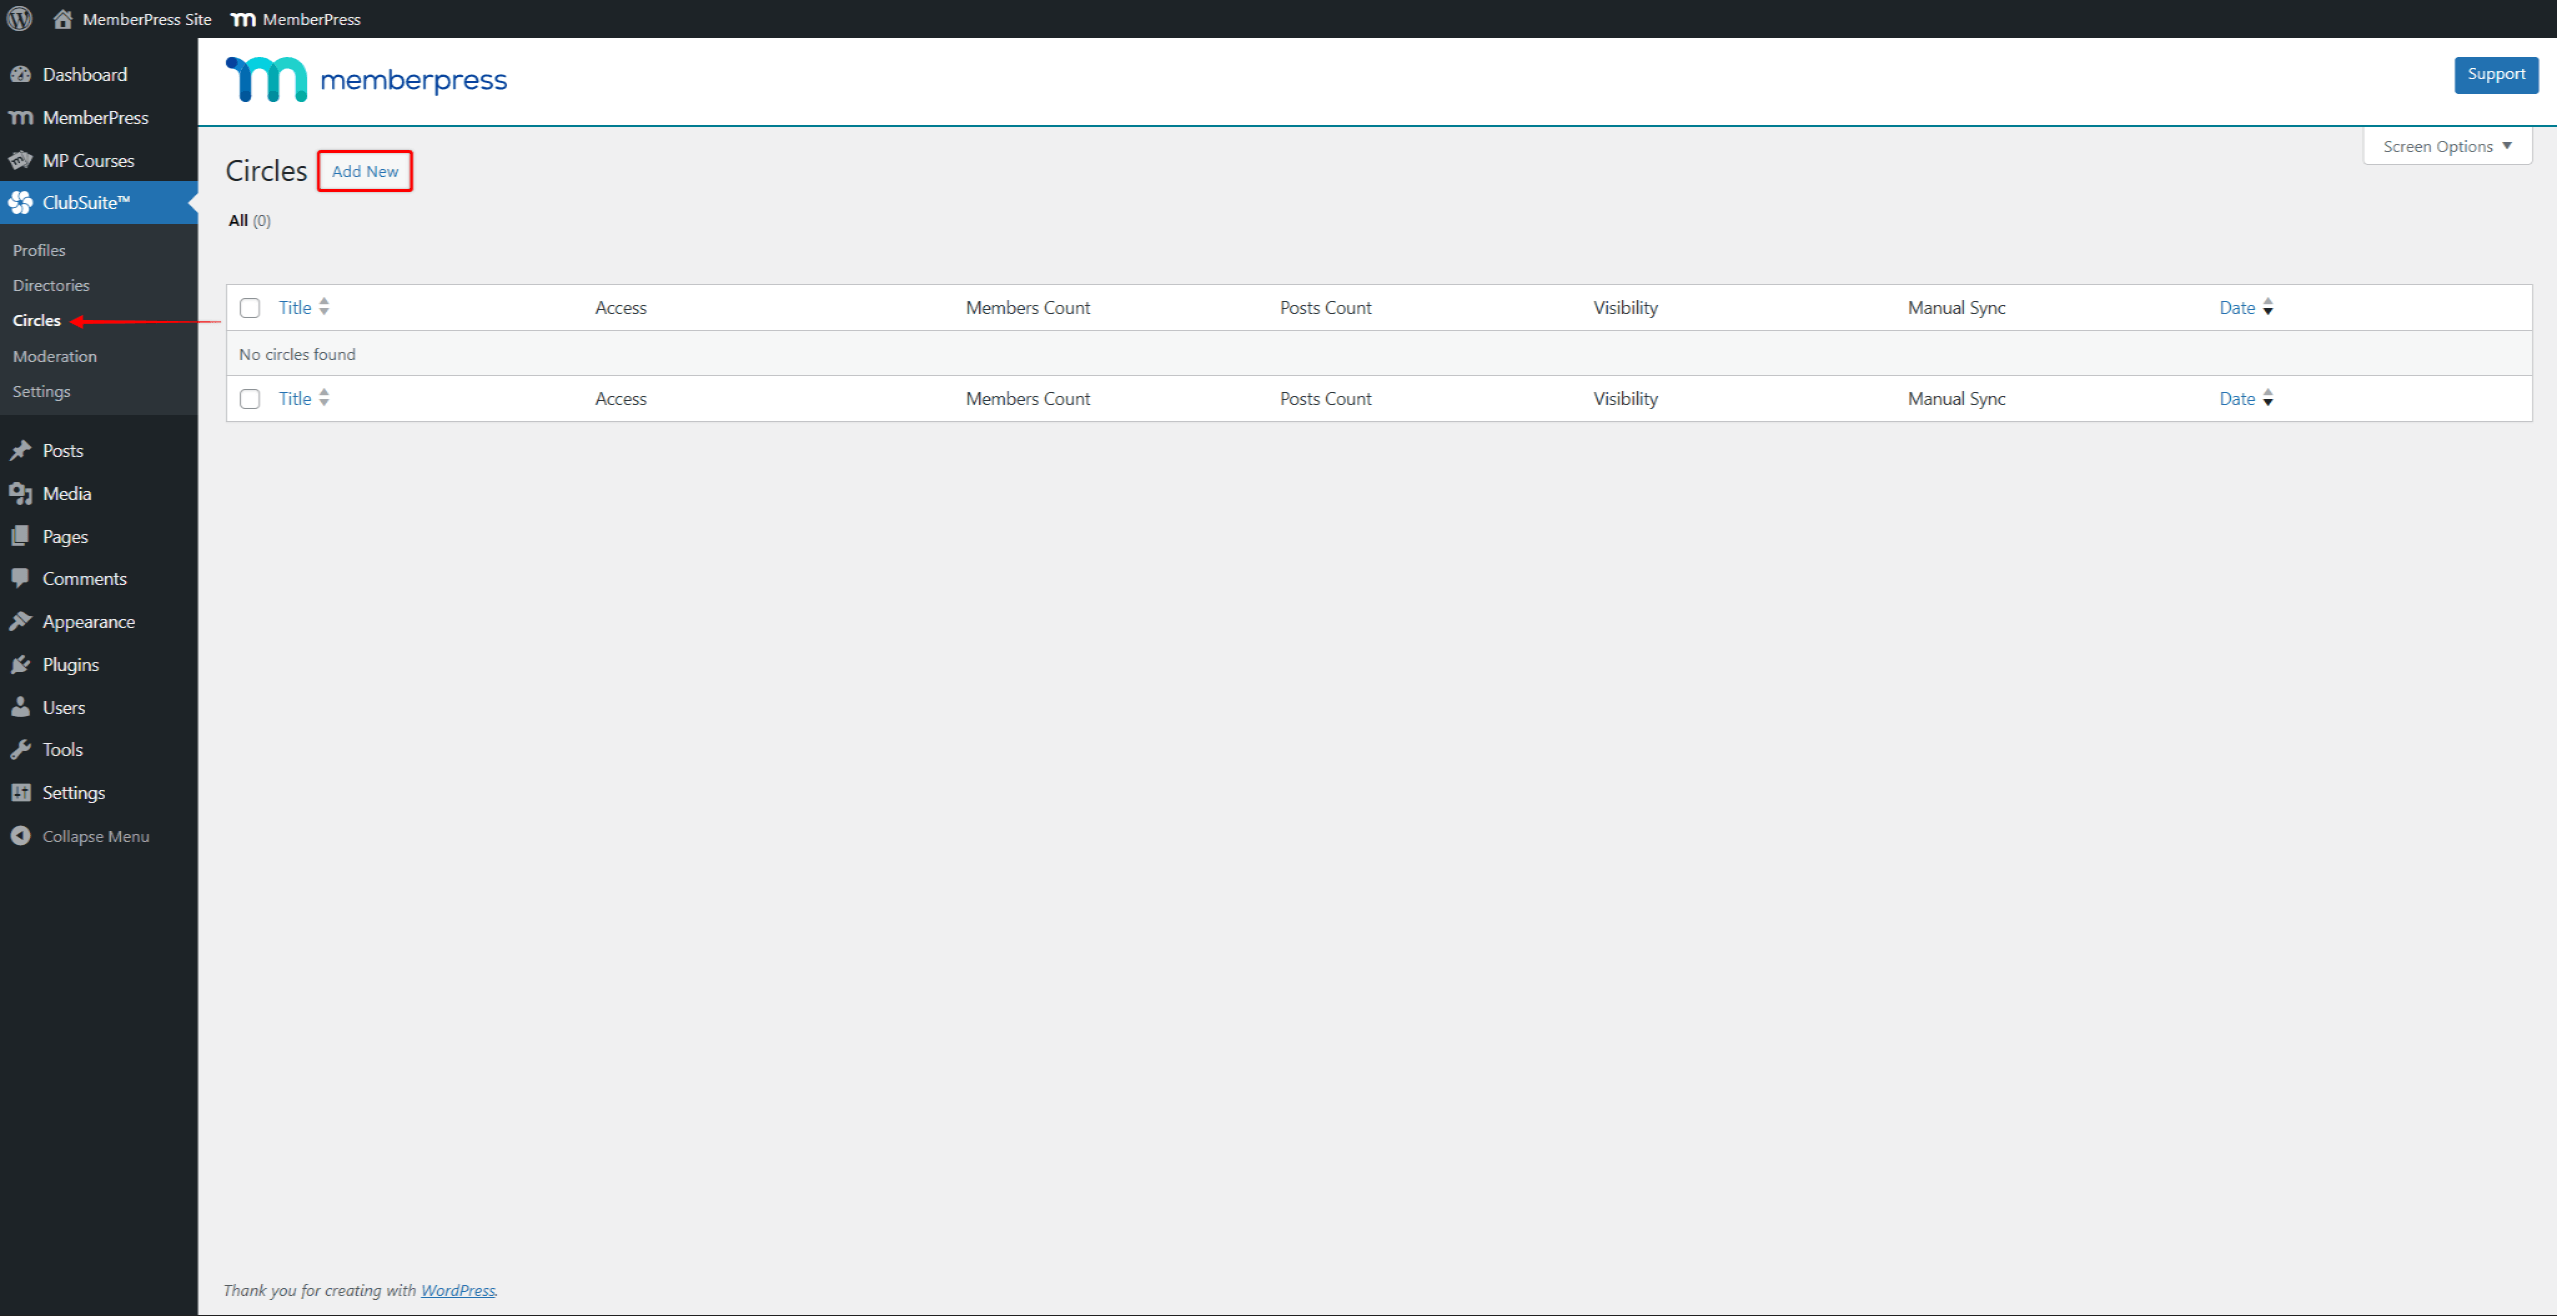
- Clique em Adicionar novo.
- Adicionar um Título do círculo que explique claramente o tópico ou o objetivo da comunidade.
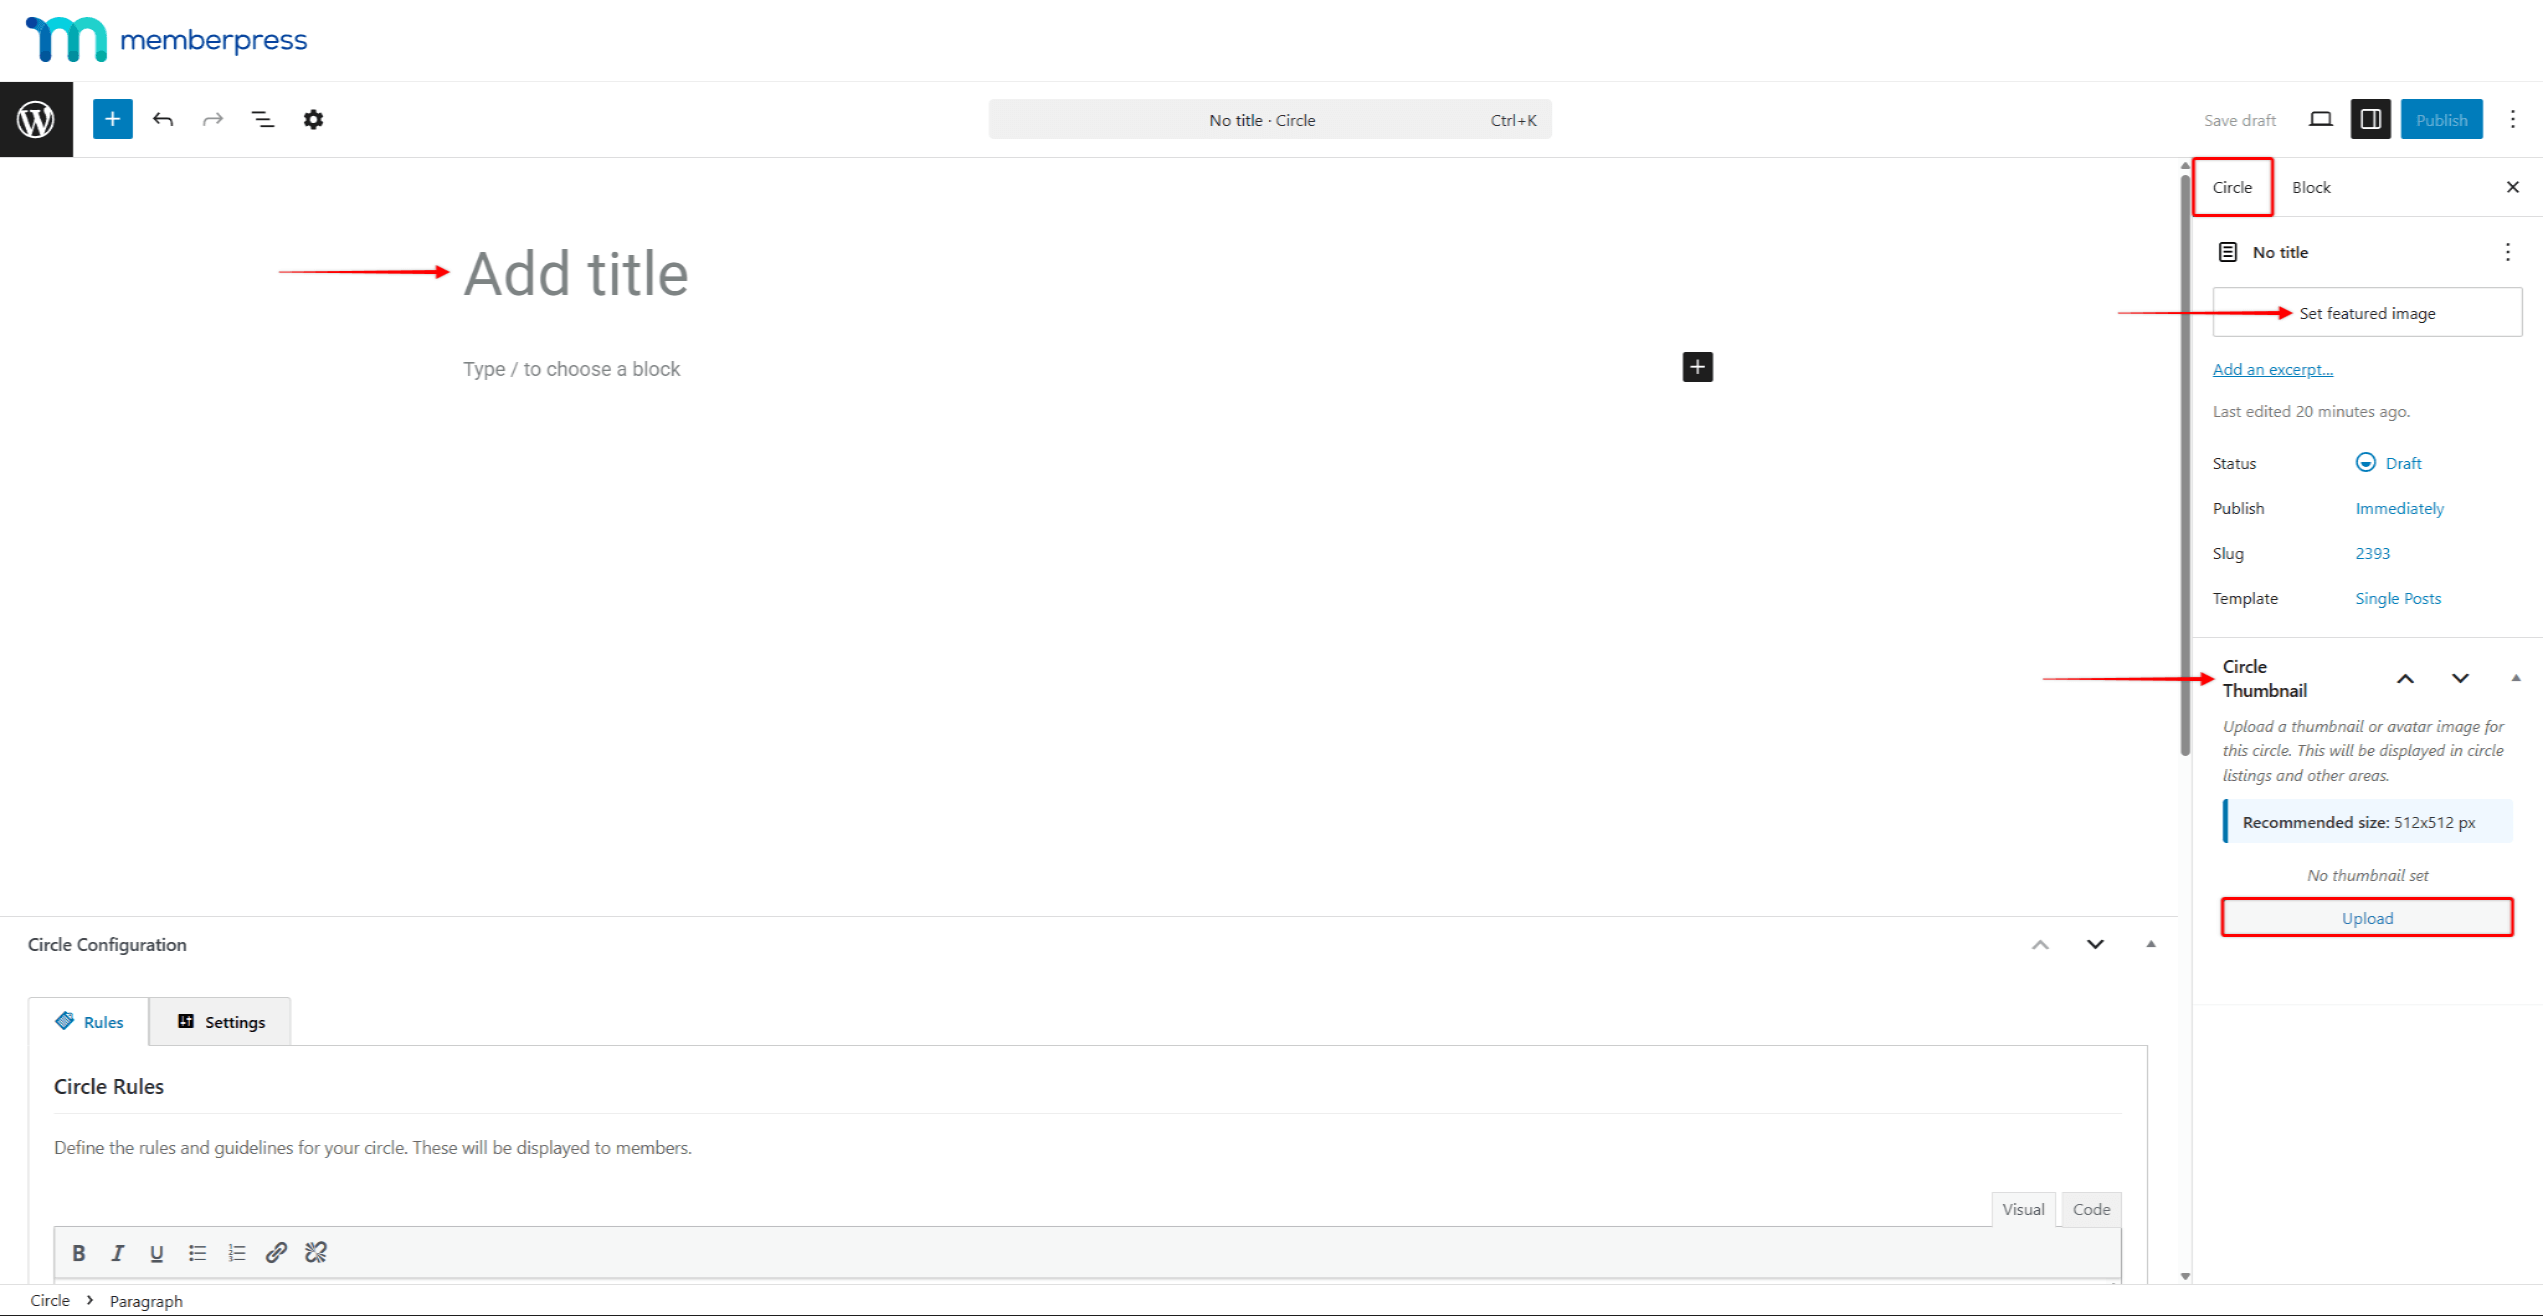
- No painel do lado direito, clique no ícone Guia Círculo. Aqui, clique no botão Definir imagem em destaque e escolha a imagem que você deseja usar como Imagem da capa do círculo.
- Além disso, na seção Guia Círculo, expanda o Miniatura de círculo e carregue a imagem em miniatura do círculo.
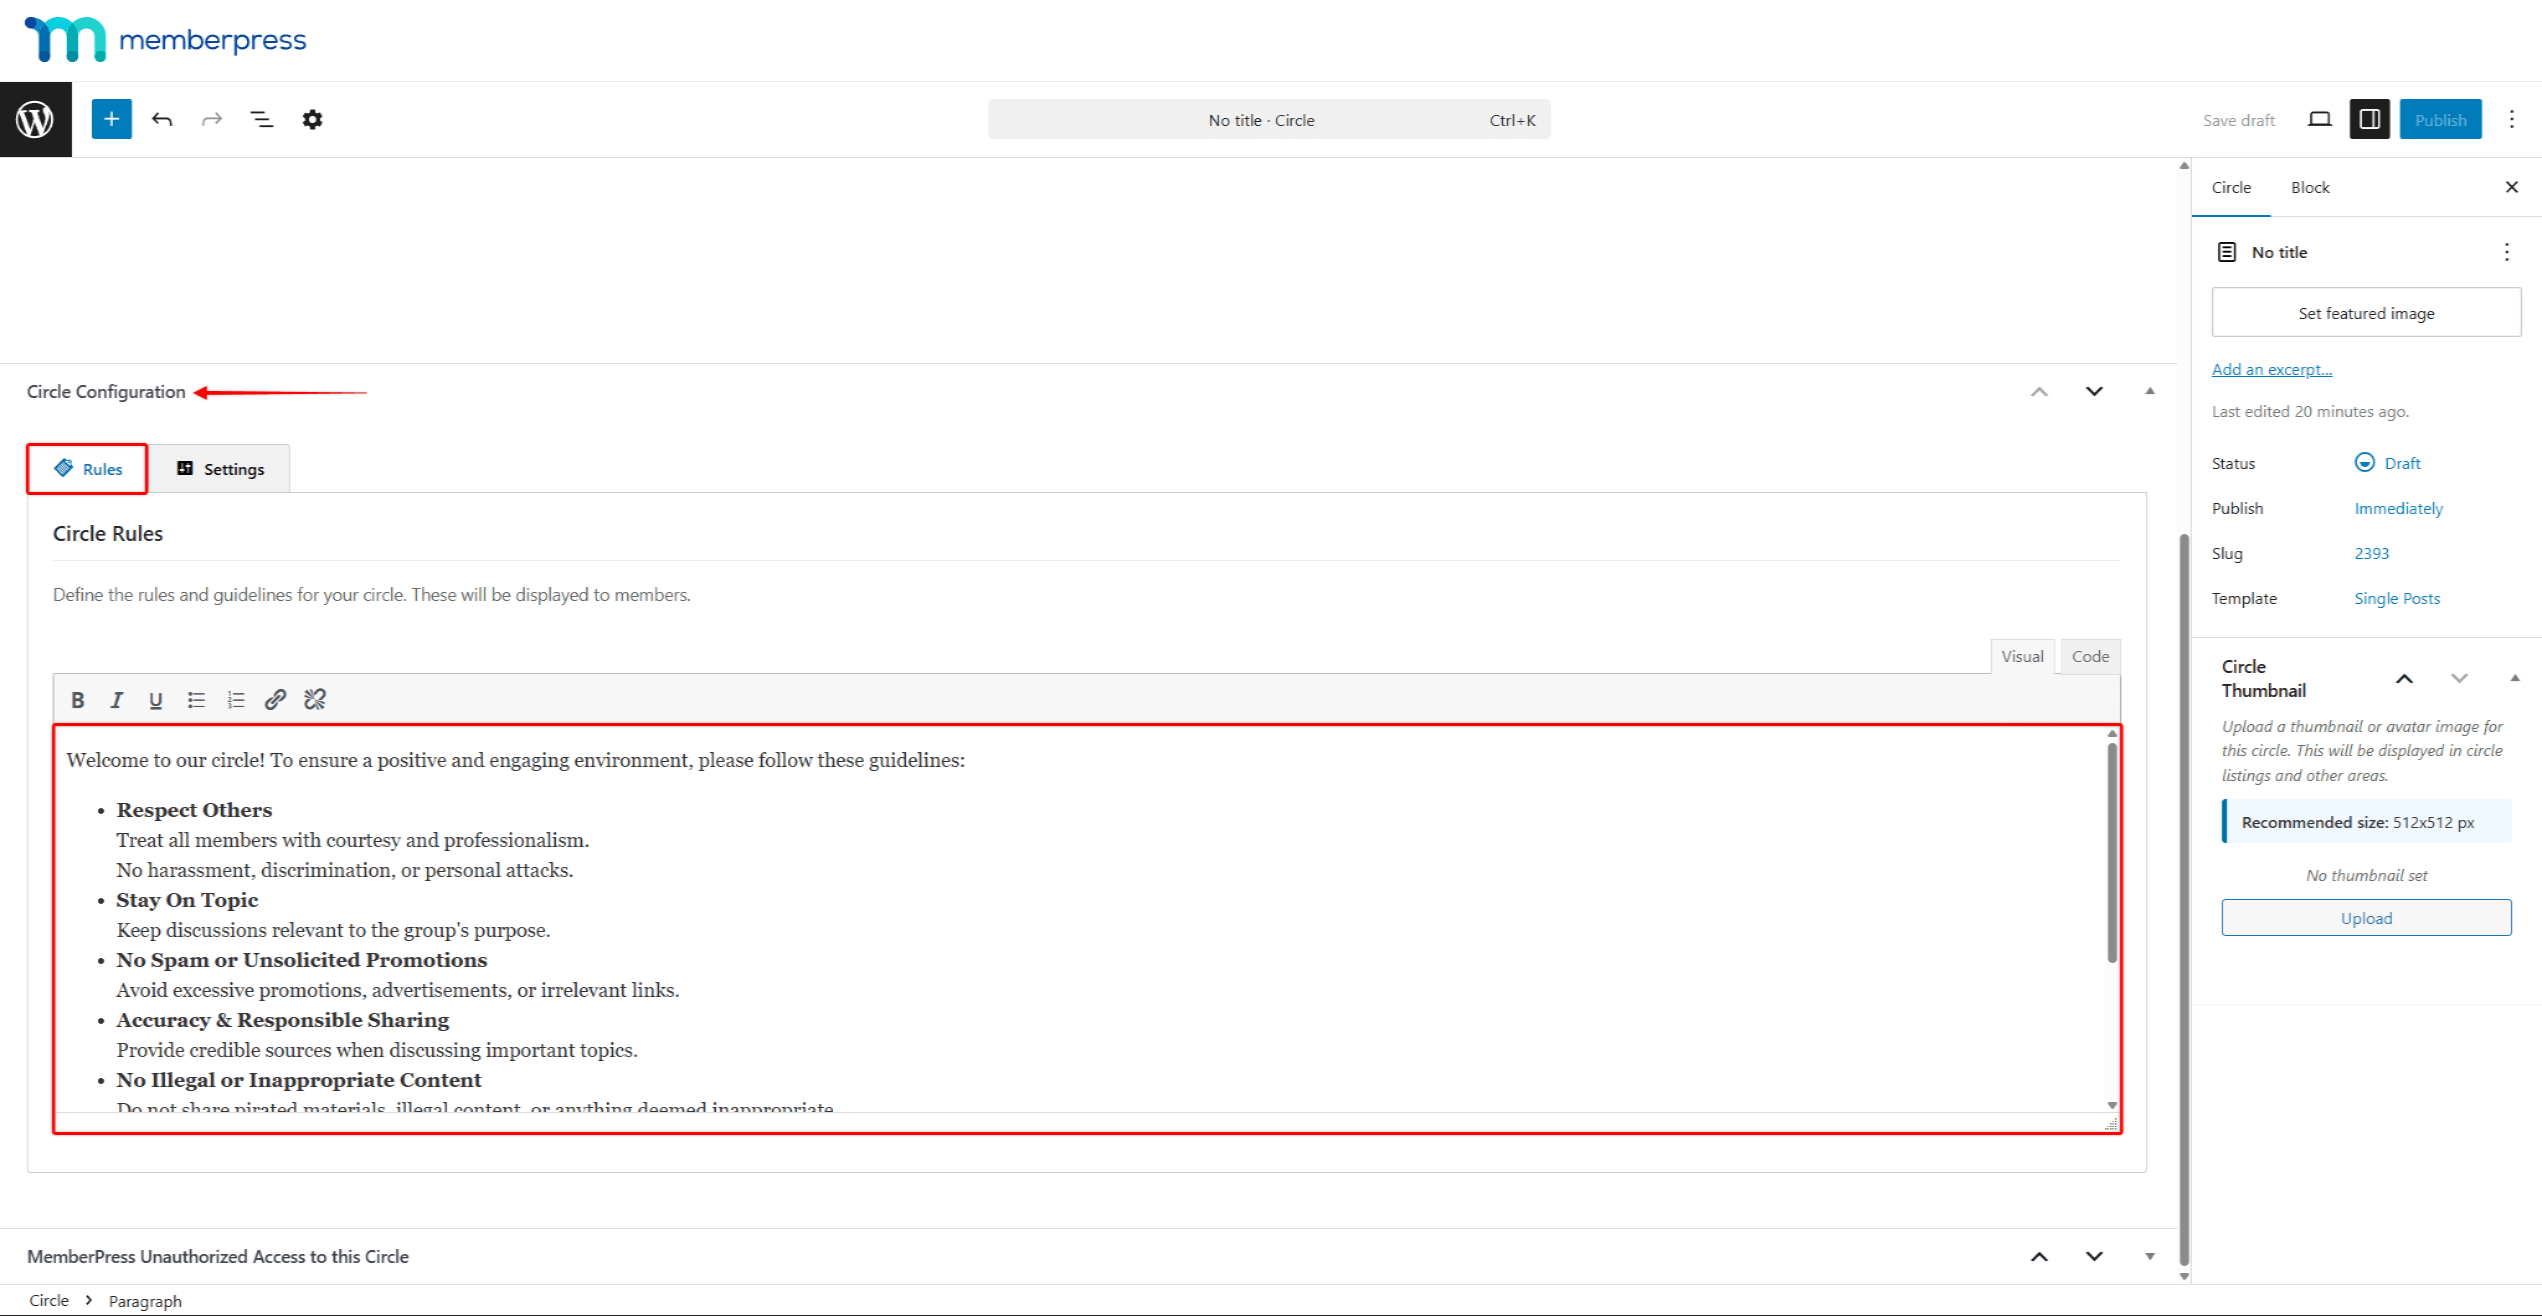
- Role para baixo até a seção Configuração de círculos painel. Clique no ícone Regras guia para adicionar as regras da comunidade. O MemberPress adicionará automaticamente o conteúdo das regras padrão, que você pode usar, modificar ou substituir por suas regras personalizadas.
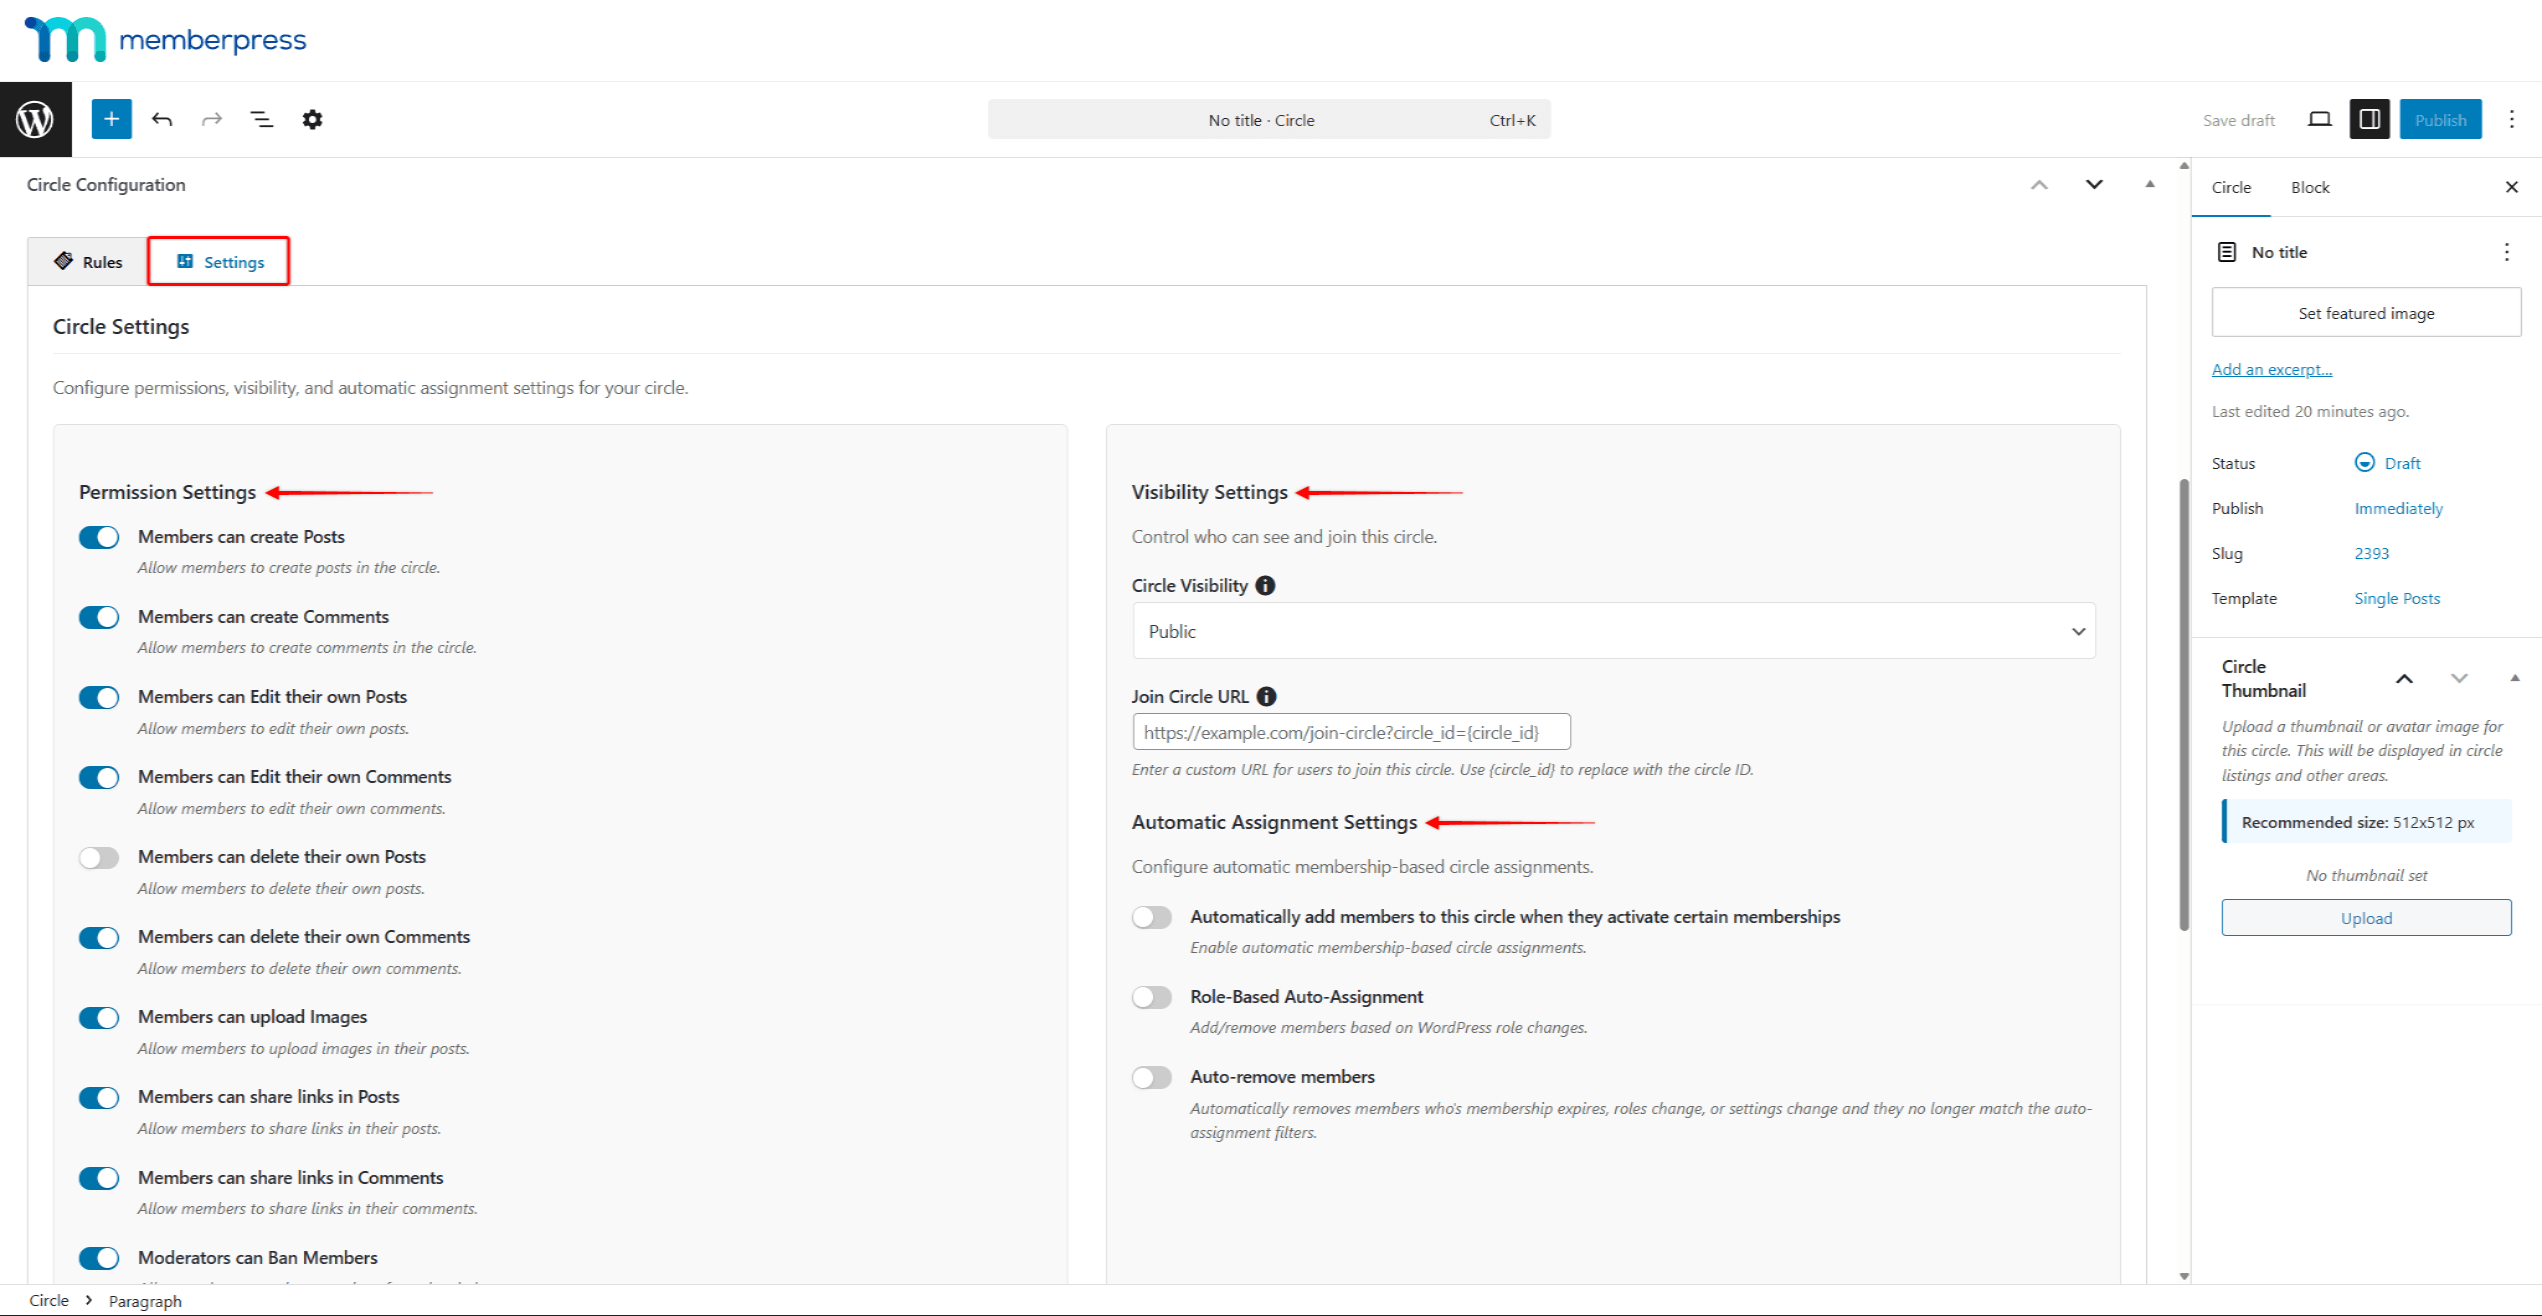
- Em seguida, clique no botão Configurações para configurar Configurações de círculo:
- Configurações de permissãoDefinem quais ações são permitidas para membros e moderadores;
- Configurações de visibilidade: define quem pode ver e participar do círculo;
- Configurações de atribuição automática: definem como os membros devem ser adicionados e removidos do círculo.
- Clique em Publicar para tornar o Círculo disponível.
Configuração de círculos
Cada Círculo pode ter diferentes recursos ativados com base em seu tipo e finalidade no Configurações de círculo painel.
Configurações de permissão
Sob o Configurações de permissão, você pode ativar e desativar as seguintes permissões:
- Os membros podem criar postagens: Permitir que os membros criem postagens no círculo.
- Os membros podem criar comentários: Permitir que os membros criem comentários no círculo.
- Os membros podem editar suas próprias postagens: Permitir que os membros editem suas próprias publicações.
- Os membros podem editar seus próprios comentários: Permitir que os membros editem seus próprios comentários.
- Os membros podem excluir suas próprias postagens: Permitir que os membros excluam suas próprias publicações.
- Os membros podem excluir seus próprios comentários: Permitir que os membros excluam seus próprios comentários.
- Os membros podem fazer upload de imagens: Permitir que os membros carreguem imagens em suas postagens.
- Os membros podem compartilhar links nas postagens: Permitir que os membros compartilhem links em suas postagens.
- Os membros podem compartilhar links nos Comentários: Permitir que os membros compartilhem links em seus comentários.
- Os moderadores podem banir membros: Permitir que os moderadores banam membros do círculo.
- Os moderadores podem cancelar o banimento de membros: Permitir que os moderadores desbanam membros do círculo.
- Ocultar publicações de membros banidos: Ocultar publicações de membros banidos no círculo.
- Ocultar comentários de membros banidos: Ocultar comentários de membros banidos no círculo.
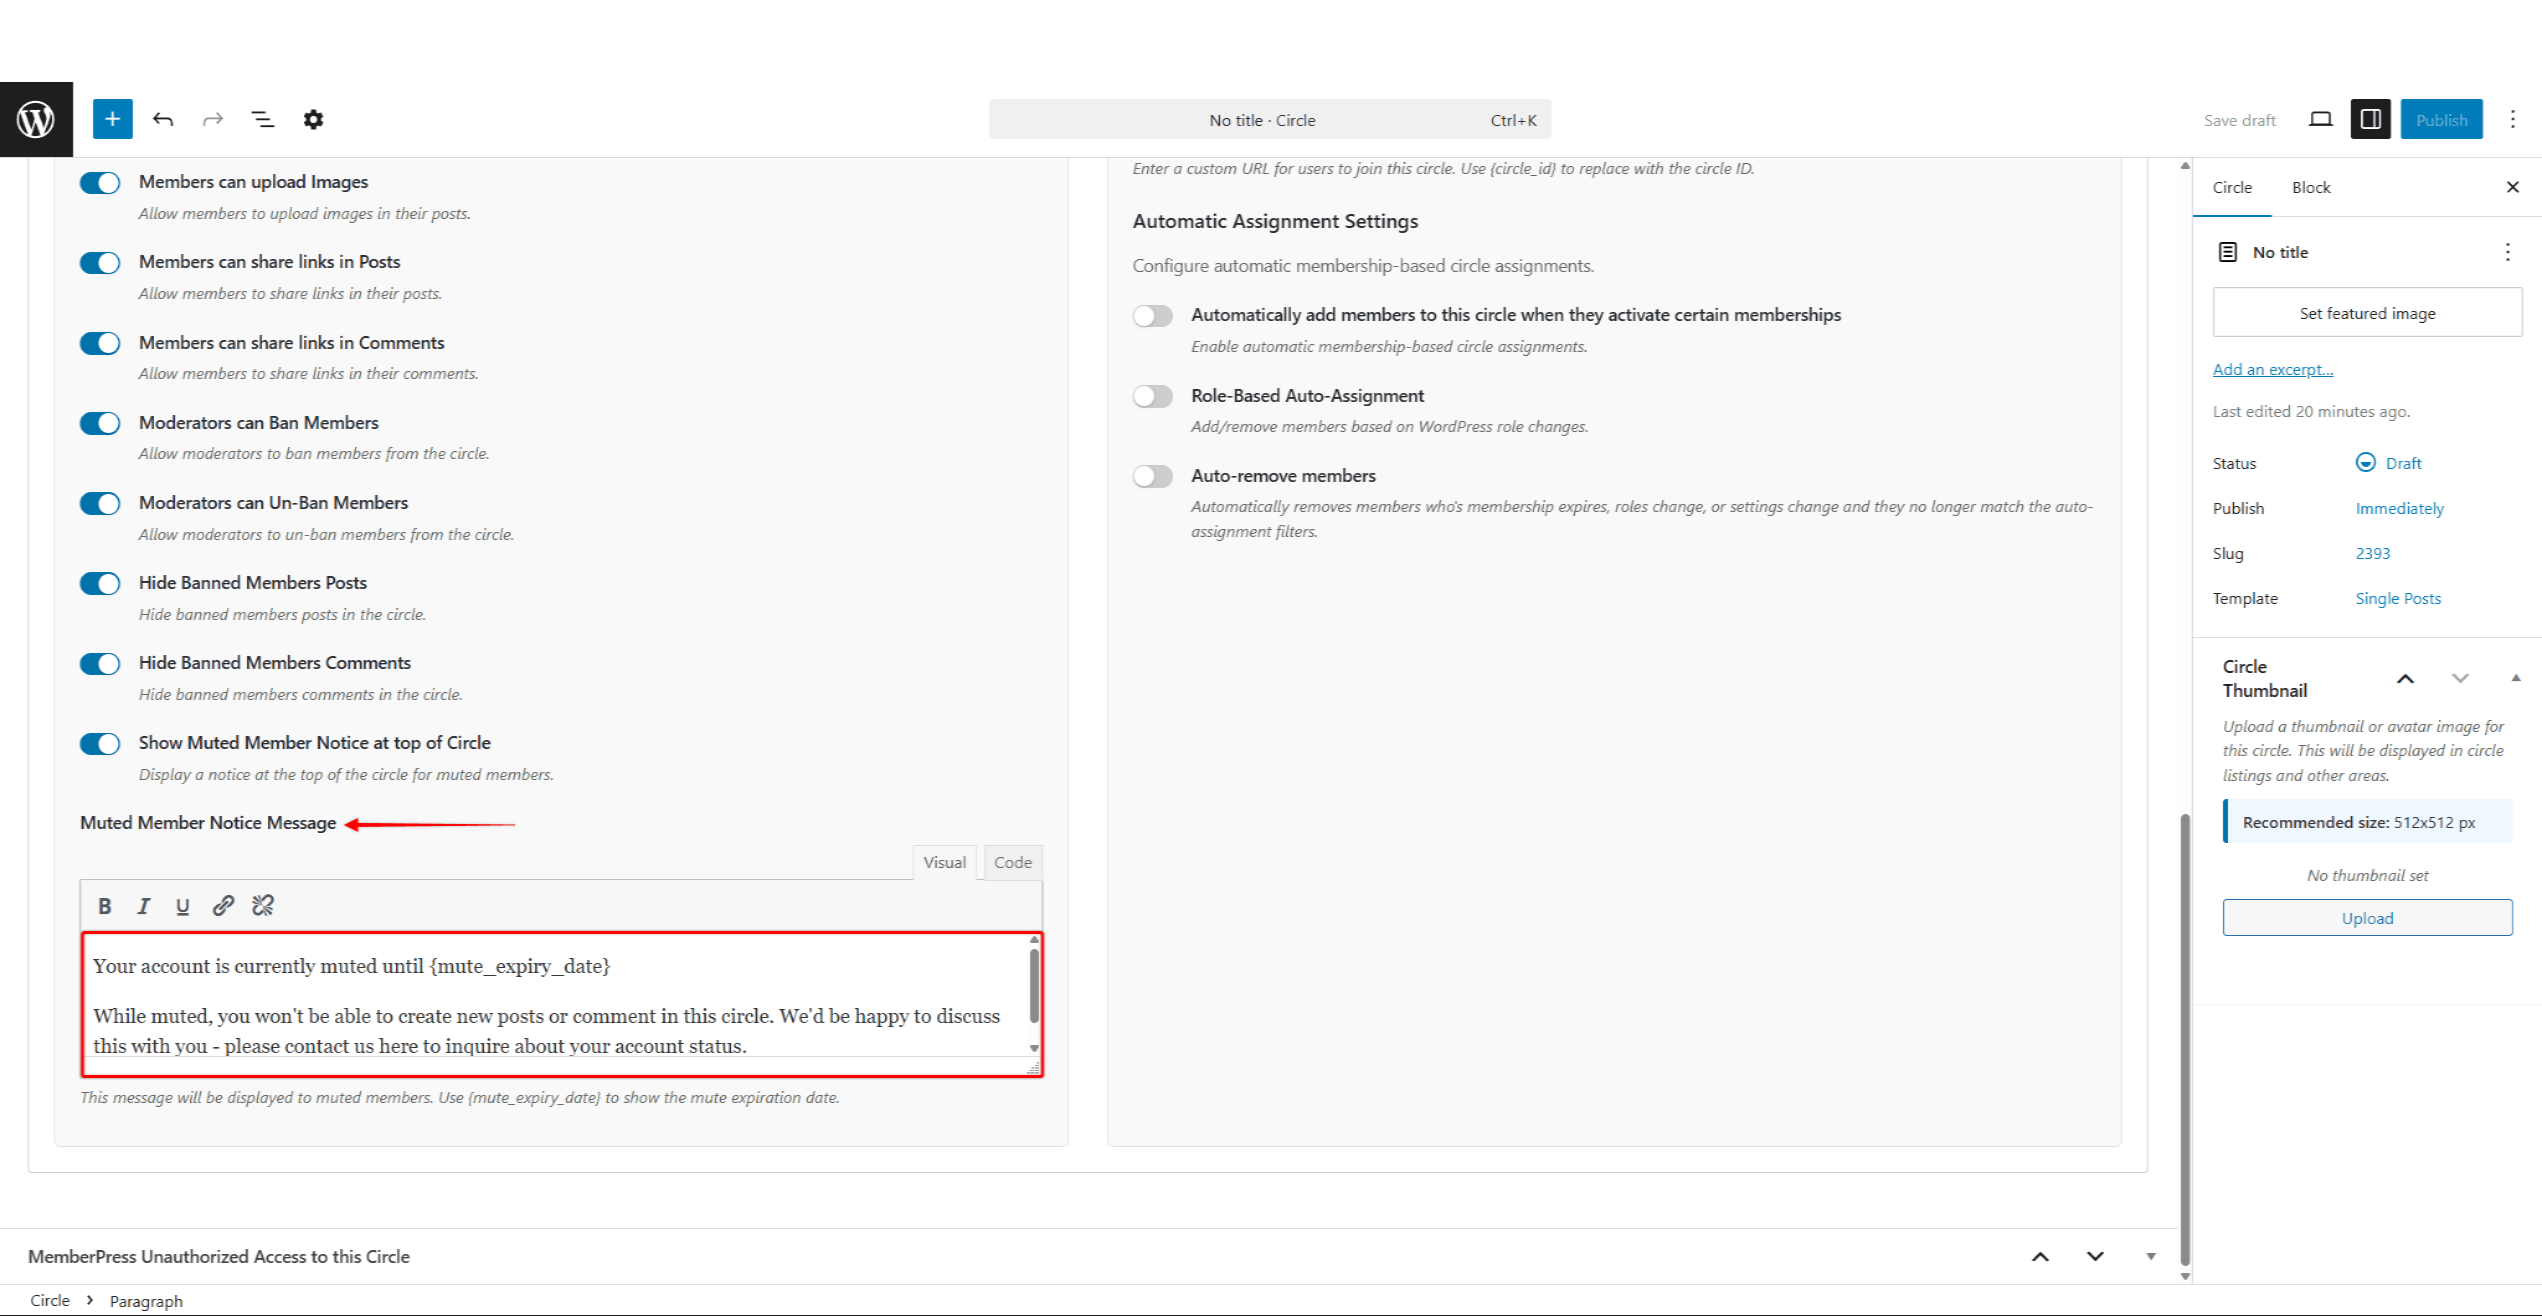
- Mostrar aviso de membro silenciado na parte superior do círculo: Exibir um aviso na parte superior do círculo para membros silenciados.
Você também pode modificar uma mensagem personalizada em Mensagem de aviso de membro silenciado. Essa mensagem será exibida para os membros silenciados.
Configurações de visibilidade
As configurações de visibilidade do círculo determinam como os membros entram no círculo e acessam seu conteúdo.
Você pode definir a Visibilidade do círculo como:
- Público:
- Essa opção faz o Círculo visível no diretório Circle;
- O Círculo conteúdo (postagens/comentários) é visível para todos Usuários conectados e desconectados;
- A o usuário conectado pode participar do Circle clicando no botão Aderir botão;
- A usuário desconectado pode ver o conteúdo, mas precisa fazer login (e participar) para interagir.
- Conectado:
- Essa opção fará com que o Círculo visível no diretório Circle;
- O Círculo conteúdo é visível para usuários conectados, incluindo aqueles sem nenhuma assinatura;
- A o usuário conectado pode participar do Circle clicando no botão Aderir botão;
- A O usuário desconectado não pode ver o conteúdo, nem interagir.
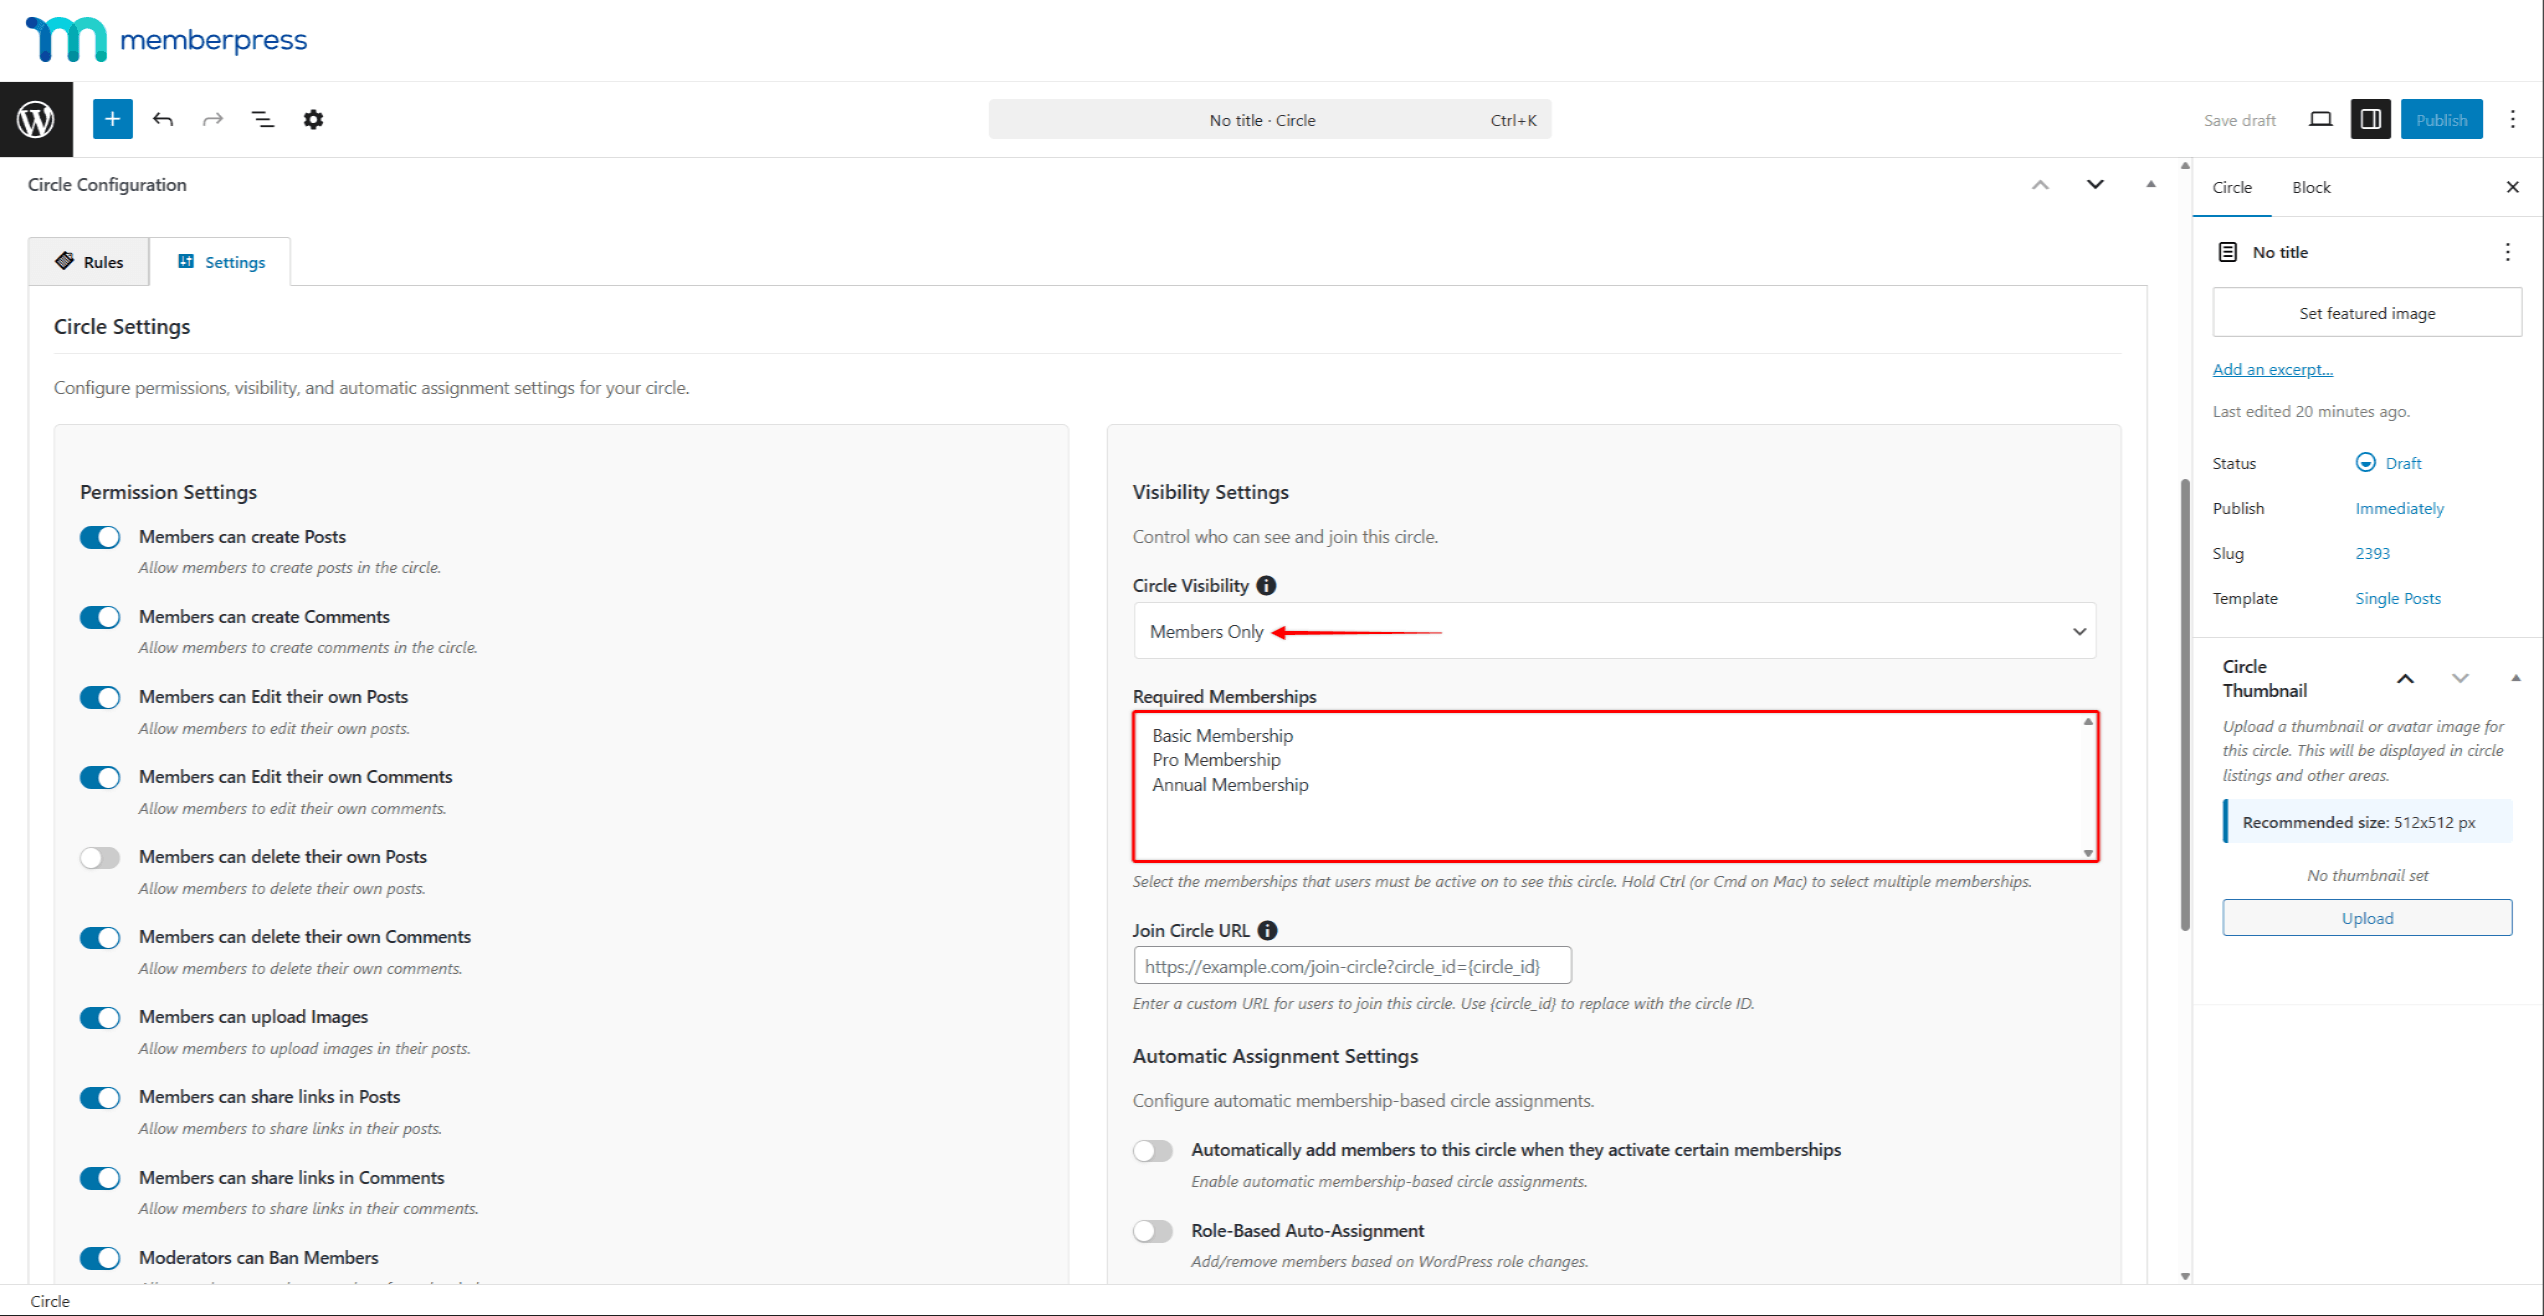
- Somente para membros:
- Essa opção fará com que o Círculo visível no diretório Circle;
- O Círculo conteúdo é visível apenas para membros (logados) se inscreveu em uma das associações necessárias (membros autorizados).
- Somente membros autorizados pode ver o conteúdo e interagir;
- Se essa opção for selecionada, o Associações obrigatórias será exibido em Visibility Settings (Configurações de visibilidade). Selecione uma ou mais associações obrigatórias.
- Oculto:
- Essa opção fará com que o Círculo oculto no diretório Circle, impedindo a adesão de novos membros;
- Somente o os membros existentes (associados) podem ver o Círculo no diretório do Círculo;
- Os administradores e moderadores podem adicionar manualmente novos membros para esse círculo.
Além disso, em Visibility Settings (Configurações de visibilidade), você pode definir o URL do círculo de adesão para cada círculo. Esse URL deve apontar para a página em que os usuários podem se registrar e, se aplicável, encontrar informações adicionais sobre o círculo.
Além disso, os usuários que não estiverem autorizados a participar do círculo serão redirecionados para esse URL.
Configurações de atribuição automática
Por fim, você precisa escolher o método de atribuição automática de círculo baseado em associação:
- Adicionar automaticamente membros a esse círculo quando eles ativarem determinadas associações: essa opção adiciona usuários quando eles se inscrevem na associação necessária.
- Atribuição automática baseada em funçãocom essa opção, os membros serão adicionados automaticamente a um círculo com base na função de usuário necessária. Também, se essa função de usuário for removida para o usuário específico, o o usuário será automaticamente removido do círculo.
Remoção automática de membros: Remove automaticamente os membros que não atendem mais aos requisitos de atribuição automática. Isso geralmente acontece quando a associação de um usuário expira ou a função de um usuário é alterada. Além disso, isso pode ocorrer se as configurações do Círculo forem alteradas de modo que o usuário não corresponda mais aos filtros de atribuição automática.
Gerenciamento de círculos
Você pode encontrar todos os seus círculos MemberPress em Painel de controle > ClubSuite™ > Círculos.
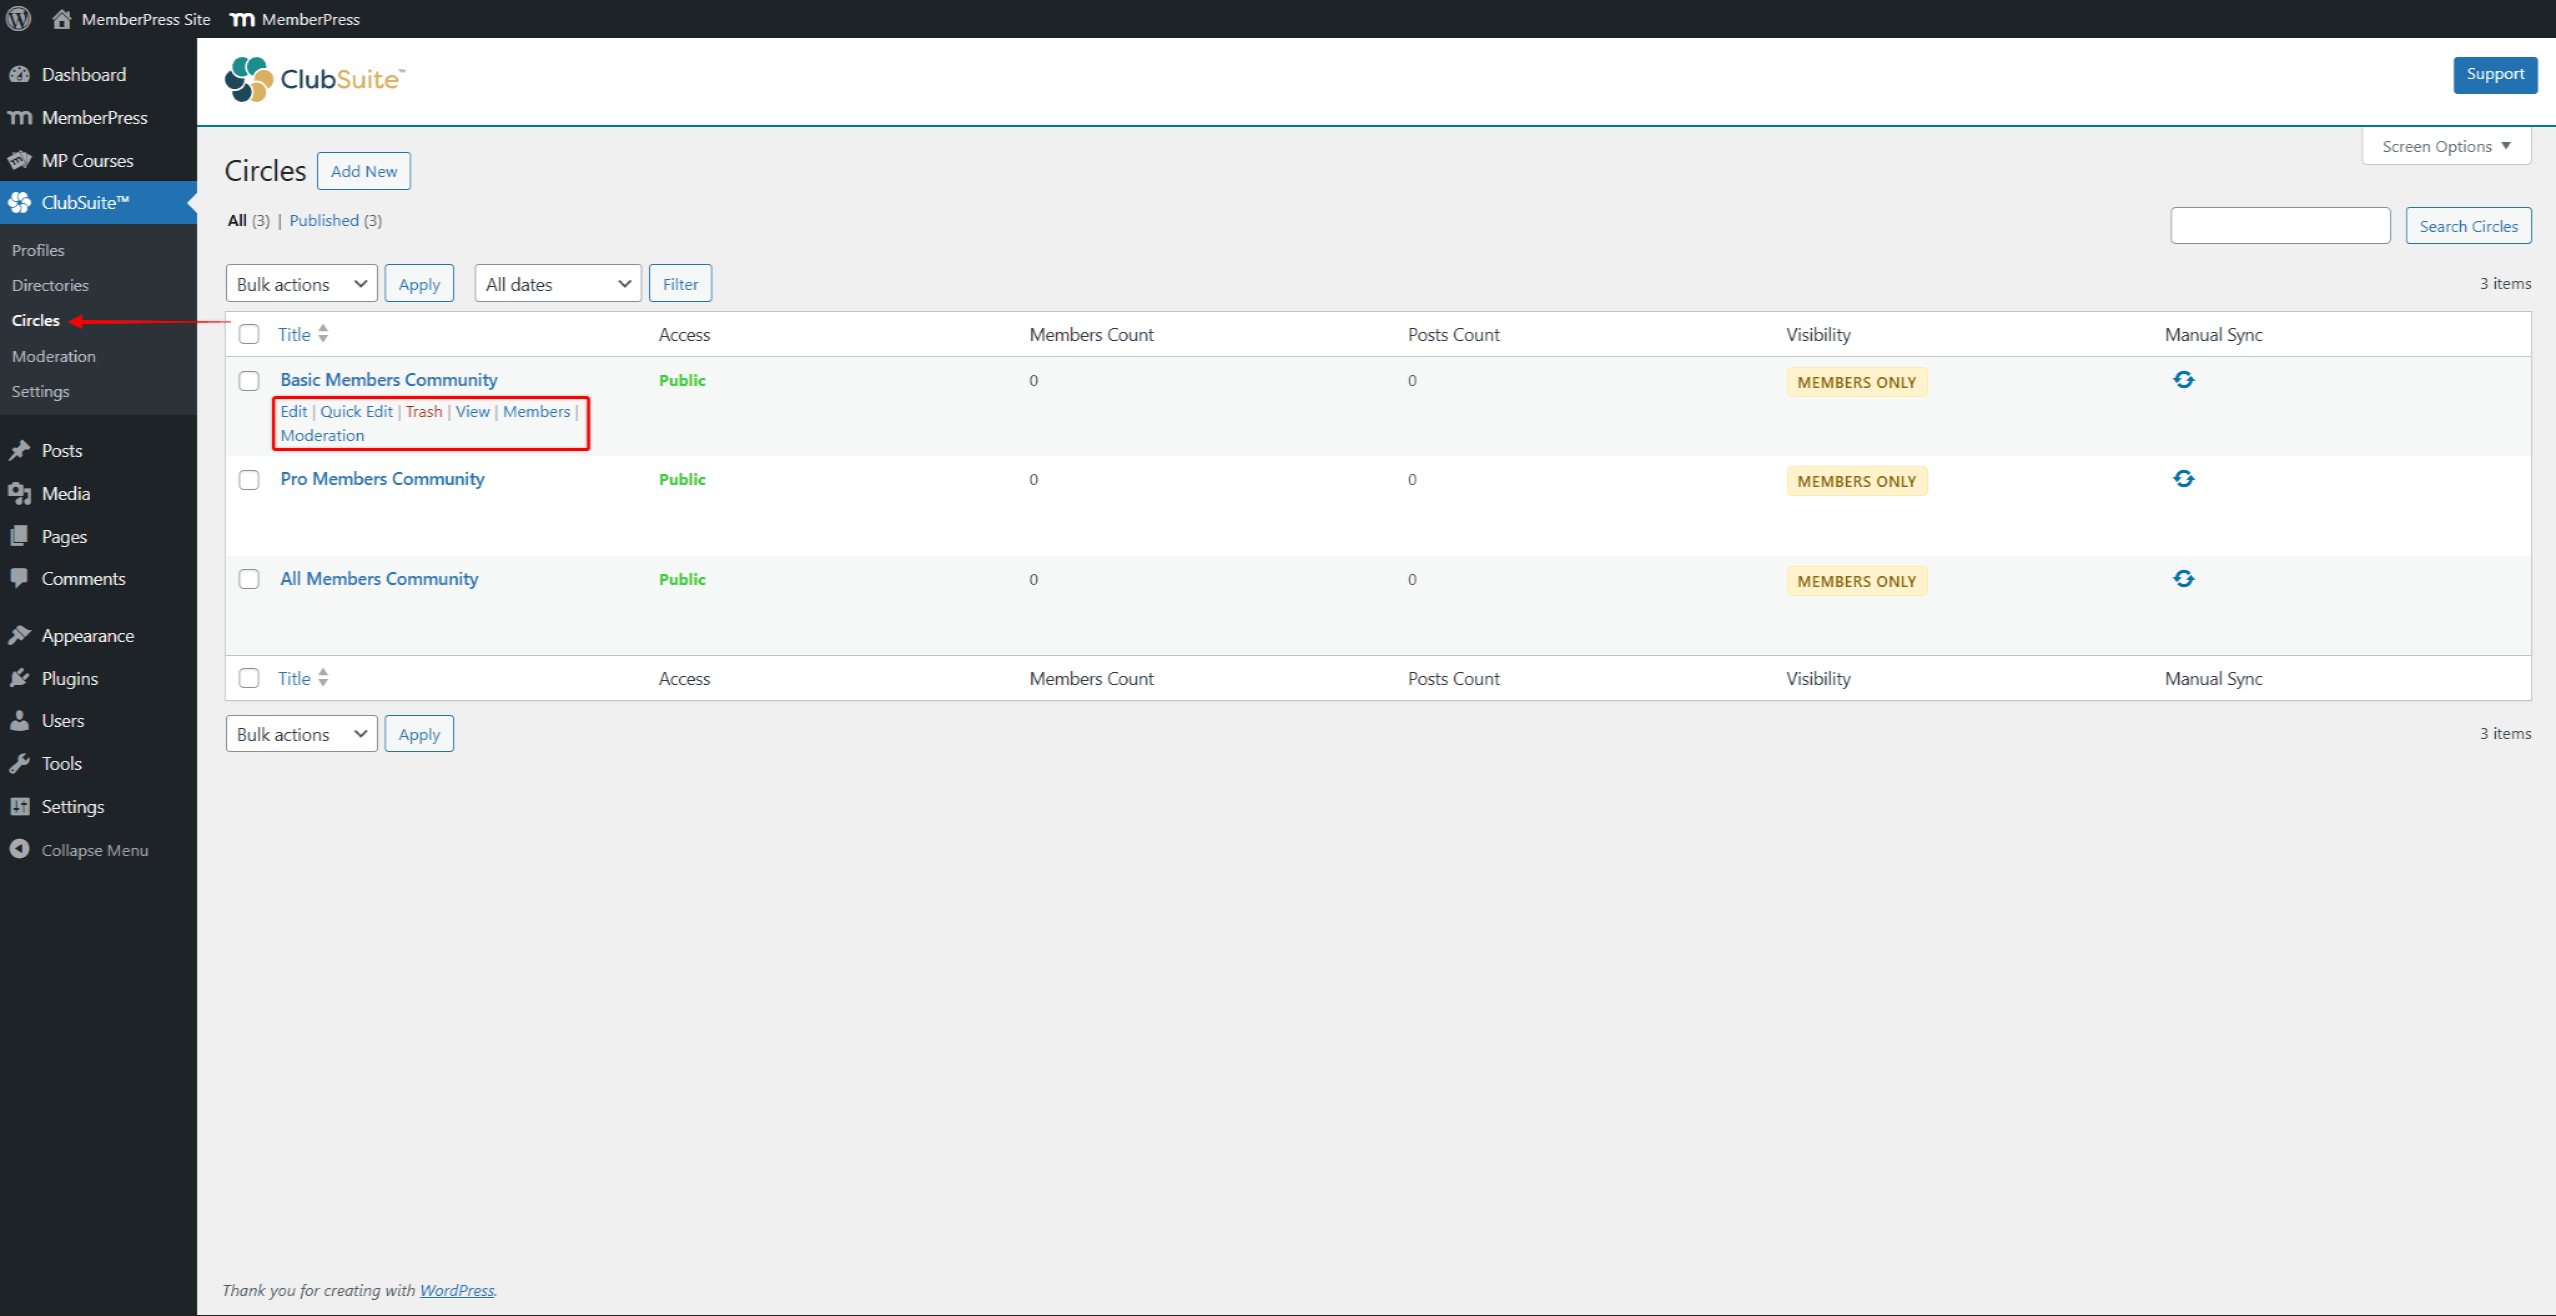
Aqui, você pode adicionar, editar, moderar ou excluir seus círculos. Passe o mouse sobre o nome do círculo para exibir as opções de gerenciamento.
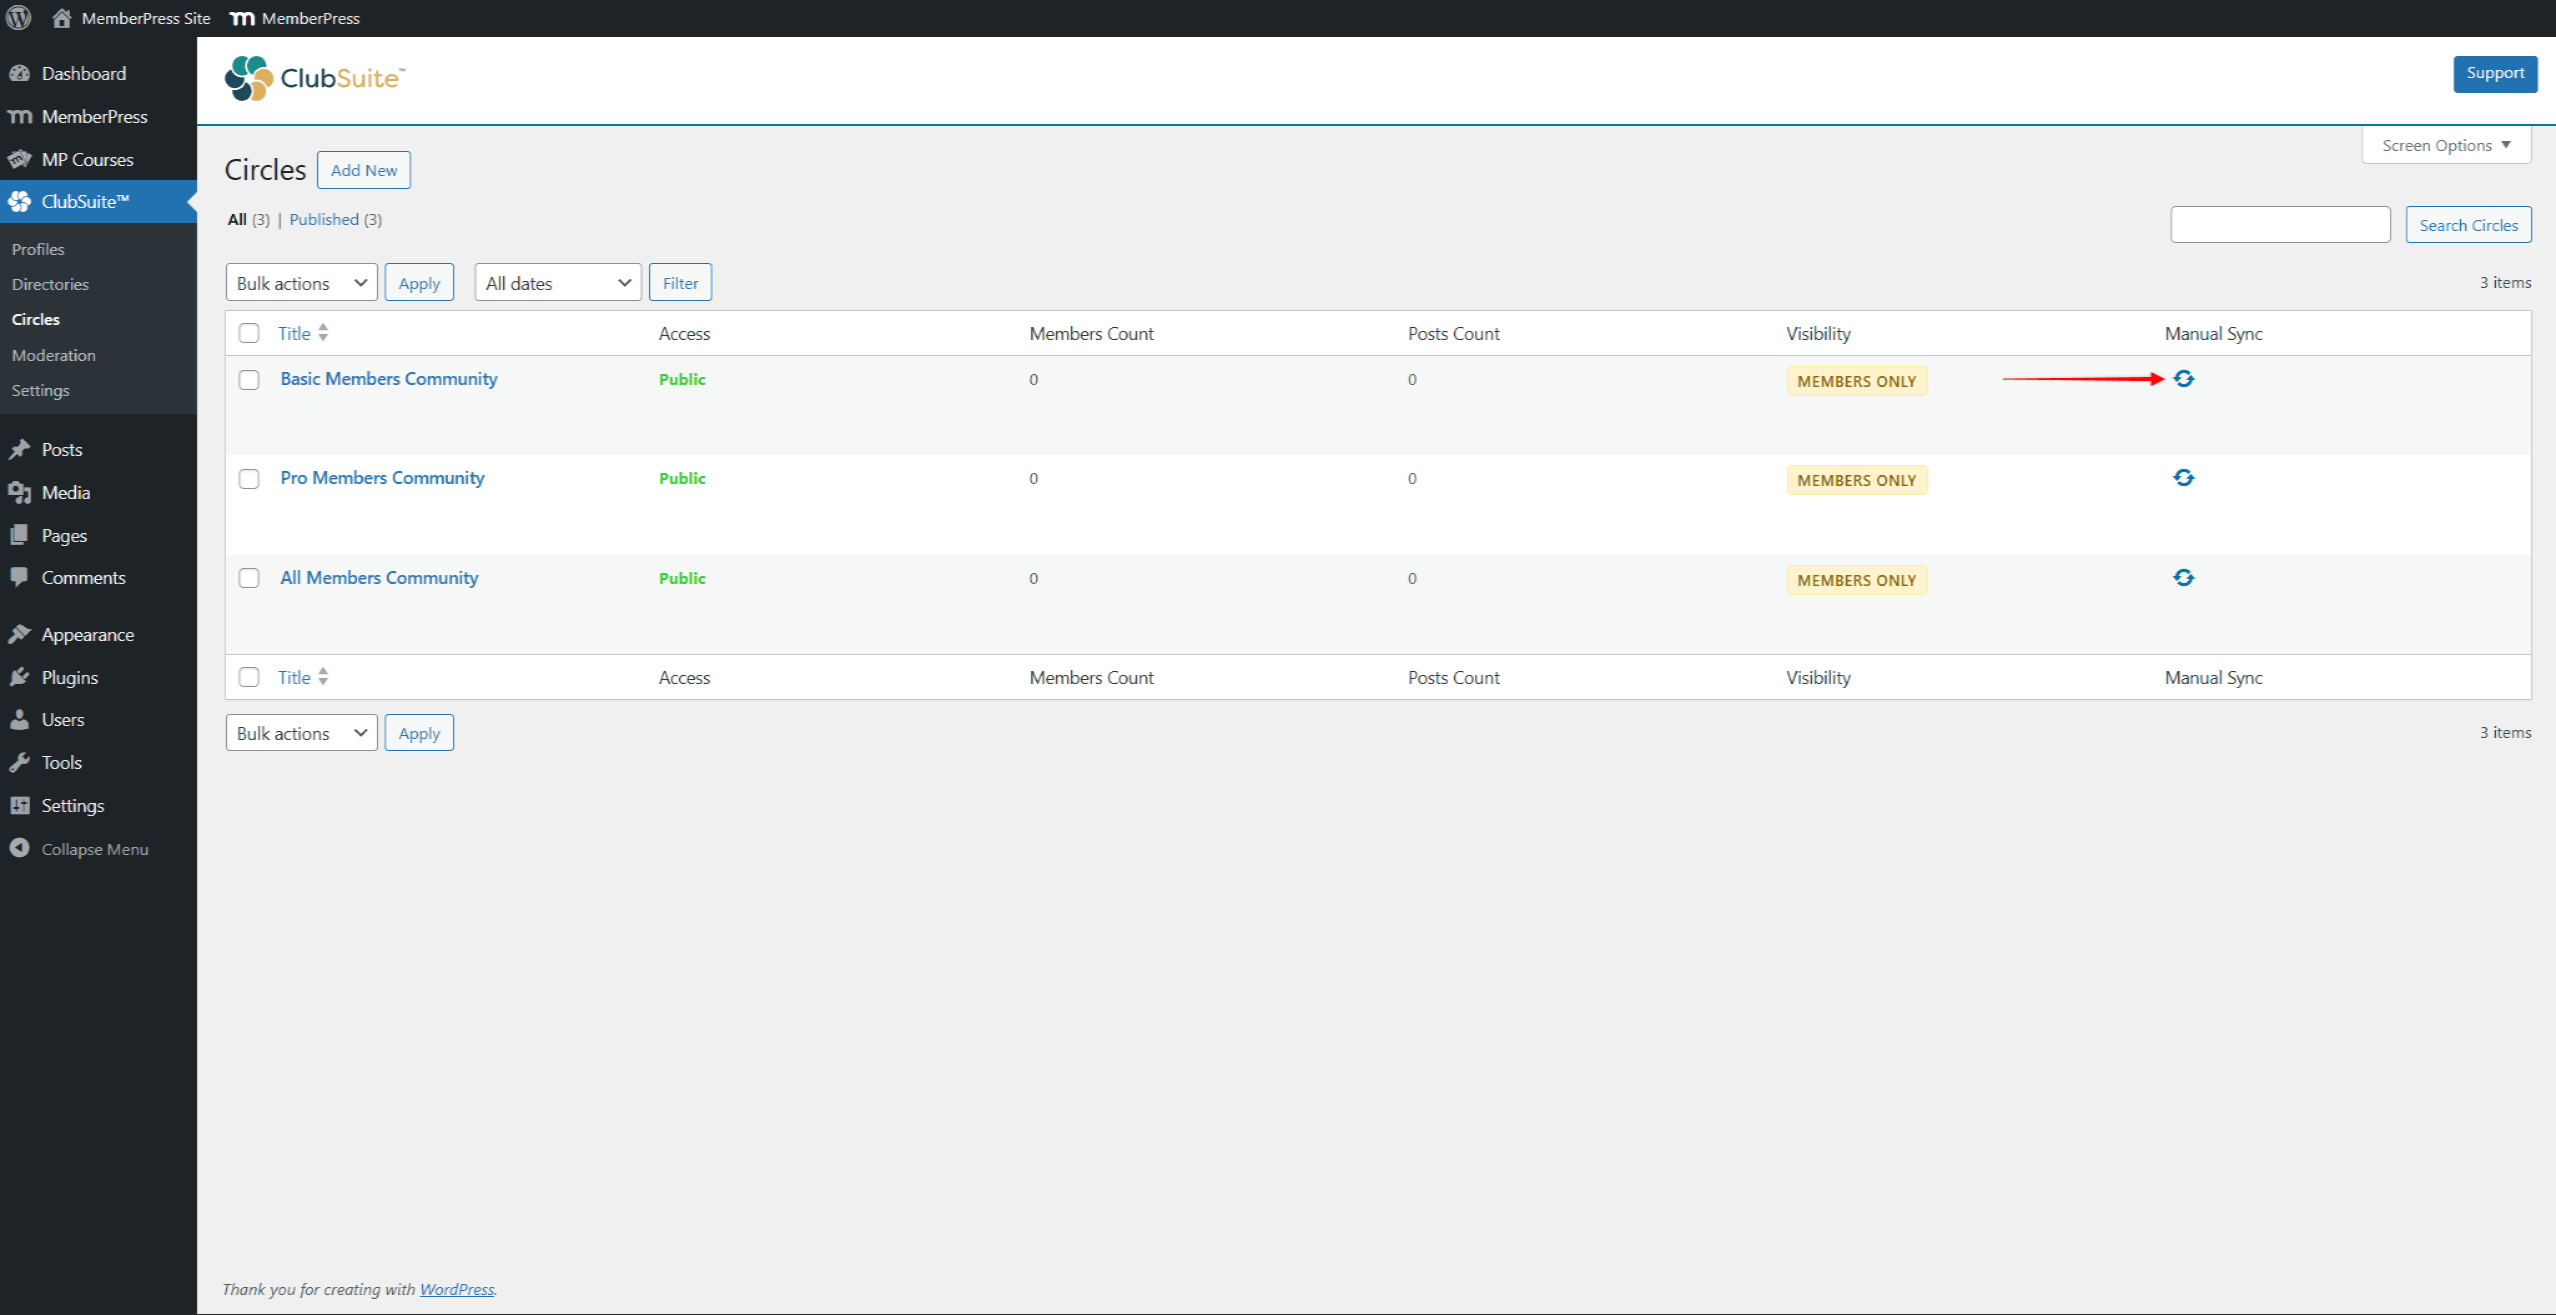
Além disso, se necessário, você pode sincronizar manualmente qualquer Círculo para garantir que todas as alterações feitas sejam aplicadas imediatamente.
Além disso, seus usuários podem encontrar todas as suas comunidades acessando o Página do diretório de círculos. Por padrão, essa página usará o /mp-circle slug (por exemplo., https://yourdomain.com/mp-circle).
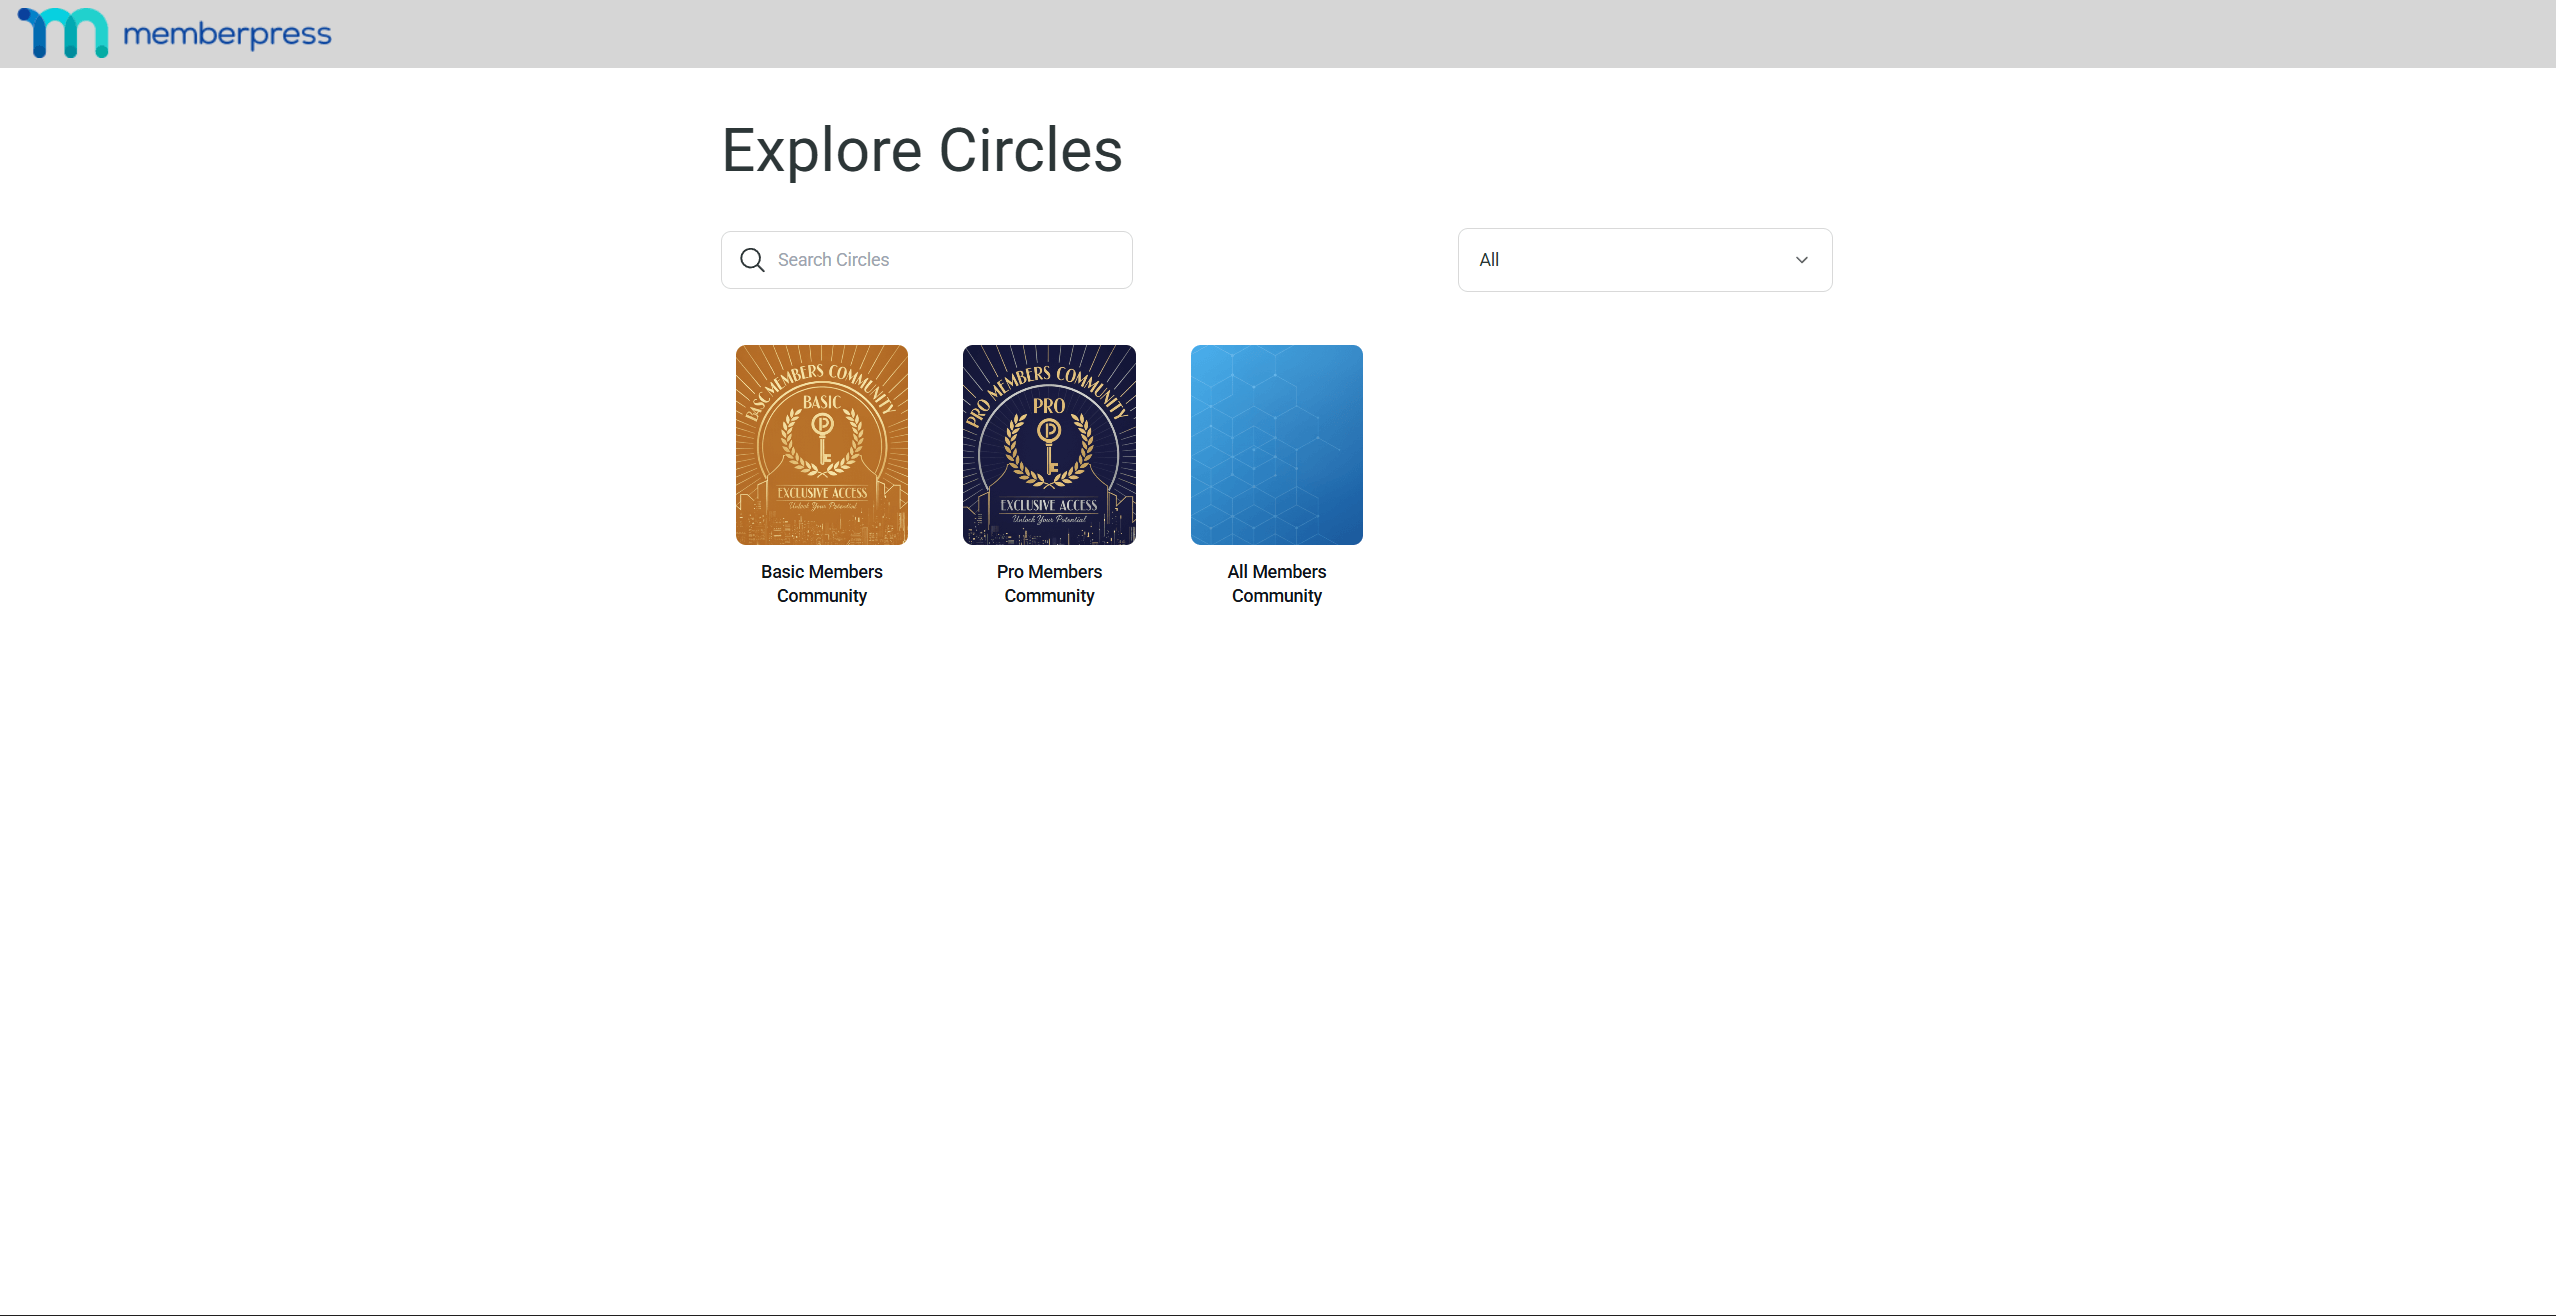
Para ajudar seus usuários a encontrar círculos facilmente, link para a página de diretório do Circle para os menus e elementos de design apropriados.
Adding Circle Directory to Custom Pages With Shortcode
MemberPress Circle directory can be displayed on any custom page using a shortcode. This allows the Circle directory to be placed flexibly anywhere on your website.
The shortcode displays the same Circle directory available at the default /mp-circle URL. Members can browse, search, and join Circles directly from this custom page.
The shortcode works with the Gutenberg block editor and popular page builders like Elementor and Divi.
Adding Circle Directory Shortcode With Gutenberg
Follow these steps to add the Circle directory to any custom page or post with Gutenberg:
- Navegue até Dashboard > Pages > Add New Page.
- Add a title for the page.
- Adicionar um Código curto block to the page content area.
- Enter the following shortcode:
[mpcirc-circles]. - Clique em Publicar para salvar a página.
The page will now display the Circle directory with all visible Circles.
Adding Circle Directory Shortcode With Page Builders
Furthermore, you can add the MemberPress Circle directory to pages and posts created with almost any page builder. To do this, use your page builder's Shotcode module to add the Circle directory shotcode to a page.
For example, add the Shortcode widget in Elementor ou o Code module in Divi. Then paste the circle shortcode into it.
Práticas recomendadas para gerenciar círculos
Crie propósitos claros para o Círculo que atraiam os membros certos. Círculos vagos ou muito amplos têm dificuldade para manter o foco e o envolvimento. Use nomes específicos e pesquisáveis para ajudar os membros a encontrar comunidades relevantes.
Manter padrões de moderação consistentes em todos os Círculos. Documentar claramente as políticas e aplicá-las de forma justa. Treinar moderadores para lidar com situações de maneira uniforme, respeitando a singularidade do Círculo.
Comemore publicamente as conquistas do Círculo. Compartilhe histórias de sucesso em boletins informativos, destaque os Círculos ativos em sua página inicial e reconheça os líderes excepcionais do Círculo. Esse reconhecimento incentiva a participação contínua e atrai novos membros.


