

Mit der MemberPress AI Foundation kann die Claude Desktop Die App stellt eine Verbindung zu einer MemberPress-Website her. Sobald die Verbindung hergestellt ist, liest Claude Desktop die MemberPress-Daten aus und führt gängige Aufgaben im Rahmen eines ganz normalen Gesprächs aus, ohne dass jemand Code schreiben muss.
Diese Anleitung führt einen Site-Administrator durch den gesamten Einrichtungsprozess. Sie behandelt die Installation des AI Foundation-Add-ons und anschließend die Verbindung mit Claude Desktop mithilfe des Assistenten. MCP-Einrichtungsassistent und die Claude-Desktop-Anschlüsse Konfigurationsoberfläche. Es werden zu keinem Zeitpunkt Konfigurationsdateien bearbeitet.
Was diese Konfiguration bietet
Eine verbundene Claude-Desktop-App kann Mitglieder, Mitgliedschaften, Transaktionen, Abonnements, Kurse und andere MemberPress-Daten abrufen. Bei aktiviertem Schreibzugriff kann sie zudem gängige Aktionen ausführen, wie beispielsweise das Anlegen von Mitgliedern, die Bearbeitung von Rückerstattungen oder die Verwaltung von Abonnements.
Die Verbindung nutzt die Model Context Protocol (MCP). MCP ist ein offener Standard, der es KI-Clients ermöglicht, über eine vorhersehbare Schnittstelle auf externe Daten zuzugreifen. AI Foundation enthält einen MCP-Server in MemberPress. Claude Desktop stellt eine Verbindung zu diesem Server her, sobald der Administrator dies genehmigt hat.
Die MemberPress AI Foundation – Überblick und Einrichtungsanleitung behandelt das Protokoll, den Server und die verfügbaren Bereiche ausführlicher.
Bevor Sie beginnen
Die Website muss diese Anforderungen erfüllen, damit die Verbindung funktioniert:
- Ein funktionierendes MemberPress-Einbau unter WordPress 6.5 oder höher;
- Eine aktive MemberPress-Lizenz (erforderlich zum Herunterladen des AI Foundation-Add-ons);
- PHP 8.0 oder höher auf dem Server (die meisten aktuellen Hosting-Pakete erfüllen diese Anforderung);
- Eine aktive Claude Desktop Installation auf dem Computer des Administrators.
Installation von MemberPress AI Foundation
Die Installation von AI Foundation erfolgt über den Standard-Workflow für MemberPress-Add-ons.
Standardinstallation
- Überprüfen Sie, ob die MemberPress-Lizenz aktiv ist unter MemberPress > Einstellungen > Lizenz;
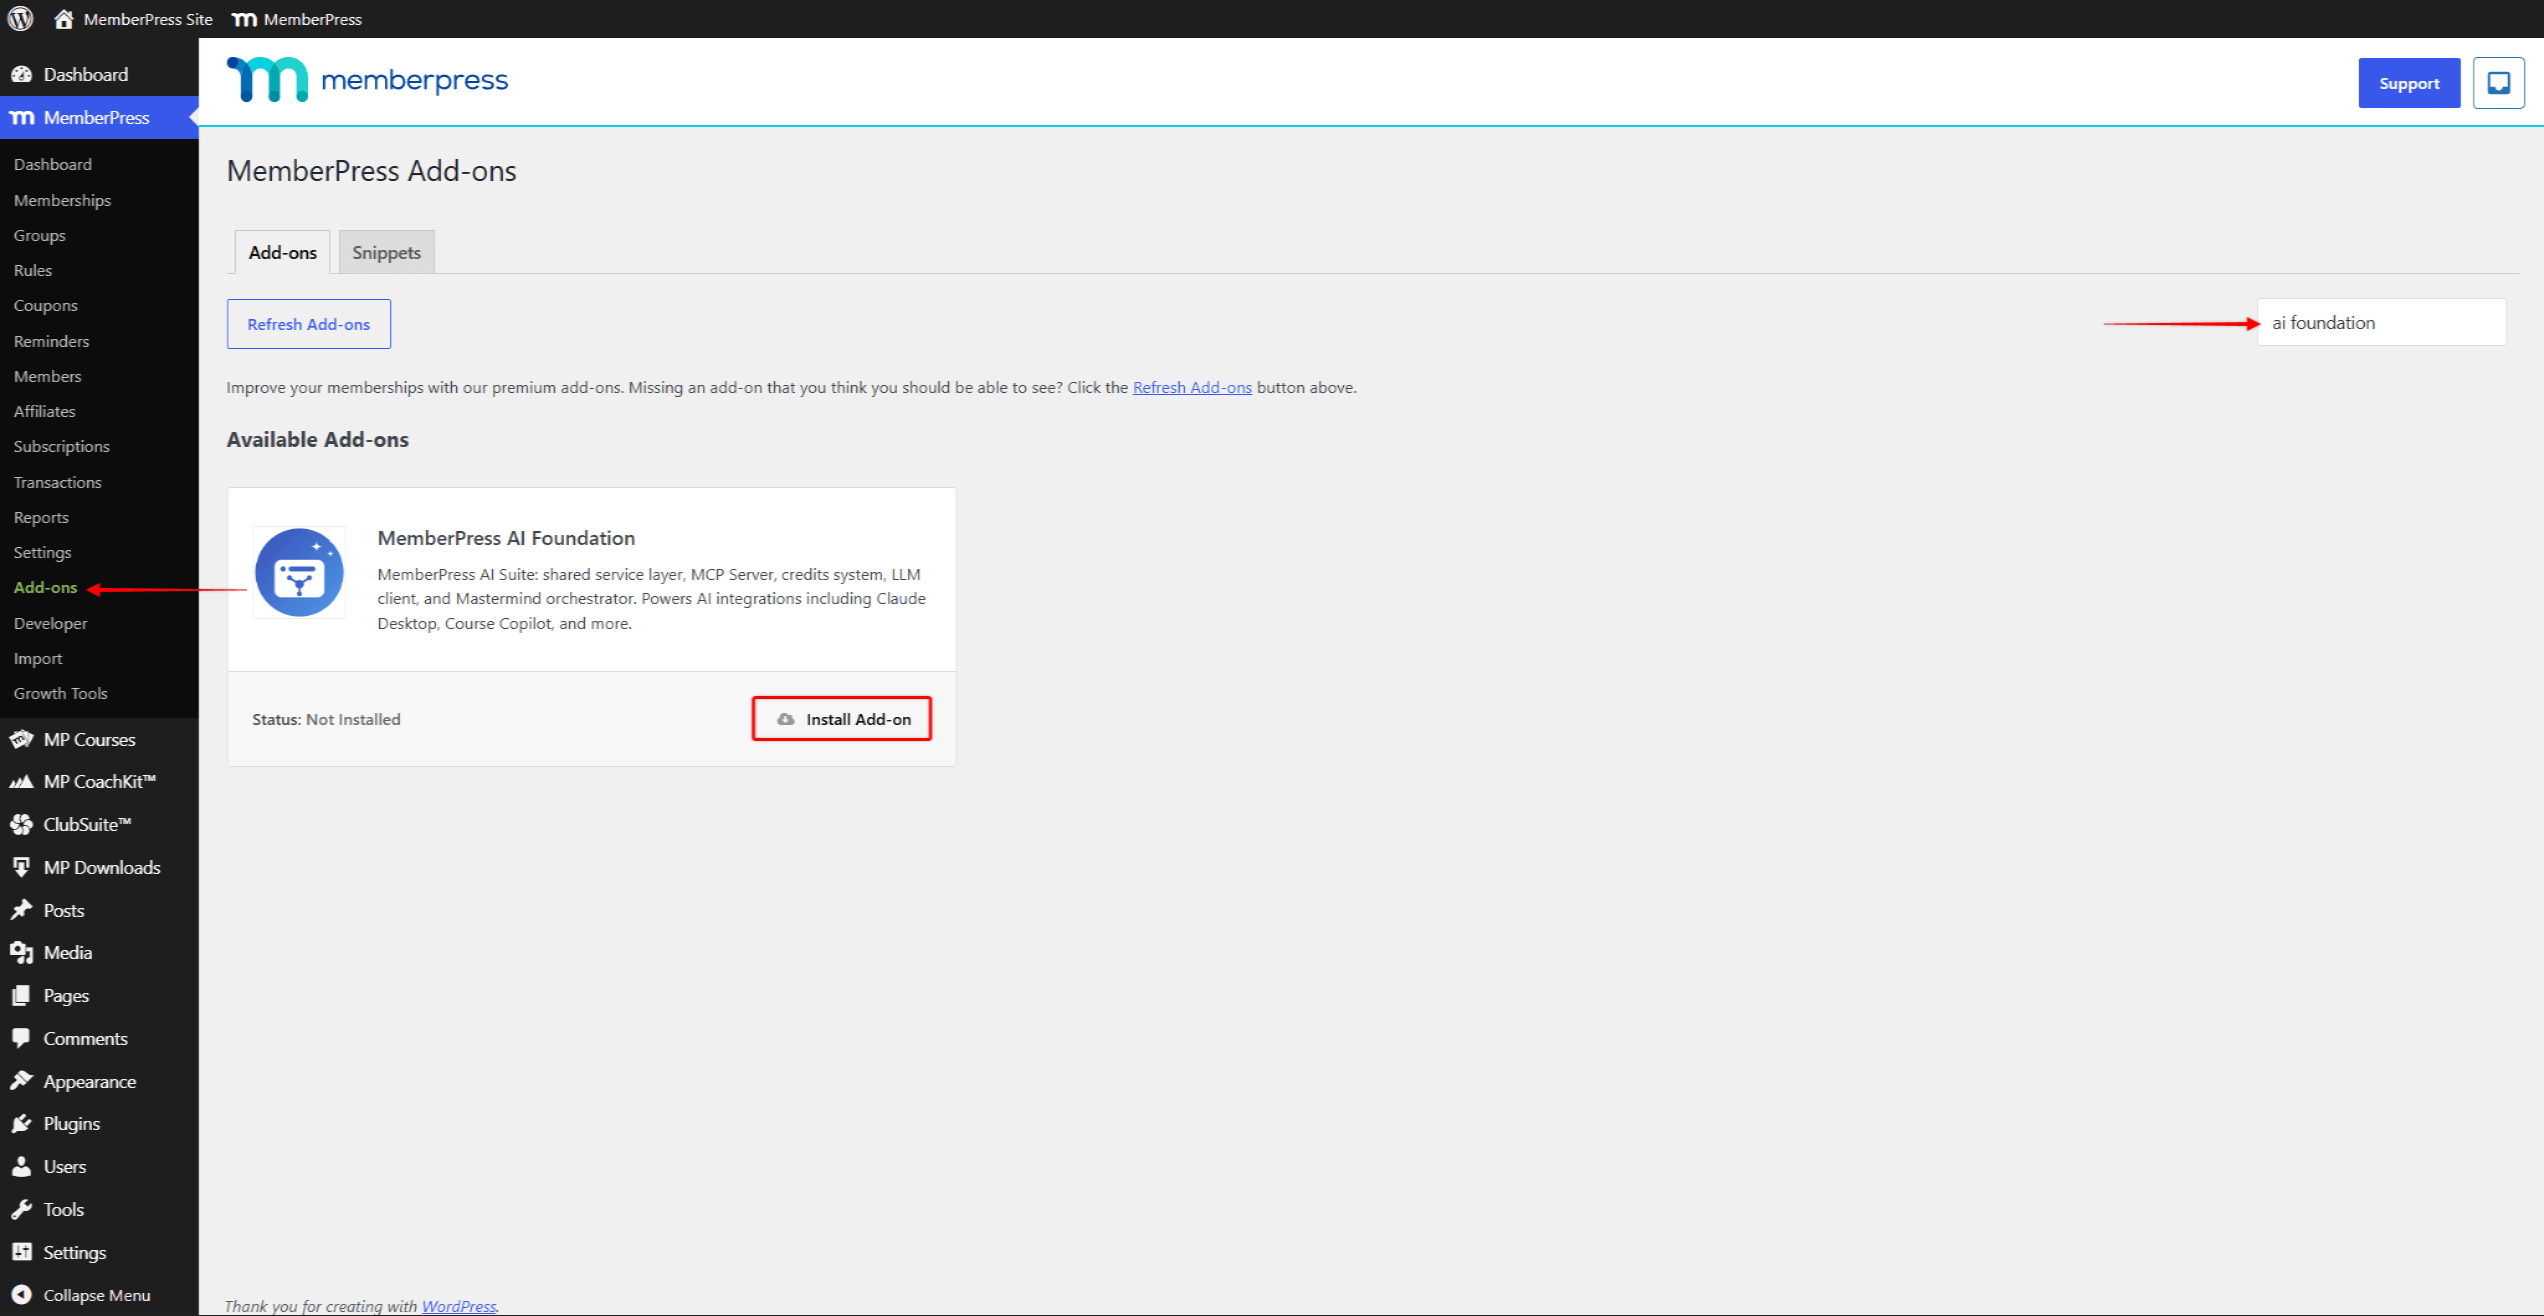
- Navigieren Sie zu MemberPress > Add-ons;
- Suchen Sie die KI-Stiftung Karte;
- Klicken Sie auf Add-on installieren. Das Plugin wird automatisch heruntergeladen und aktiviert;
- Bestätigen Sie, dass KI-Einstellungen wird in der WordPress-Admin-Seitenleiste unter „MemberPress“ angezeigt.
Manuelle Installation
Verwenden Sie diese Methode, wenn die Website die MemberPress-Download-Server nicht direkt erreichen kann:
- Laden Sie das AI Foundation-Plugin von der MemberPress-Kundenportal;
- Navigieren Sie in WordPress zu Plugins > Neu hinzufügen > Plugin hochladen;
- Wählen Sie die heruntergeladene ZIP-Datei aus und klicken Sie dann auf Jetzt installieren;
- Klicken Sie auf Plugin aktivieren.
Überprüfung der Installation
Überprüfen Sie nach der Aktivierung zwei Dinge:
- MemberPress > KI-Einstellungen wird in der Admin-Seitenleiste angezeigt;
- MCP-Einrichtungsassistent ist die erste Registerkarte auf der Seite „KI-Einstellungen“.
Sollte eine der beiden Prüfungen fehlschlagen, wurde das Plugin nicht ordnungsgemäß aktiviert. Siehe MCP-Fehler und Fehlerbehebung für die Diagnoseschritte.
Die Registerkarten „KI-Einstellungen“
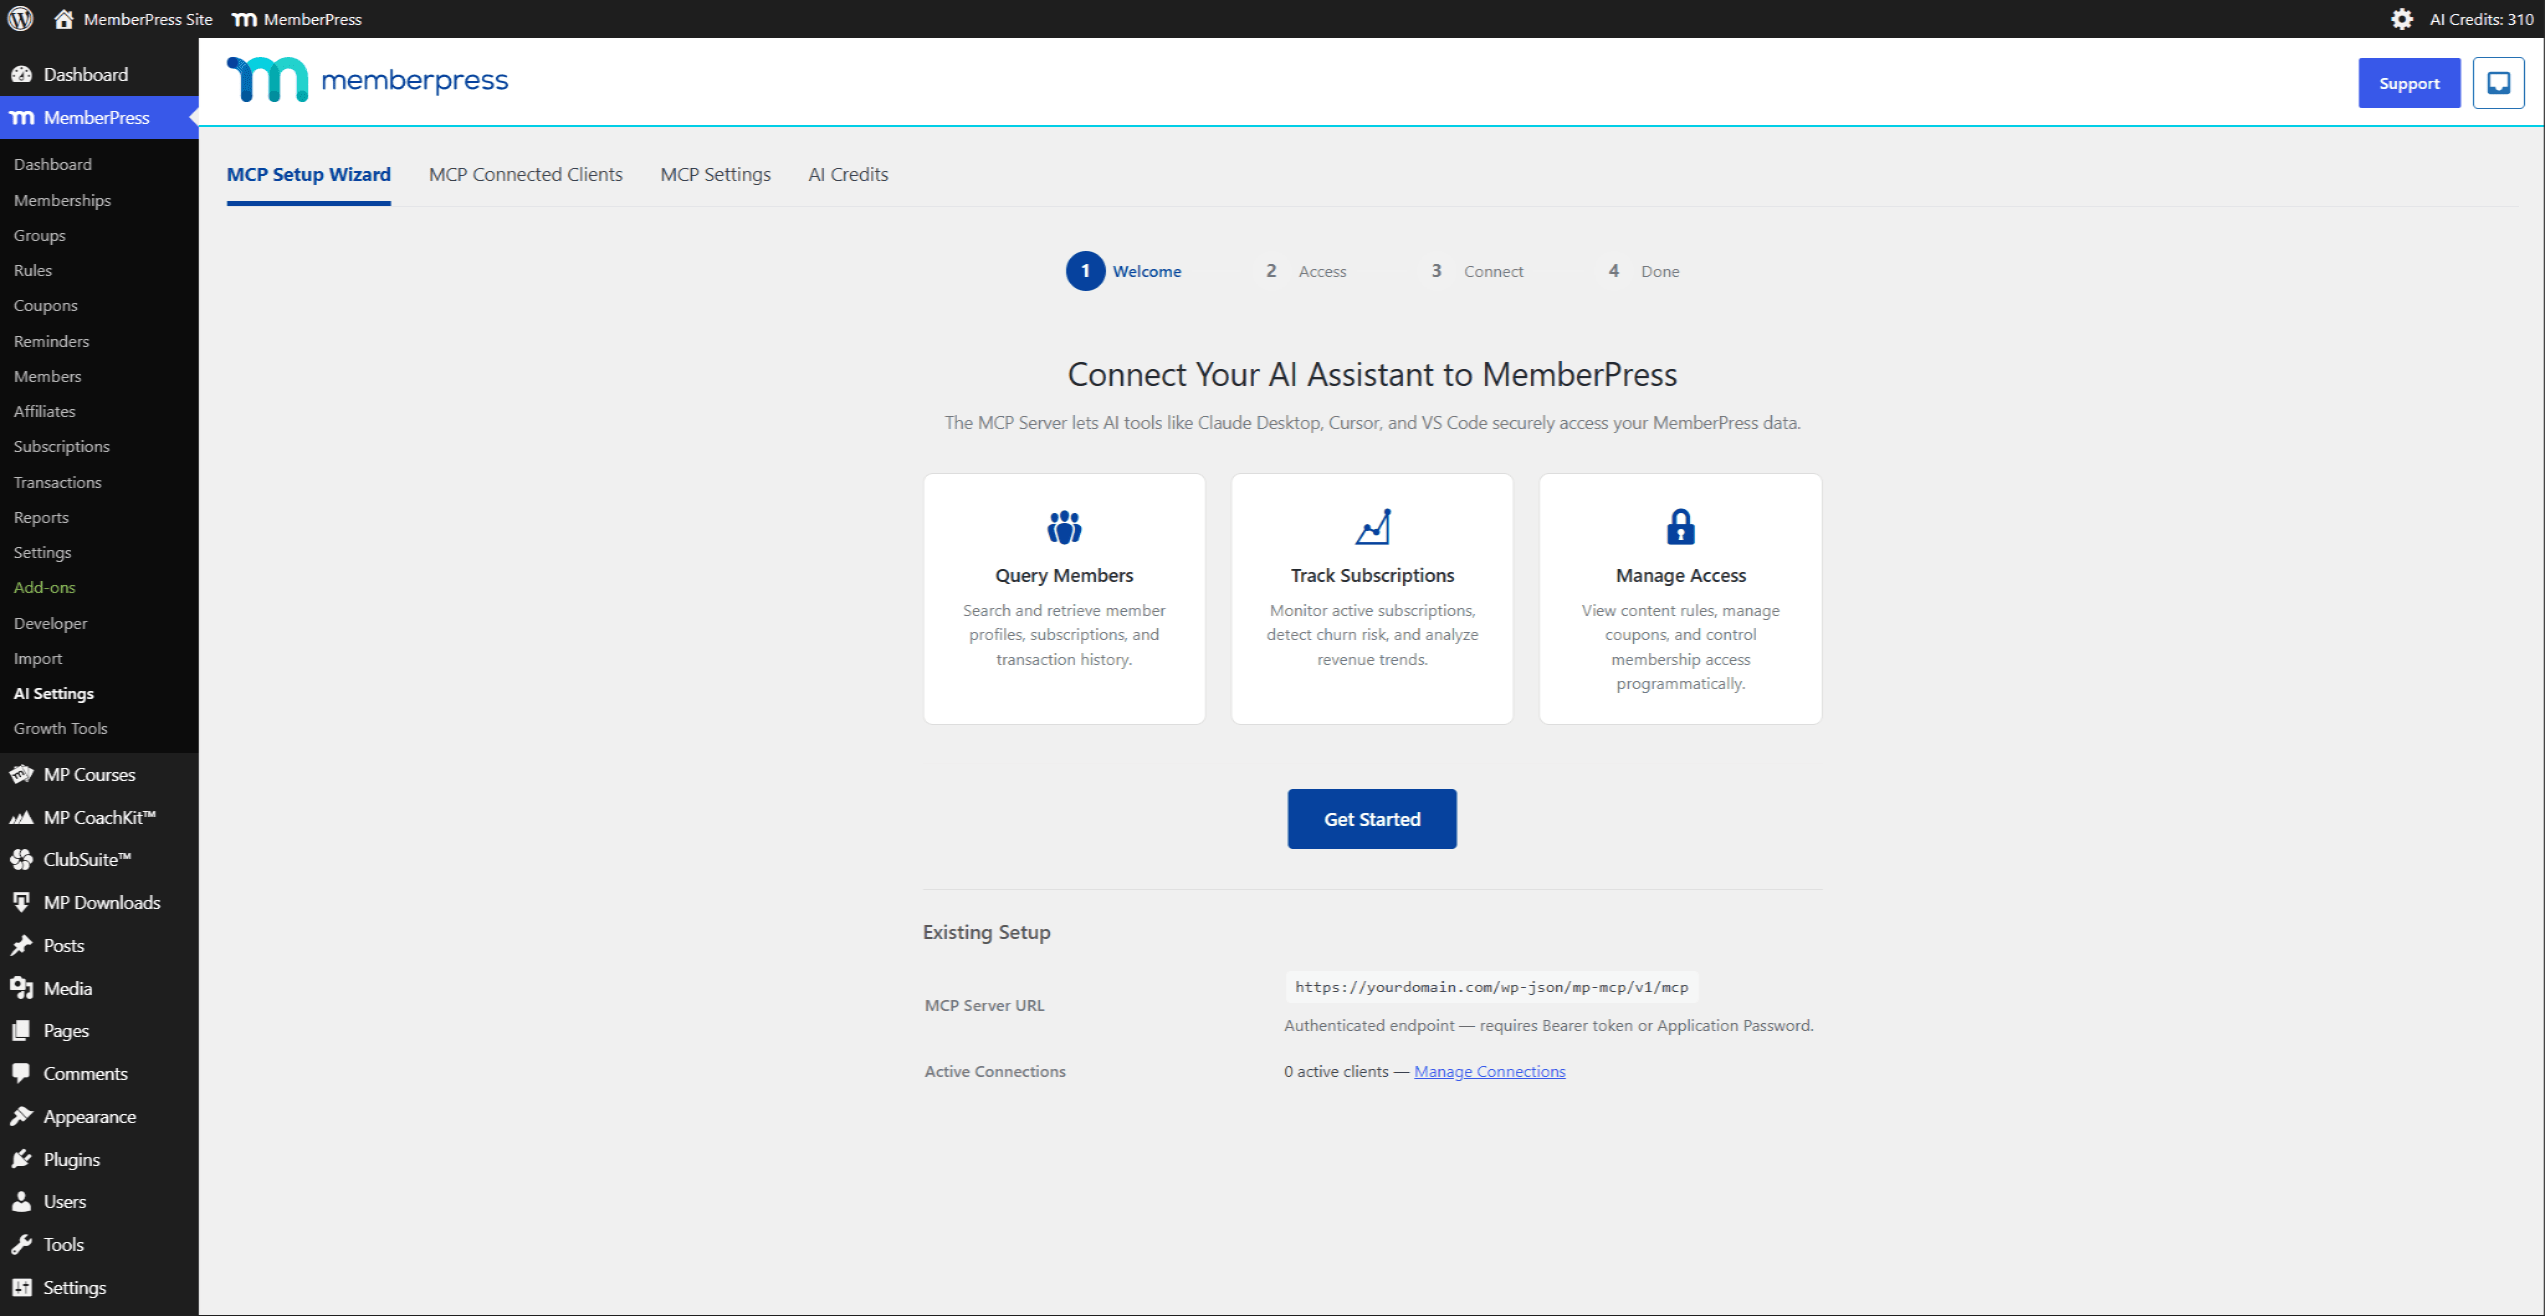
Die Dashboard > MemberPress > KI-Einstellungen Die Seite enthält vier Registerkarten. Drei davon dienen der Einrichtung der Verbindung:
- MCP-Einrichtungsassistent — führt jeden neuen Anschluss durch vier Schritte;
- Mit MCP verbundene Clients — listet alle aktiven Verbindungen auf und bricht sie ab;
- MCP-Einstellungen — legt die Zugriffsebene das schränkt die Möglichkeiten neuer Verbindungen ein.
Die vierte Registerkarte, KI-Quellenangaben, verwaltet das Guthaben für die eigenen KI-Funktionen von MemberPress. Siehe KI-Quellenangaben unten.
Legen Sie zunächst die Zugriffsebene fest
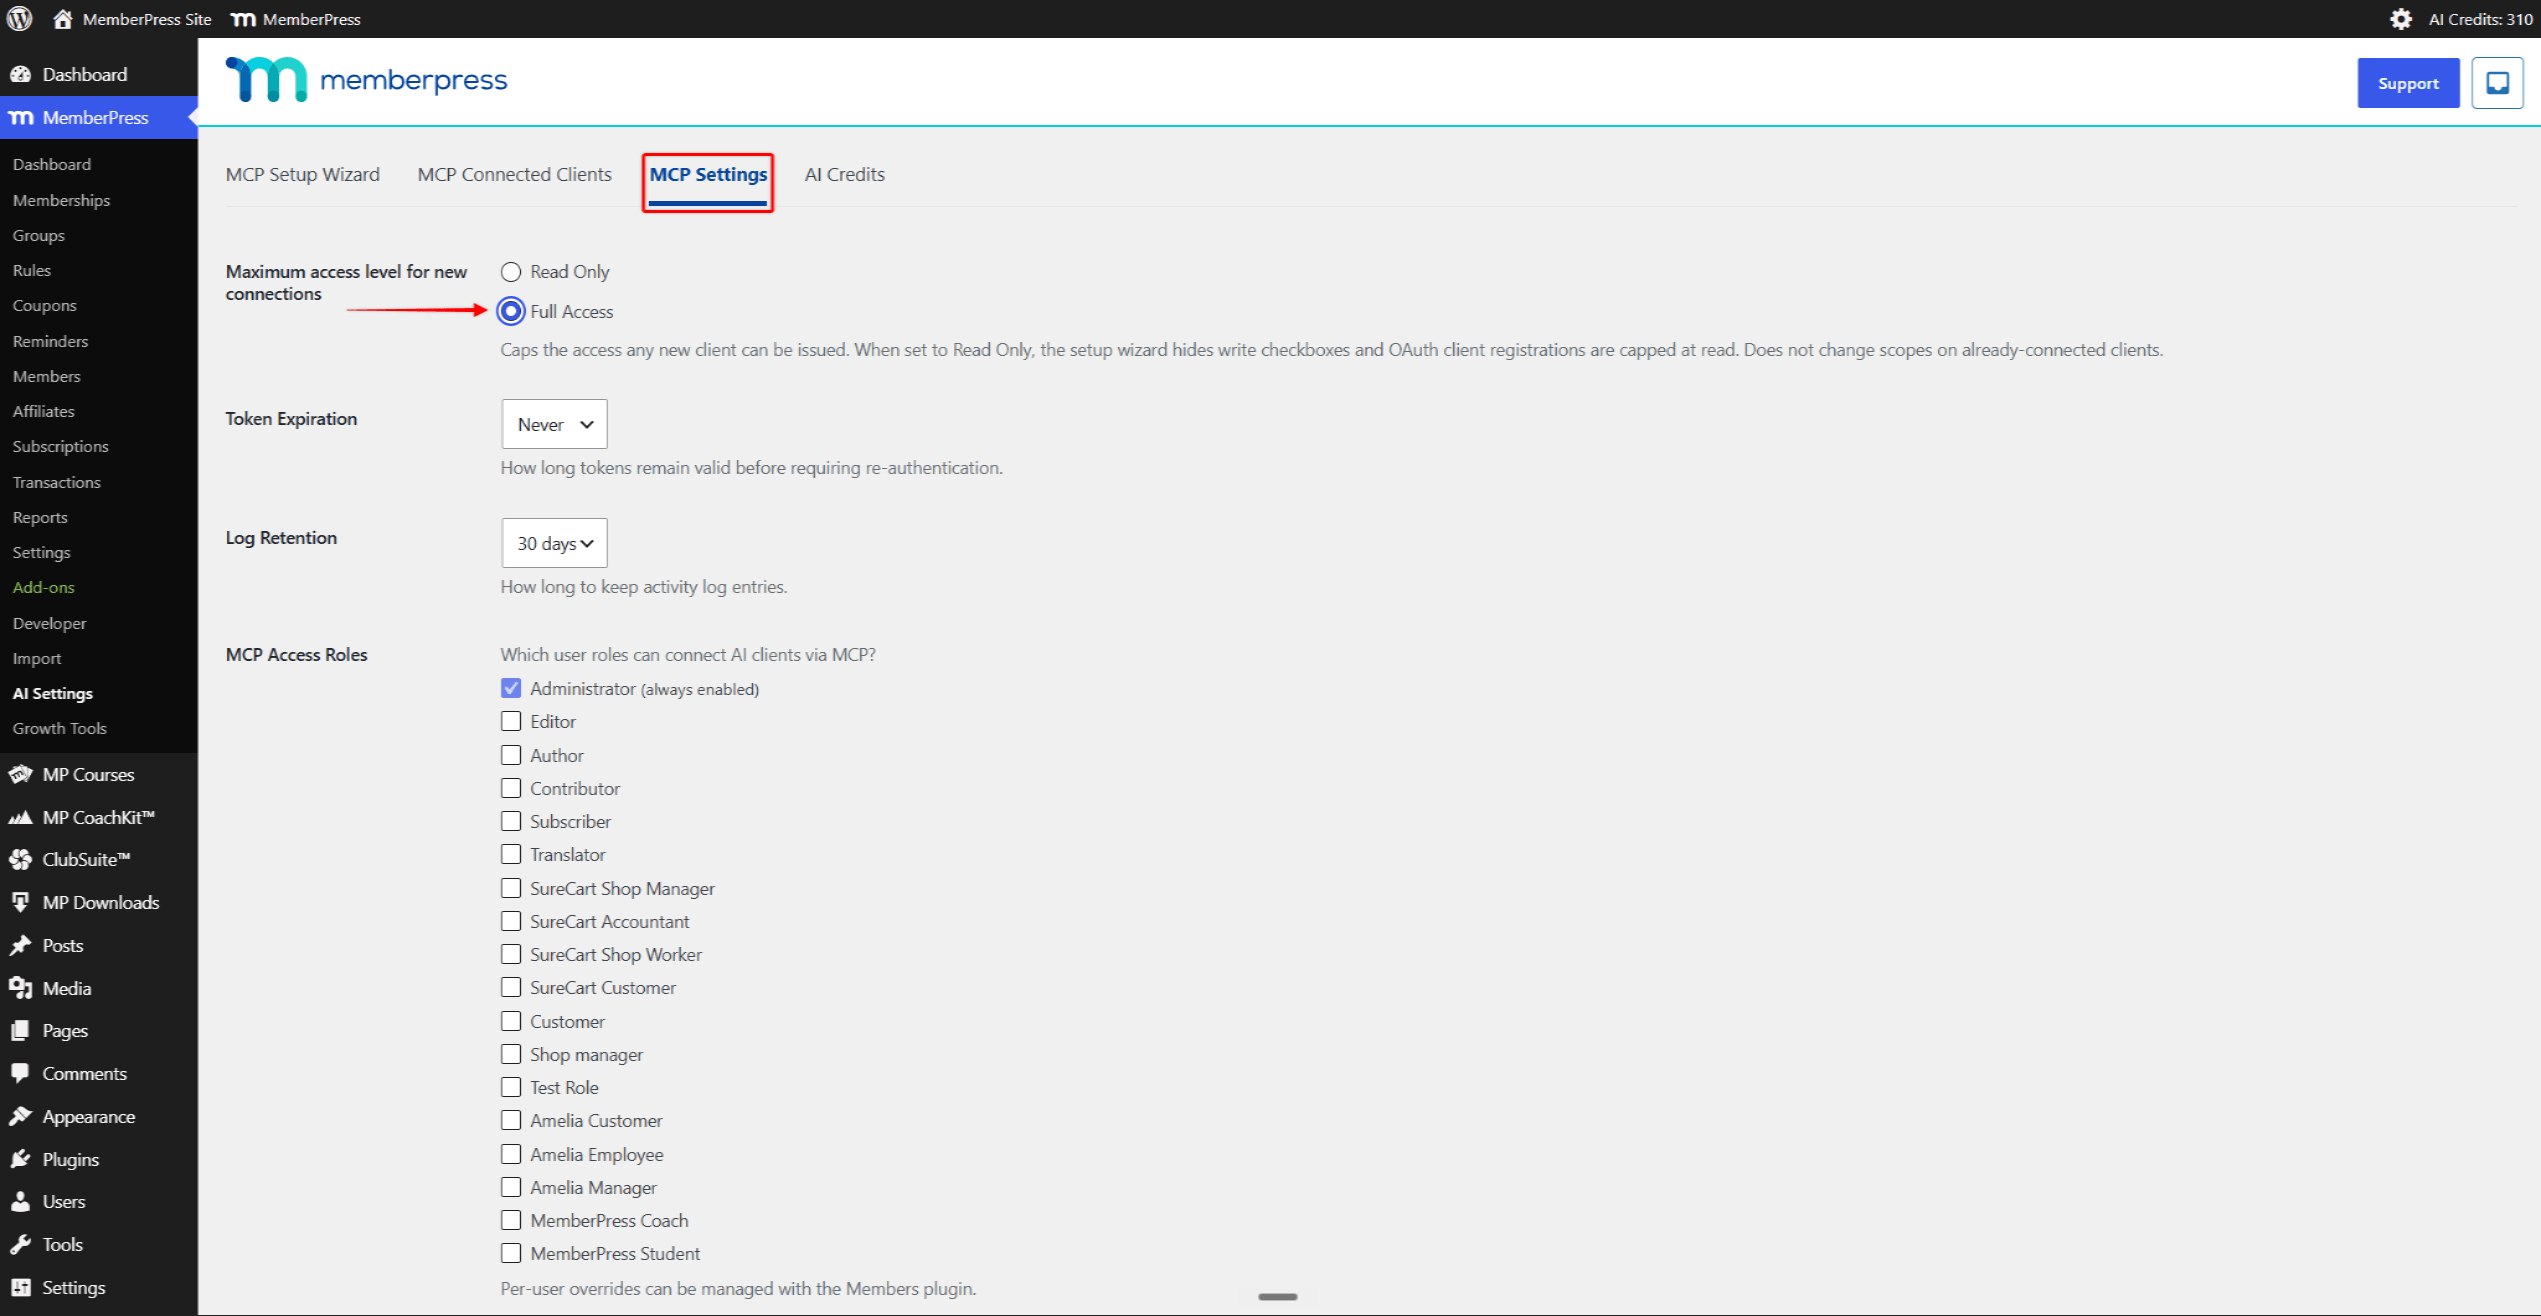
Die Zugriffsebene befindet sich in MCP-Einstellungen, nicht im Assistenten. Es begrenzt, was auch immer neu Verbindung anfordern kann. Es gibt zwei Möglichkeiten:
- Nur Lesen — Neue Verbindungen können nur MemberPress-Daten lesen;
- Voller Zugriff — Neue Verbindungen können Daten lesen und Schreibvorgänge ausführen, beispielsweise das Anlegen von Mitgliedern oder die Bearbeitung von Rückerstattungen.
Die Zugriffsebene ist die einzige Einstellung, die darüber entscheidet, ob Schreibbereiche während der Verbindung überhaupt angeboten werden. Stellen Sie sie ein vor den Assistenten ausführen.
So legen Sie die Zugriffsebene fest:
- Navigieren Sie zu Dashboard > MemberPress > KI-Einstellungen > MCP-Einstellungen;
- Wählen Sie Nur Lesen oder Voller Zugriff unter “Maximale Zugriffsebene für neue Verbindungen”;
- Klicken Sie auf Einstellungen aktualisieren.
Claude Desktop verbinden
Die Verbindung verläuft über zwei Flächen: die MCP-Einrichtungsassistent in WordPress und die Steckverbinder Bedienfeld in Claude Desktop. Der Assistent unter Dashboard > MemberPress > KI-Einstellungen > MCP-Einrichtungsassistent, stellt bei jeder Ausführung eine neue Verbindung her, sodass es wiederverwendet werden kann, sobald ein anderer Client eine Verbindung benötigt. Führen Sie die Schritte der Reihe nach durch.
Schritt 1: Öffnen Sie den Assistenten
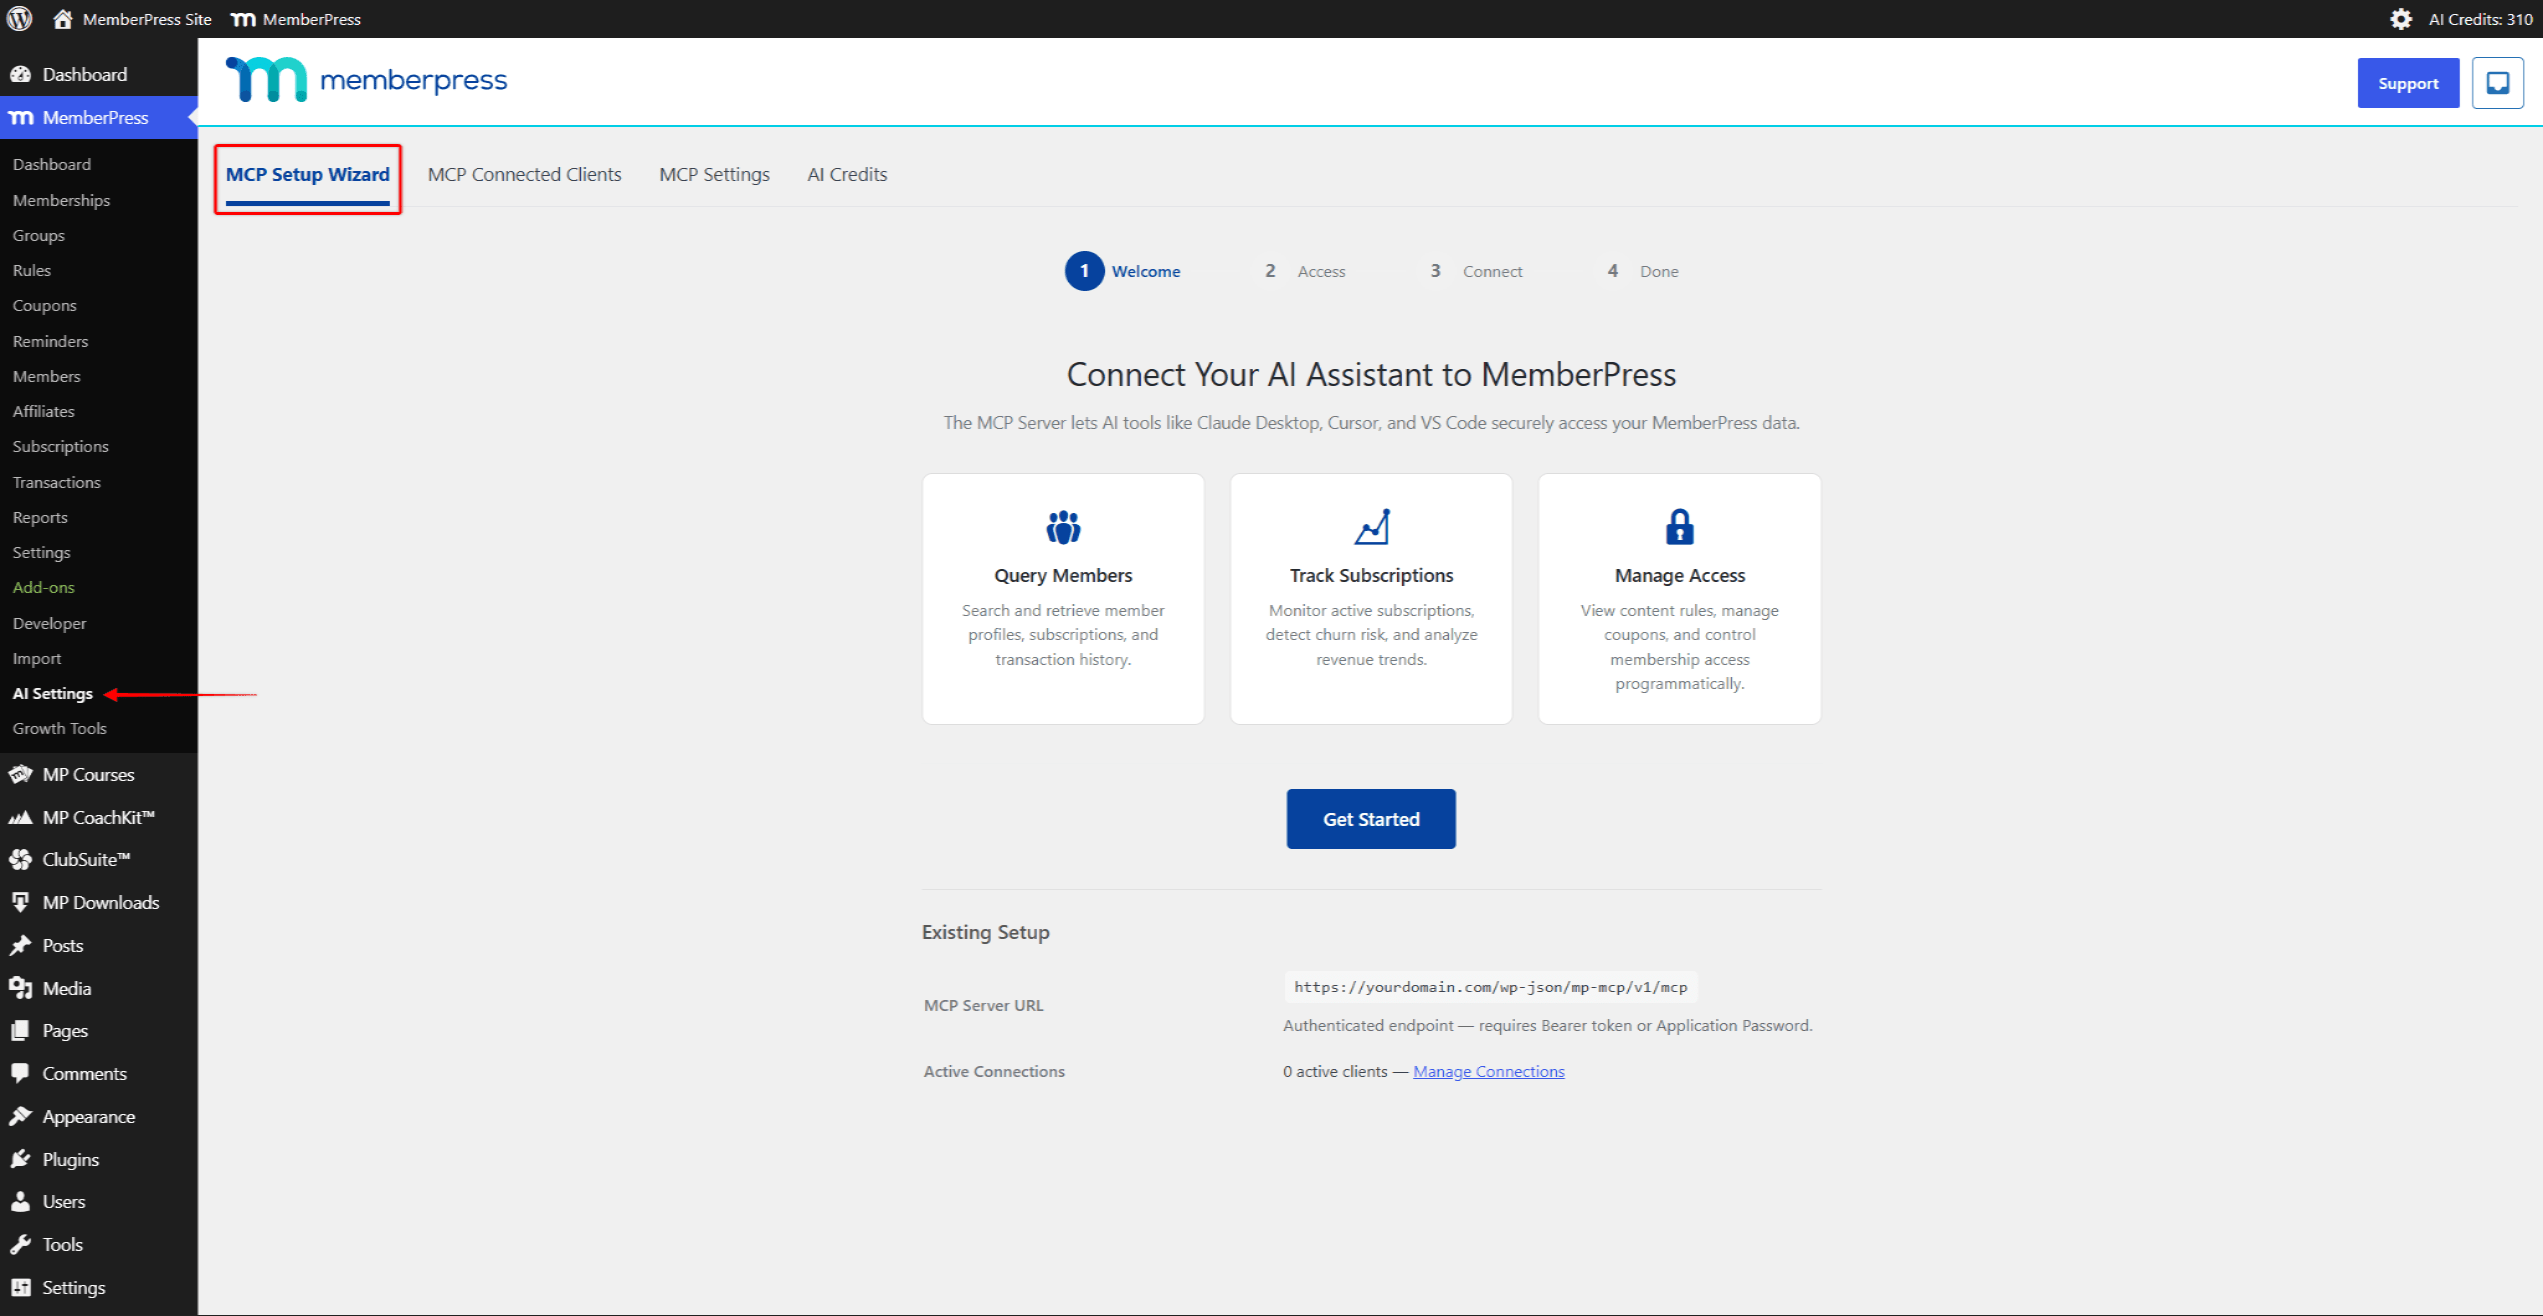
- Navigieren Sie zu Dashboard > MemberPress > KI-Einstellungen > MCP-Einrichtungsassistent;
- Überprüfen Sie die Willkommen Bildschirm, auf dem die Details zum MCP-Server sowie alle bestehenden Verbindungen angezeigt werden;
- Klicken Sie auf Los geht's.
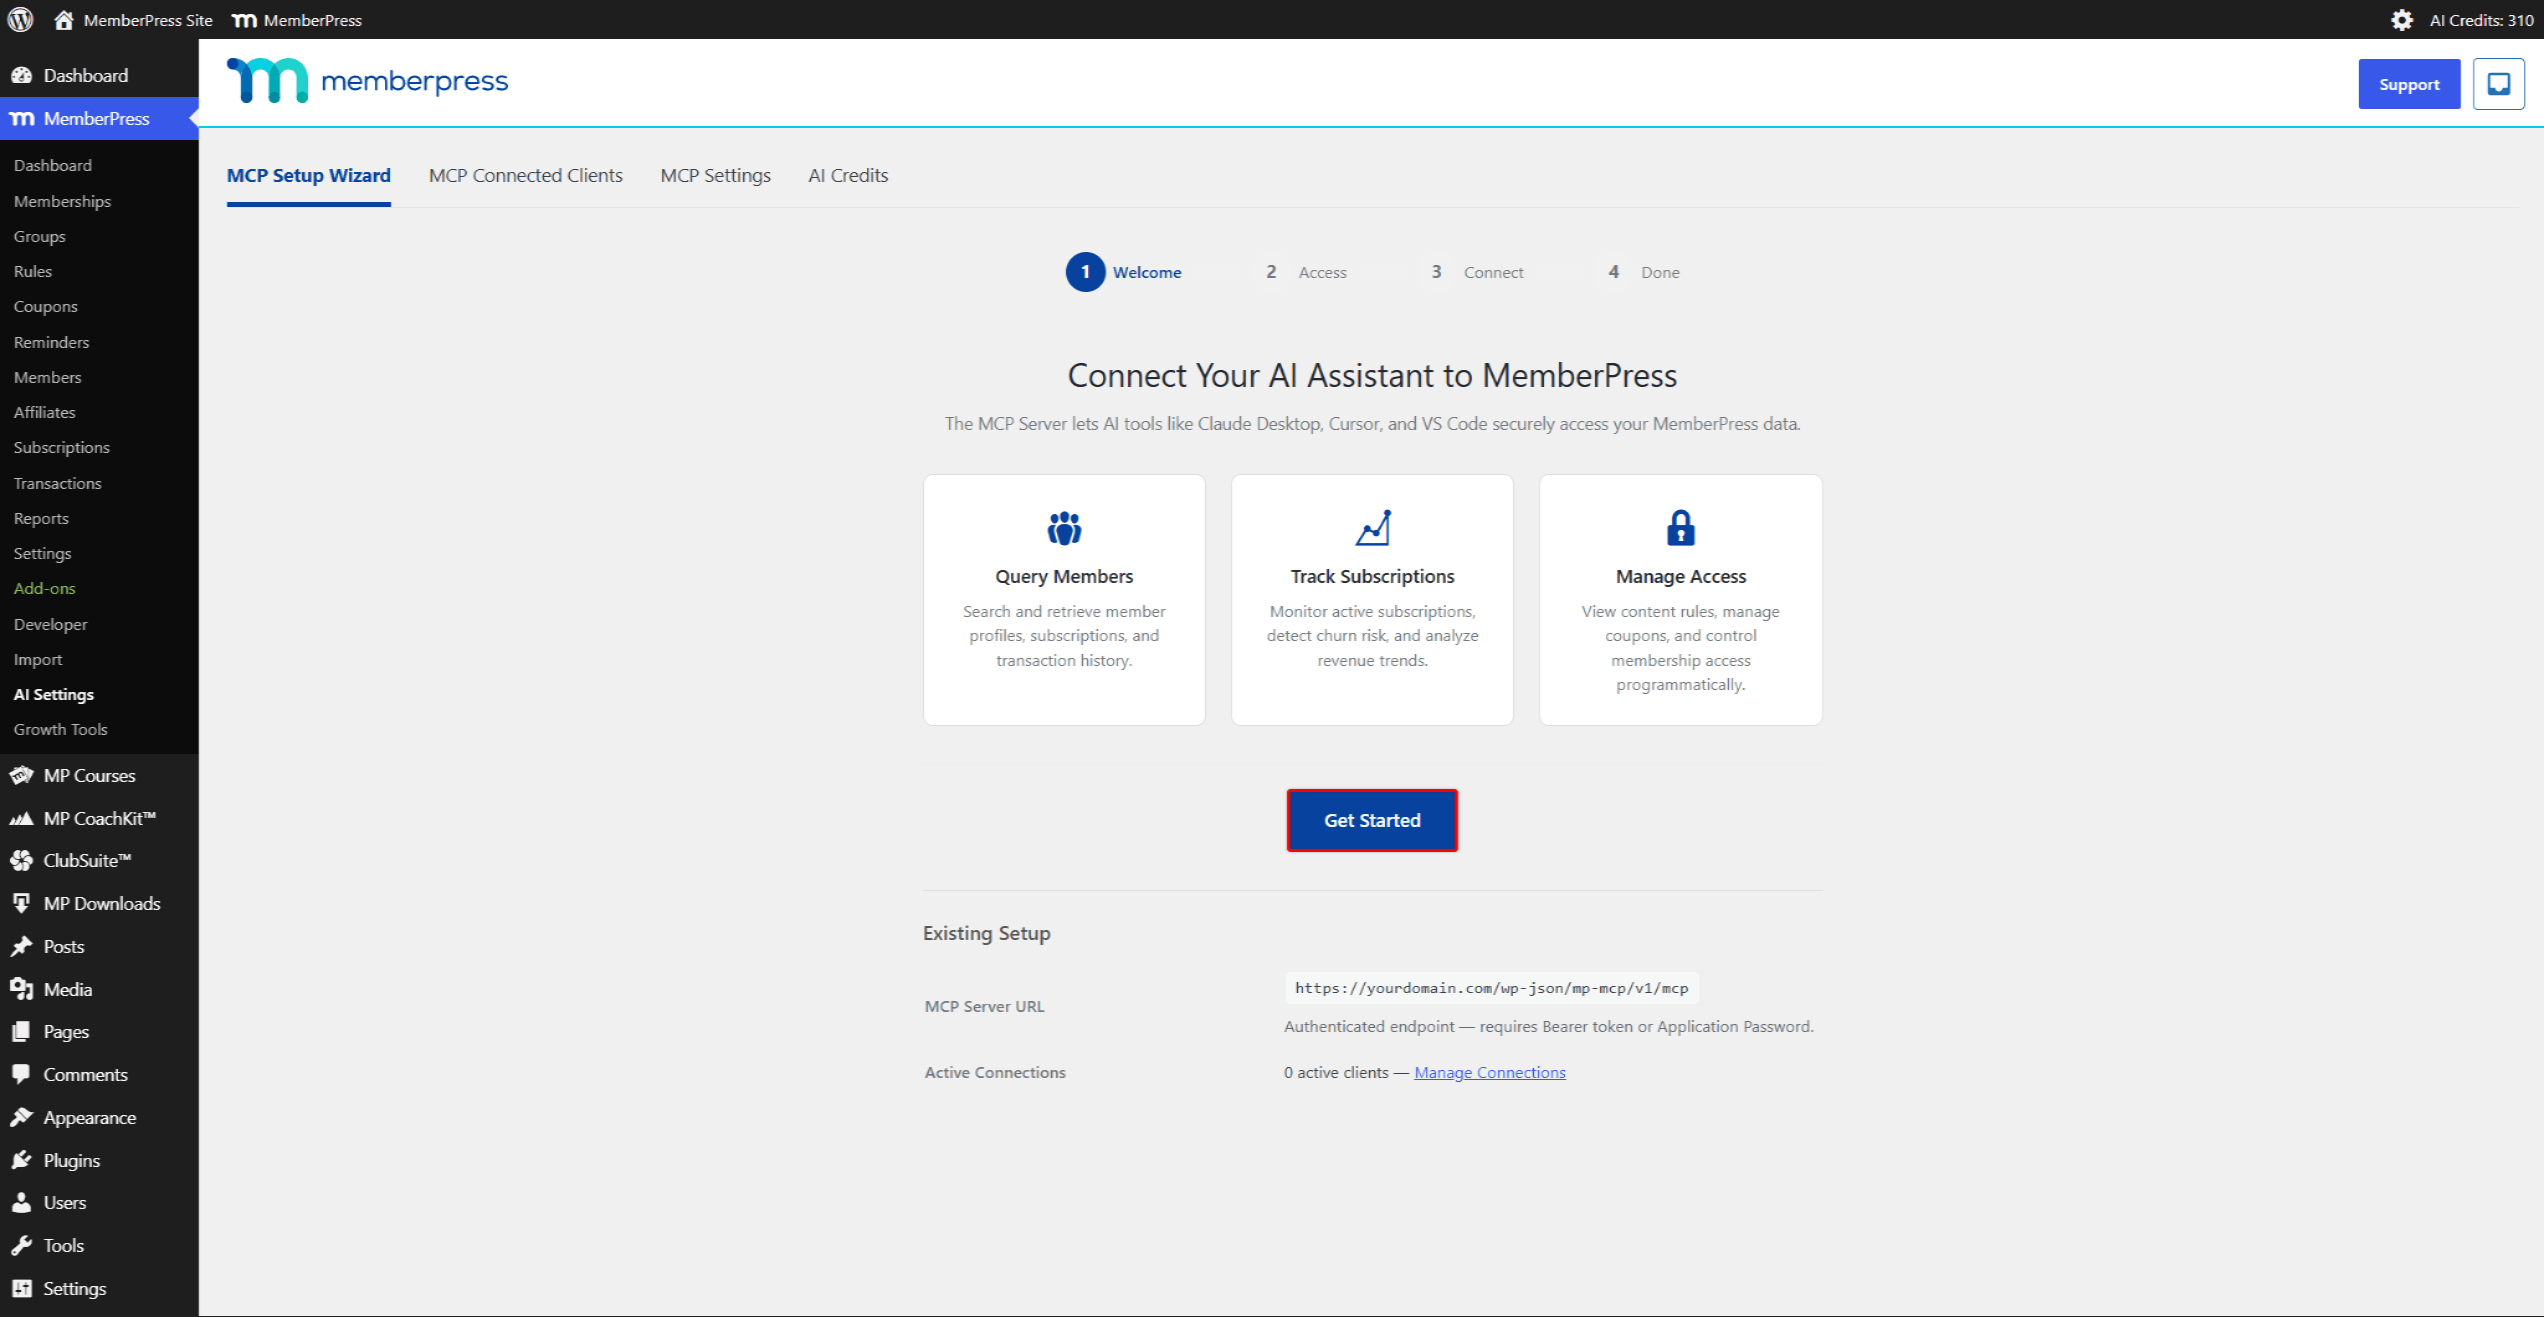
Schritt 2: Überprüfen Sie die Zugriffsebene
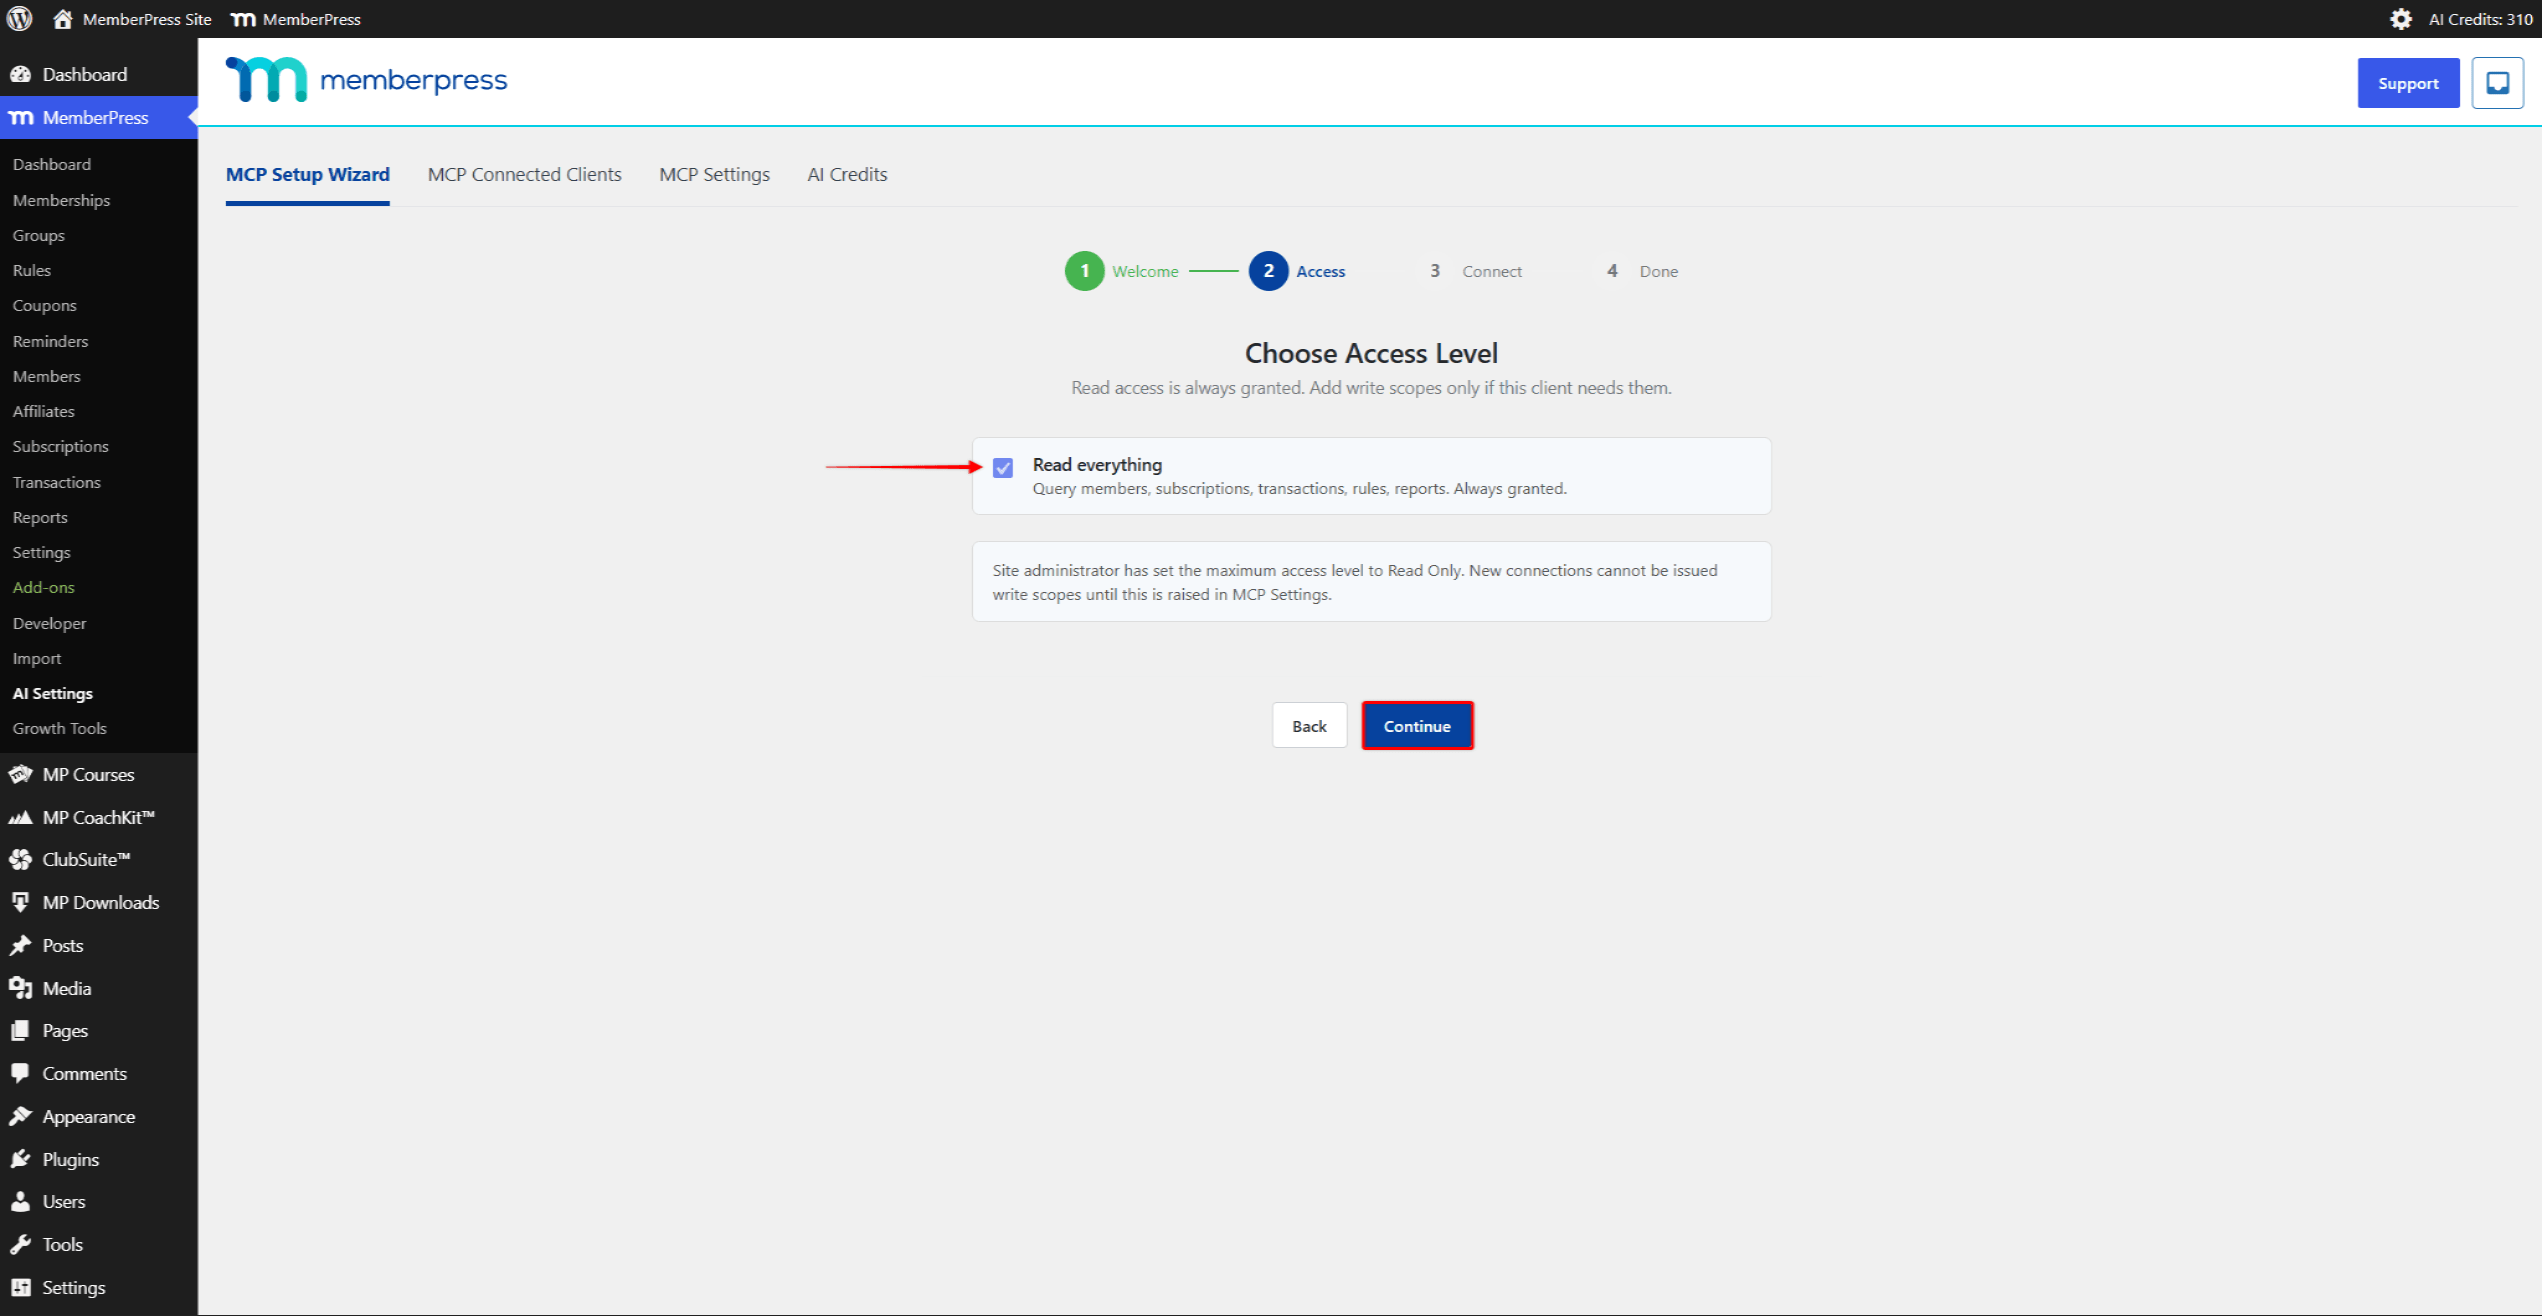
Der Zauberer Zugang Schritt lautet “Zugriffsebene auswählen” und spiegelt die in den MCP-Einstellungen festgelegte Zugriffsebene wider. Es gibt hier keine Option für „Nur Lesen“ oder „Vollzugriff“ – diese Auswahl wurde bereits im vorherigen Abschnitt getroffen.
Wenn die Zugriffsebene „Nur Lesen“ ist, der Schritt zeigt einen einzigen gewährten Geltungsbereich an:
- Alles lesen — Abfragen zu Mitgliedern, Abonnements, Transaktionen, Regeln und Berichten. Immer gewährt.
In einer Meldung wird erklärt, dass Schreibbereiche nicht verfügbar sind: “Der Site-Administrator hat die maximale Zugriffsebene auf ”Nur Lesen‘ festgelegt. Neuen Verbindungen können keine Schreibberechtigungen erteilt werden, bis diese Einstellung in den MCP-Einstellungen angehoben wird.“
Wenn die Zugriffsebene „Vollzugriff“ ist, In diesem Schritt werden Kontrollkästchen für den Schreibbereich hinzugefügt, die standardmäßig alle aktiviert sind. Deaktivieren Sie alle Bereiche, die für diese Verbindung nicht benötigt werden:
- Inhalt bearbeiten — Zugriffsregeln und Gutscheine erstellen;
- Mitglieder verwalten — Mitglieder anlegen und aktualisieren, Unternehmensunterkonten verwalten;
- Abrechnungsvorgänge (erhebliche Auswirkungen) — Rückerstattungen vornehmen, Abonnements stornieren, aussetzen oder wieder aktivieren;
- Massenimporte (hohe Auslastung) — Mitglieder aus einem JSON-Array massenweise anlegen;
- Webhooks verwalten — Webhooks erstellen und löschen, E-Mail-Erinnerungen aktivieren bzw. deaktivieren;
- Kursfortschritt — Lektionen als abgeschlossen markieren, den Lernfortschritt der Schüler zurücksetzen (erfordert das Add-on „Kurse“).
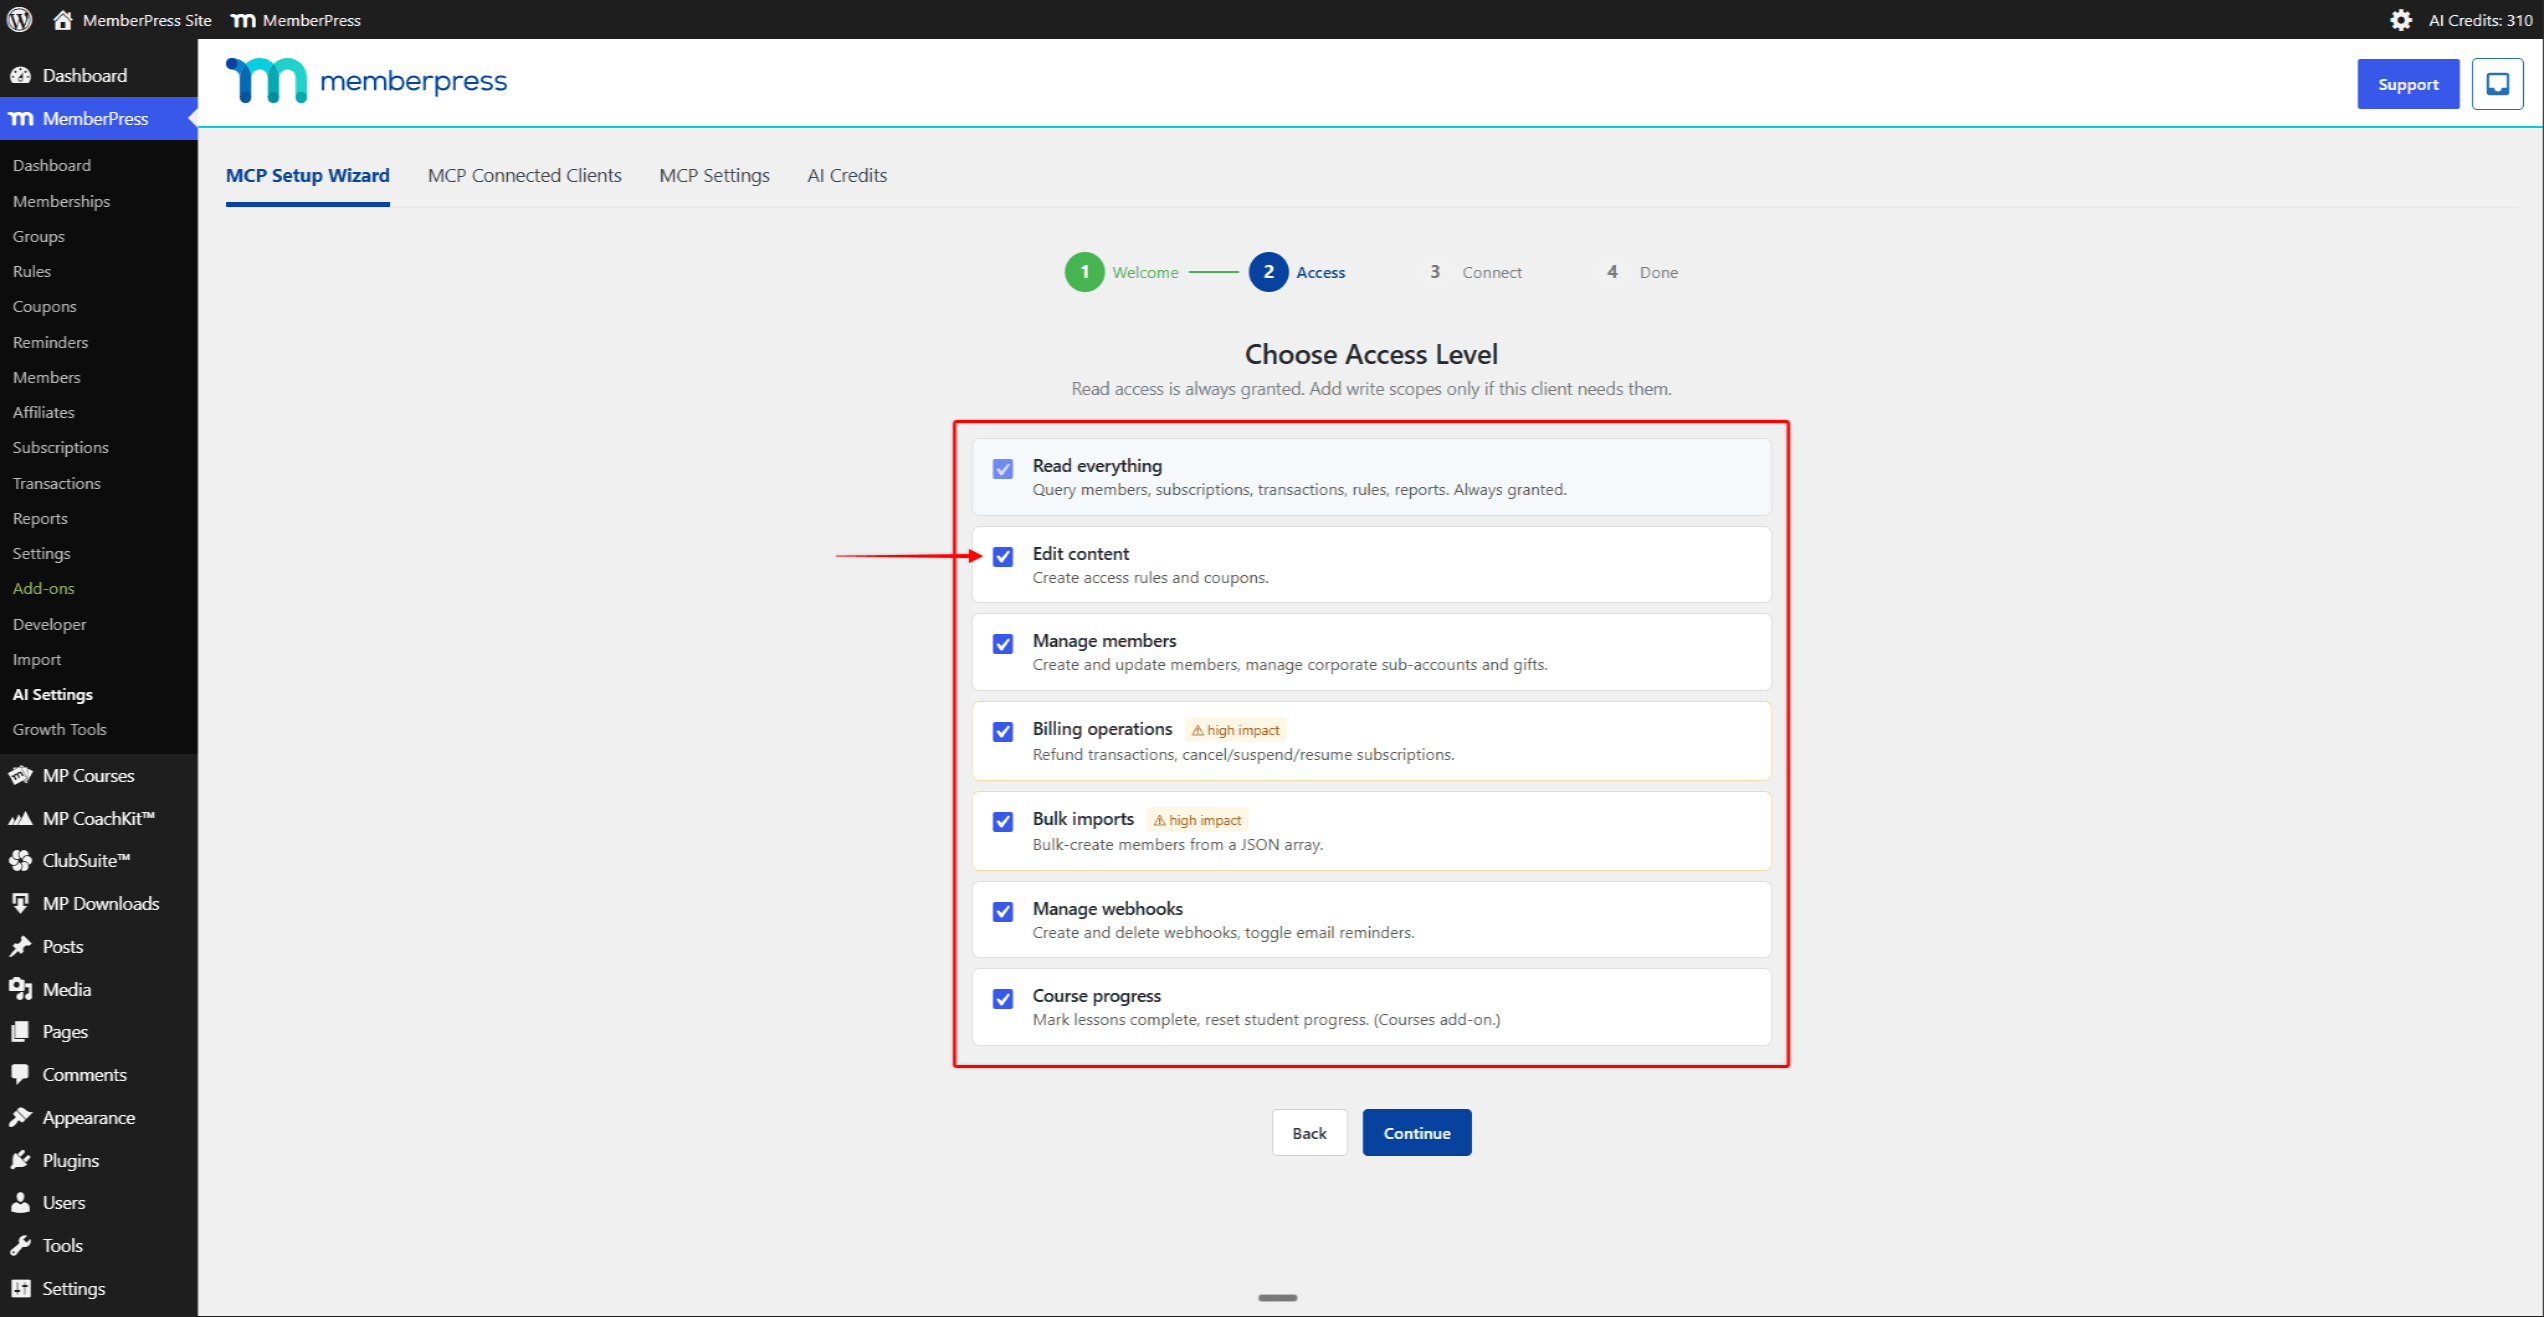
Klicken Sie auf Weiter um zum Schritt „Connect“ zu gelangen.
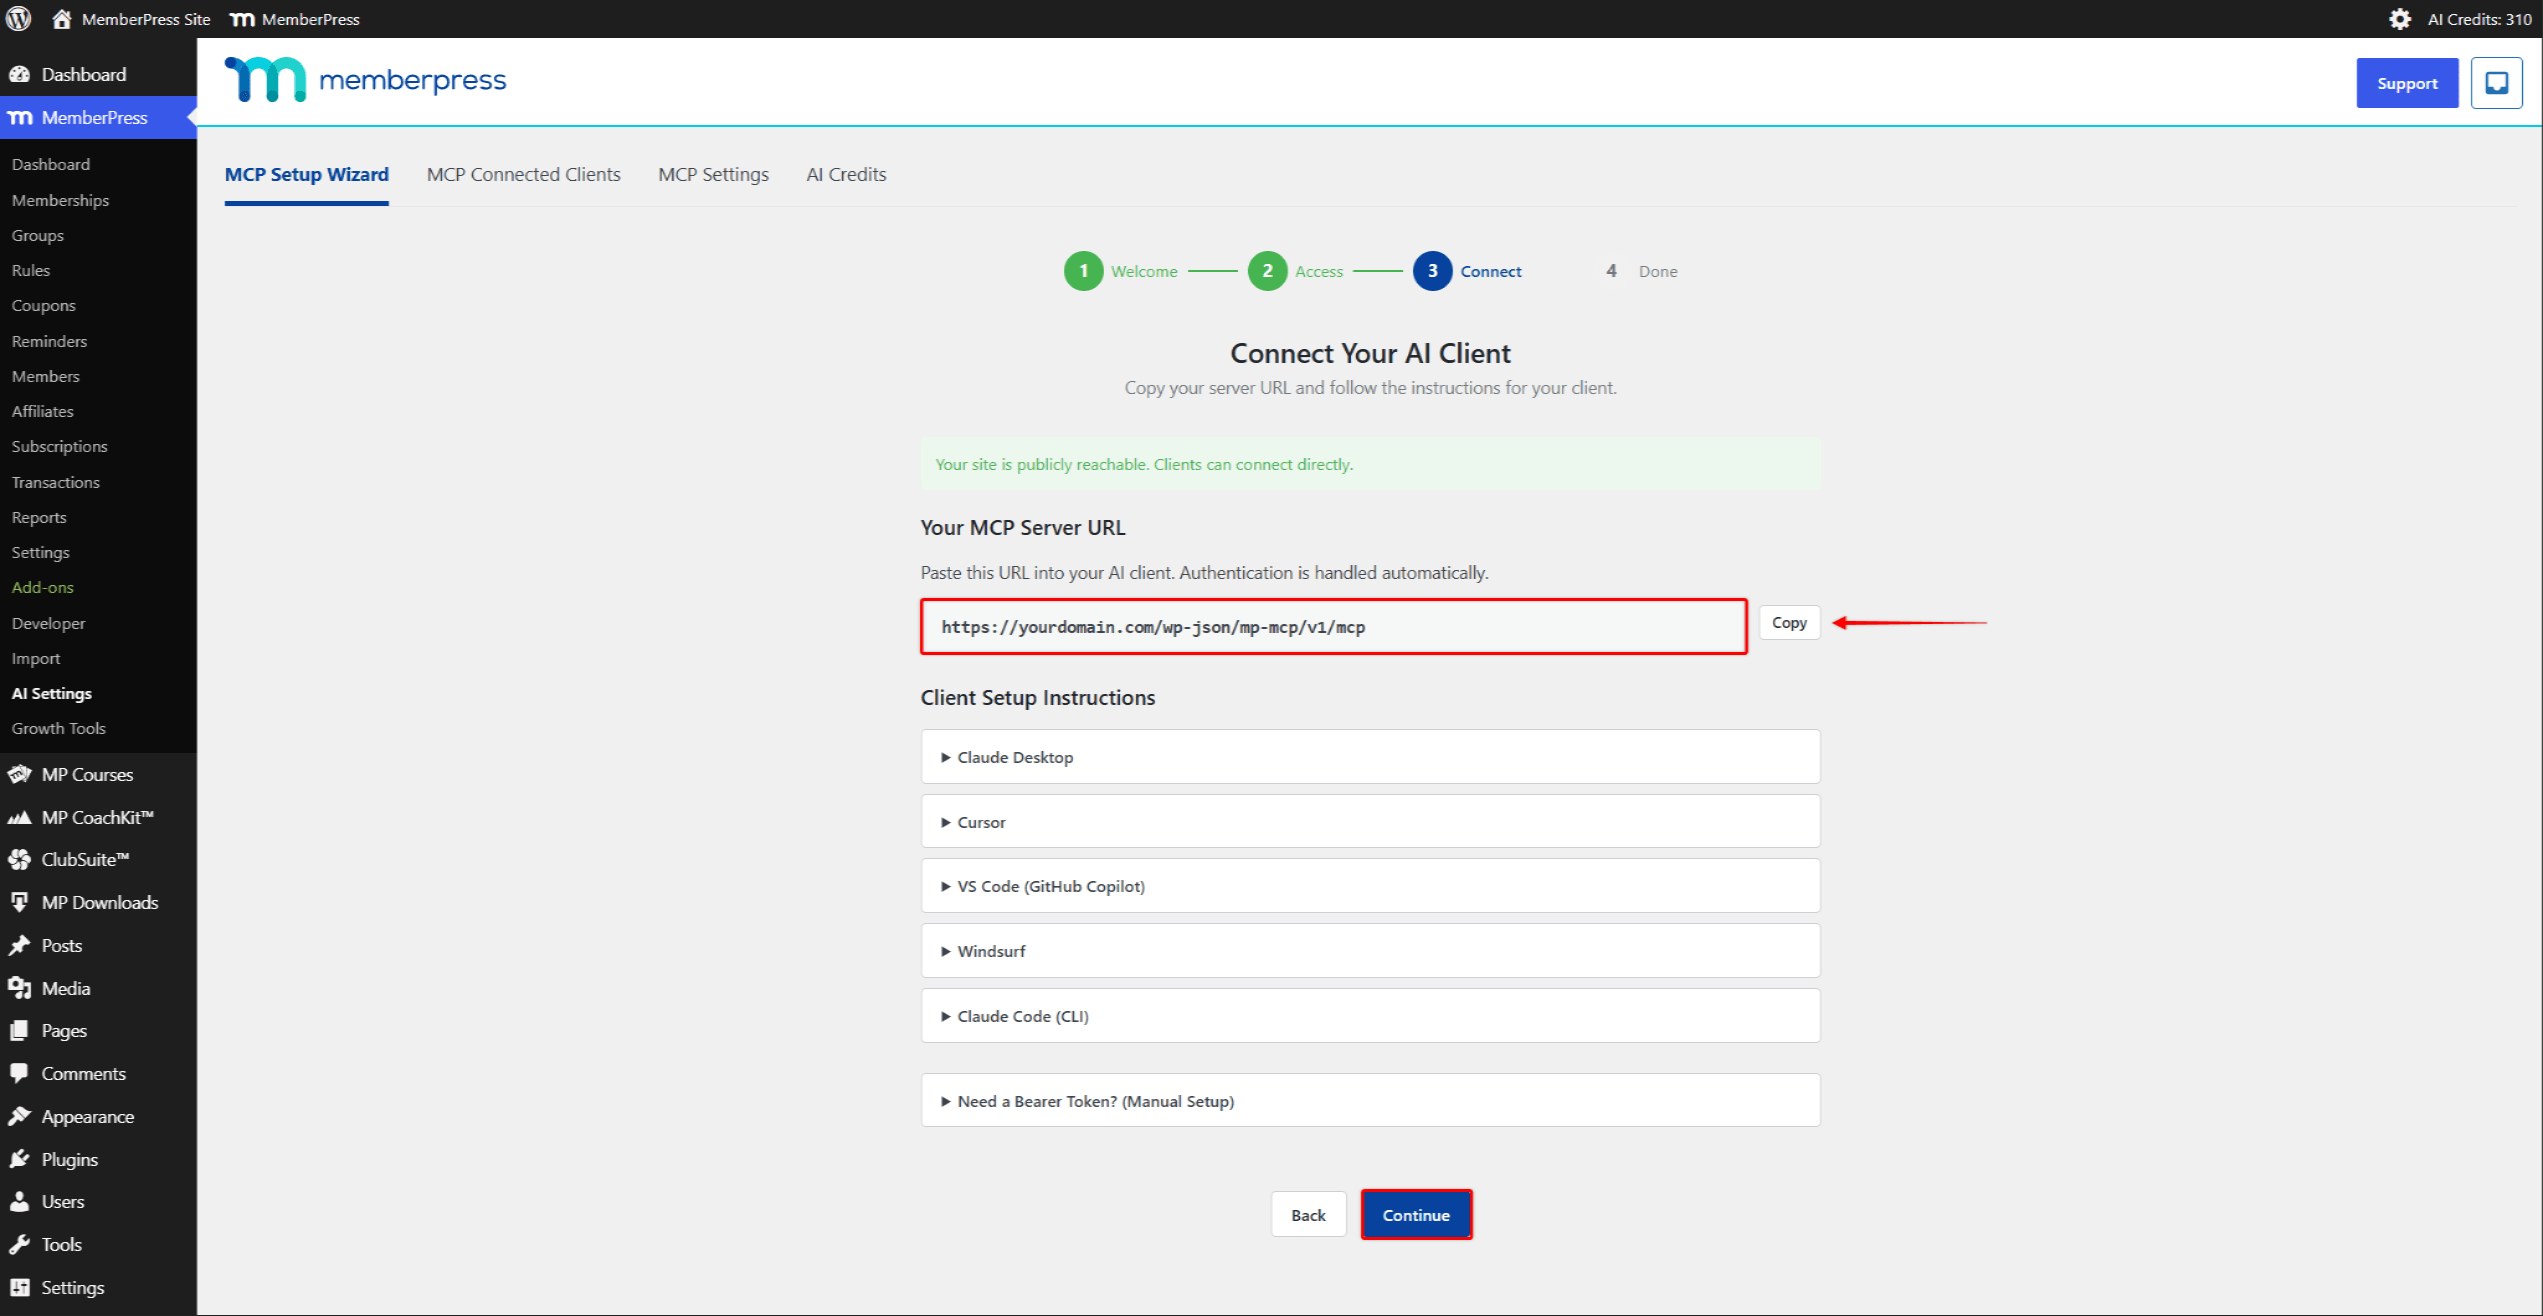
Schritt 3: Kopieren Sie die Server-URL
Der Zauberer Verbinden Sie Schritt lautet “Verbinden Sie Ihren KI-Client”. Dort werden die URL des MCP-Servers sowie ein Bereich für jeden unterstützten Client angezeigt.
- Klicken Sie auf die Kopieren neben der Schaltfläche MCP-Server-URL;
- Lassen Sie diese WordPress-Registerkarte geöffnet. Der Assistent ist abgeschlossen, sobald Claude Desktop die Verbindung autorisiert hat.
Schritt 4: Fügen Sie den Connector in Claude Desktop hinzu
Wechseln Sie auf demselben Computer zur Claude-Desktop-App.
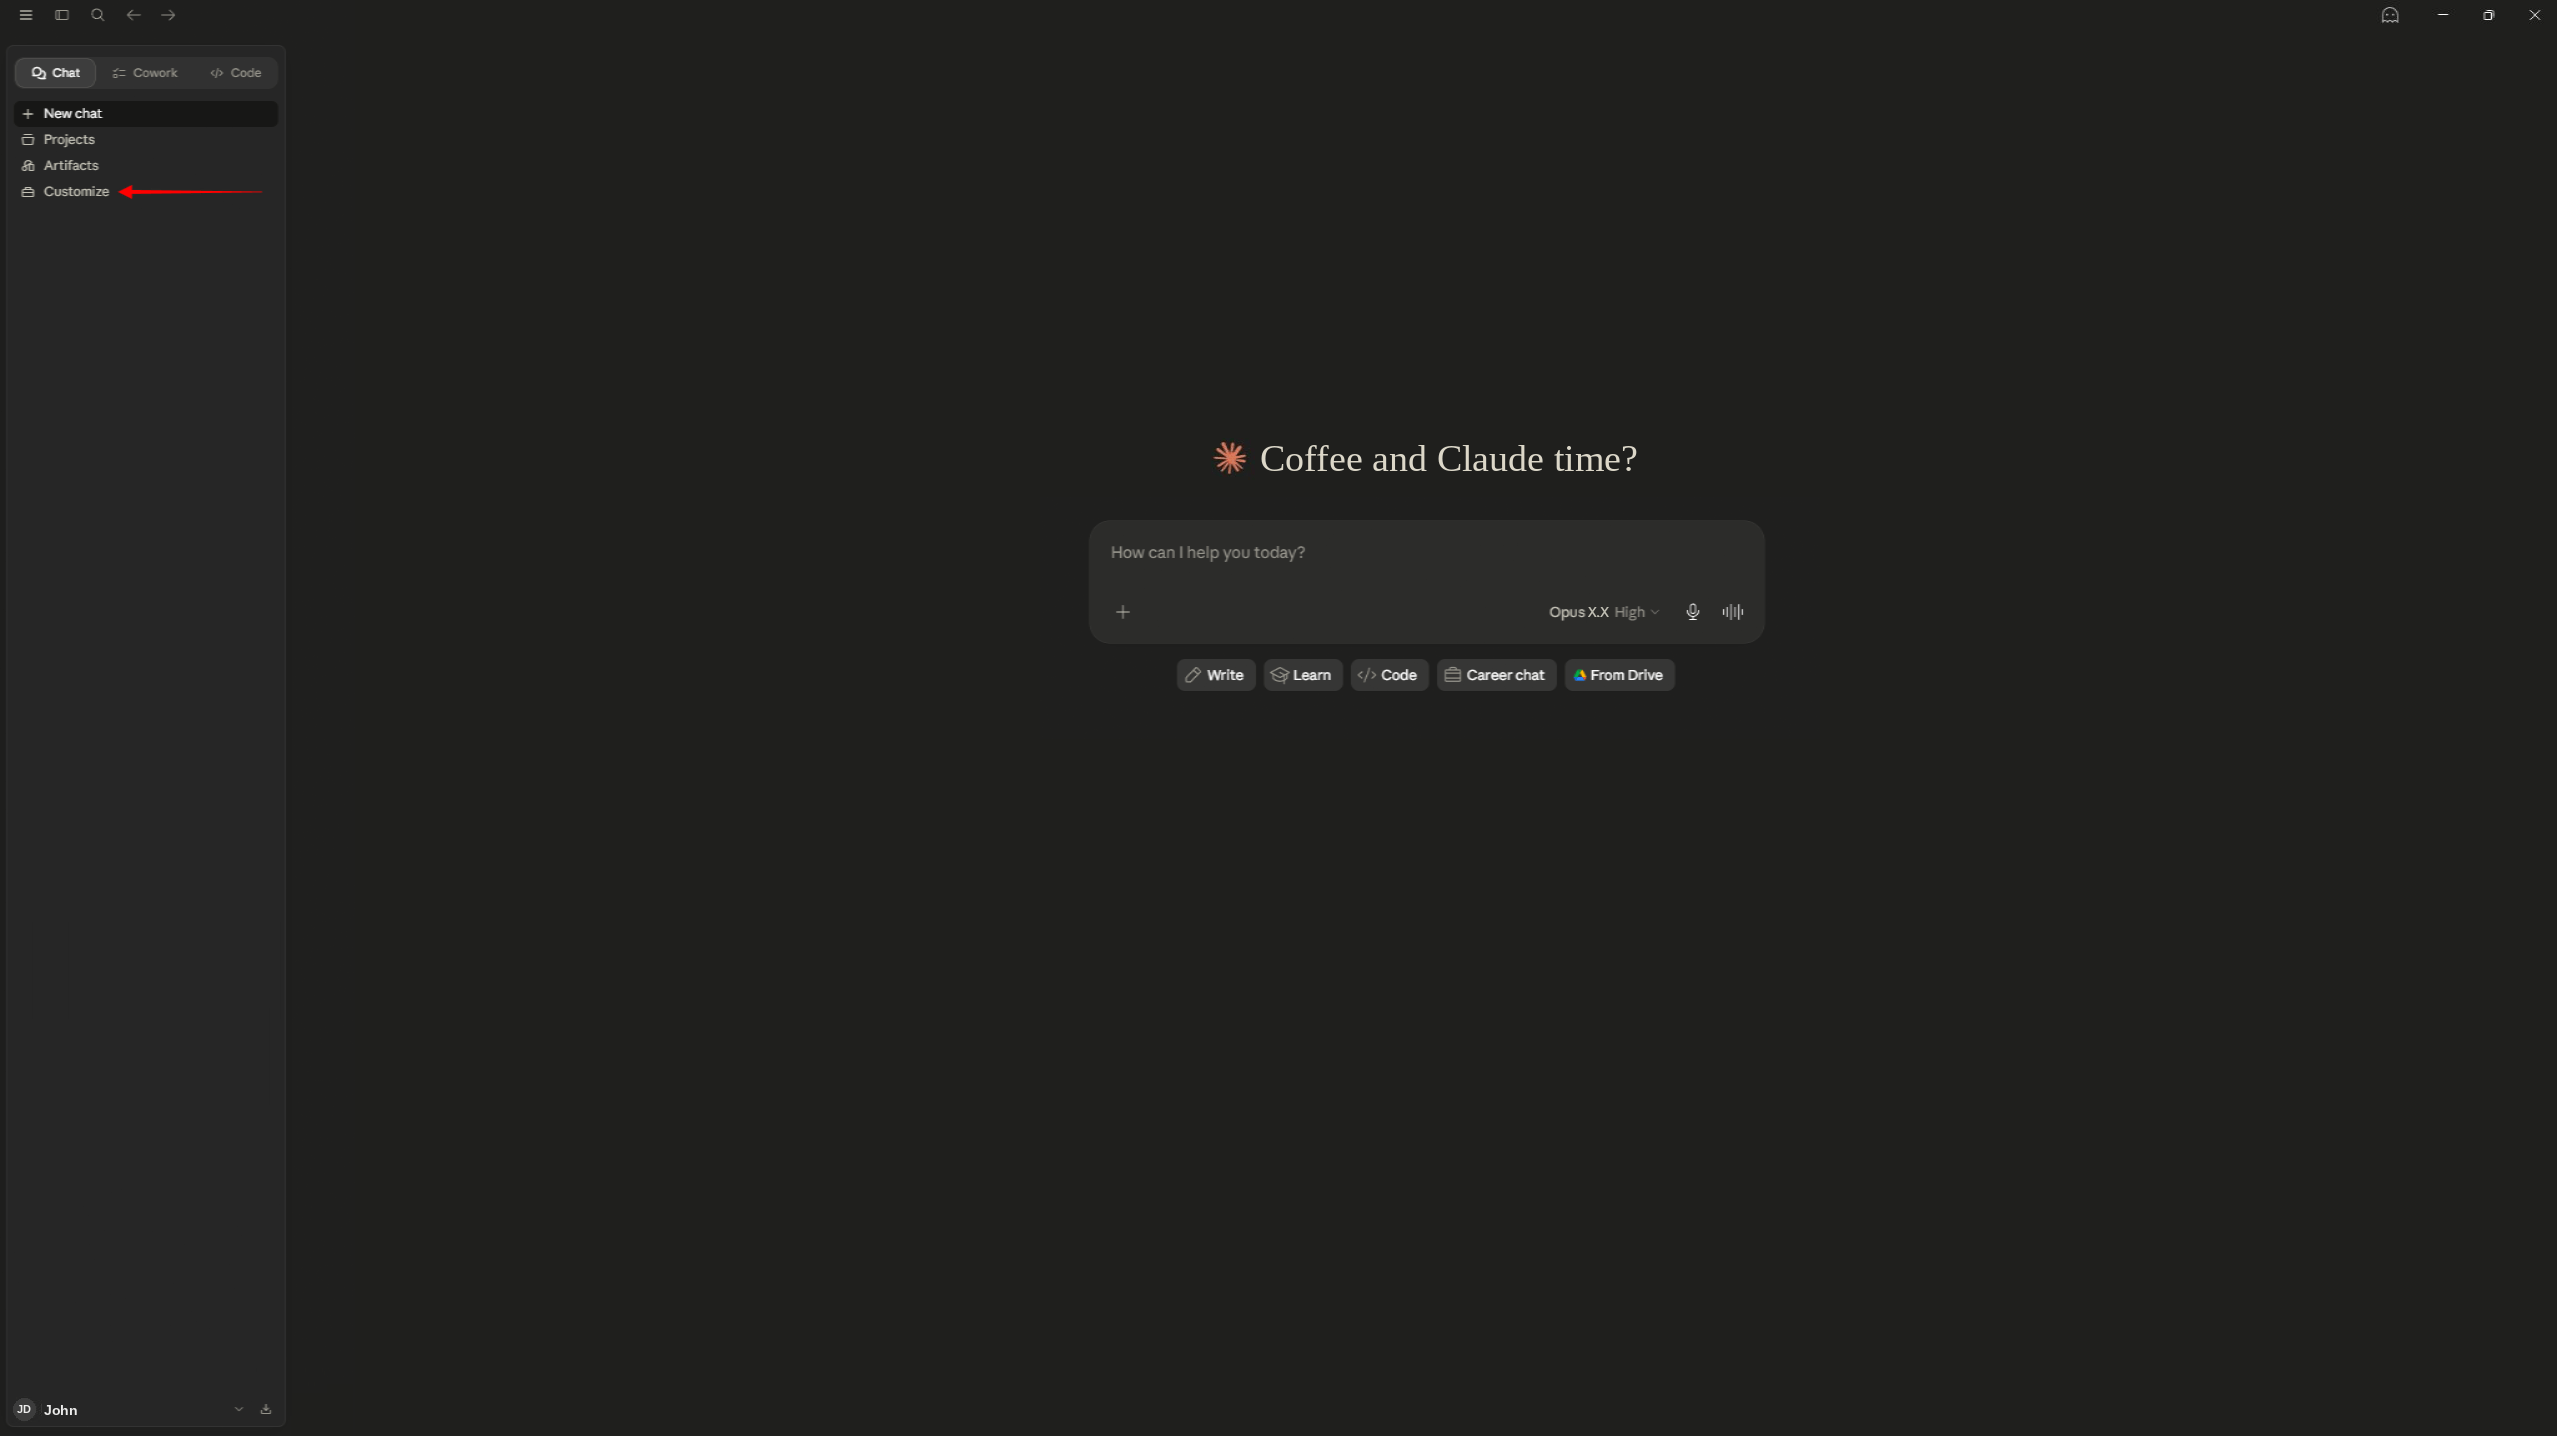
- Öffnen Sie Claude Desktop und klicken Sie auf Anpassen in der Seitenleiste;
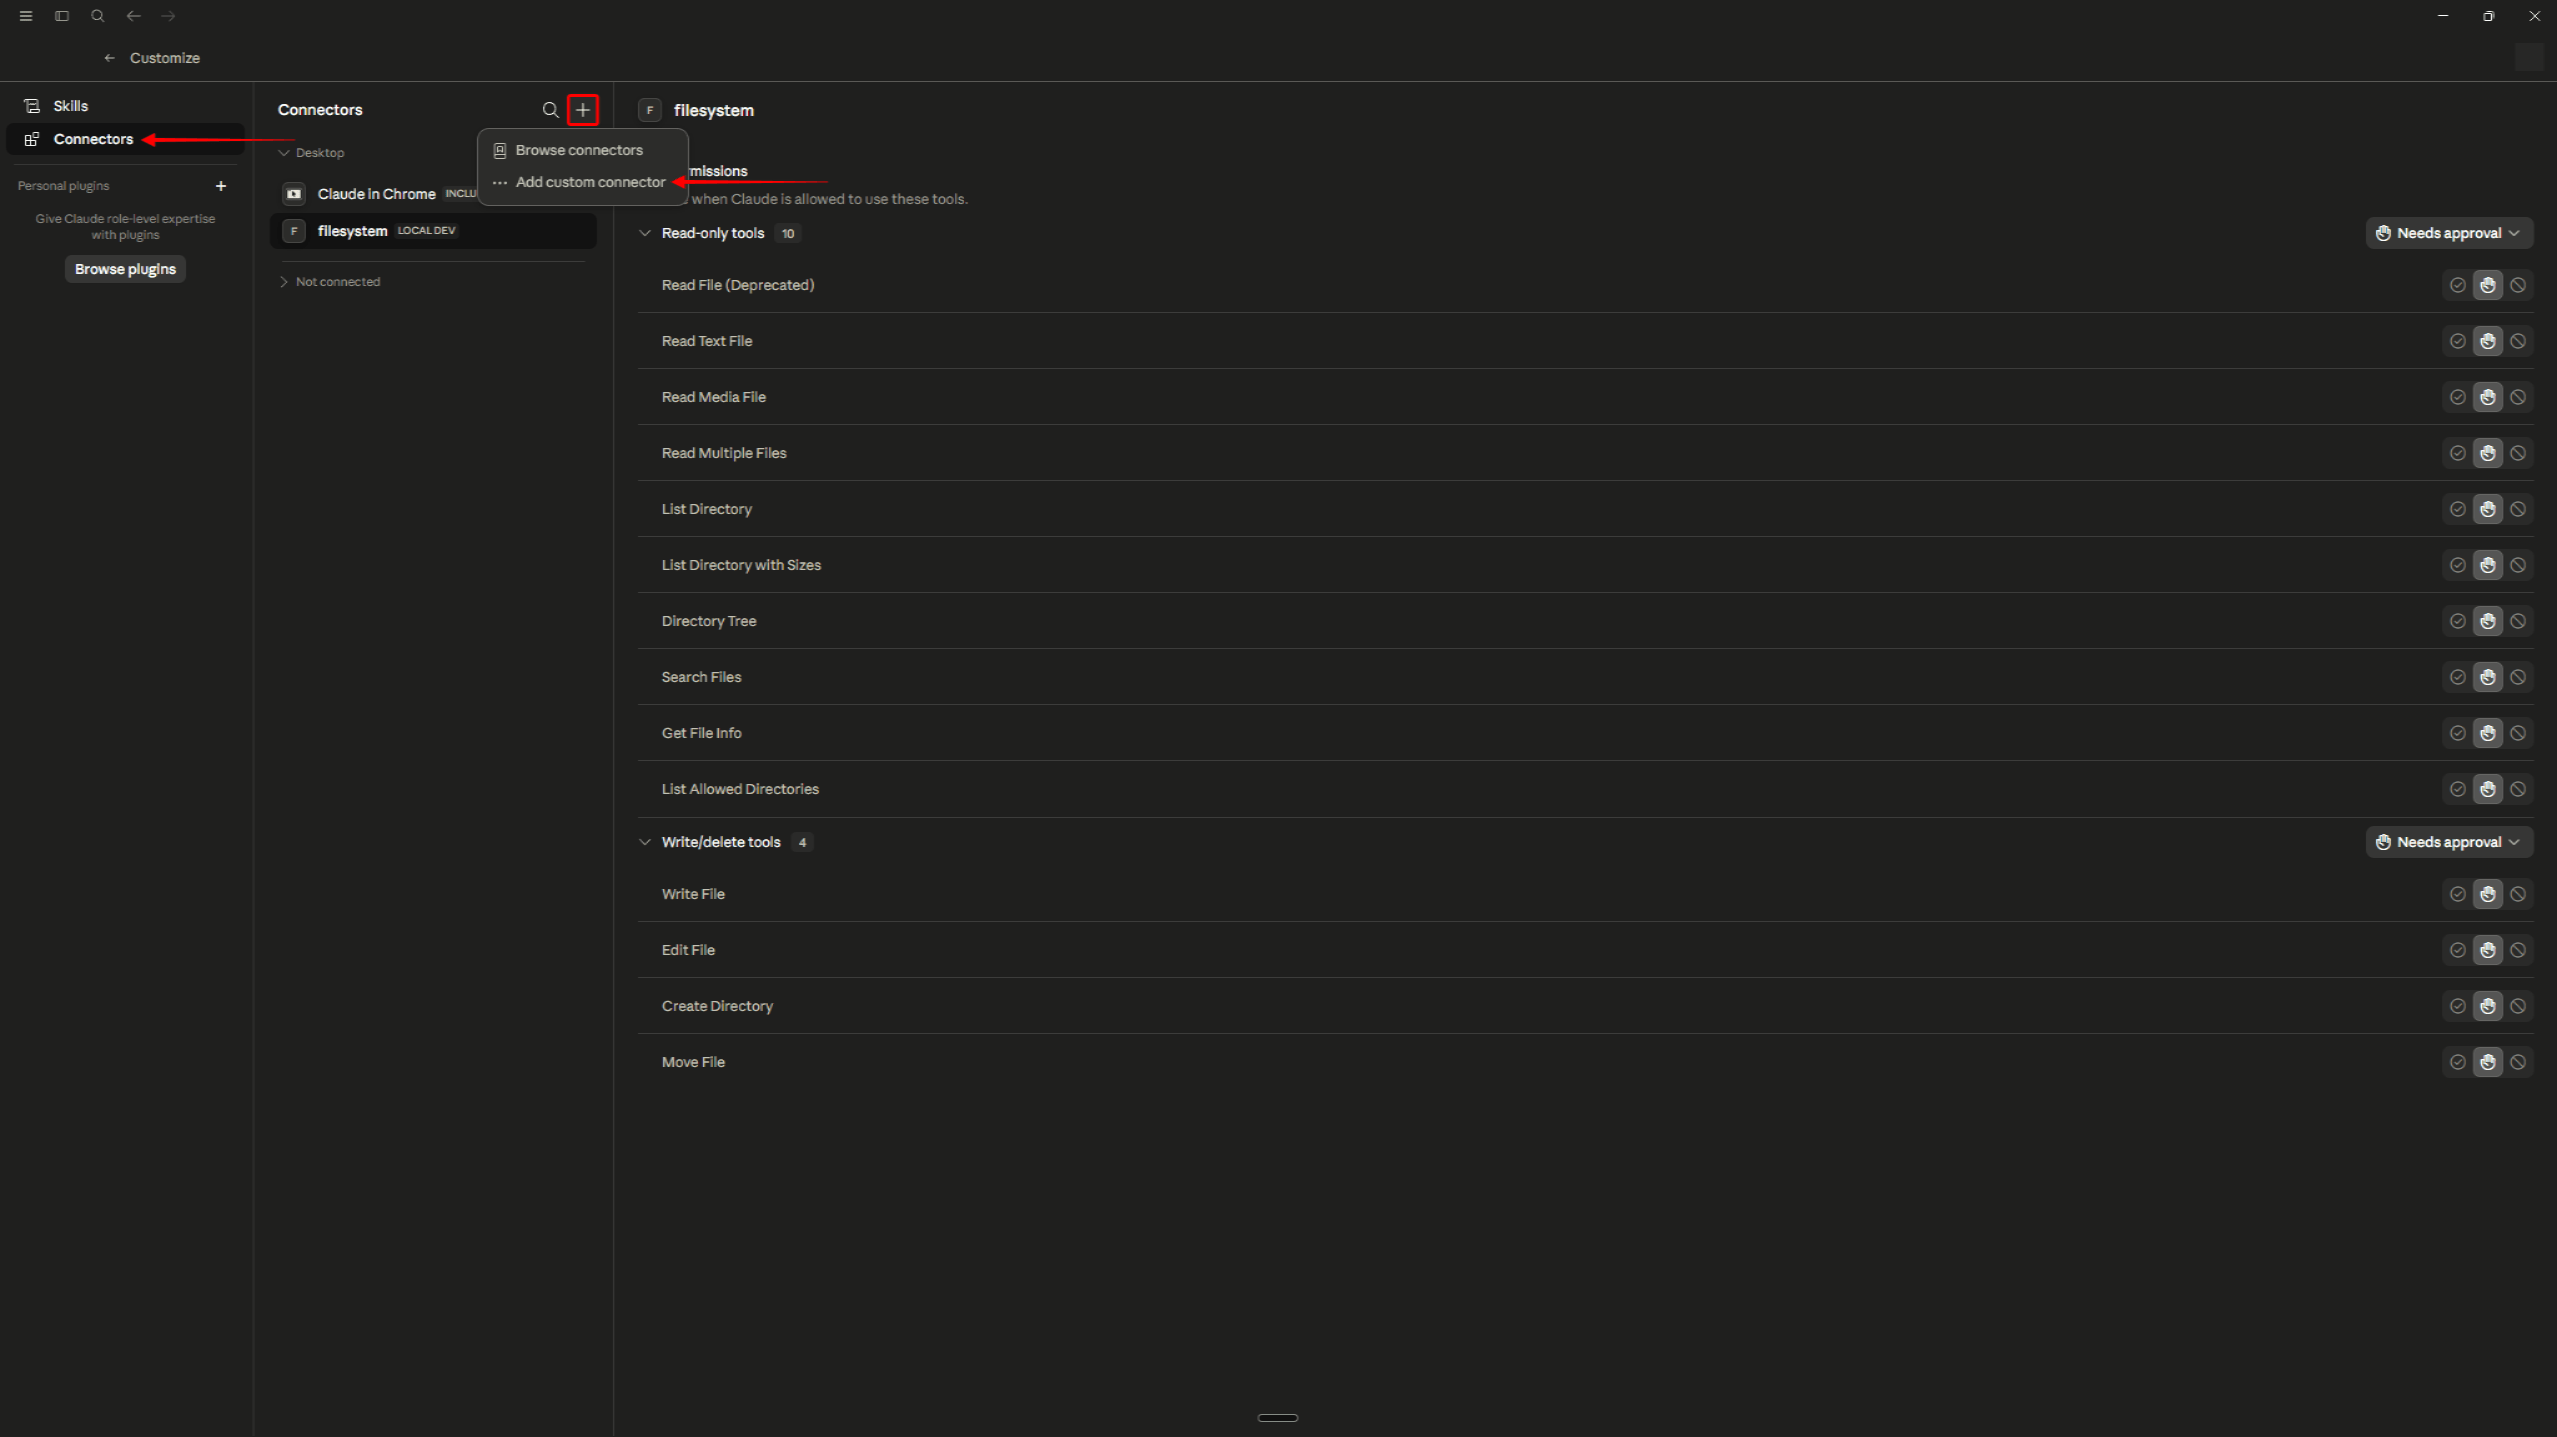
- Wählen Sie Steckverbinder;
- Klicken Sie auf Benutzerdefinierten Konnektor hinzufügen (das + Steuerung).
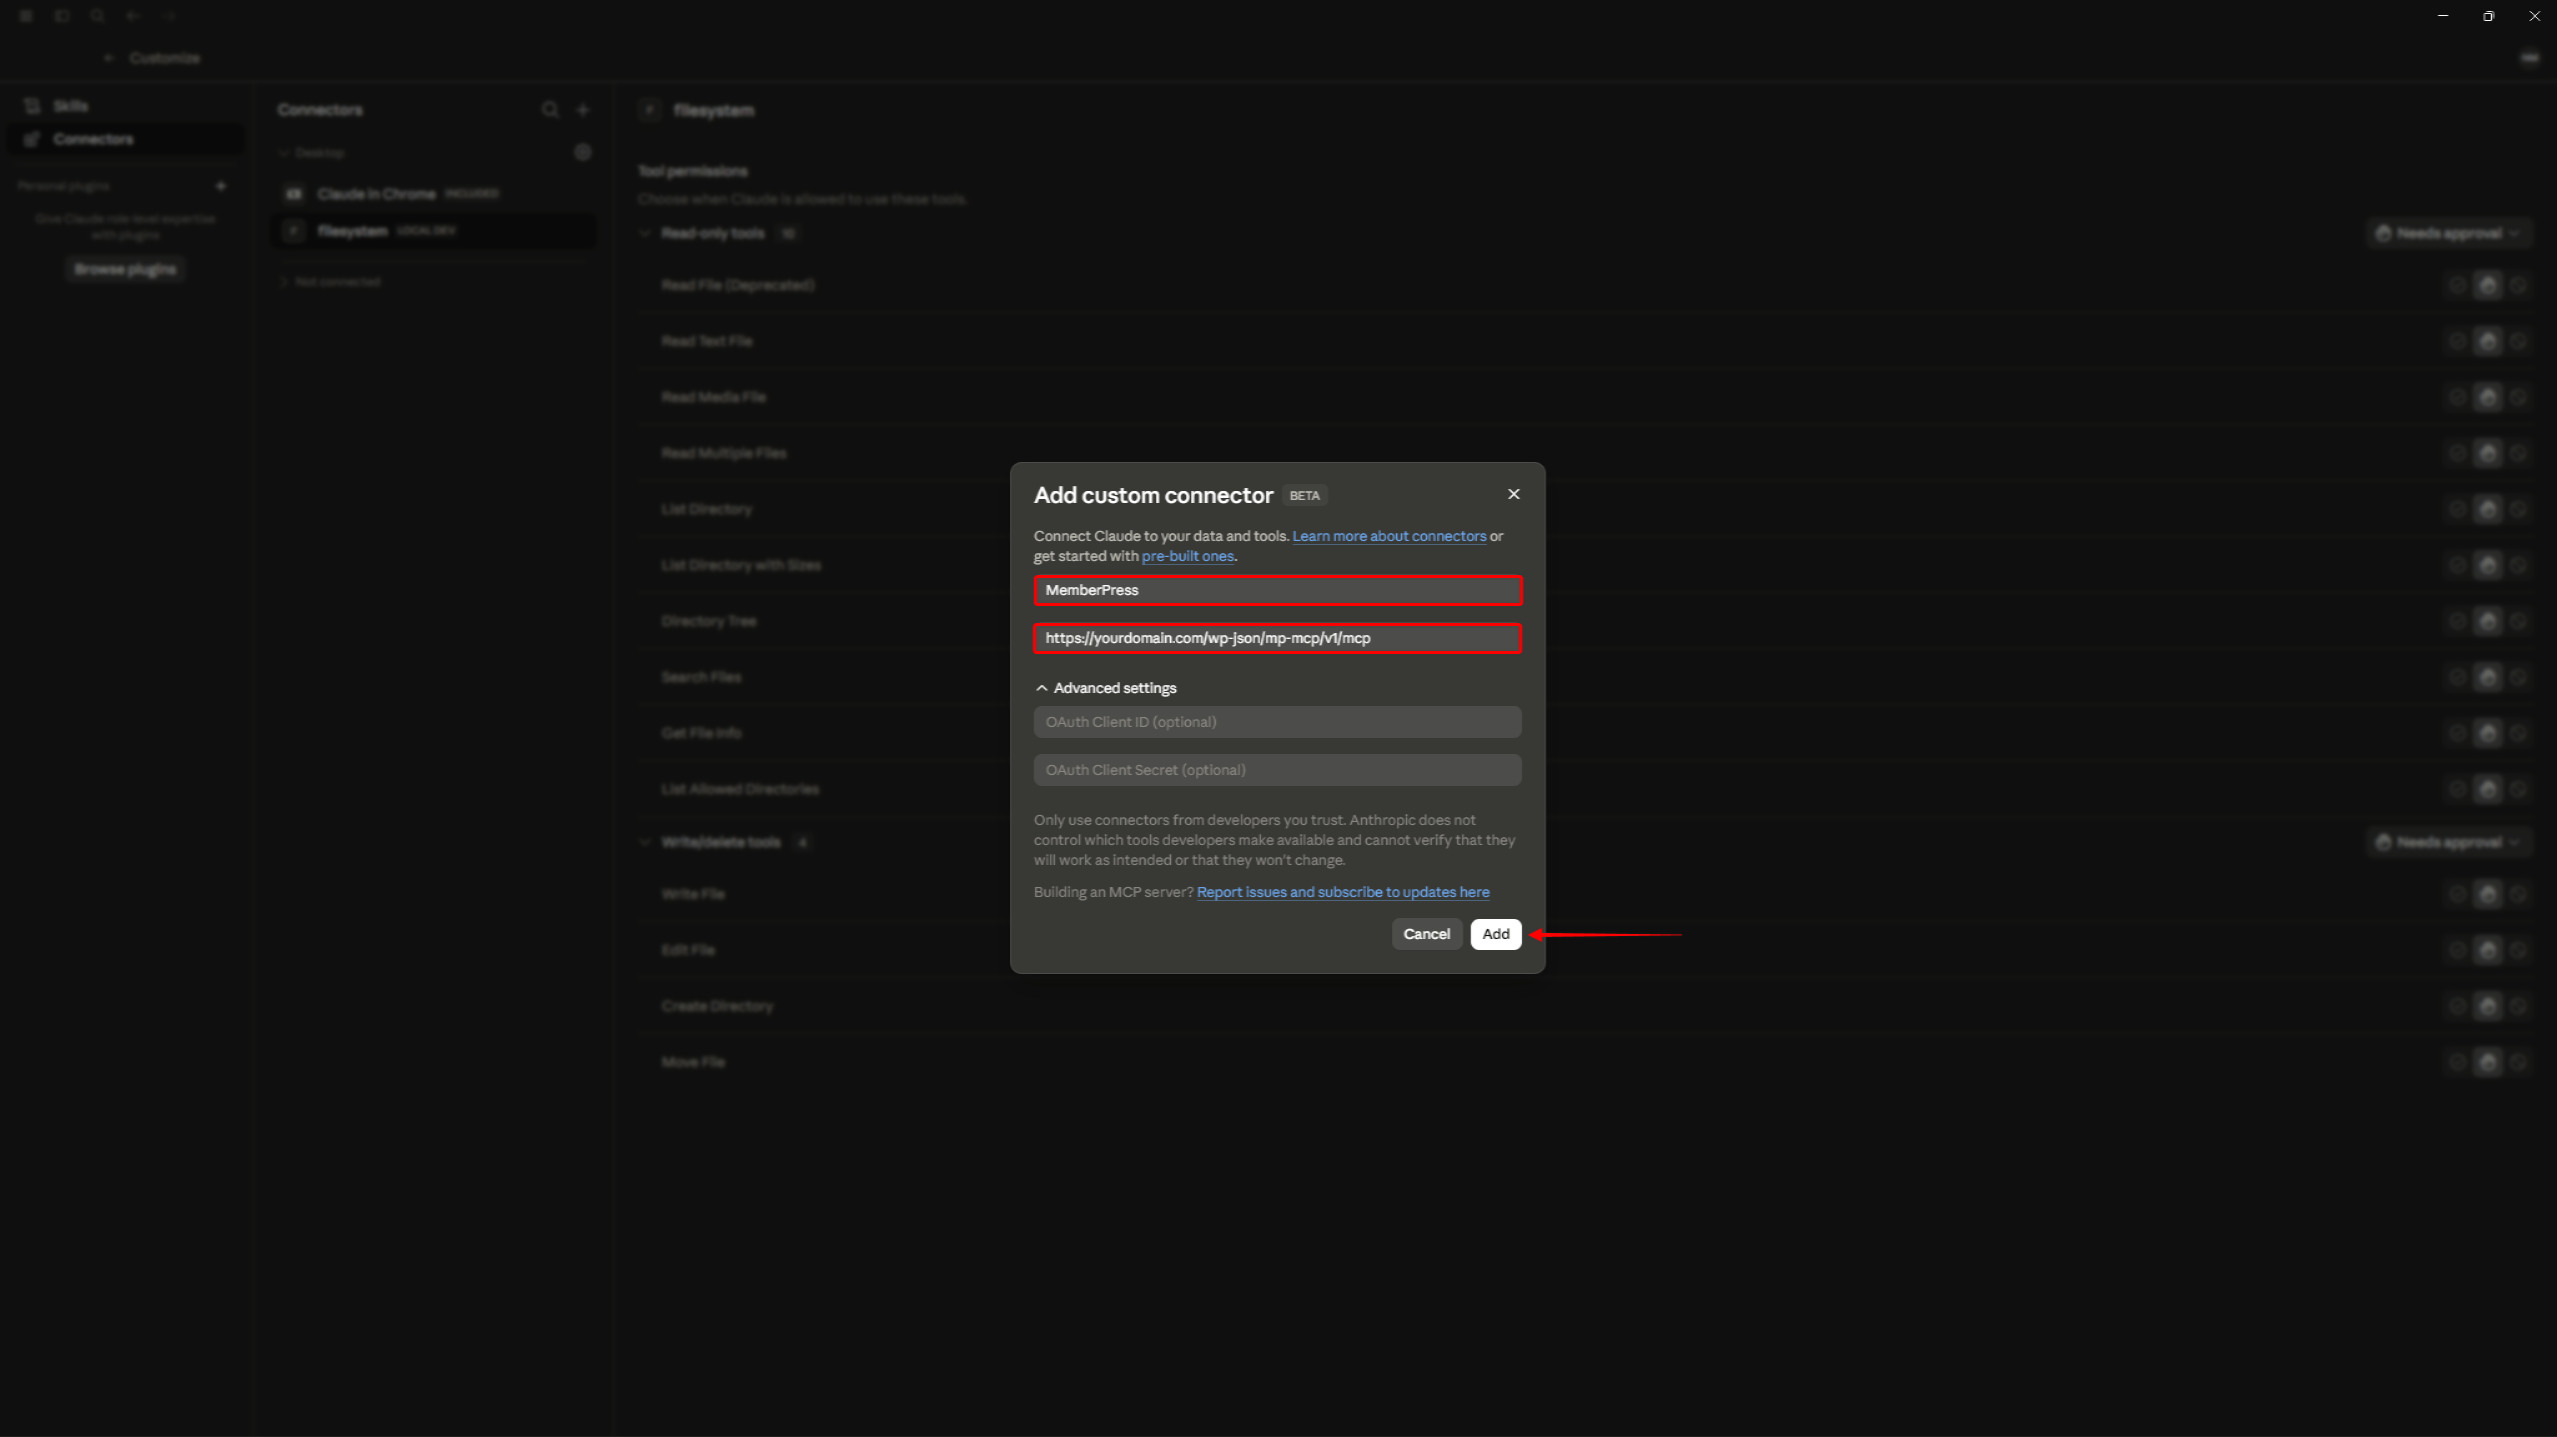
Im sich öffnenden Dialogfeld:
- Eingabe MemberPress als Name des Anschlusses;
- Füge die kopierte URL in das URL des Remote-MCP-Servers Feld;
- Lassen Sie das optionale OAuth-Client-ID und OAuth-Client-Secret Felder leer – sie sind zusammengeklappt unter Erweiterte Einstellungen, und es ist nicht notwendig, sie zu erweitern;
- Lesen Sie den Hinweis zur Vertrauenswürdigkeit durch und klicken Sie anschließend auf hinzufügen.
Schritt 5: Verbinden und autorisieren
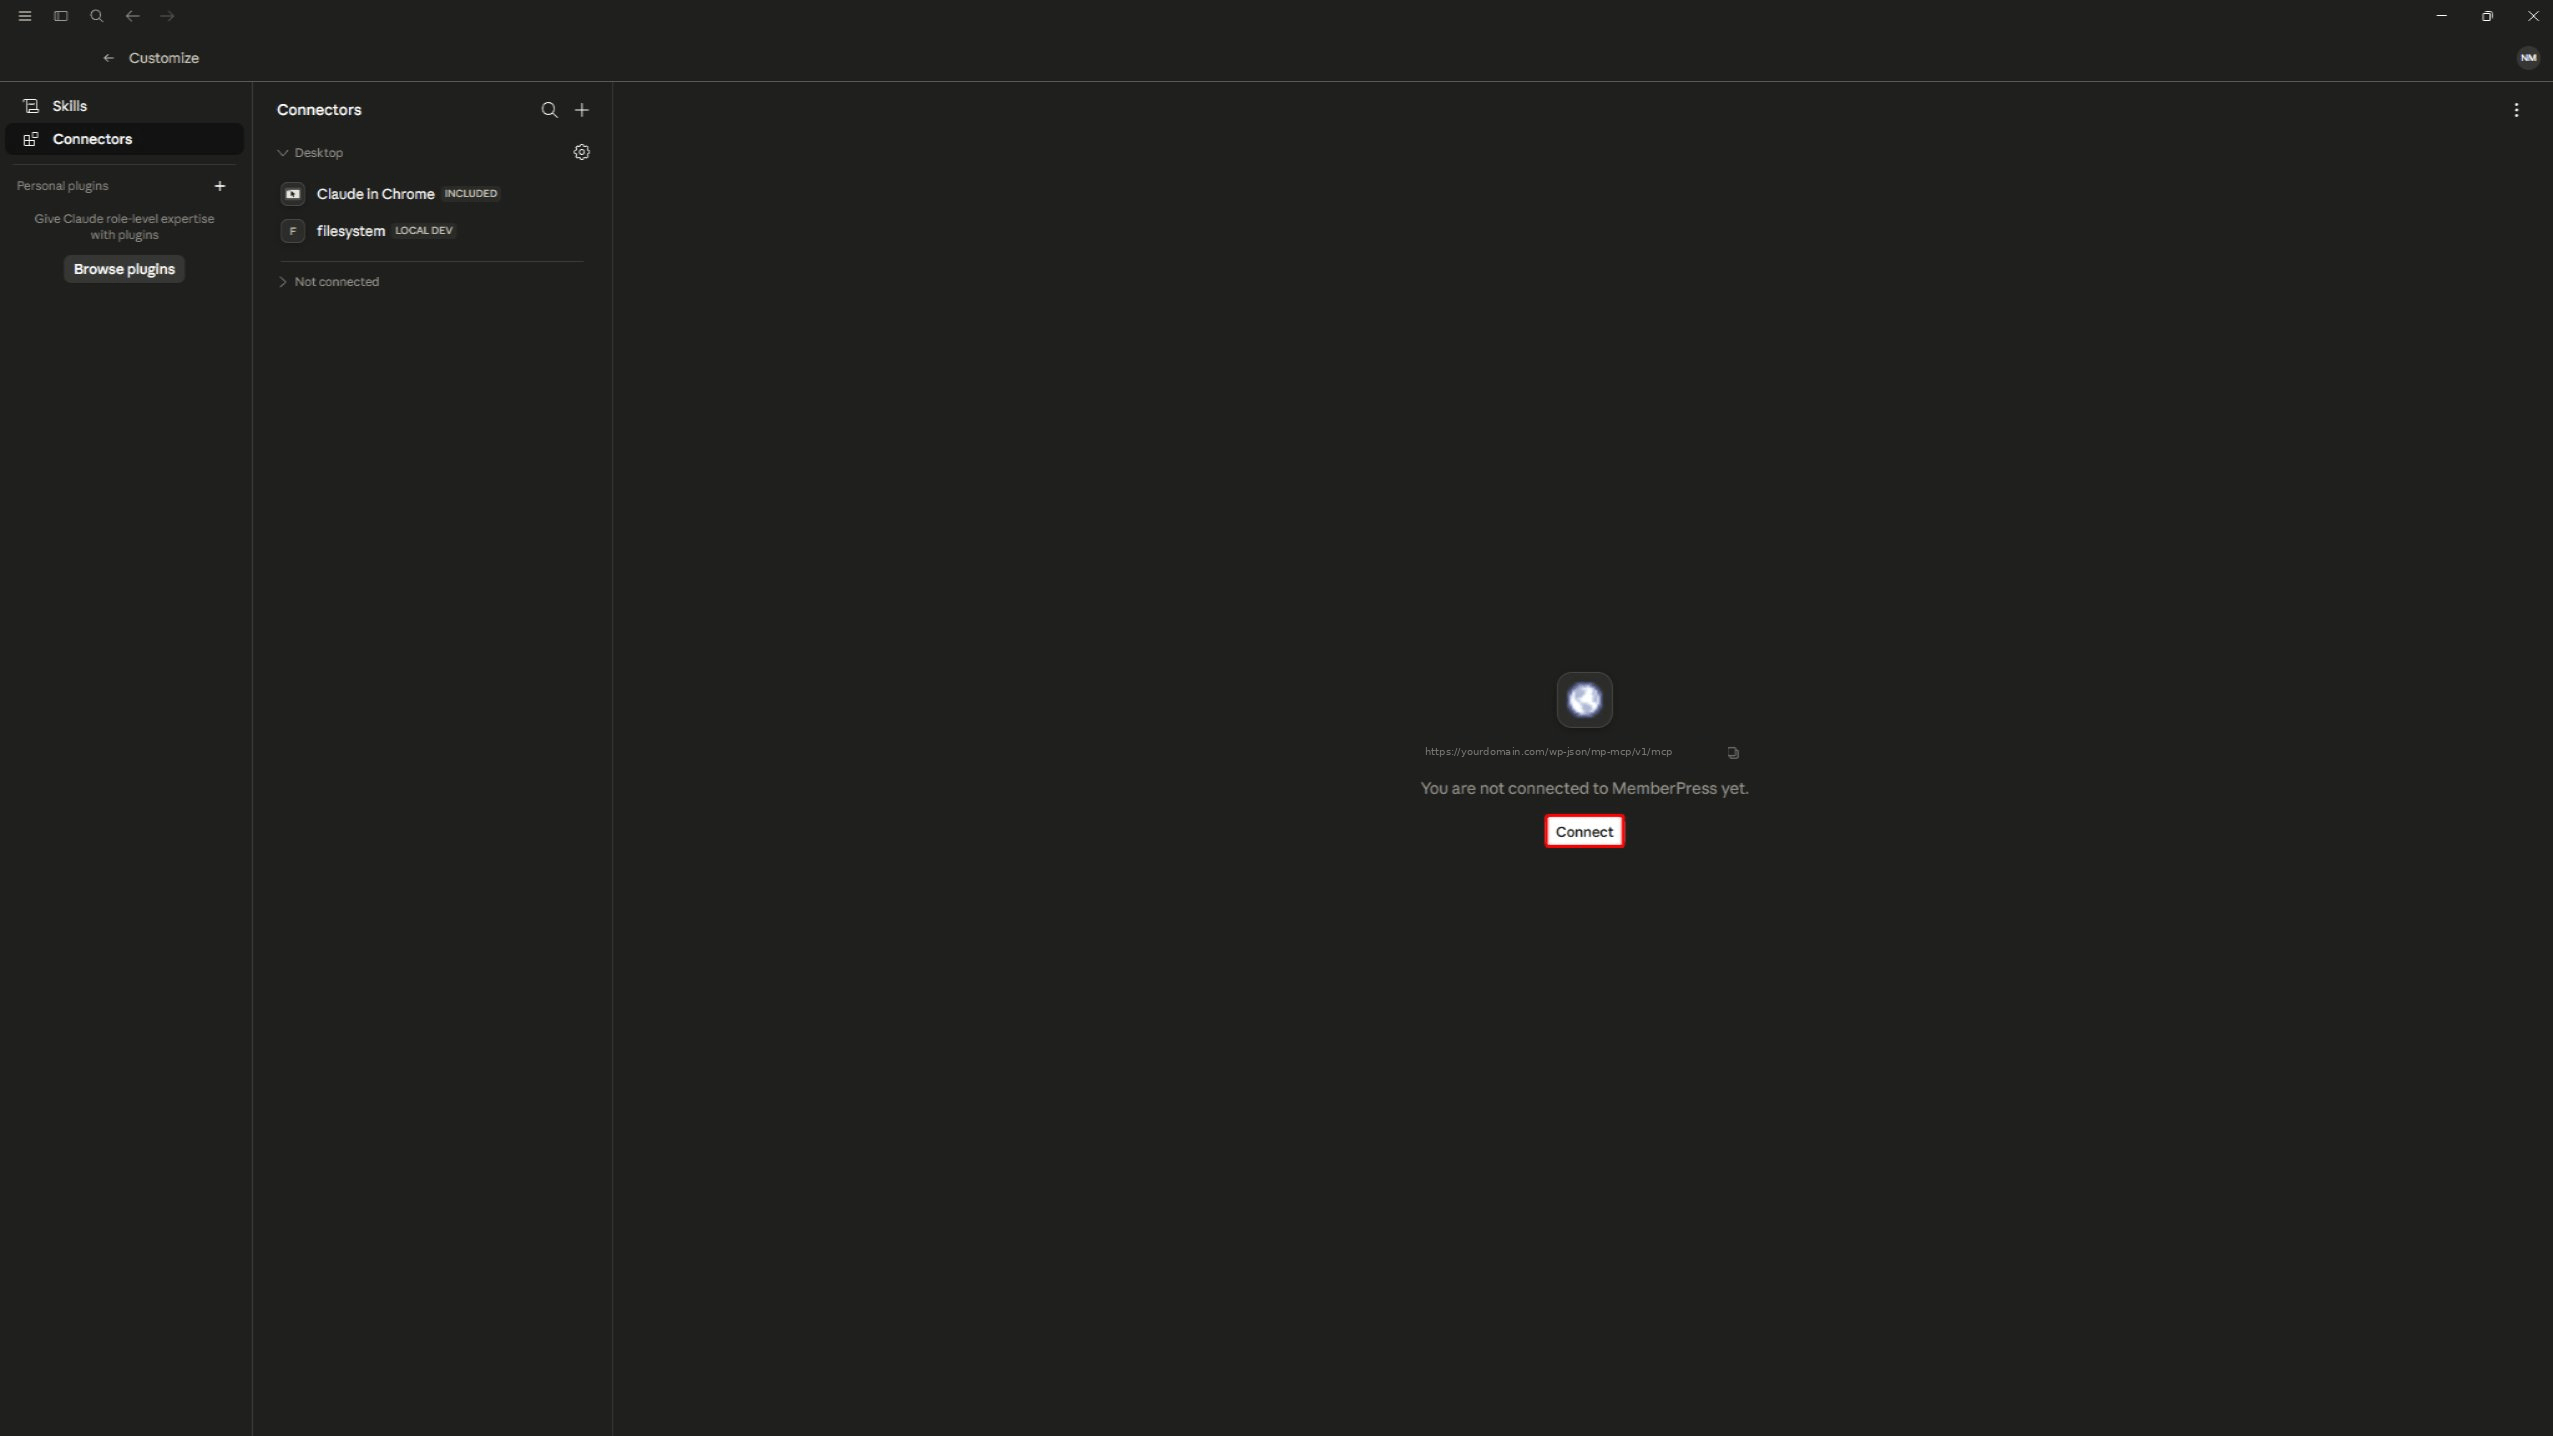
- Auf der neuen MemberPress Anschluss, klicken Sie auf Verbinden Sie;
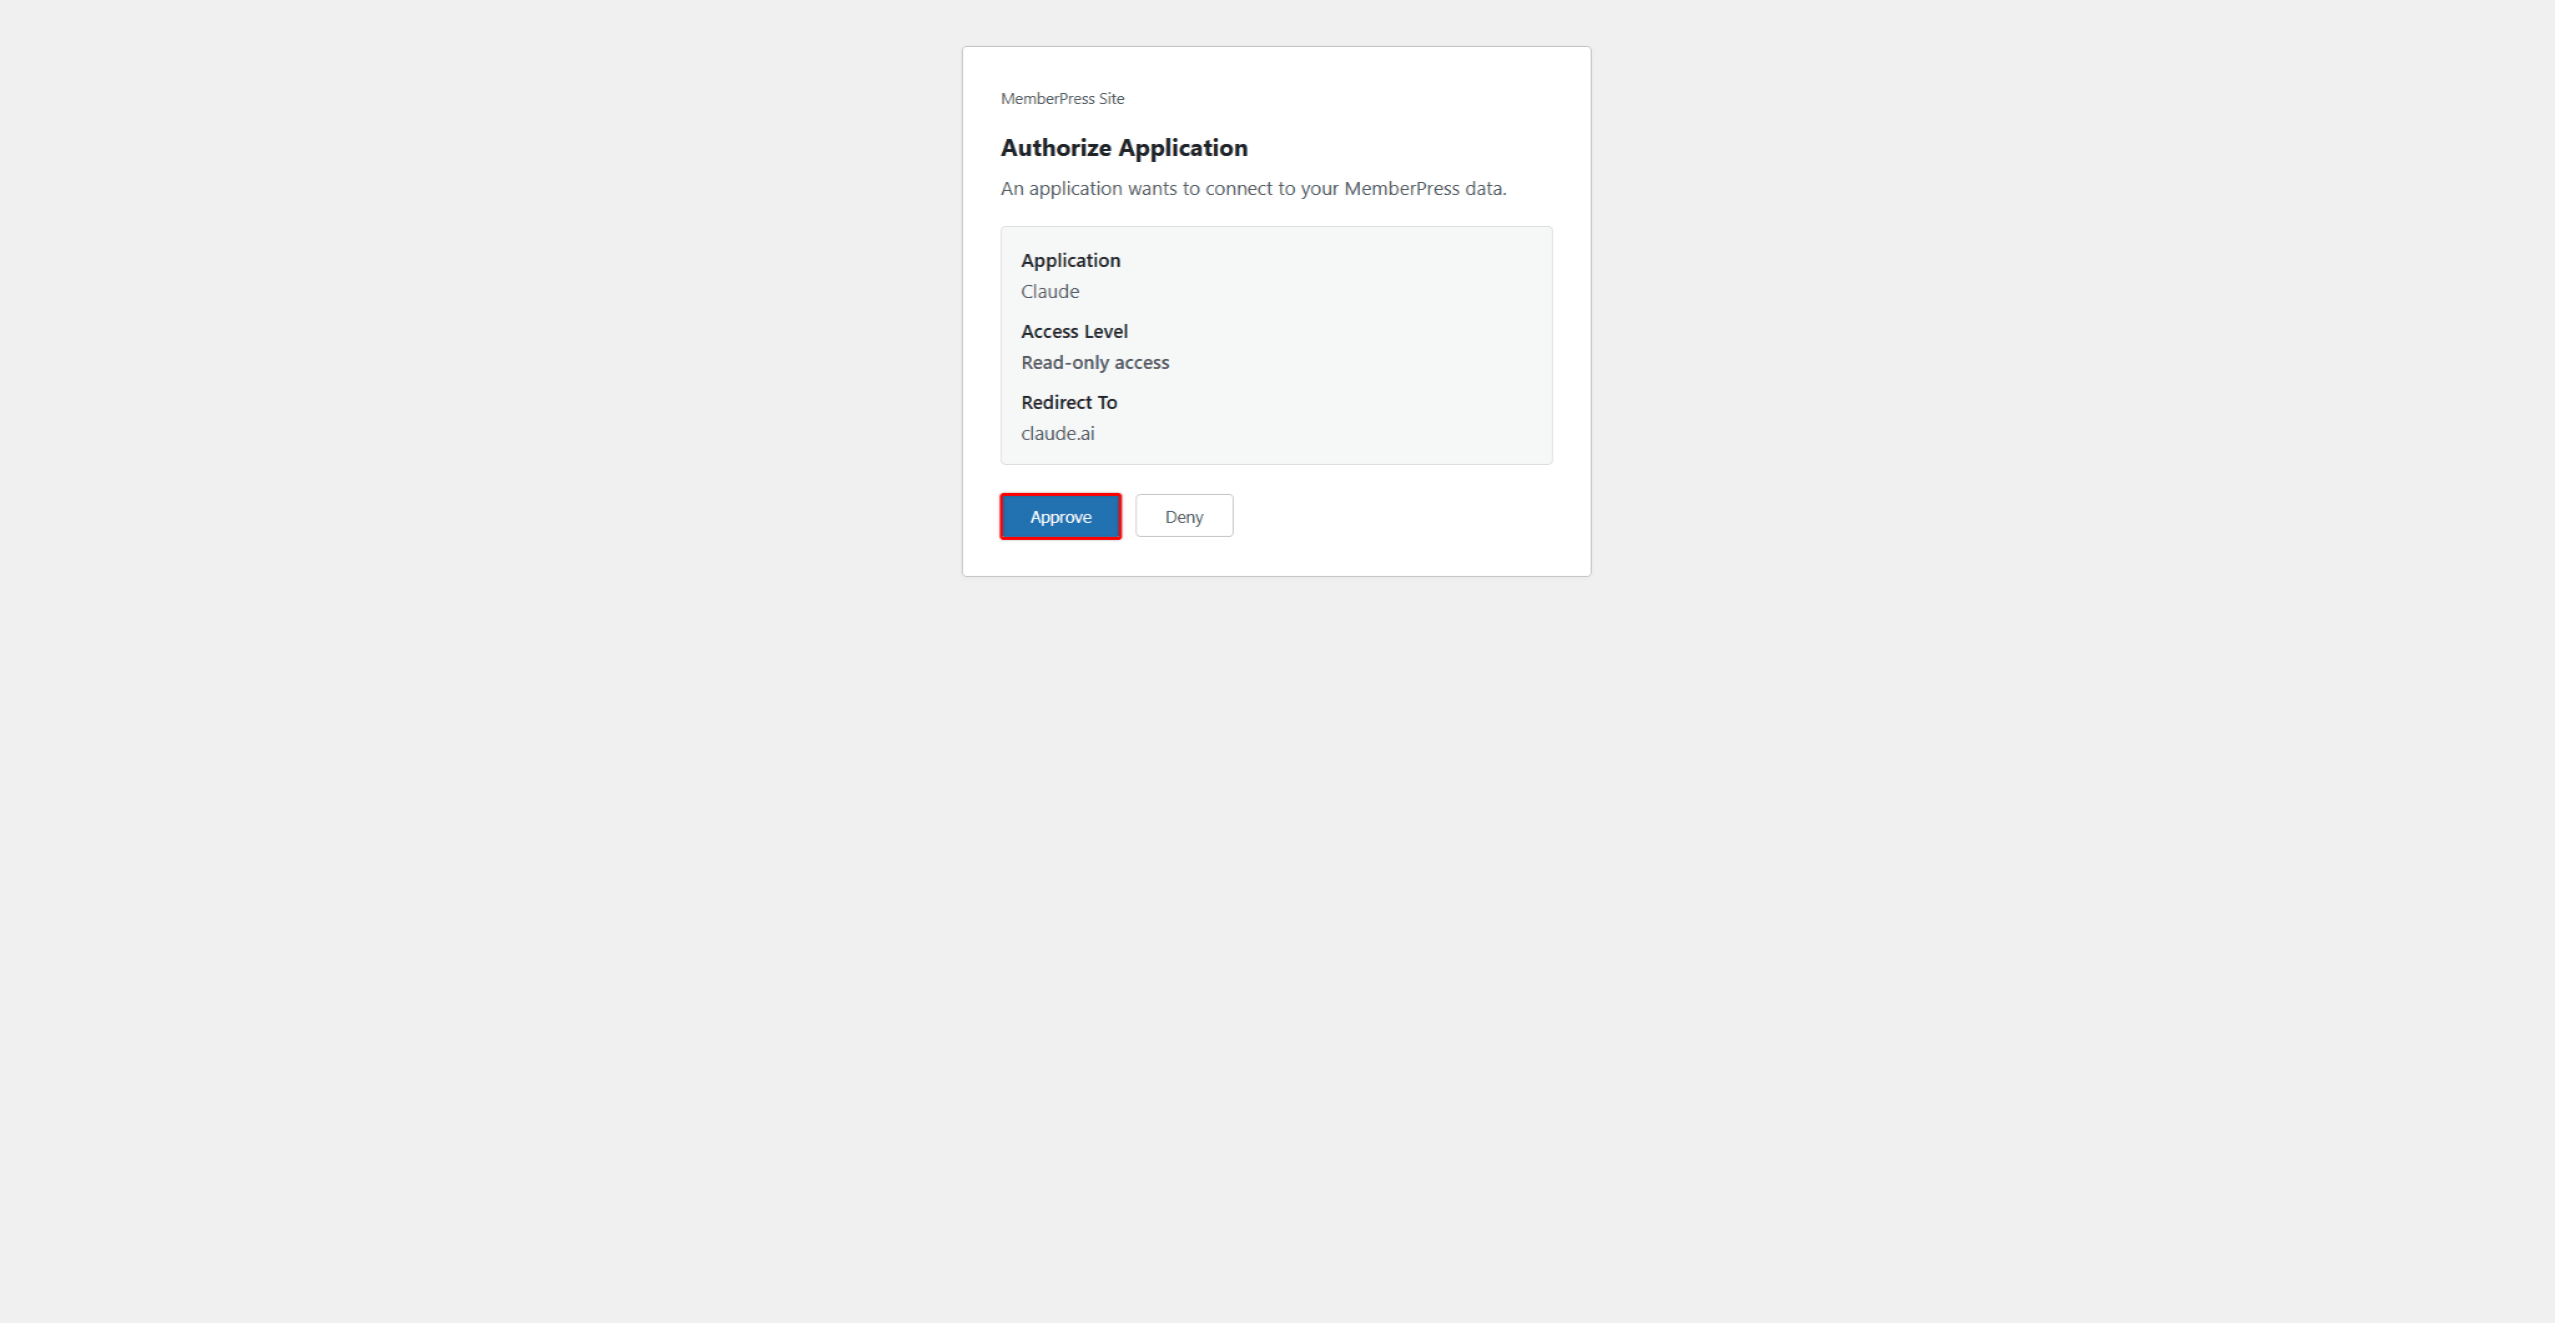
- Es öffnet sich ein Browserfenster mit der “Antrag genehmigen” Bildschirm. Dort wird die Anwendung angezeigt (Claude), die gewährte Zugriffsebene und das Umleitungsziel (claude.ai);
- Melden Sie sich auf der MemberPress-Website an, falls keine aktive Sitzung vorliegt;
- Klicken Sie auf Genehmigen Sie Zugriff zu gewähren oder Ablehnen um abzubrechen.
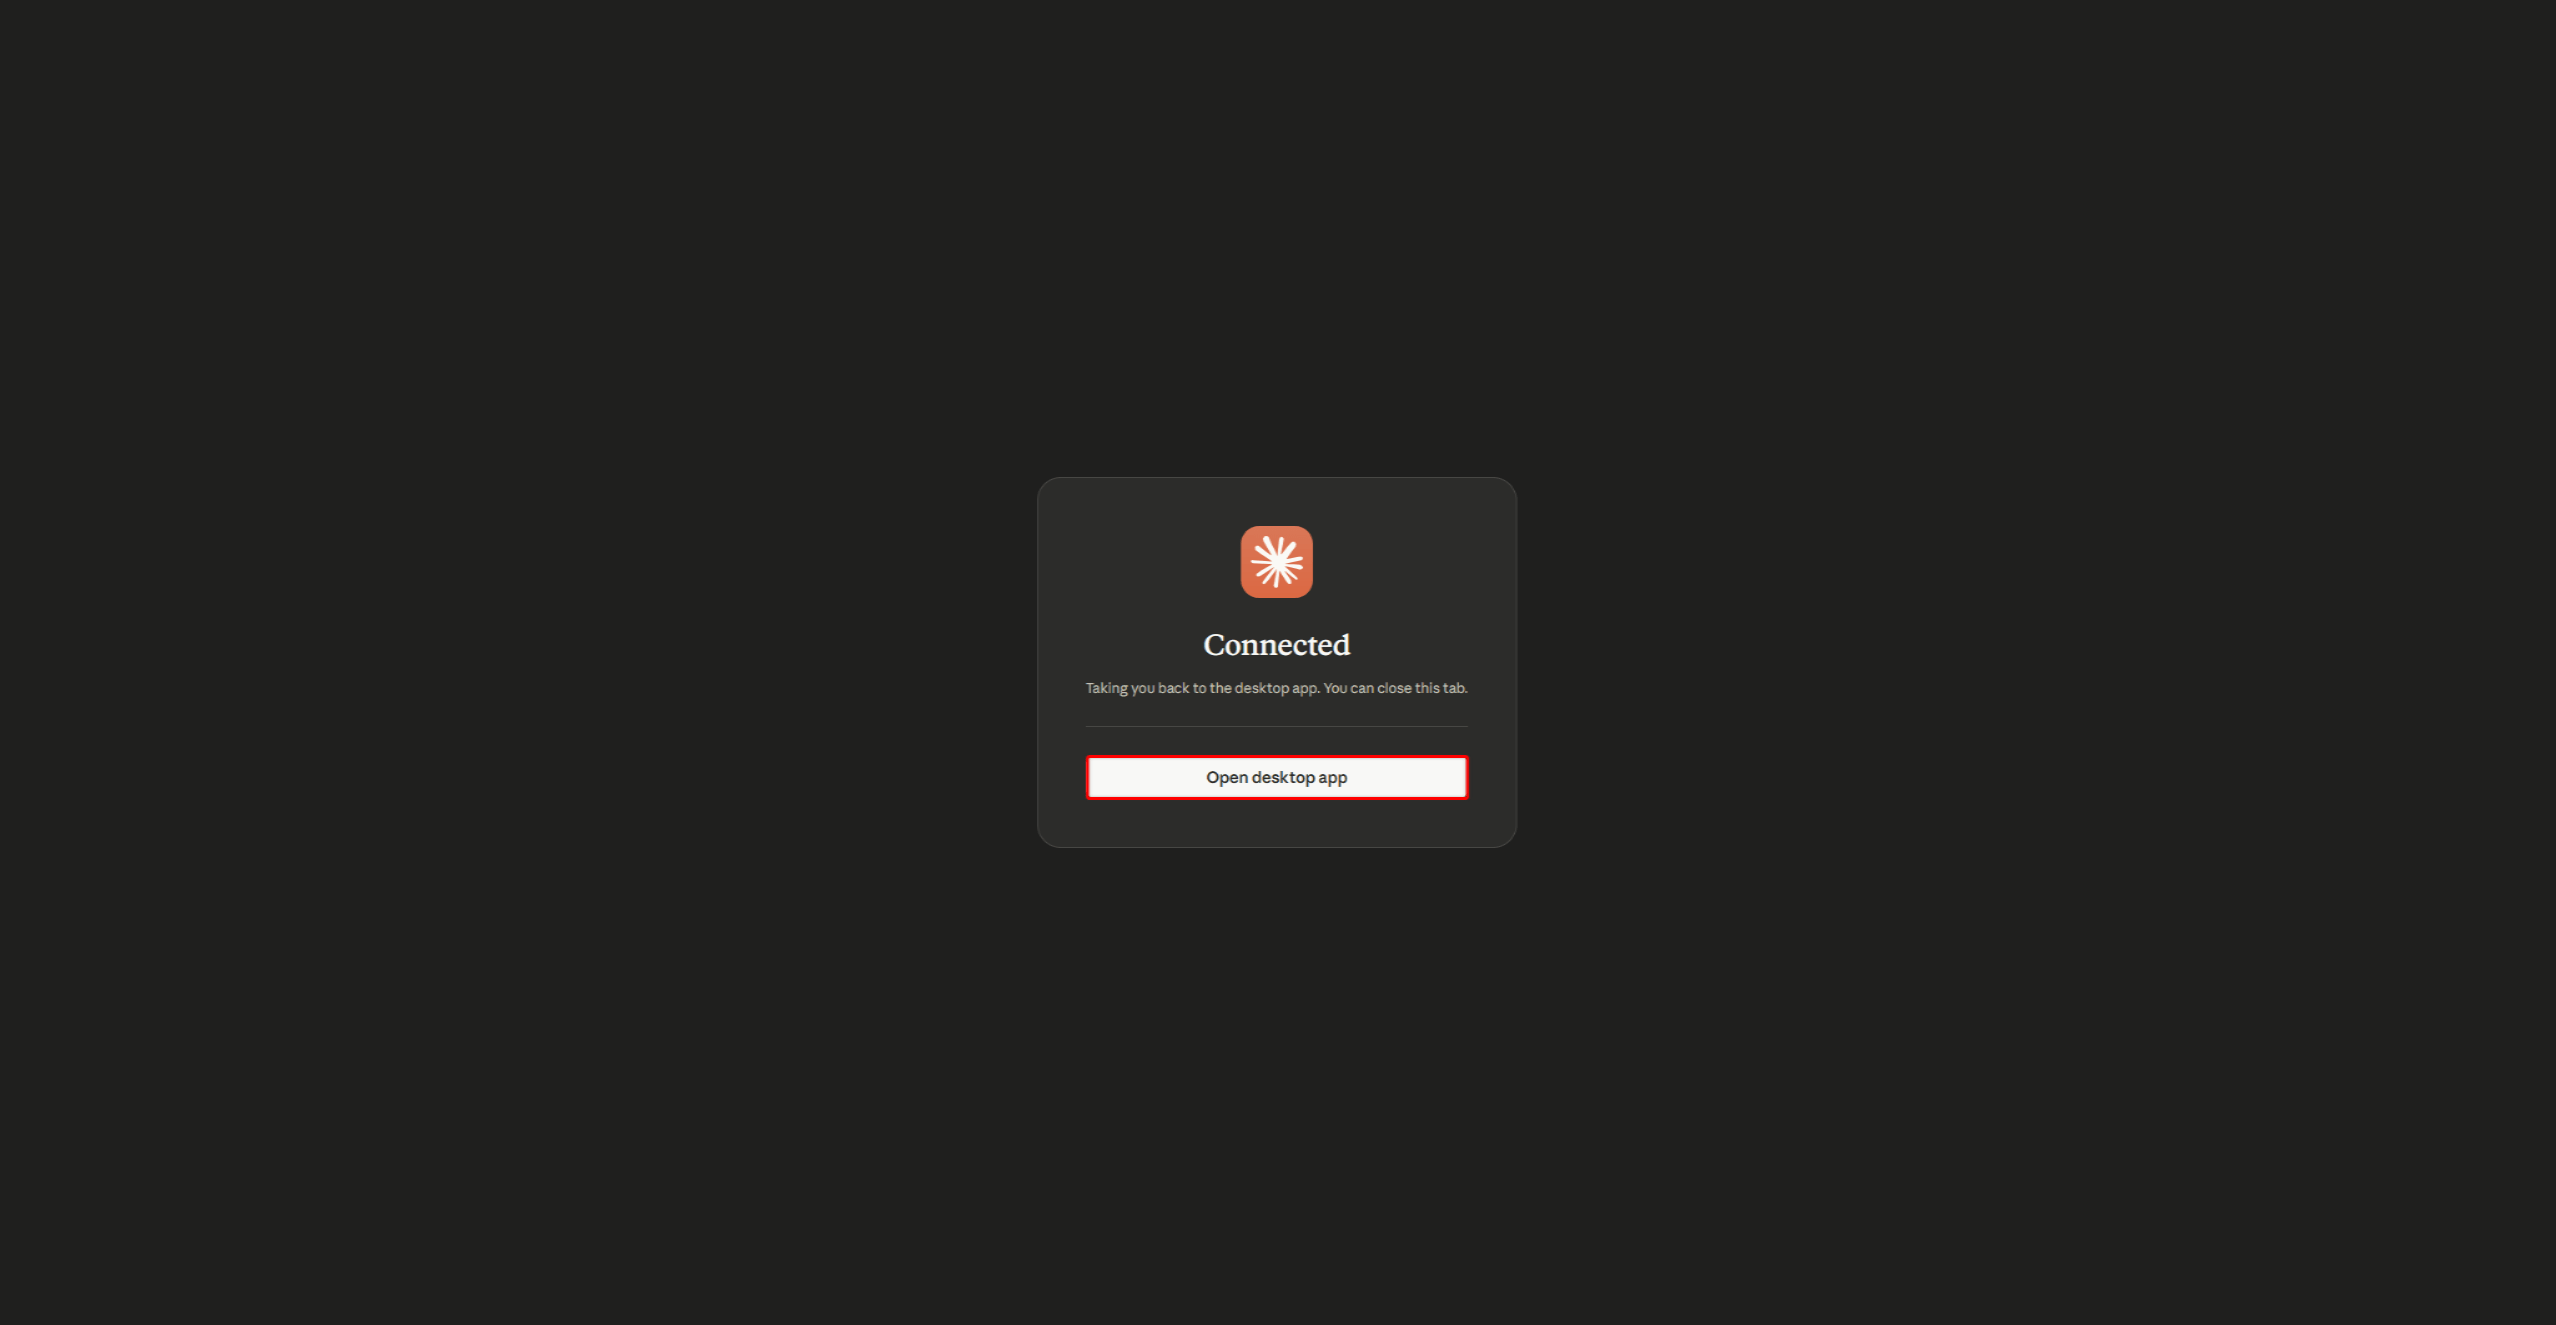
Nach der Bestätigung zeigt der Browser eine “Vernetzt” Seite und leitet Sie automatisch zurück zu Claude Desktop. Falls die Weiterleitung nicht funktioniert, klicken Sie auf Desktop-App öffnen.
Schritt 6: Verbindung bestätigen
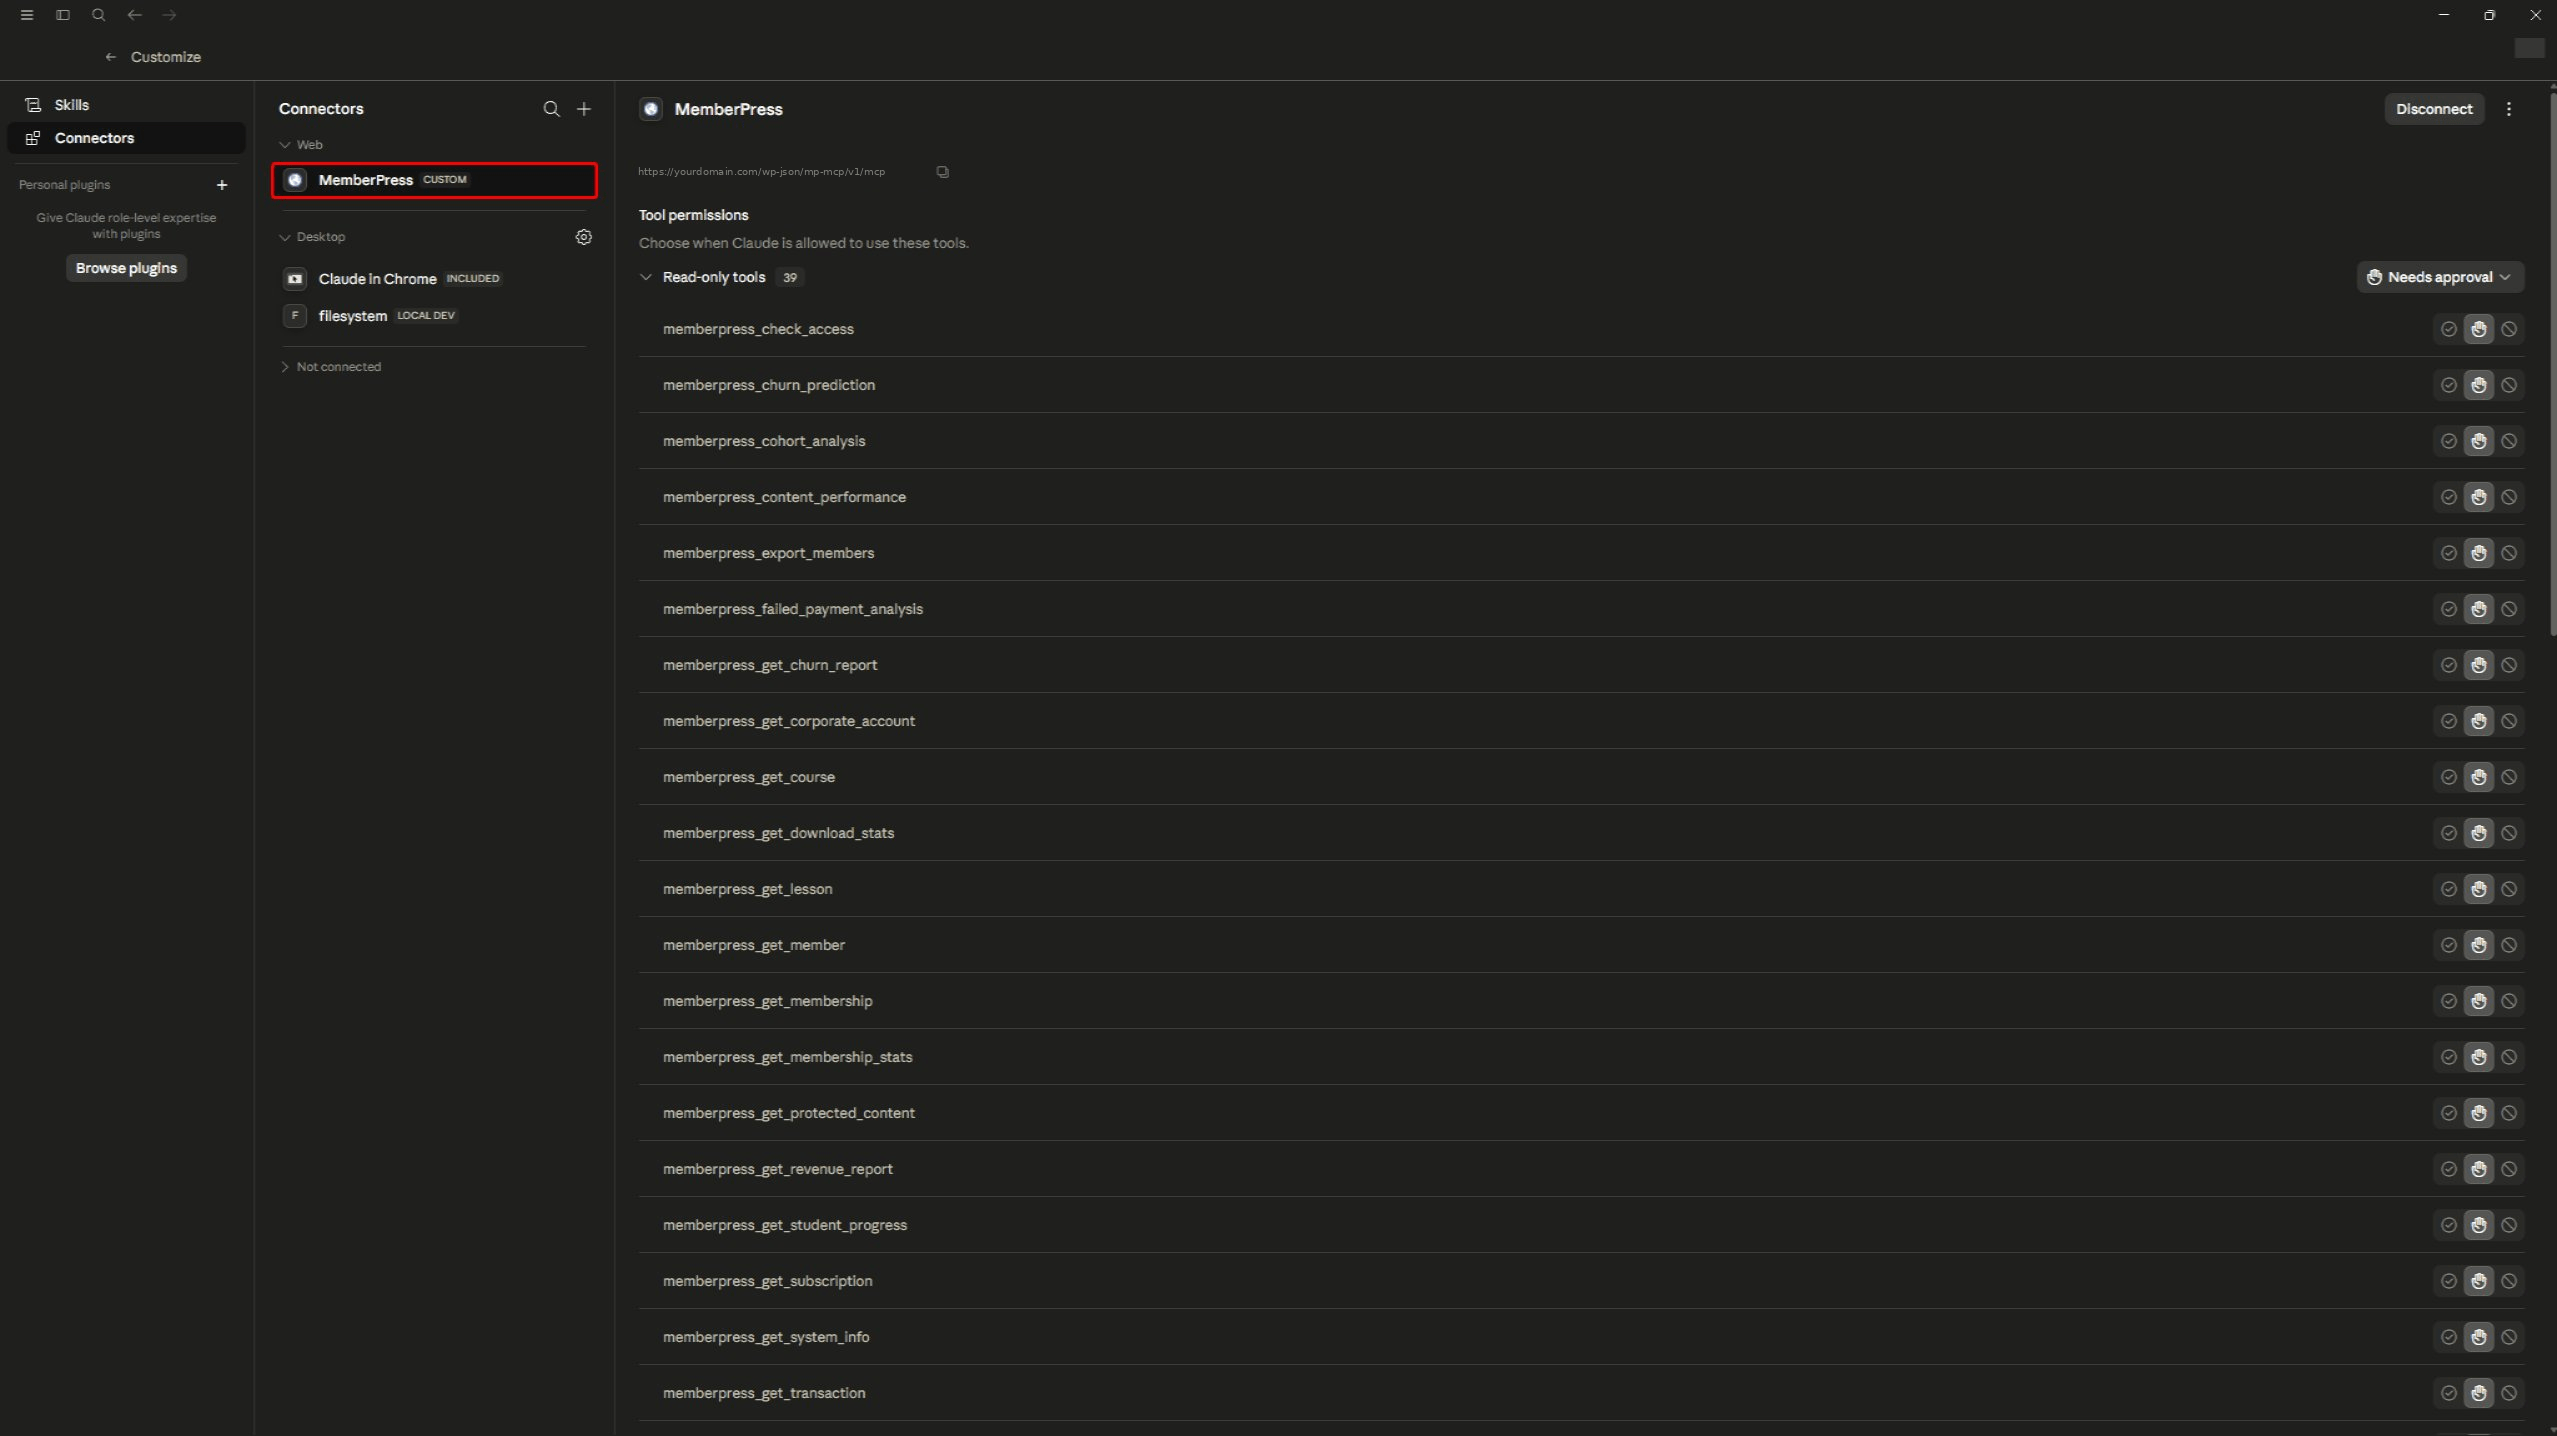
- In Claude Desktop ist die MemberPress Der Anschluss wird nun als verbunden angezeigt und listet die verfügbaren Werkzeuge auf;
- Der Stecker Tool-Berechtigungen Die Liste zeigt an, was geladen wurde: Eine schreibgeschützte Verbindung lädt 39 schreibgeschützte Tools; eine Verbindung mit uneingeschränktem Zugriff enthält zusätzlich folgende Angaben: 15 Werkzeuge zum Schreiben und Löschen. Jedes Tool ist standardmäßig auf “Muss genehmigt werden”, daher fragt Claude Desktop nach, bevor es eines davon ausführt;
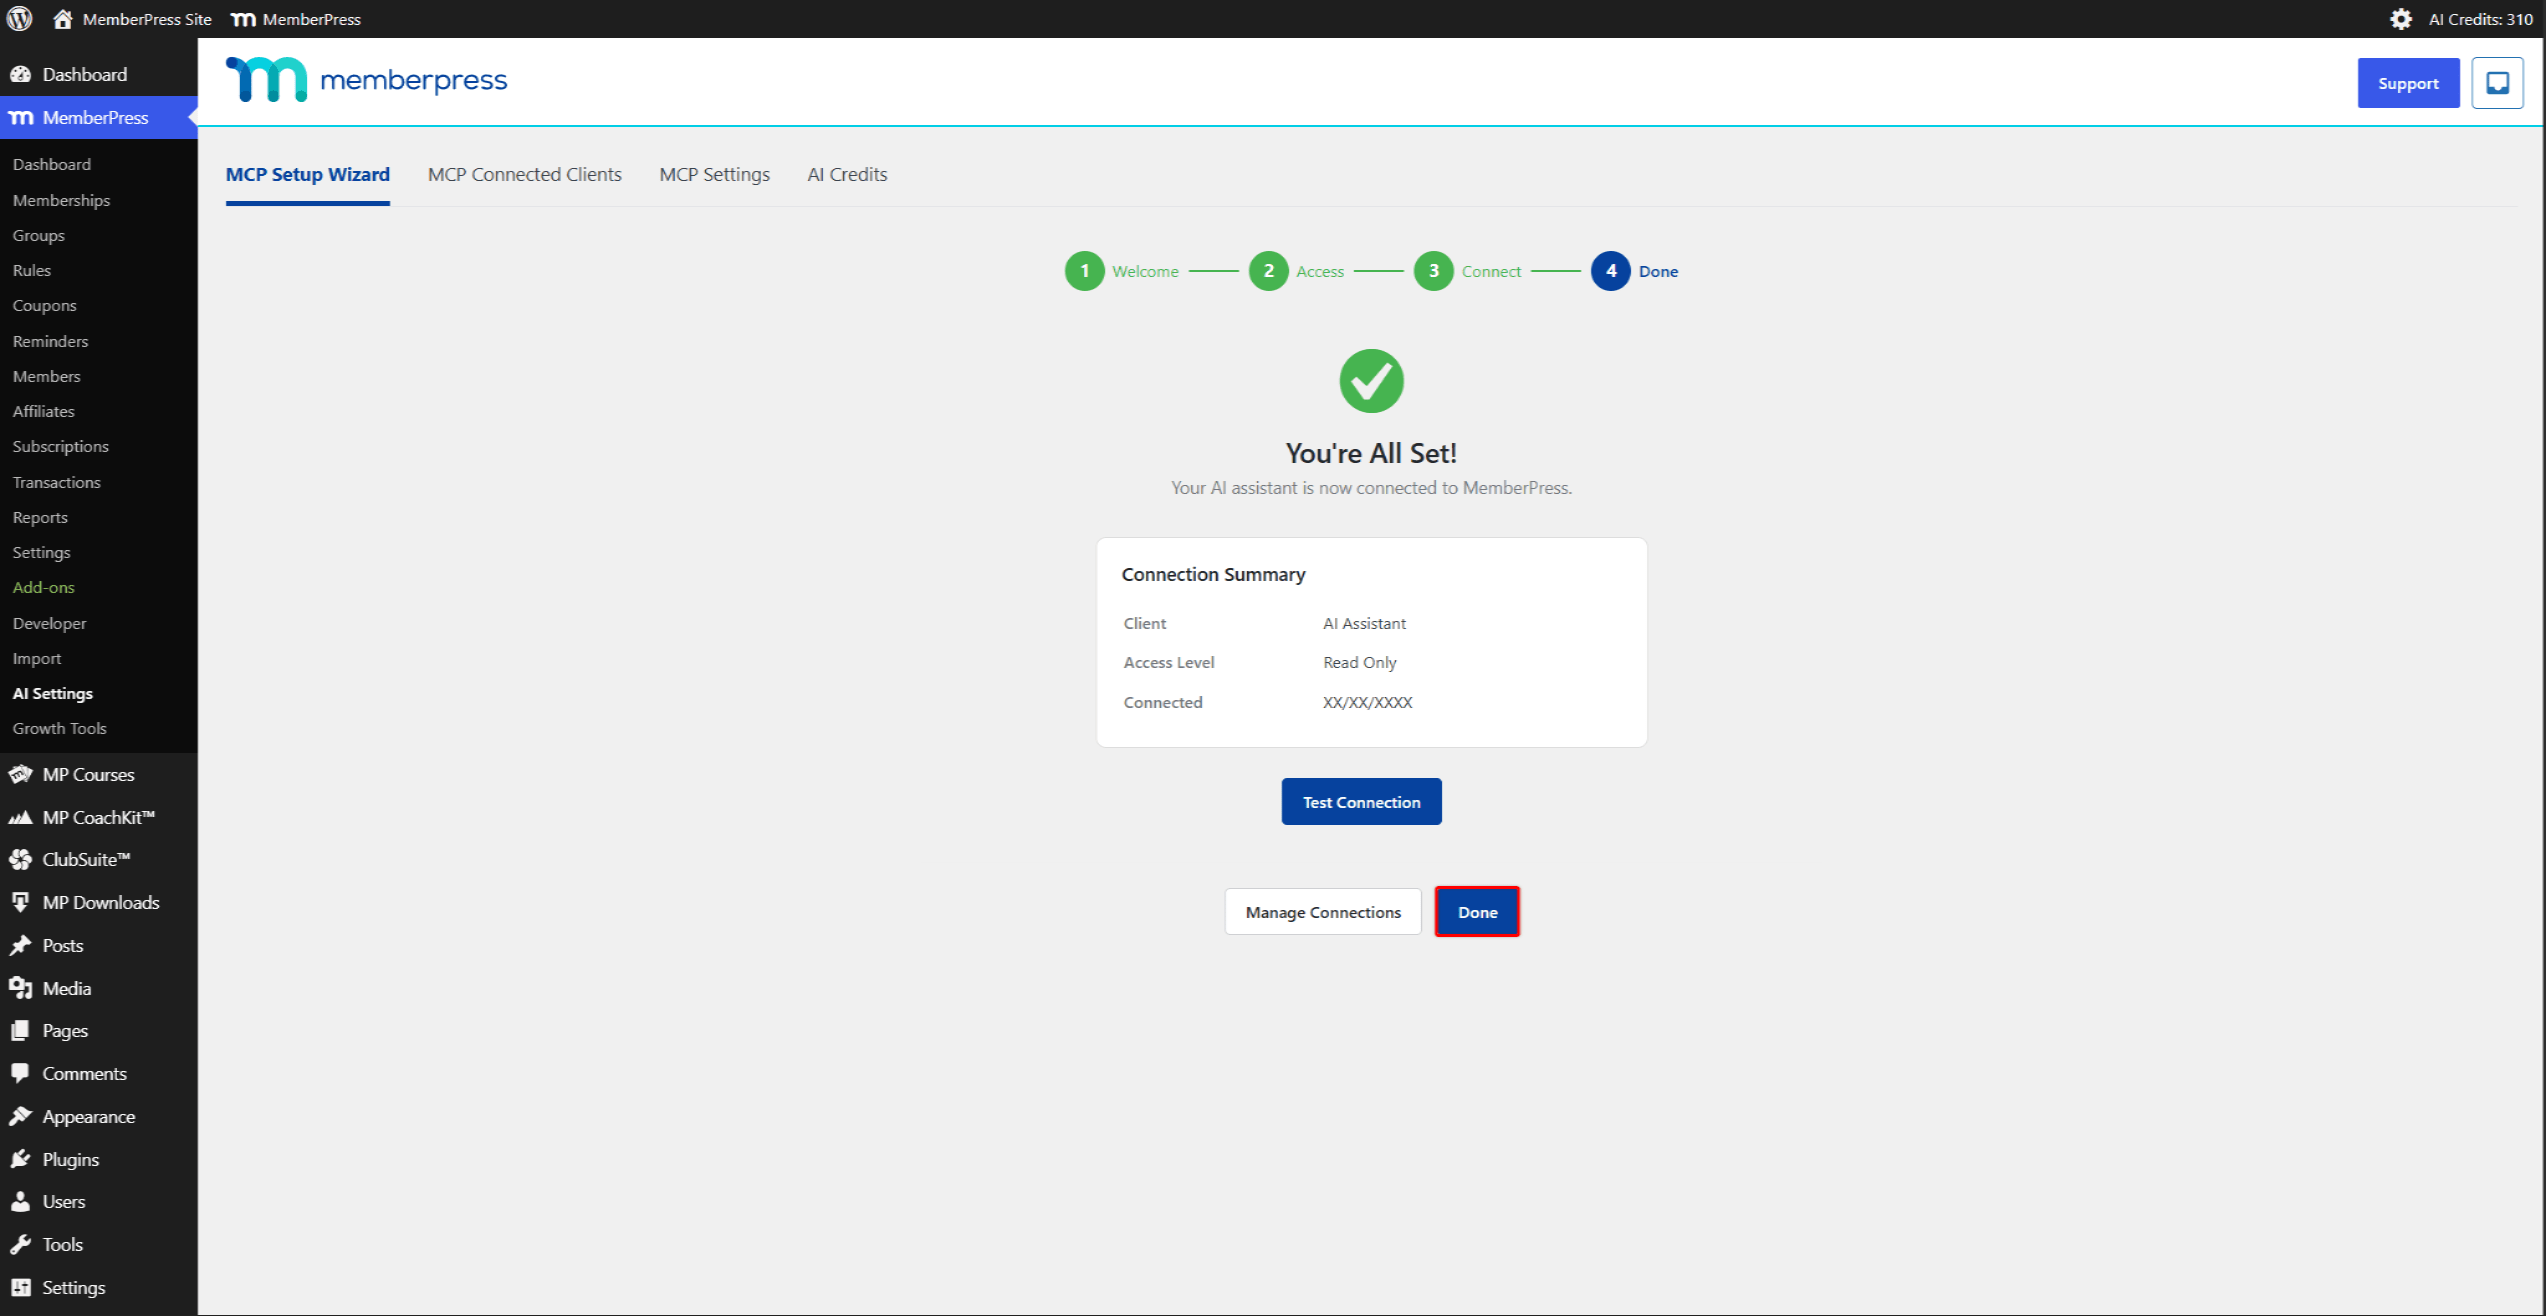
- Kehren Sie zum WordPress-Assistenten zurück, der nun die “Alles klar!” Bildschirm mit einer Verbindungsübersicht.
Der Zauberer Erledigt Dieser Schritt verfügt über drei Schaltflächen: Verbindung testen, Verbindungen verwaltenund Erledigt. Klicken Sie auf Erledigt um fertig zu werden.
Überprüfung der Verbindung
Überprüfen Sie innerhalb von Claude Desktop, ob die Verbindung funktioniert:
- Öffnen Sie Claude Desktop und starten Sie eine neue Unterhaltung;
- Bestätigen Sie die
memberpress_*Die Werkzeuge werden in der Liste der verfügbaren Werkzeuge angezeigt (zum Beispiel,Mitgliederliste_Mitglieder); - Stellen Sie eine einfache Testfrage, zum Beispiel “Nenne die fünf neuesten Mitglieder auf der MemberPress-Website.”;
- Den Tool-Aufruf genehmigen, wenn Claude Desktop ihn anfordert;
- Überprüfen Sie, ob Claude Desktop die Daten zurückgibt.
Ändern der Zugriffsebene einer bestehenden Verbindung
Die Zugriffsebene einer Verbindung wird bei ihrer Erstellung festgelegt. Sie kann nicht nachträglich erhöht oder herabgesetzt werden. Um sie zu ändern, ersetzen Sie die Verbindung:
- Öffnen Sie in Claude Desktop Anpassen > Anschlüsse > MemberPress und klicken Sie Trennen Sie die Verbindung;
- Legen Sie in WordPress die neue Zugriffsebene unter folgendem Pfad fest: MemberPress > KI-Einstellungen > MCP-Einstellungen und klicken Sie Einstellungen aktualisieren;
- Zurück in Claude Desktop klicken Sie auf Verbinden Sie Wählen Sie erneut den MemberPress-Anschluss aus und bestätigen Sie anschließend die Autorisierung. Dadurch wird eine neue Verbindung auf der neuen Zugriffsebene hergestellt.
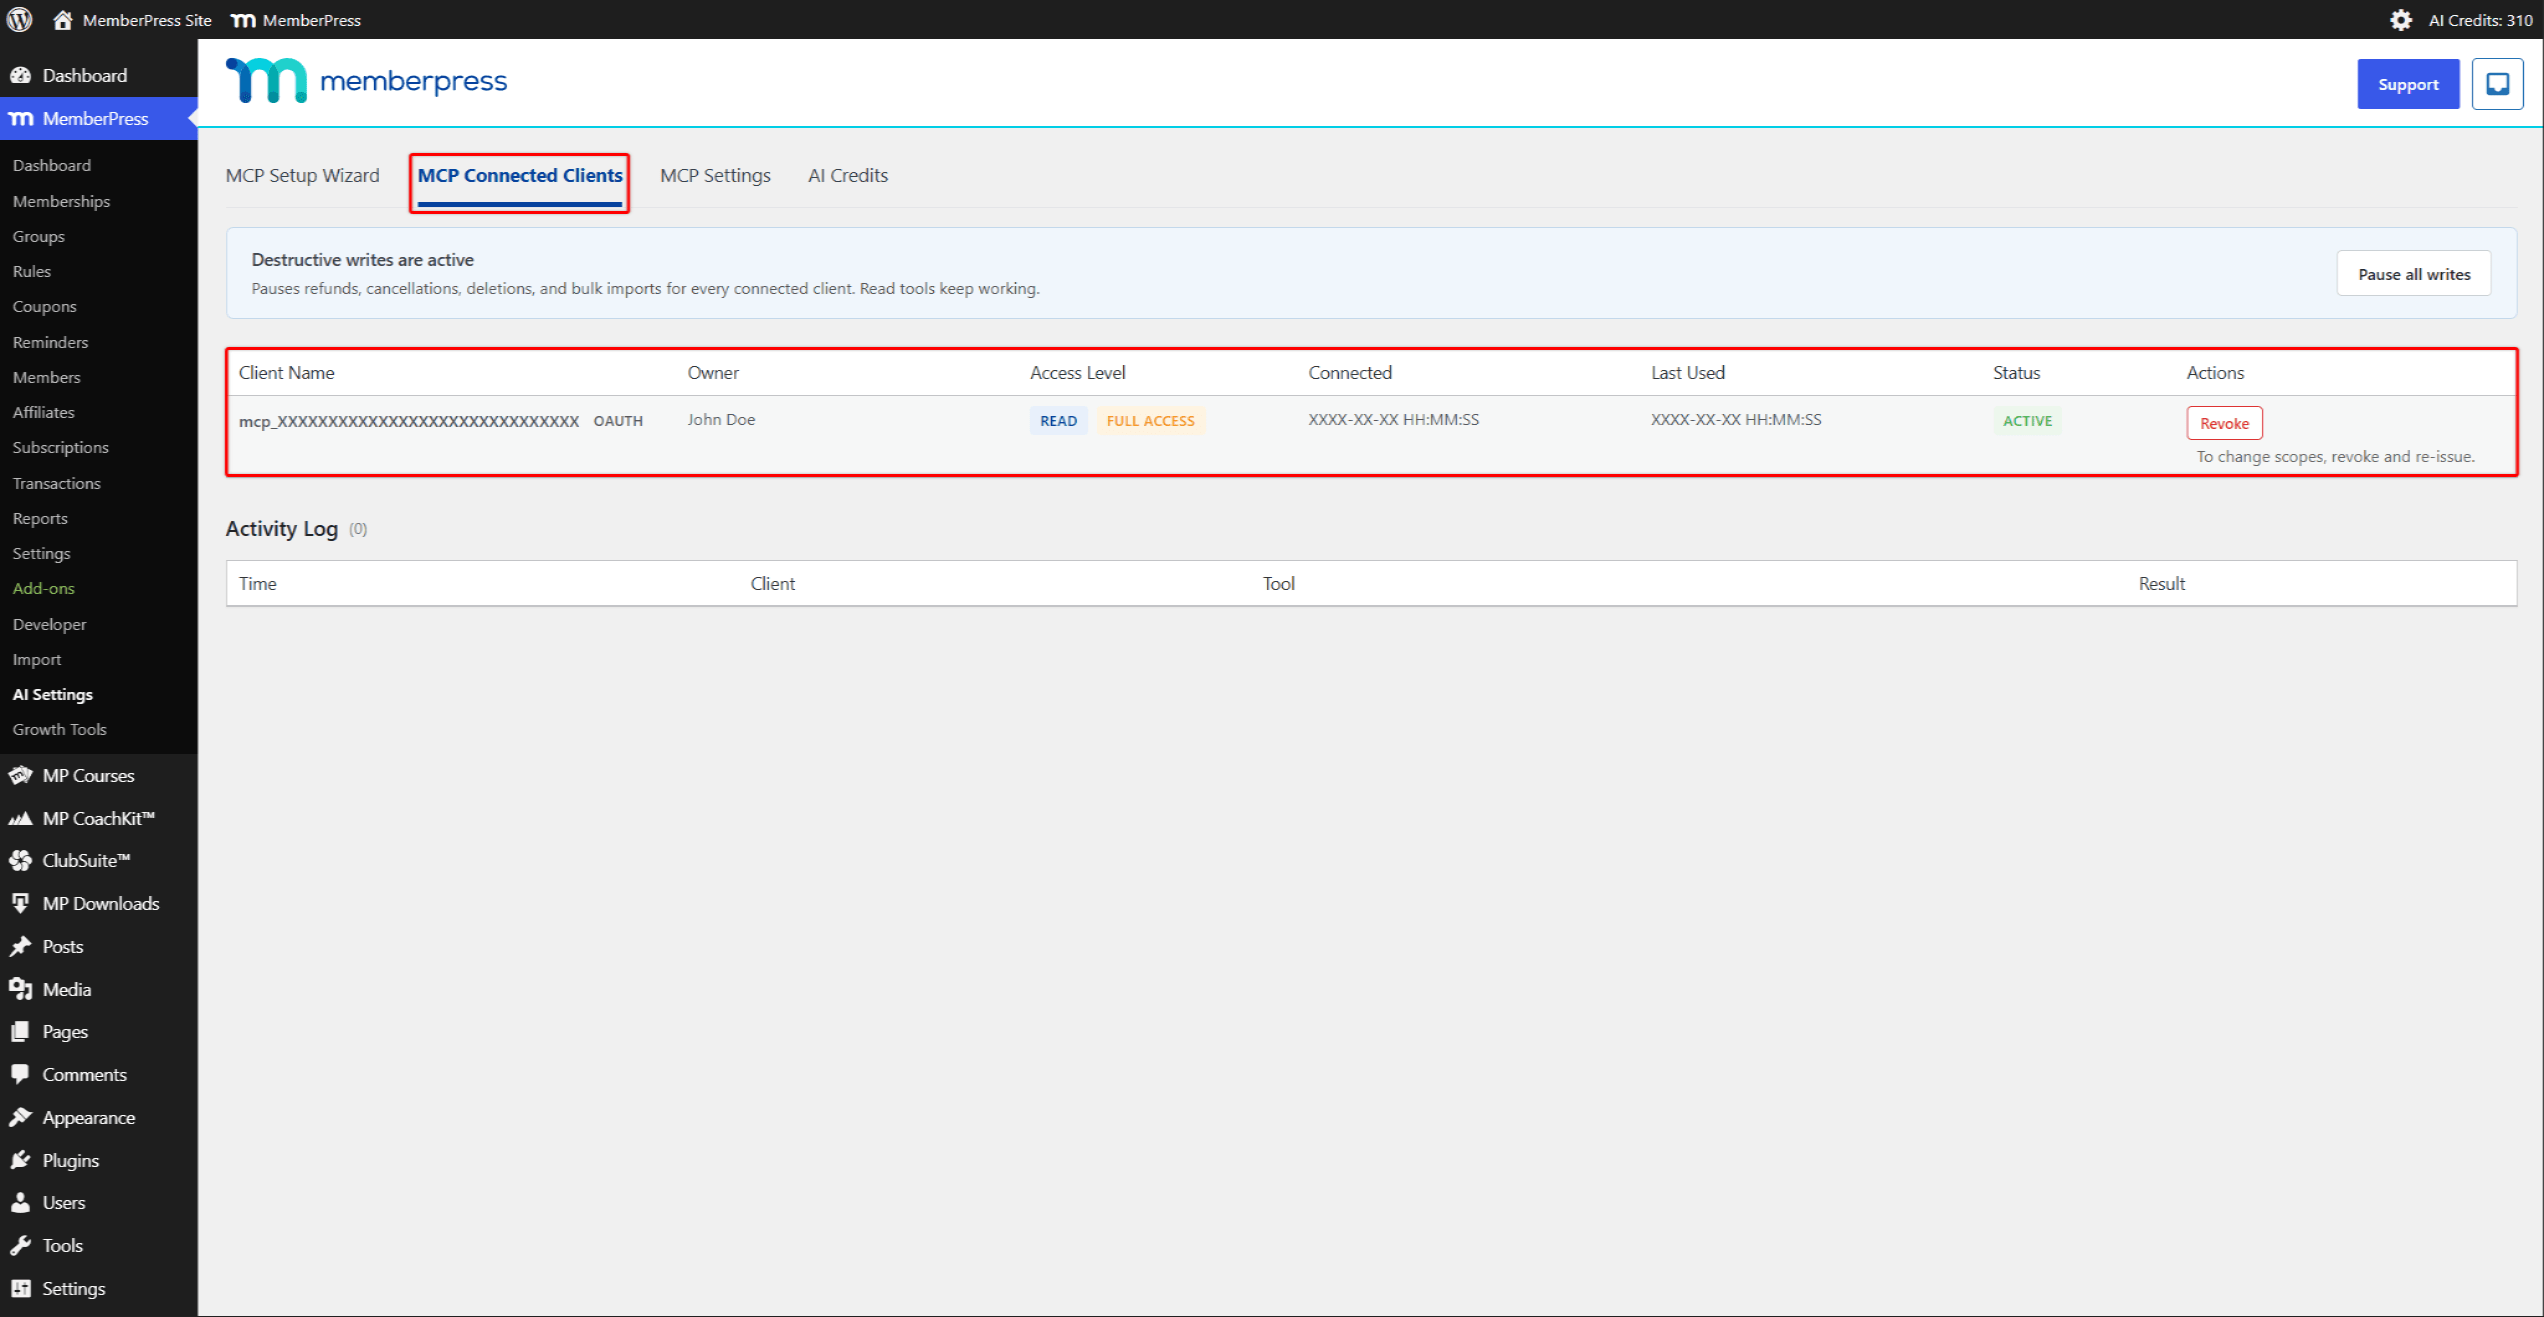
Um die alte Zeile zu löschen, öffnen Sie Mit MCP verbundene Clients, die frühere Verbindung anhand ihrer Verbundener Zeitstempel und Zugriffsebeneund klicken Sie auf Widerrufen. Der Status der alten Zeile bleibt unverändert Aktiv Nach der Trennung der Verbindung auf Client-Seite – Claude Desktop benachrichtigt die Website nicht – ist das Widerrufen hier die einzige Möglichkeit, die Verbindung zu beenden.
Verbindungen verwalten
Jede aktive Verbindung wird unter Dashboard > MemberPress > KI-Einstellungen > Mit MCP verbundene Clients. Die Tabelle listet OAuth-Verbindungen (aus dem Assistenten) und Sitzungen mit Anwendungskennwort in einer Ansicht auf.
Jede Zeile enthält folgende Spalten:
- Name des Kunden;
- Eigentümer;
- Zugriffsebene;
- Verbunden (der Zeitstempel, zu dem die Verbindung hergestellt wurde);
- Zuletzt verwendet;
- Status;
- Aktionen (einschließlich Widerrufen).
Ein Authentifizierungs-Chip protokolliert, wie sich jede Verbindung angemeldet hat – zum Beispiel, OAUTH für Wizard-Verbindungen oder APP-PASSWORT für Sitzungen mit Anwendungskennwort.
Eine Verbindung aufheben
So entfernen Sie eine Claude-Desktop-Verbindung:
- Navigieren Sie zu Dashboard > MemberPress > KI-Einstellungen > Mit MCP verbundene Clients;
- Suchen Sie die Zeile für die Verbindung;
- Klicken Sie auf Widerrufen in dieser Zeile;
- Bestätigen Sie die Eingabeaufforderung mit folgendem Wortlaut: “Möchten Sie dieses Token wirklich widerrufen? Dieser Vorgang kann nicht rückgängig gemacht werden.”.
Ein Hinweis zu Anwendungspasswörtern
A WordPress Anwendungskennwort Man kann auch einen MCP-Client mit MemberPress verbinden. Verbindungen mit Anwendungskennwort sind auf Lesezugriff beschränkt, unabhängig von den WordPress-Berechtigungen des Benutzers. Für Schreibzugriff sind der Assistent und der oben beschriebene OAuth-Ablauf erforderlich.
KI-Quellenangaben
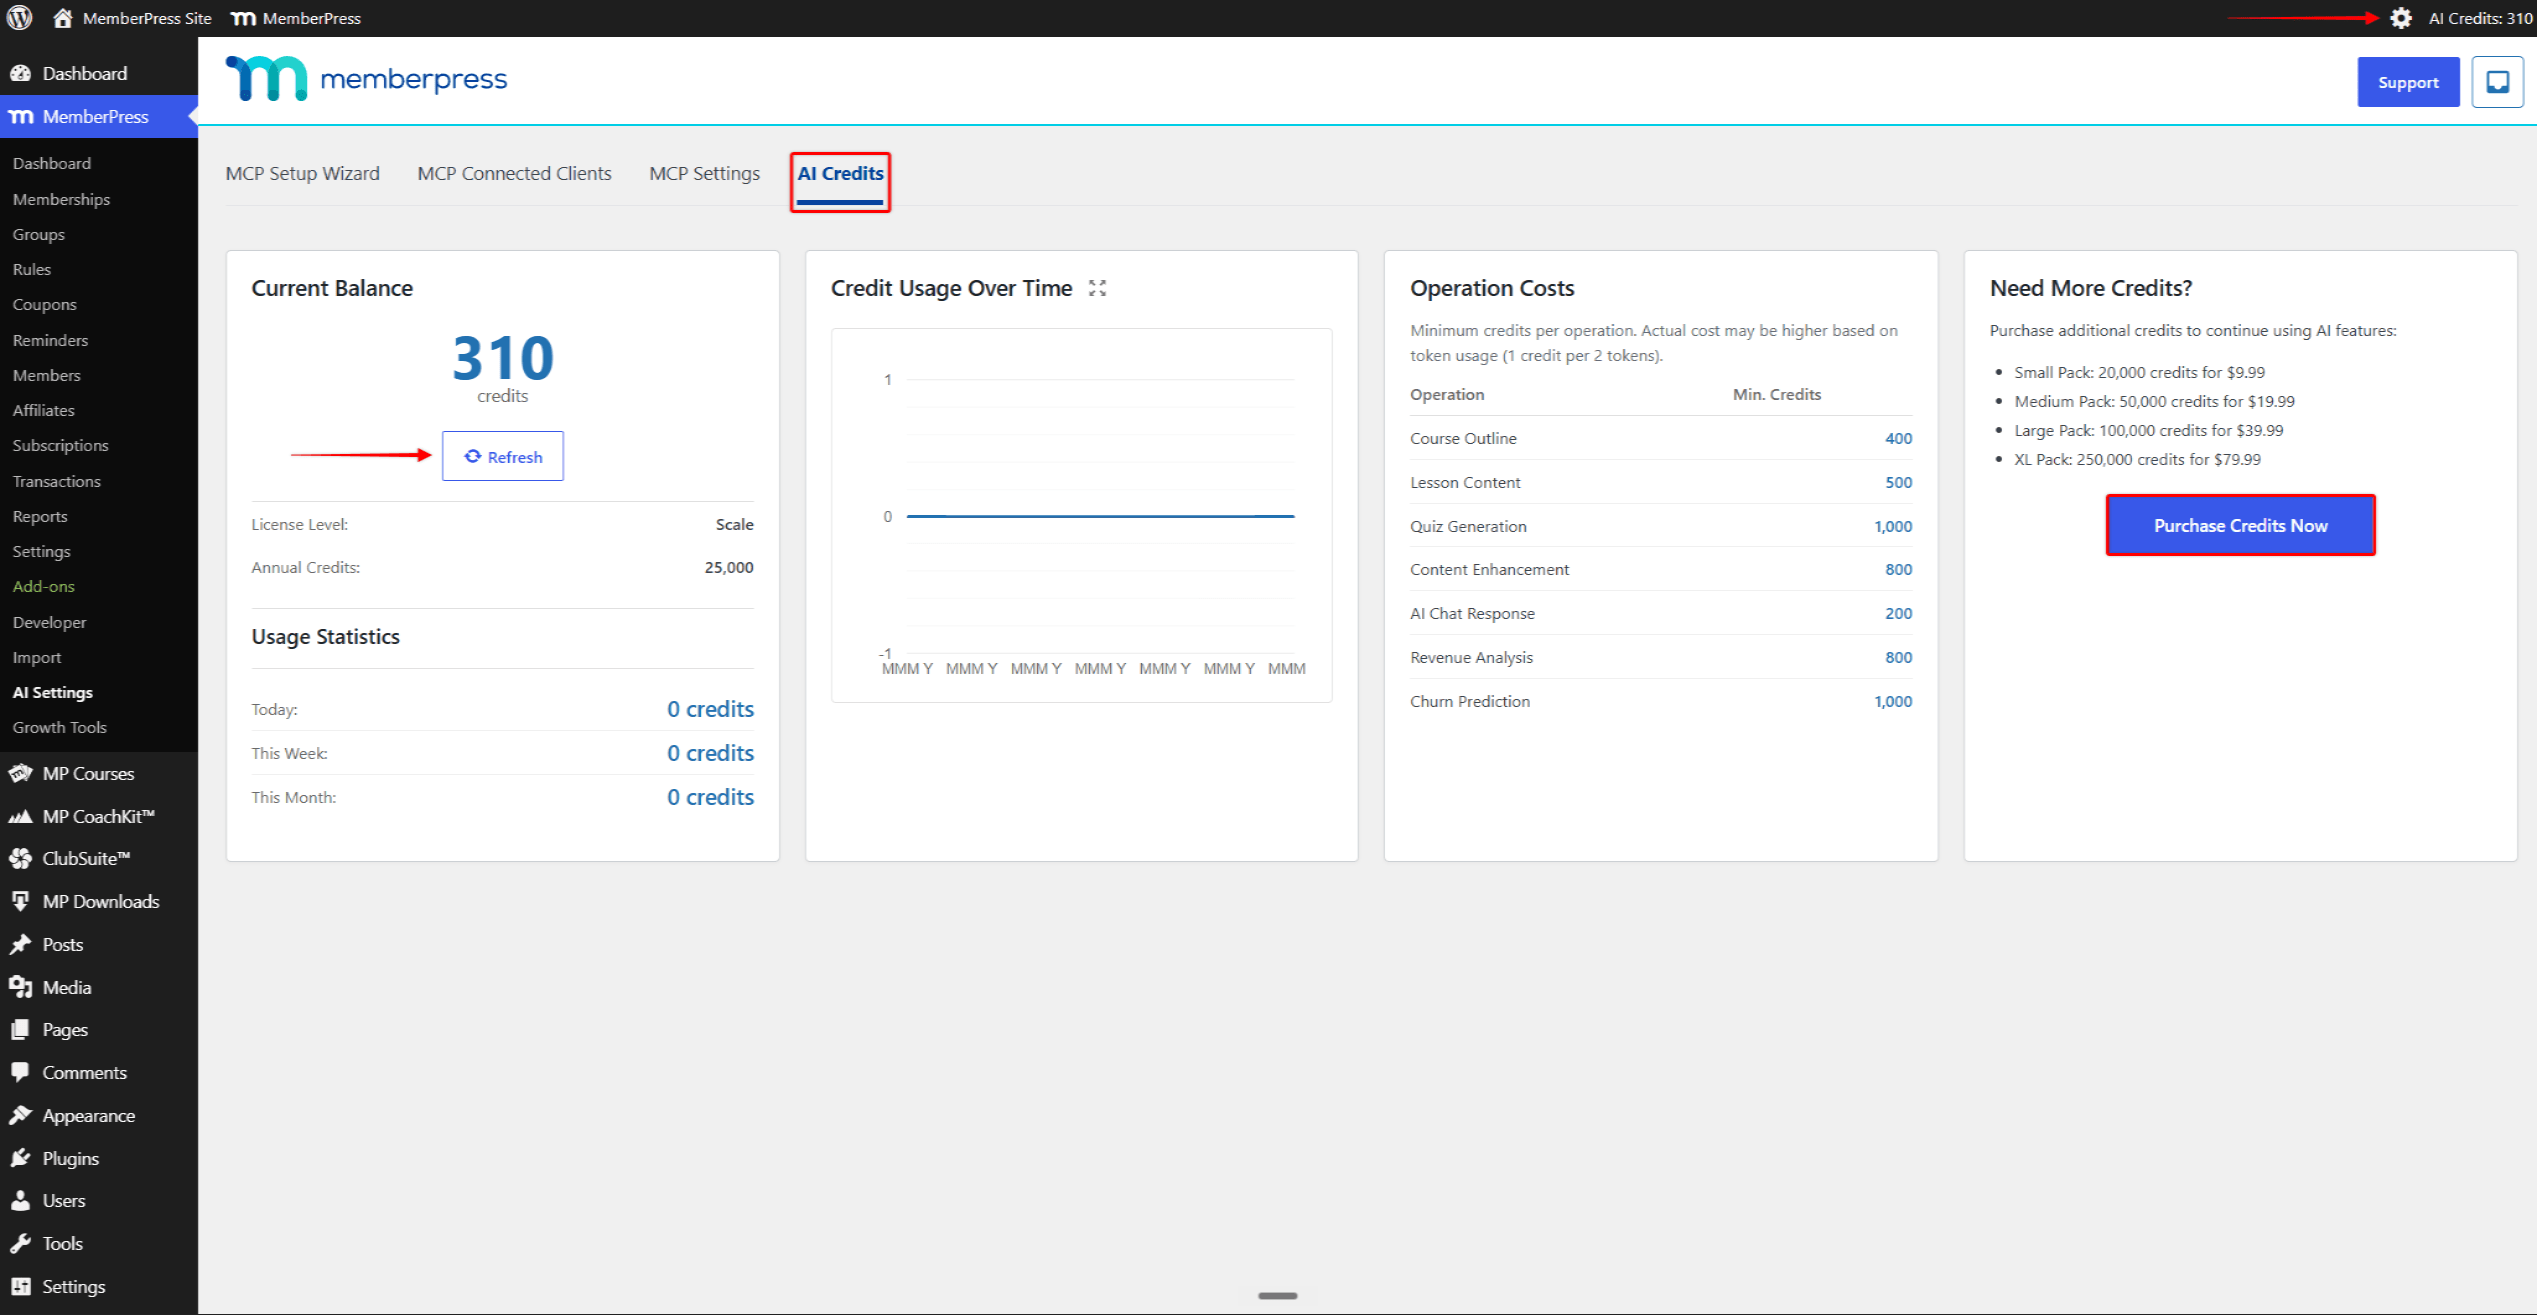
AI-Credits dienen zur Finanzierung der eigenen KI-Funktionen von MemberPress. Claude Desktop nutzt diese nicht. Die Nutzung der KI wird über das Claude-Konto von Anthropic abgerechnet, und MCP-Tool-Aufrufe aus Claude Desktop verbrauchen keine AI-Credits.
Die KI-Quellenangaben im Reiter Dashboard > MemberPress > KI-Einstellungen > KI-Credits Zeigt den aktuellen Kontostand an und bietet die Möglichkeit, Guthaben nachzukaufen. Nutze diese Funktion, um Guthaben für die MemberPress-KI-Funktionen aufzuladen, die darauf angewiesen sind.
Eine ausführliche Erläuterung des AI-Credits-Systems finden Sie unter MemberPress AI Foundation – Überblick und Einrichtungsanleitung.
Weitere KI-Kunden
Claude Desktop ist einer von mehreren MCP-kompatiblen Clients, die eine Verbindung zu MemberPress herstellen. Das Vorgehen ist bei allen gleich; lediglich die Schritte auf der Client-Seite unterscheiden sich. Die MCP-Einrichtungsassistent Versanddetails für vier weitere Kunden:
- Cursor;
- VS Code (über GitHub Copilot);
- Windsurfen;
- Claude-Code (die CLI).
Die AI-Clients mit MemberPress verbinden Die Entwicklerdokumentation behandelt jeden einzelnen davon, zusammen mit dem gesamten Vokabular sowie den OAuth- und Bearer-Token-Abläufen.
Zusammenfassung
Installieren Sie AI Foundation von MemberPress > Add-ons, und legen Sie anschließend die Zugriffsebene in MCP-Einstellungen. Führen Sie das MCP-Einrichtungsassistent Um die Server-URL zu kopieren, fügen Sie in Claude Desktop einen benutzerdefinierten Konnektor hinzu und bestätigen Sie die Autorisierung. Die Verbindung wird dann in Mit MCP verbundene Clients, wo Sie diese auch widerrufen können. Um die Zugriffsebene einer Verbindung zu ändern, trennen Sie die Verbindung, erhöhen oder senken Sie die Zugriffsebene, stellen Sie die Verbindung wieder her und widerrufen Sie die alte Zeile.










 DE
DE  EN
EN  ES
ES  FR
FR  PT
PT 