

MemberPress AI Foundation permet à la Claude Desktop L'application communique avec un site MemberPress. Une fois connectée, Claude Desktop lit les données MemberPress et exécute des tâches courantes par le biais d'une conversation ordinaire, sans que personne n'ait à écrire de code.
Ce guide accompagne l'administrateur du site tout au long du processus de configuration. Il explique comment installer le module complémentaire AI Foundation, puis comment connecter Claude Desktop à l'aide de l'assistant de configuration. Assistant de configuration MCP et le Connecteurs de bureau Claude panneau de configuration. Aucun fichier de configuration n'est modifié à aucun moment.
Ce que cette configuration offre
Une application Claude Desktop connectée peut consulter les informations relatives aux membres, aux adhésions, aux transactions, aux abonnements, aux formations et à d'autres données MemberPress. Lorsque l'accès en écriture est activé, elle peut également effectuer des actions courantes telles que la création de membres, le traitement des remboursements ou la gestion des abonnements.
La connexion utilise le Protocole de contexte de modèle (MCP). Le MCP est une norme ouverte qui permet aux clients d'IA d'accéder à des données externes via une interface prévisible. AI Foundation intègre un serveur MCP au sein de MemberPress. Claude Desktop se connecte à ce serveur une fois que l'administrateur l'a autorisé.
Les Présentation et guide d'installation de MemberPress AI Foundation aborde plus en détail le protocole, le serveur et les périmètres disponibles.
Avant de commencer
Le site doit répondre à ces exigences pour que la connexion fonctionne :
- Un projet Installation de MemberPress sur WordPress 6.5 ou une version ultérieure ;
- Une licence MemberPress active (nécessaire pour télécharger le module complémentaire AI Foundation) ;
- PHP 8.0 ou une version ultérieure sur le serveur (la plupart des formules d'hébergement actuelles répondent à cette exigence) ;
- Un système actif Claude Desktop installation sur l'ordinateur de l'administrateur.
Installation de MemberPress AI Foundation
AI Foundation s'installe via le processus standard d'installation des modules complémentaires MemberPress.
Installation standard
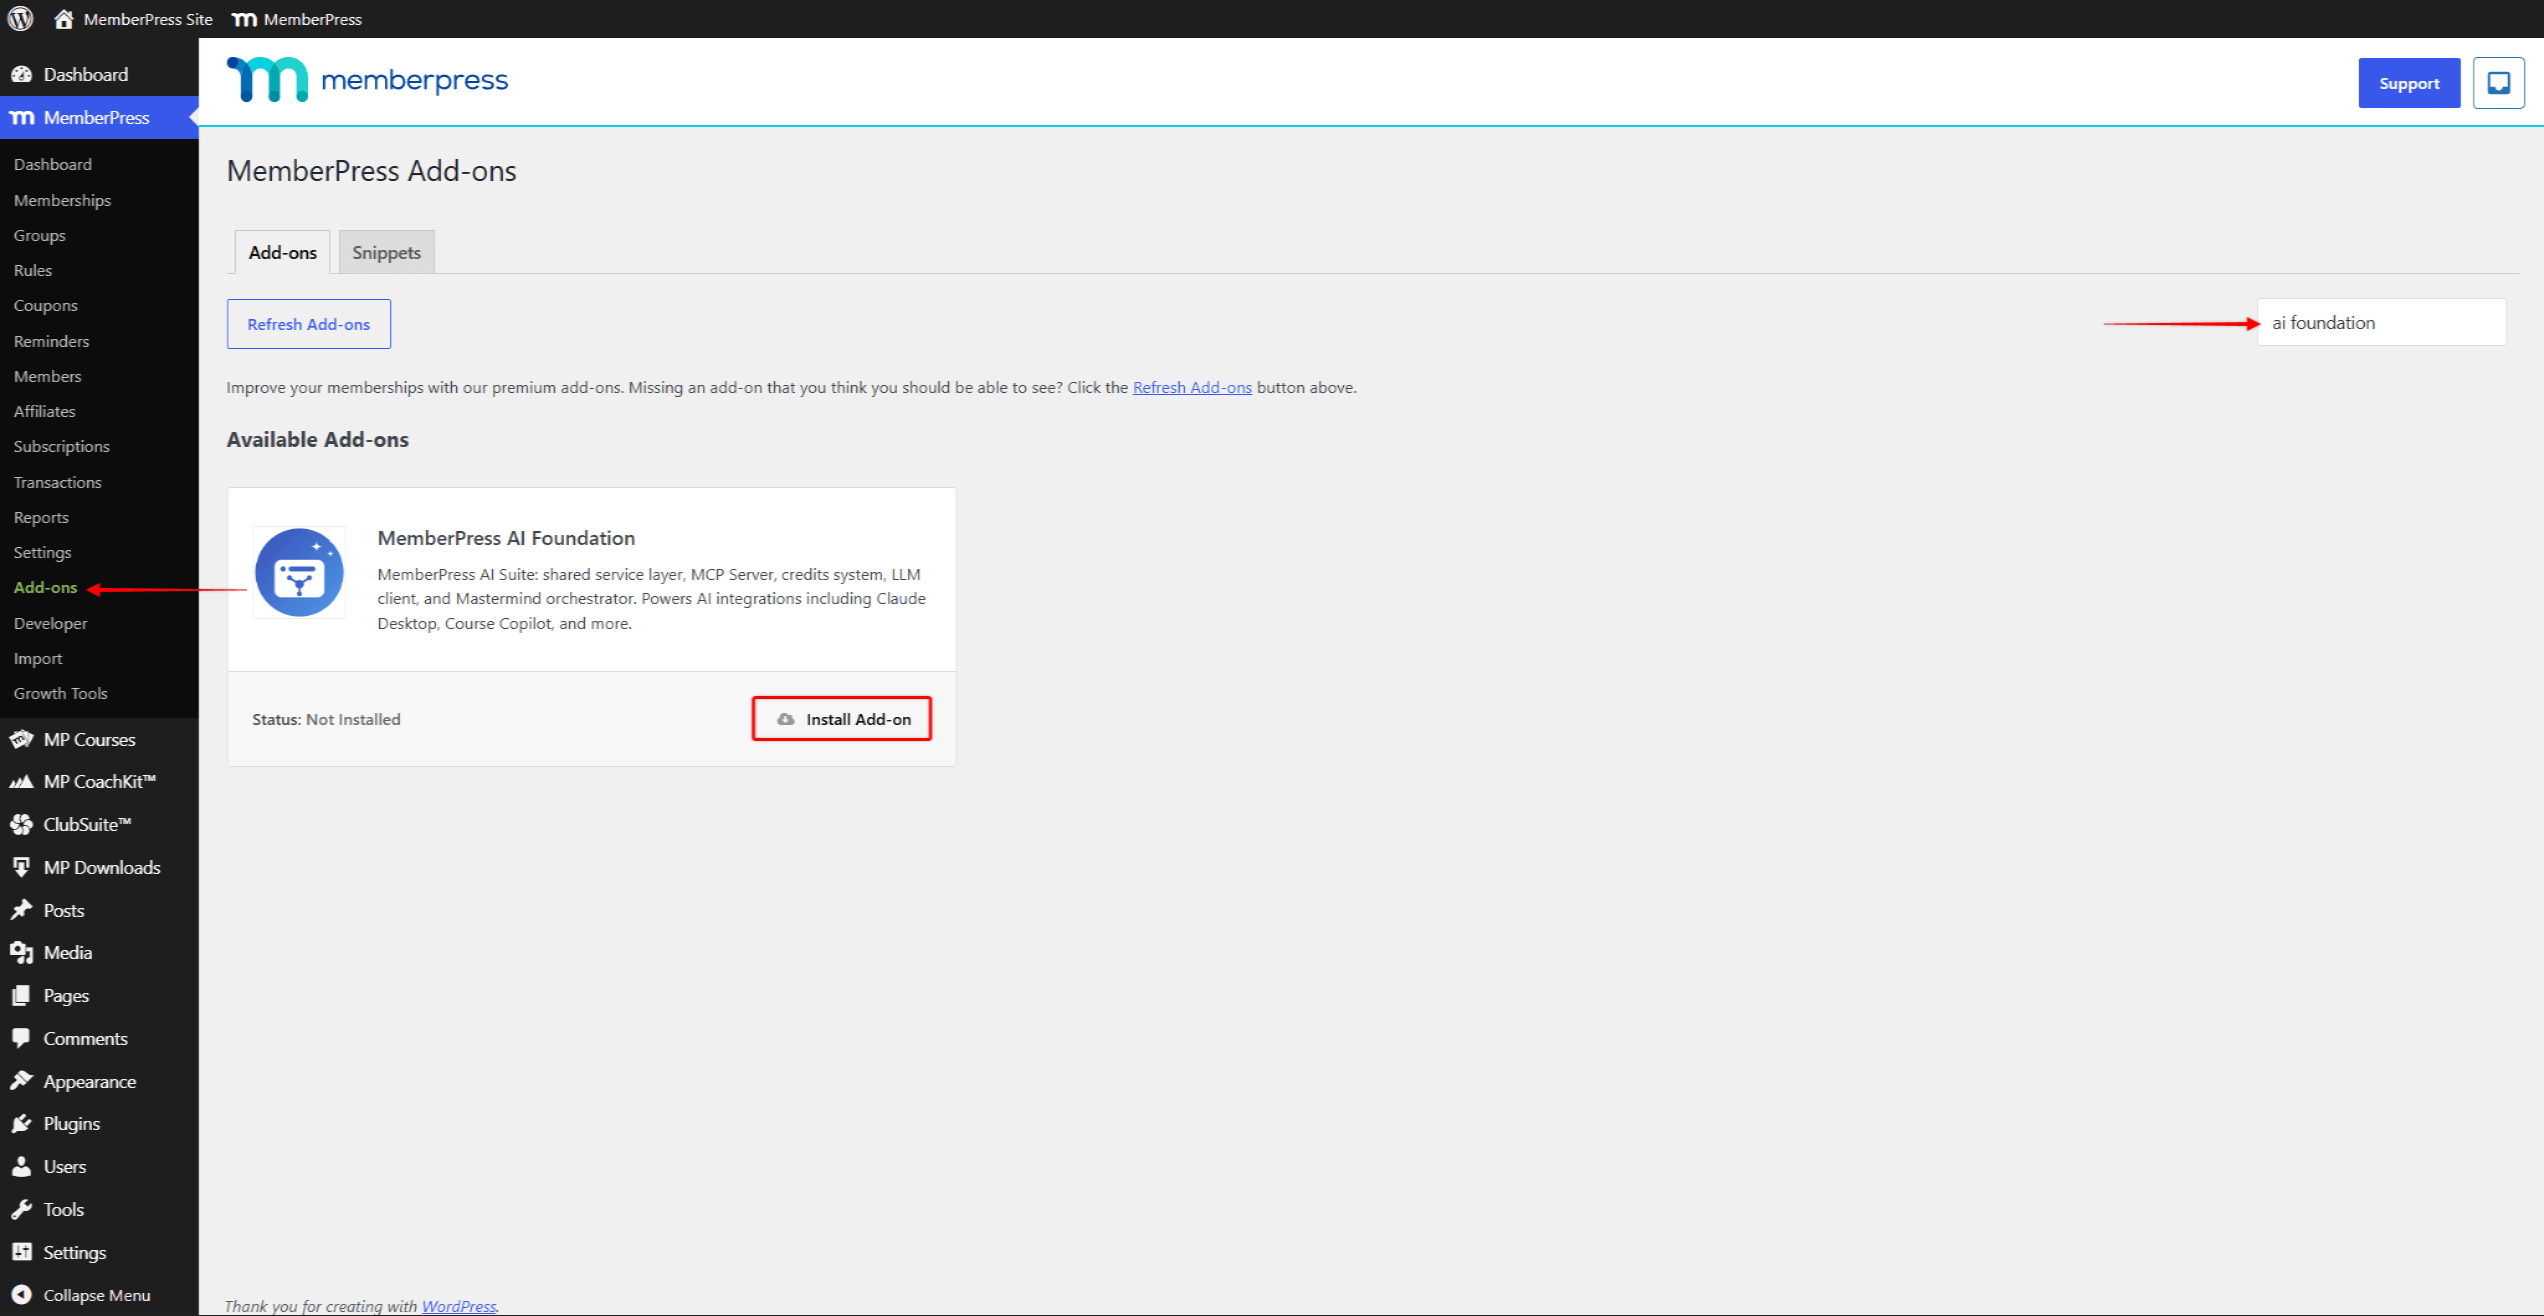
- Vérifiez que la licence MemberPress est active à l'adresse MemberPress > Paramètres > Licence;
- Naviguez jusqu'à MemberPress > Modules complémentaires;
- Localiser le Fondation pour l'IA carte ;
- Cliquez sur Installer le module complémentaire. Le plugin se télécharge et s'active automatiquement ;
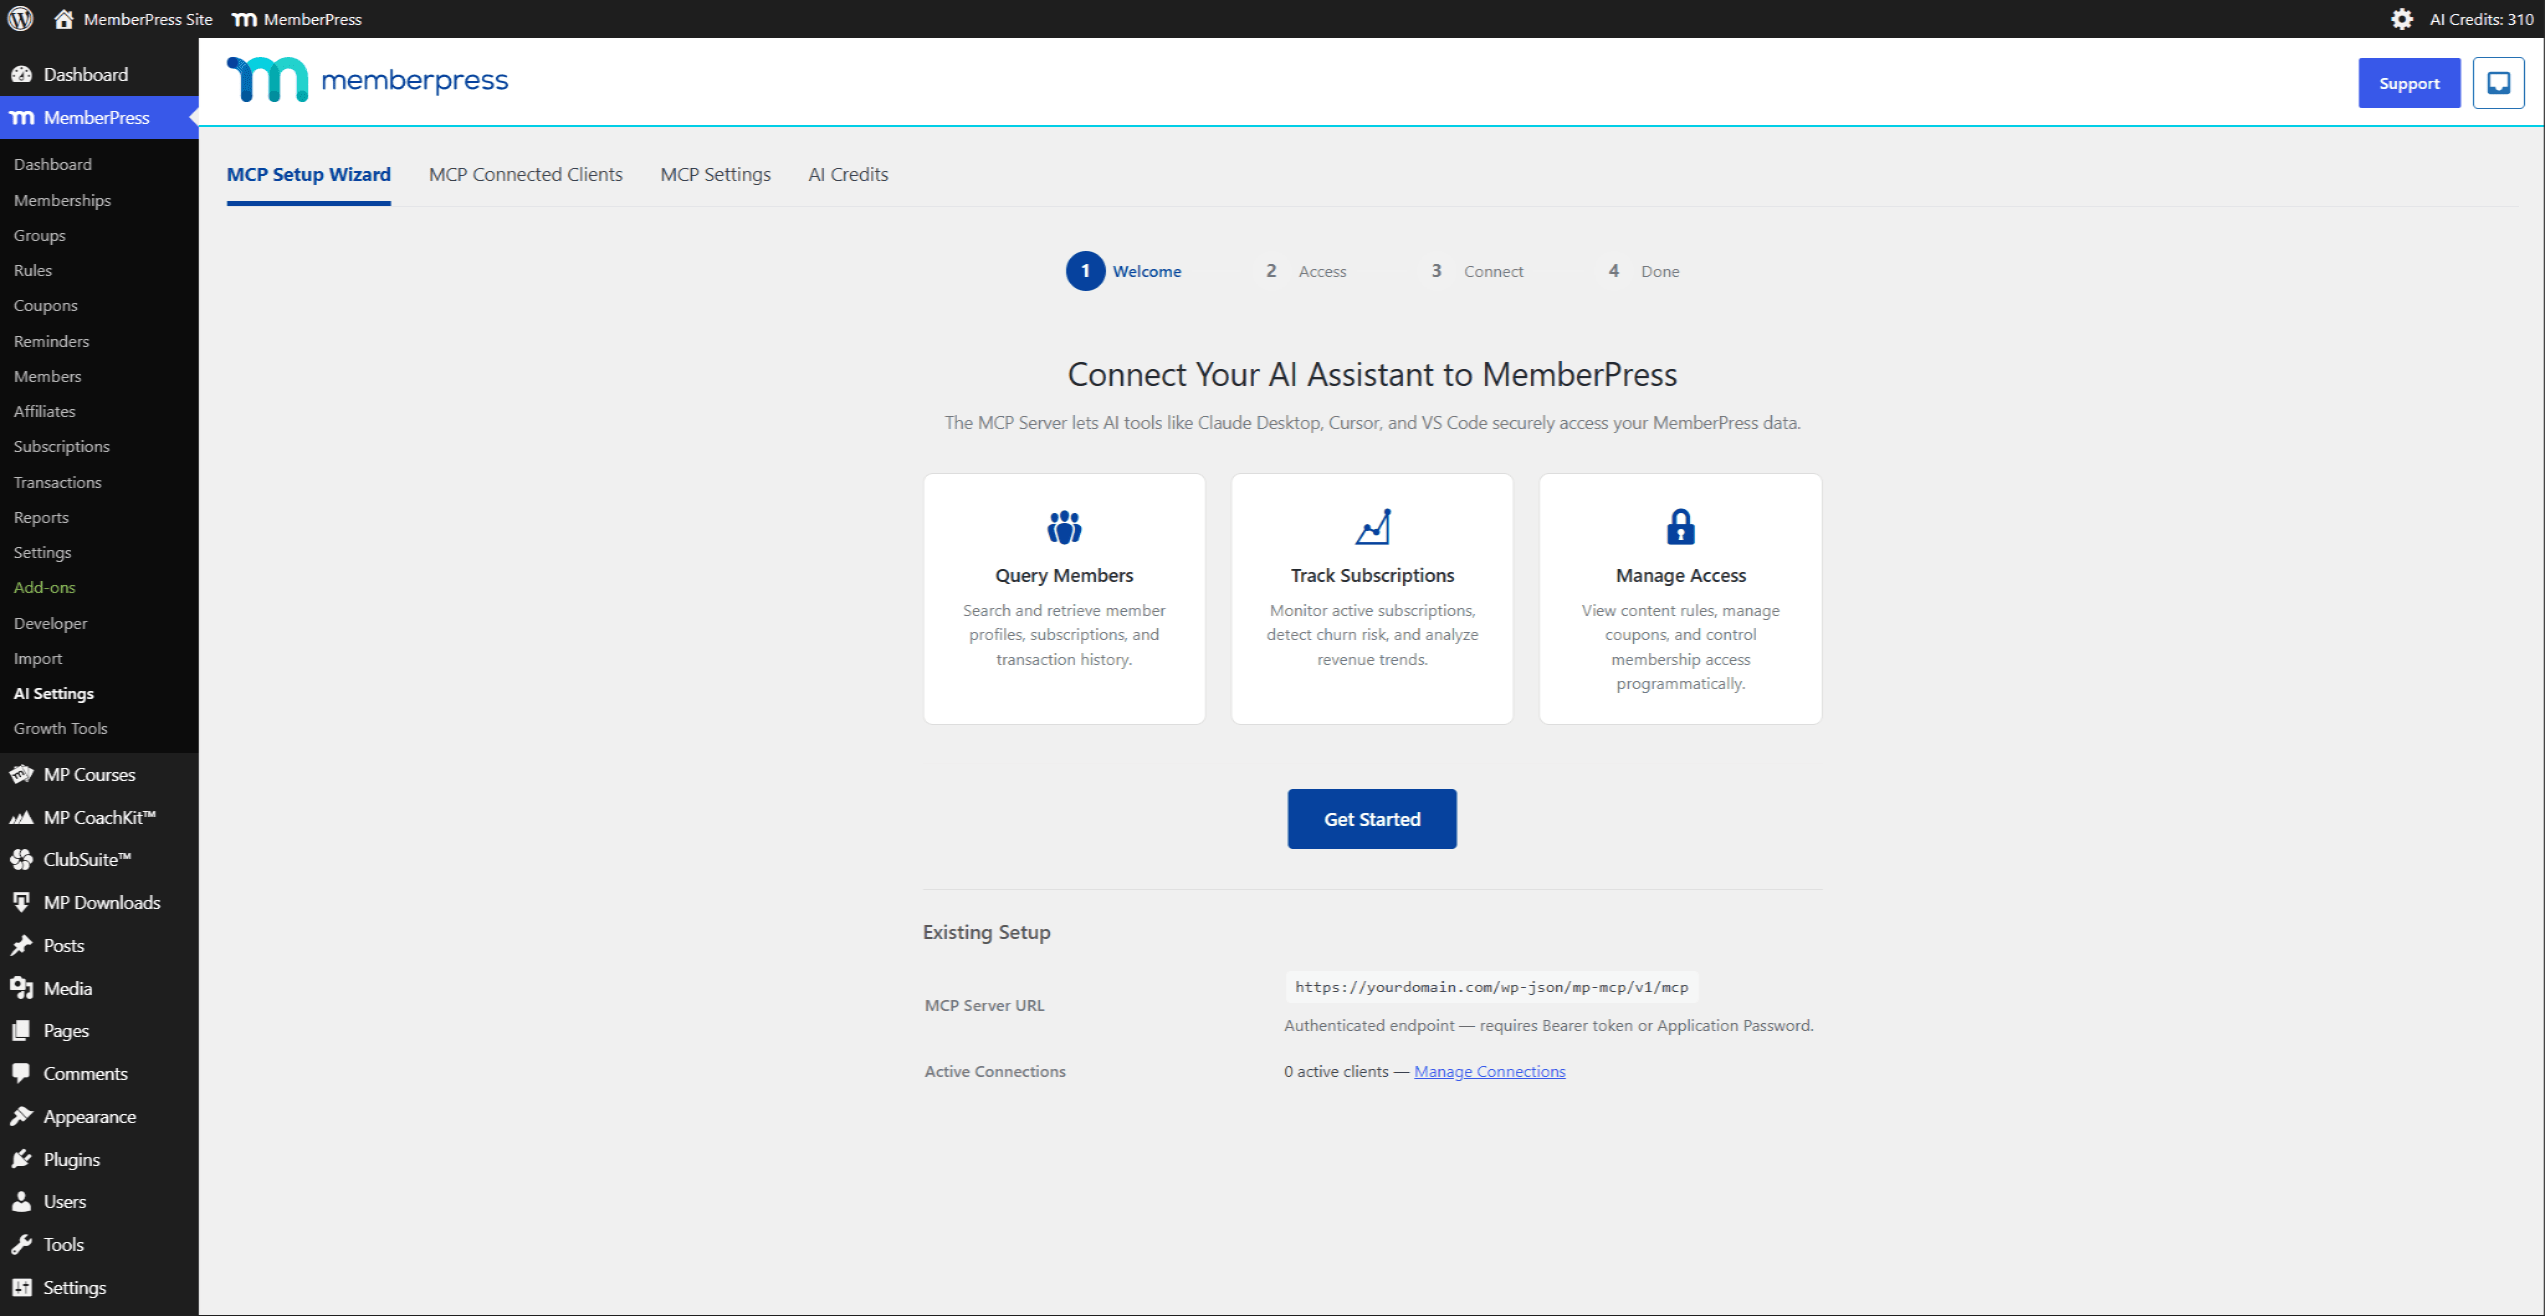
- Confirmez que Paramètres IA apparaît dans la barre latérale d'administration de WordPress sous MemberPress.
Installation manuelle
Utilisez cette méthode lorsque le site ne peut pas accéder directement aux serveurs de téléchargement MemberPress :
- Téléchargez le plugin AI Foundation depuis le Portail de gestion de compte MemberPress;
- Dans WordPress, accédez à Plugins > Ajouter un nouveau plugin > Upload Plugin;
- Sélectionnez le fichier ZIP téléchargé, puis cliquez sur Installer maintenant;
- Cliquez sur Activer le plugin.
Vérification de l'installation
Une fois l'activation effectuée, vérifiez deux points :
- MemberPress > Paramètres IA apparaît dans la barre latérale d'administration ;
- Assistant de configuration MCP Il s'agit du premier onglet de la page « Paramètres IA ».
Si l'une ou l'autre de ces vérifications échoue, cela signifie que le plugin ne s'est pas activé correctement. Voir Erreurs MCP et dépannage pour les étapes du diagnostic.
Les onglets « Paramètres IA »
Les Tableau de bord > MemberPress > Paramètres IA Cette page comporte quatre onglets. Les trois premiers permettent de configurer la connexion :
- Assistant de configuration MCP — accompagne chaque nouvelle connexion à travers quatre étapes ;
- Clients connectés à MCP — répertorie toutes les connexions actives et les interrompt ;
- Paramètres MCP — définit le niveau d'accès qui limite les possibilités offertes par les nouvelles connexions.
Le quatrième onglet, Crédits IA, gère le solde créditeur des fonctionnalités d'IA propres à MemberPress. Voir Crédits IA ci-dessous.
Définissez d'abord le niveau d'accès
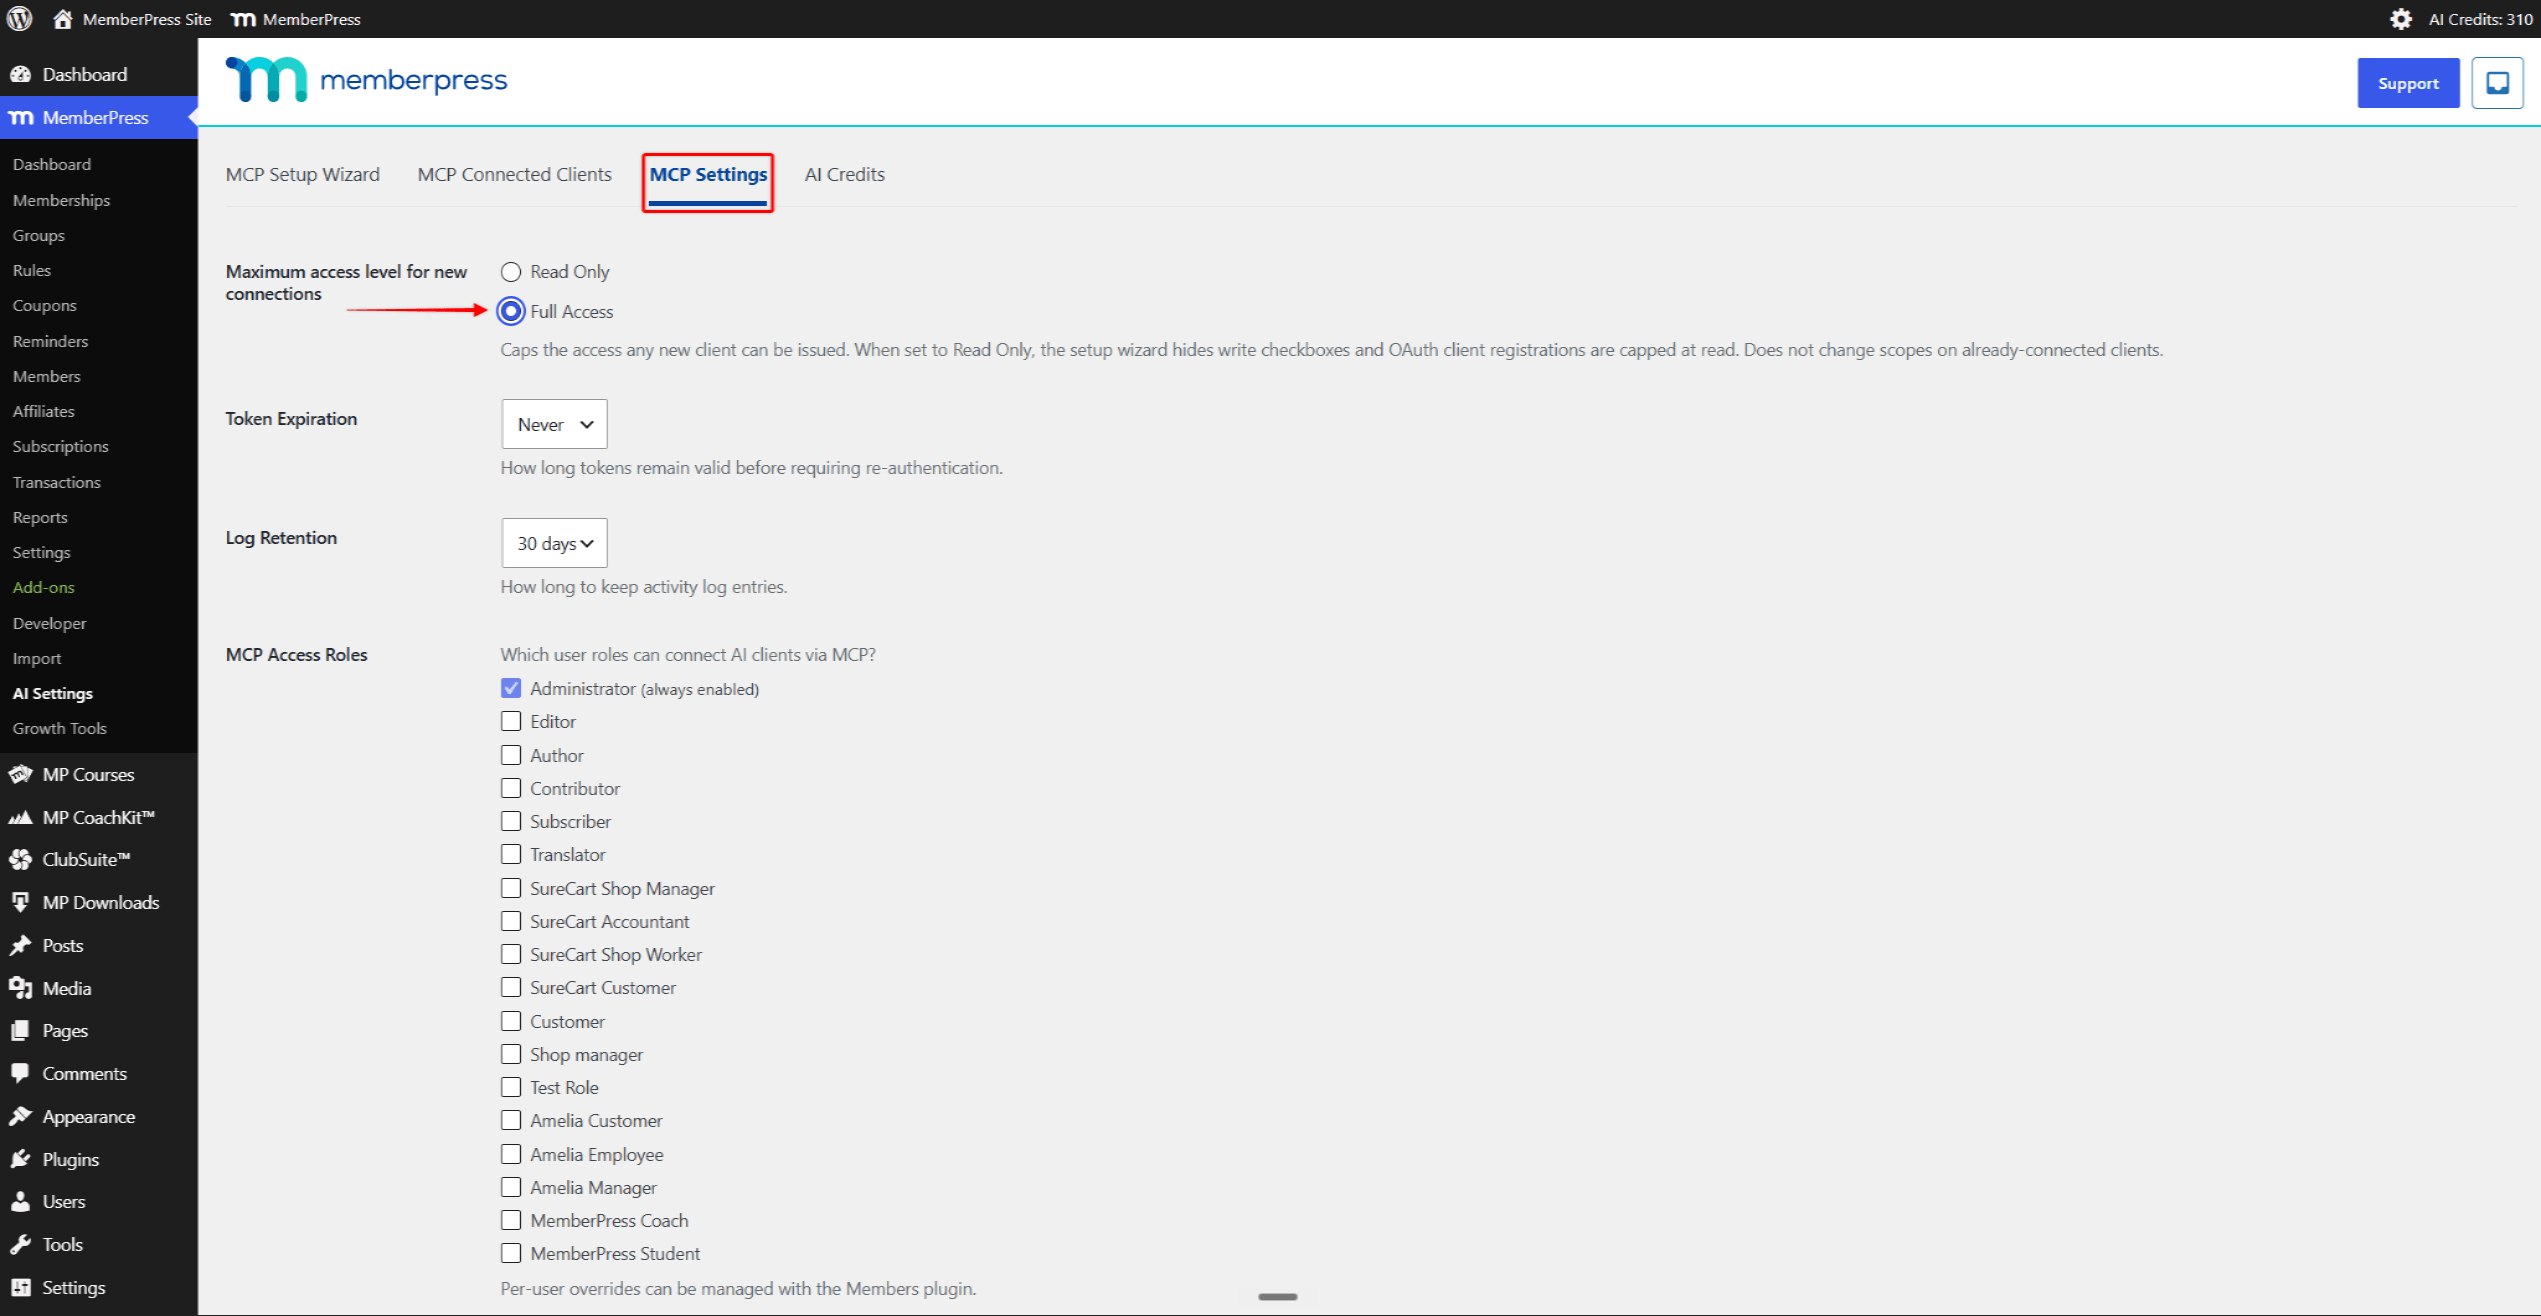
Le niveau d'accès se trouve dans Paramètres MCP, et non dans l'assistant. Cela limite ce que n'importe quel nouveau que la connexion peut demander. Deux options sont possibles :
- Lecture seule — les nouvelles connexions ne peuvent lire que les données MemberPress ;
- Accès complet — Les nouvelles connexions peuvent lire des données et effectuer des opérations d'écriture, telles que la création de membres ou le traitement des remboursements.
Le niveau d'accès est le seul paramètre qui détermine si les portées d'écriture sont proposées ou non pendant la connexion. Définissez-le avant lancer l'assistant.
Pour définir le niveau d'accès :
- Naviguez jusqu'à Tableau de bord > MemberPress > Paramètres IA > Paramètres MCP;
- Choisir Lecture seule ou Accès complet sous “ Niveau d'accès maximal pour les nouvelles connexions ”;
- Cliquez sur Mettre à jour les paramètres.
Connexion à Claude Desktop
La connexion s'étend sur deux surfaces : la Assistant de configuration MCP dans WordPress et le Connecteurs panneau dans Claude Desktop. L'assistant, à l'adresse Tableau de bord > MemberPress > Paramètres IA > Assistant de configuration MCP, établit une nouvelle connexion à chaque exécution ; il peut donc être réutilisé dès qu'un autre client doit se connecter. Suivez les étapes dans l'ordre.
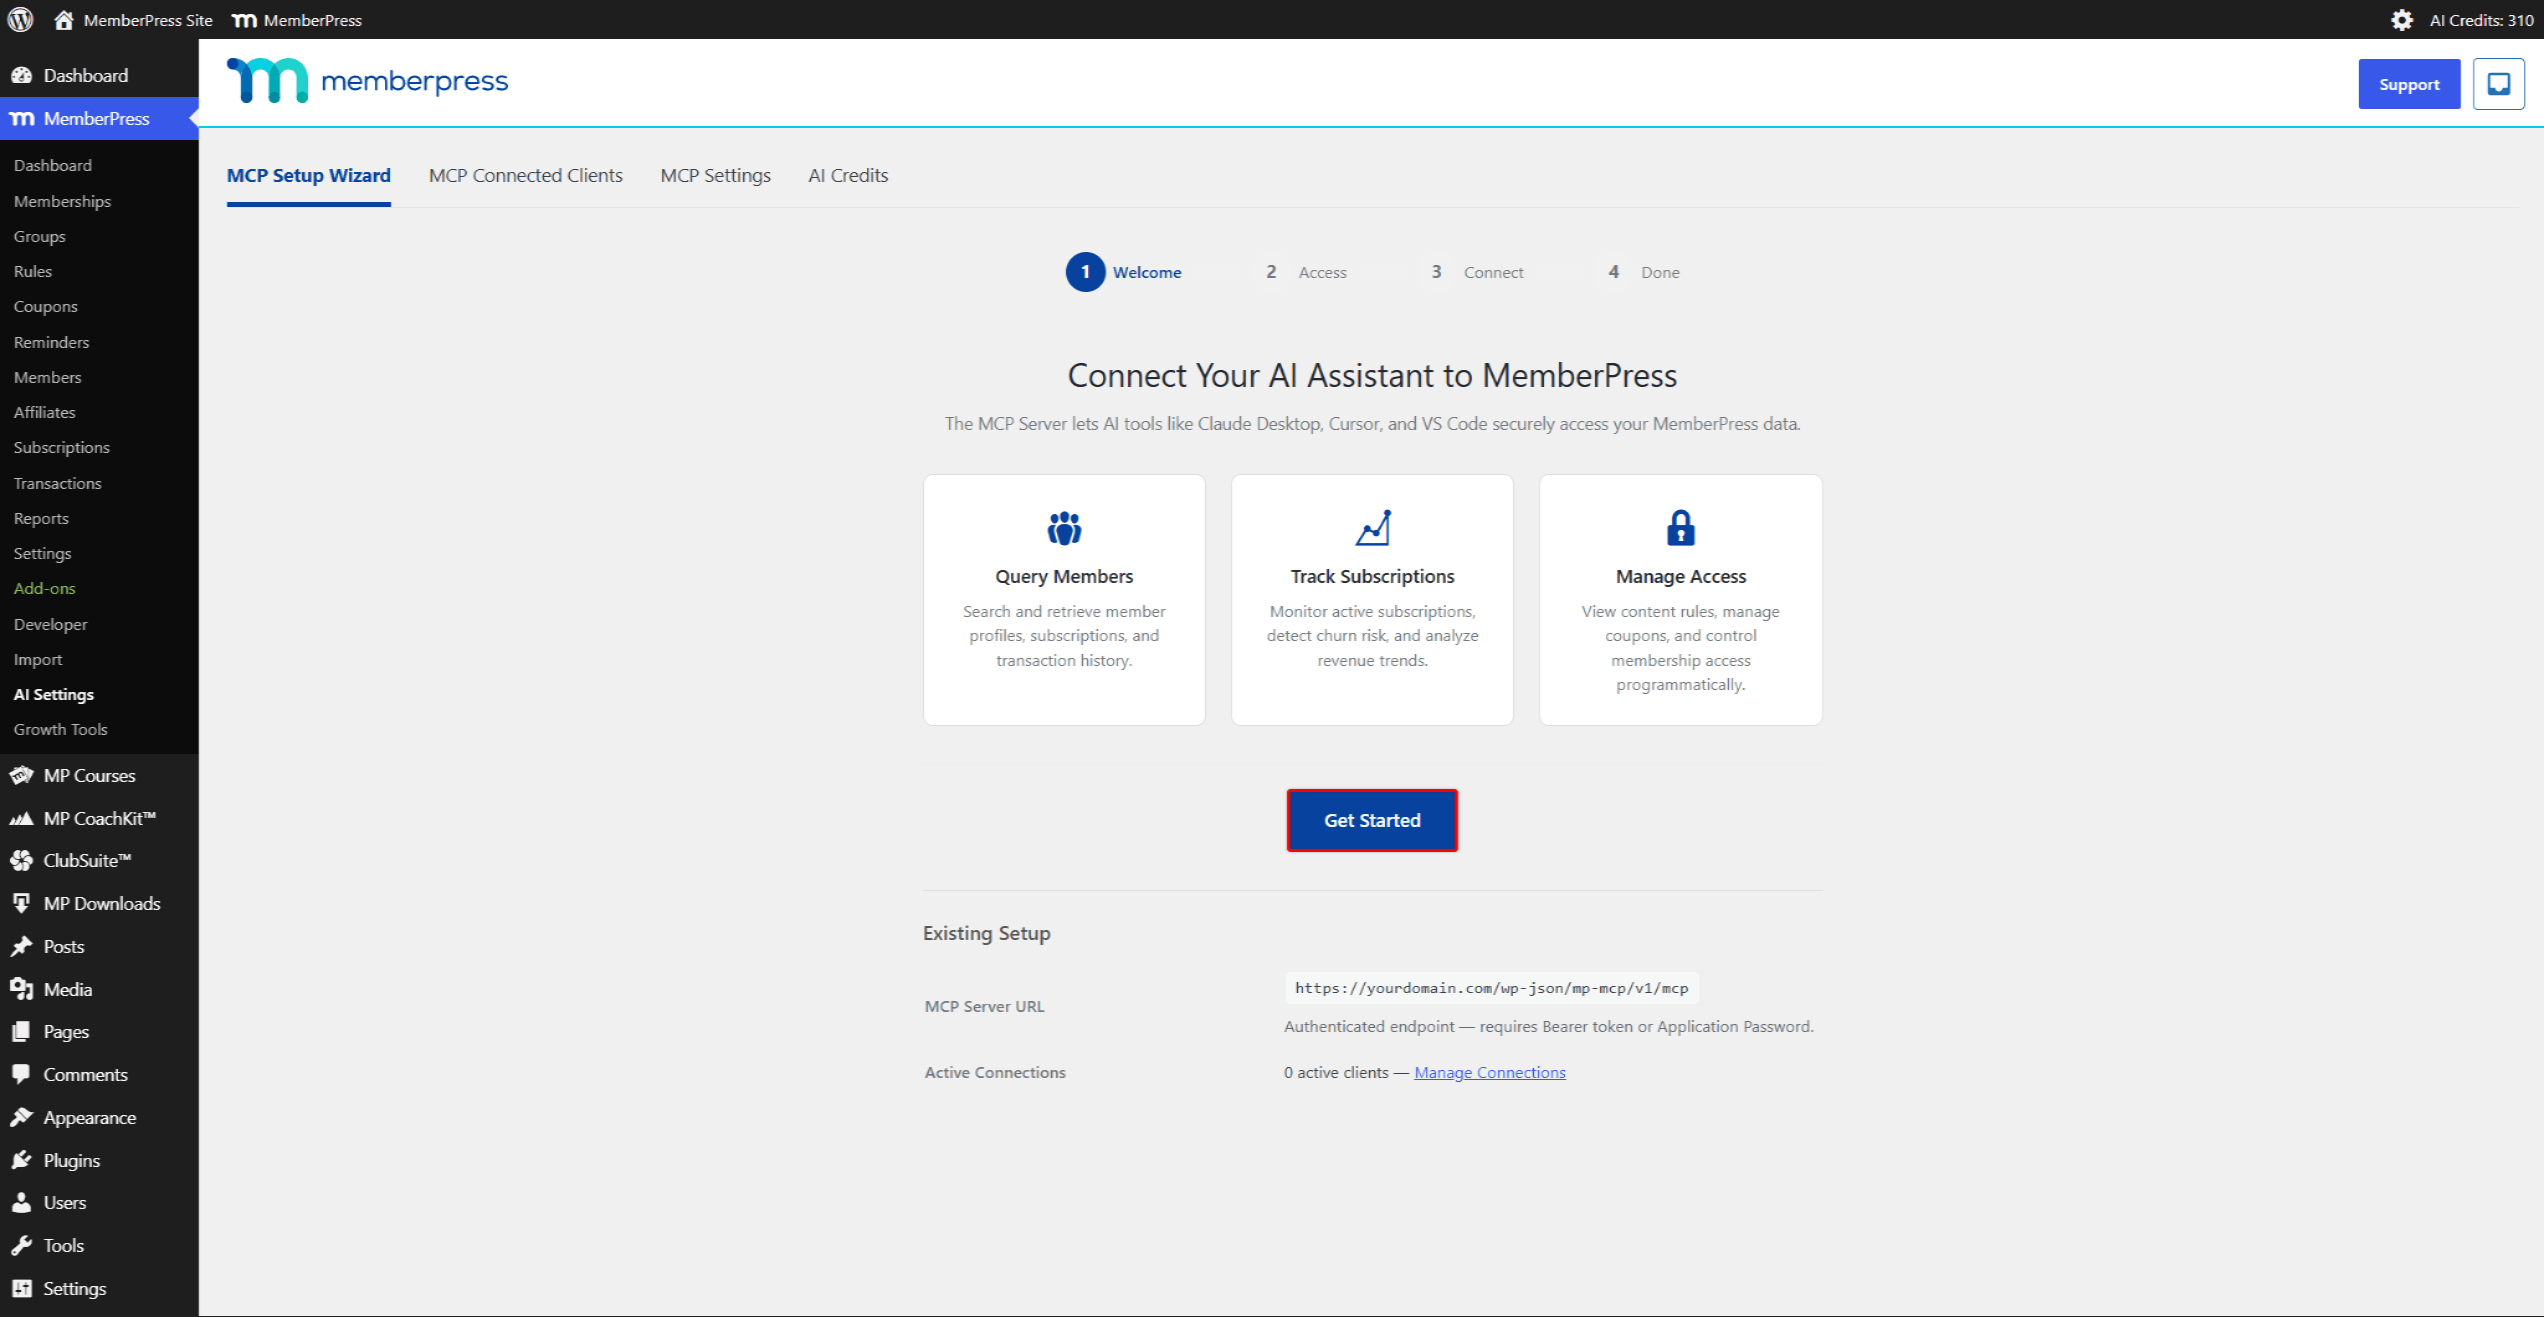
Étape 1 : Ouvrez l'assistant
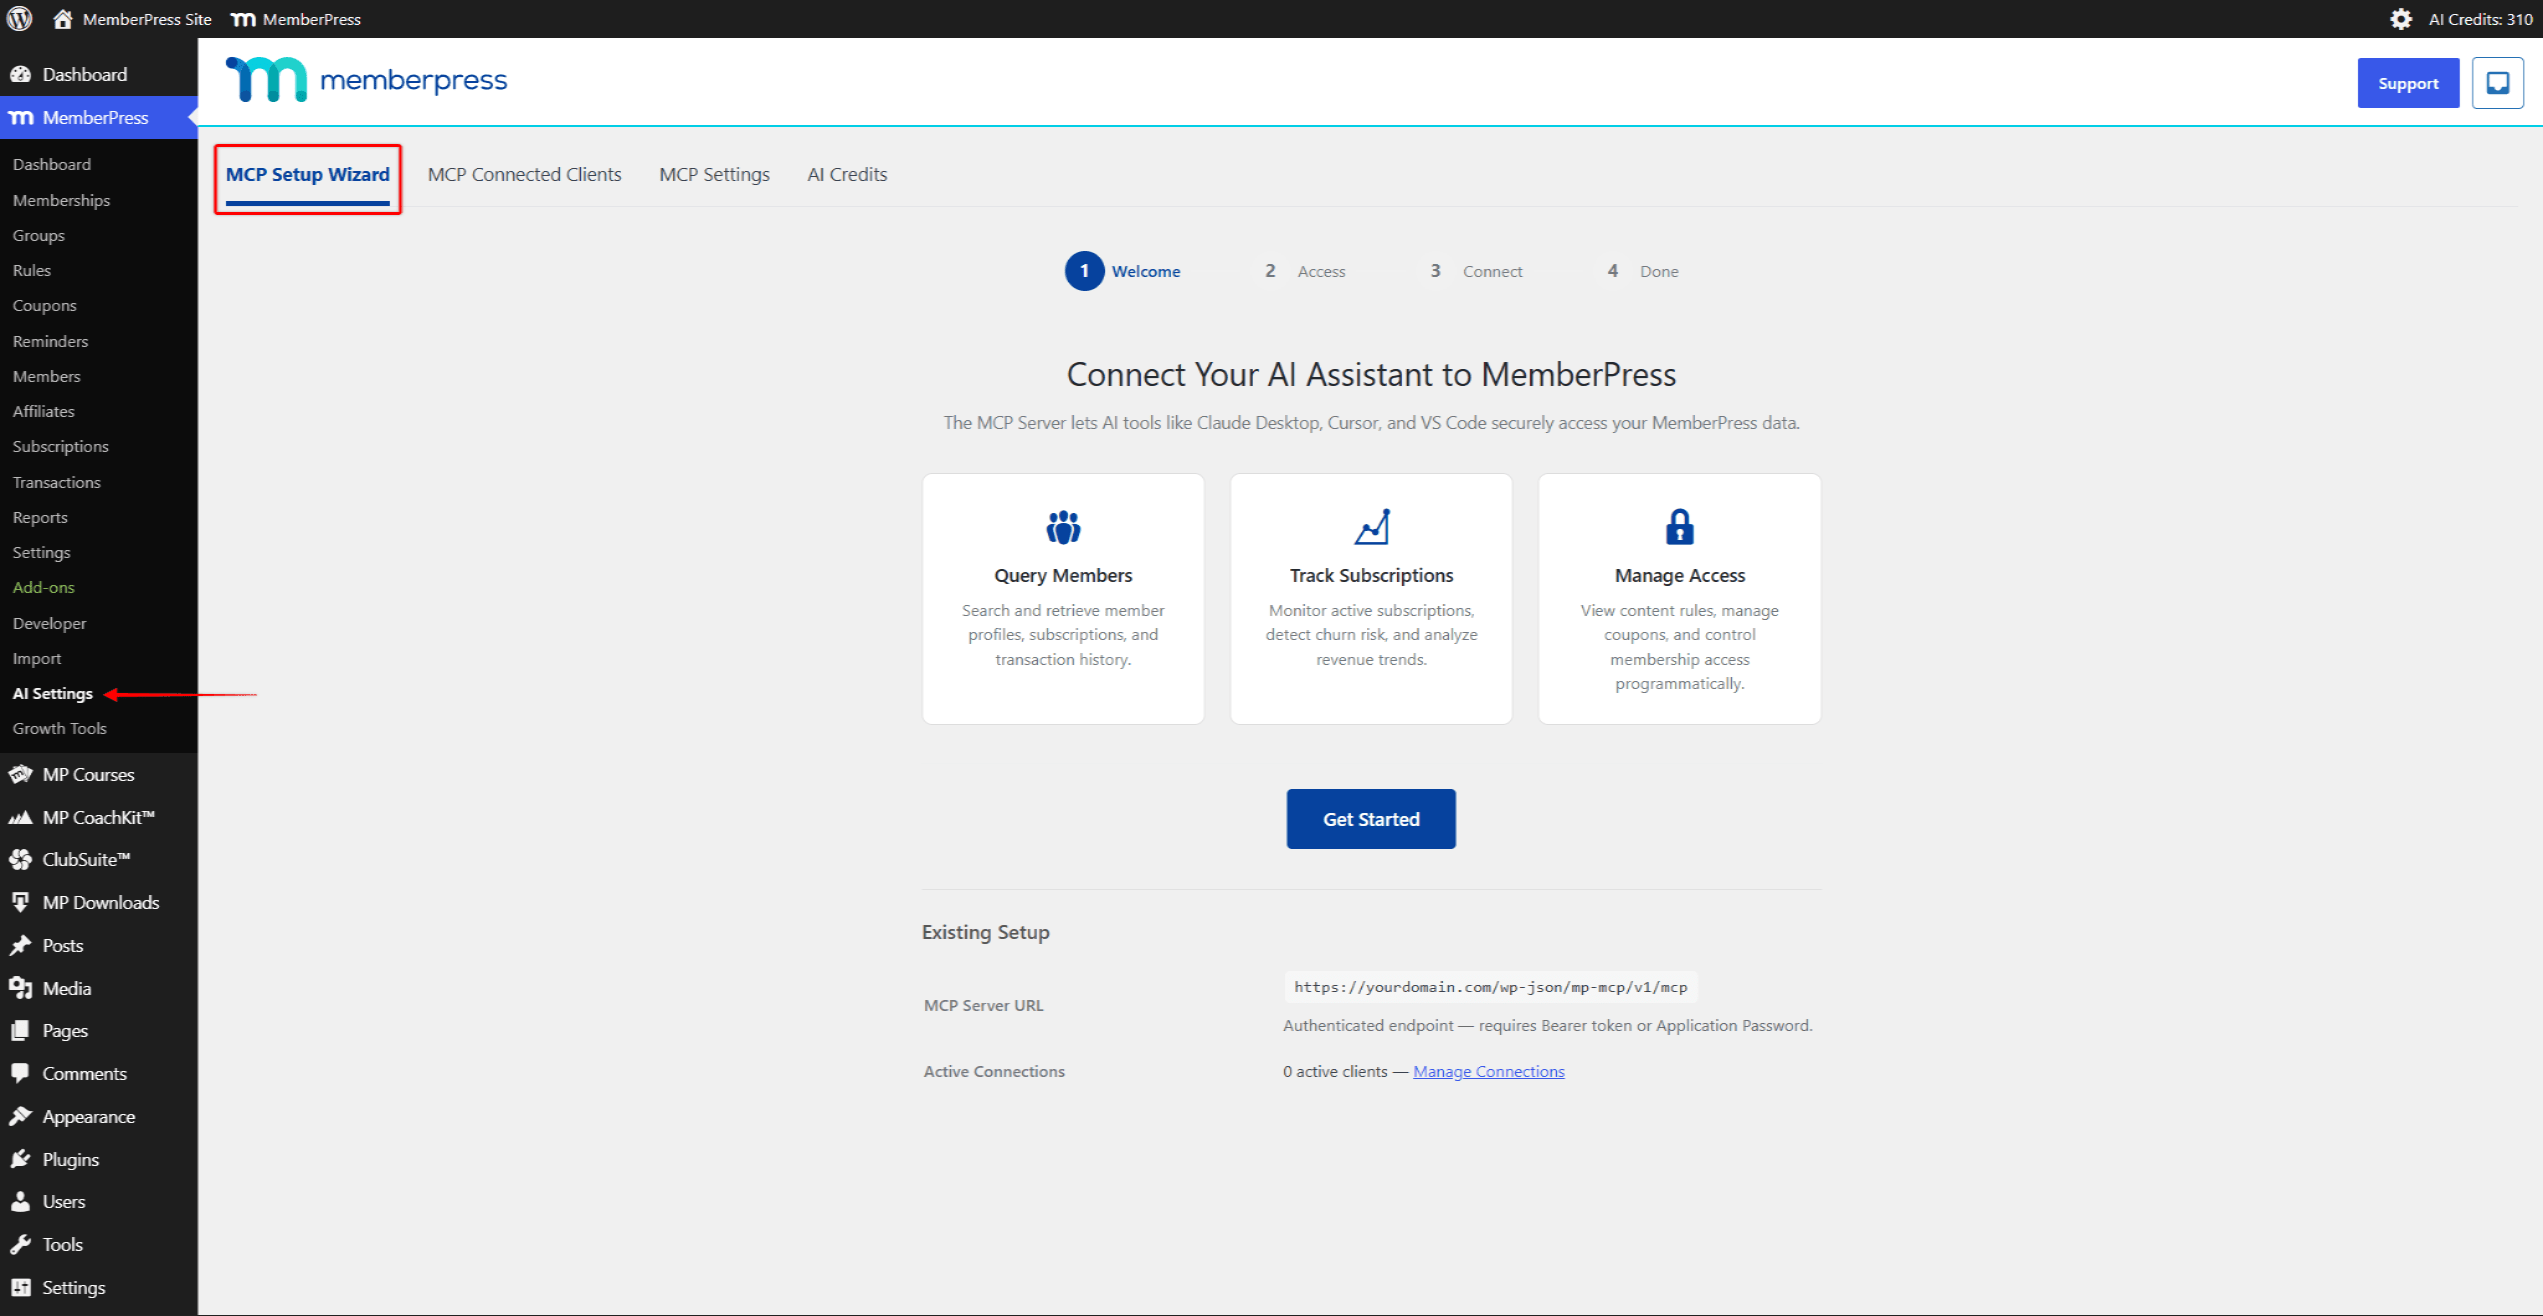
- Naviguez jusqu'à Tableau de bord > MemberPress > Paramètres IA > Assistant de configuration MCP;
- Examinez le Bienvenue écran, qui affiche les informations relatives au serveur MCP ainsi que les connexions existantes ;
- Cliquez sur Commencer.
Étape 2 : Vérifier le niveau d'accès
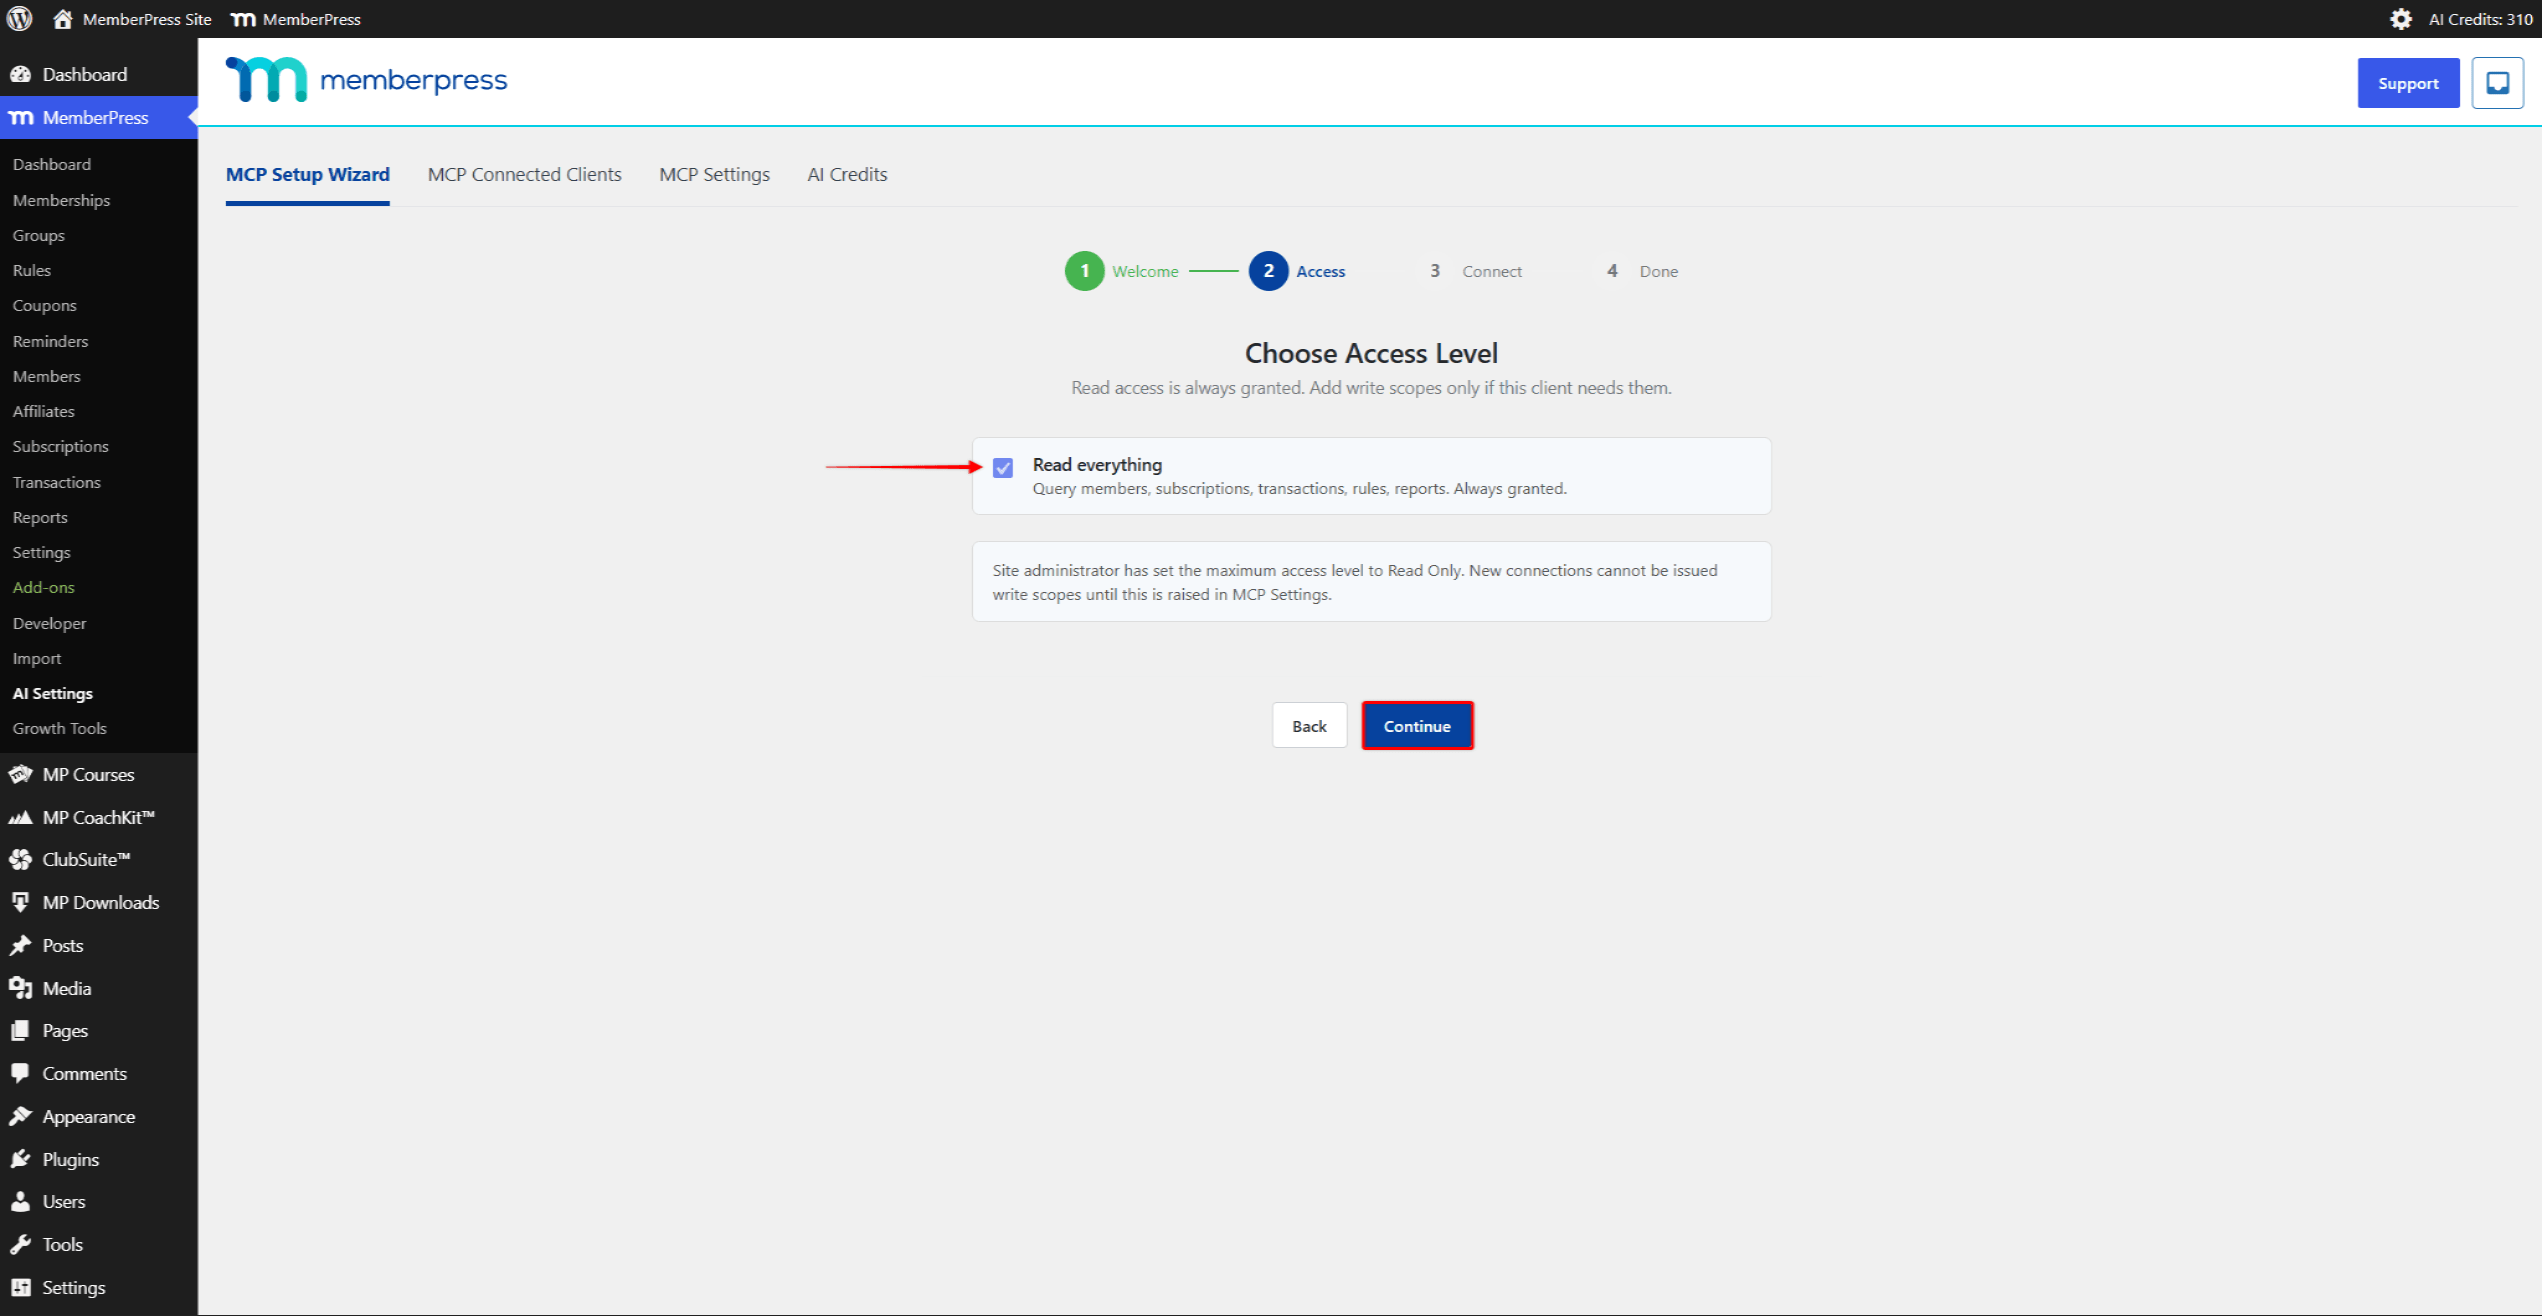
Le sorcier’s Accès étape : lecture “ Choisir le niveau d'accès ” et correspond au niveau d'accès défini dans les paramètres MCP. Il ne propose pas d'option « Lecture seule » ou « Accès complet » : ce choix a été effectué dans la section précédente.
Lorsque le niveau d'accès est « Lecture seule », cette étape affiche un seul champ d'application accordé :
- Tout lire — Interroger les membres, les abonnements, les transactions, les règles et les rapports. Accès toujours autorisé.
Un message indique que les portées d'écriture ne sont pas disponibles : “ L'administrateur du site a défini le niveau d'accès maximal sur ” Lecture seule ». Les nouvelles connexions ne peuvent pas se voir attribuer de droits d'écriture tant que ce paramètre n'aura pas été relevé dans les paramètres MCP. »
Lorsque le niveau d'accès est « Accès complet », cette étape ajoute des cases à cocher correspondant aux périmètres d'écriture, toutes cochées par défaut. Décochez les périmètres dont cette connexion n'a pas besoin :
- Modifier le contenu — Créer des règles d'accès et des bons de réduction ;
- Gérer les membres — Créer et mettre à jour les membres, gérer les sous-comptes d'entreprise ;
- Opérations de facturation (impact important) — Rembourser des transactions, annuler, suspendre ou réactiver des abonnements ;
- Importations en vrac (impact élevé) — Créer en masse des membres à partir d'un tableau JSON ;
- Gérer les webhooks — Créer et supprimer des webhooks, activer ou désactiver les rappels par e-mail ;
- Avancement du cours — Une fois les leçons terminées, réinitialiser la progression des élèves (nécessite le module complémentaire « Cours »).
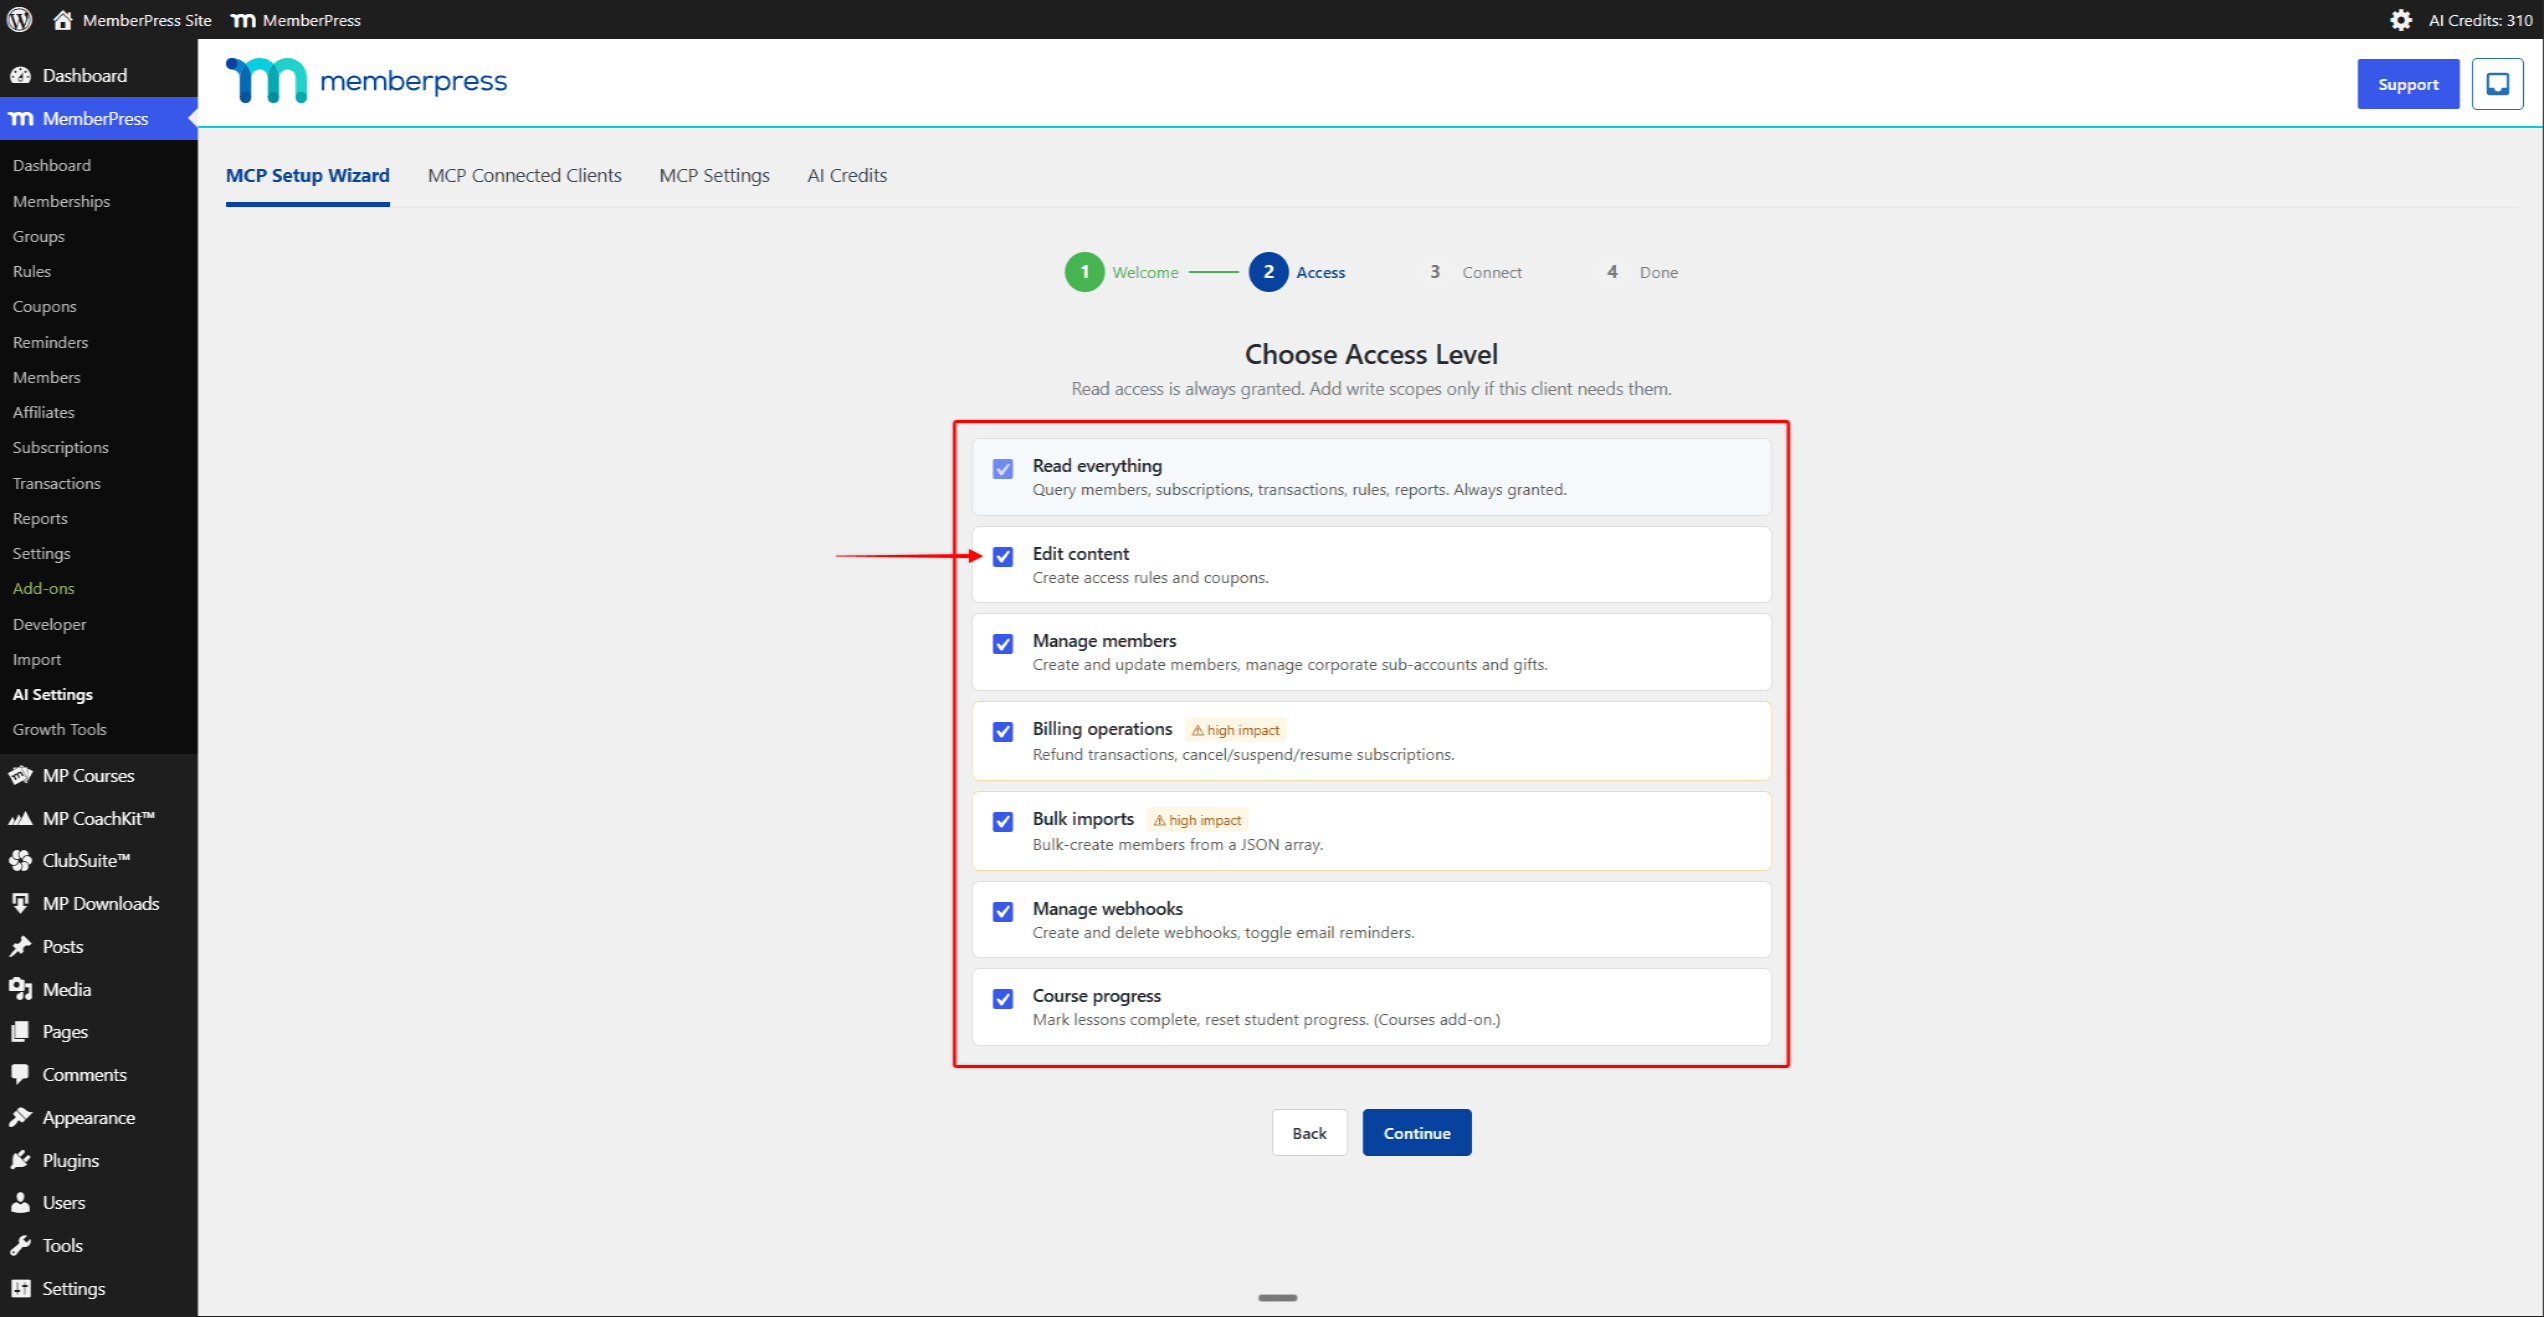
Cliquez sur Continuer pour passer à l'étape « Connect ».
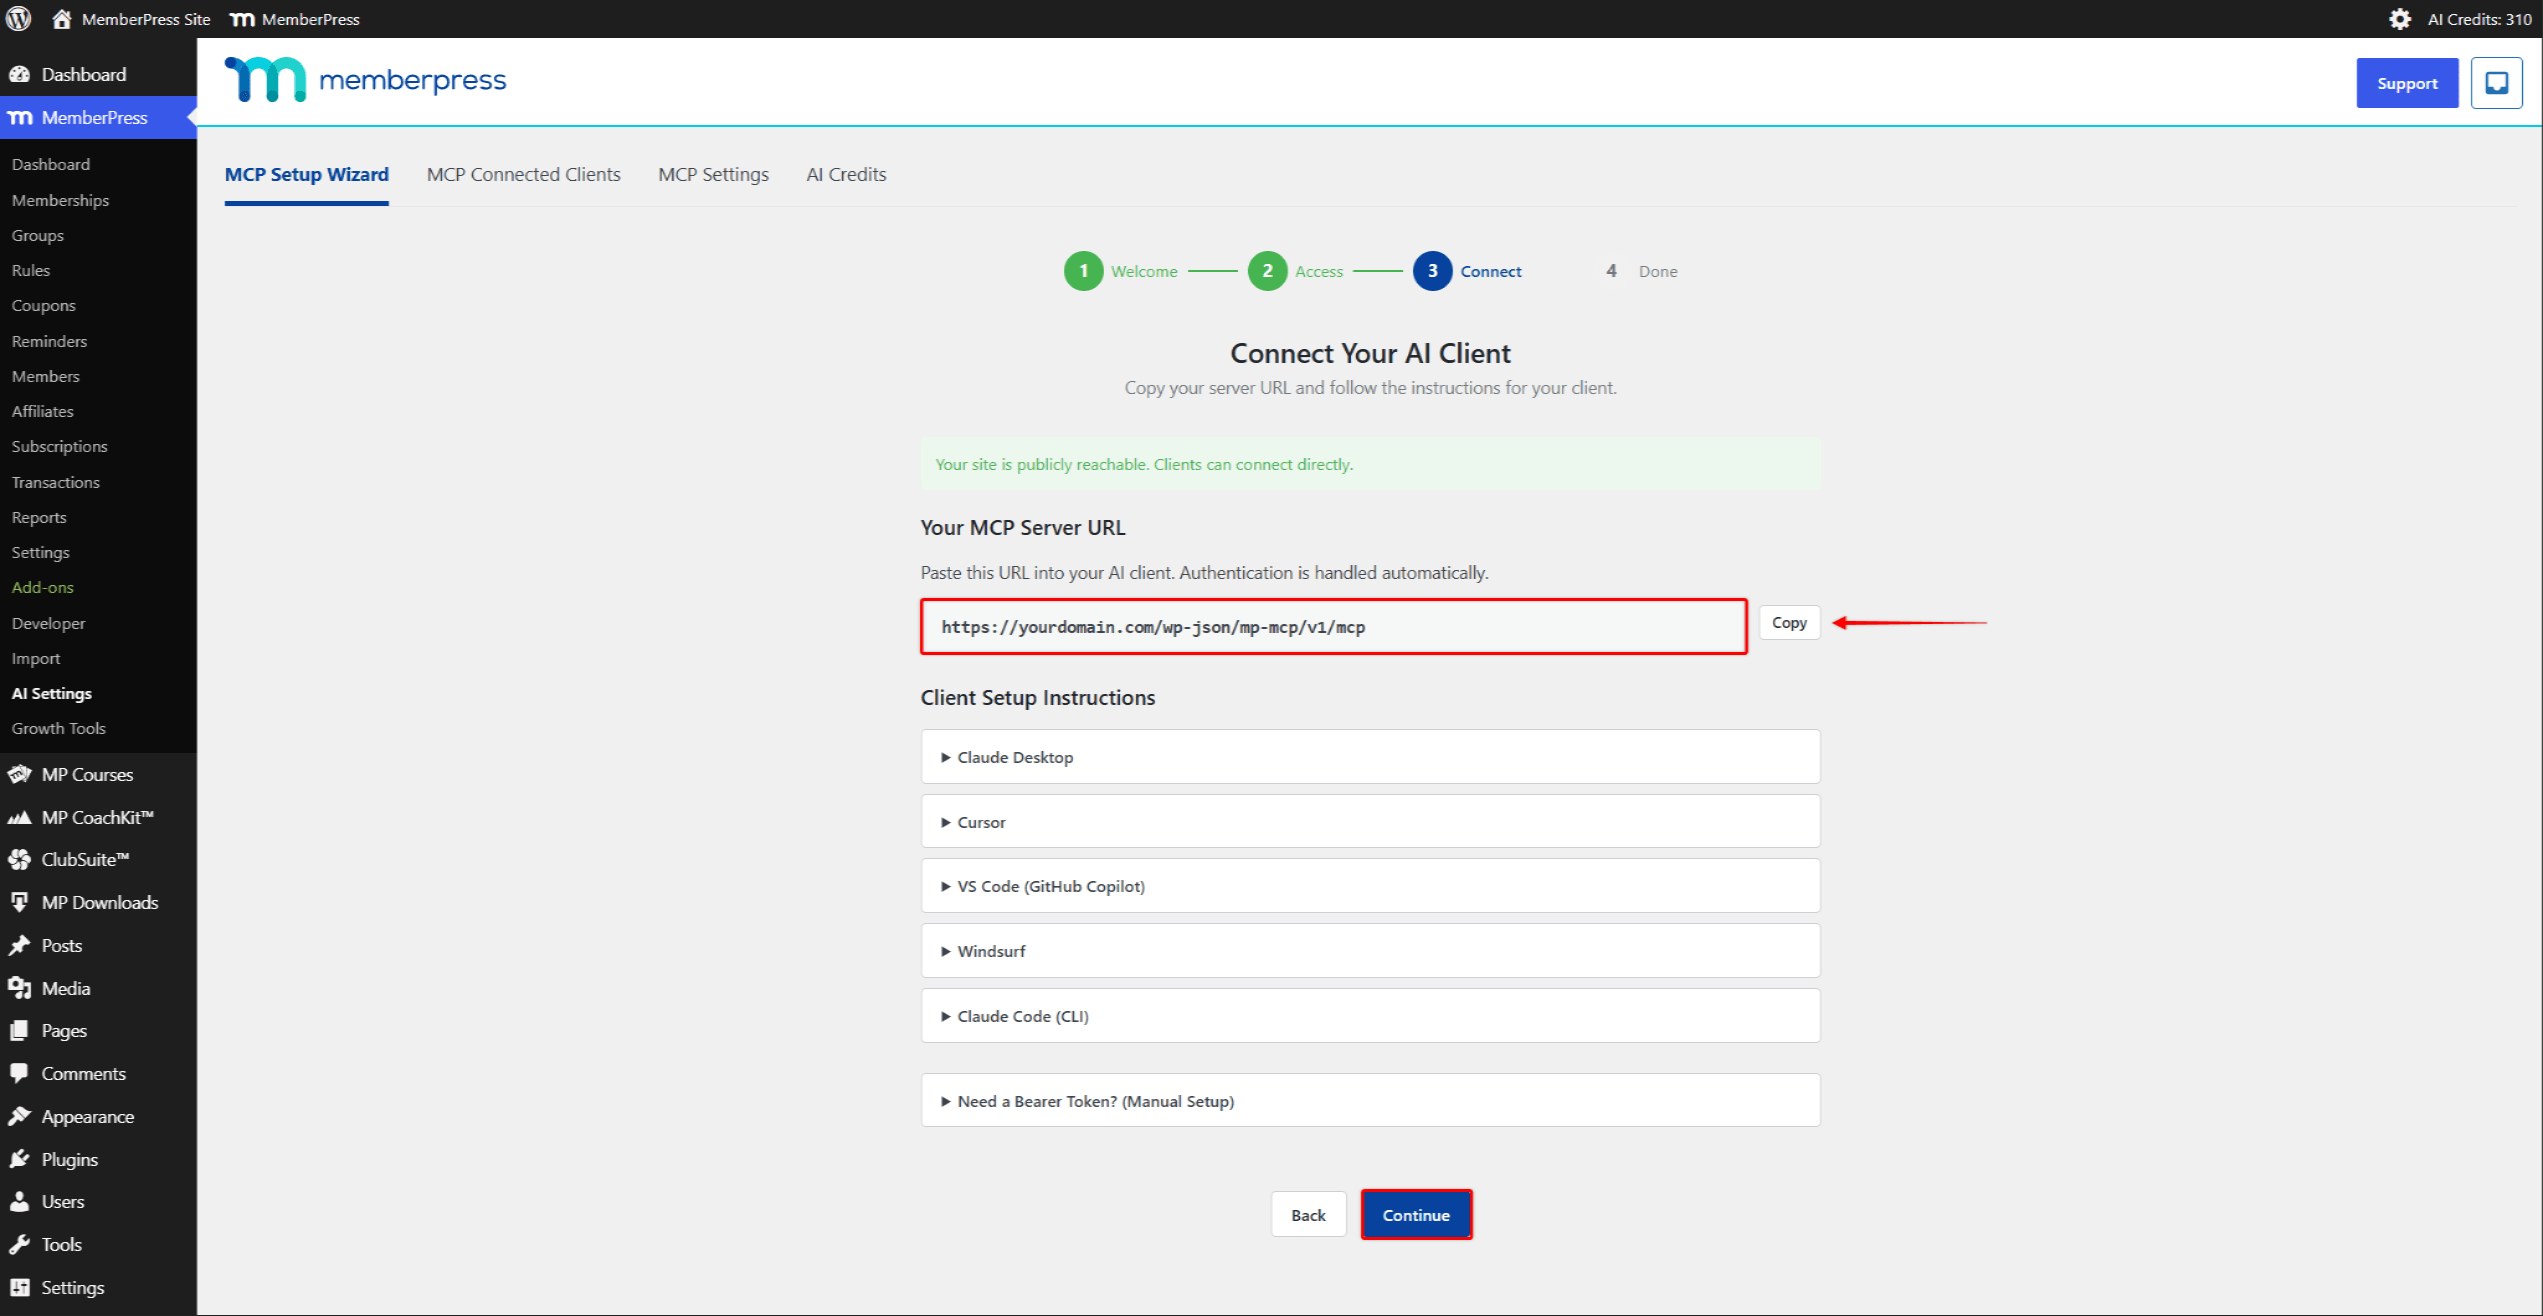
Étape 3 : Copiez l'URL du serveur
Le sorcier’s Connecter étape : lecture “ Connectez votre client IA ”. Il affiche l'URL du serveur MCP ainsi qu'un panneau pour chaque client pris en charge.
- Cliquez sur le bouton Copie à côté du bouton URL du serveur MCP;
- Laissez cet onglet WordPress ouvert. L'assistant se termine une fois que Claude Desktop a autorisé la connexion.
Étape 4 : Ajouter le connecteur dans Claude Desktop
Passez à l'application Claude Desktop sur le même ordinateur.
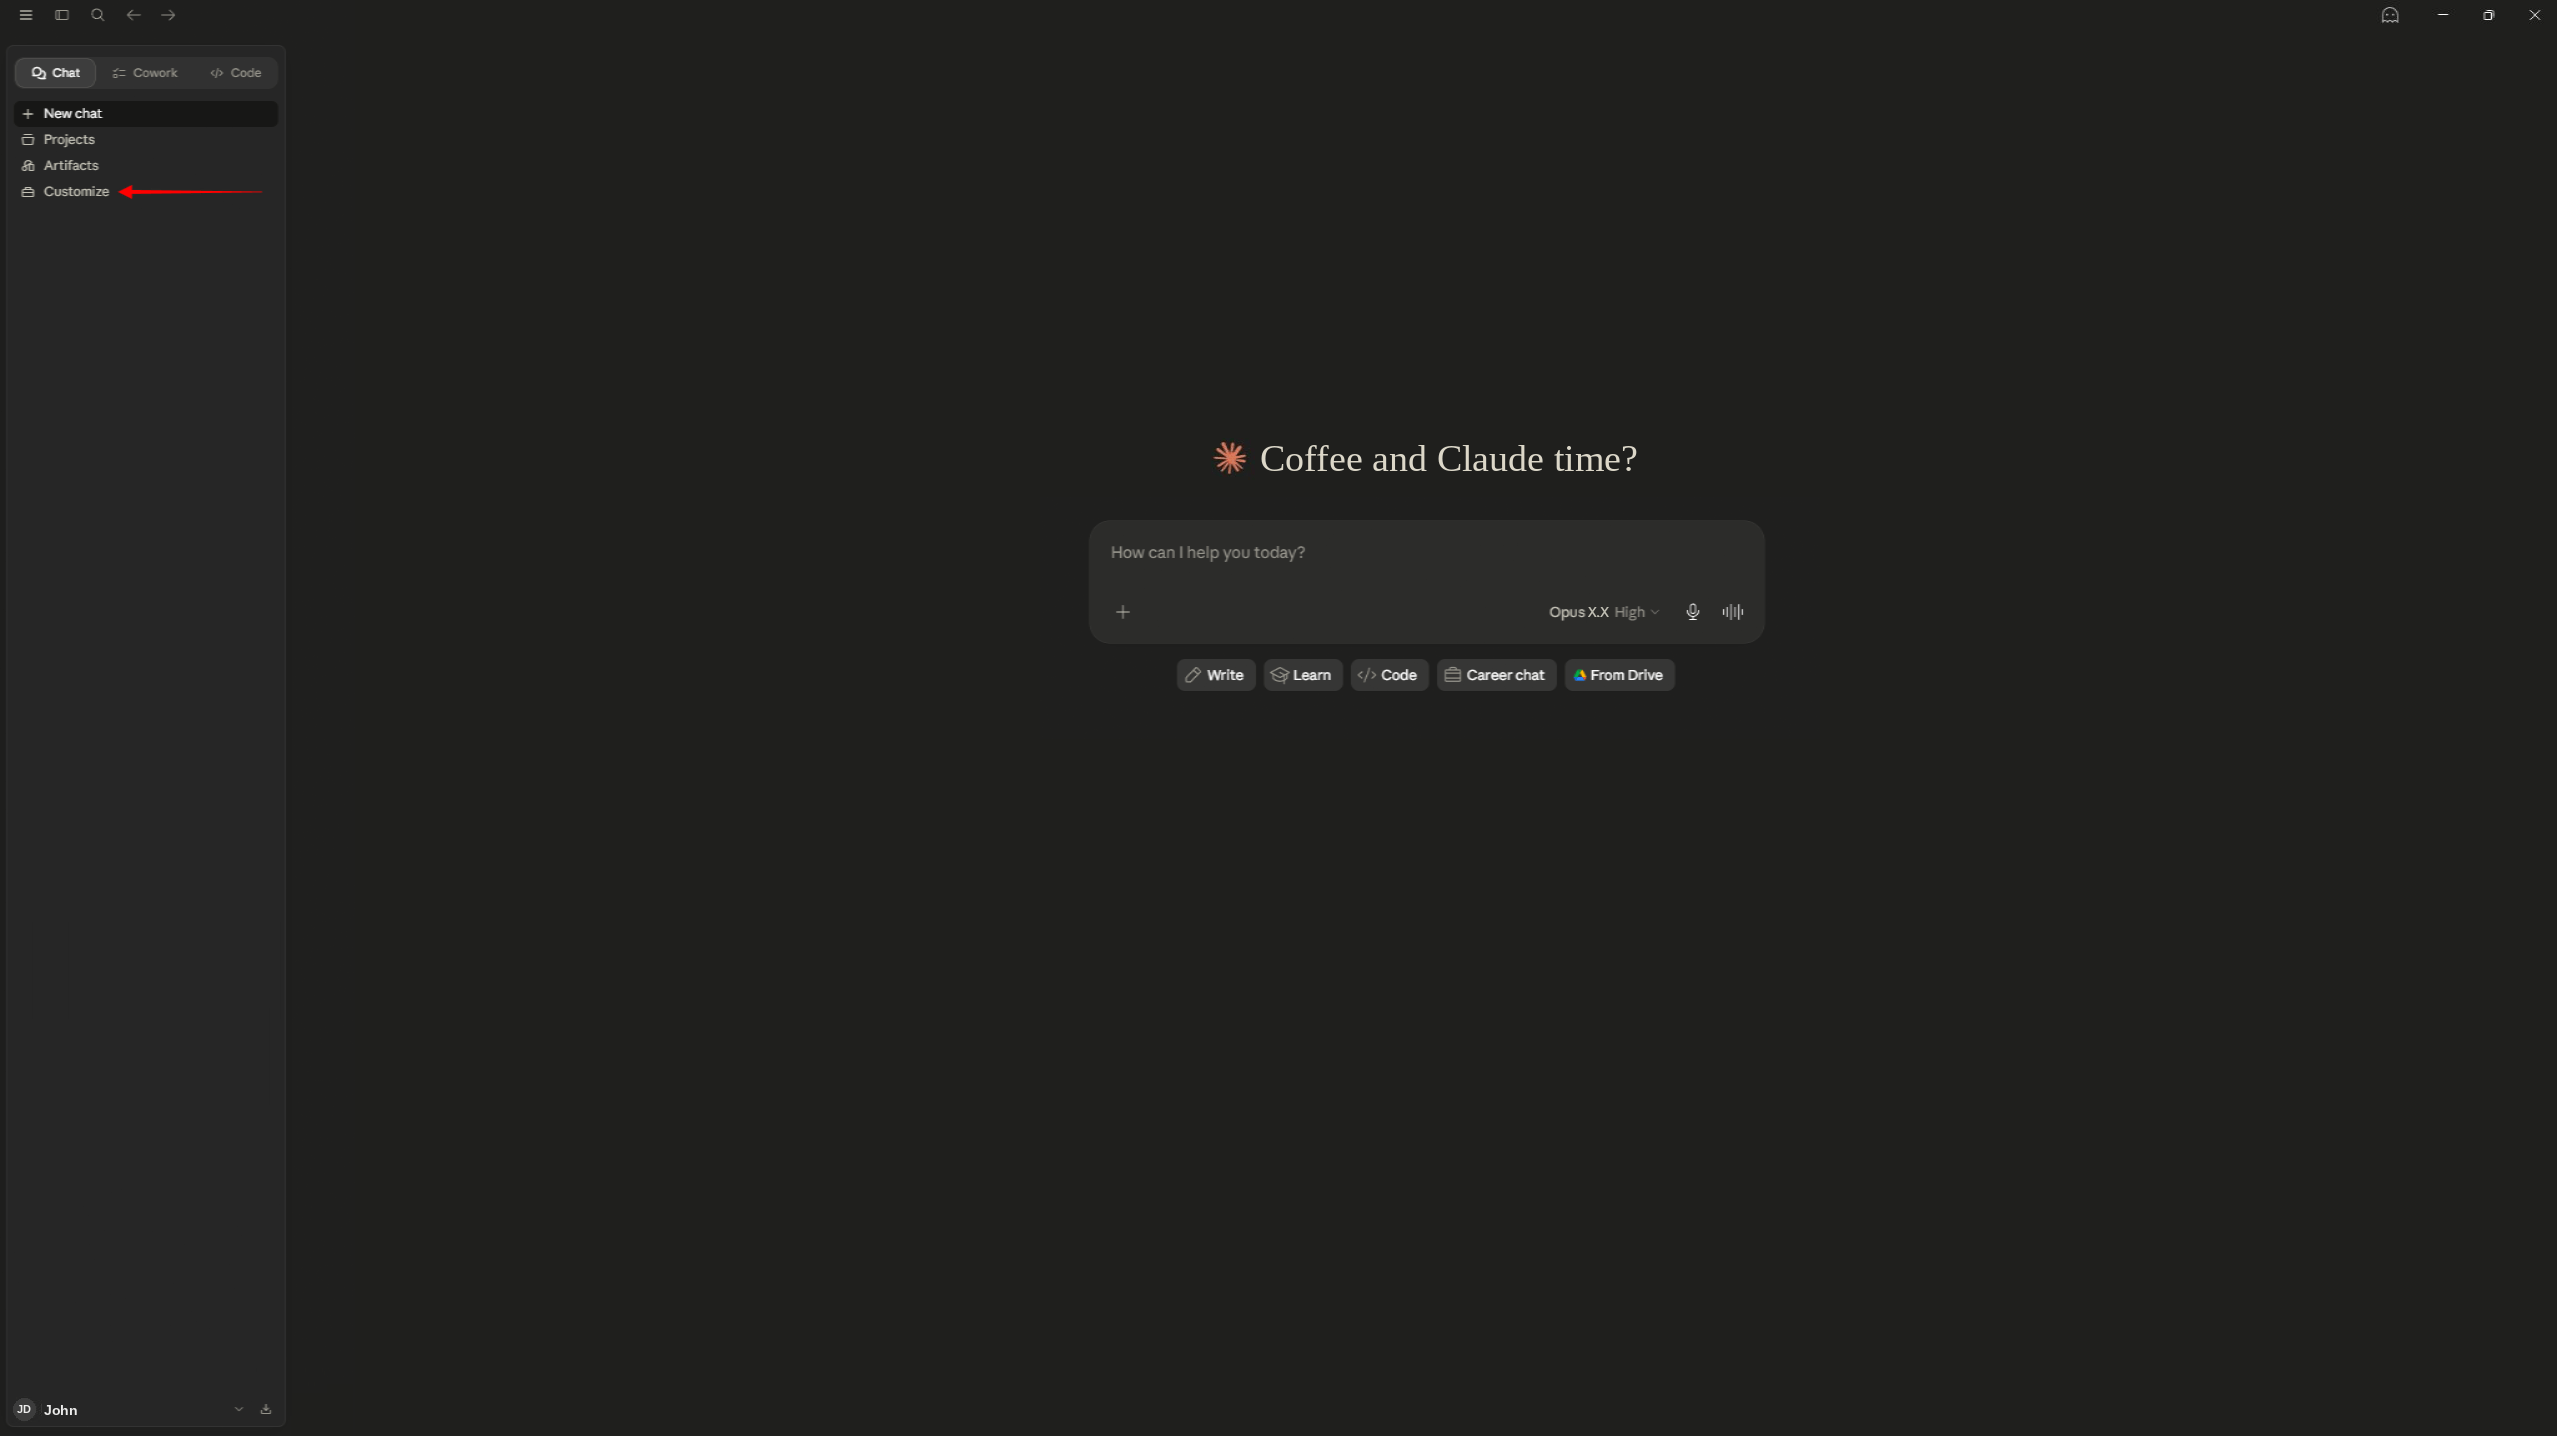
- Ouvrez Claude Desktop et cliquez sur Personnaliser dans la barre latérale ;
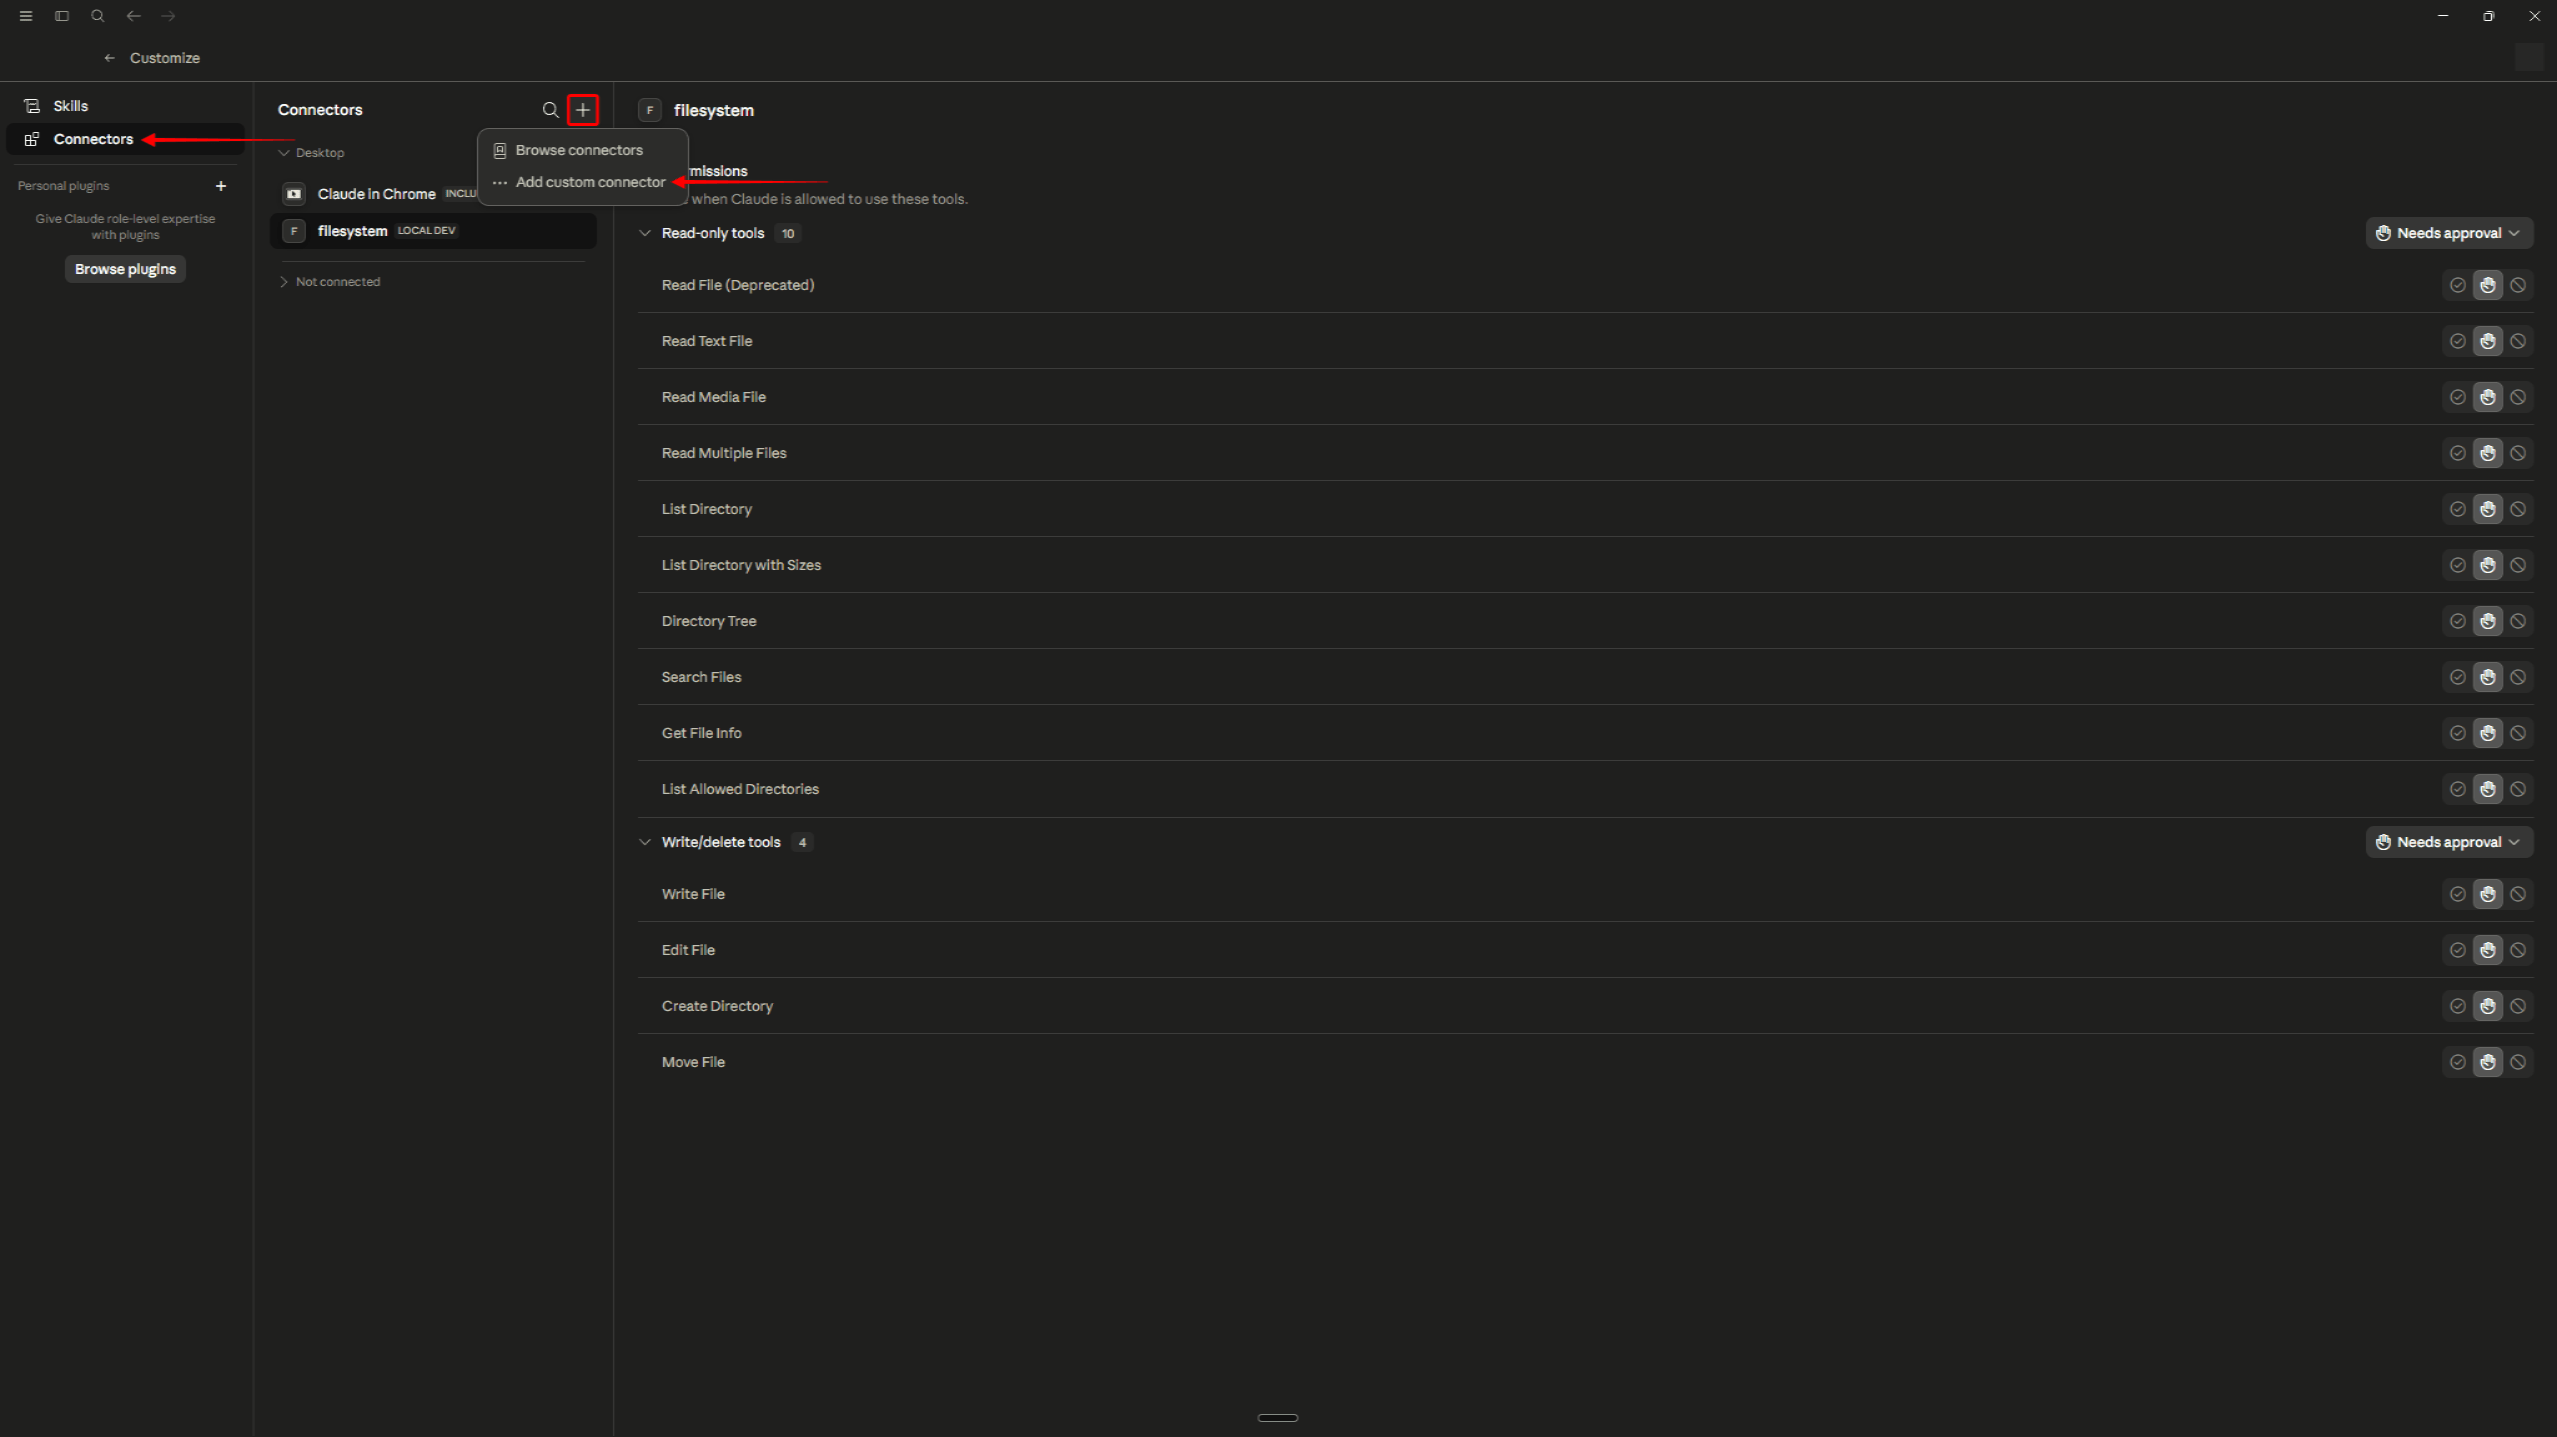
- Sélectionner Connecteurs;
- Cliquez sur Ajouter un connecteur personnalisé (le + (contrôle).
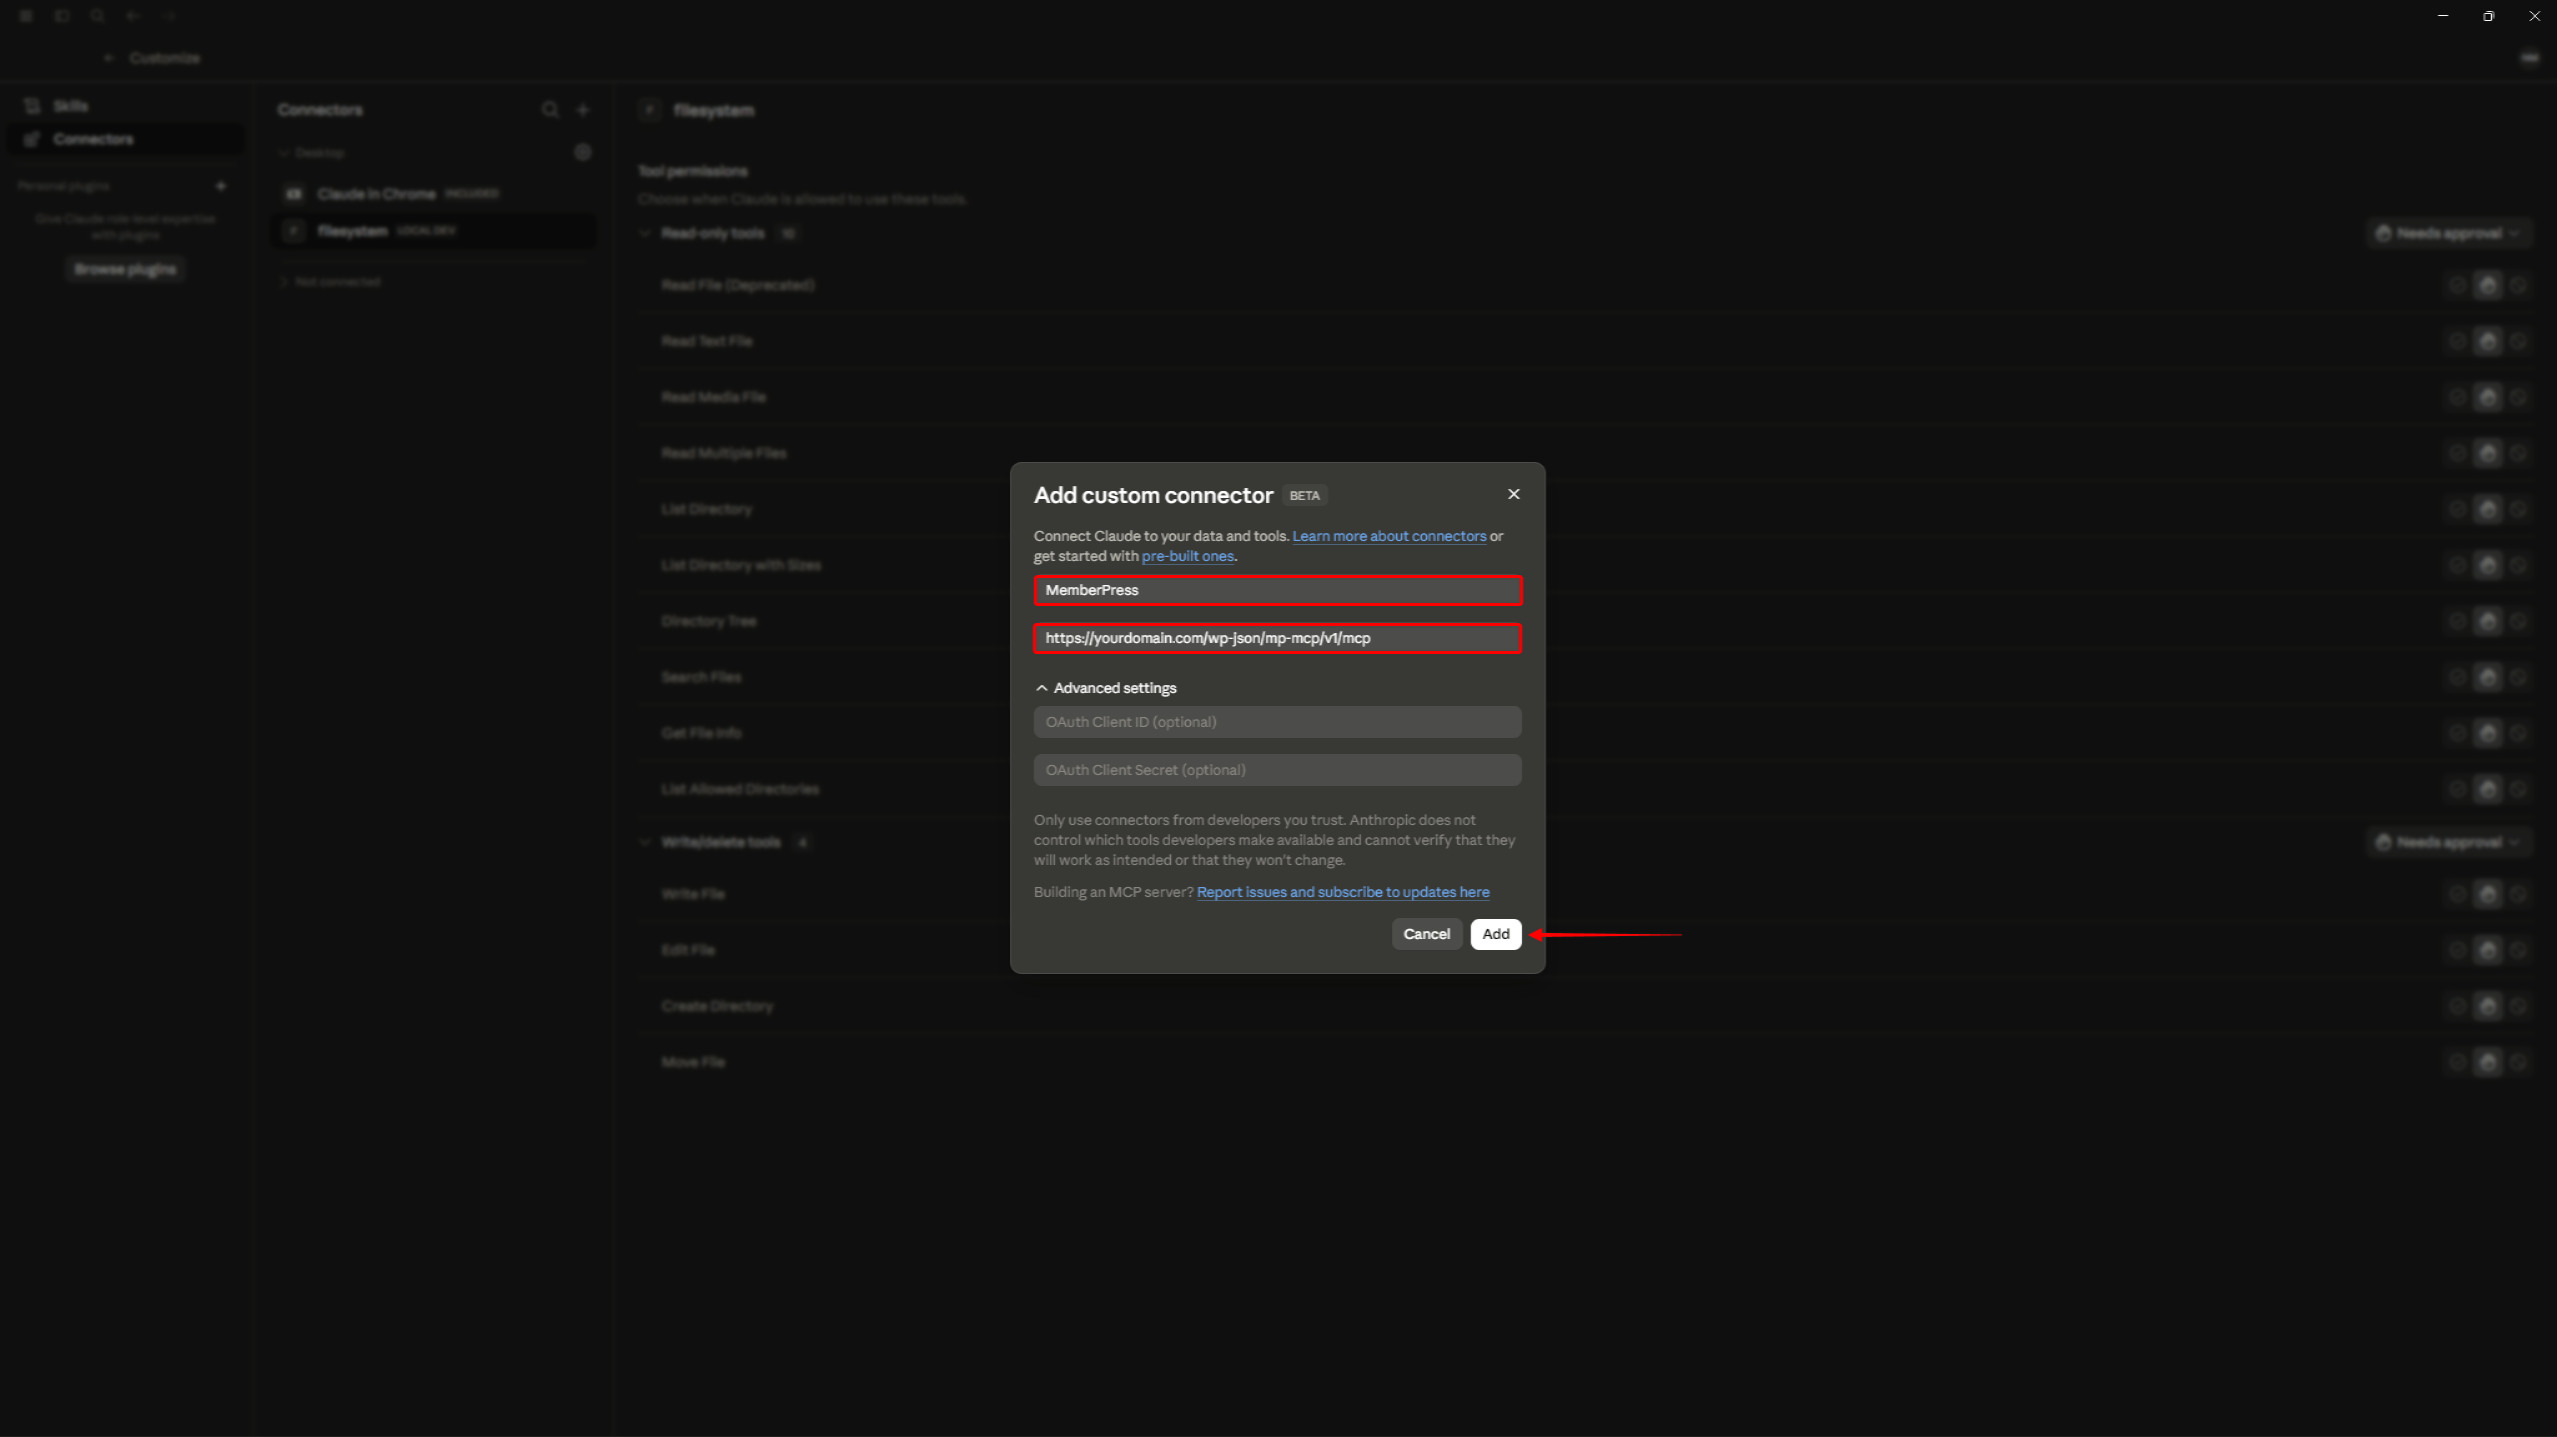
Dans la boîte de dialogue qui s'ouvre :
- Entrer MemberPress comme nom du connecteur ;
- Collez l'URL copiée dans le URL du serveur MCP distant domaine ;
- Laissez le champ facultatif Identifiant client OAuth et Clé secrète du client OAuth champs vides — ils apparaissent repliés sous Paramètres avancés, et il n'est pas nécessaire de les développer ;
- Lisez l'avis de confiance, puis cliquez sur Ajouter.
Étape 5 : Se connecter et s'autoriser
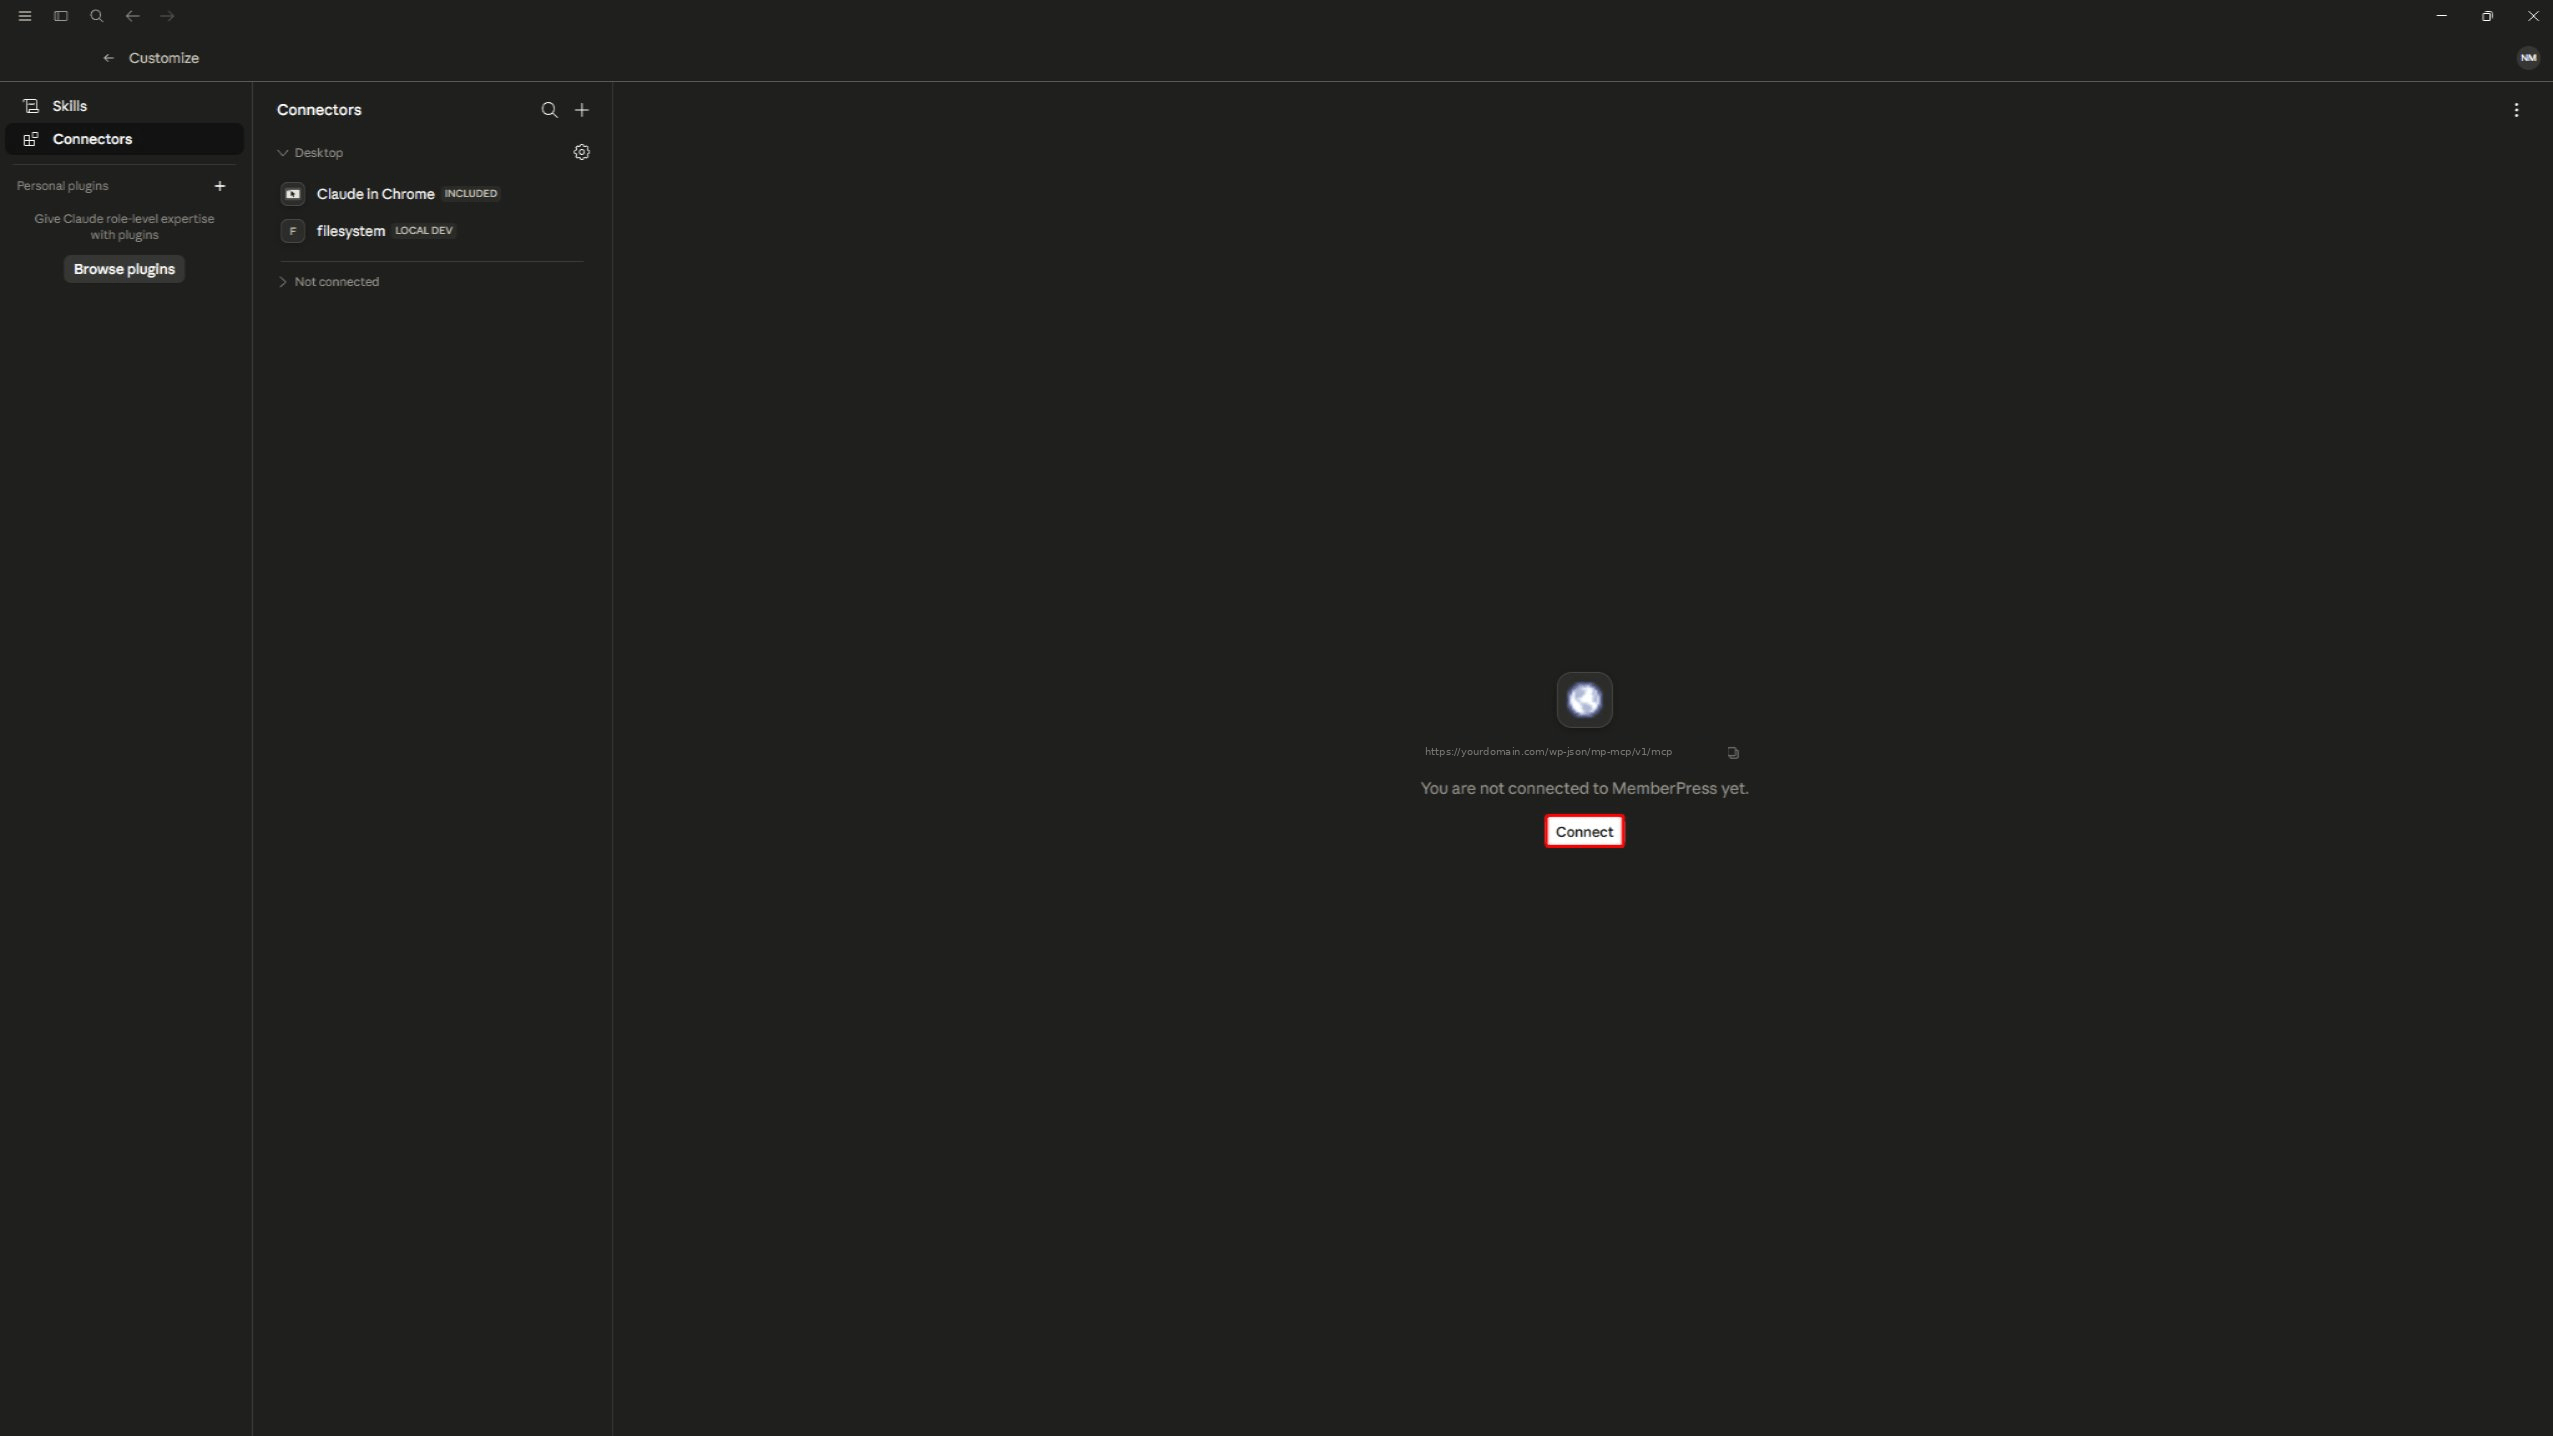
- Sur le nouveau MemberPress connecteur, cliquez sur Connecter;
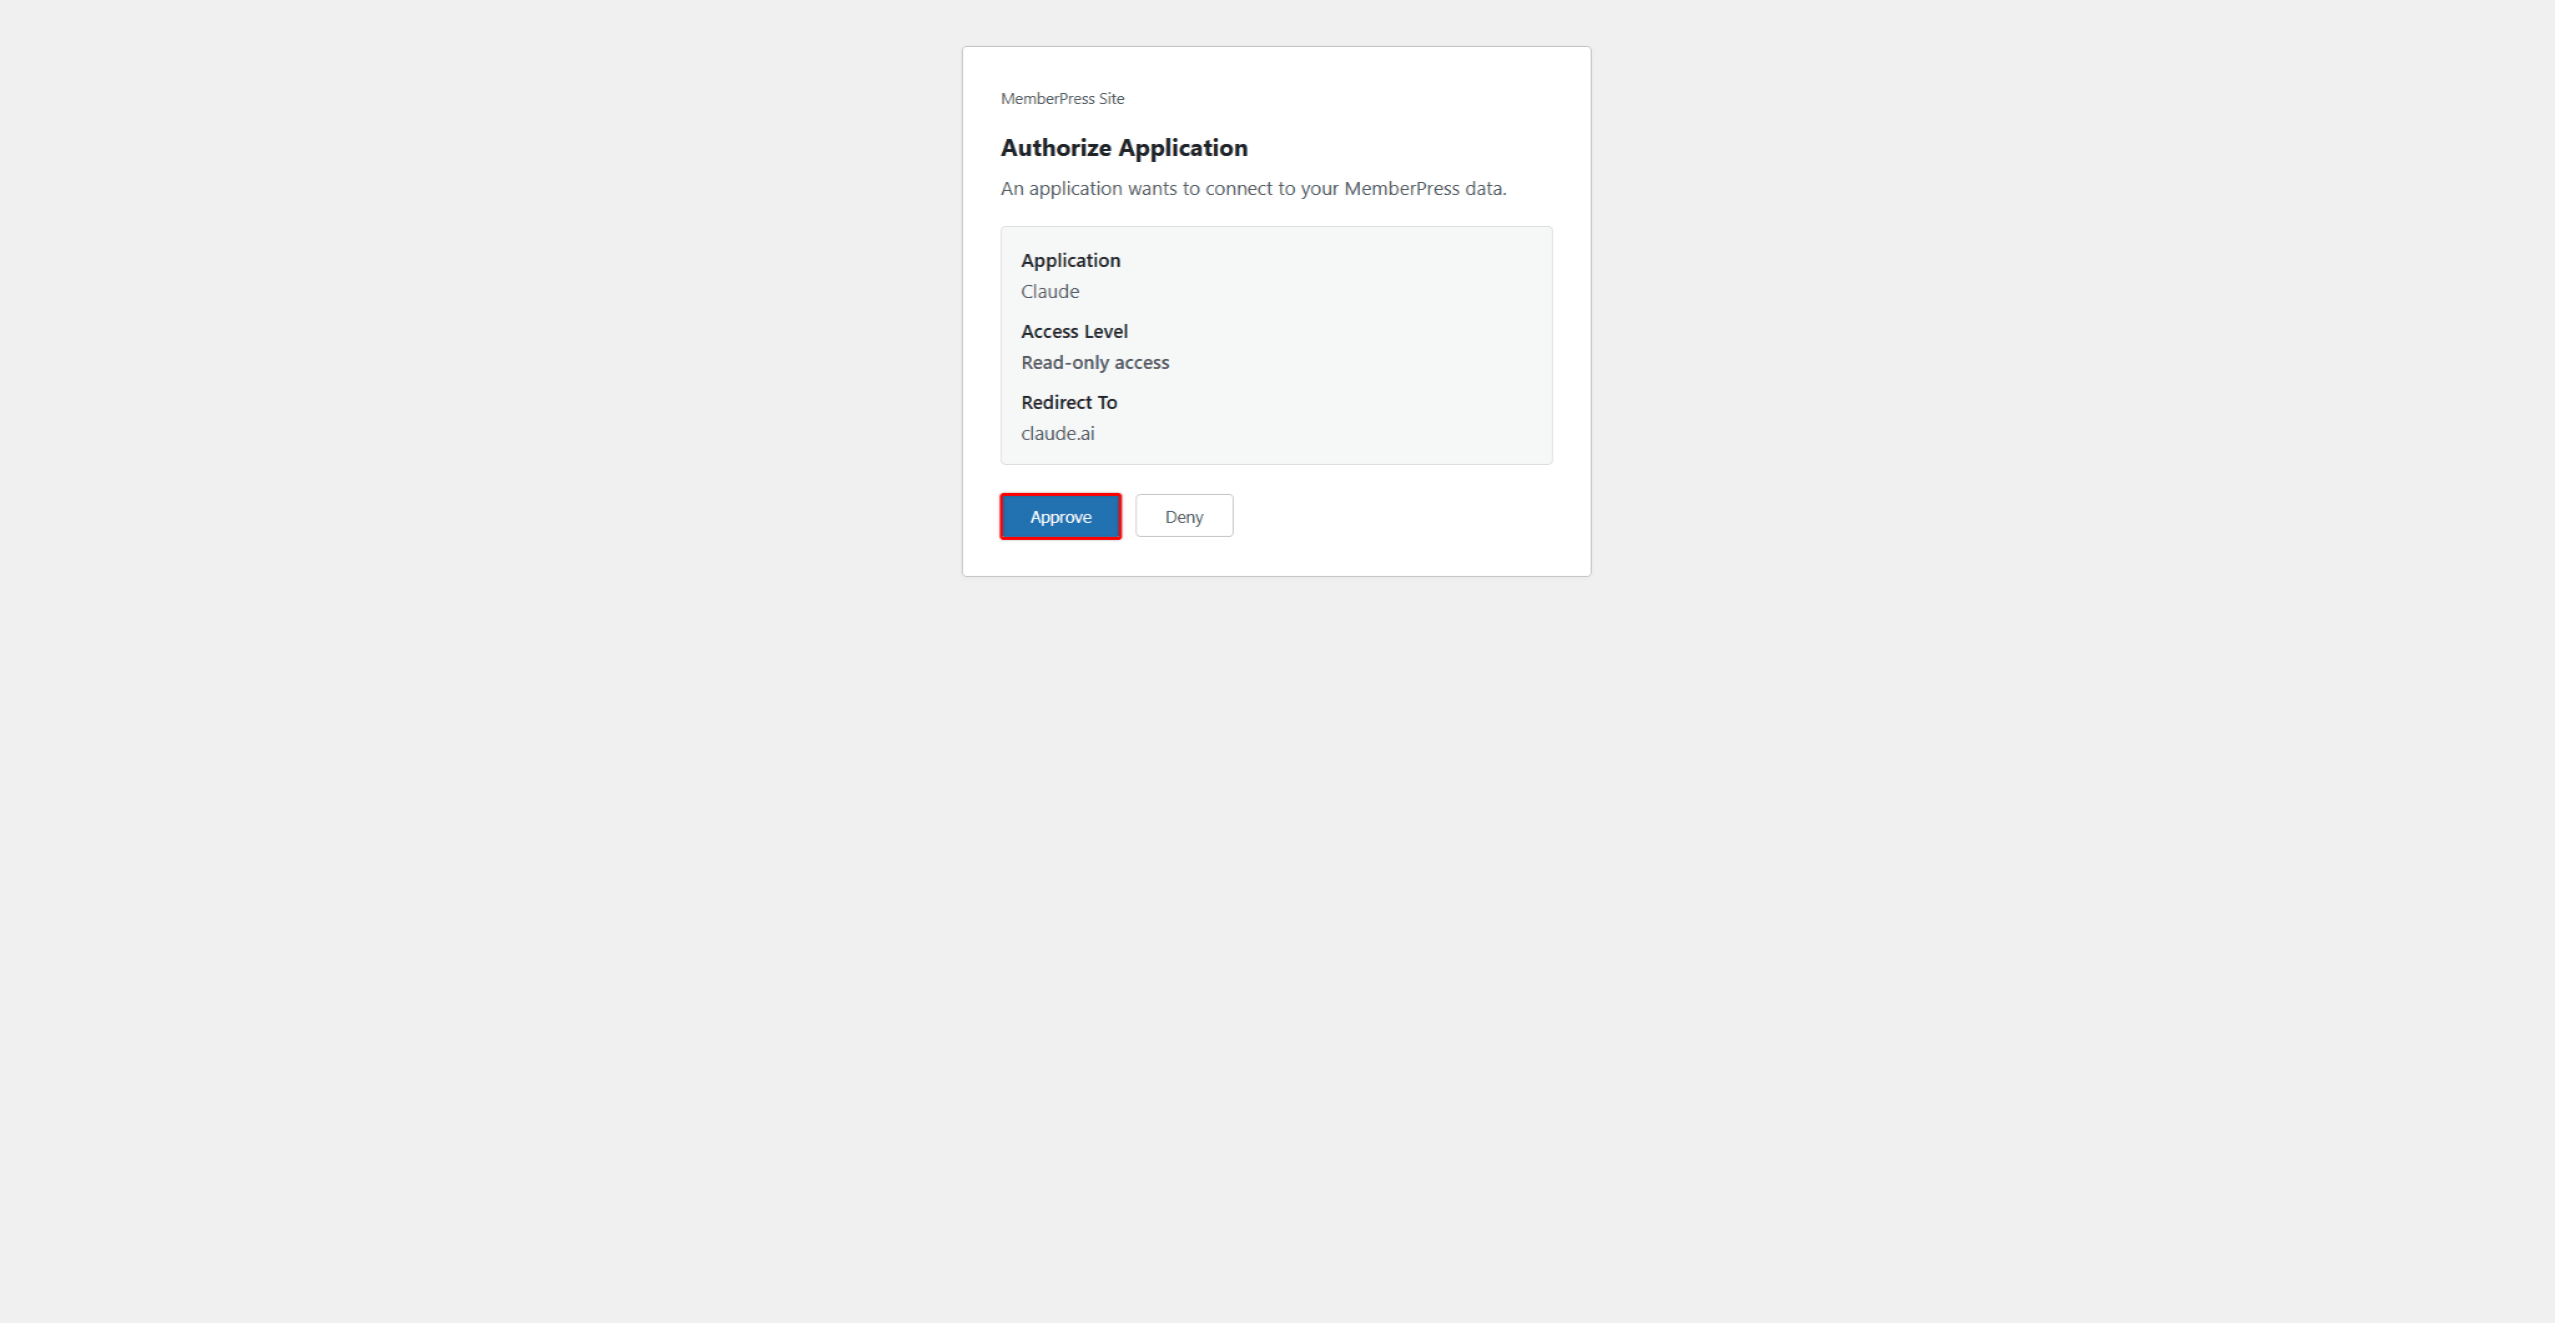
- Une fenêtre de navigateur s'ouvre avec le “ Autoriser la demande ” écran. Il affiche l'application (Claude), le niveau d'accès accordé et la destination de la redirection (claude.ai);
- Connectez-vous au site MemberPress s'il n'y a pas de session active ;
- Cliquez sur Approuver pour accorder l'accès, ou Refuser pour annuler.
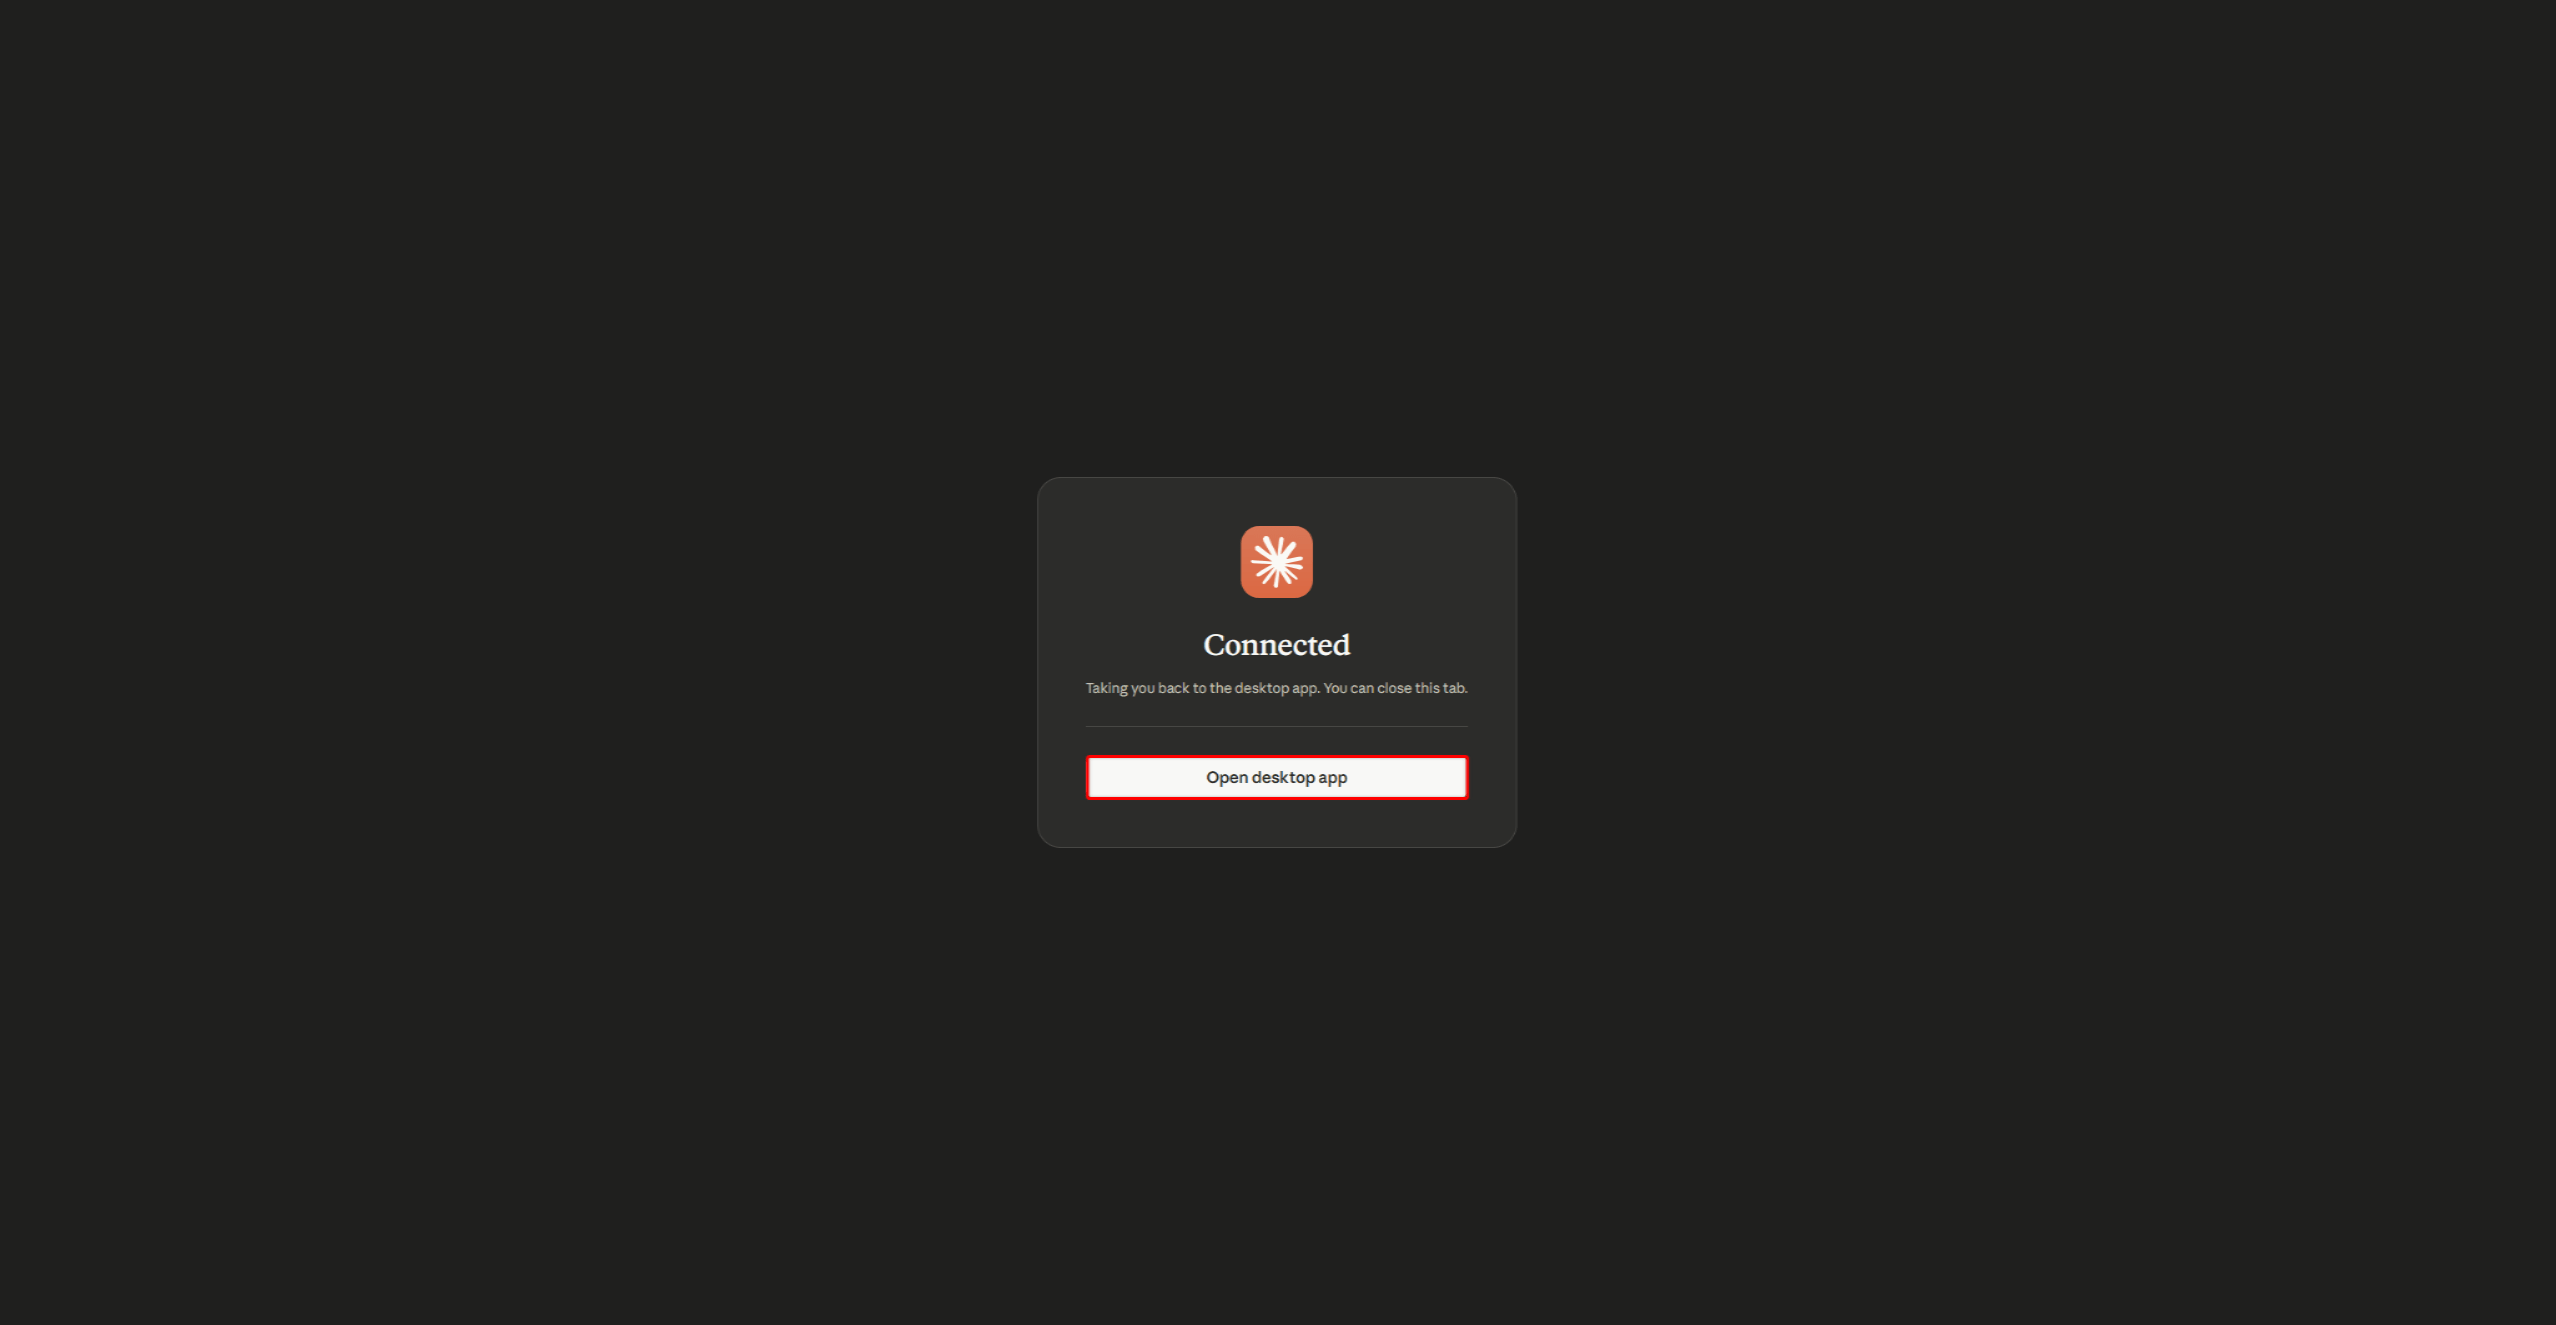
Une fois la validation effectuée, le navigateur affiche un “ Connecté ” page et vous ramène automatiquement à Claude Desktop. Si la redirection ne se déclenche pas, cliquez sur Ouvrir l'application de bureau.
Étape 6 : Vérifier la connexion
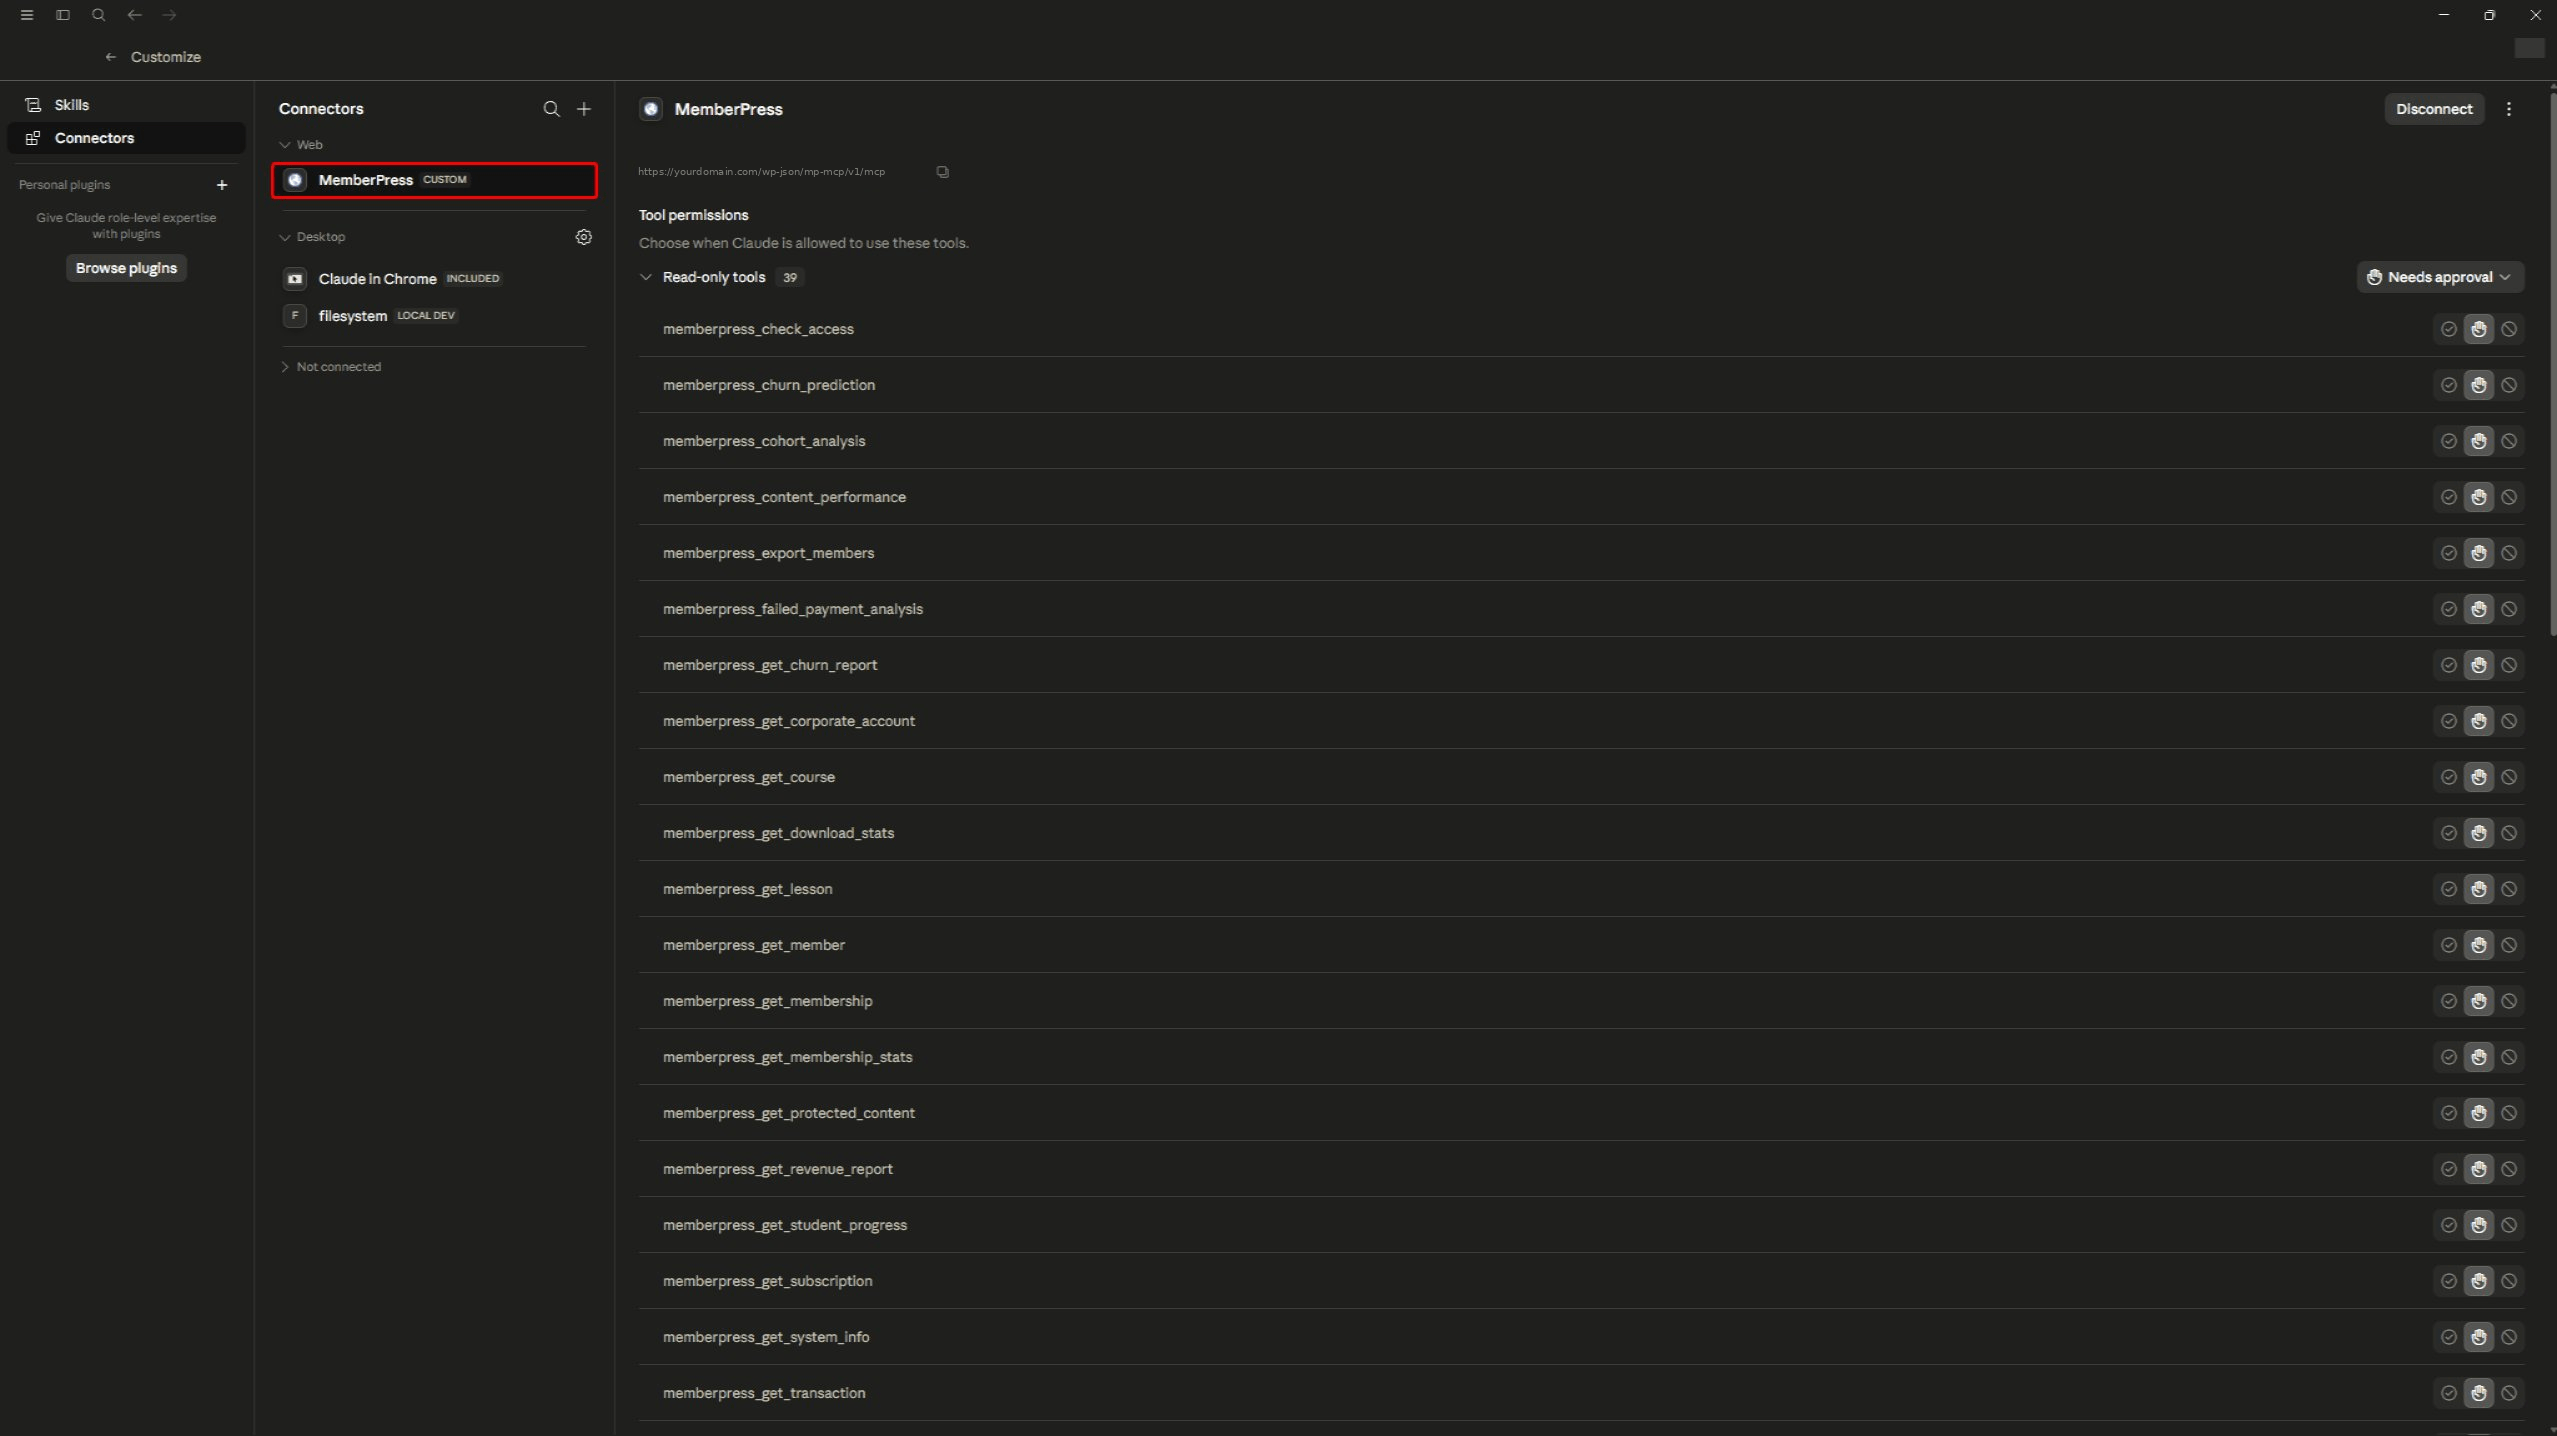
- Dans Claude Desktop, le MemberPress Le connecteur apparaît désormais comme connecté et affiche la liste des outils disponibles ;
- Le connecteur Autorisations d'outils La liste indique ce qui a été chargé : une connexion en lecture seule charge 39 outils en lecture seule; une connexion avec accès complet inclut en outre 15 outils d'écriture/suppression. Chaque outil est configuré par défaut sur “ À valider ”, c'est pourquoi Claude Desktop demande confirmation avant d'en exécuter une ;
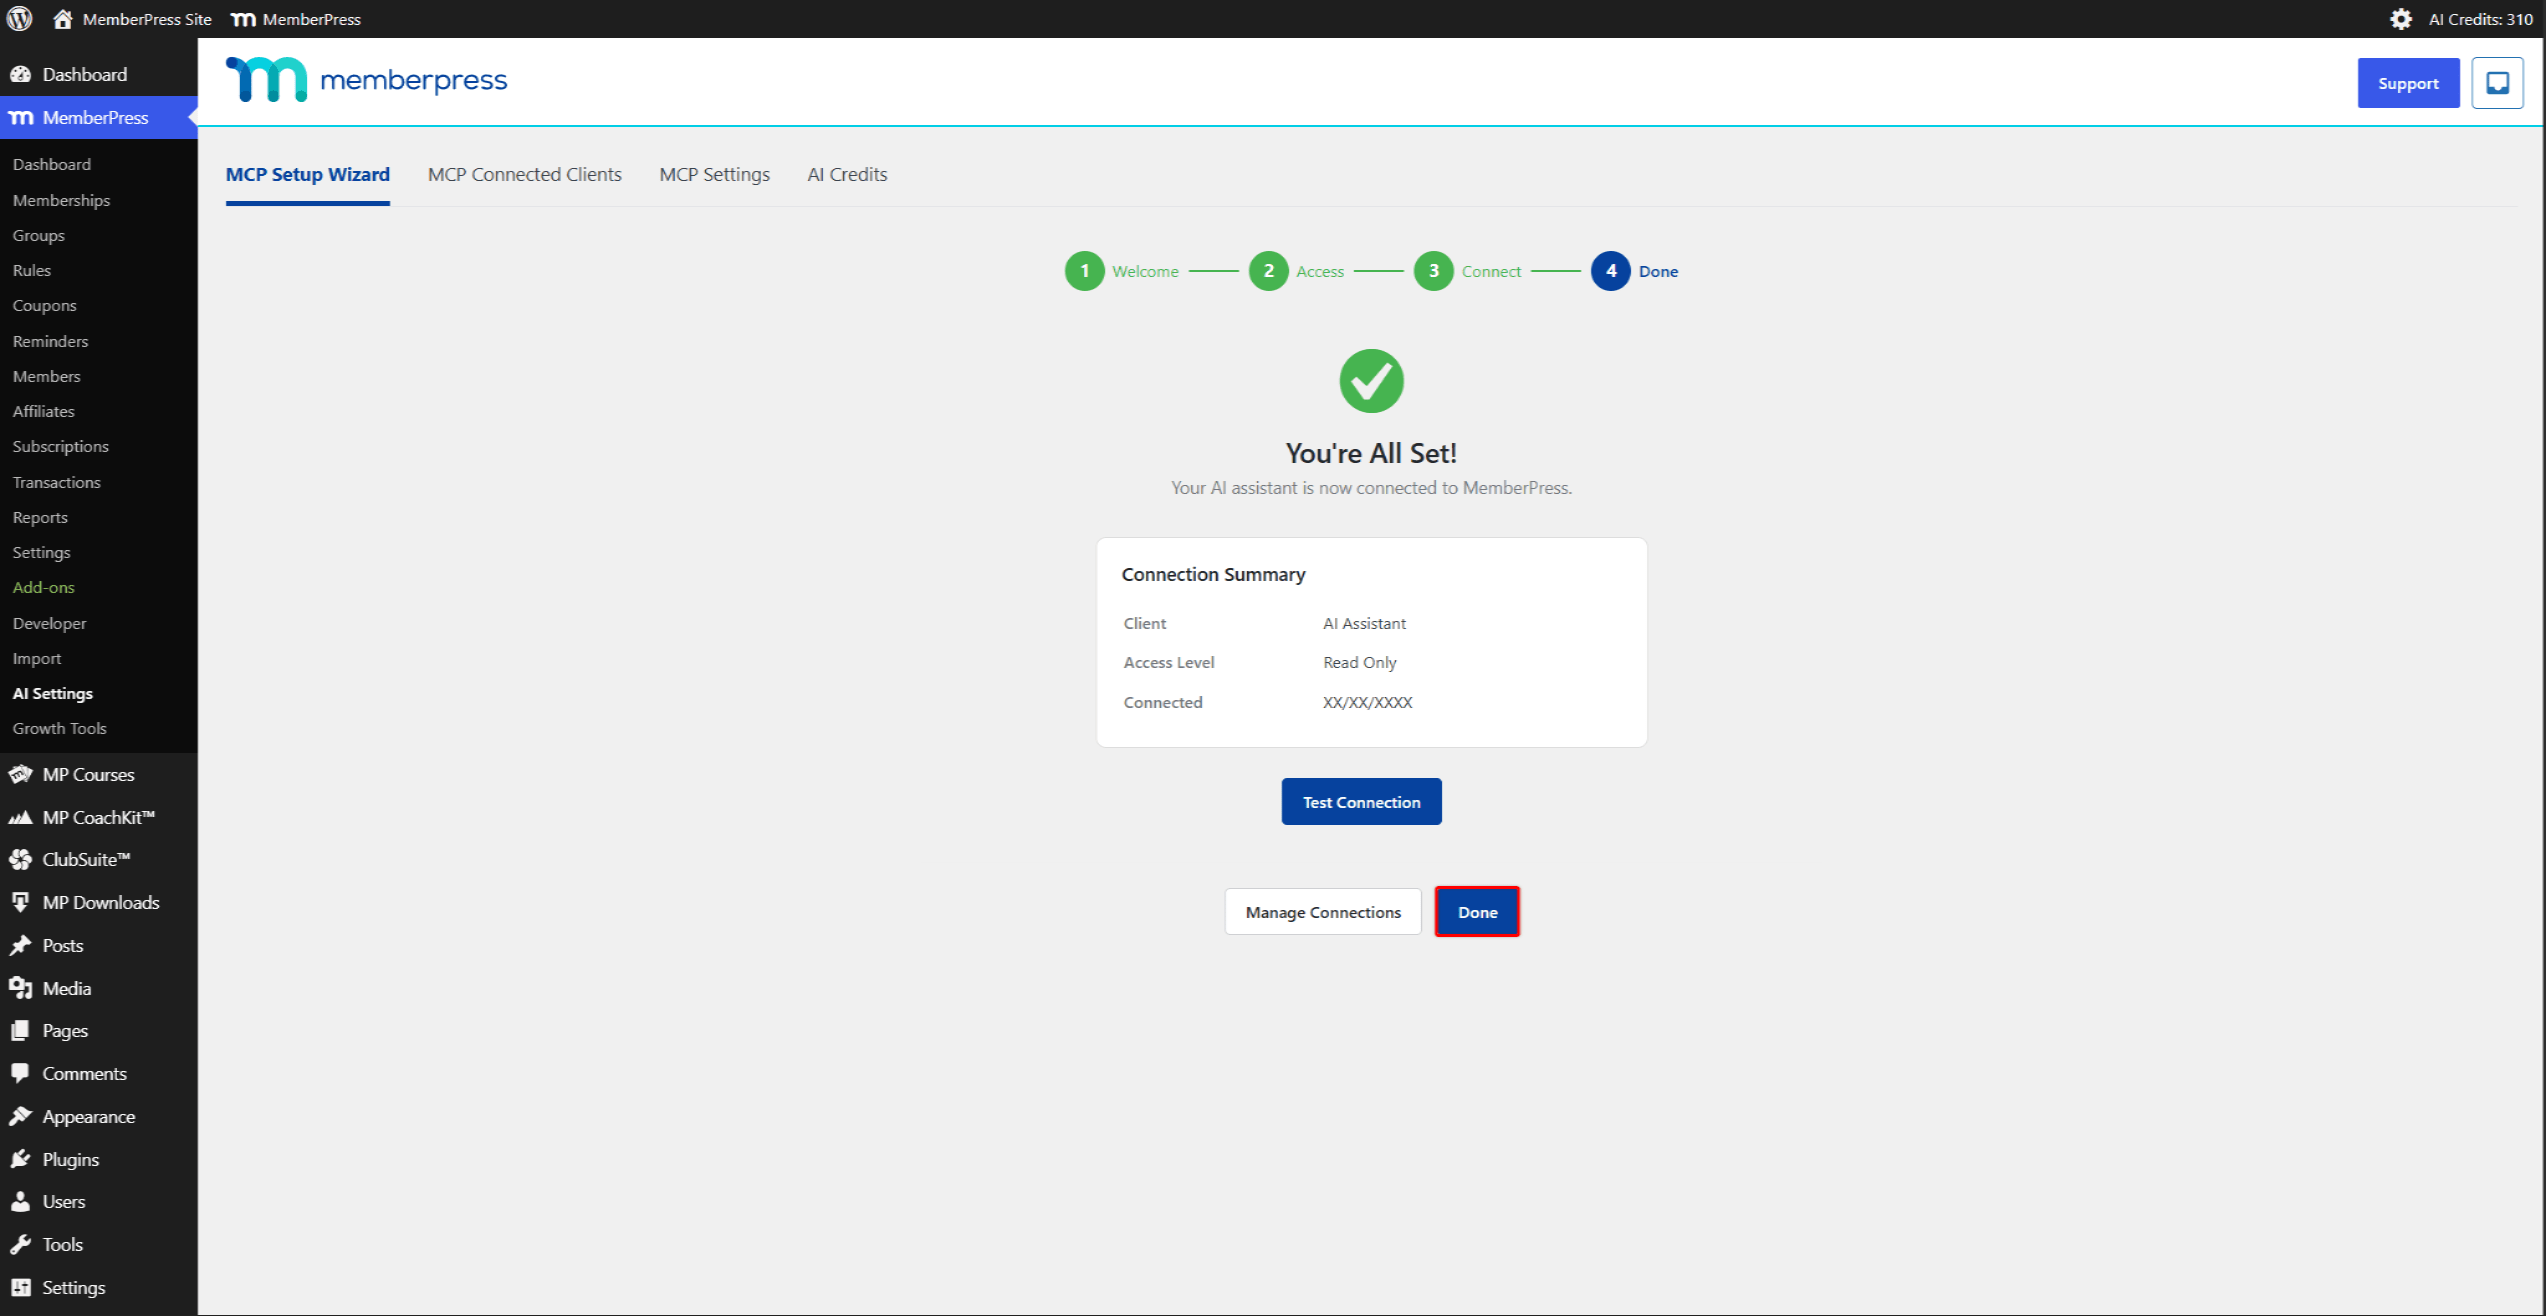
- Revenez à l'assistant WordPress, qui affiche désormais le “ C’est bon, tout est prêt ! ” écran présentant un récapitulatif de la connexion.
Le sorcier’s Terminé Cette étape comporte trois boutons : Tester la connexion, Gérer les connexionset Terminé. Cliquez sur Terminé pour terminer.
Vérification de la connexion
Vérifiez que la connexion fonctionne depuis Claude Desktop :
- Ouvrez Claude Desktop et lancez une nouvelle conversation ;
- Vérifiez que le
memberpress_*les outils apparaissent dans la liste des outils disponibles (par exemple,liste_des_membres_de_memberpress); - Posez une question simple, par exemple : “ Indiquez les noms des 5 membres les plus récents sur le site MemberPress. ”;
- Valider l'appel de l'outil lorsque Claude Desktop en fait la demande ;
- Vérifiez que Claude Desktop renvoie bien les données.
Modification du niveau d'accès d'une connexion existante
Le niveau d'accès d'une connexion est défini lors de sa création. Il ne peut être ni augmenté ni réduit a posteriori. Pour le modifier, remplacez la connexion :
- Dans Claude Desktop, ouvrez Personnaliser > Connecteurs > MemberPress et cliquez sur Déconnexion;
- Dans WordPress, définissez le nouveau niveau d'accès à l'adresse suivante : MemberPress > Paramètres IA > Paramètres MCP et cliquez sur Mettre à jour les paramètres;
- De retour dans Claude Desktop, cliquez sur Connecter sur le connecteur MemberPress, puis validez l'autorisation. Cela crée une nouvelle connexion au nouveau niveau d'accès.
Pour supprimer l'ancienne ligne, ouvrez Clients connectés à MCP, identifiez la connexion précédente grâce à son Horodatage associé et Niveau d'accèset cliquez sur Révoquer. Le statut de l'ancienne ligne reste Actif Après la déconnexion côté client — Claude Desktop n'en informe pas le site —, la révoquer ici est donc le seul moyen de le fermer.
Gestion des connexions
Chaque connexion active apparaît sous Tableau de bord > MemberPress > Paramètres IA > Clients connectés à MCP. Le tableau répertorie dans une seule vue les connexions OAuth (issues de l'assistant) et les sessions avec mot de passe d'application.
Chaque ligne comporte les colonnes suivantes :
- Nom du client;
- Propriétaire;
- Niveau d'accès;
- Connecté (l'horodatage de la création de la connexion) ;
- Dernière utilisation;
- Statut;
- Actions (y compris Révoquer).
Une puce d'authentification enregistre la manière dont chaque connexion s'est connectée — par exemple, OAUTH pour les connexions via l'assistant ou MOT DE PASSE DE L'APPLICATION pour les sessions avec mot de passe d'application.
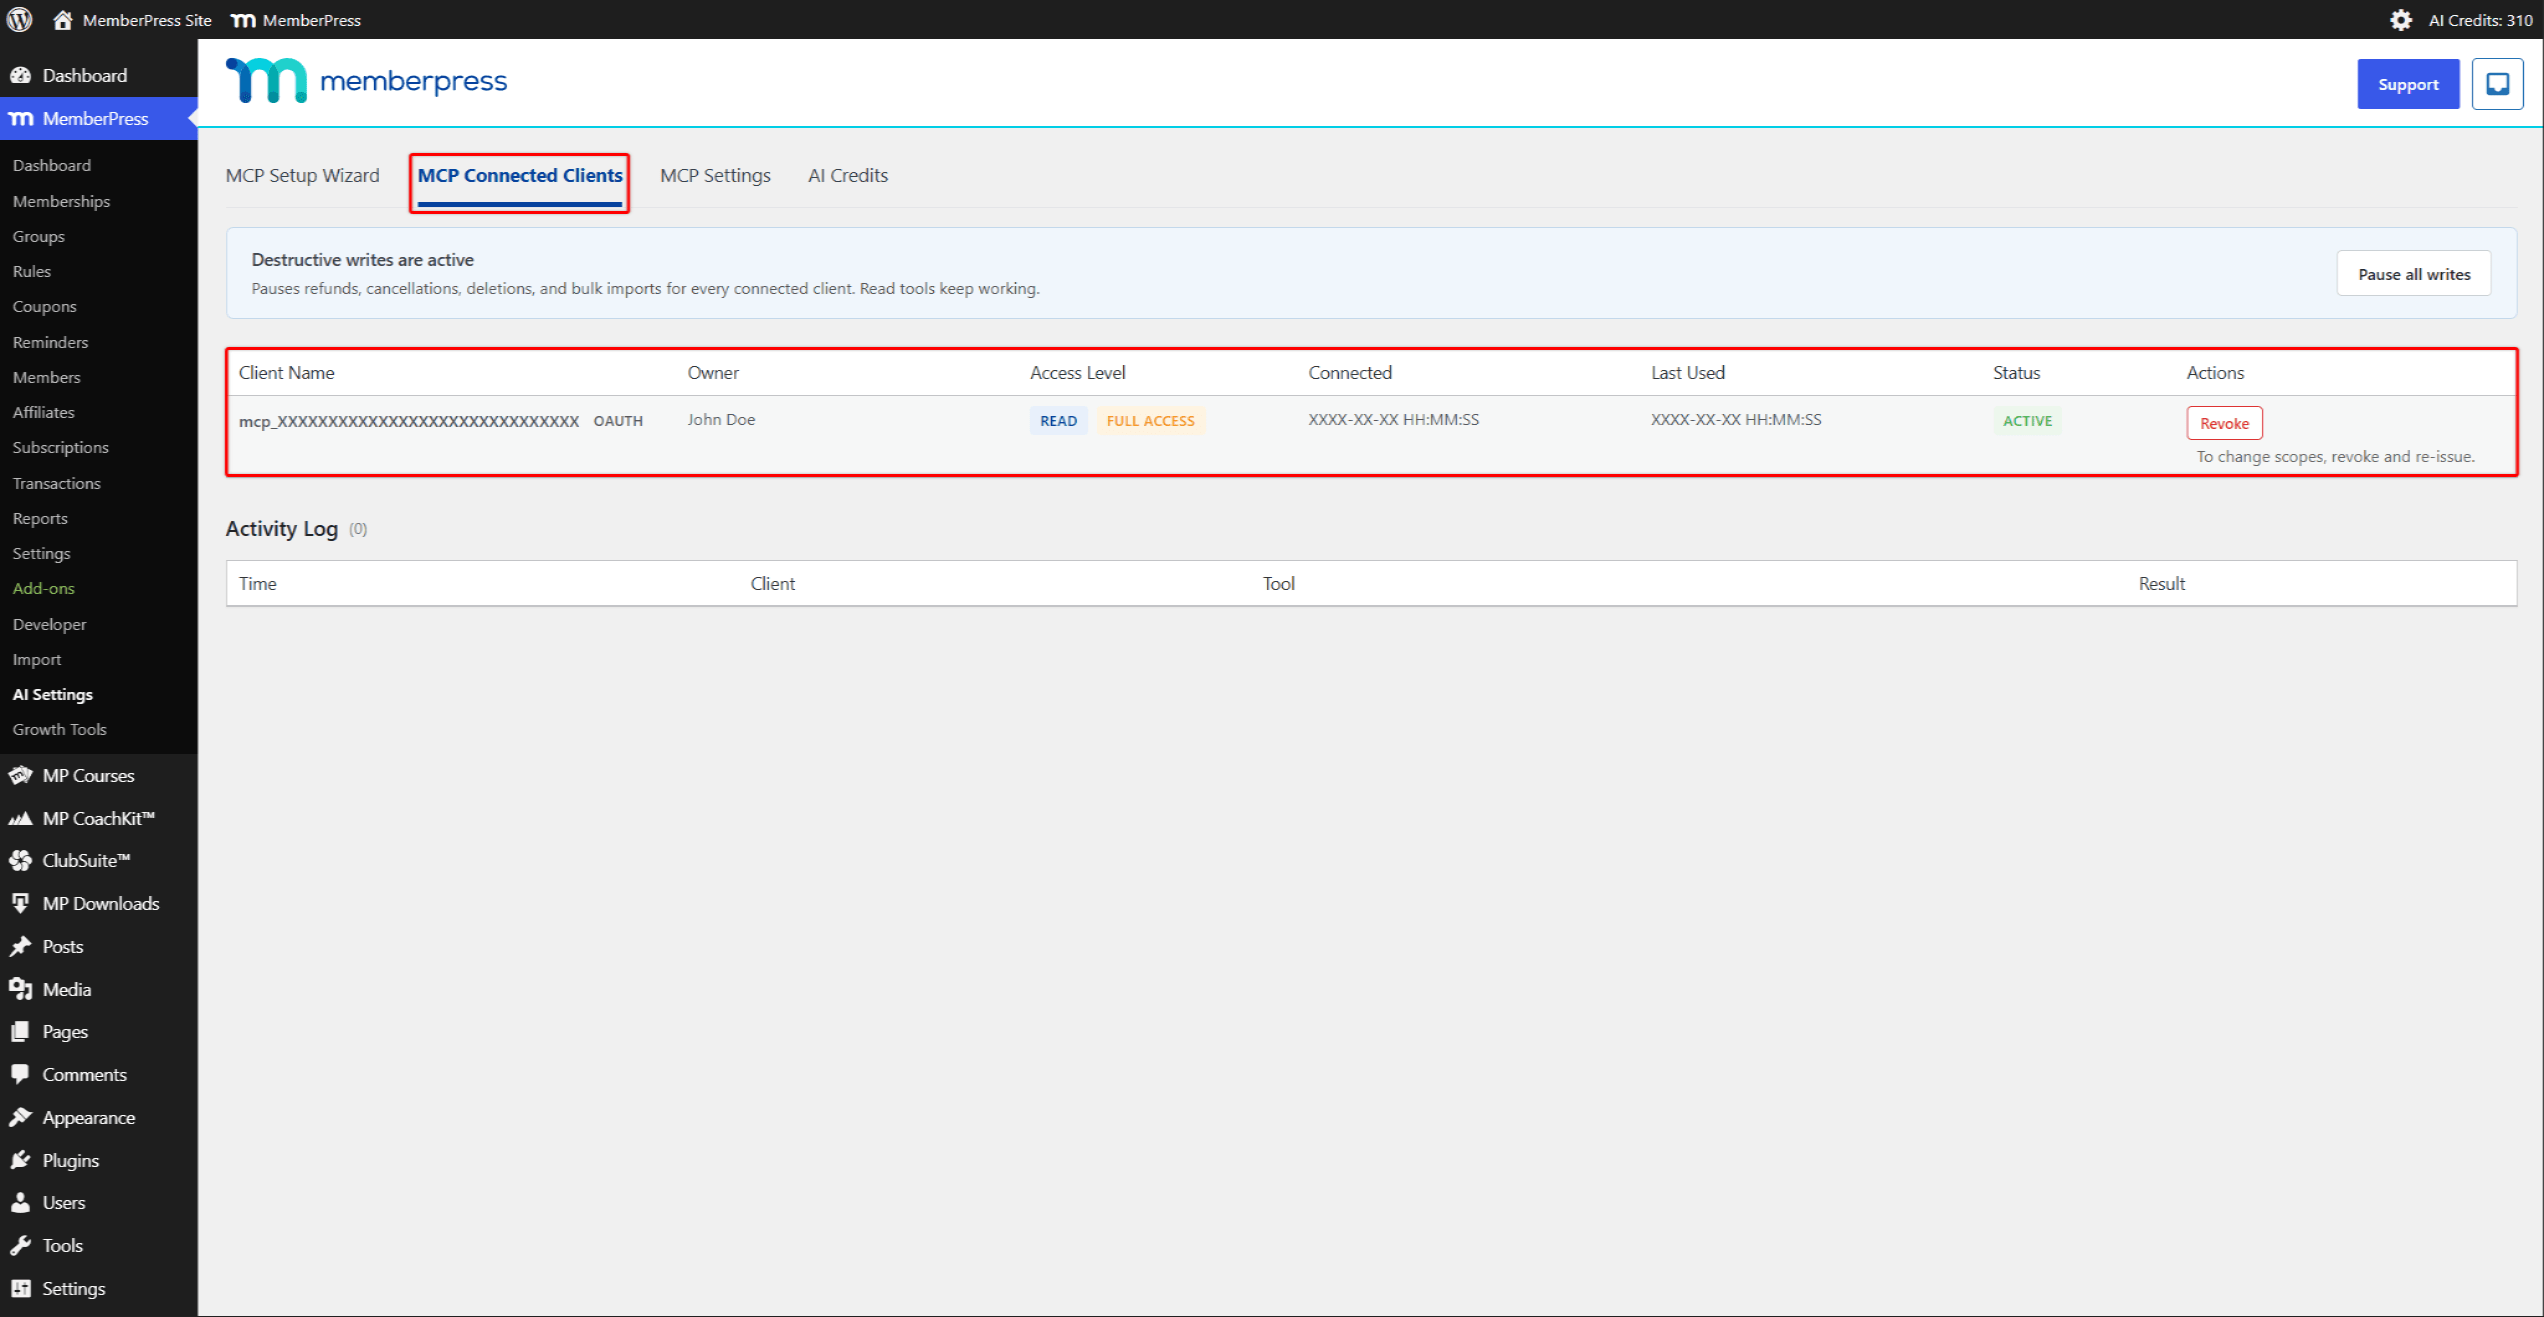
Révocation d'une connexion
Pour supprimer une connexion Claude Desktop :
- Naviguez jusqu'à Tableau de bord > MemberPress > Paramètres IA > Clients connectés à MCP;
- Recherchez la ligne correspondant à la connexion ;
- Cliquez sur Révoquer sur cette ligne ;
- Confirmez le message suivant : “ Êtes-vous sûr de vouloir révoquer ce jeton ? Cette action est irréversible. ”.
Remarque concernant les mots de passe des applications
A WordPress Mot de passe de l'application Il est également possible de connecter un client MCP à MemberPress. Les connexions par mot de passe d'application sont limité à l'accès en lecture, quelles que soient les autorisations WordPress de l'utilisateur. L'accès en écriture nécessite l'assistant et le processus OAuth décrits ci-dessus.
Crédits IA
Les crédits IA alimentent les fonctionnalités d'IA propres à MemberPress. Claude Desktop ne les utilise pas. L'utilisation de l'IA est facturée via le compte Claude par Anthropic, et les appels à l'outil MCP depuis Claude Desktop ne consomment pas de crédits IA.
Les Crédits IA onglet à Tableau de bord > MemberPress > Paramètres IA > Crédits IA affiche le solde actuel et propose d'en acheter davantage. Utilisez-la pour recharger vos crédits destinés aux fonctionnalités IA MemberPress qui en dépendent.
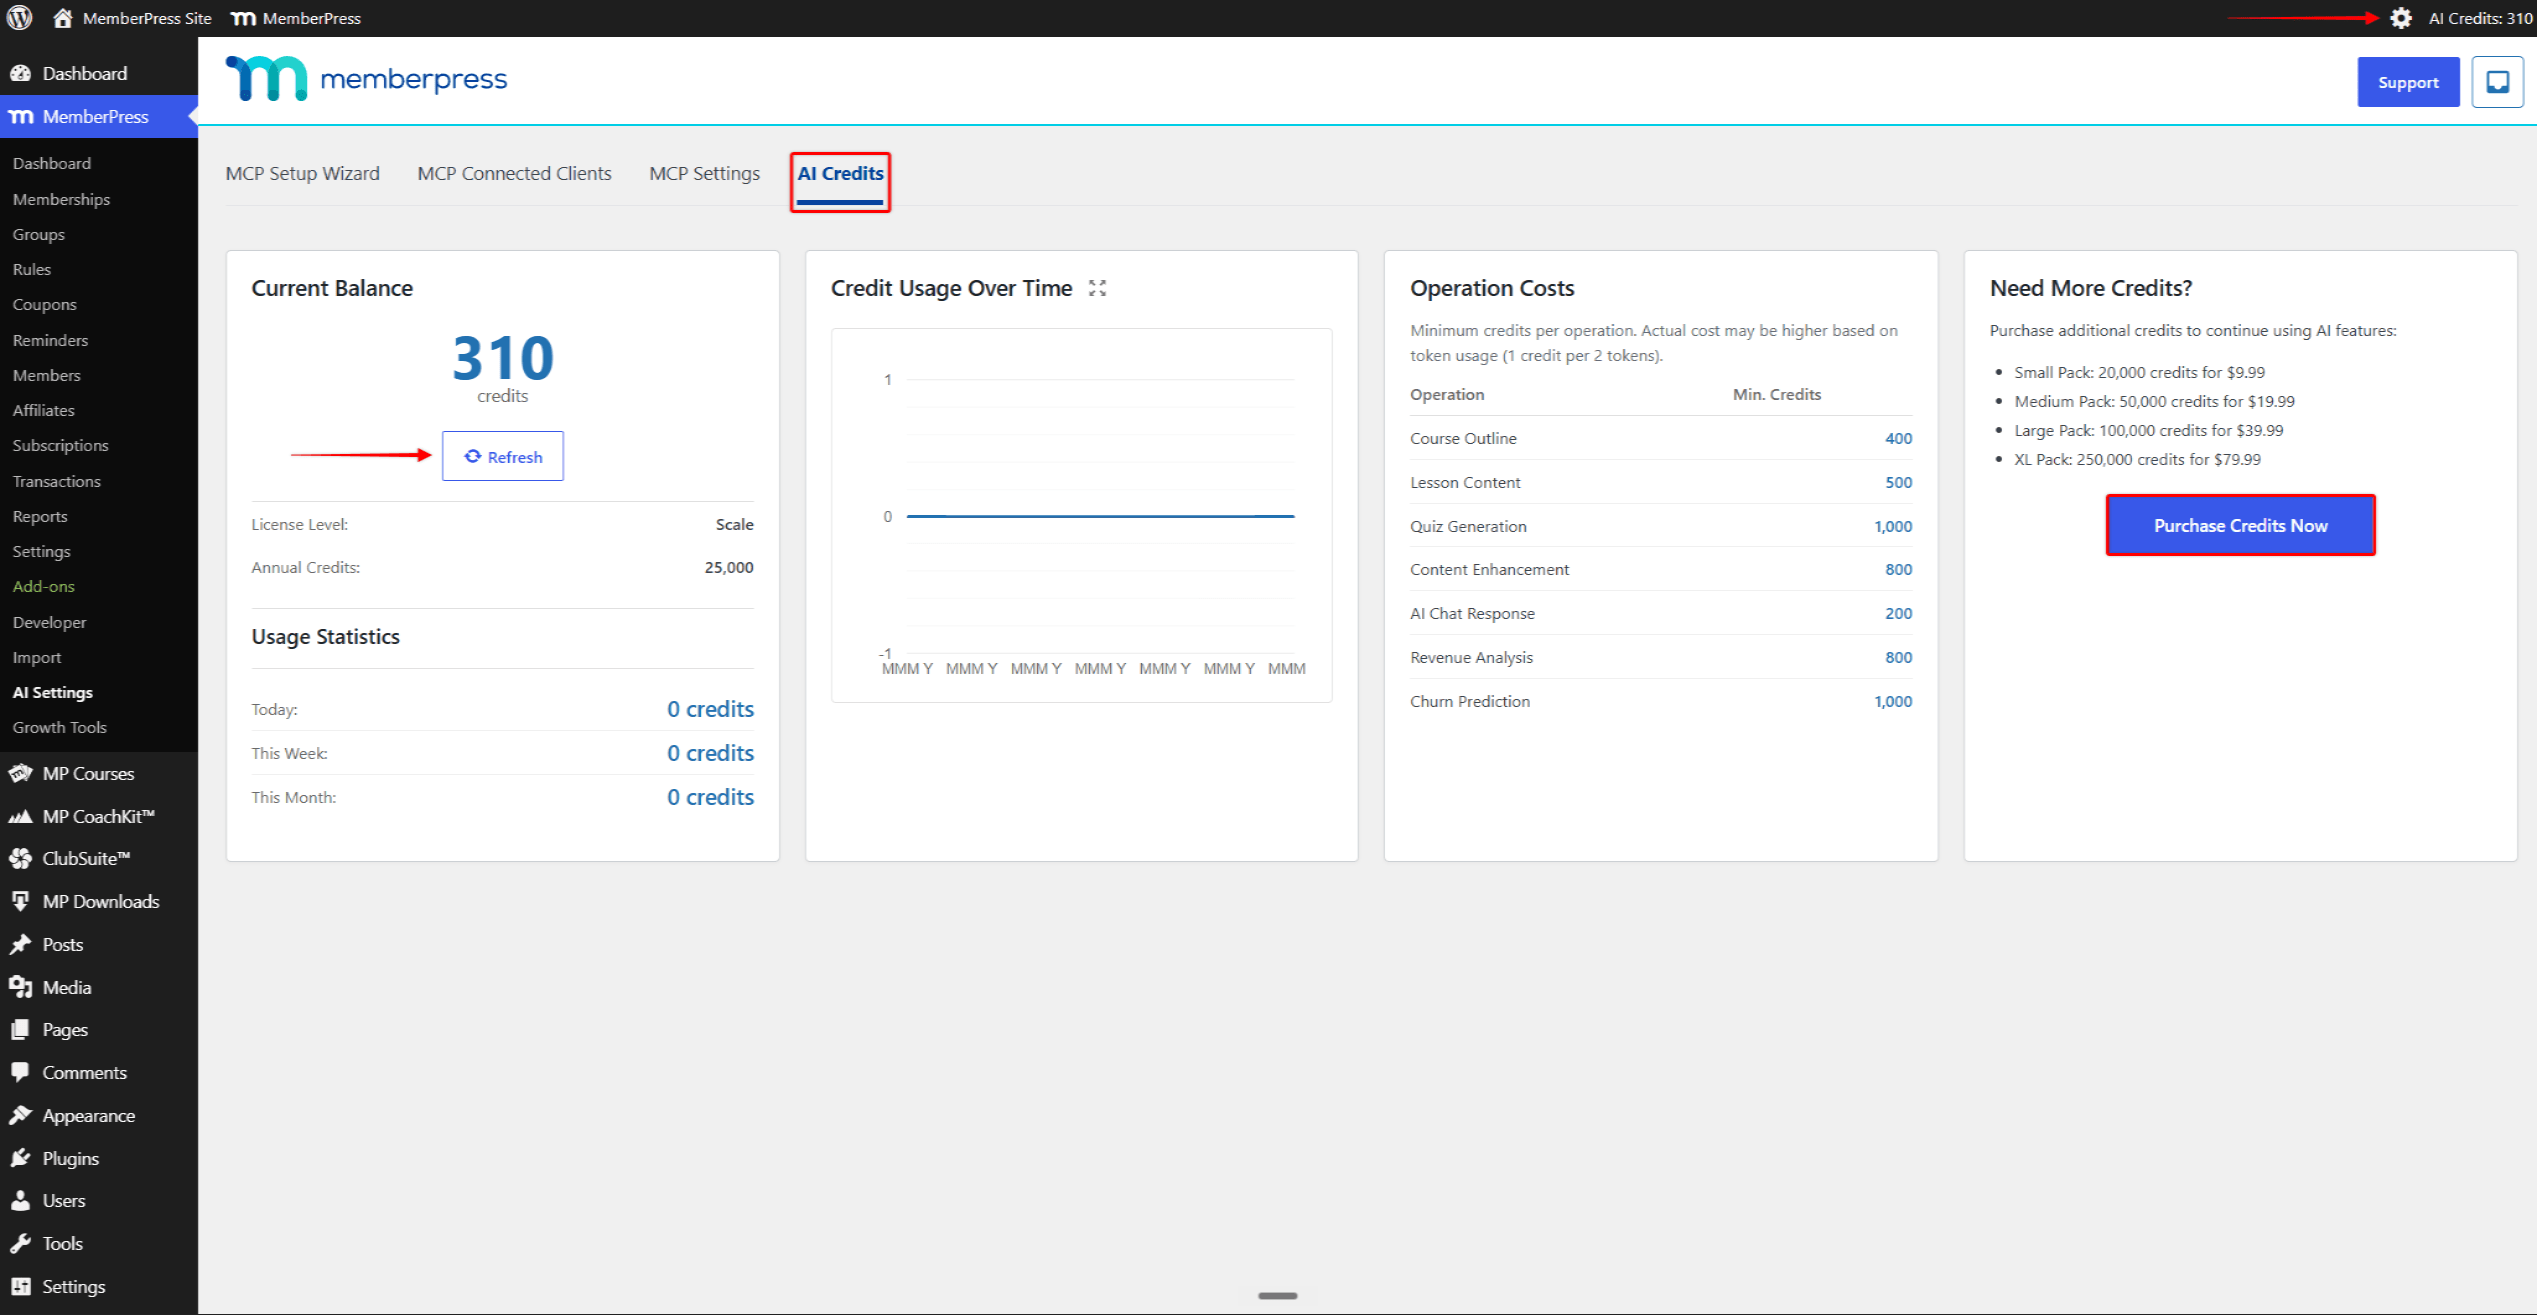
Pour une explication détaillée du système de crédits IA, consultez la Présentation et guide d'installation de MemberPress AI Foundation.
Autres clients du secteur de l'IA
Claude Desktop est l'un des nombreux clients compatibles MCP qui se connectent à MemberPress. Le principe est le même pour chacun d'entre eux ; seules les étapes côté client diffèrent. Le Assistant de configuration MCP les informations relatives à la connexion de quatre clients supplémentaires :
- Curseur;
- VS Code (via GitHub Copilot) ;
- Planche à voile;
- Claude Code (l'interface en ligne de commande).
Les Connexion des clients IA à MemberPress Le guide de référence pour les développeurs traite chacun de ces éléments, ainsi que l'ensemble du vocabulaire et les flux de jetons OAuth et Bearer.
Résumé
Installez AI Foundation à partir de MemberPress > Modules complémentaires, puis définissez le niveau d'accès dans Paramètres MCP. Exécutez le Assistant de configuration MCP Pour copier l'URL du serveur, ajoutez un connecteur personnalisé dans Claude Desktop, puis validez l'autorisation. La connexion apparaît alors dans Clients connectés à MCP, où vous pouvez également la révoquer. Pour modifier le niveau d'accès d'une connexion, déconnectez-vous, augmentez ou réduisez le niveau d'accès, reconnectez-vous, puis révoquez l'ancienne ligne.










 FR
FR  EN
EN  ES
ES  DE
DE  PT
PT 