Lesson 4: How to Protect Your Content with MemberPress Rules
We skimmed the protected content surface in Lesson 1. But now it’s time to dive all in on how to get paid for the content you create.
In this Video…
Discover the magic behind monetizing your WordPress membership site with MemberPress Rules. As an example, we’ll demonstrate how to protect blog posts based on categories.
How to Protect Content with MemberPress Rules
Step 1: Go to MemberPress > Rules > and Click the “Add New” Button
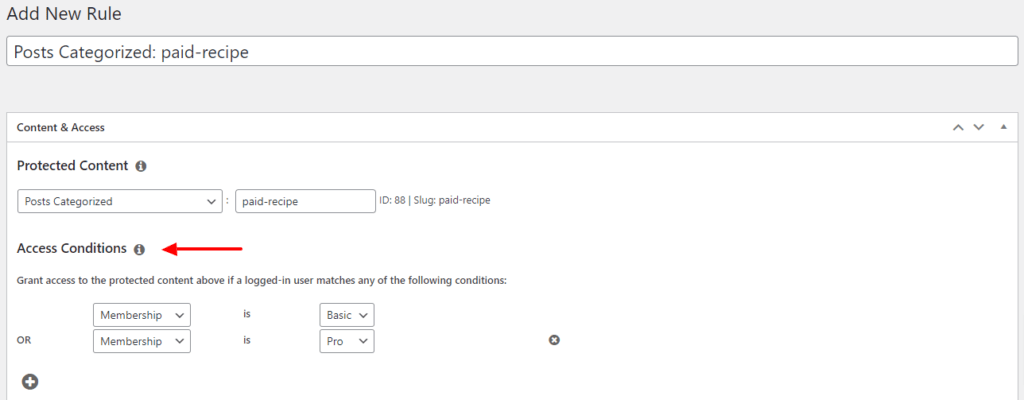
Step 2: Configure the Protected Content Rule
This is what tells the Rule how to identify your premium content. Here's a list of the ways MemberPress allows you to protect content:
- A Single Post. This allows you to protect one individual post.
- Categories. This allows you to protect any posts that have been assigned a certain category. Using categories in WordPress is a great way to keep your membership content organized.
- Tags. This allows you to protect any post which has been tagged with a specific tag. This is similar to the categories rule but utilizes WordPress tags.
- All Posts. This allows you to protect all posts on your site at one time. Be sure to use this option with caution, as it can conflict with other Rules you may have set already such as A Single Post, Posts Categorized As, or Posts Tagged.
- A Single Page. This allows you to protect one individual page.
- Child Pages. This allows you to protect all child pages of the selected page. A child page in WordPress is any page to which you assign a Parent value when creating/editing the page.
- All Pages. This allows you to protect all pages at once. Also be sure to use this option with caution, as it can conflict with other Rules you may have set already, such as Child Pages Of and A Single Page.
- Partial. Select this option if you only plan to use this rule to hide partial content with the use of a shortcode or PHP snippet (see here).
- Custom URL. Allows you to protect files and pages by the URL. This is the type of rule you'll use to protect standalone files such as PDFs. Read this page for more information on protecting files.
- Custom Post Type. yAny custom post types that you've created will appear in the drop-down menu when selecting Rule type. You'll have the option to protect any of the custom post types based on all custom post types or one individual custom post for the one you've selected.
Step 3: Under Access Conditions, specify which membership tier(s) should have permission to view this content.
You may want to restrict access to certain pages or posts to specific memberships. For instance, if you run a website that offers online courses, you may want to restrict access to certain course materials to paying members only.
With MemberPress Rules, you can create a membership level for paying members and assign the restricted course materials to that membership level. This ensures only paying members can access the course materials.

For a more in-depth look at MemberPress Rules, watch our more extensive video below:
Resources + Related Reads
- Read >> How to Use MemberPress Content Protection Rules
- Support Doc: Rules Overview
- Support Doc: Unauthorized Access Management
- Support Doc: Using the Unauthorized Redirect
- Support Doc: Protecting Partial Content
How to Deliver Protected Content
After you’ve protected your content, the last thing you want to do is make your entire collection fully available to your members all at once.
Just think, if a member gets all they need in their first month, why would they pay for a second?
An easy way to prevent this “one-and-done” situation on your site is to set up content dripping.
Releasing content out over an extended period of time has a number of benefits, but primarily, it creates that “don’t miss out” sense that keeps readers coming back for more.
For example, let's say you have 12 protected podcasts. Instead of letting members binge all 12 shows, then bounce before next month's billing cycle, you can enable content dripping so members only have access to one episode per week.
Learn more about how to drip content in our video below:
Related Reads + Resources
- Read >> The Skinny on Drip Content
- Read >> How to Protect Content Based on Roles and Capabilities
- Support Doc: Dripping and Expiring Protected Content

