

MemberPress permet de transformer ses pages par défaut en modèles de blocs WordPress. Ces modèles sont appelés « Full Site Editing » (FSE). Vous pouvez ainsi modifier vos pages d'inscription, de remerciement, de compte, de connexion et de tarifs dans l'éditeur de site WordPress.
Ce document explique comment activer le mode FSE et appliquer des modèles à vos pages d'adhésion. Il aborde également la modification des modèles dans l'éditeur de site et le retour au mode ReadyLaunch™ par défaut.
Que sont les modèles FSE MemberPress ?
ReadyLaunch™ est le système de modèles MemberPress pour le Pages réservées MemberPress (par exemple, les pages d'inscription, de compte et de connexion). Par défaut, les modèles ReadyLaunch™ utilisent des mises en page prédéfinies que vous pouvez gérer depuis les paramètres de MemberPress. Vous pouvez les modifier à l'aide des blocs Gutenberg dans le Éditeur de blocs WordPress nécessite le mode FSE.
Lorsque vous activez le mode FSE, MemberPress convertit ces pages en pages WordPress natives. modèles de blocs. Vous pouvez ensuite ouvrir chaque modèle dans le Rédacteur du site et le modifier à l'aide de blocs. Les modèles FSE ne fonctionnent qu'avec le pages réservées et le pages d'inscription et de tarifs.
Lorsque le mode FSE est activé, vous pouvez :
- Modifier les pages par défaut de MemberPress sans code personnalisé ;
- Ajoutez, supprimez, déplacez et personnalisez n'importe quel bloc au sein de chaque modèle ;
- Modifier l'en-tête et le pied de page communs appliqués à ces pages ;
- Conservez toutes les fonctionnalités de MemberPress dans les nouveaux modèles.
C'est vous qui choisissez les pages gérées par les modèles FSE. Vous pouvez également revenir au mode ReadyLaunch™ par défaut à tout moment.
Exigences
Le mode FSE nécessite les éléments suivants :
- WordPress 6.7 ou version ultérieure. Le mode FSE utilise l'API d'enregistrement des modèles de blocs WordPress, ajoutée dans cette version ;
- Un thème de bloc actif (un thème « Full Site Editing »). Parmi les exemples, on peut citer le Thème ReadyLaunch™ et les thèmes WordPress par défaut (par exemple, Twenty Twenty-Five) ;
- Le plugin MemberPress a été installé et activé.
Activation du mode FSE
Le mode FSE est désactivé par défaut. Son activation n'entraîne pas de modification automatique de votre site web. Suivez ces étapes pour l'activer :
- Naviguez jusqu'à Tableau de bord > MemberPress > Paramètreset cliquez sur le bouton ReadyLaunch™ tabulation.
- Lorsque votre thème prend en charge la fonction « Édition complète du site », un message s'affiche en haut de l'onglet. Ce message indique : “ Votre thème prend en charge la fonctionnalité ” Full Site Editing ». Activez le mode FSE pour utiliser les modèles de blocs MemberPress sur vos pages d'adhésion. » Cliquez sur le bouton Activer le mode FSE bouton figurant dans l'avis.
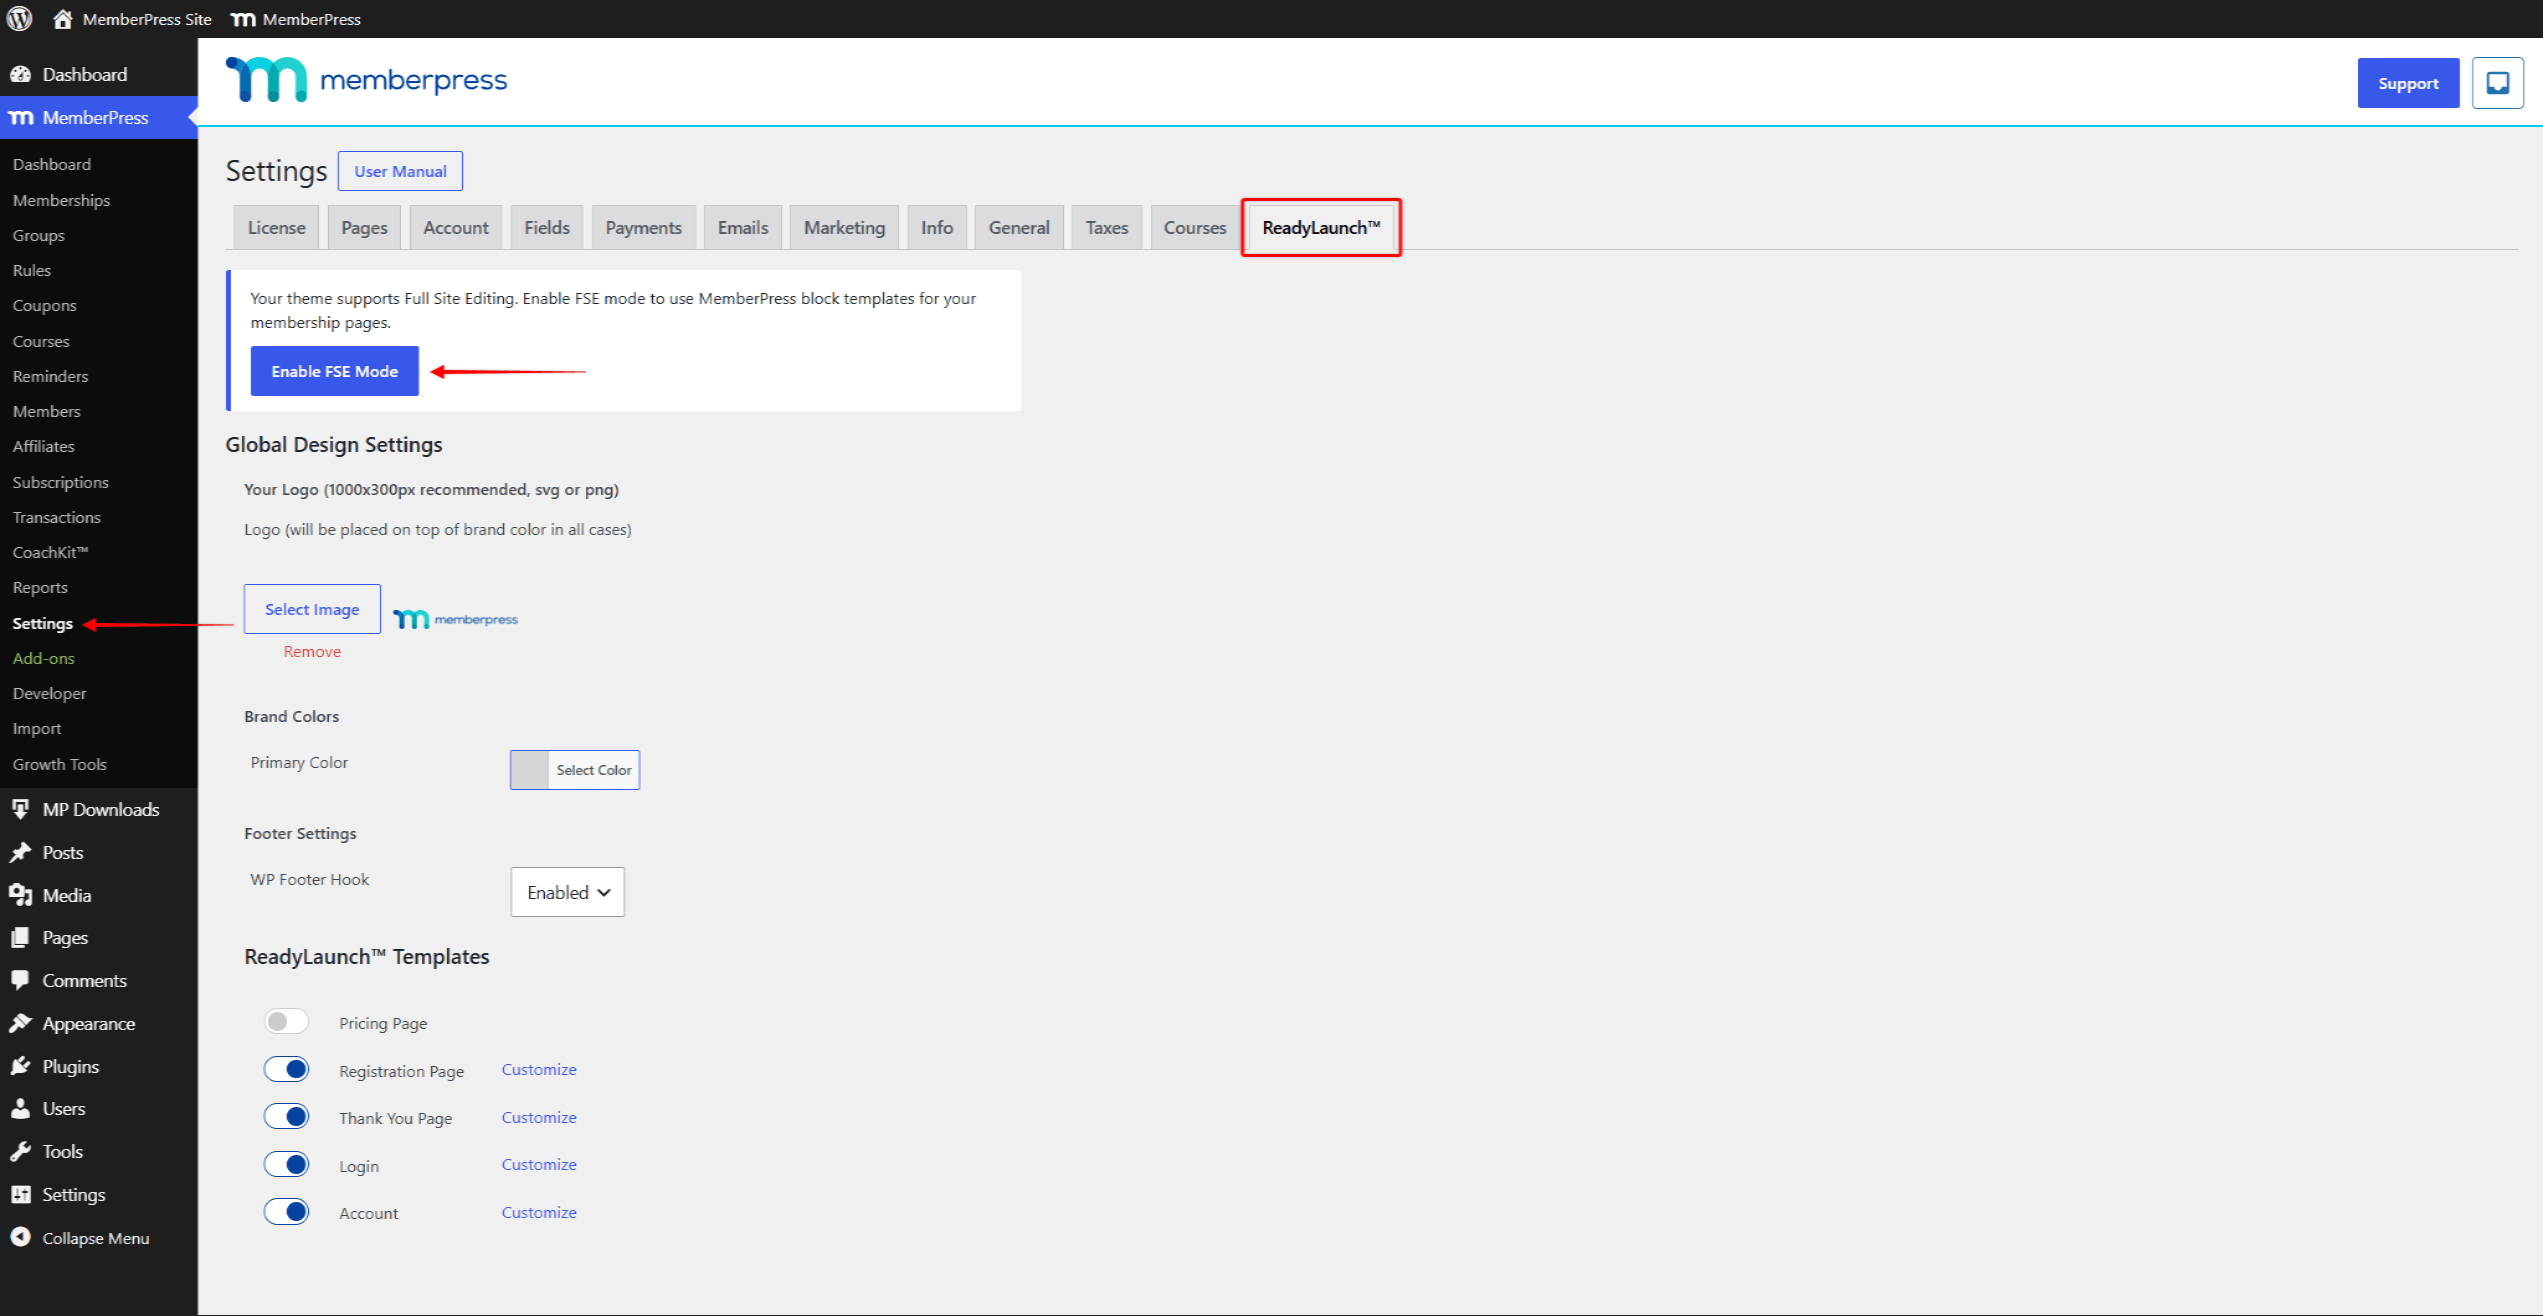
- Une boîte de dialogue vous indique que les modèles FSE s'appliqueront à vos pages MemberPress. Cliquez sur OK pour confirmer.
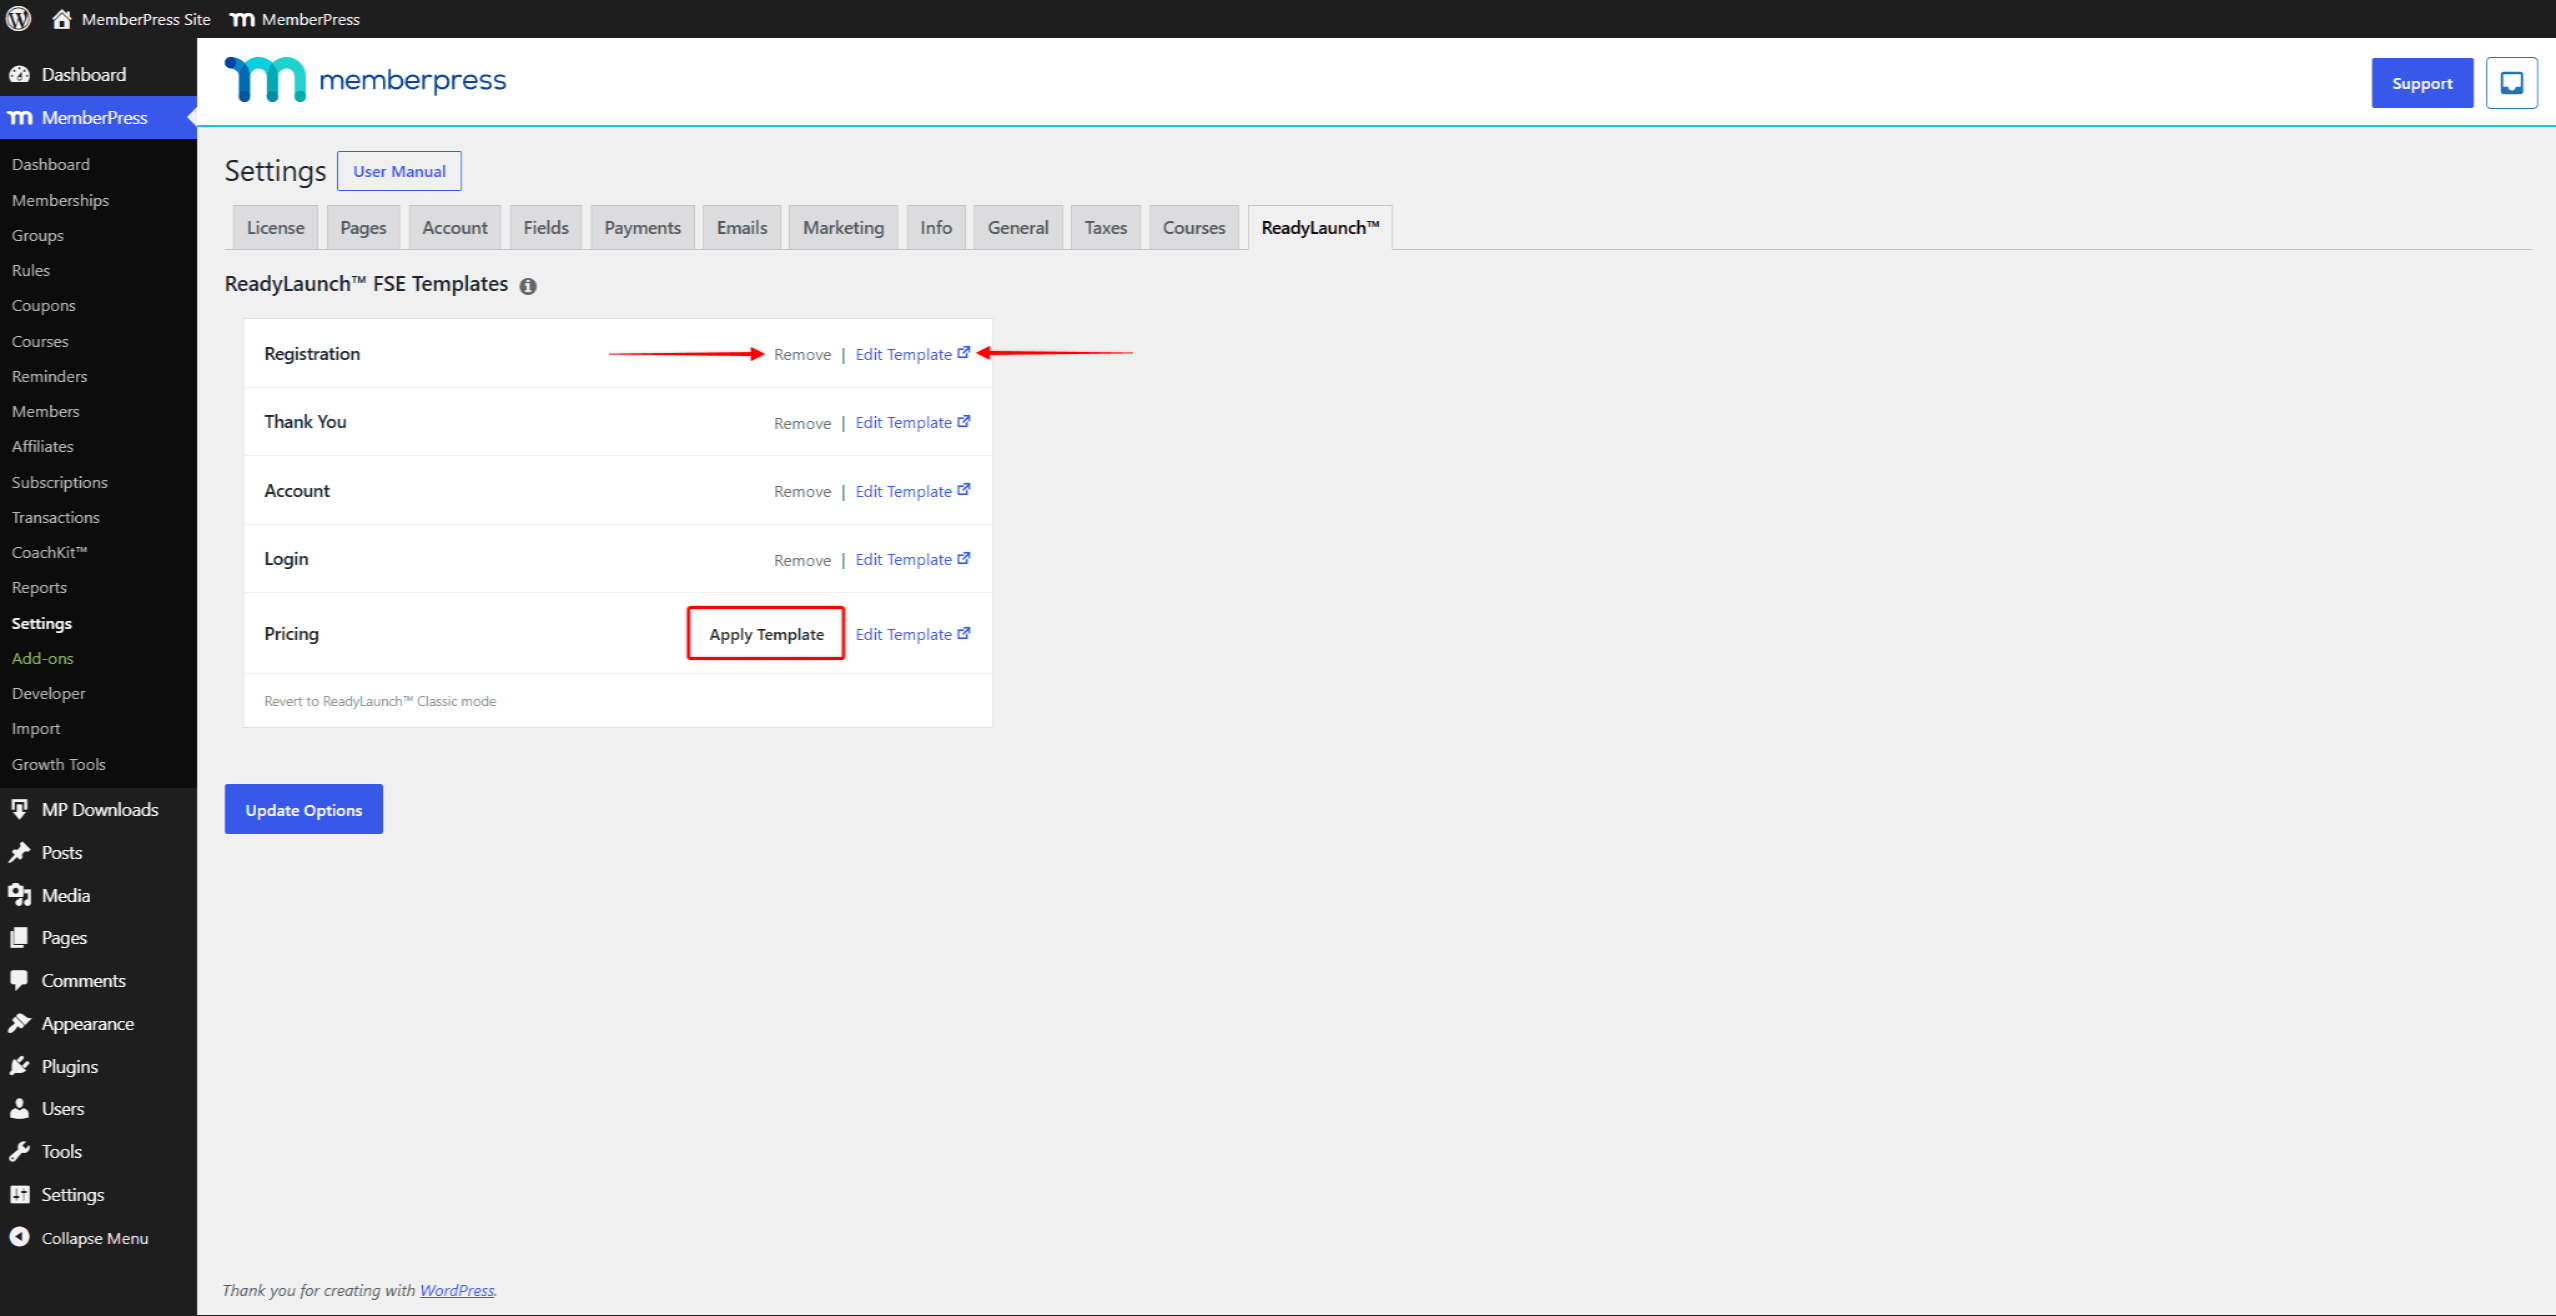
- Les ReadyLaunch™ L'onglet affiche désormais le “ Modèles ReadyLaunch™ FSE ” tableau au lieu des paramètres de conception ReadyLaunch™ par défaut.
Les modèles ReadyLaunch™ par défaut que vous utilisez déjà restent en vigueur. MemberPress les convertit en modèles FSE tout en conservant vos paramètres. Vos paramètres de conception ReadyLaunch™ par défaut (par exemple, les couleurs de la marque et les images d'accueil) sont repris comme valeurs de départ.
Gestion des modèles FSE
Lorsque le mode FSE est activé, le ReadyLaunch™ L'onglet « Listes » propose un modèle par page. Les modèles de base couvrent vos pages d'inscription, de remerciement, de compte, de connexion et de tarifs.
Chaque ligne affiche le nom du modèle à gauche et les actions disponibles à droite :
- Appliquer le modèle: indique que le modèle n'est pas actif. Cliquez dessus pour appliquer le modèle aux pages concernées ;
- Retirer: indique quand le modèle est appliqué. Cliquez dessus pour dissocier le modèle des pages concernées ;
- Modifier le modèle: ouvre le modèle dans l'éditeur de site. Cette action est disponible pour tous les modèles.
Un modèle s'applique simultanément à toutes les pages associées. Par exemple, le modèle d'inscription s'applique à toutes vos pages d'adhésion. Pour appliquer un modèle :
- Recherchez la ligne du modèle, puis cliquez sur le Appliquer le modèle bouton.
- Confirmez l'action dans la fenêtre contextuelle du navigateur.
- La ligne est mise à jour, et le Retirer Le lien remplace le bouton.
- Répétez cette opération pour chaque page que vous souhaitez voir gérée par les modèles FSE.
- Cliquez sur le bouton Options de mise à jour pour enregistrer vos paramètres.
Modification des modèles dans l'éditeur de site
Chaque modèle appliqué s'ouvre dans l'éditeur de site WordPress. Vous pouvez alors le modifier comme n'importe quel contenu basé sur des blocs :
- Naviguez jusqu'à Tableau de bord > MemberPress > Paramètreset cliquez sur le bouton ReadyLaunch™ tabulation.
- Dans la ligne du modèle, cliquez sur le Modifier le modèle lien. Le modèle s'ouvre dans l'éditeur de site, dans un nouvel onglet du navigateur.
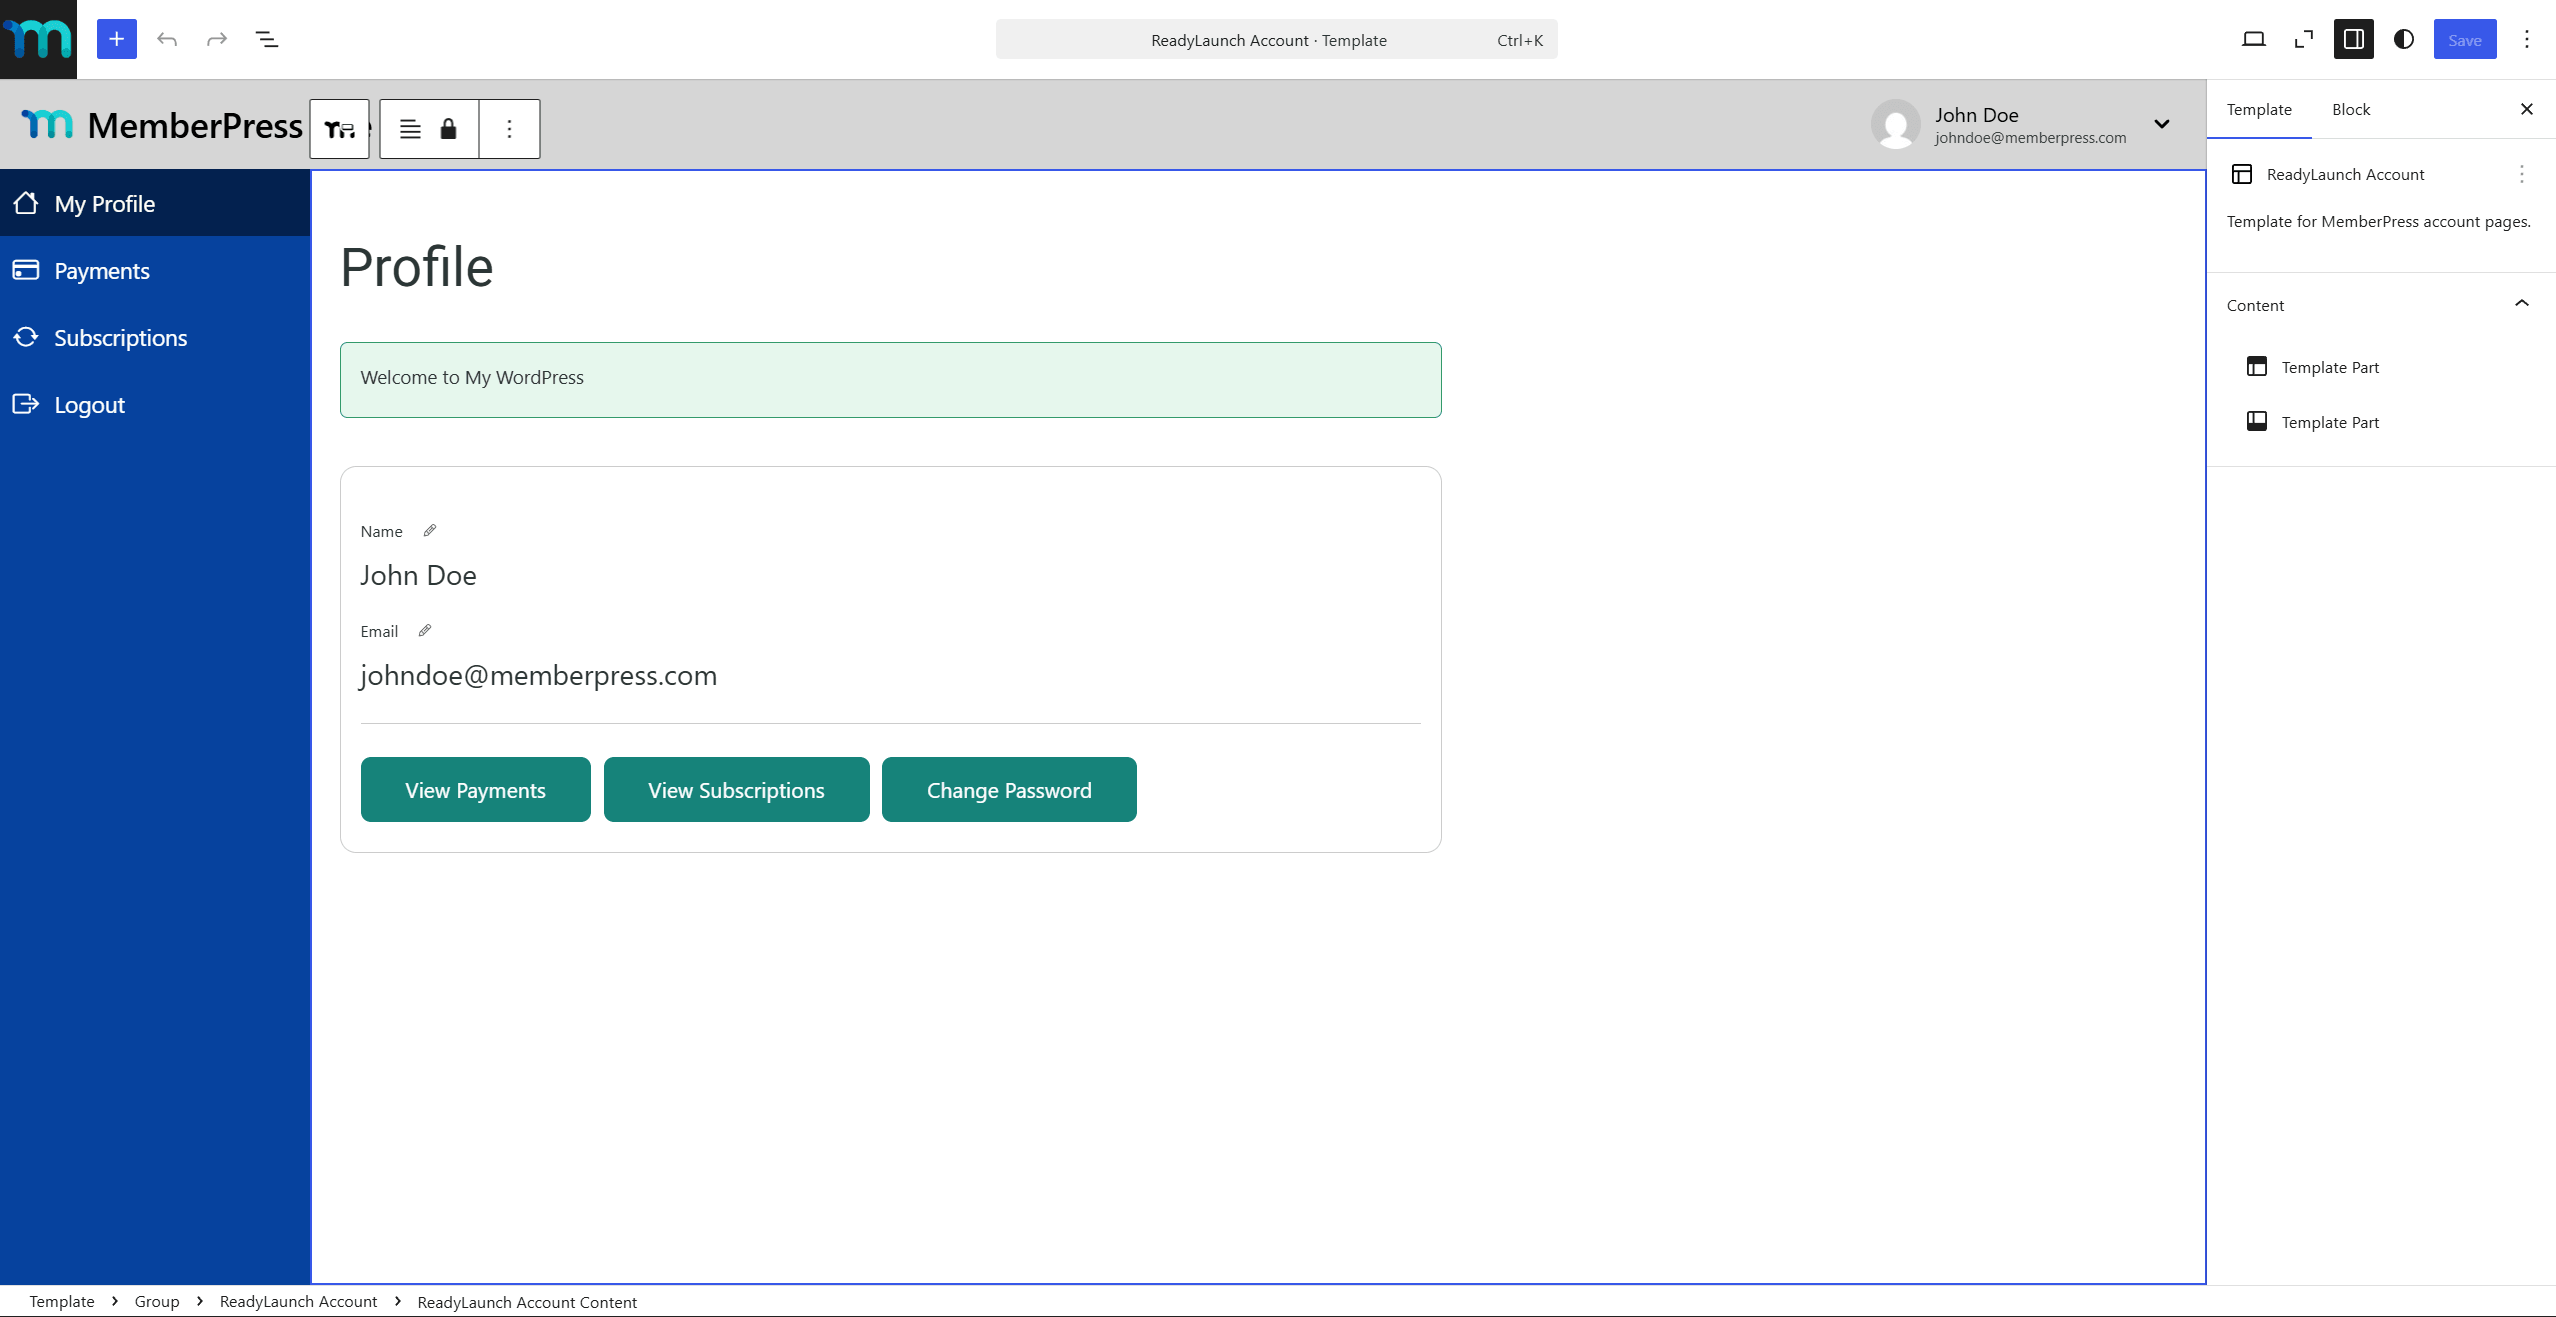
- Ouvrir le Affichage sous forme de liste pour voir la structure du modèle. Chaque modèle comporte un en-tête commun, le contenu de la page et un pied de page commun.
- Cliquez sur n'importe quel bloc pour le modifier. Vous pouvez modifier le texte, les couleurs et la mise en page, ou encore ajouter et supprimer des blocs.
- Cliquez sur Économiser pour publier vos modifications.
Les modifications s'appliquent à toutes les pages utilisant ce modèle. Vos visiteurs voient immédiatement le nouveau design.
Modification de l'en-tête et du pied de page partagés
L'en-tête et le pied de page sont communs éléments de modèle. Tous les modèles FSE MemberPress utilisent le même en-tête et le même pied de page. Lorsque vous modifiez l'un de ces éléments, la modification s'applique partout.
Vous pouvez modifier l'en-tête ou le pied de page de deux façons :
- Dans n'importe quel modèle ouvert, cliquez sur la zone d'en-tête ou de pied de page, puis cliquez sur Modifier le texte d'origine.
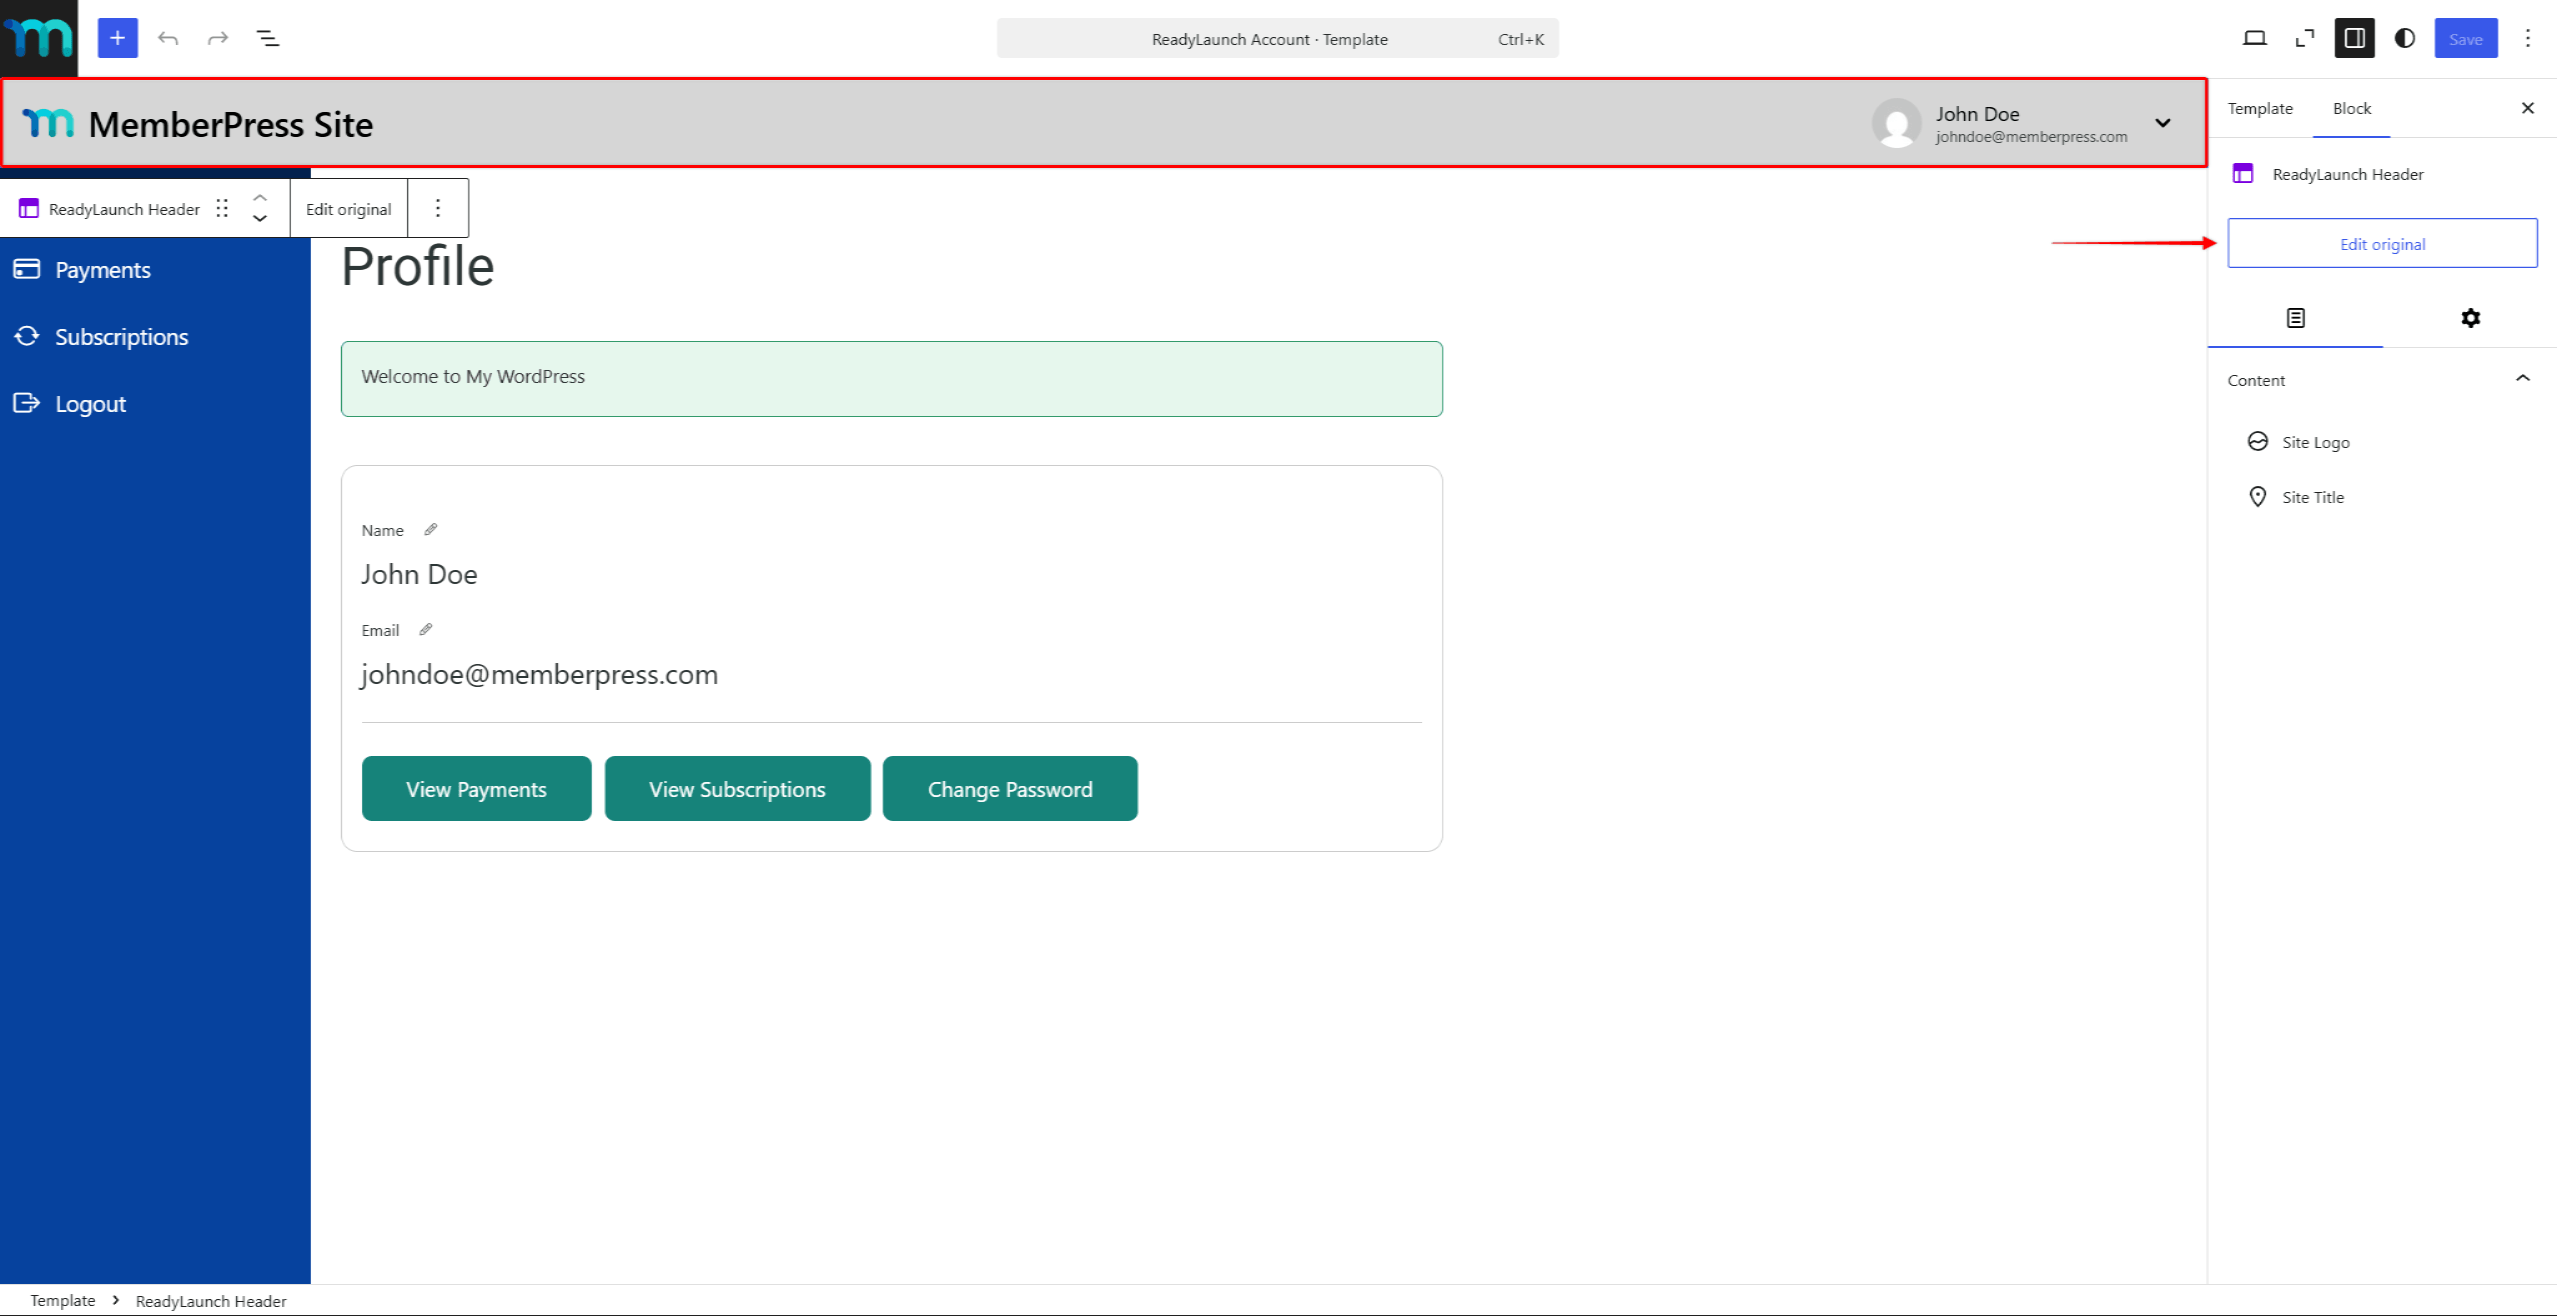
- Vous pouvez également vous rendre sur Tableau de bord > Apparence > Éditeur, cliquez Modèles, puis ouvrez l'en-tête ou le pied de page.
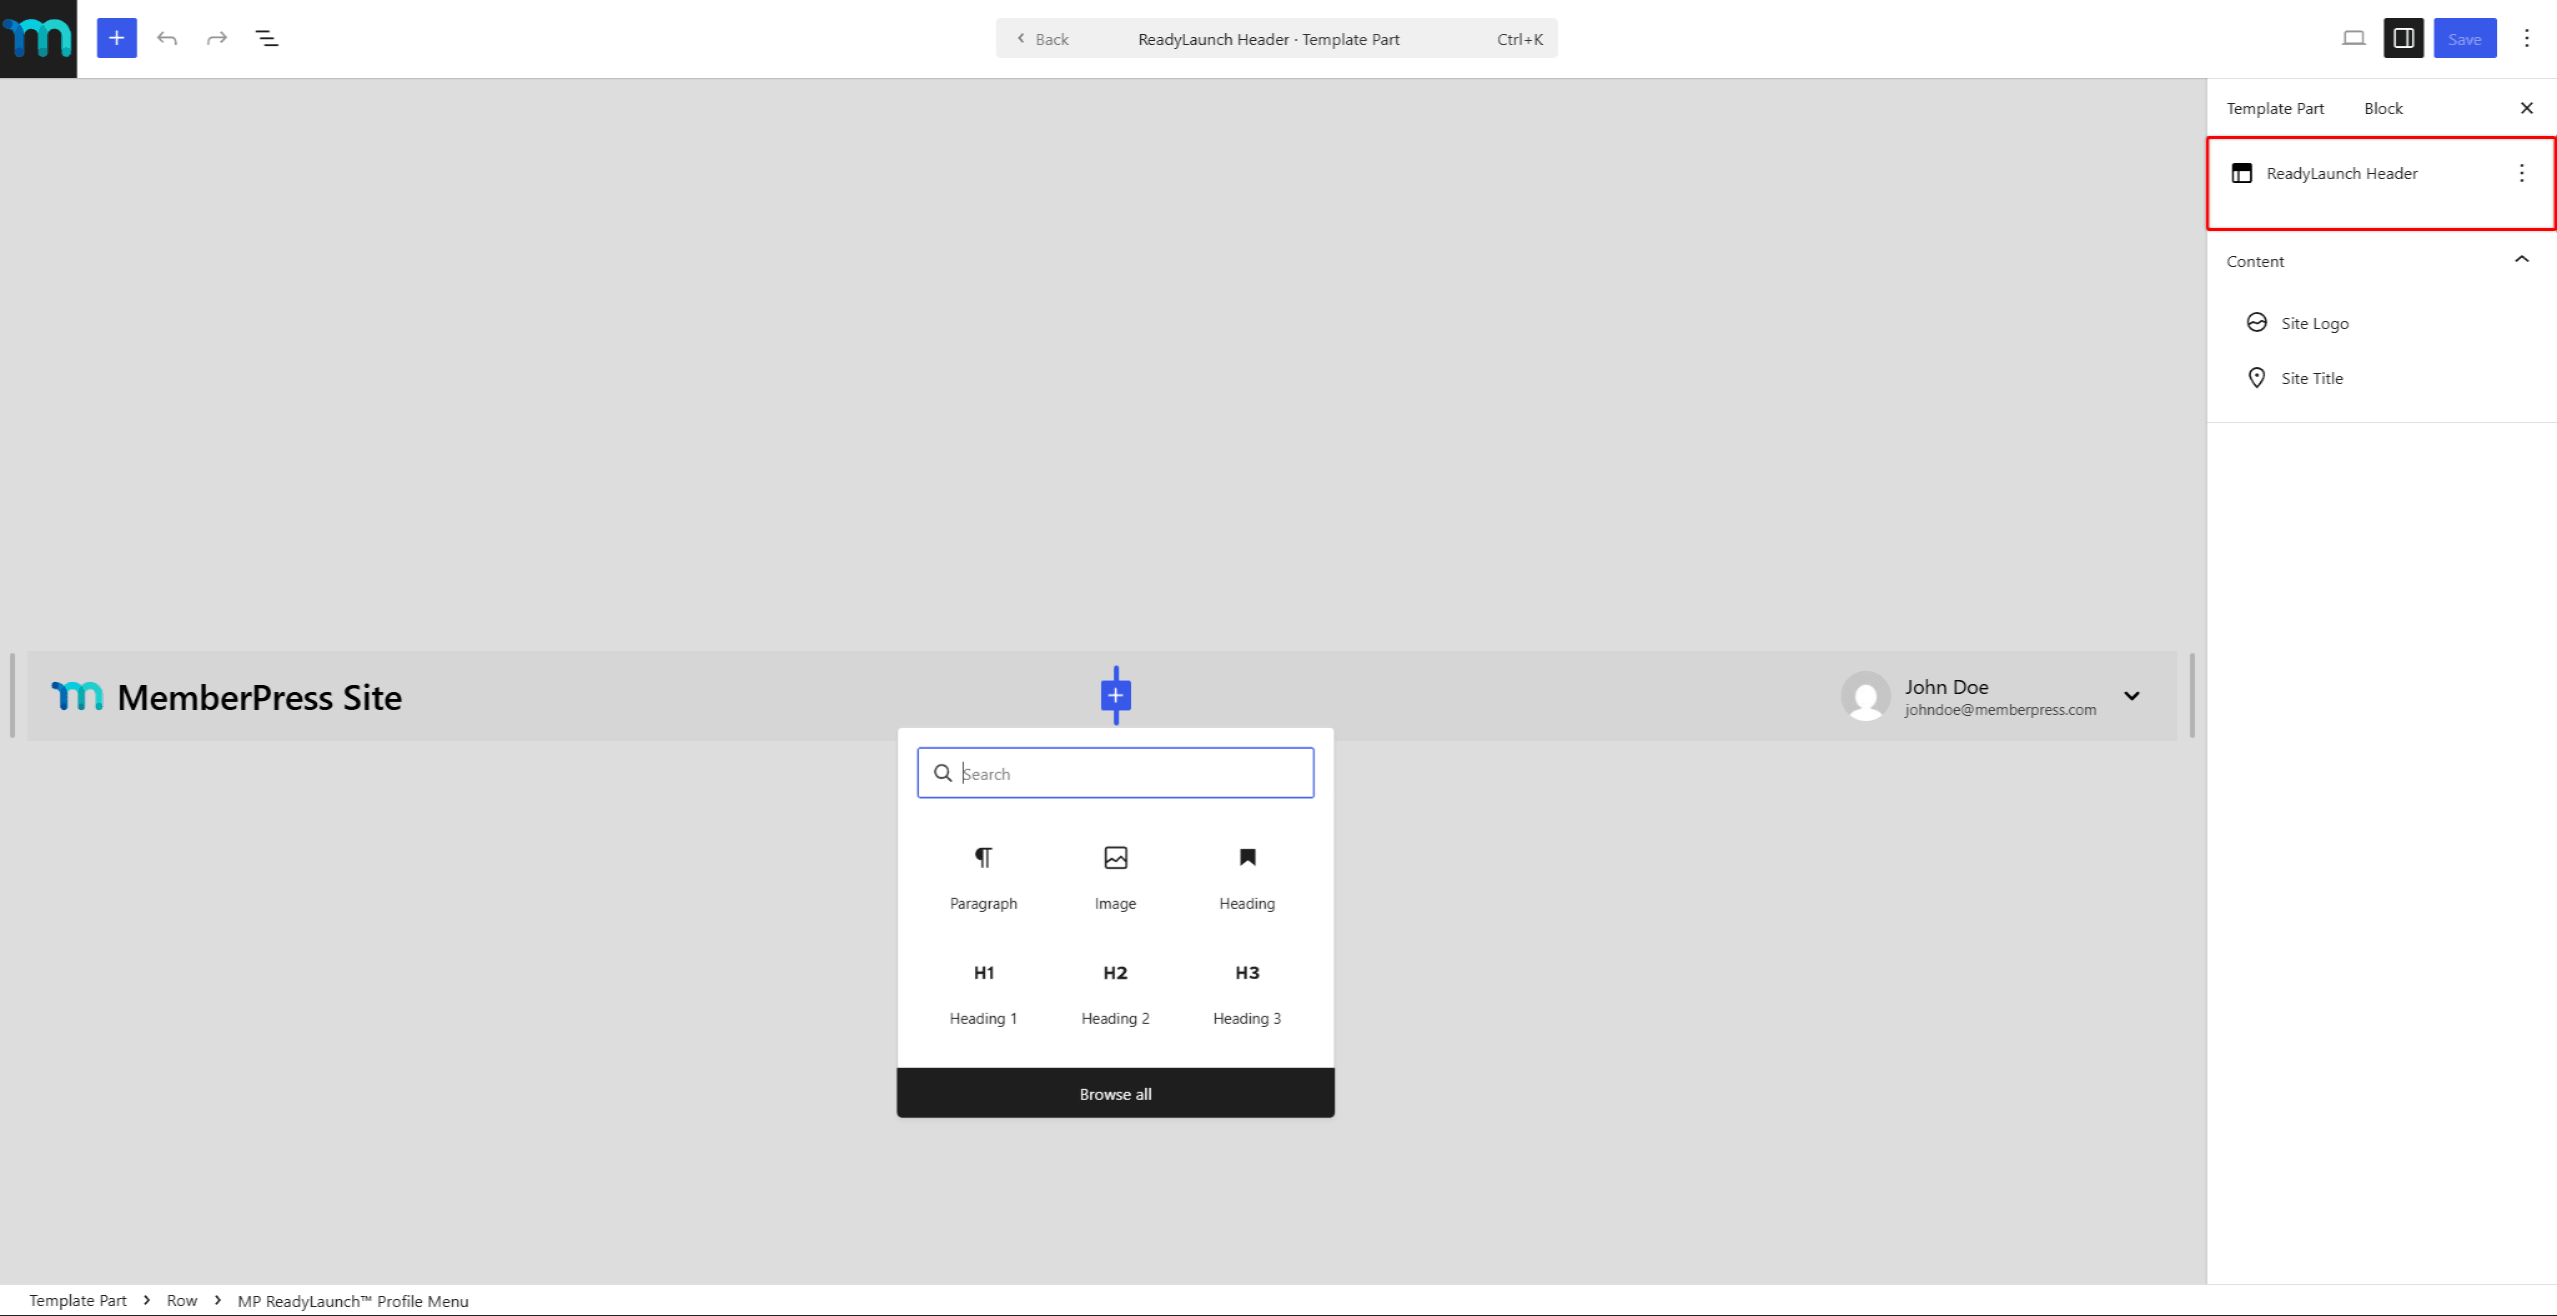
Ici, vous pouvez ajouter des blocs, déplacer des éléments et modifier les couleurs. Cliquez sur Économiser pour appliquer les modifications à tous les modèles.
Options du modèle
Chaque modèle dispose de ses propres blocs et paramètres. Par exemple :
- Les compte Le modèle comporte le menu du compte et les zones de contenu du compte. Vous pouvez définir la disposition du menu (verticale ou horizontale), les couleurs du menu et une image d'accueil ;
- Les merci Le modèle comporte deux sections : l'une pour les paiements réussis et l'autre pour les paiements ayant échoué. Vous pouvez modifier le contenu affiché à vos clients dans chaque cas ;
- Les enregistrement Le modèle identifie le niveau d'adhésion affiché par un visiteur. Le bloc d'inscription charge automatiquement le niveau d'adhésion correspondant.
Cliquez sur n'importe quel bloc d'un modèle pour afficher ses paramètres et ses styles dans le panneau de droite.
Modèles d'extensions
Certaines extensions MemberPress ajoutent leurs propres modèles FSE. Lorsqu'une telle extension est active, ses modèles apparaissent sous forme de nouvelles lignes dans le tableau. Vous pouvez les appliquer, les supprimer et les modifier comme les modèles par défaut.
Ces modules complémentaires sont fournis avec les modèles FSE :
- Cours sur MemberPress: ajoute le modèle « cours » et l'en-tête « cours » ;
- MemberPress CoachKit™: ajoute le modèle de coaching ;
- MemberPress ClubCircles™: ajoute le modèle « cercles ».
La documentation de chaque extension fournit des informations détaillées sur ces modèles.
Revenir au mode ReadyLaunch™ par défaut
Vous pouvez revenir au mode ReadyLaunch™ par défaut à tout moment :
- Naviguez jusqu'à Tableau de bord > MemberPress > Paramètreset cliquez sur le bouton ReadyLaunch™ tabulation.
- Cliquez sur le bouton Revenir au mode ReadyLaunch™ Classic lien situé au bas de la “ Modèles ReadyLaunch™ FSE ” tableau.
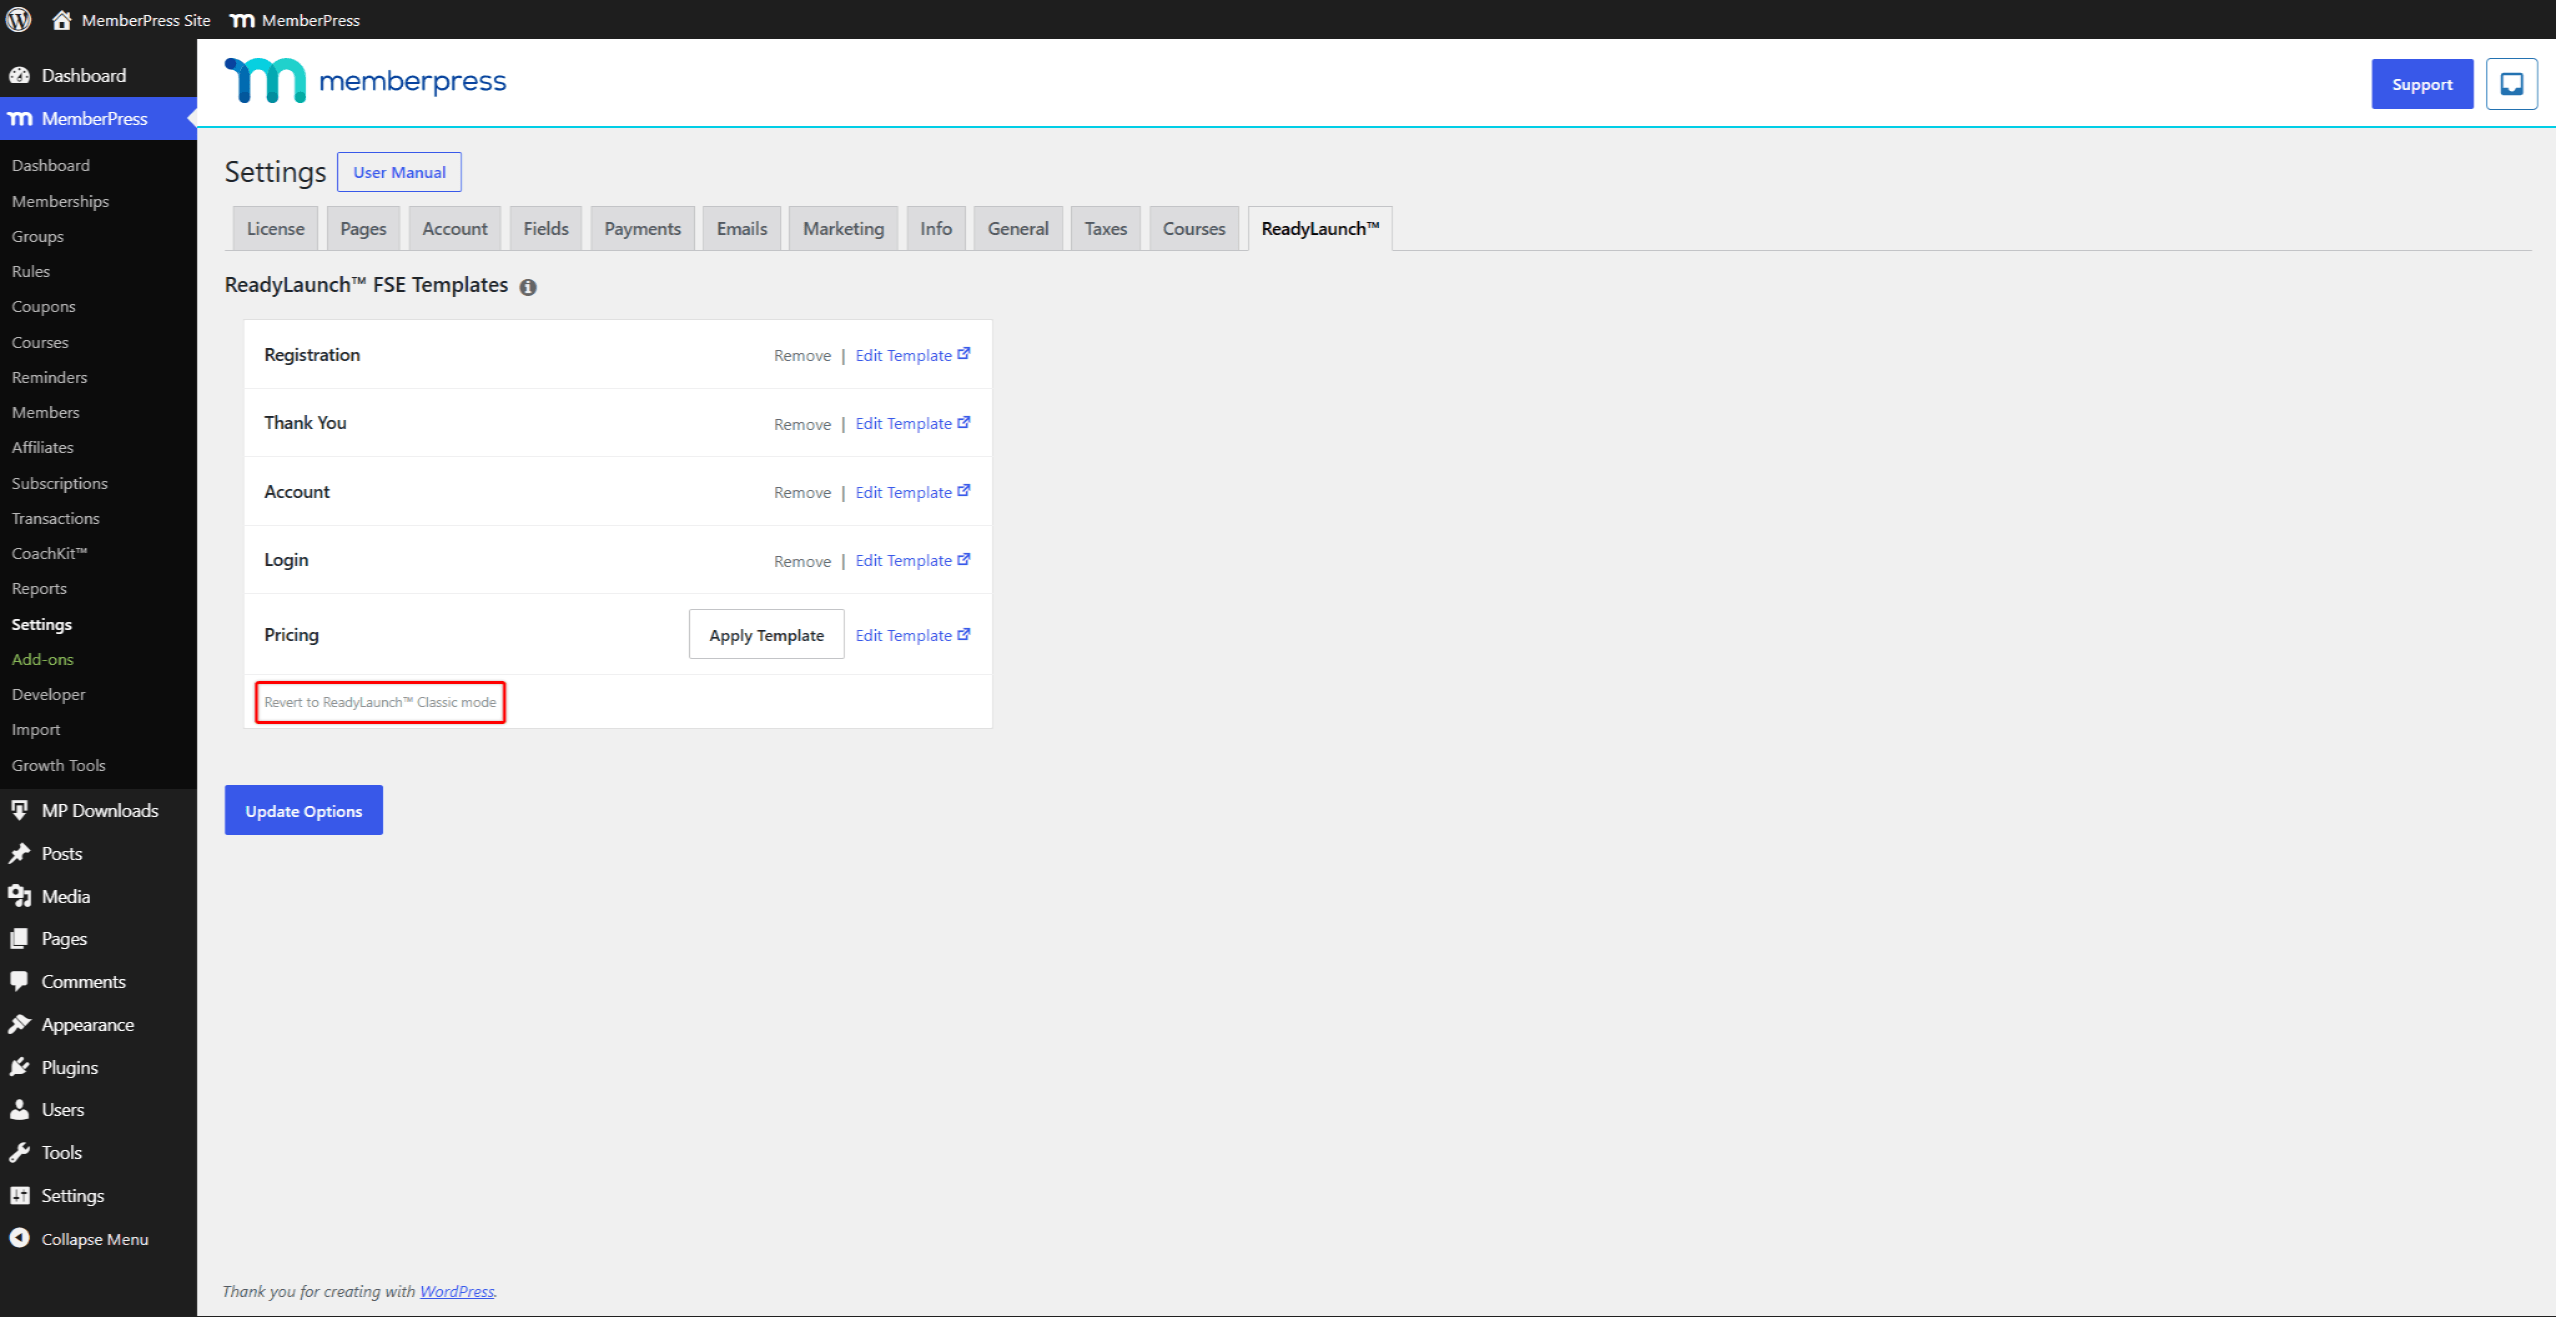
- Confirmez l'action dans la fenêtre contextuelle du navigateur.
Cet onglet affiche à nouveau les paramètres de conception par défaut de ReadyLaunch™. Les boutons de basculement des modèles sont désactivés par défaut. Activez les boutons de basculement correspondant aux modèles ReadyLaunch™ par défaut que vous souhaitez utiliser. La notification FSE s'affiche également à nouveau, vous permettant de réactiver le mode FSE à tout moment.
La restauration ne supprime pas les personnalisations apportées à votre modèle. WordPress conserve les modifications effectuées dans l'éditeur de site, et celles-ci réapparaissent lorsque vous réactivez le mode FSE.
Résumé
Le mode FSE MemberPress transforme vos pages d'adhésion en modèles de blocs WordPress. Il vous suffit d'activer ce mode une seule fois, d'appliquer les modèles dont vous avez besoin, puis de tout modifier dans l'éditeur de site. L'en-tête et le pied de page communs garantissent une mise en page homogène de toutes vos pages.
Pour en savoir plus sur les modèles ReadyLaunch™ par défaut, consultez le Présentation de ReadyLaunch™. Si vous avez besoin d'un thème par blocs, vous pouvez utiliser le Thème ReadyLaunch™. Pour créer des pages personnalisées, consultez le blocs Gutenberg MemberPress disponibles.










 FR
FR  EN
EN  ES
ES  DE
DE  PT
PT 