

Le thème ReadyLaunch™ est un thème WordPress inclus dans les formules MemberPress. Pour commencer à utiliser ce thème sur votre site web, vous devez d'abord l'installer et l'activer.
Ce guide explique comment installer le thème ReadyLaunch™ à partir de la page « Extensions » de MemberPress. Il aborde également le téléchargement depuis votre compte MemberPress, les autres méthodes d'installation possibles et les étapes de dépannage de base.
Avant de commencer
Vous pouvez installer plusieurs thèmes WordPress, mais un seul thème peut être actif à la fois. Par défaut, WordPress active automatiquement l'un de ses thèmes par défaut après l'installation.
Vous devez donc installer le thème ReadyLaunch™ et le définir comme thème actif.
Ce thème est conçu pour fonctionner avec le plugin MemberPress. Ce plugin fournit les modèles et les blocs FSE pour vos pages d'adhésion, et le thème les met automatiquement en forme.
Avant de commencer, assurez-vous d'avoir :
- Un abonnement MemberPress actif (formule « Launch », « Growth » ou « Scale ») ;
- Les Plugin MemberPress installé avec un licence activée;
- WordPress 6.7 ou version ultérieure ;
- Accès à l'espace d'administration de WordPress (tableau de bord) avec les identifiants d'administrateur ;
- Facultatif (pour les méthodes alternatives uniquement) : accès à votre Compte MemberPress et un accès FTP.
Installation à partir de la page des modules complémentaires de MemberPress
La méthode d'installation recommandée est l'installation en un clic depuis la page des extensions de MemberPress :
- Naviguez jusqu'à Tableau de bord > MemberPress > Modules complémentaires.
- Trouver le Thème ReadyLaunch™ dans la liste.
- Cliquez sur le bouton Installer le module complémentaire bouton figurant sur la fiche du thème ReadyLaunch™.
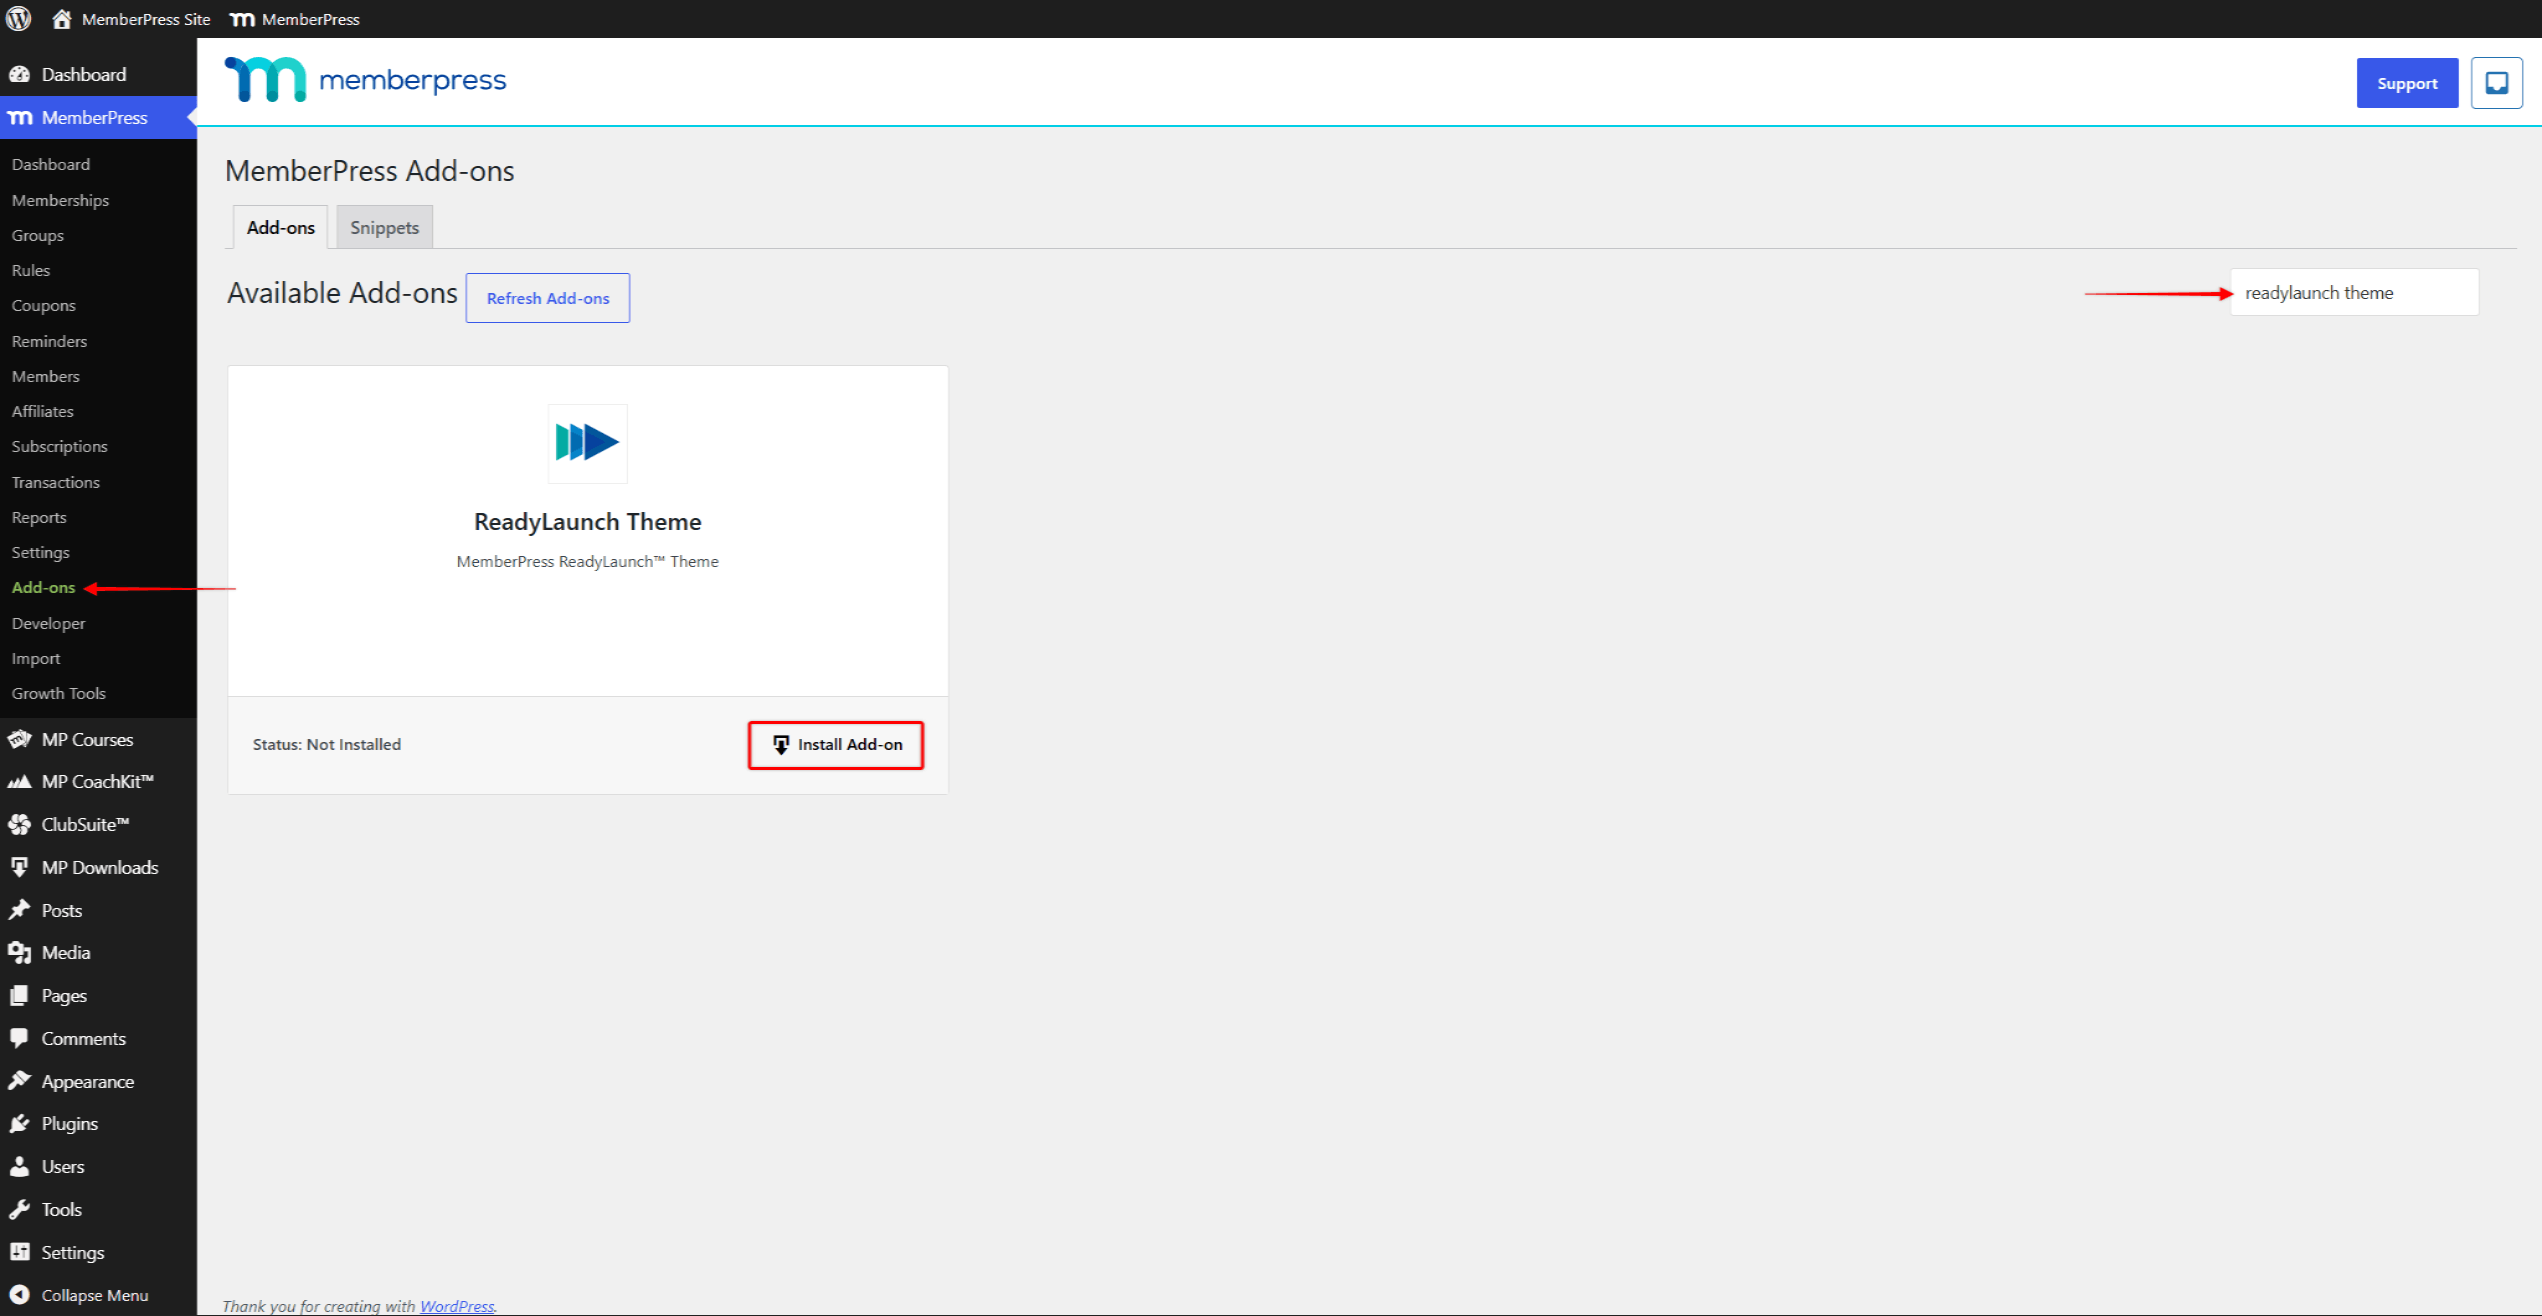
MemberPress installe automatiquement le thème. Grâce à cette méthode, vous pouvez éviter de télécharger et de mettre en ligne manuellement le fichier, et passer directement à l'activation.
Téléchargement du thème depuis votre compte MemberPress
Vous pouvez également télécharger le thème sous forme de fichier ZIP depuis votre compte MemberPress. Pour le télécharger, procédez comme suit :
- Connectez-vous à votre Compte MemberPress.
- Cliquez sur le bouton Téléchargements tabulation.
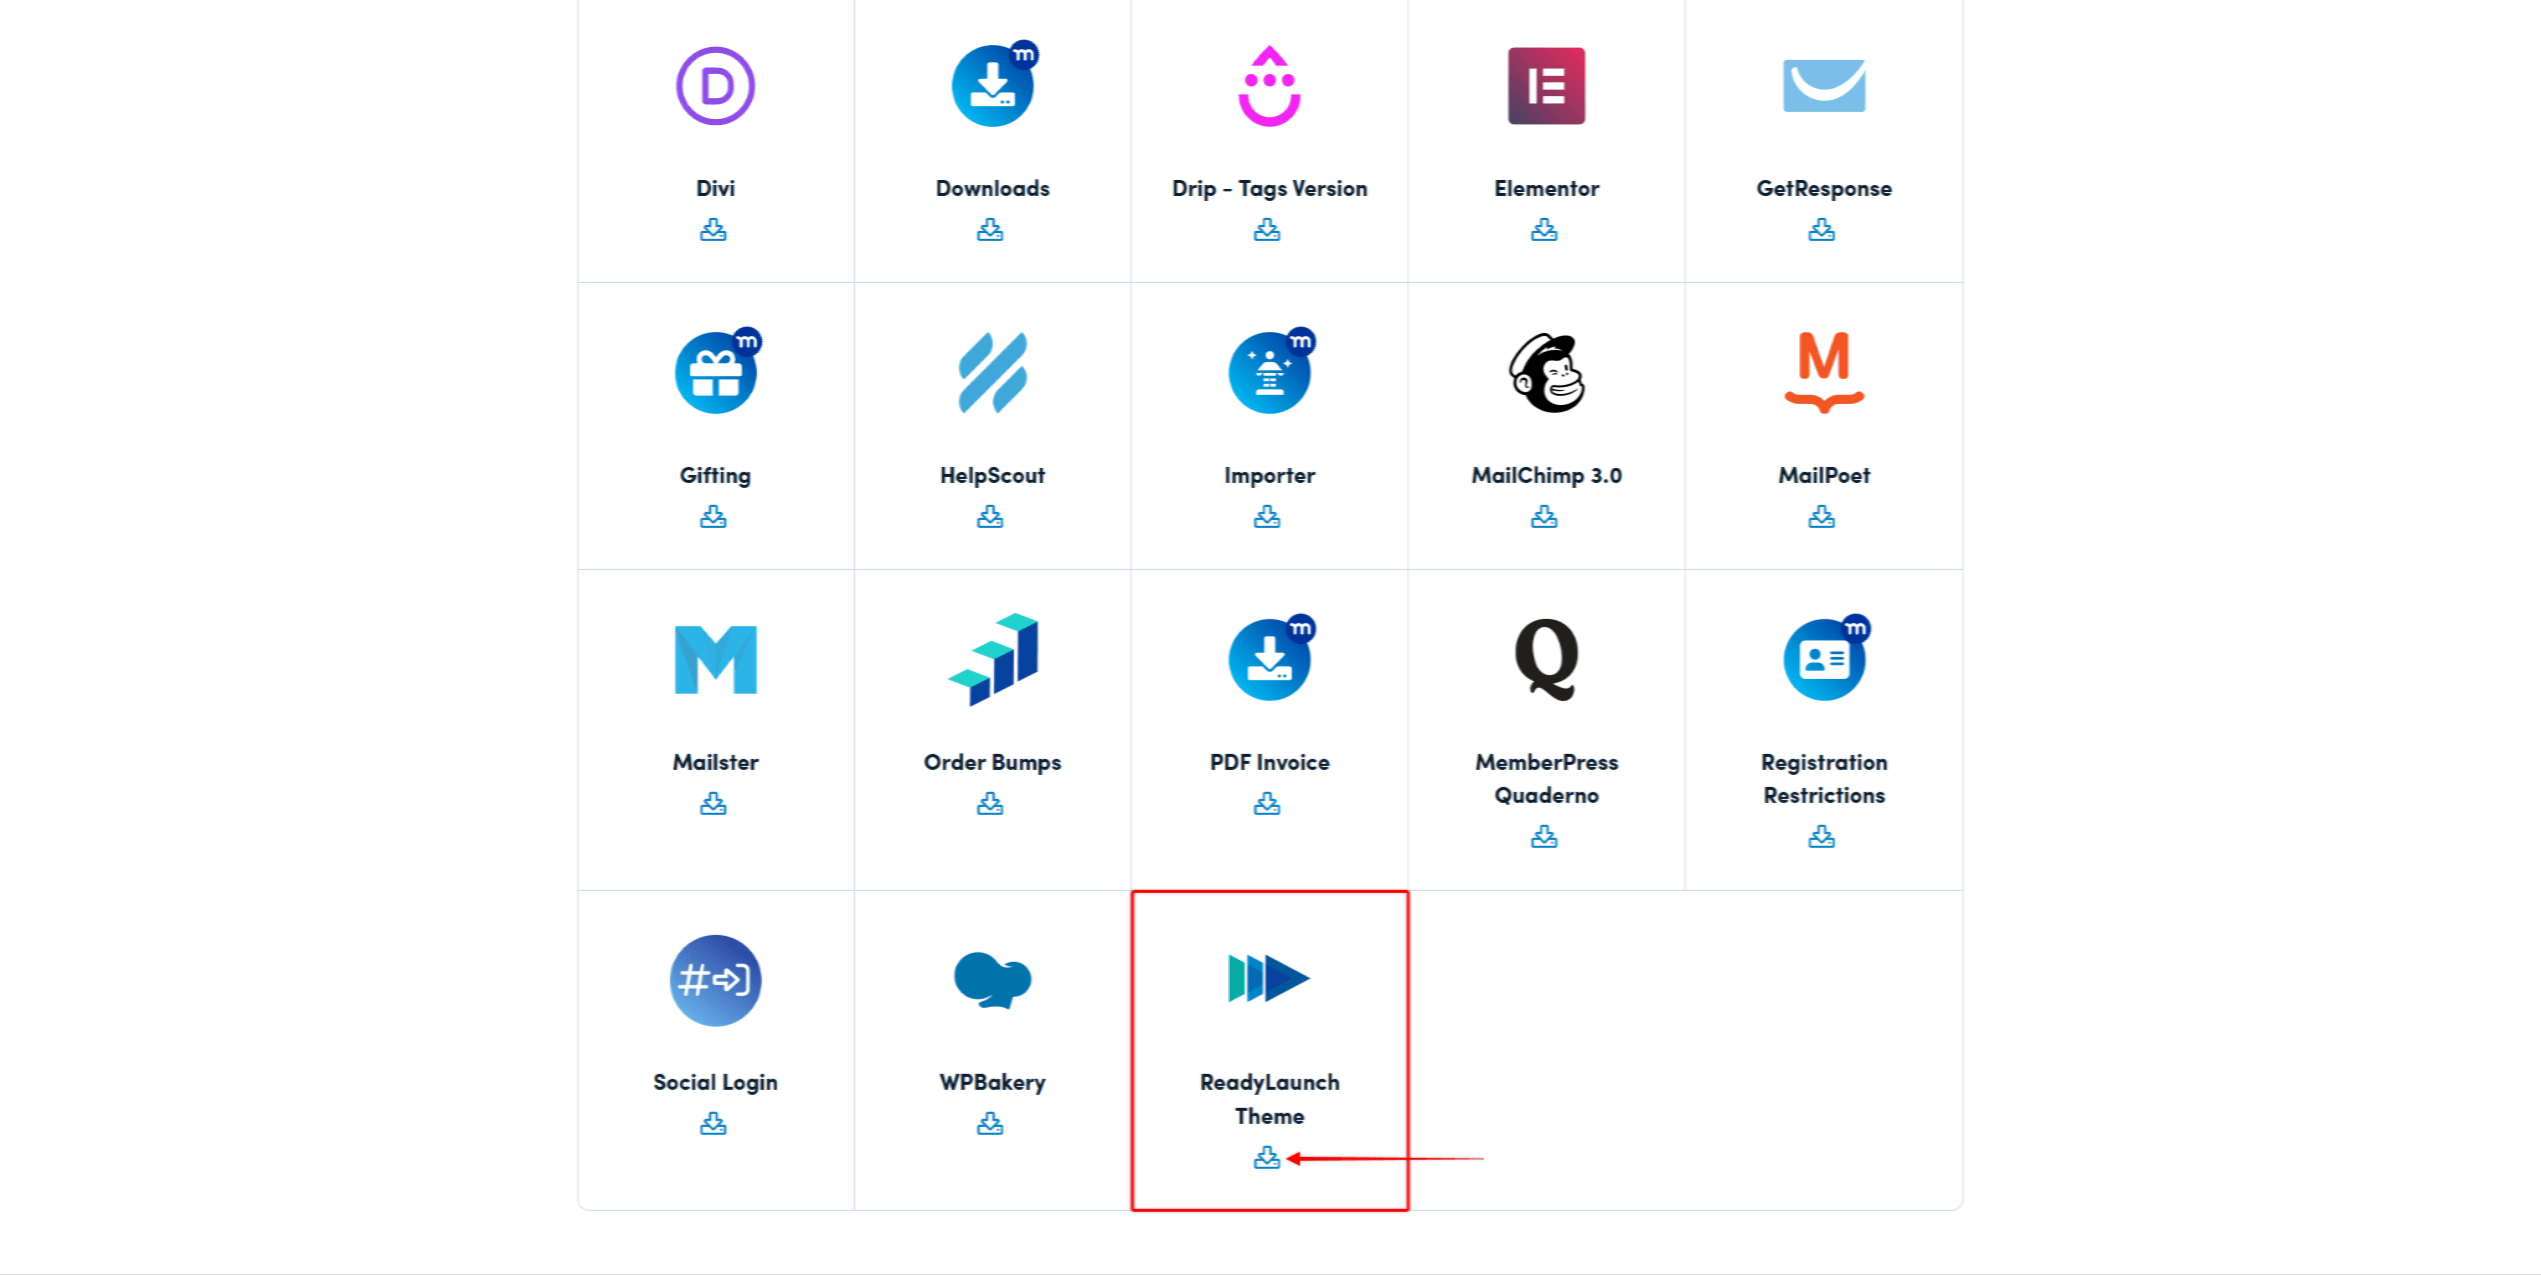
- Trouver Thème ReadyLaunch™ dans la liste des téléchargements.
- Cliquez sur le bouton icône de téléchargement à côté. Cela permet de télécharger le
readylaunch-X.X.X.zipsur votre ordinateur (le numéro de version indiqué dans le nom du fichier peut varier).
Une fois le fichier ZIP téléchargé, connectez-vous à votre site web. Suivez ces étapes pour télécharger et installer le thème :
- Naviguez jusqu'à Tableau de bord > Apparence > Thèmes.
- Cliquez sur Ajouter un thème.
- Cliquez sur le bouton Télécharger le thème bouton.
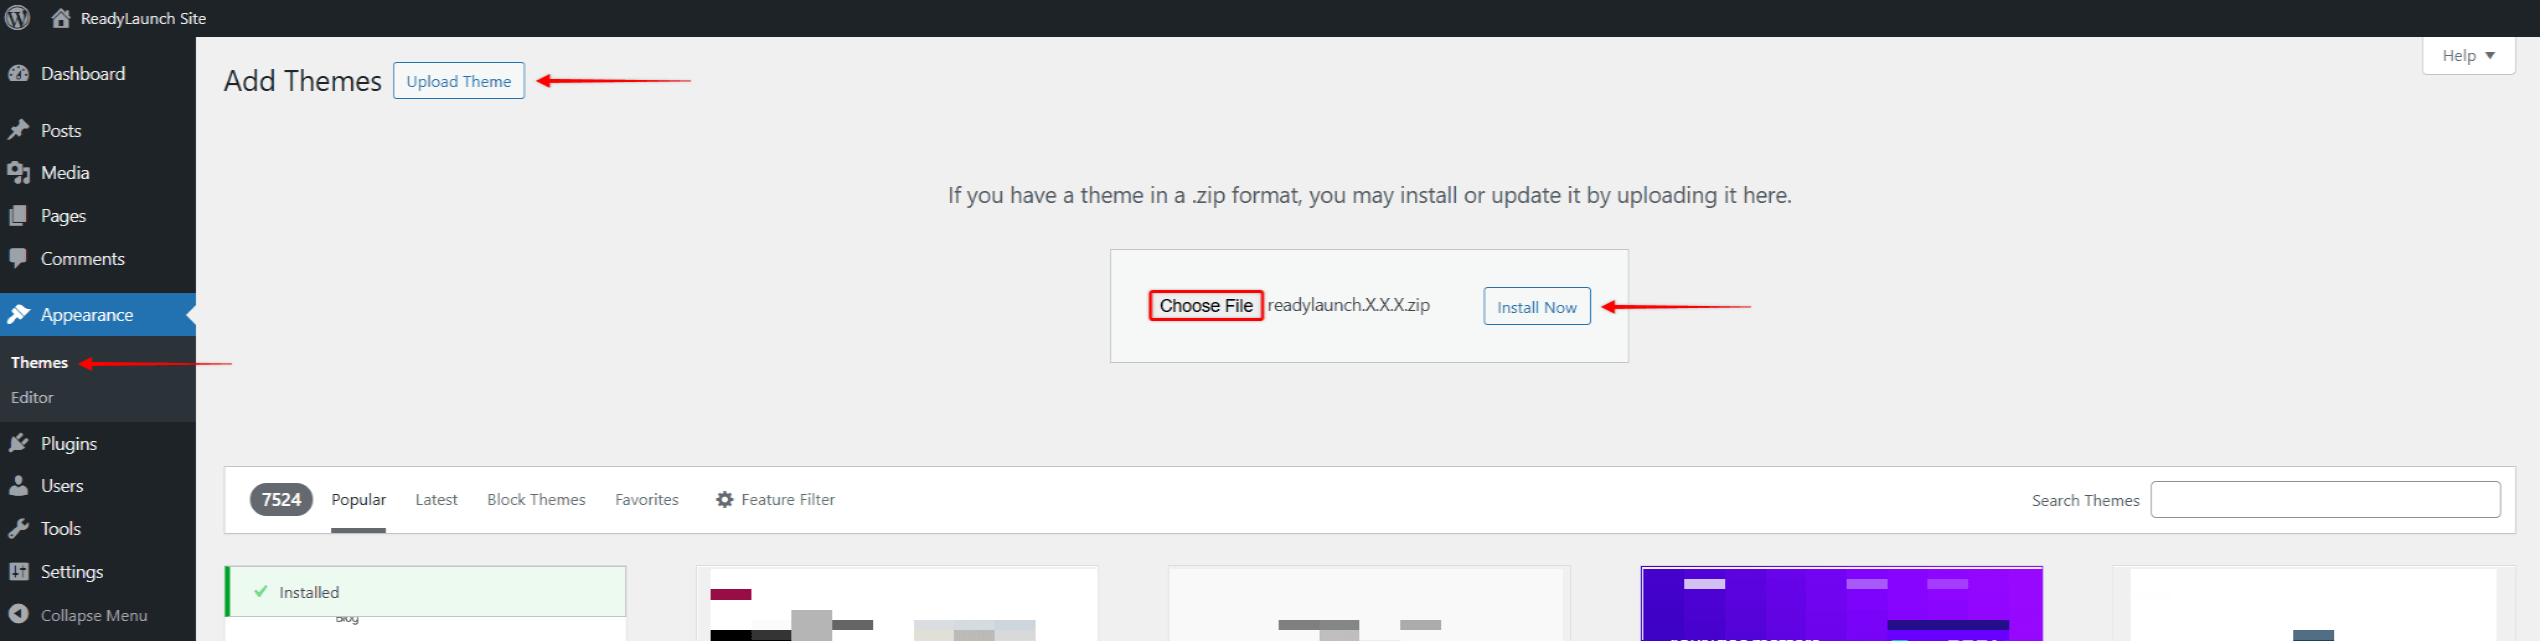
- Cliquez sur Choisir un fichier et sélectionnez l'option
readylaunch-X.X.X.zipfichier que vous avez téléchargé précédemment. - Cliquez sur Installer maintenant.
Le programme d'installation affiche le “ Le thème a été installé avec succès. ” message s'affichant une fois l'installation terminée.
Autre méthode d'installation : téléchargement via FTP
Dans de rares cas, la méthode d'installation par téléchargement peut échouer. Le plus souvent, cela est dû à la configuration de votre site web ou à des limitations du serveur.
Même s'il est préférable d'identifier et de corriger le problème à la source, le téléchargement du thème via FTP peut constituer une solution de contournement :
- Décompressez le
readylaunch-X.X.X.zipenregistrer le fichier à un emplacement de votre ordinateur. - Connectez-vous à votre serveur à l'aide d'un client FTP (par exemple :. FileZilla). Si cette fonctionnalité est disponible, vous pouvez également utiliser le gestionnaire de fichiers fourni par votre hébergeur.
- Accédez au dossier « themes » (généralement
/wp-content/themes/). - Téléchargez le fichier extrait
readylaunchdossier dans le dossier « themes » de votre site web.
Si le téléchargement s'est déroulé correctement, le thème ReadyLaunch™ apparaît à l'adresse Tableau de bord > Apparence > Thèmes.
Activation de ReadyLaunch™
Une fois l'installation terminée, définissez ReadyLaunch™ comme thème actif :
- Naviguez jusqu'à Tableau de bord > Apparence > Thèmes.
- Trouver ReadyLaunch™ dans votre liste de thèmes, puis cliquez dessus.
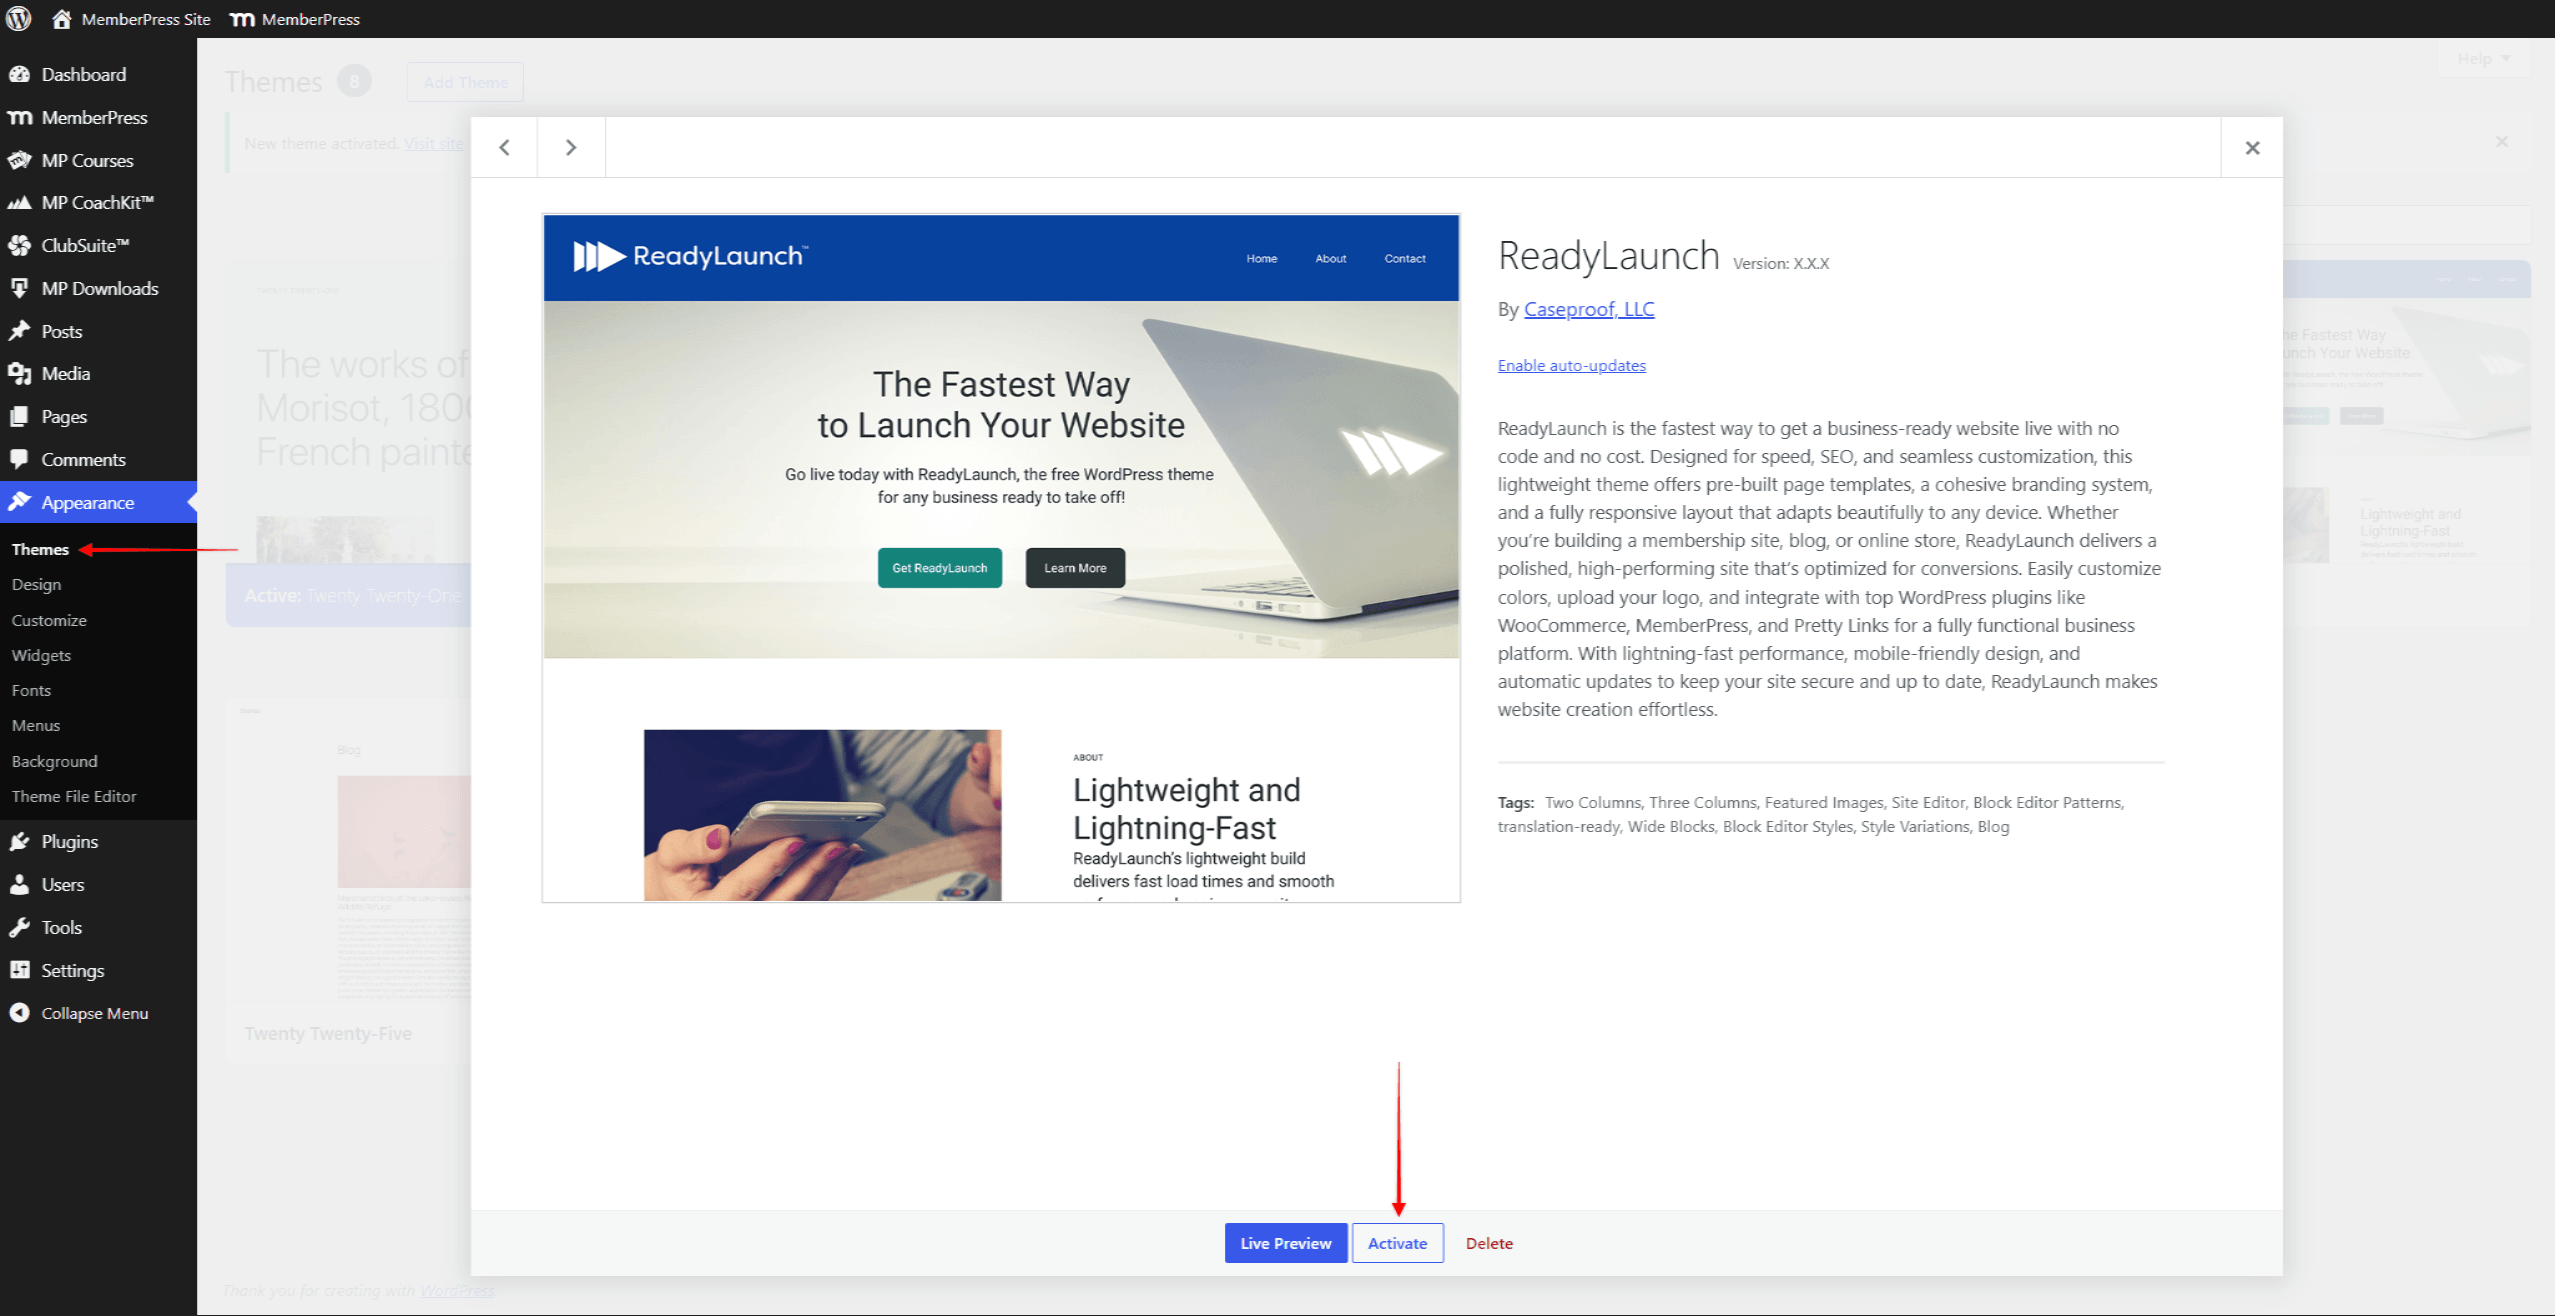
- Cliquez sur le bouton Activer bouton du thème ReadyLaunch™.
- Attendez la confirmation d'activation.
Problèmes d'installation courants
Vous trouverez ci-dessous les problèmes d'installation les plus courants ainsi que les solutions possibles.
Thème indisponible sur la page des extensions
Il se peut que le thème ReadyLaunch™ n'apparaisse pas à l'adresse Tableau de bord > MemberPress > Modules complémentaires. Dans ce cas, vérifiez les points suivants :
- Confirmez votre La licence MemberPress est active sur le site web.
- Vérifiez que votre abonnement est bien actif dans votre Compte MemberPress.
- Mettez à jour le plugin MemberPress vers la dernière version.
Si le thème n'est toujours pas disponible, téléchargez-le depuis votre compte Téléchargements l'onglet à la place.
Erreur de téléchargement
Les “ Le fichier téléchargé dépasse la limite `upload_max_filesize` ” Ce message indique que la limite de téléchargement du serveur a été atteinte. Essayez l'une des solutions suivantes :
- Contactez votre hébergeur pour augmenter la limite.
- Augmenter la limite en modifiant le
upload_max_filesizeetpost_max_sizedirectives dans lephp.inifichier. Essayez de fixer la limite à 128 Mo ou 256 Mo. Vous pouvez également y parvenir par d'autres moyens, par exemple en modifiant le.htaccessfichier. - Utilisez la méthode d'installation par FTP décrite ci-dessus.
- Installez le thème via le panneau de contrôle de votre hébergeur.
Le thème ne s'affiche pas
Il se peut que le thème ReadyLaunch™ n'apparaisse pas dans la liste des thèmes à l'adresse Tableau de bord > Apparence > Thèmes. Dans ce cas, procédez comme suit :
- Actualisez la page des thèmes.
- Vérifier le
/wp-content/themes/répertoire via un client FTP ou un module complémentaire de gestion de fichiers (par exemple,. Gestionnaire de fichiers). - Vérifiez que les droits d'accès du dossier sont définis sur 755.
Prochaines étapes
Une fois le thème installé et activé, continuez Configuration de ReadyLaunch™:
- Ajoutez votre identité visuelle ;
- Mettez à jour votre en-tête et votre pied de page ;
- Mettez à jour vos styles ;
- Ajoutez votre contenu (articles et pages).
Le thème ReadyLaunch™ est également fourni avec des modèles prédéfinis modèles pour vos pages, ainsi que blocs et motifs. Ces éléments prêts à l'emploi permettent d'accélérer la création du site web.










 FR
FR  EN
EN  ES
ES  DE
DE  PT
PT 