

The ReadyLaunch™ theme is a WordPress theme included with MemberPress plans. To start using the theme on your website, you must first install and activate it.
This guide explains how to install the ReadyLaunch™ theme from the MemberPress Add-ons page. It also covers the download from your MemberPress account, alternative installation methods, and basic troubleshooting.
Before You Begin
You can install multiple WordPress themes, but only one theme can be active at a time. By default, WordPress activates one of its default themes automatically after installation.
Thus, you should install the ReadyLaunch™ theme and set it as your active theme.
The theme is designed to pair with the MemberPress plugin. The plugin provides the FSE templates and blocks for your membership pages, and the theme styles them automatically.
Before you start, ensure you have:
- An active MemberPress subscription (Launch, Growth, or Scale plan);
- The MemberPress plugin installed with an activated license;
- WordPress 6.7 or higher;
- Access to the WordPress admin area (Dashboard) with Administrator user credentials;
- Optionally (for the alternative methods only): access to your MemberPress account and FTP access.
Installing From the MemberPress Add-ons Page
The recommended installation method is the one-click install from the MemberPress Add-ons page:
- Navigate to Dashboard > MemberPress > Add-ons.
- Find the ReadyLaunch™ Theme in the list.
- Click the Install Add-on button on the ReadyLaunch™ Theme card.
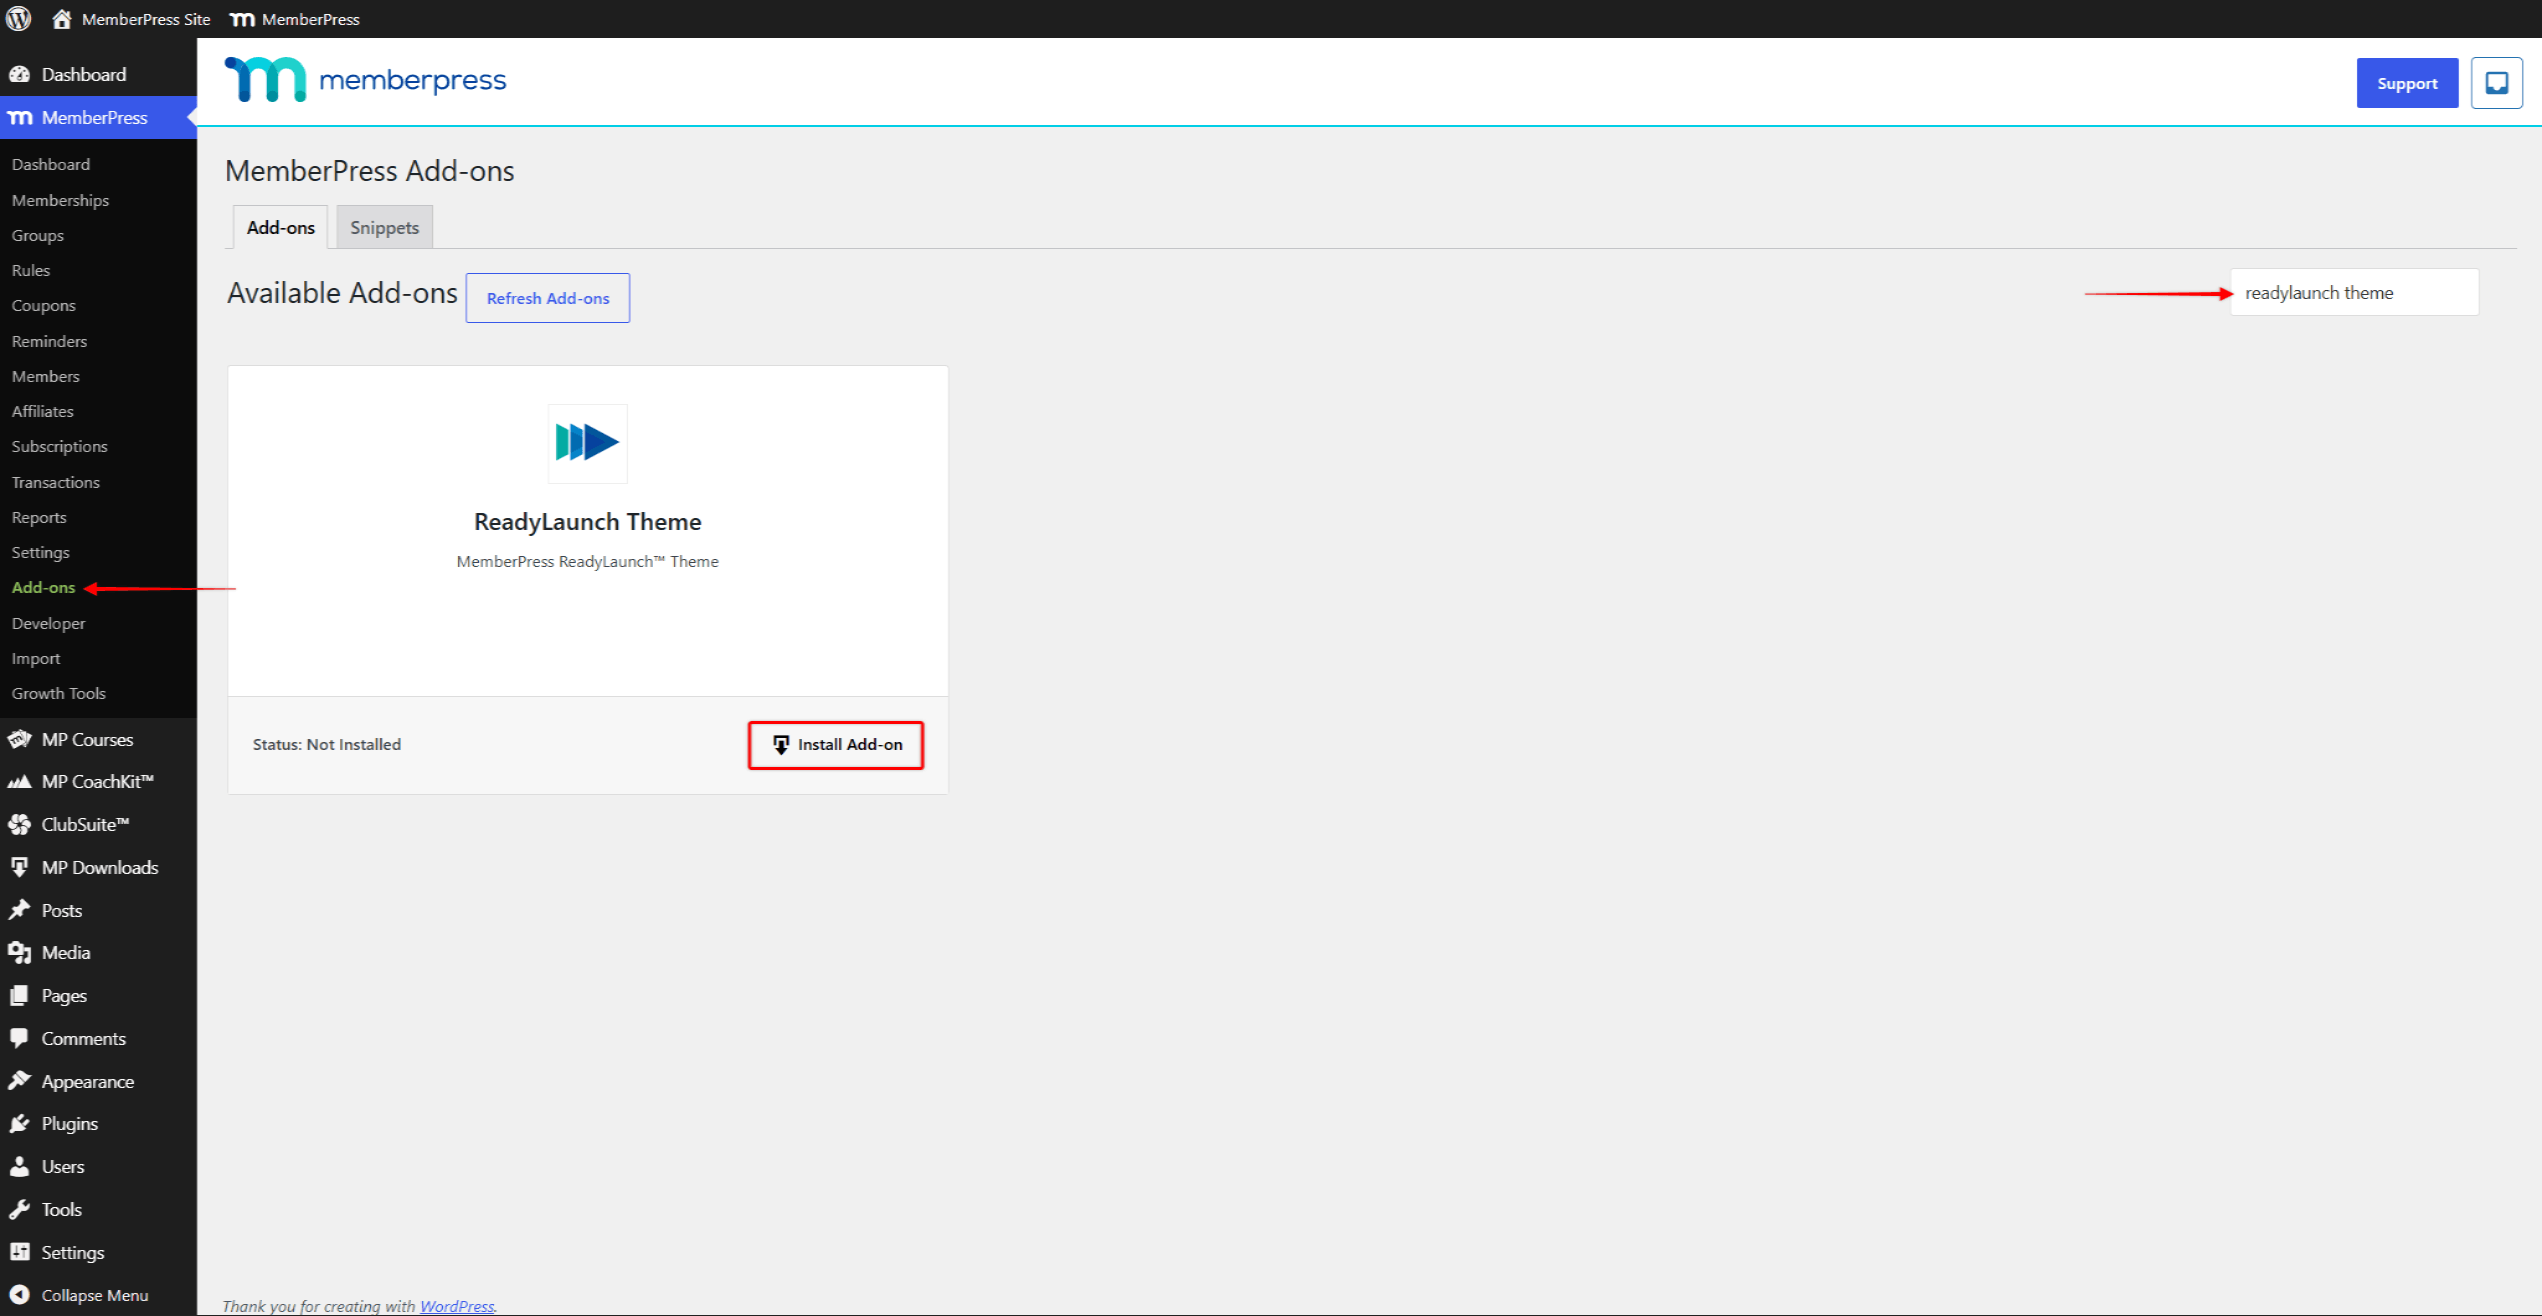
MemberPress installs the theme automatically. With this method, you can skip the manual download and upload, and continue to activation.
Downloading the Theme From Your MemberPress Account
Alternatively, you can download the theme as a ZIP file from your MemberPress account. Follow these steps to download it:
- Log in to your MemberPress account.
- Click the Downloads tab.
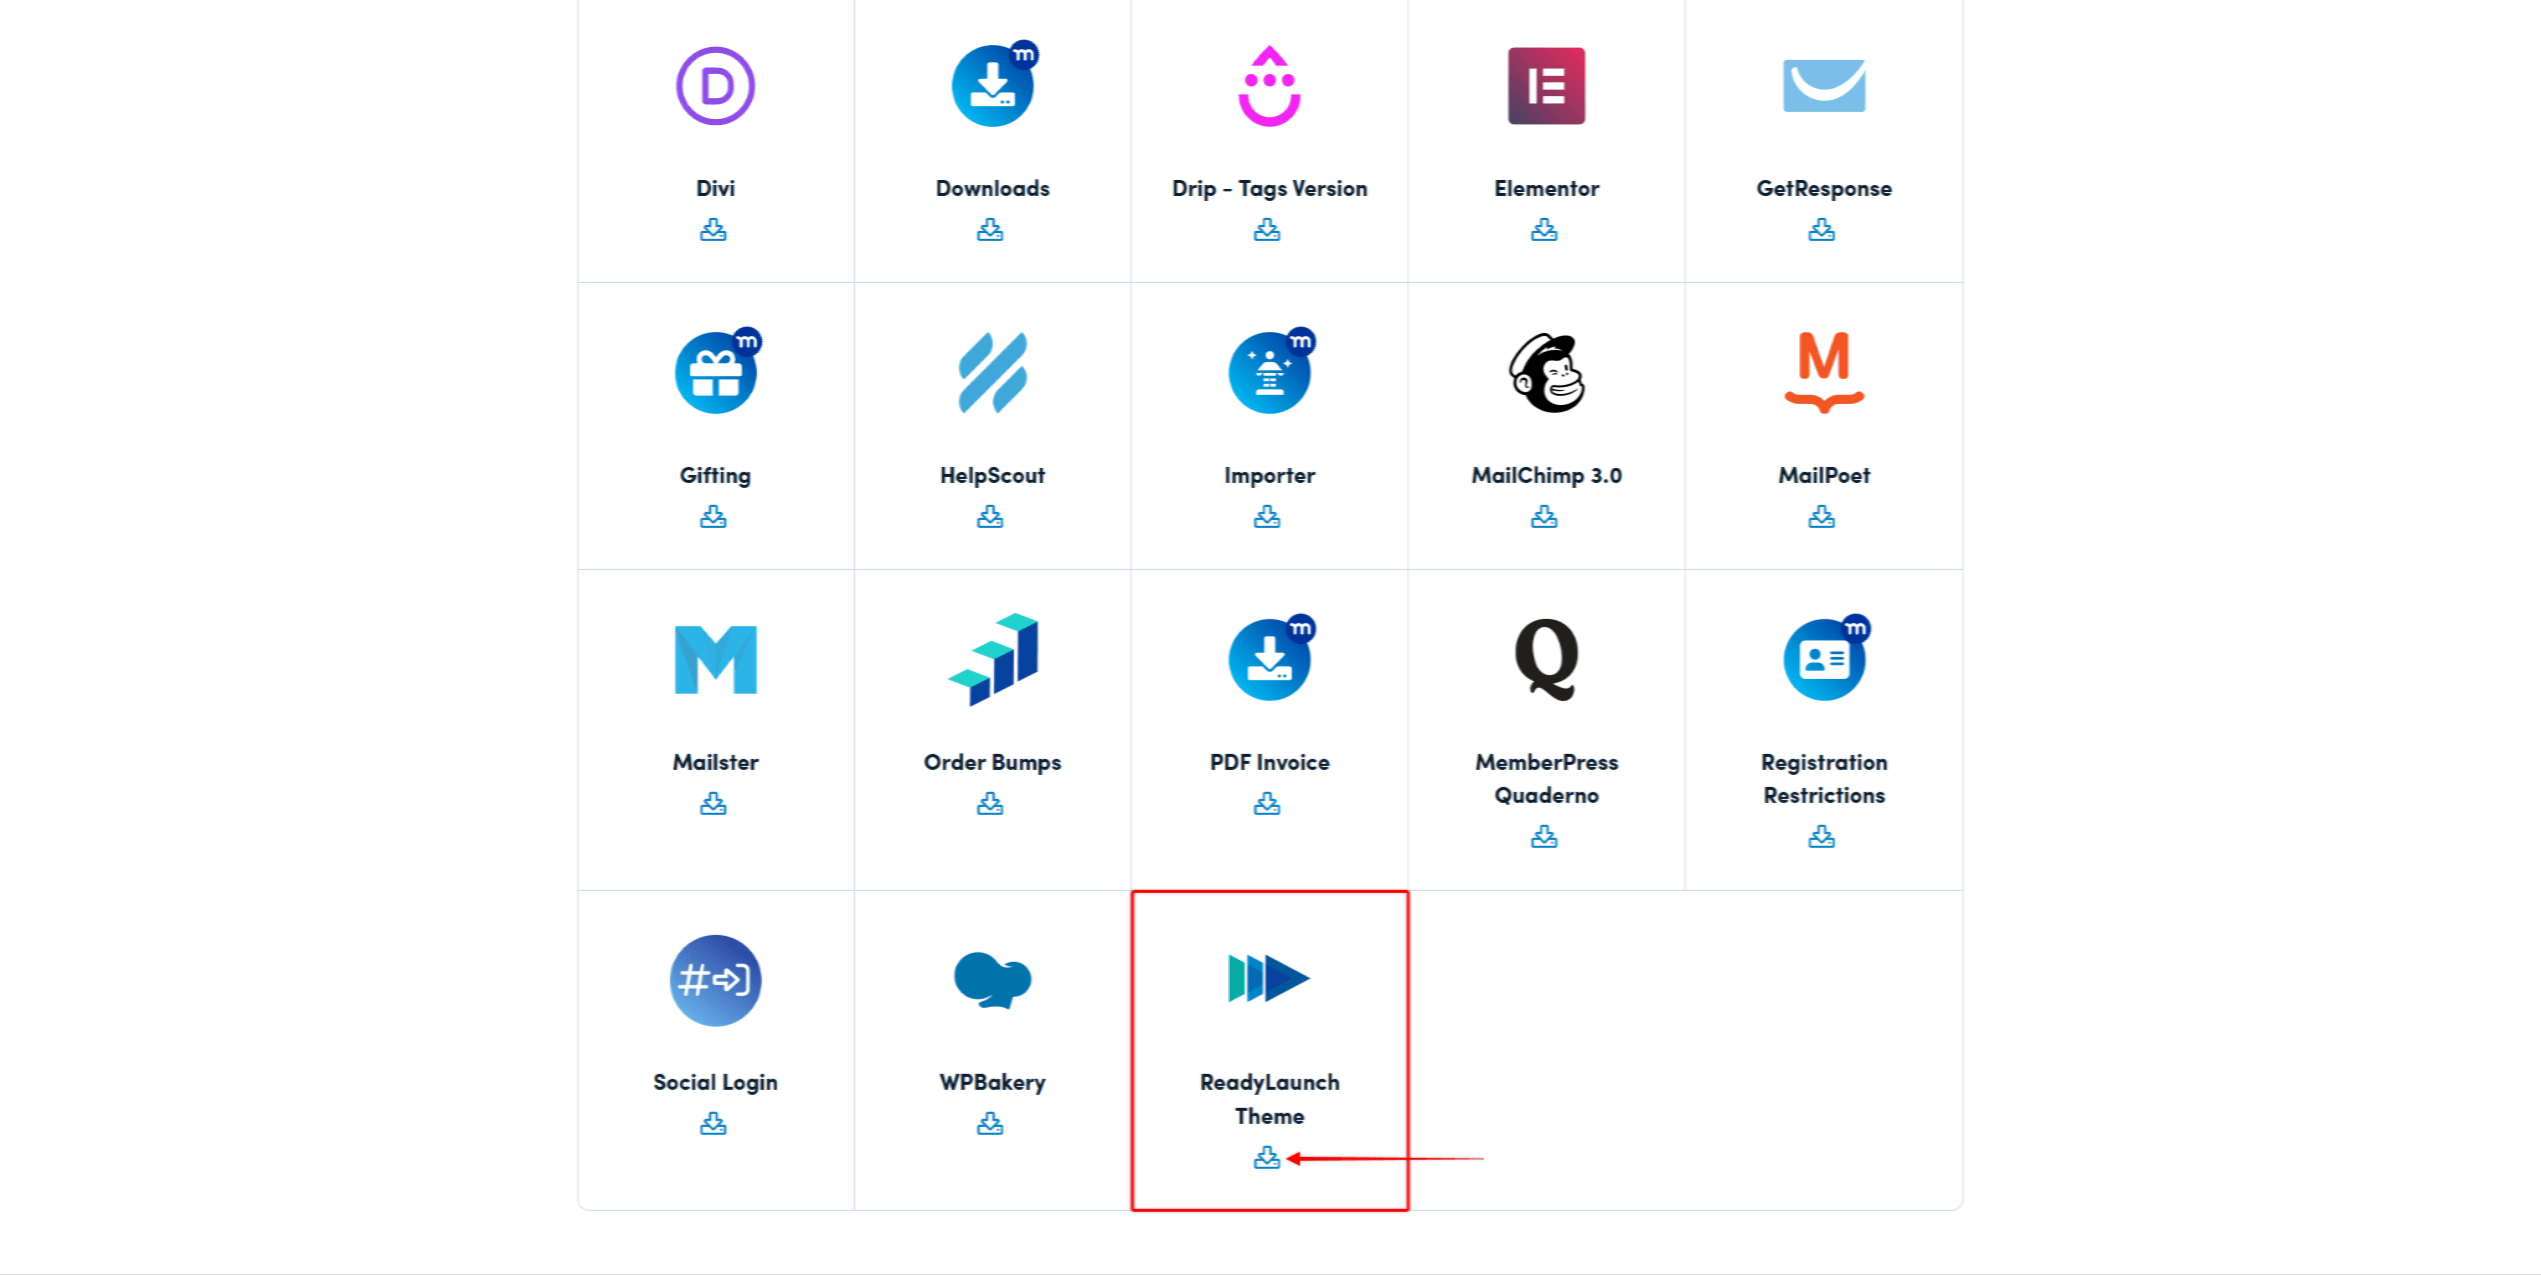
- Find ReadyLaunch™ Theme in the downloads list.
- Click the download icon next to it. This downloads the
readylaunch-X.X.X.zipfile to your computer (the version number in the file name may differ).
Once you download the ZIP file, log in to your website. Follow these steps to upload and install the theme:
- Navigate to Dashboard > Appearance > Themes.
- Click Add Theme.
- Click the Upload Theme button.
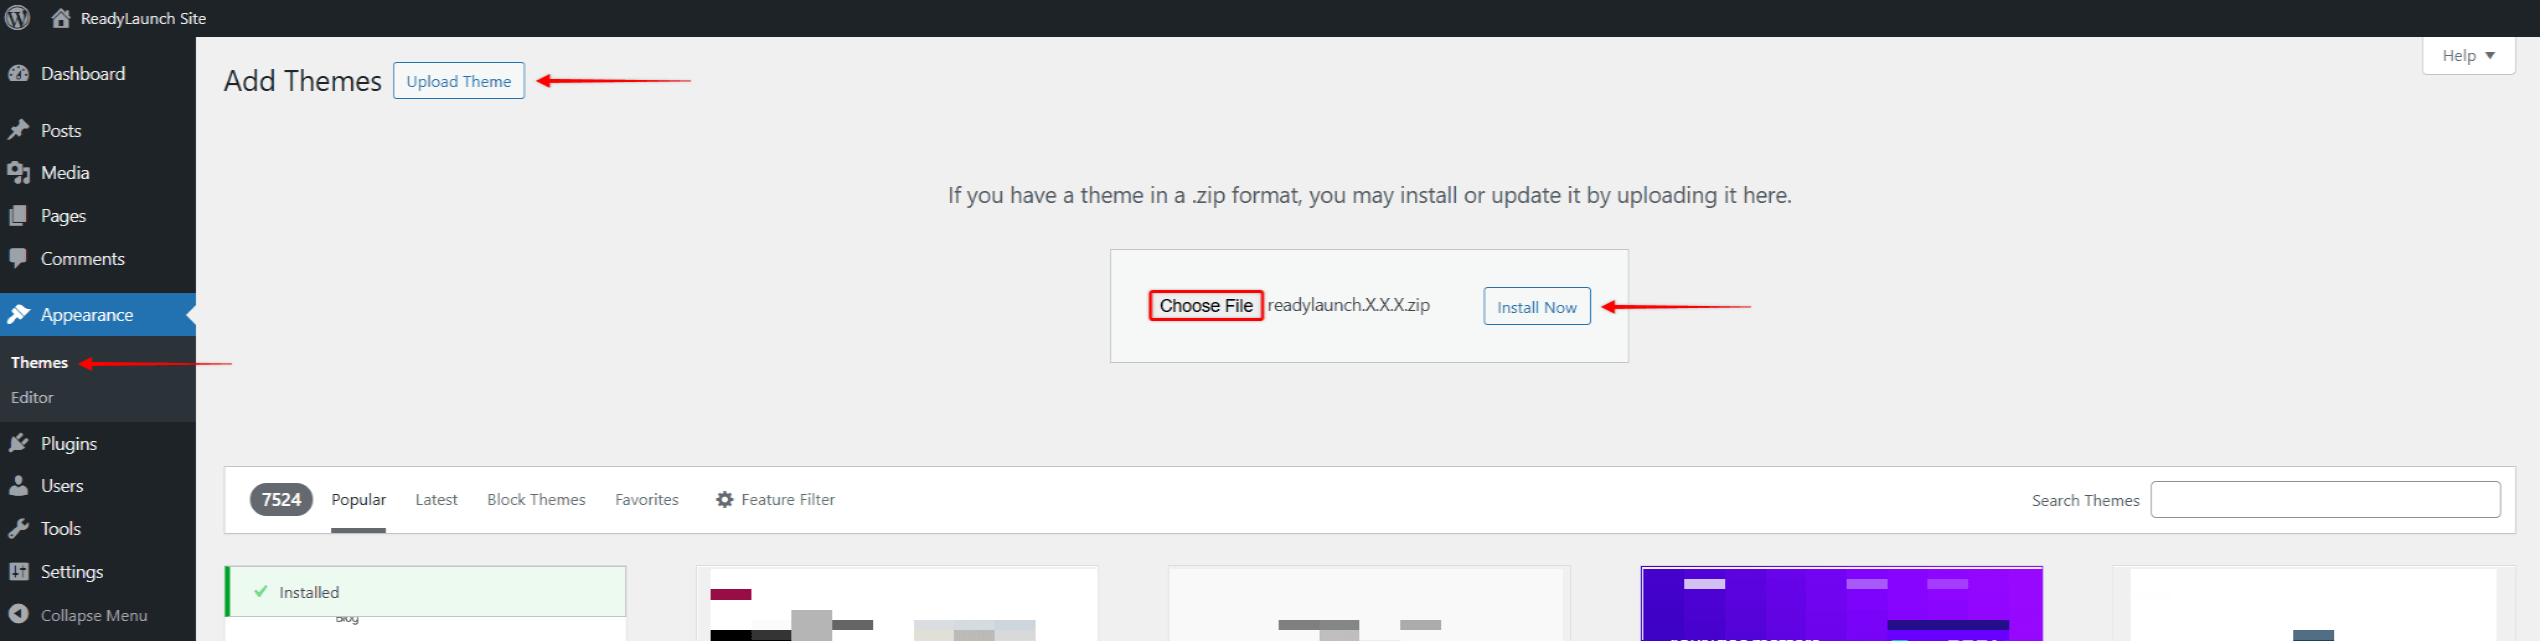
- Click Choose File and select the
readylaunch-X.X.X.zipfile you previously downloaded. - Click Install Now.
The installer displays the “Theme installed successfully.” message when the installation completes.
Alternative Installation Method: FTP Upload
In rare cases, the upload installation method may fail. Most often, the cause relates to your website configuration or server limitations.
Though you should identify and correct the underlying issue, uploading the theme over FTP is a potential workaround:
- Extract the
readylaunch-X.X.X.zipfile to a location on your computer. - Connect to your server through an FTP client (e.g. FileZilla). If available, you can also use the file manager provided by your hosting service.
- Navigate to the themes folder (usually
/wp-content/themes/). - Upload the extracted
readylaunchfolder to your website’s themes folder.
If the upload was successful, the ReadyLaunch™ theme appears at Dashboard > Appearance > Themes.
Activating ReadyLaunch™
Once installed, make ReadyLaunch™ your active theme:
- Navigate to Dashboard > Appearance > Themes.
- Find ReadyLaunch™ in your themes list and click on it.
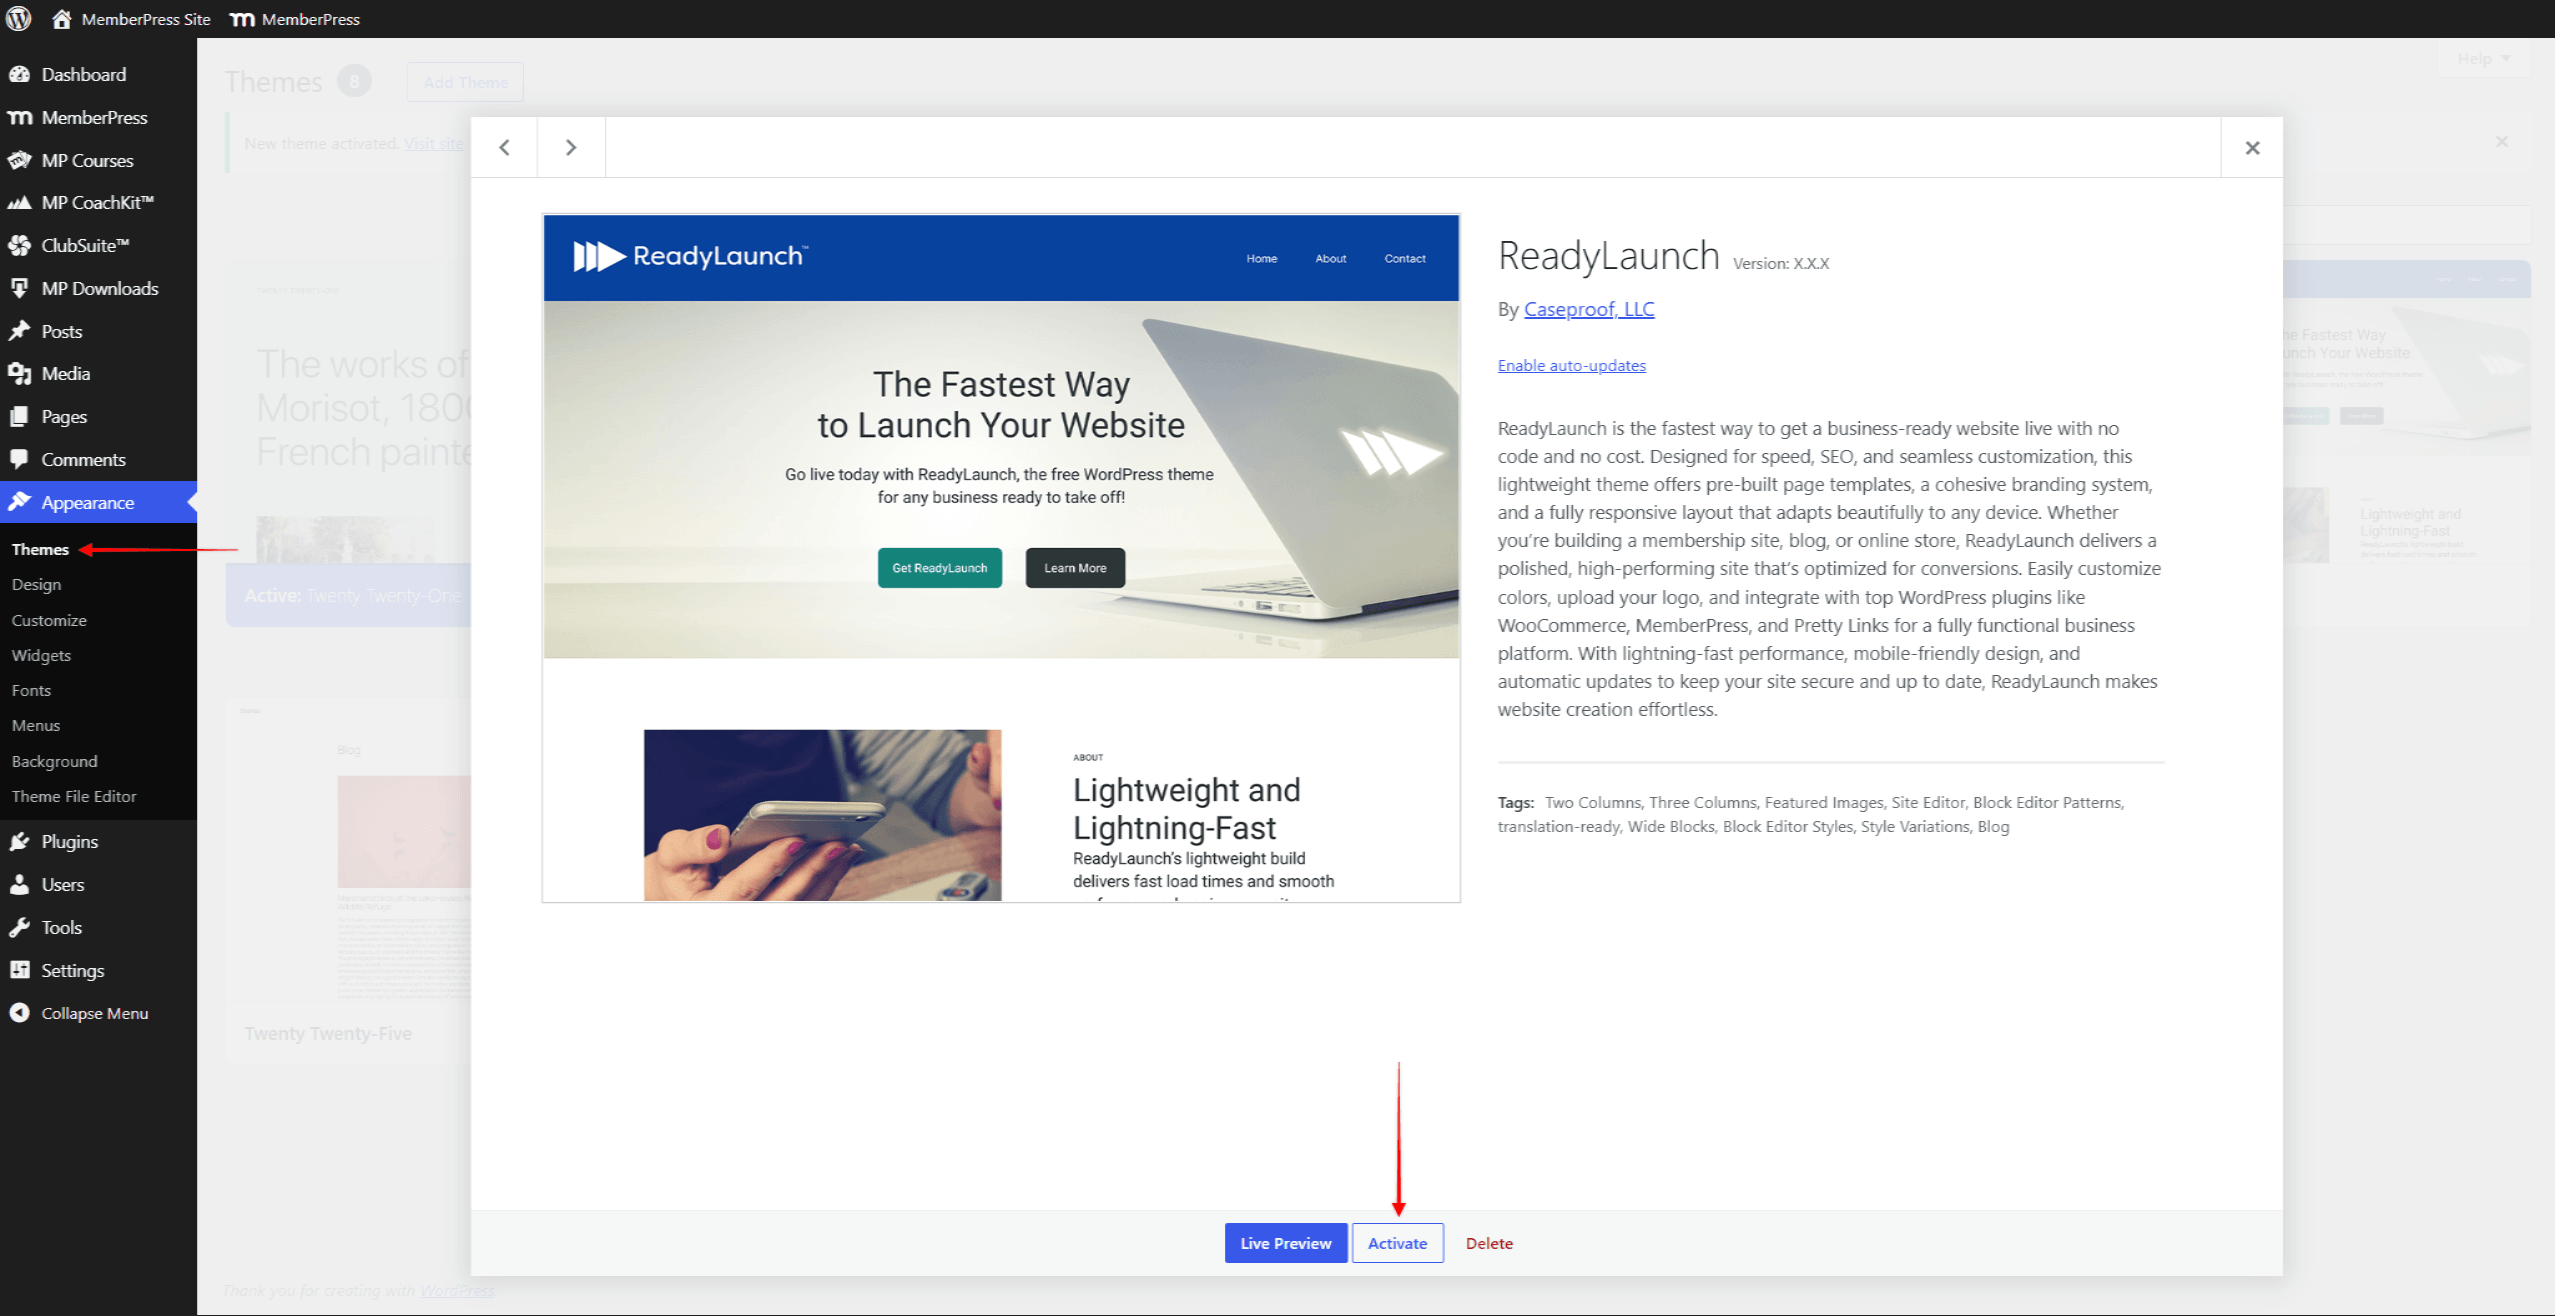
- Click the Activate button on the ReadyLaunch™ theme.
- Wait for the activation confirmation.
Common Installation Issues
Below, you can find common installation issues and potential solutions.
Theme Not Available on the Add-ons Page
The ReadyLaunch™ theme may not appear at Dashboard > MemberPress > Add-ons. In that case, check the following:
- Confirm your MemberPress license is active on the website.
- Confirm your subscription is active in your MemberPress account.
- Update the MemberPress plugin to the latest version.
If the theme is still unavailable, download it from your account’s Downloads tab instead.
Upload Failed Error
The “The uploaded file exceeds the upload_max_filesize” message indicates a server upload limit. Try one of the following solutions:
- Contact your host to increase the limit.
- Increase the limit by modifying the
upload_max_filesizeandpost_max_sizedirectives in thephp.inifile. Try setting the limit to 128 MB or 256 MB. You can also achieve this through other methods, such as editing the.htaccessfile. - Use the FTP installation method described above.
- Install the theme via your hosting control panel.
Theme Not Showing
The ReadyLaunch™ theme may not appear in the themes list at Dashboard > Appearance > Themes. In that case, try these steps:
- Refresh the themes page.
- Check the
/wp-content/themes/directory through an FTP client or a file manager plugin (e.g. File Manager). - Verify folder permissions are 755.
Next Steps
With the theme installed and activated, continue setting up ReadyLaunch™:
- Add your branding;
- Update your header and footer;
- Update your styles;
- Add your content (posts and pages).
The ReadyLaunch™ theme also comes with pre-built templates for your pages, as well as blocks and patterns. These pre-made elements speed up the website build.










