Enabling comments on your WordPress membership site is a great way to build a relationship with your visitors and potential members. However, comments can have negative consequences if not managed properly.
Making it easy for your audience to share their thoughts and ask questions gives you an opportunity to demonstrate your knowledge and commitment to customer service. After all, if a potential member arrives at your website, has a question, but doesn’t see an easy way to ask it, they might leave, never to return. However, if instead, they leave a comment on your article, you quickly respond and — with the right tools – automatically email them a notification, they’ll have a much more positive experience.
One big downside of WordPress comments is that they can be abused by spammers, turning your legitimate website into a spammy link farm. Also, if badly managed, comments left by your visitors that go without a reply can lead to frustration, causing potential members to look elsewhere.
So in order for you to successfully manage comments on your membership site, this guide will help you get to grips with this key feature of WordPress, as well as giving you some tips on making the WordPress comments system even better.
Let’s get started…
How to Manage Comments in WordPress
By default anyone can leave a comment on the blog posts you publish on your WordPress website. However, comments can easily be disabled.
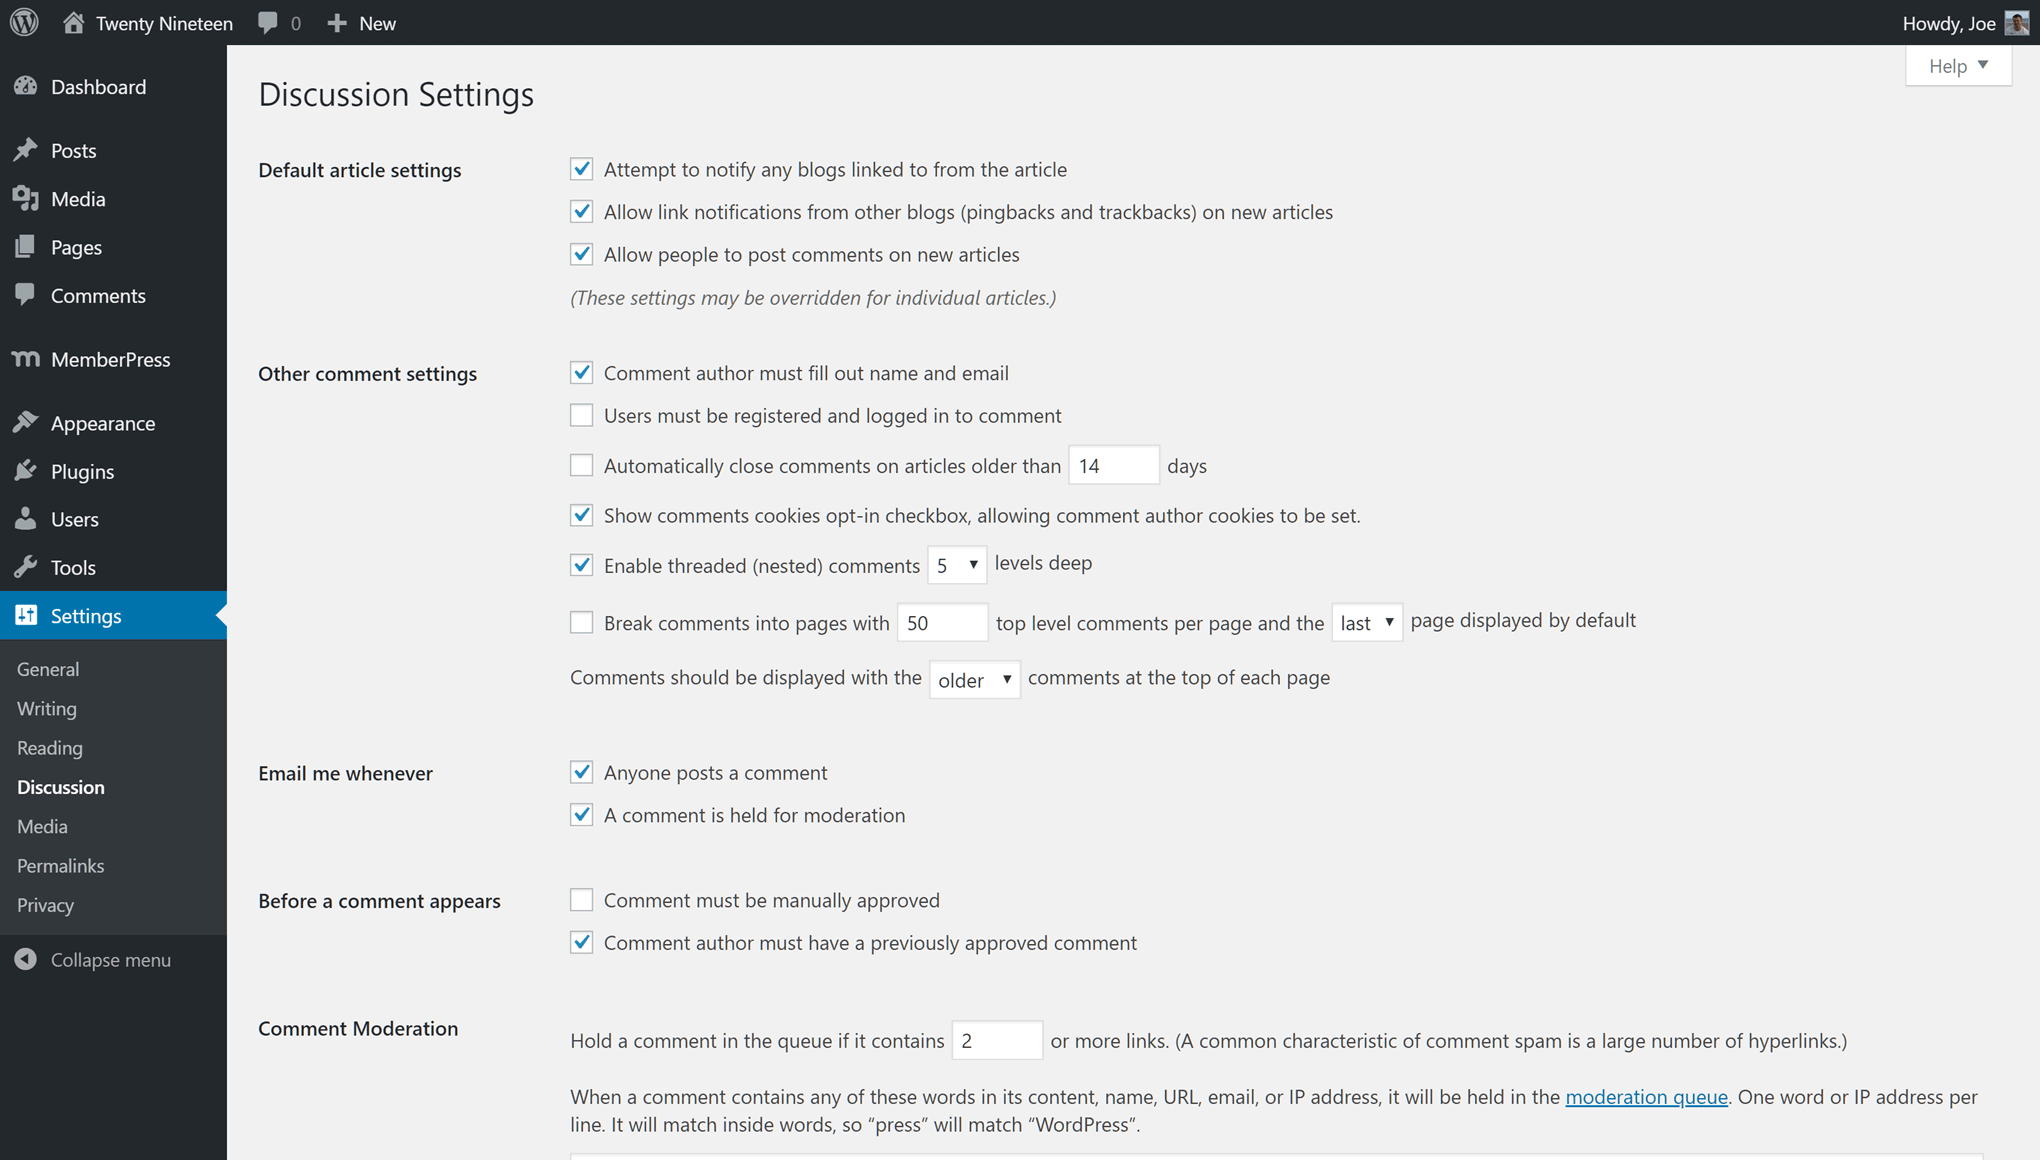
So to check the current status of whether your website is configured to accept comments from your visitors, log in to your WordPress Dashboard, then navigate to the Discussion control panel, located under the Settings menu.
Enabling and Disabling Membership Site Comments
From the Discussion Settings page, you can see the status of your website by looking at the Allow people to post comments on new articles setting. If the box is checked, then by default, visitors will be able to leave comments. However, this setting can be overridden for individual articles.

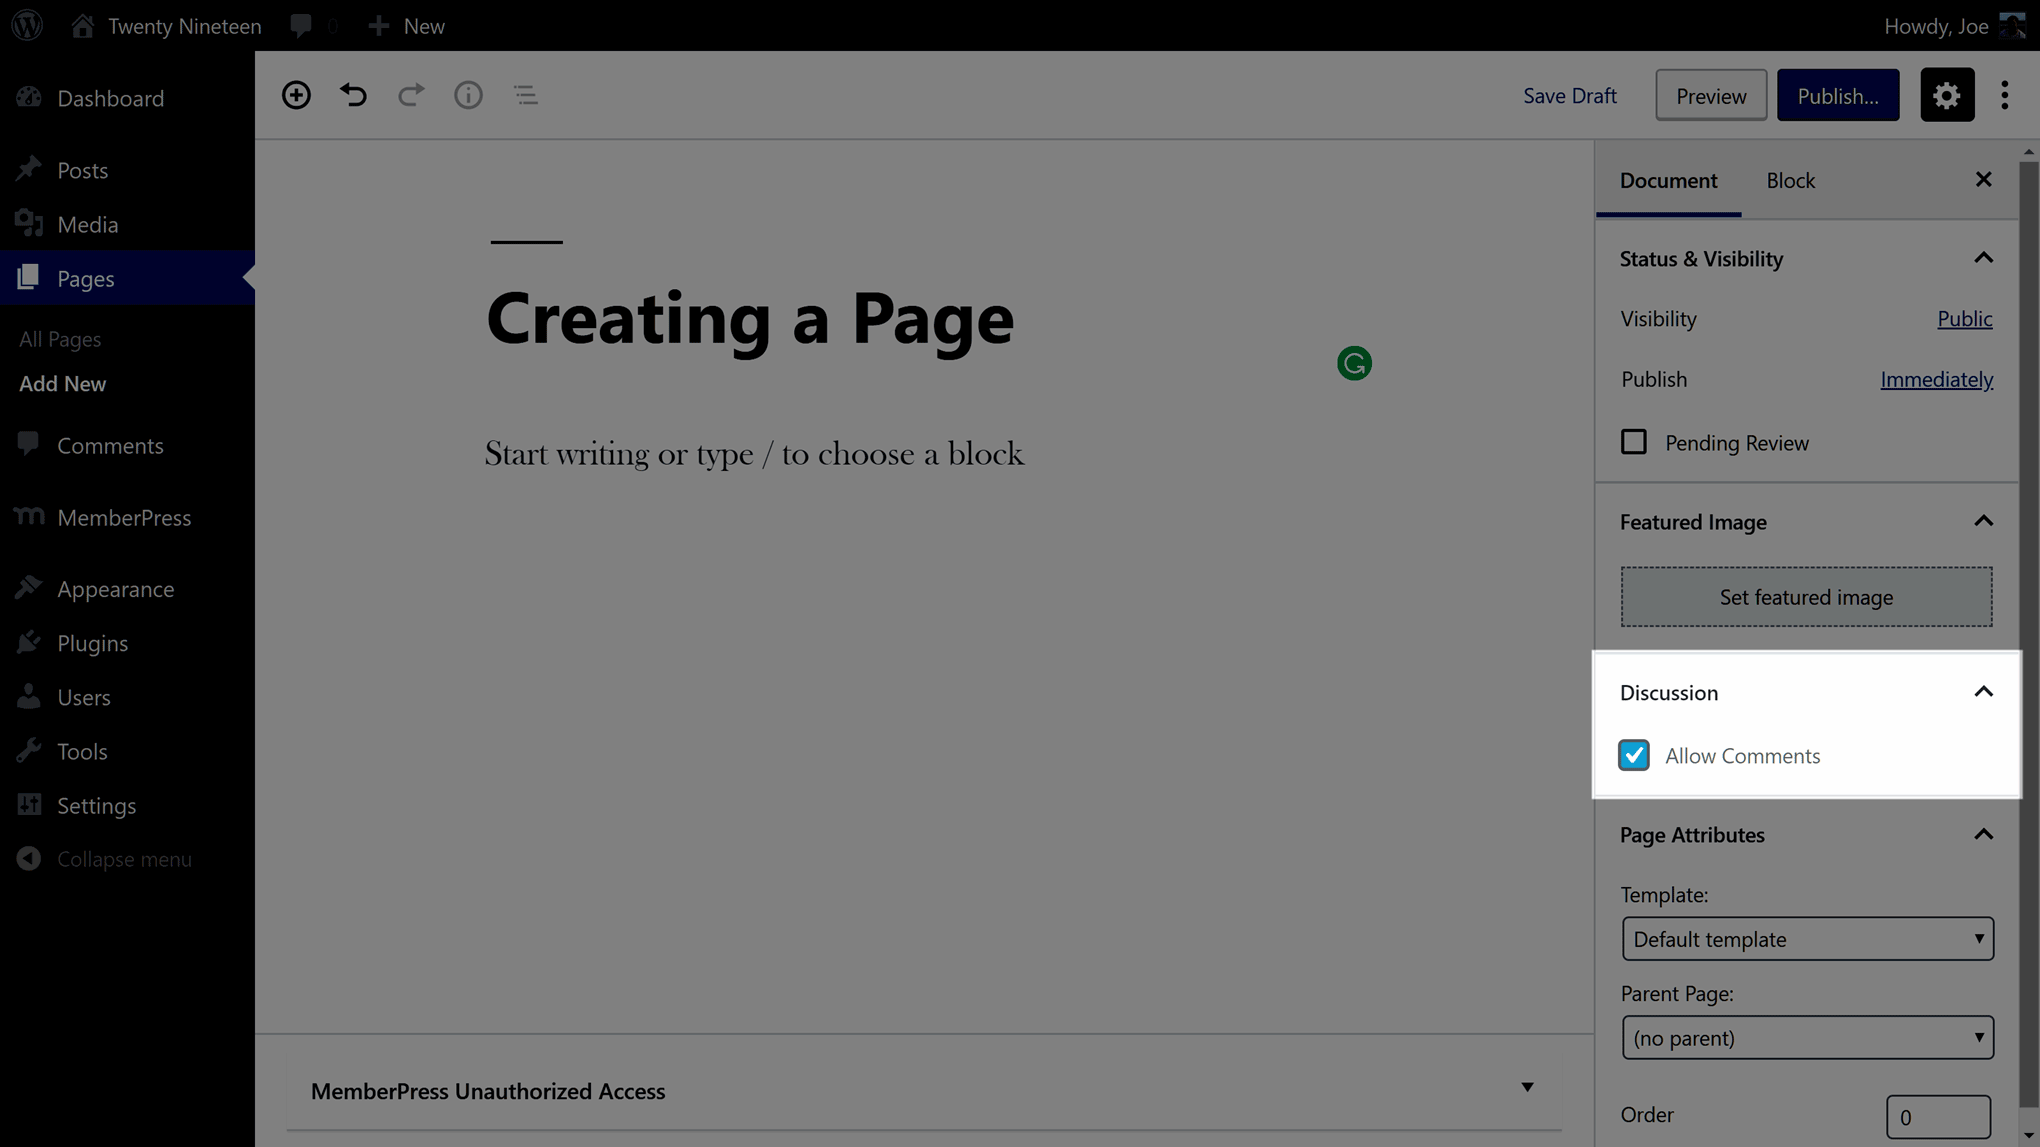
If you do want to enable or disable comments for the individual articles on your site, you can do so when editing that particular piece of content. From the post or page editor screen, look for the Discussion section on the right-hand panel and check or uncheck the Allow Comments box.
You get more control over how comments work on your WordPress membership website in the next set of options, including whether to automatically close comments on older articles and other settings that control how comments are displayed.

Managing Comment Email Notifications
You can also enable or disable the email notifications that you’ll receive each time a comment is left on your blog. Depending on your workflow, you may wish to enable this so that you can quickly respond to comments as they are left. Alternatively, you might prefer to log in to your WordPress Dashboard at set times and manage your pending membership site comments in one go.

As your website gets busier, you probably won’t want regular email notifications disturbing you each time a comment has been posted, but for those just starting out, it might be worth leaving this feature enabled so you can keep a close eye on how your visitors are interacting with your website and its content.
Enabling Comment Moderation Settings
By default, the first time a visitor leaves a comment on one of your articles it will be held back for moderation rather than automatically published on your website. However, after you’ve approved a comment for a specific visitor, their future comments will be automatically published.

Sticking with the default settings pictured above is recommended. Although more cautious site owners might want to check the first box to require all comments to be manually approved. The final section of the Discussion Settings gives you the ability to automatically flag comments, regardless of who has posted them, including comments that contain a set number of links or certain words.
Moderating Your Membership Site Comments
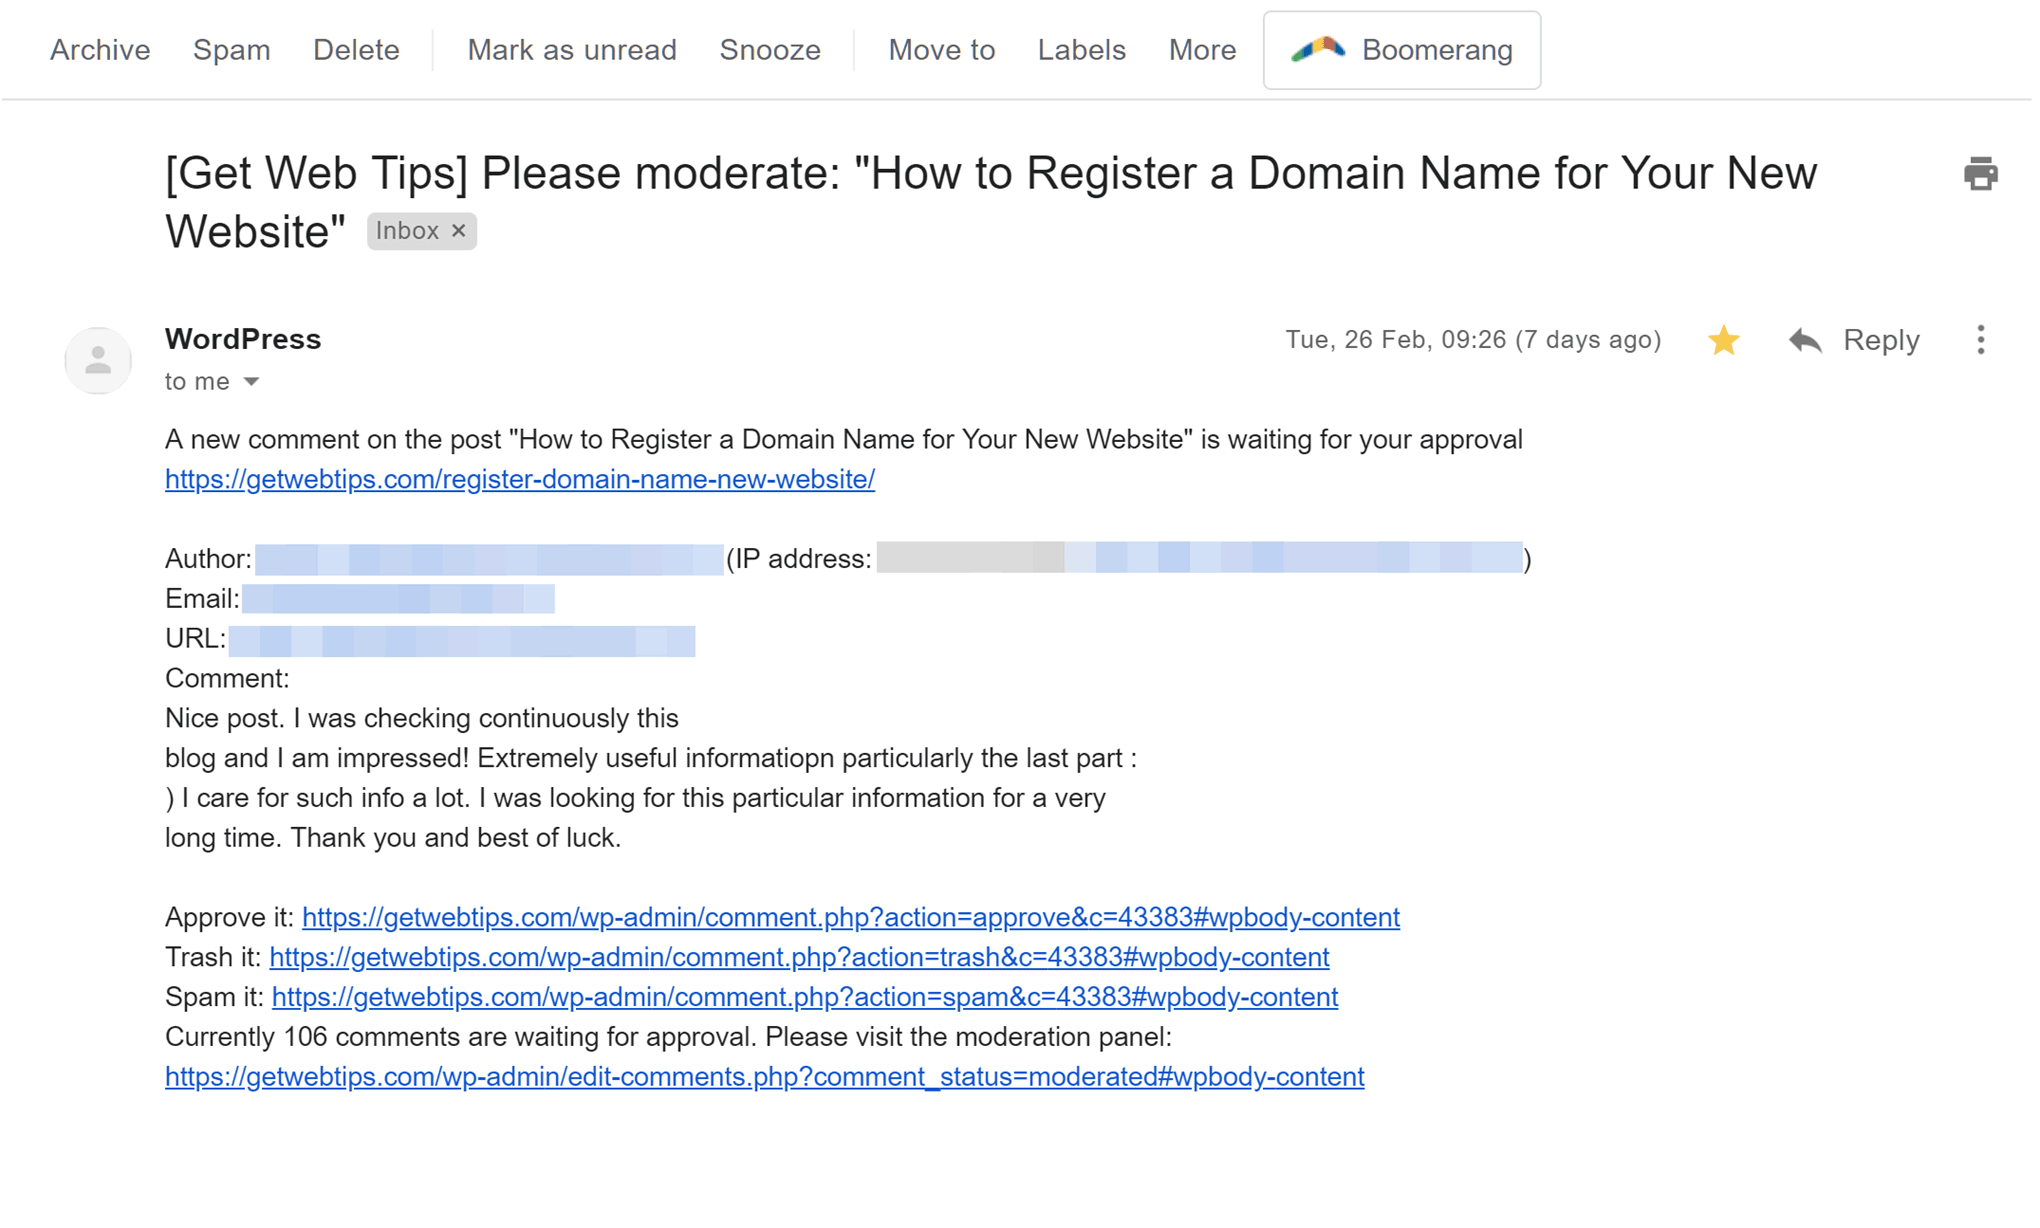
If you have given your visitors the ability to leave comments on your membership site, you might start getting notifications that people are joining the discussion. If you do receive an email notification, WordPress helpfully includes links in the message so you can quickly approve or reject a comment.
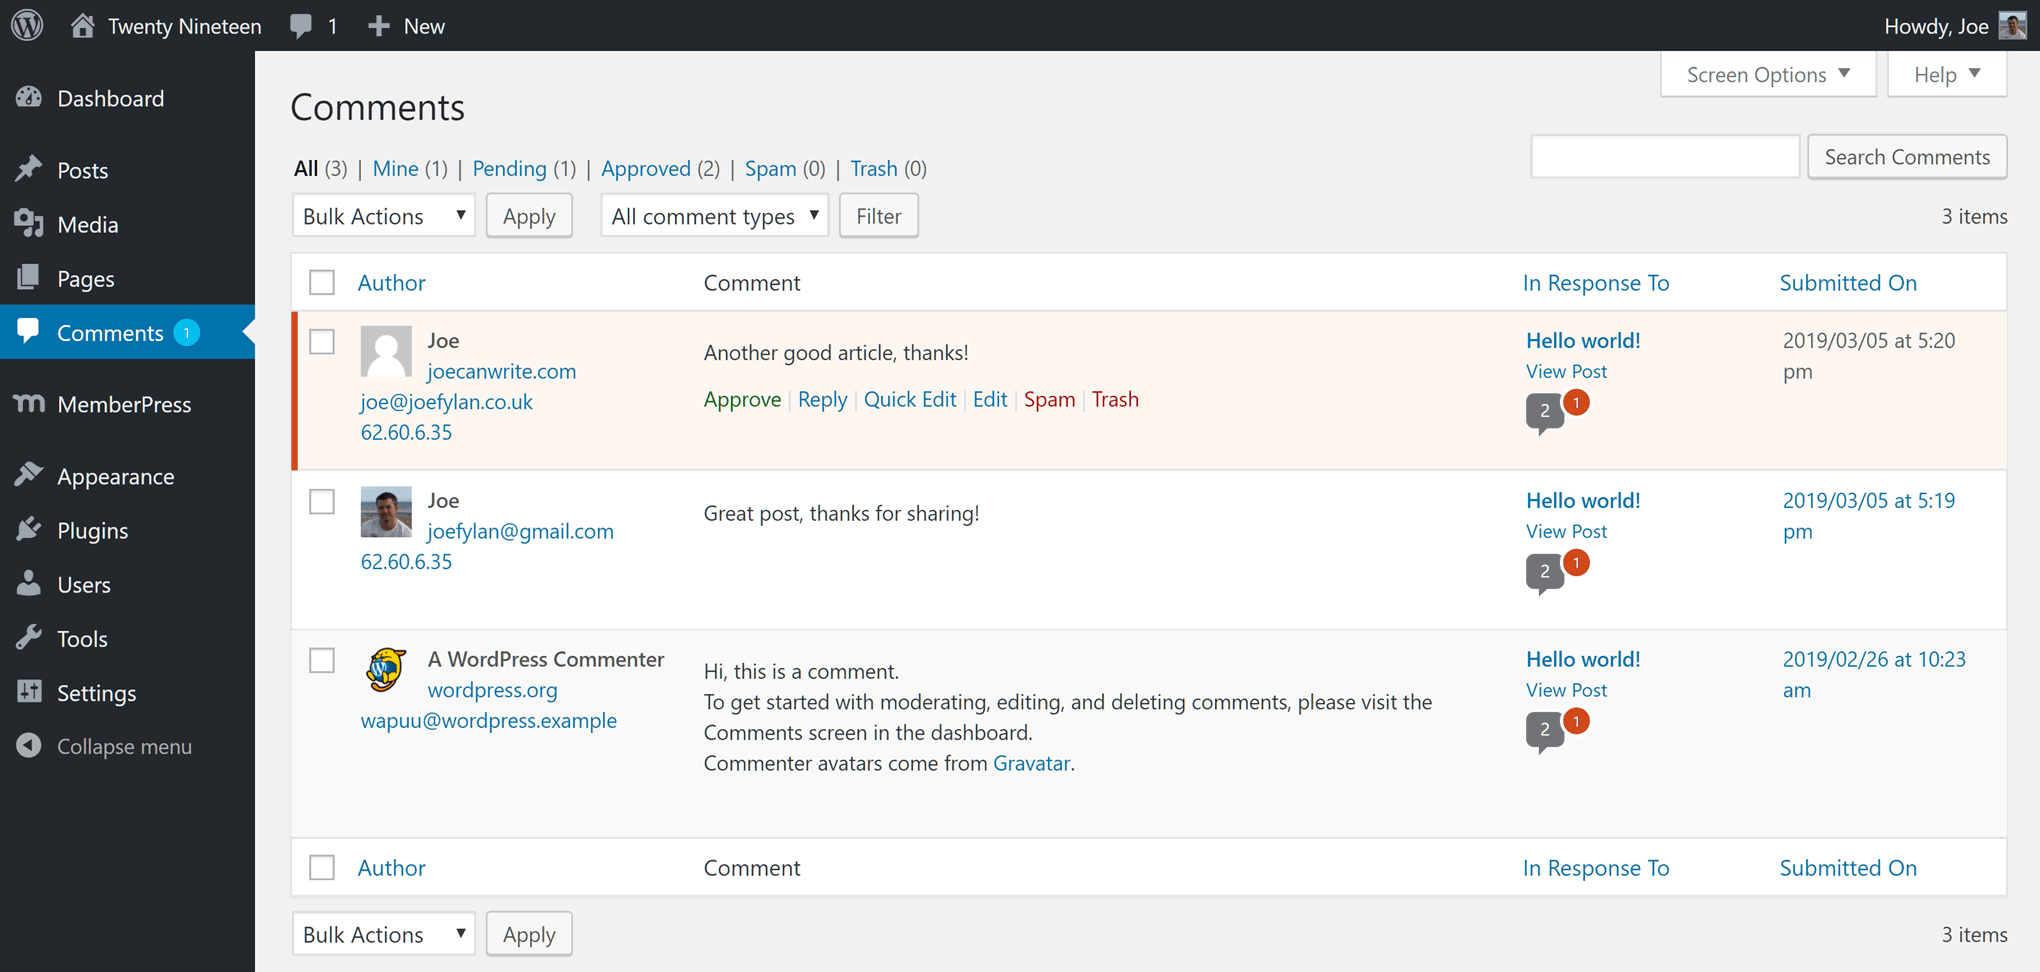
Whether you’ve enabled email notifications or not, whenever you log in to your WordPress Dashboard you will also see a notification if there are any comments that need your attention. These notification icons are usually located in the header area and on the sidebar menu.
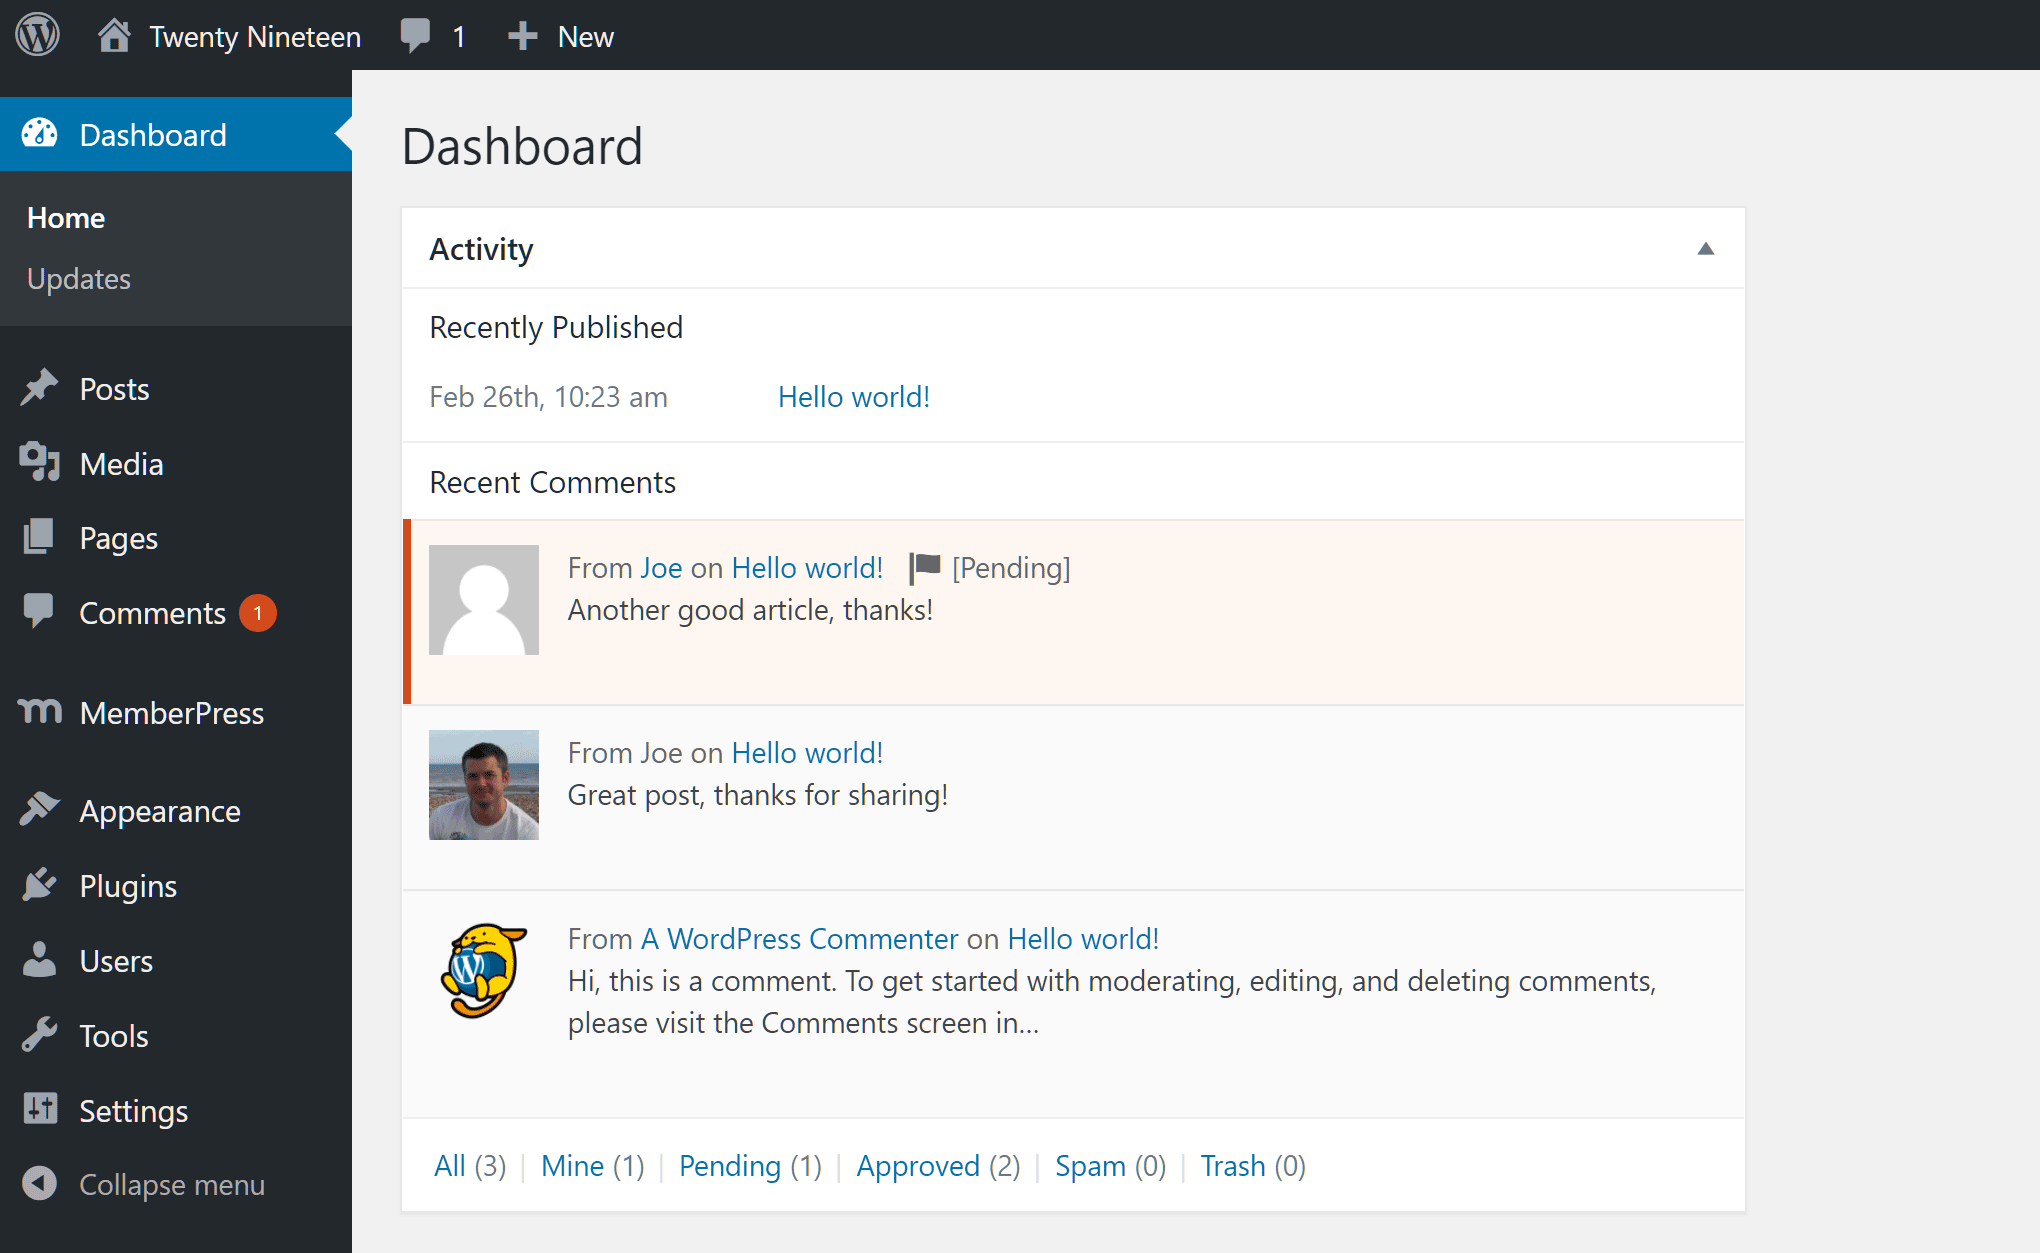
Once you click through to the comments section of the WordPress Dashboard, you can then approve or delete any comments as well as edit them if necessary.
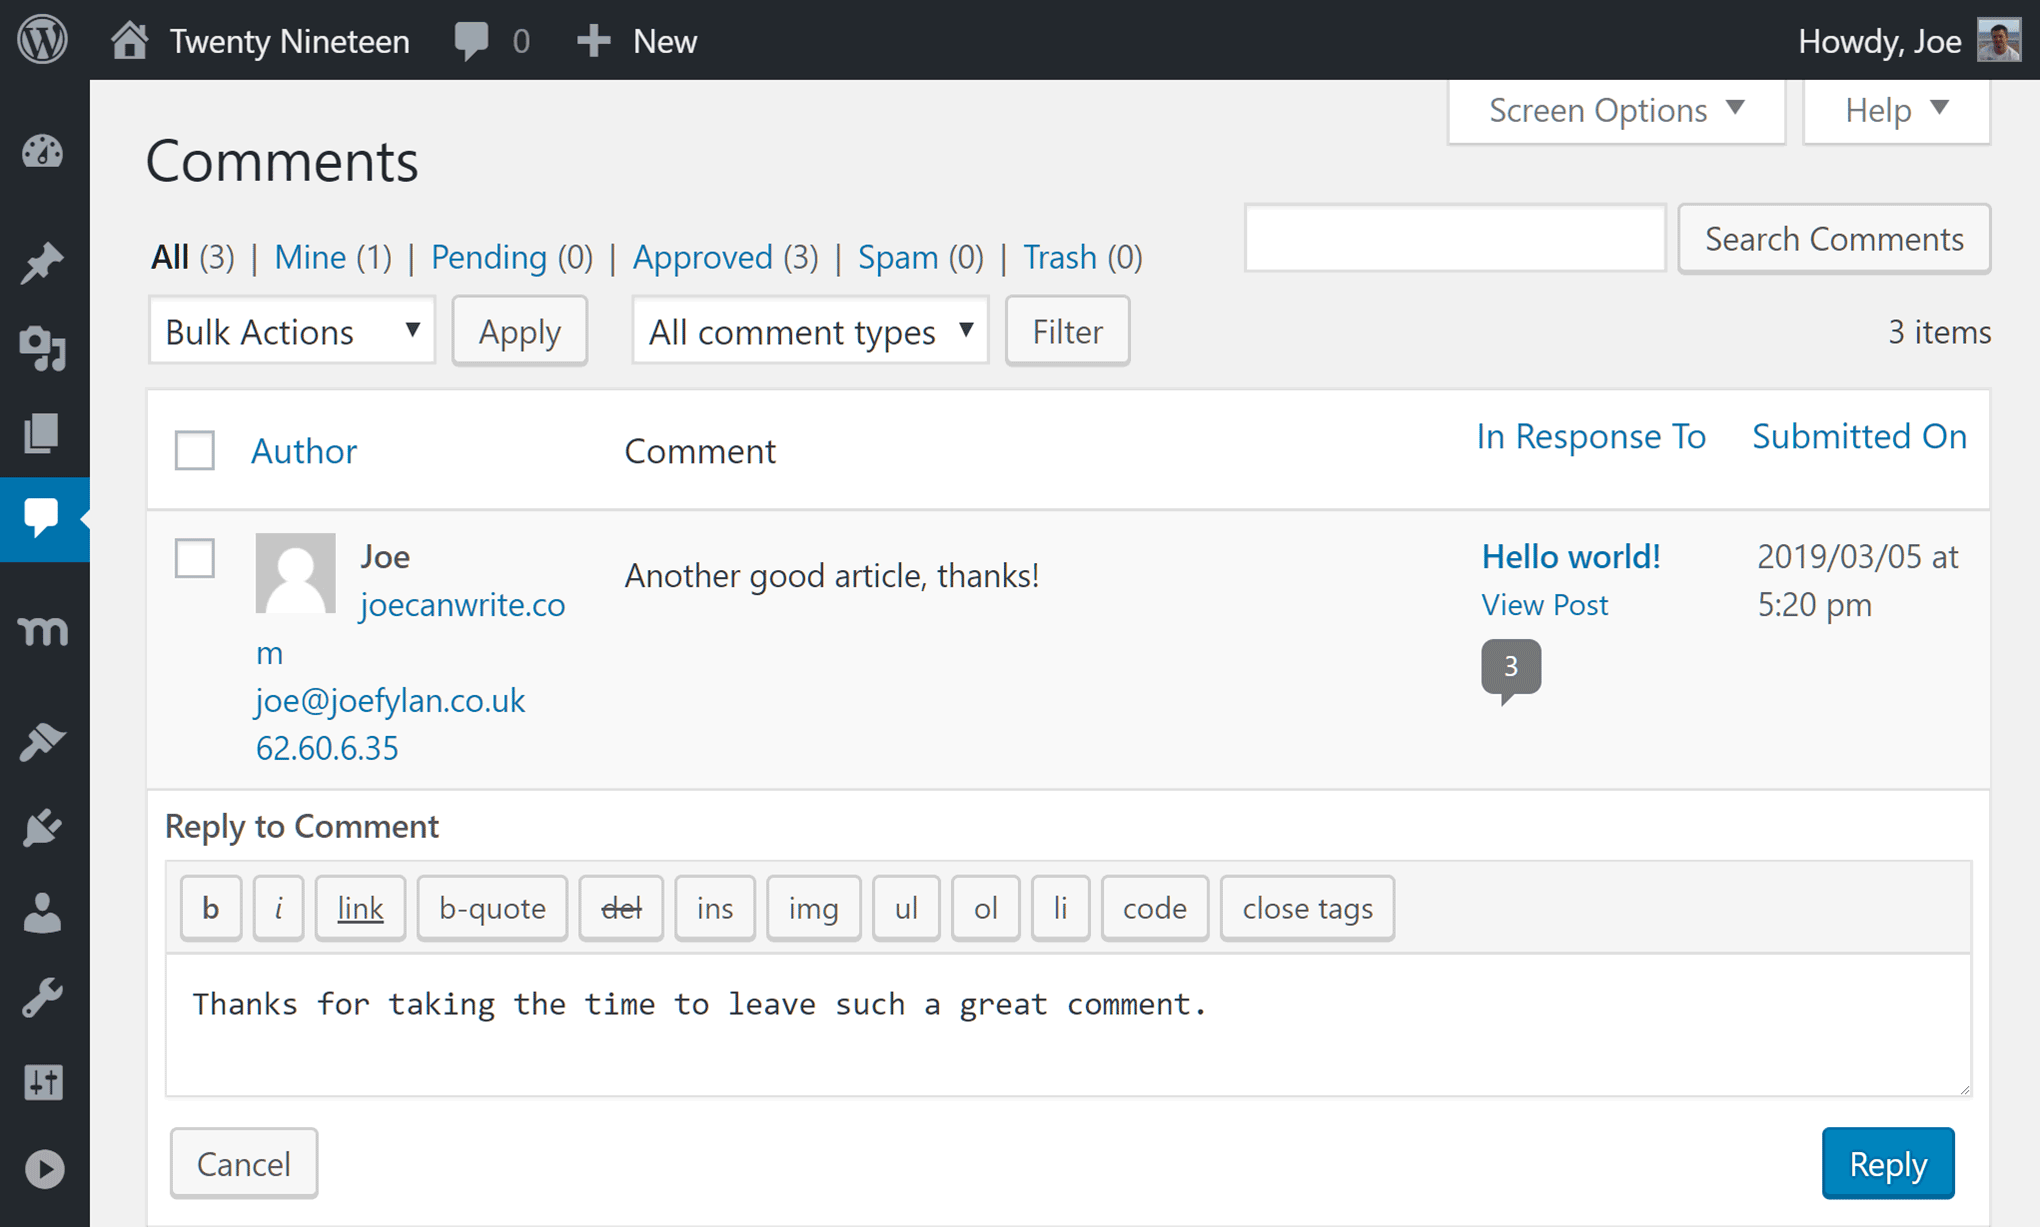
To help you save time, you can also reply to any comments from within your WordPress Dashboard, rather than going to the published post or page the comment was left on.
That about covers how to manage comments on your membership site using the core functionality of WordPress, However, as is often the case with WordPress, you can extend this functionality to improve comment handling on your website.
WordPress Membership Site Comment Plugins
Here’s a quick overview of some useful WordPress plugins that can enhance how you manage comments on your membership site.
Comment Spam Fighting Plugin

Unfortunately, WordPress comment sections are often targeted by spammers who want to promote their websites via your articles. By leaving a comment that contains a link, the spammers hope your visitors will click on those links and check out the spammer’s site.
Once your site goes live, these spam comments can quickly build up. Thankfully, there’s a free plugin that can help send most of these fake comments straight to the spam folder and that’s the Akismet Anti-Spam plugin from Automattic. If you are going to enable comments on your website, it’s highly recommended that you install Akismet or activate the anti-comment spam module in the Jetpack plugin.
Comment Reply Notification Plugin

By default, WordPress won’t let your visitors know that someone has replied to one of their comments. However, by installing this free and effective plugin, your website will automatically send your visitors an email when someone takes the time to reply to a comment they’ve left.
The main benefit of adding this feature to your website is that it will help bring the visitors who’ve left a comment back to your membership site. Not only does this give them the ability to see the reply to their comment, but it also gives you another opportunity to promote your membership site to them.
If you are using the Jetpack suite of tools on your website, then you should probably enable the Jetpack commenting system instead of installing this plugin, as Jetpack provides many of these features, such as social media logins, comment liking, and site subscription options.
wpDiscuz Enhanced Comments System Plugin
With features like an AJAX-powered real-time commenting system and the ability to choose which fields are displayed in your comment forms, the free wpDiscuz plugin aims to enhance the default WordPress commenting feature.
So if you’d rather not install Jetpack – as you might not need all the other features that comes with it – then trying wpDiscuz could be a good alternative.
Final Thoughts
You should now have a better understanding of how to manage comments on your membership site as well as some steps you can take to upgrade the commenting experience.
If you are going to keep comments enabled on your WordPress website, then it’s a good idea to try and respond to any comments as quickly as possible, in order to provide a good service to your readers and keep the conversation going. By installing some of the comment enhancement plugins available for WordPress, you should find it easier to keep on top of this aspect of running a successful membership community.
Do you have any questions about managing comments on a WordPress membership site? If so, let us know in the comments below.


Add a Comment