If you want to ensure that your membership site looks trustworthy while also reducing the risk of your site security being compromised, you should definitely be using an SSL certificate. Once you’ve enabled SSL — switching from HTTP to HTTPS — on your site, data will be transferred securely throughout your membership website and to the servers it communicates with.
While the security benefits alone should be enough of an incentive for you to enable SSL, there is another reason to do so.
If you haven’t added SSL to your website, this fact is clearly displayed to your visitors, letting them know your site is not secure — something that probably won’t help with your signup rates!
In this guide to SSL for membership sites, we’ll give you a quick overview of what this all means and why you really should be using SSL. After that, we move on to showing you how to add SSL to your membership site, including the options for getting an SSL certificate for free.
So if you’d like to make your membership website more secure and gain the trust of your visitors, read on.
What Is SSL Is and Why Does Your Membership Site Need It?
SSL stands for secure socket layer and by adding it to your membership site, any data or information – including payment details and passwords – entered into your site by your members and other visitors is sent securely between the user’s browser and the remote location — usually a web server — where the data is being transferred.
By using SSL to encrypt any data submitted by your users, you can reduce the chances of it being intercepted and falling into the wrong hands as it travels from the user’s computer to the destination server. This data includes their usernames and passwords, or even the payment details they use to join your membership program.
Also, as search engines like Google, and web browsers like Chrome and Firefox, alert users when they are visiting a website that isn’t using SSL, and therefore isn’t secure, this is something that could already be costing you new members.
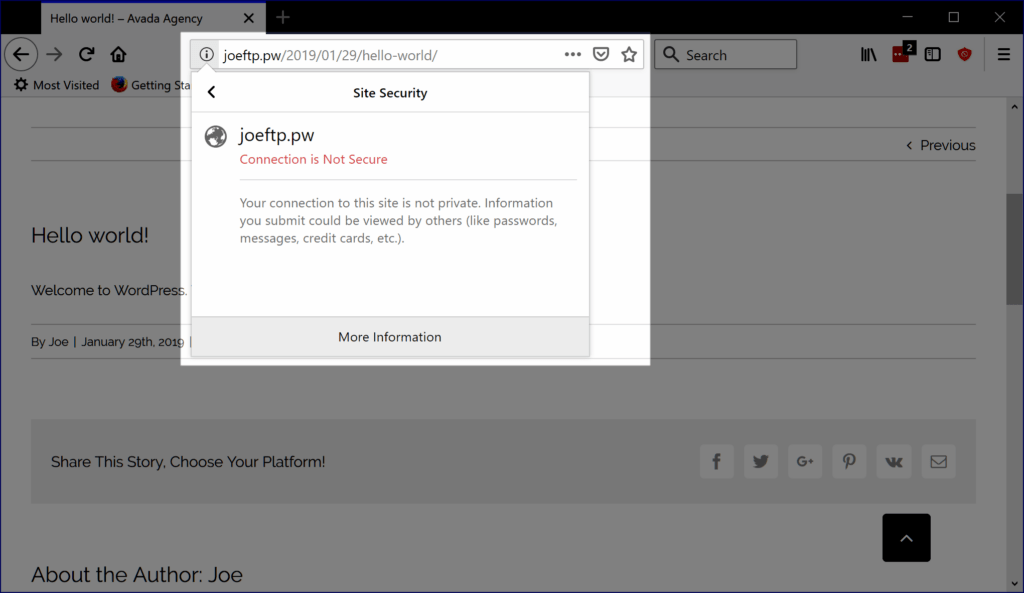
As the screenshot below illustrates, if a website isn’t using SSL, the browser will let visitors know this and warn them that their connection is not secure. Would you enter your data into an unsecured site? Probably not, and your members probably wouldn’t either.

If you want to know more about SSL and how it works, as well as get a better understanding of why your membership site needs it, this quick and informative video from HubSpot is worth watching. However, if you’ve heard enough and just want to find out how to add SSL to your membership site, read on for our guide.
Adding SSL to Your Membership Website
Before we go any further, you should probably check to see if your membership site already has SSL or not.
To do so, visit your website and then look at the address bar in your browser. If you see a padlock icon, as in the image below, then your website is using SSL. If it does appear to be secure, visit a few other pages on your website to cheek that the SSL certificate has been applied site wide.

Another quick way to check is to see if the address or URL of your website starts with https or http. HTTPS indicates your site is using the Hyper Text Transfer Protocol Secure instead of the regular unsecured Hyper Text Transfer Protocol.
If you can’t see a padlock, as is the case in the image below, then your website is probably not secure. Clicking on the information icon should provide you with more details about the situation of your site. You can also enter the address of your website into this checker on the HubSpot website to find out more information about the status of your site.

Once you’re satisfied that your website doesn’t have an SSL certificate, it’s time to add one. Thankfully, the process is very straightforward, and depending on your preferences and current situation, it could even be free.
Adding a Free SSL Certificate to Your Membership Site
Due to the importance of the internet being secure, several organizations give away perfectly good free SSL certificates. ZeroSSL and Let’s Encrypt, are two examples of organizations that aim to give anyone who wants to make their website secure, the ability to do so for free by switching from HTTP to HTTPS.
Thankfully, many of the best web hosts now make it possible to enable a free SSL certificate for your website in just a few clicks. This can usually be carried out through your hosting account dashboard, and due to this, depending on who’s hosting your website, you can probably enable SSL and HTTPS on your website right now.
Rapyd Cloud, Bluehost, SiteGround, and WP Engine are just a few web hosts that are very popular with WordPress users that offer easy-to-activate SSL certificates as part of their service.
So if you’re using one of these hosts, you should be able to log into your account area and activate the certificate. It will then be activated for your site without any downtime or disruption to the user experience. Anyone using HTTP in the URL when accessing your site will be seamlessly redirected to the new secure HTTPS URL.
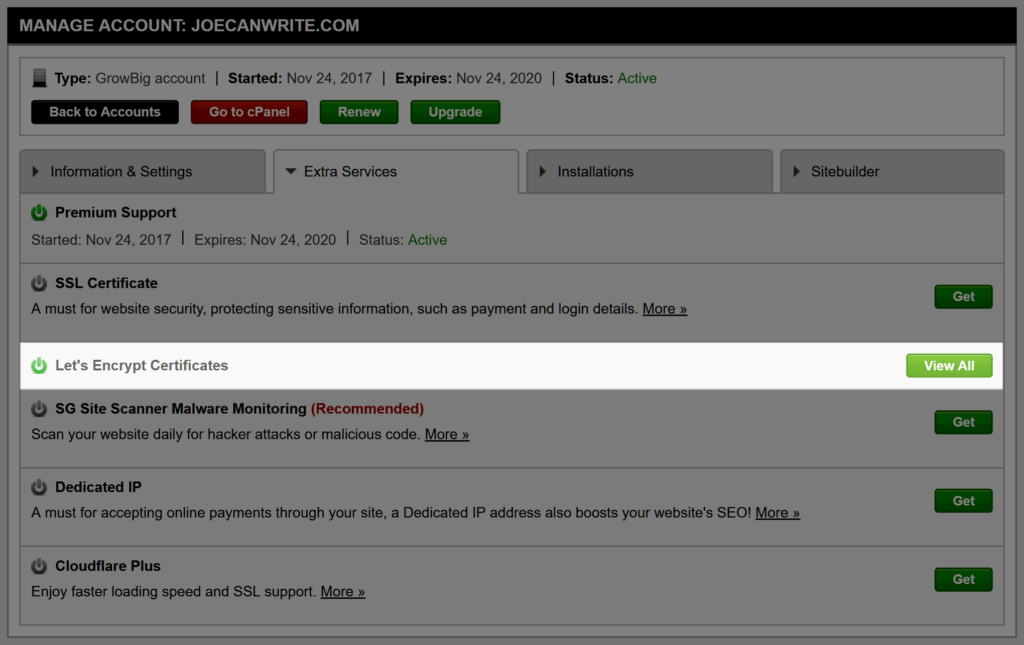
With SiteGround, for example, you can visit your account area, then the extra services tab to get a free Let’s Encrypt certificate and enable SSL for your membership site’s domain.

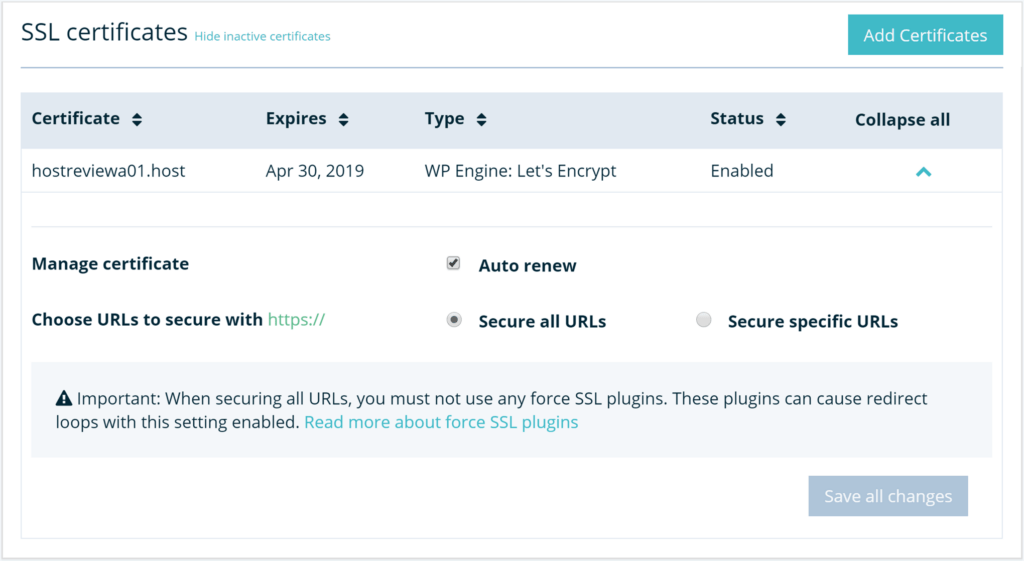
WP Engine, a premium managed WordPress web host for sites that want fast hosting and all the benefits associated with increased site speed, also makes it very easy to enable a free SSL certificate. Simply login to your account area on the WP Engine site, navigate to the SSL section, and then click on the Add Certificates button.

After choosing the SSL certificate from Let’s Encrypt from the available options, your site will switch from the unsecured HTTP to the secure HTTPS protocol.
With some hosts, it can take up to a few hours for the SSL certificate to be applied to your site. But if it you’ve waited a while and nothing appears to have happened, get in touch with your web hosts support staff to see if there is any problems.
If you’re using another web host, check out their support pages or use Google to search for hostname + Let's Encrypt SSL to find the relevant page that will tell you how to make your site more secure.
Final Thoughts
Hopefully you now have all the information needed to add SSL to your membership website. In most cases your web host will make it very easy to enable a free SSL certificate for your site, in just a few clicks.
If your host doesn’t offer a free SSL certificate in the straightforward way that Rapyd Cloud, Bluehost, SiteGround, and WP Engine do, then there’s a good chance they’ll still be willing and able to enable SSL for you, but you’ll have to contact them directly to start the process.
Using a free SSL certificate isn’t the only option. You can instead choose to purchase an SSL certificate from another provider. In fact, if you are handling member credit card details yourself, rather than using a payment processor like PayPal or Stripe, then you should look into buying an extended validation certificate to see if it’s the right choice for your business. However, in most cases, a free SSL certificate from ZeroSSL or Let’s Encrypt should suffice.
Areyou ready to enable SSL for your membership site? Let us know in the comments
below.


Add a Comment