From Zero to Hero: How Ad Hatred Can Boost Your 💰
Think back to the last time you opened up a news article, or worse, a favorite recipe from a website. The ads can be over the top.
In some industries, though, publishers and creators need those ads to monetize their content – whether readers like them or not.
And most readers don’t. That’s why nearly every recipe website has a Jump to Recipe link. I’ll bet those are the most frequently clicked links on the internet!

However, there’s a silver lining of opportunity to the cloud of disdain hovering over your ads. And that silver lining is upselling.
If you’ve got a WordPress website built around an ad monetization model, you’ve got an awesome opportunity to upsell free readers into paid members.
And you can do it easily, regardless of how or where you display your ads.
Low Hanging Fruit for WordPress Websites
MemberPress can create an ad-free experience your readers will thank you (and pay you) for.
You can easily hide your ads from the view of paid members. And because MemberPress is so flexible, you can create custom ad experiences based on membership levels.
For example, a recipe blog might publish all its content for free, with ads everywhere. Some options for ad locations are:
- Sidebar Widgets
- Header Widgets
- Footer Widgets
- In-line Blocks
- Popups
So, in order to create value for premium members, the site owner might hide some or all ad areas from paid members.
Convert Free Visitors to Paid Members Easily
For example, you can hide pop-up ads and in-line ads for basic members.
So, your basic members would still see the sidebar or others placed outside the content area. Then, you can offer a plus or pro upgrade to hide all ads.
The structure might look like this:
- Free – Free visitors see all ads in header, footer, sidebar, in-line with content, and popups
- Basic – Visitors only see ads in header, footer, and sidebar
- Pro – Visitors see no ads
Ad Serving Methods for WordPress
Let’s first review the most common methods for serving ads on a WordPress website – static insertion and dynamic insertion.
Static Insertion
This method is great if you only have a single image or link to share as an ad. It’s as simple as adding your image and placing a link behind it with the block editor.
And some of your favorite themes and page builders also have static ad space available. For example, with Divi, you can define a static ad to appear in pre-defined areas, like a header or sidebar.
Dynamic Insertion
This is a more common method and inserts relevant ads within predefined areas. A plugin or theme often controls where ads will show up. Often, a third party ad network, such as Google Adsense, will determine which ads appear.
Whether you’re using static or dynamic ad insertion, the methods for hiding your ads from paid members are the same.
How to Hide Ads for Paid Members or Subscribers on WordPress
If you’re looking for the best way to give your readers a premium level, ad-free experience, you’ll want to start by installing MemberPress.
It’s the most trusted solution for controlling content visibility on WordPress. I’ll show you what I mean.

Get MemberPress Today!
Start getting paid for the content you create.
How to Configure MemberPress for an Ad-free Experience
Installing MemberPress is as easy as installing any other plugin. Once installed, the plugin walks you through the major setup activities with ease.
We’ve written a lot on the topic, and we’ve got this handy video tutorial to get you up and running very quickly.
Recommended Ad Management Plugin for WordPress
If you don’t already have a plugin or theme that provide ad management, you’ll want to install a plugin. Several free and premium plugins support dynamic ad insertion. My favorite, and the one we use on MemberPress, is AdSanity.
However, for the examples in this post, I’m using my second favorite ad management plugin, Advanced Ads.
Using MemberPress Rules to Remove Ads for Members
Now that you’ve got MemberPress installed and configured, it’s time to set up your ad-free rule.
In the admin panel, go to MemberPress > Rules and create a new rule. Use the Partial rule type for this.
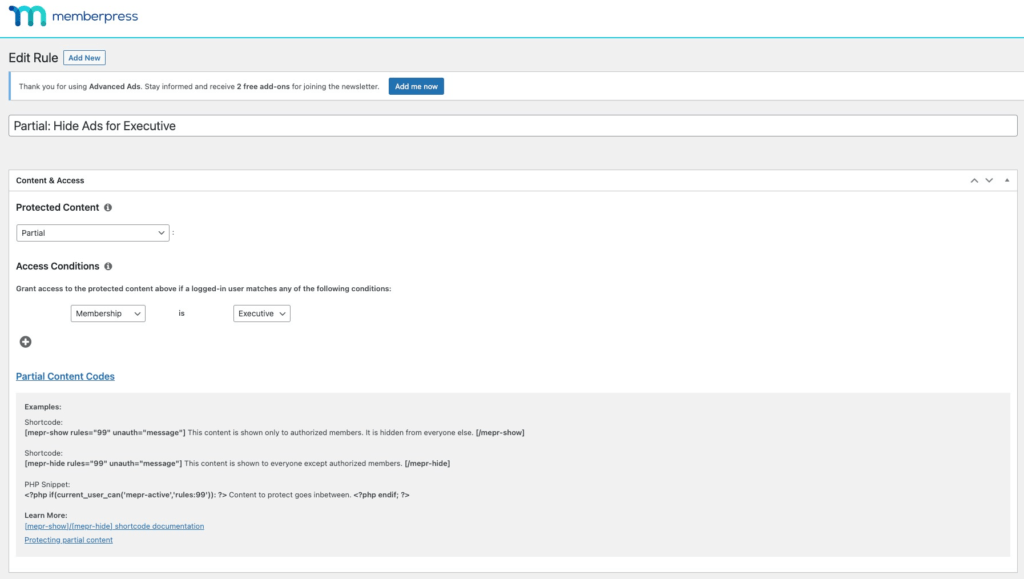
In my sandbox site, I have two membership levels named Premium and Executive. And I’ve configured my rule to control content for my Executive members. I intend to hide ads from people who have joined my Executive membership.
In the screenshot above, you can see example shortcodes to either show or hide content based on this rule. So, let’s start there.
Using a Shortcode to Hide Ads on WordPress
All the popular Ad Management plugins allow you to deliver ads with a shortcode. In this example, I’m using the free plugin Advanced Ads.
However, this process will work with our recommended plugin, AdSanity as well as virtually any other ad management plugin.
Place your ad shortcode wherever you want to serve ads. Then wrap it with the MemberPress Hide shortcode. Here’s what it looks like using an in-line ad spot between paragraphs in my fictitious blog.
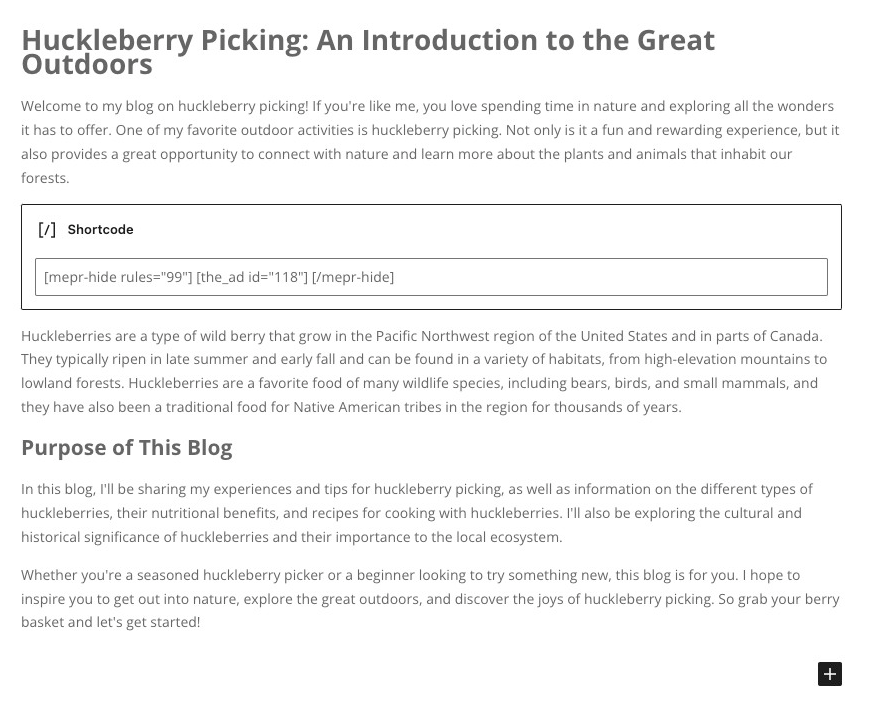
This method hides the ad content from view of my Executive level members. Anyone who is not an Executive member will see the ad. For example, in my use case, the Premium members will still see the ad.
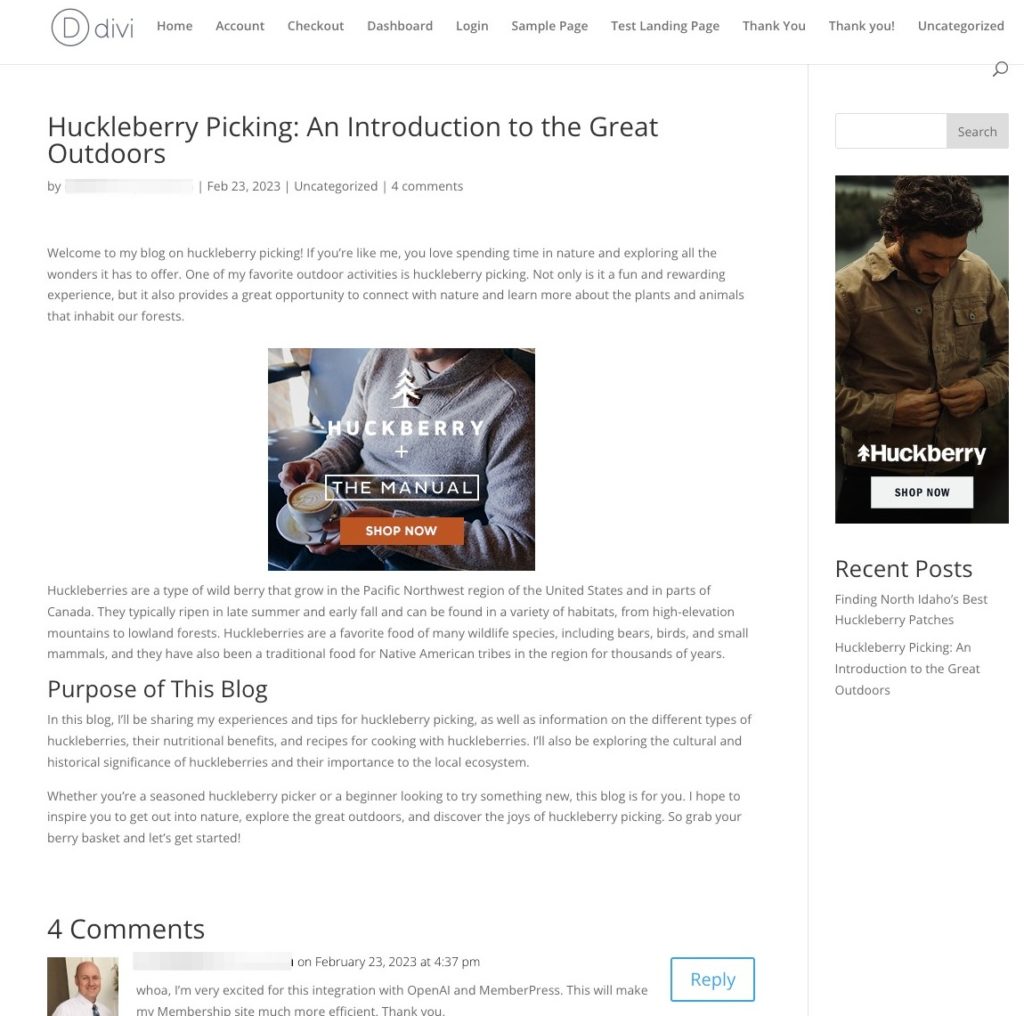
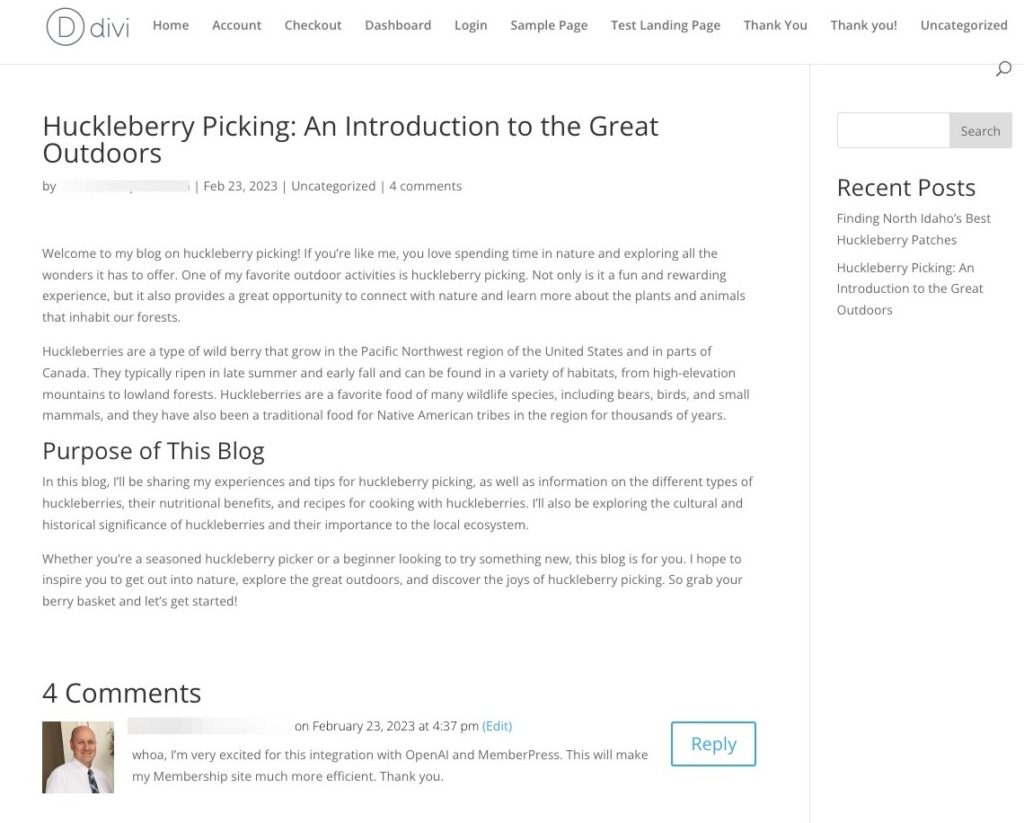
Notice the ad in the sidebar as well? That’s a widget area, I’ll show you how to handle ads in widget areas next. But first, here is what my Executive members experience when they read the same post.
Using MemberPress Protected Blocks to Hide Ads on WordPress
When you install MemberPress, you’ll see a new block item named Protected. This is a MemberPress-protected block. MemberPress gives you granular control of virtually any content element in WordPress.
You can add a protected block inside a post, page, course, lesson, or even a widget. The AdSanity plugin allows you to insert an ad or group of ads into a widget as well.
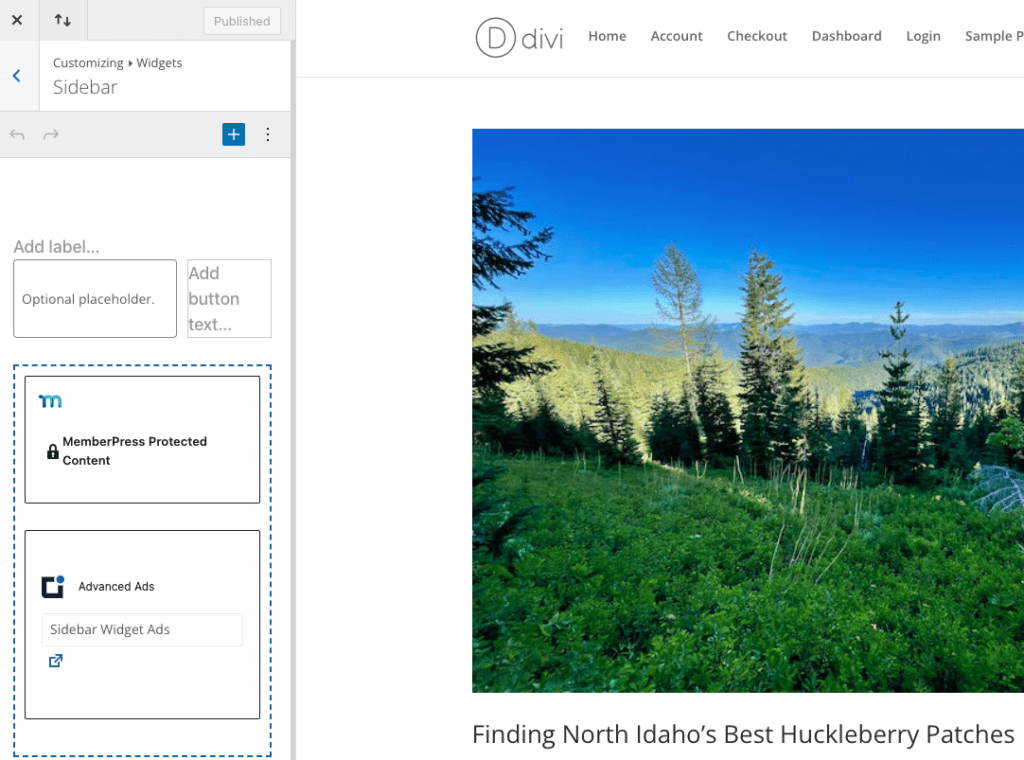
So, to hide ads within a widget, first add a protected block to the widget. This is how you would do it with Divi.
In the WordPress Admin Menu, navigate to Divi > Theme Customizer. Then select Widgets, and then Sidebar.
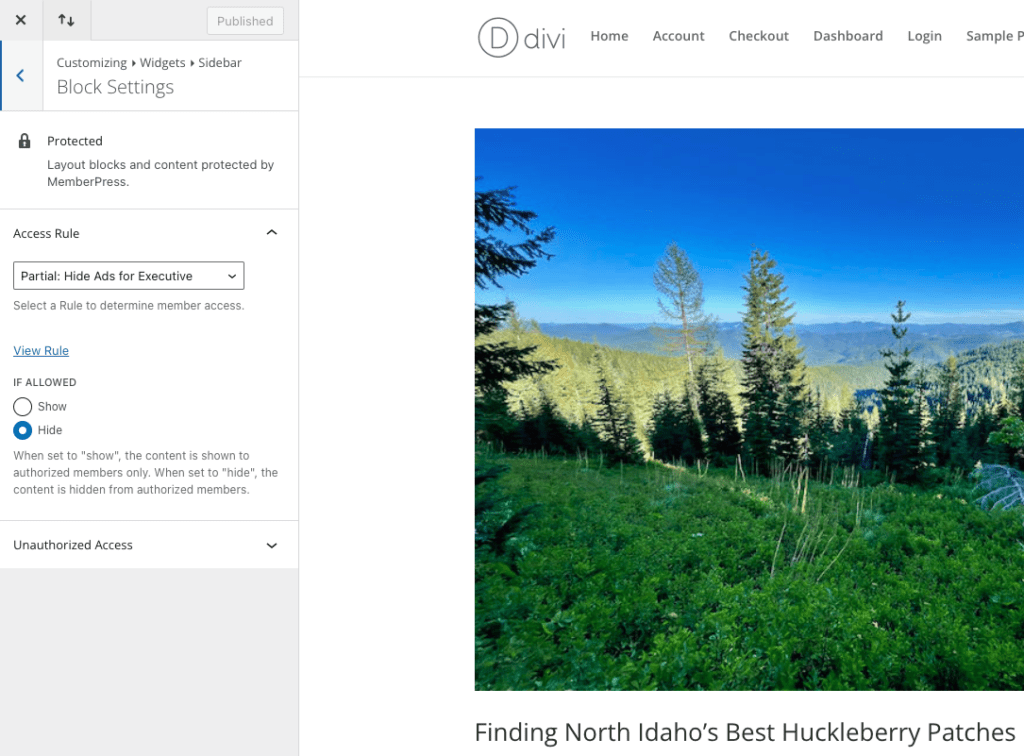
When you add the protected block, just configure it to reference your desired rule. Then be sure to select the option to Hide content from members included in the rule.
The next step is to drop your ad or ad group into the protected block. Then be sure to save the configuration and test it out!
Using Order Bumps to Upsell at Checkout
Now you have a low-ad and ad-free version to shout from the rooftops, it’s time to get upselling.
Order Bumps is MemberPress’s answer to chewing gum at the supermarket checkout. Boost your average order value and watch your bottom line skyrocket when you add one-click upsells at checkout.
Encourage members to enhance their order and upgrade their subscriptions by making it super easy to make the switch.
Here are some examples of Order Bumps for a language learning course:
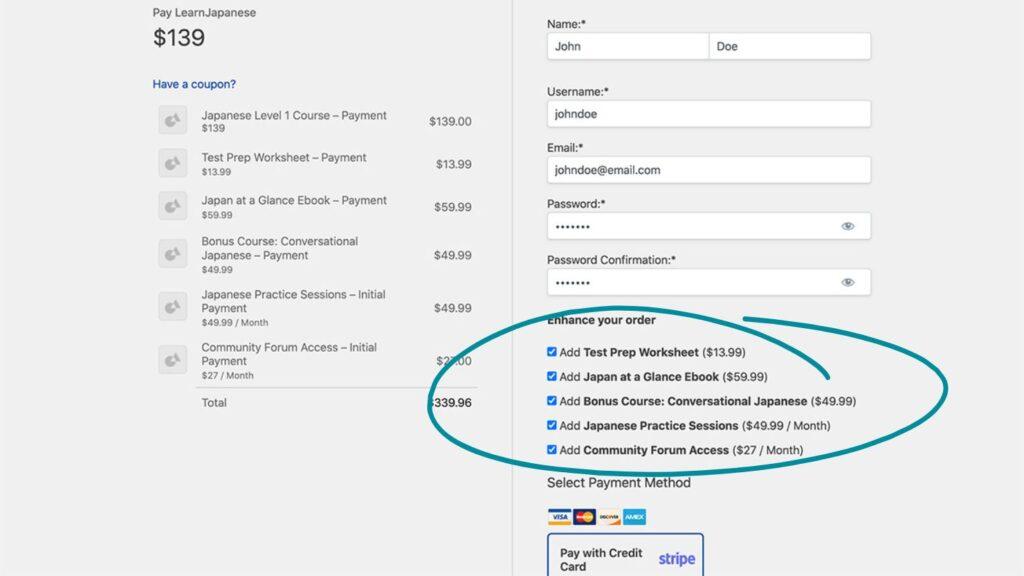
As you can see, Order Bumps aren’t just limited to subscription upgrades, you can add practically any digital product or service.
To add Order Bumps and upsell your ad-free version at checkout, first you need install the Order Bumps add-on.
From your WordPress dashboard, go to MemberPress > Add-ons > Order Bumps > Install Add-on. Once it’s installed, click on the toggle to Activate.
Then navigate to MemberPress > Memberships and click on the membership tier you want to edit.
In my case, I’m adding an Order Bump to the Basic membership checkout process.
Scroll down to Membership Options > Order Bumps tab.
Edit the Order Bumps Heading. In this instance, you can change it to “Go ad-free”, for example.
Click the plus icon (+) to add your Order Bump, and click the down arrow to select the ad-free membership option.
Make sure to hit Update and you’re good to go!
Wrapping Up
As you can see, MemberPress makes content control a breeze. If you’re using ads to monetize your blog, you need MemberPress. Imagine generating consistent, reliable revenue from paid subscribers or members.
It’s an easy upsell for your loyal readers. And it doesn’t require a lot of work. The most difficult part may be deciding how much to charge for a membership…
How Much to Charge for Ad-free Membership
You’re probably already doing the math to determine how to price your memberships. Consider how much traffic your blog gets. What is your ratio of new to returning visitors each month? Returning visitors will be your primary target.
And it doesn’t take many paid subscribers to make this all worthwhile. Set a goal for how many returning visitors you’d like to convert to paid memberships. Could you convert just 20% of your frequent visitors to subscribe?
For a great example of this strategy being put to use, take a look at my personal favorite recipe blog, 40Aprons. And of course, they’re one of our favorite customers too.
Have any questions about how to upsell by creating an ad-free version? Ask away in the comments section!


Add a Comment