Starting a classified ads website can be profitable, but trying to compete head-on with an industry leader like Craigslist probably isn’t. The site generates a monthly average of 83 million visitors. That’s more than Google brings in.
So how does a small online classified ads business compete? Instead of casting your net too broadly, you can try focusing on one classified ads niche, with a membership site that offers resources not available elsewhere.
In this post, we’ll show you how to set up a membership site in WordPress for classified ads. Let’s get started!
Why You Need a Membership Site for Your Classified Ads
You could monetize your classified ads available for anyone to peruse. However, it can be a smart idea to lock them away for registered and/or paying users only. Membership sites offer many potential advantages:
- You can brand your site, and develop a reputation as the go-to resource for your niche-based community.
- With multiple membership levels, you can offer packages for people who want premium services or products.
- Financially, you can gain by serving a wider customer base inside one niche while earning more with premium services.
Care.com, a membership-based classified ads site for caregivers, employs this model – with a twist. It sells memberships to buyers, not to caregivers:
Care.com membership targets businesses that want to offer access to caregivers as an employee benefit. Members gain “unlimited” access to a network of caregivers for their employees’ family members, including pets. This is just one creative approach to a niche-based classified ads membership system.
Locality is a great place to start when coming up with your niche. Things like local services (babysitting, dog walking, car washing) and things to do (free events, local events hosted by schools, events for families) are always in demand. And many people appreciate the trustworthiness and authenticity of a dedicated local listing.
It’s a bit on the older side, but the Quora Q&A “What Makes a Niche Classified Ads Site Successful” has some incredibly helpful and timeless info you might want to check out.
How to Start a Membership Site for Classified Ads (In 5 Steps)
Next, we’ll walk through the five steps to set up a WordPress classified ads membership site using our own MemberPress plugin.

Step 1: Choose Your Target Audience
Who are your ideal customers, and why will they buy from you? If you don’t know, moving ahead with your website until you do is risky. Without a clearly defined target audience, it’s difficult to make the best choices for building and growing your membership site.
So we’d recommend that you begin by learning about buyer personas and how to use them in your marketing plan. You’ll need this clarity to determine what membership packages and pricing will help you meet your revenue goals.
Step 2: Set Up MemberPress
To get started, you’ll need a hosting plan with a simple WordPress website. You may also want to choose a dedicated classified ads theme, which will jump-start your site’s design.
With WordPress set up, you’re ready to add membership features to your site:
Our MemberPress plugin builds membership capabilities into WordPress sites. It lets you set up multiple membership levels, create subscriptions, and protect access to information, including specific posts, entire categories, and even courses.
To get started, check out our pricing plans and decide which one is best for your needs. After completing your purchase, remember to copy the license number that’s displayed on the download page. You’ll need this to complete the installation.
Then open up your WordPress site, and in the left-hand menu find Plugins > Add New:
Upload the MemberPress zip file you downloaded, then install and activate it. You’ll also need to enter the license number you copied earlier.
Step 3: Create Membership Levels
To set up membership levels, click on Memberships under MemberPress in the left-hand menu:
This is where you’ll use the decisions you made about your target audience and marketing plans in Step 1. Let’s say you decided to offer two memberships: one Free and one Premium plan priced at $67 per month.
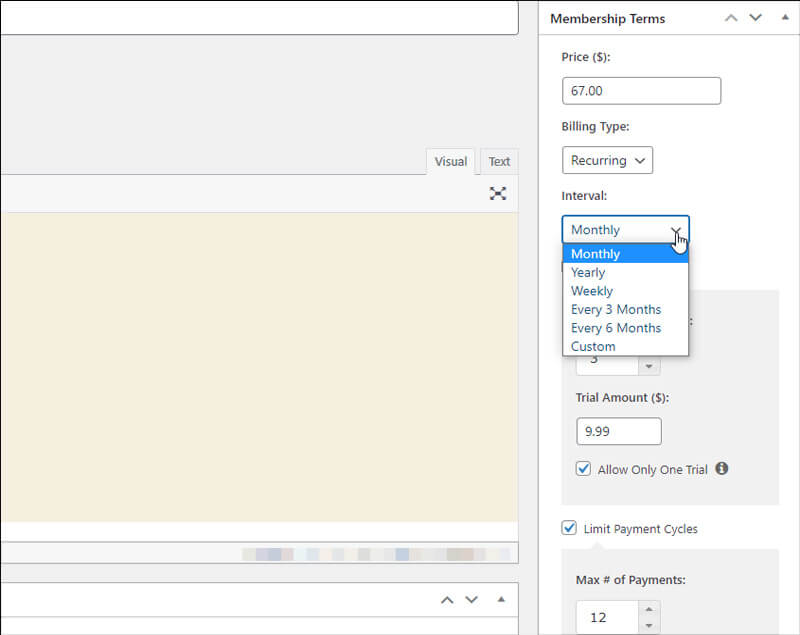
In the screenshot below, we created a recurring Premium membership with a Price of $67. Note that you could also make this a one-time fee:
MemberPress also lets you offer free trials, and customize various other aspects of your membership plans. Once you’re happy with your choices, you can hit Publish to make the plan live. To add additional membership levels, simply repeat this process.
After you’ve created at least one membership level, you can set rules for who has access. In the left-hand menu, under MemberPress, click on Rules:
First, select which pages will be protected (we chose All Pages). Then, select who gets access, such as Premium members only:
If you have multiple membership levels, you can set different rules for each group.
Step 4: Set Up Your Payment Processors
MemberPress works with several payment processors, and setup is easy. Go to MemberPress > Settings, and click on Payments > Add Payment Method. In the Gateway drop-down menu, choose your payment method:
If you choose Offline Payment, you’ll have the option of completing each purchase manually. For other payment types, you’ll need to complete some requested setup details. You can set up as many payment processors as you like.
Step 5: Create Login Forms
At this point, you’re almost done. Before wrapping up, however, you’ll want to add a login option to your menu, to give members easy access.
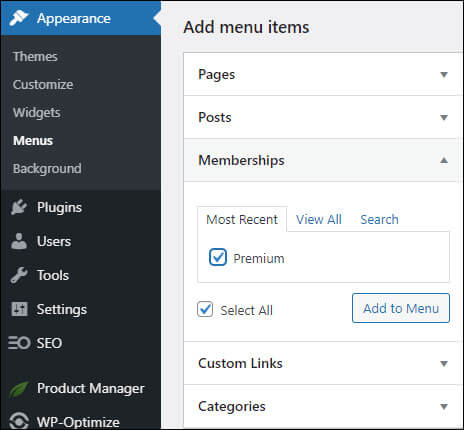
To do this, go to Appearance > Menus and look for Memberships in the Add Menu Items box. Click on it, and you should see all of your membership levels listed.
Select the options you want to include in your menu, and then hit Add to Menu:
If you don’t see Memberships in the Add Menu Items, you may have to change your Screen Options in order to view them. To do this, go to the top right-hand corner of your screen, and click on the Screen Options box.
In the drop-down box on the left side, select Memberships:
Now you should see Memberships in the Add Menu Items box:
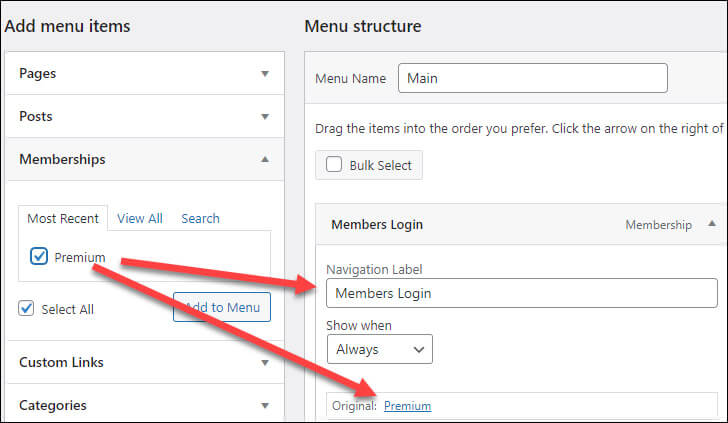
Next, the Menu Structure box lets you organize your menu. Keep in mind that your login options need to be labeled clearly. So you may want to change the name to something your audience will recognize, such as “Member Login”. This won’t change the actual name of the membership level, just the way it appears in the menu.
Don’t forget to save your menu when you’re done. At this point, your membership site is all set up! You can start inviting members and gathering classified ads.
Conclusion
A membership site can add more revenue and perceived value to your classified ads. Better yet, it’s easy and cost-effective to set one up.

Get MemberPress Today!
Create and Monetize a New Classified Ads Website Fast and Easy
With MemberPress, you can create an online classified ads business on WordPress in just five easy steps.
- Determine how you’re going to meet your target audience’s needs.
- Set up MemberPress to add membership capabilities to your WordPress site.
- Create your membership levels and the rules for each one.
- Integrate your payment processors.
- Set up member login access.
What kind of classified ads site are you building? Share your thoughts with us in the comments section below!
If you liked this article, be sure to follow us on Facebook, Twitter, Instagram, and LinkedIn! And don’t forget to subscribe in the box.


Add a Comment