So you’re looking to create and sell an online course – I’m stoked for you. Sharing your knowledge online is a great way to optimize your cash and has super high earning potential – well above what you could make teaching in-person classes.
There are loads of things to cover, and you’re probably feeling a little overwhelmed, but I got you.
By the end of this post, you’ll have a clear path forward and feel prepped for a smooth launch and confident about your course’s success.
This online course launch checklist includes the processes and tools you need to get your course off the ground and ready to make you money $$$!
So let’s get into it.
Research and Planning
Skip to Research and Planning Course Checklist 👉
Before you start filming lessons or crafting modules, you need to lay the groundwork for your course. Nailing the research and planning phase will make everything that follows easier and more effective. Here’s how to do it:
1. Conduct Competitive Analysis
First, scope out the competition. Spend some time researching similar courses in your niche. What’s already out there? What’s selling well? Just as importantly – what’s missing?
Look for gaps in the market. For example, if you notice most courses on social media marketing cover general strategies but skip over TikTok growth hacks, that’s an opportunity to stand out.
By filling those gaps, you’ll attract students and position yourself as an authority in your niche.
Pro Tip: Read reviews of competitor courses. Negative feedback is gold because it tells you exactly what people want but aren’t getting. Use that insight to shape your course.
2. Identify Your Target Audience
Once you understand the market, zoom in on who you’re creating this course for.
Who are these people? What do they struggle with? What’s motivating them to take your course?
For instance, if you’re building a course on affiliate marketing, your audience could range from total newbies who don’t know what a referral link is, to experienced marketers looking to scale.
Each group has different needs, so you need to decide who you’re catering to.
Ask yourself:
- What problem does my course solve, and who’s most likely to pay for that solution?
- What knowledge level does my ideal student have?
- Where do they hang out online (forums, social media, etc.)?
The more specific you are, the easier it will be to create content that resonates.
3. Define Crystal-Clear Learning Objectives
Your aim is to guide students toward a tangible result. Define what success looks like for them. By the end of your course, what should they know, be able to do, or feel confident about?
Example:
Instead of vague goals like “learn email marketing,” go for “students will be able to design and launch an email campaign that converts subscribers into paying customers.” Make it measurable and specific.
Bonus:
Clear objectives also help you stay focused when creating content. If a lesson doesn’t contribute to the goal, cut it. BE RUTHLESS!
4. Plan Your Course Structure and Delivery Methods
Once you’ve nailed the “what” and the “who,” it’s time to figure out the “how.” A well-organized course makes the learning experience smoother and keeps students engaged.
Break your content into bite-sized modules. We go into more depth about micro modules and their benefits here.👈
Each modules should focus on a single skill or concept to avoid overwhelming your audience. For example:
- Module 1: Intro to Affiliate Marketing
- Module 2: Choosing Profitable Niches
- Module 3: Setting Up Your First Campaign
When it comes to delivery methods, mix it up. People learn differently, so combine video lessons, downloadable guides, quizzes, and interactive elements. The more variety, the more engaging your course.
5. Decide on Your Course Tools
Before jumping to content creation, take time to research the tools you’ll use to build and deliver your course.
The platforms you choose can shape how you structure your content, what features you include (like quizzes or multimedia), and how easily students can interact with your course.
For most creators, WordPress combined with MemberPress Courses is the ideal solution.
WordPress offers unparalleled flexibility and control, while MemberPress simplifies subscriptions and course creation with powerful features like quizzes, certificates, and progress tracking.
By understanding what your tools can do upfront, you’ll save time later by creating content that aligns perfectly with your platform’s capabilities.
Plus, with tools like MemberPress, you can deliver a professional experience without needing to hire a developer.
Free Online Course Launch Checklist: Research and Planning
✅ Conduct Competitive Analysis
☐ Research similar courses in your niche.
☐ Identify what’s already out there and what’s selling well.
☐ Spot gaps in the market that you can fill.
☐ Read competitor reviews, especially negative ones, to identify unmet needs.
☐ Use these insights to shape your course and differentiate yourself.
✅ Identify Your Target Audience
☐ Define who your course is for
☐ Identify their pain points, challenges, and motivations.
☐ Determine their knowledge level to tailor your content.
☐ Ask:
– What problem does my course solve?
– Who’s most likely to pay for this solution?
– Where does my audience hang out online?
✅ Define Crystal-Clear Learning Objectives
☐ Set measurable, specific goals for what students will achieve.
☐ Ensure objectives align with the skills or knowledge they want to gain.
☐ Cut content that doesn’t contribute directly to these objectives.
✅ Plan Your Course Structure and Delivery Methods
☐ Outline your course into logical module.
☐ Ensure each module builds on the previous one for smooth progression.
☐ Plan to include a mix of delivery methods.
✅ Decide on Your Course Tools
☐ Research and choose the tools to build and deliver your course.
☐ Evaluate platforms based on:
– Compatibility with your content structure.
– Support for features like multimedia, quizzes, and tracking.
– Ease of use for both you and your students.
☐ Ensure your tools align with your goals to save time and deliver a polished course experience.
Building an Online Presence
Skip to Building an Online Presence Checklist 👉
With WordPress and MemberPress under your belt there are just 2 steps to building an online home for your course!
6. Create a Strong Brand
Your brand’s your identity, which means it has to be created to signify trust and a lasting commitment between you and your audience. It also has to be special, making you stand out from other competitors.
You want to create consistency across your website and other customer-facing materials. Your aim is to leave a lasting impression on your audience that communicates what your brand is about, and resonates with them.
So what do you do? It’s simple. You define your brand identity by clarifying what your brand stands for, what makes you unique, and the emotional connection you want to build with your audience.
All your target audience research will come in handy here – information about their pain points and preferences will inform your messaging, design choices, and overall brand strategy.
Creating a strong visual identity is the most immediate way to make your brand instantly recognizable. That involves choosing a logo and color scheme.
7. Build Your Website (In Minutes!)
With these two factors (logo and color scheme) nailed down you can can design your course site in minutes with ReadyLaunch™ by MemberPress.
ReadyLaunch™ is a built-in, customizable page maker in MemberPress that lets you personalize your course site with your brand’s logo and colors.
It ensures your course pages are mobile-responsive and optimized for sales, with an attractive and well-structured layout.
And here’s the best part: ReadyLaunch™ comes with pre-designed templates for essential pages like your pricing page, registration page, thank you page, login page, and account page.
Even more exciting – you can do all this with zero coding required!
Free Online Course Launch Checklist: Building an Online Presence
✅ Create a Strong Brand
☐ Clarify your brand’s purpose:
– What does your brand stand for?
– What makes you unique?
– What emotional connection do you want to build with your audience?
☐ Use audience research to inform your messaging, tone, and strategy.
☐ Choose a memorable logo.
☐ Select a color scheme.
✅ Build Your Website
☐ Use ReadyLaunch™ by MemberPress to design your branded course site. in minutes.
☐ If not using ReadyLaunch™, manually create the following pages & ensure they’re mobile-responsive:
– Account Page
– Pricing Page
– Registration Page
– Thank You Page
– Login Page
☐ Add your logo, brand colors, and fonts to personalize the site.
☐ Ensure your course site is optimized for sales and easy navigation.
Course Content Development
Skip to Course Content Development Checklist 👉
Now you’ve got a home for your course and a clear idea about what you want it to look like and achieve, it’s time to go into more depth and get creating!
8. Build Your Course Content Outline
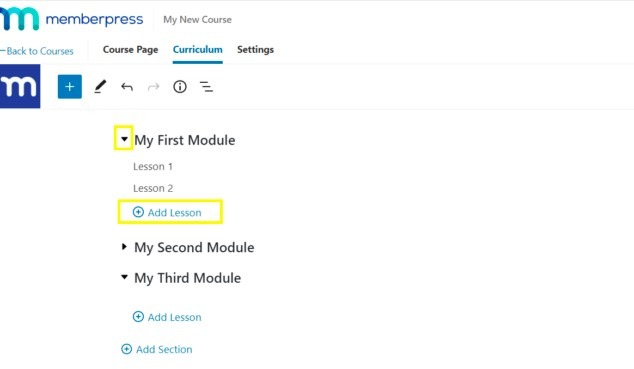
It’s time to flesh out your course structure planning from step 4. Break each of your modules down into small, easily digestible lessons.
If you’re delivering your lessons in video content, research suggests that you should aim to make your lessons no longer than 15 minutes in length, ideally under 10 minutes.
One study by MIT(pdf) found that average student engagement in videoed lectures lasted 6 minutes on average.
With these stats in mind, think about how you can segment your lessons into shorter videos.
In MemberPress Courses, you can set up as many modules and lessons as you like, and building a curriculum is completely intuitive.
9. Develop High-Quality Educational Materials (Videos, Slides, PDFs)
Now you have the bones of your curriculum, it’s time to start filling it out with your course materials!
Video is the most popular way to deliver your course content, for one HUGE reason – it’s engaging. But ultimately, you have to be the judge of what’s the best way to communicate your course content.
Slides and PDFs provide great references and revision aids for students and providing another way for students to absorb course materials, catering to different learning styles.
Tips for Producing Engaging Videos
- Keep Videos Short: Aim for video lengths under six minutes to maximize engagement. Shorter videos require more planning but keep students’ attention longer.
- Adopt an Informal Style: Casual, relatable settings make the videos feel more personal and approachable and therefore more engaging! While you want the video quality to be good, avoid using an impersonal studio setting.
- Speak Enthusiastically and Naturally: Speak with energy and confidence. Fast-paced, enthusiastic delivery is more engaging.
- Enhance Tutorials for Rewatching: For how-to videos, include visual signposts or bookmarks for easy skimming and rewatching.
- Edit Effectively: Remove filler words, pauses, and other distractions during post-production to keep the content crisp and engaging.
- Use a Variety of Teaching Styles Use visuals, animations, and demonstrations to complement spoken explanations to cater to different learning styles.
- Make Videos Accessible: Add captions and transcripts to make videos accessible to learners with hearing impairments or parents who don’t want to wake the baby!
Since MemberPress Courses uses WordPress Gutenberg blocks, it’s easy to add videos, images, text and PDF files into each lesson.
10. Create Engaging Quizzes and Assignments
You might think quizzes and assignments are just about testing your students, but they’re also great engagement-boosting tools that help reinforce learning and give your students a sense of accomplishment.
When done right, they’ll help keep your students motivated and make your course more interactive and rewarding. Here’s how to create assessments that stand out:
Make It Fun and Interactive
Think beyond basic multiple-choice questions. Use a mix of formats like matching, or fill-in-the-blank to keep students engaged.
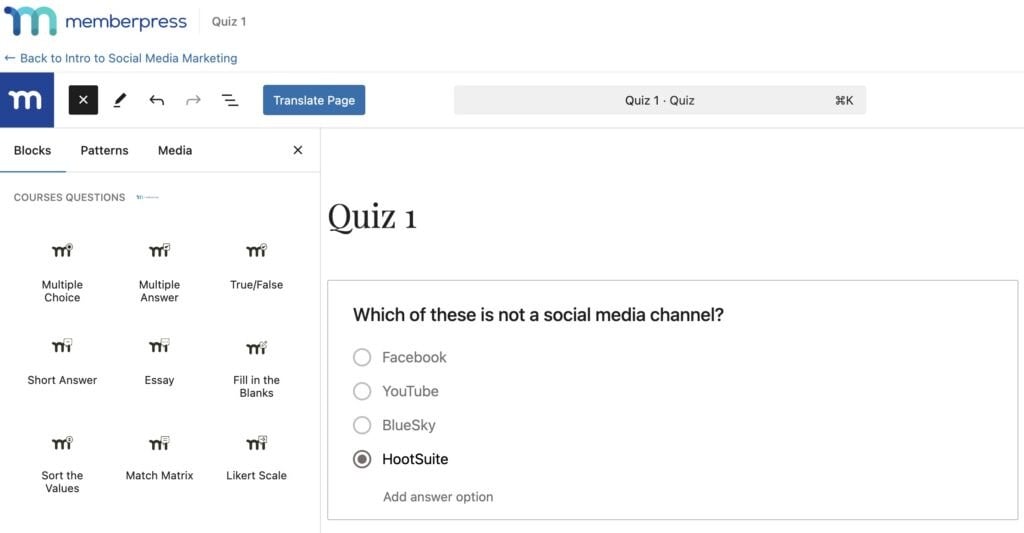
MemberPress Courses includes 9 different quiz question types to help mix things up.
Provide Immediate Feedback
With these quiz questions you can offer automated grading and feedback to give students instant results and explanations. This helps reinforce learning while keeping the experience seamless.
Tailor Assessments to Your Content
Design quizzes and assignments to reflect your course’s objectives. For example, if you’re teaching a photography course, create an assignment where students submit edited photos based on a technique they’ve just learned.
With the MemberPress Courses Assignments feature, your students can upload all kinds of projects for you to grade from images, portfolios, videos and long-form essays. You can get creative about the assignments you want to set your students.
The nature of these assignments means you’ll have to grade them manually, which is made easy with the MemberPress Courses Gradebook feature.
Keep It Bite-Sized
Don’t overwhelm students with lengthy assessments. Short, frequent quizzes or assignments are more engaging and provide regular opportunities to check understanding.
Mix It Up Across Modules
Vary the types of quizzes and assignments throughout your course. For instance, use knowledge-check quizzes early on and more practical, application-based assignments in later modules.
Enable Retakes and Flexibility
Allow students to retake quizzes or resubmit assignments to encourage improvement and mastery of the material.
11. Reward with Certificates
Celebrating your students’ success is a fantastic way to keep them motivated and engaged. Offering certificates of completion not only adds value to your course but also provides a tangible reward that students can showcase in their professional and personal lives. Here’s how to make certificates a meaningful part of your course:
Why Certificates Matter
- Motivation: Certificates give students something to work toward, helping them stay focused and engaged throughout the course.
- Recognition: They serve as a formal acknowledgment of the student’s effort and learning achievement.
- Shareable Achievements: Students can share their certificates on LinkedIn, resumes, or personal websites to highlight their skills and knowledge.
How to Offer Certificates with MemberPress Courses
MemberPress Courses makes it easy to automatically issue certificates to students upon course completion.
You can choose from several designs and customize certificates to reflect your branding and include all relevant details, such as:
- Student name
- Course name
- Completion date
- Your logo and signature
With the certificate feature built into MemberPress Courses, there’s no need for additional plugins or manual processes. It’s seamless and fully automated.
Add Expiry Dates for Ongoing Certifications
For courses that require regular recertification, such as compliance training or industry-specific skills, you can set expiry dates for certificates.
This encourages students to stay up-to-date with their knowledge by retaking your course after a specified period, ensuring their skills remain relevant.
Encourage Sharing to Expand Your Reach
When students share their certificates they can become powerful marketing tools. Encourage your students to:
- Download and share their certificates on social media.
- Include certificates in their professional portfolios.
- Mention your course in their LinkedIn profiles.
With MemberPress Courses, you can provide shareable links for your students to spread far and wide, sharing their achievements and highlighting your course as a trusted source of expertise!
Free Online Course Launch Checklist: Course Content Development
✅ Build Your Course Content Outline
☐ Break your modules into small, digestible lessons.
☐ Plan to keep video lessons under 15 minutes (ideally around 6 minutes) to maintain student engagement.
☐ Use MemberPress Courses to intuitively set up your modules and lessons.
✅ Develop High-Quality Educational Materials
☐ Create engaging videos to deliver your course content:
☐ Use an informal, approachable style.
☐ Speak with enthusiasm and clarity.
☐ Add captions and transcripts for accessibility.
☐ Include supplementary materials like slides and PDFs for additional learning support.
☐ Use MemberPress Courses to seamlessly upload videos, text, and files into each lesson.
✅ Create Engaging Quizzes and Assignments
☐ Make quizzes interactive by mixing question formats (e.g., multiple-choice, matching, fill-in-the-blank).
☐ Use the MemberPress Assignments feature to let students upload images, videos, and documents directly.
☐ Keep quizzes and assignments short and frequent to maintain engagement.
☐ Allow retakes or resubmissions to encourage mastery.
✅ Reward with Certificates
☐ Motivate students with completion certificates as recognition of their effort.
☐ Set expiry dates for certificates to encourage recertification for ongoing skills.
☐ Provide shareable certificate links.
Pre-Launch Final Checks
Skip to Final Checks Checklist 👉
So you’ve finalized your course and done everything there is to do, and it seems like everything is set and ready to go. While this might be the case, you must double-check to ensure everything is in place for a successful and smooth launch.
12. Run Tests & Get Feedback
Make sure to do a quick test run to ensure your course is well-optimized and elements such as quizzes, forms, videos, and so on work without hiccups.
Beta testers are also a great idea. Get them to run through your course and give you feedback on any concerns or problems they may’ve encountered.
Lastly, ensure your content is proofread and polished. Just to make sure, you could hire the services of a proofreader to go through your course content and eliminate misspellings, grammatical errors, and other non-relevant information that you may’ve included.
Once you’ve done all these, you can confidently launch your course using MemberPress Courses, knowing that you’ve created a masterpiece primed for massive success!
Free Online Course Launch Checklist: Final Checks
✅ Test Your Course Functionality
☐ Run a test to ensure your course is fully optimized.
☐ Verify that all elements work seamlessly, including:
- Quizzes
- Forms
- Videos
- Downloads and links
✅ Get Feedback from Beta Testers
☐ Recruit beta testers to go through your course.
☐ Collect detailed feedback on:
- User experience
- Potential technical issues
- Clarity and relevance of content
✅ Proofread and Polish Your Content
☐ Ensure your course content is free from errors:
- Misspellings
- Grammatical mistakes
- Non-relevant information
☐ Consider hiring a professional proofreader for a final review.
✅ Launch with Confidence
☐ Use MemberPress Courses to officially launch your course.
☐ Celebrate knowing you’ve created a well-tested, polished masterpiece primed for success!
Conclusion
Preparing for a course launch requires a thorough approach if you want it to be a massive success and achieve the set objectives.
Key steps include defining clear learning objectives, conducting competitive research, developing solid course content, and executing a robust marketing campaign.
By carefully checking off these items, you’ll be well-positioned for a smooth and effective launch.
Thorough preparation is essential for ensuring that your course launch is successful and that your students have a seamless learning experience from day one.
To simplify and improve this process, consider using ReadyLaunch™ by MemberPress. This powerful tool streamlines course creation by offering customizable templates, mobile-responsive design, and a user-friendly interface without the need for coding knowledge.
Explore ReadyLaunch™ by MemberPress today and see how it can enhance your course creation process. If you are not satisfied with it, you can request a full refund within 14 days, no questions asked.
Finally, if you enjoyed this read, let us know in the comments box below. Also, check out additional resources and guides available on the MemberPress blog for further reading and support on your journey to course creation success!



LOVE this! It was so thorough!
Very useful, thank you very much.
The MemberPress courses feature was/is a nice benefit for anyone using their membership program. I’ve designed and launched two courses with a third one nearly ready to go. I would recommend anyone looking for a membership plugin to check out MemberPress
This checklist is amazing! Helps a lot thank you!
WOW! Thanks for the breakdown and easy to follow checklists! I finally feel like I can offer a course that will be of value to my audience.
Thank you, Wendy!