Authorize.net is a payment gateway service provider that you can connect to MemberPress, next to Stripe, Square and PayPal. MemberPress Scale comes with built-in integration with Authorize.net that you can use out of the box.
This document will show you how to connect and use Authorize.net with MemberPress.
Covered in this article:
Authorize.net Requirements and Capabilities
With the Authorize.net gateway, you receive membership payments from anywhere in the world. On the other hand, you need to be based in the UK, Europe, the US, or Australia and have a bank account locally to qualify for a merchant account.
In addition, the currency in your MemberPress settings needs to be set to one of the following supported currencies: CHF, DKK, EUR, GBP, NOK, PLN, SEK, AUD, NZD, USD, CAD.
Also, the Authorize.net Gateway comes with the following capabilities:
- Process One-Time Payments
- Process Recurring Payments
- Process Refunds
- Change credit card for Recurring Subscription
- Process Free/Paid Trial Periods
- Credit card Expiring Reminders Supported
Connecting Authorize.net To MemberPress
Before connecting Authorize.net to MemberPress, you should have an active Authorize.net merchant account.
To connect your Authorize.net merchant account to MemberPress, please follow these steps:
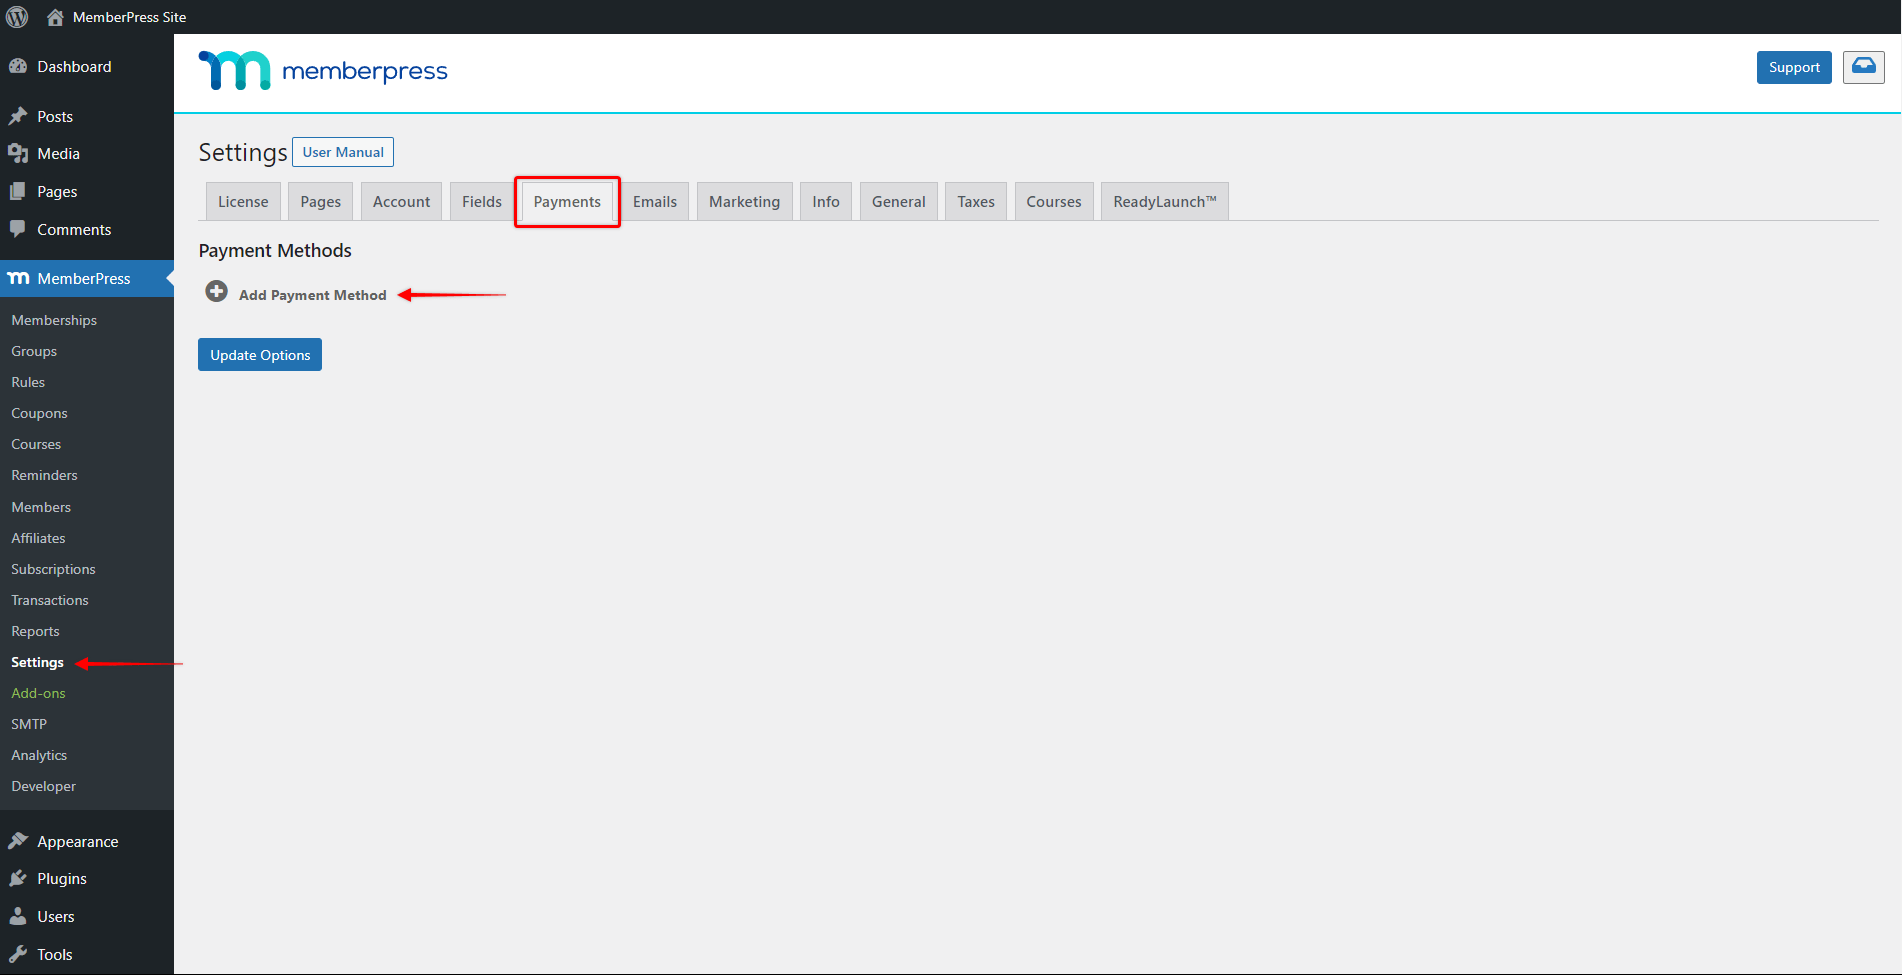
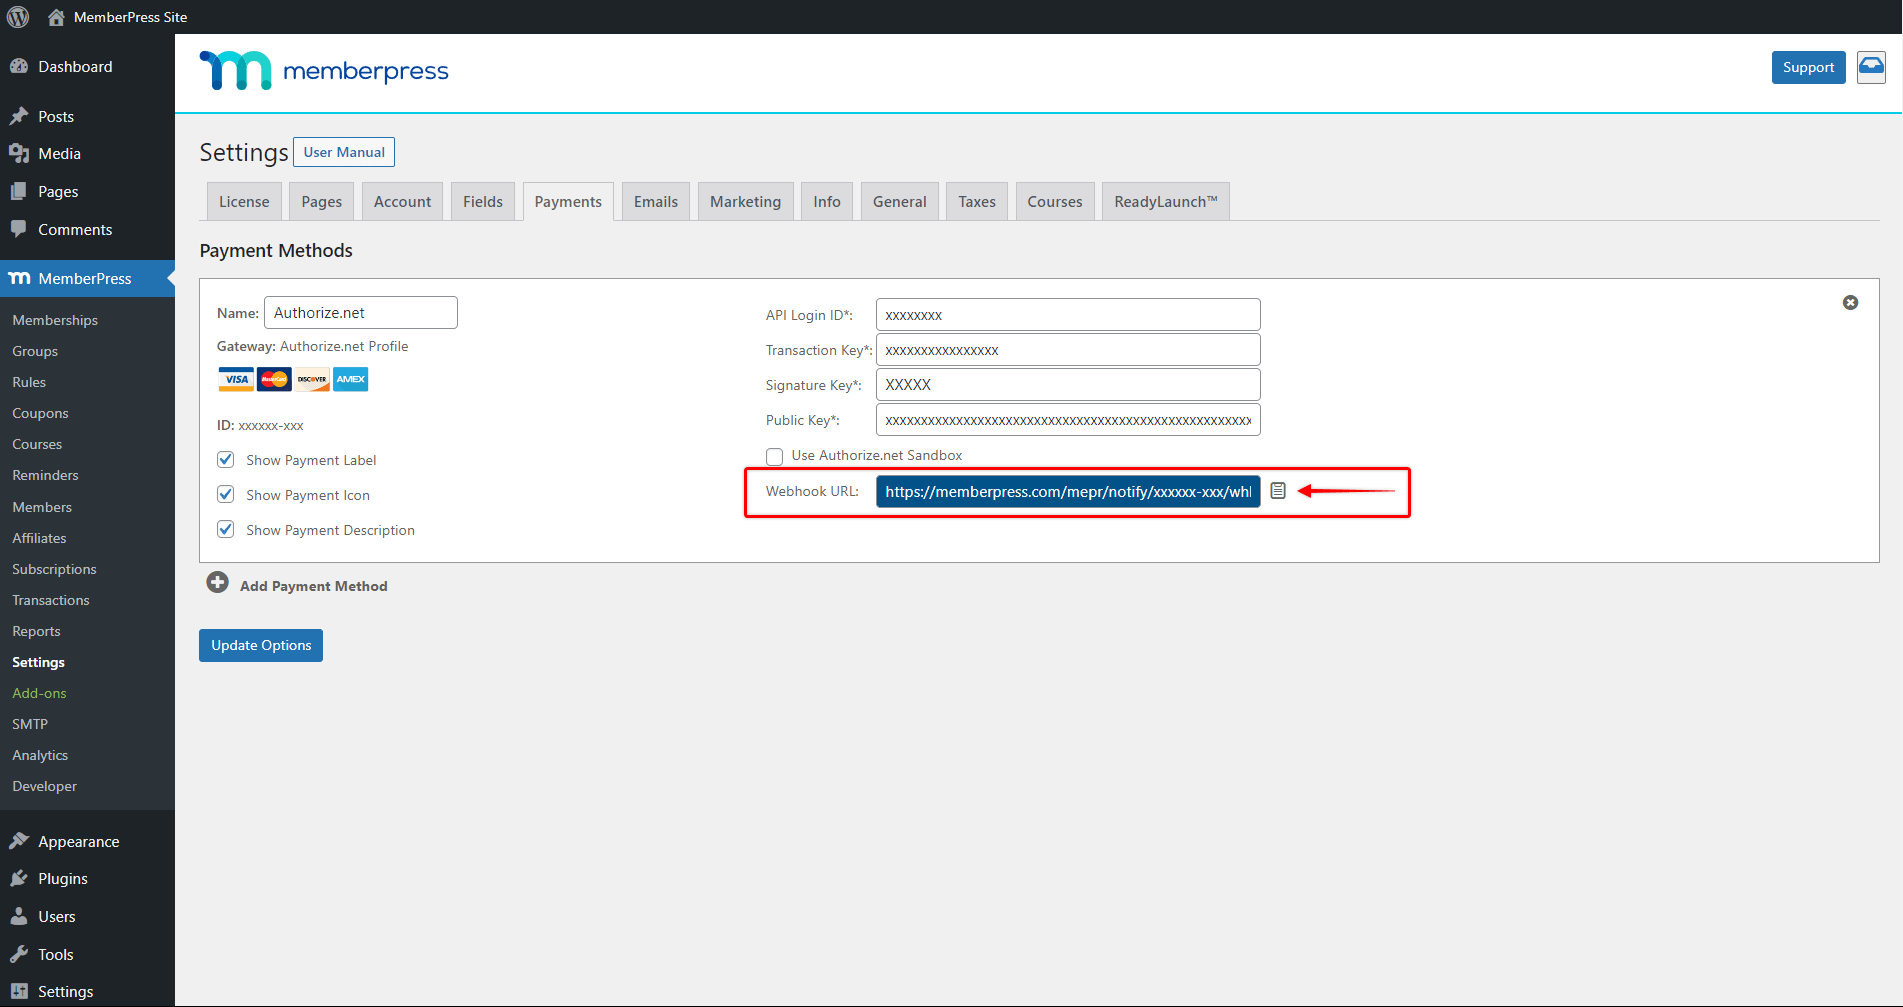
- Log in to your site, and navigate to Dashboard > MemberPress > Settings > Payments tab. Here, click the “+” icon button to open the gateway form;
- Under the “Gateway” dropdown, select the “Authorize.net Profile” option;
- In the “Name” field, you can add the label for your new gateway. Please keep in mind that your users will also see this label on your membership registration forms when choosing the payment method. In our example, we named the gateway “Authorize.net”;
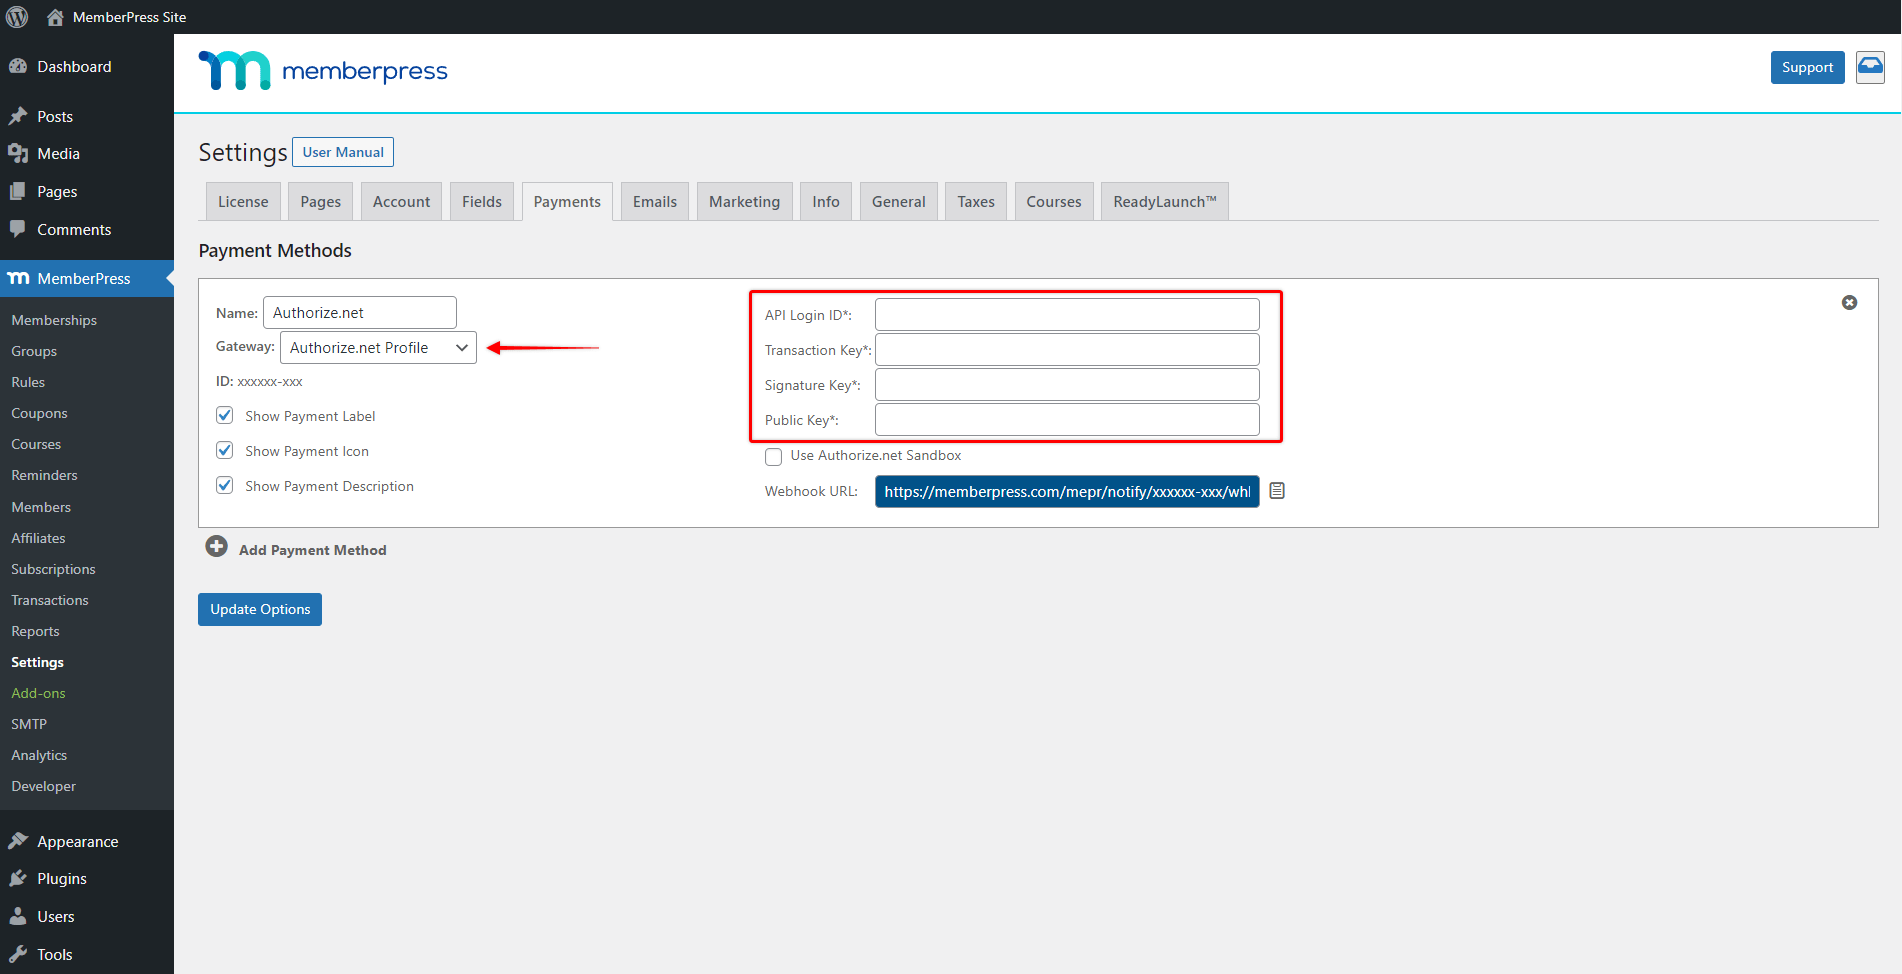
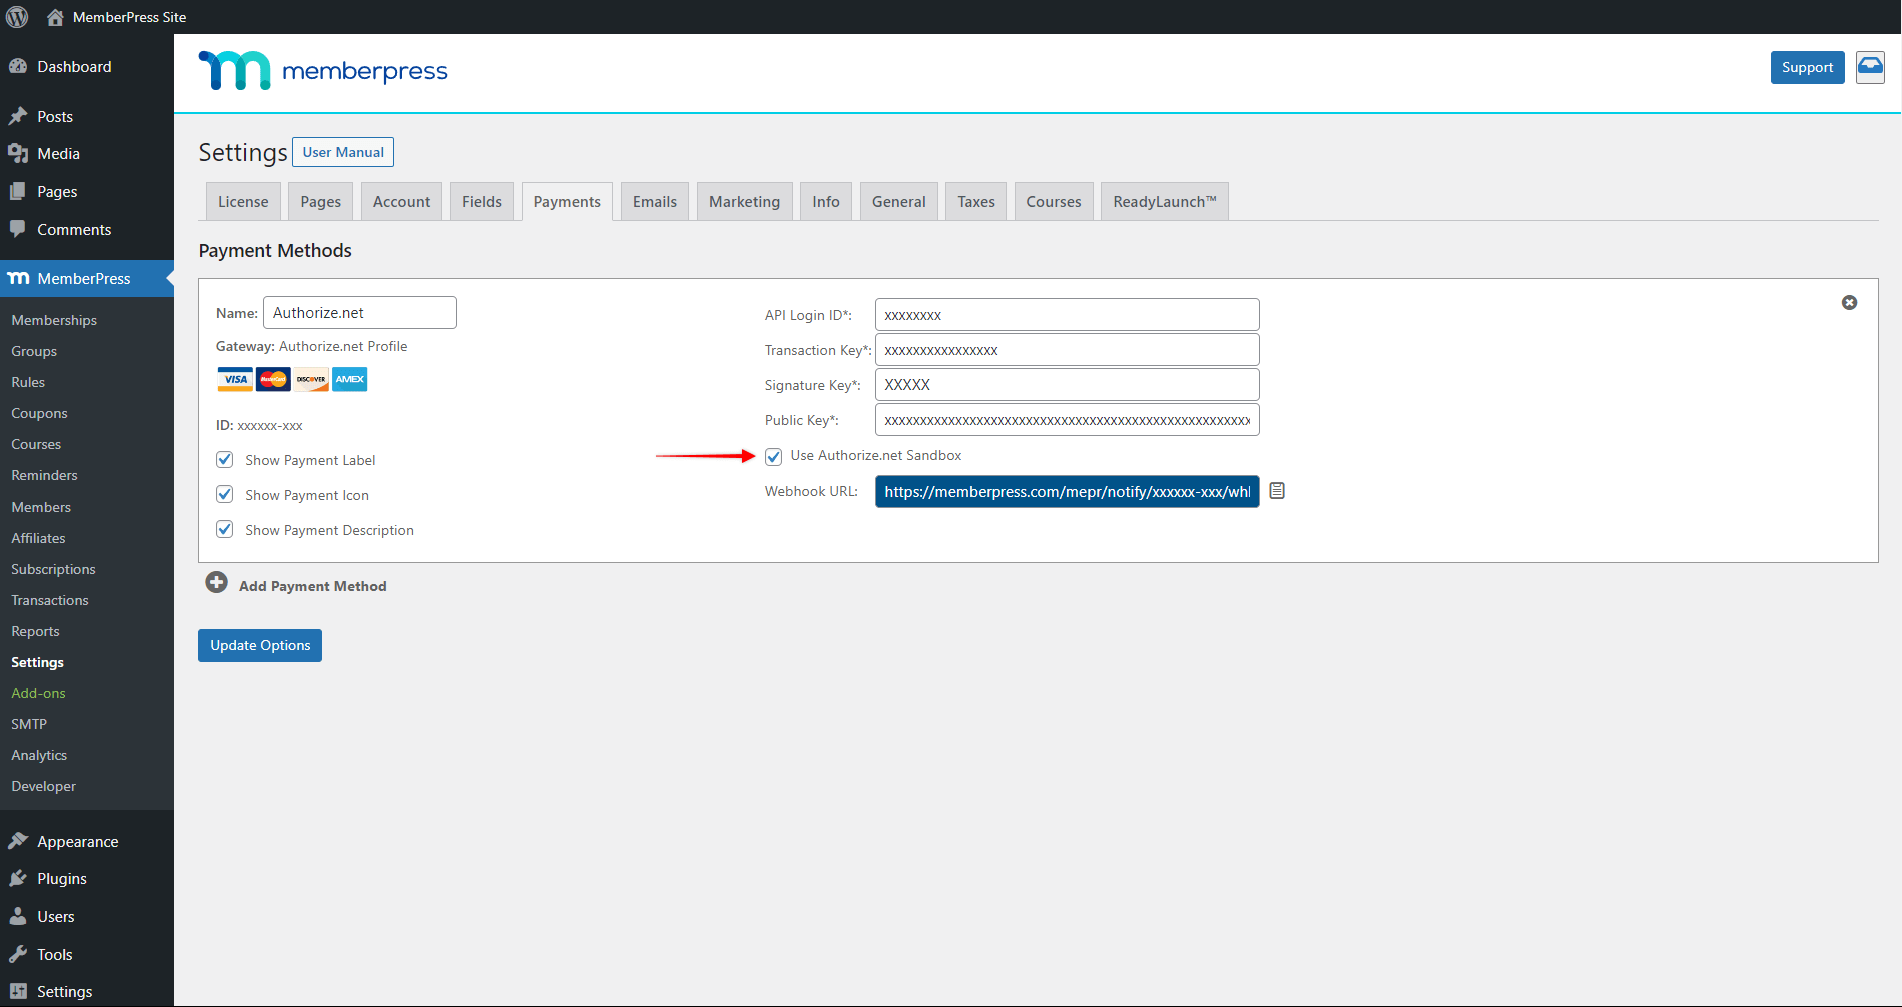
- Next, you should add your Authorize.net credentials. You should have got your API Login ID and Transaction Key when you created the Authorize.net account. Copy these credentials to their appropriate fields in the MemberPress gateway form;
- To generate the Signature Key in your Authorize.net account, click on the “Account” tab (or the “Settings” link in the side menu), and select API Credentials & Keys under “Security Settings”. Under the “Create New Key(s)” section you can generate your Signature key.
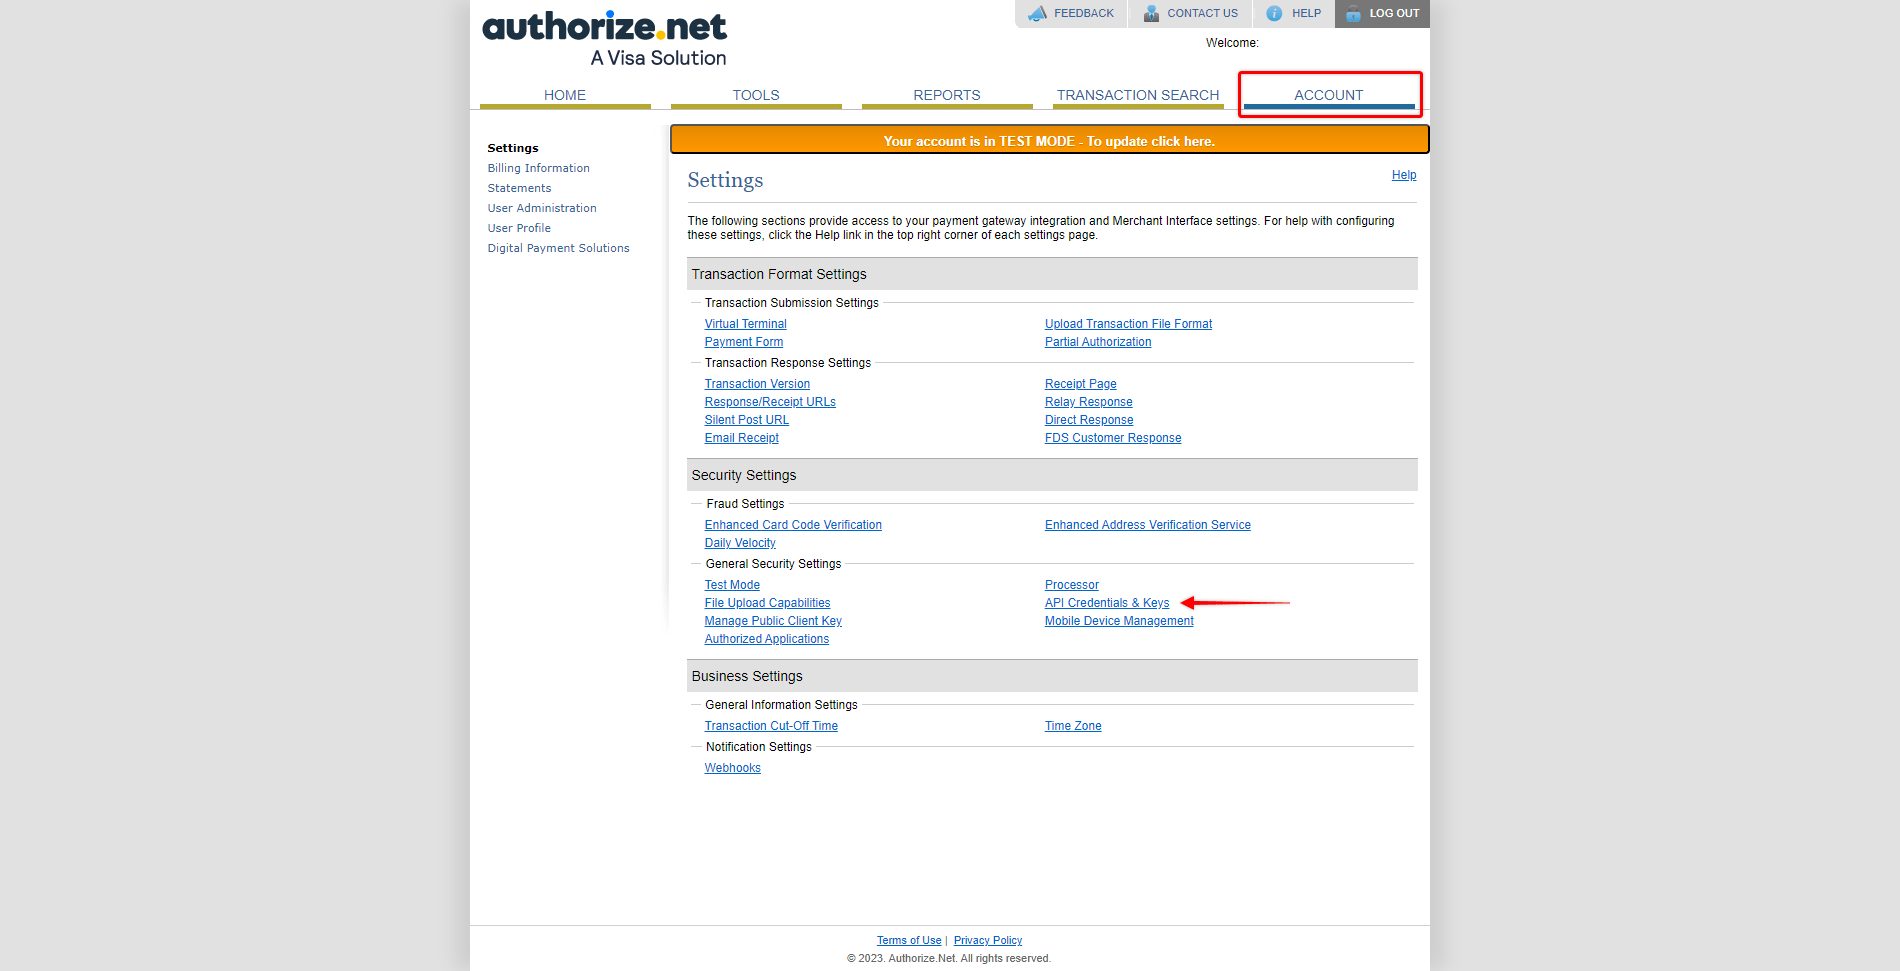
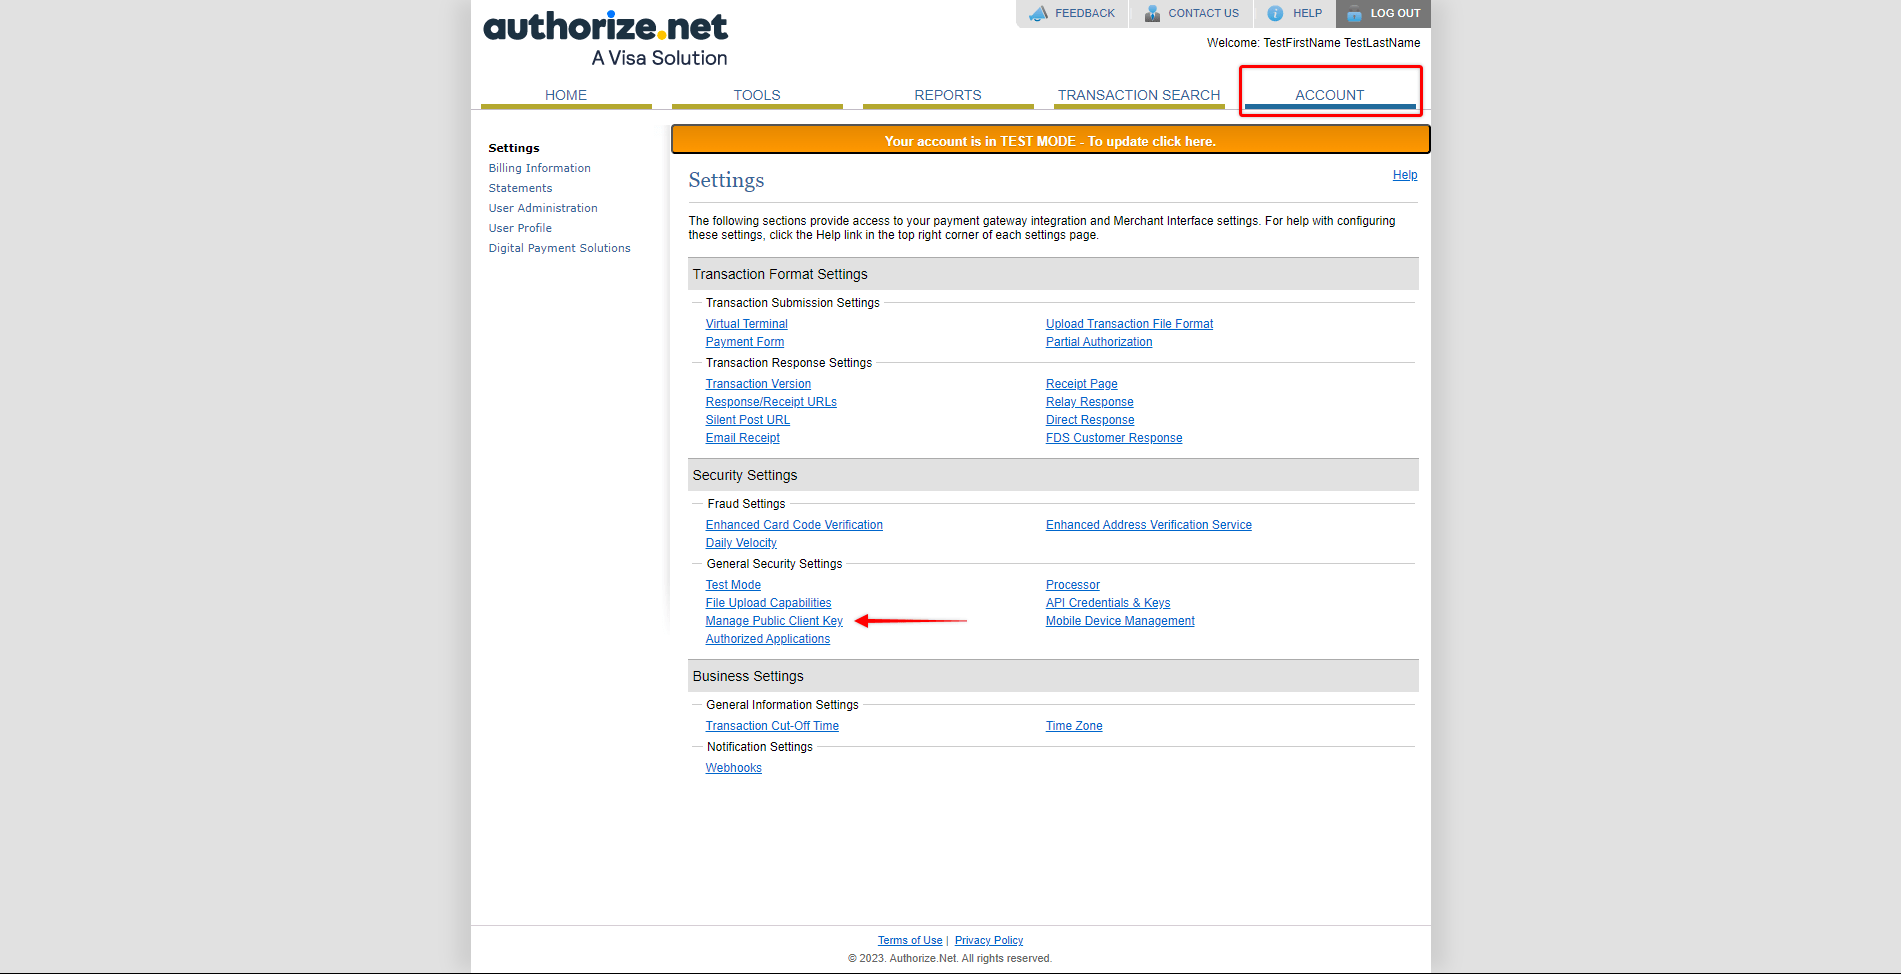
- You will also need to get the Public Key from your Authorize.net account. Find this key at Settings (the “Account” tab) > Manage Public Client Key and copy it to the MemberPress gateway form;
- Finally, add the MemberPress gateway webhook to your Authorize.net account. First, copy the Webhook URL of your Authorize.net gateway from the MemberPress settings.
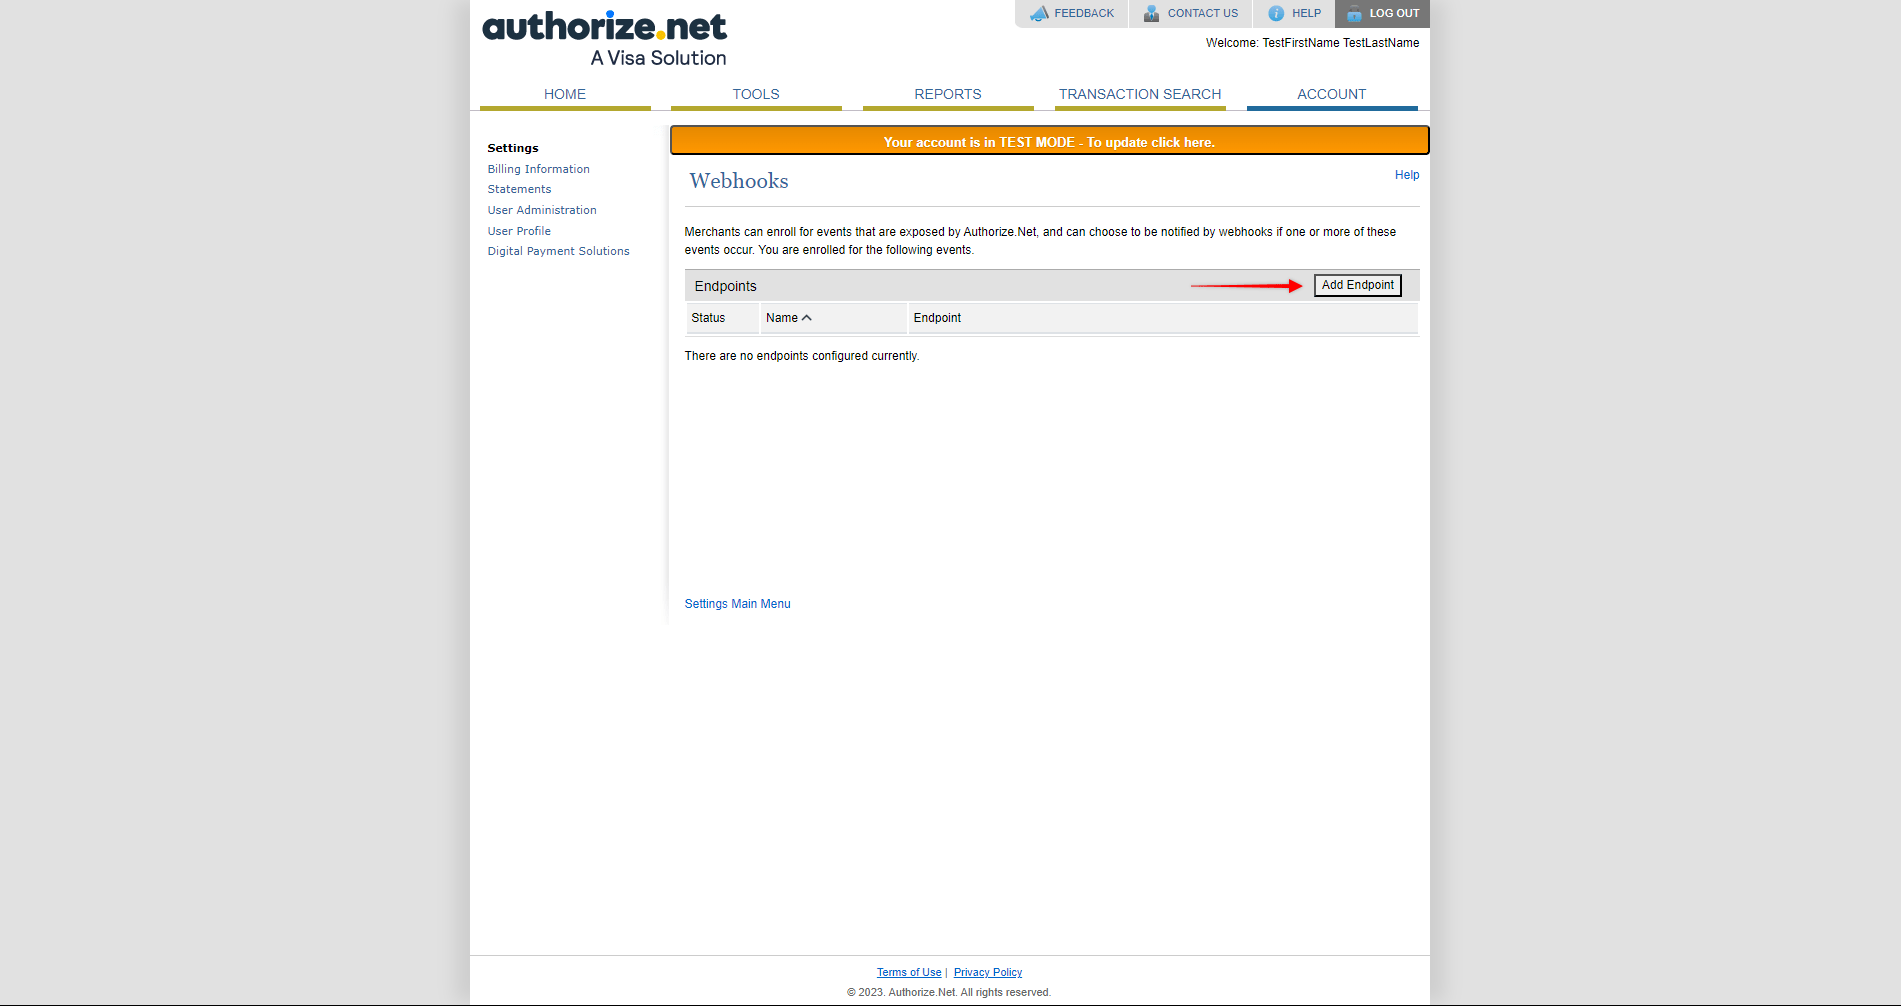
- Then, in your Authorize.net account, navigate to Settings (the “Account” tab) > Webhooks (under the “Business Settings” section) and click on the “Add Endpoint” button to open the Endpoint Editor;
- In the Endpoint Editor, give your webhook any name, paste the Webhook URL you copied from MemberPress to the “Endpoint URL” field, and set the status to Active;
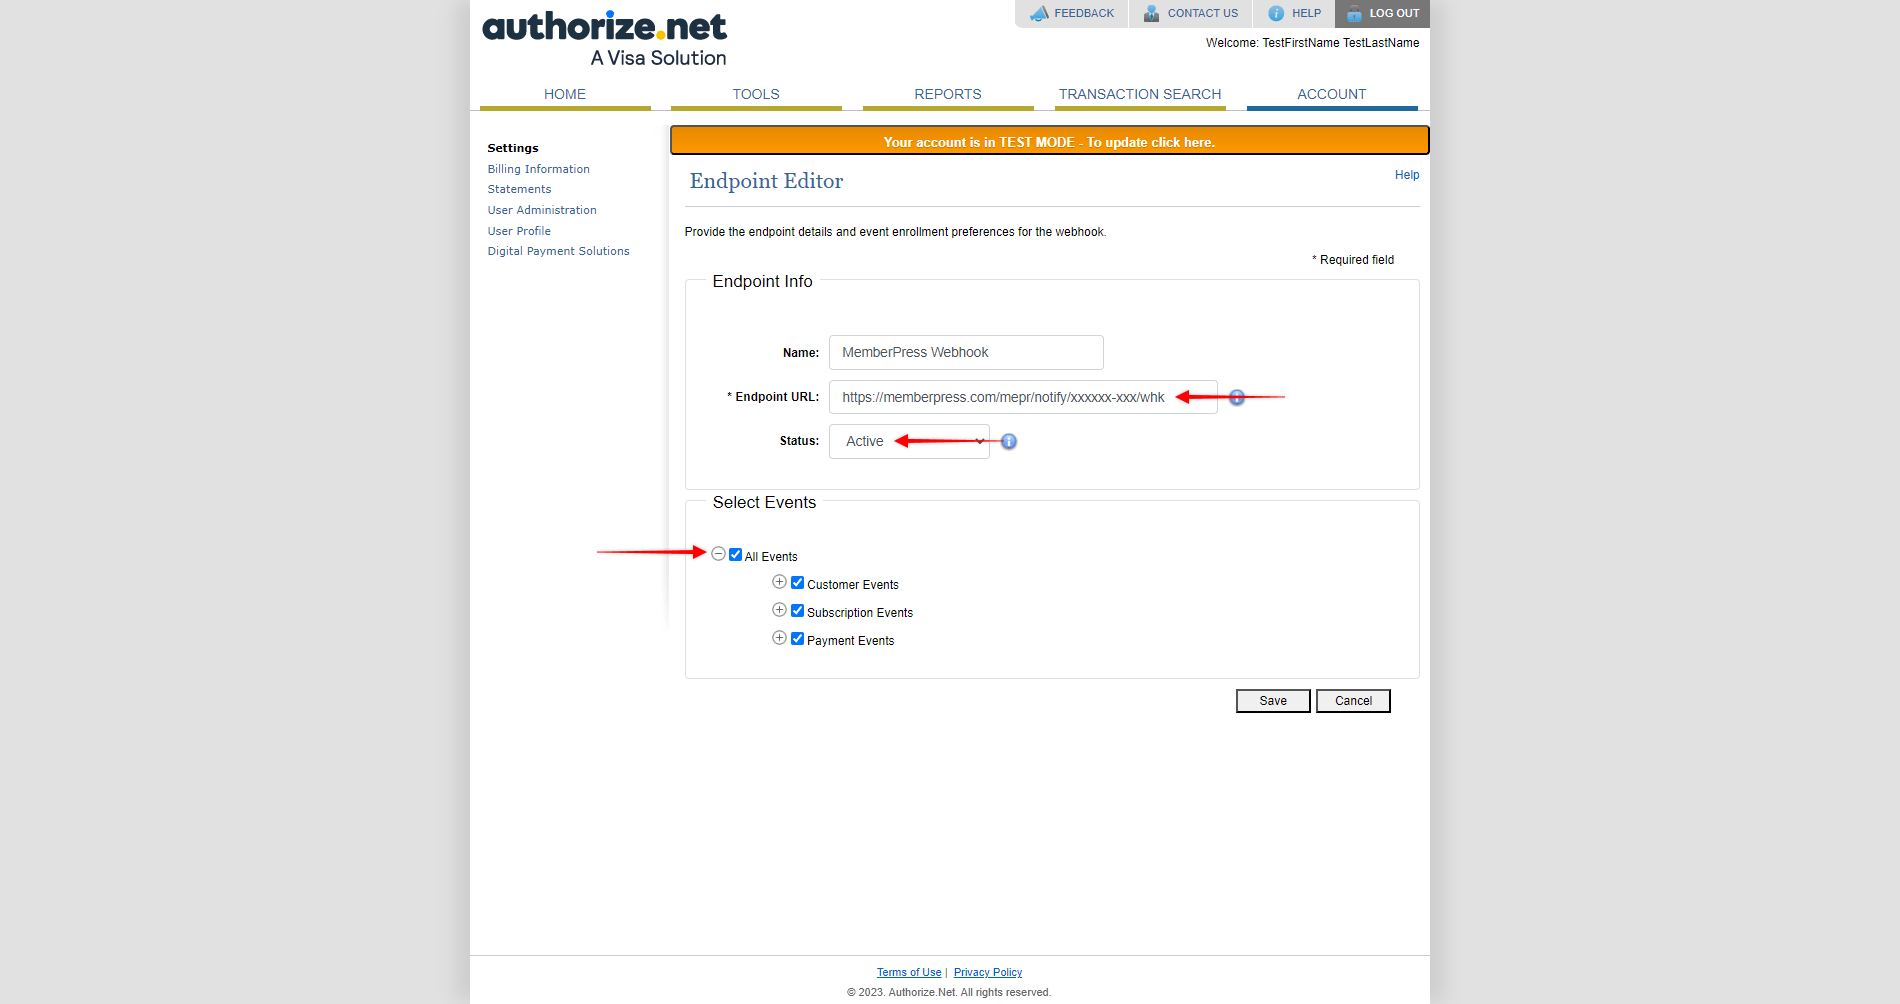
- Under the “Select Events” section choose All Events, and click the “Save” button to save your endpoint.
Now your Authorize.net payment gateway is connected to your site.
Sandbox And Testing
Before receiving live payments, it’s advisable to test your connection. Authorize.net comes with a Sandbox feature used to allow you to test your payments through MemberPress without actual live charges.
The Sandbox account will look the same as your live account. To use Sandbox you'll need to sign up for a Sandbox account. On the other hand, the Sandbox API Login ID, Transaction Key, Signature Key, and Public Key will be different from the ones in your live account.
Thus, to enable Sandbox please follow these steps:
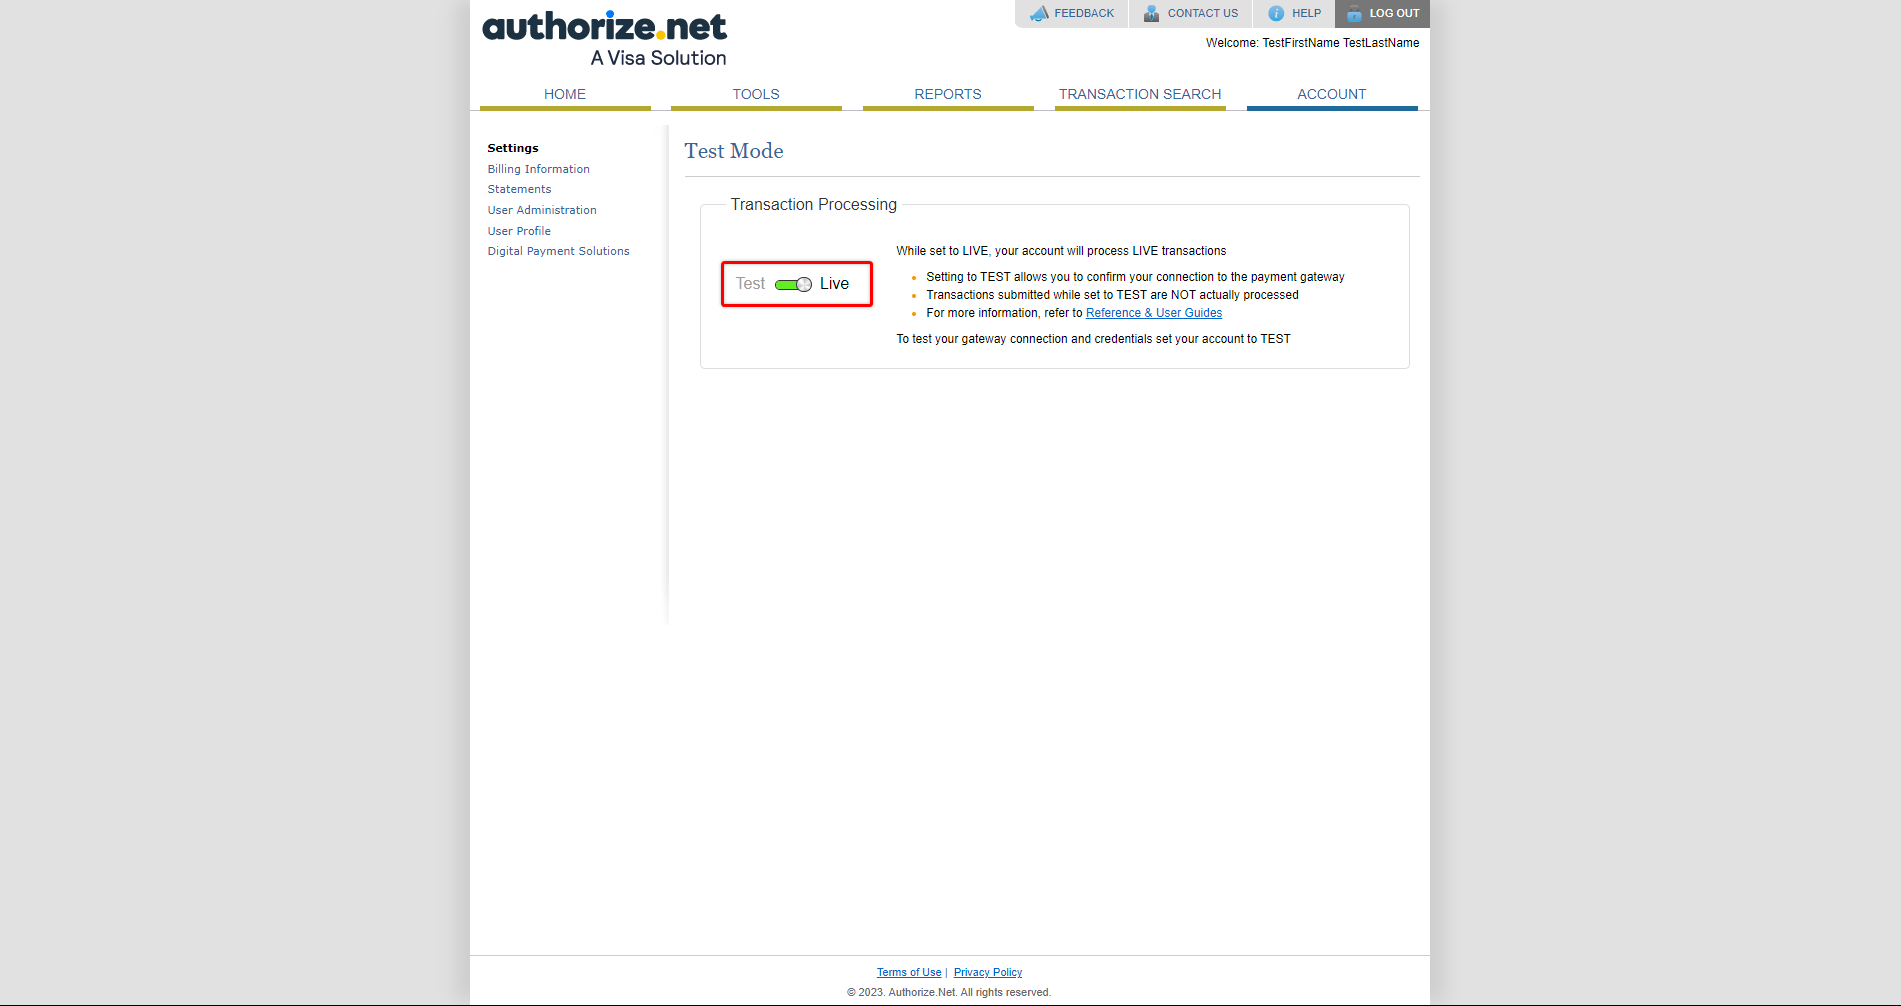
- Log in to your Authorize.net Sandbox account, and navigate to Settings > Test Mode. Switch your mode to “Live” to enable test registrations on your Sendbox account.
- Log in to your site, and navigate to the Dashboard > MemberPress > Settings > Payments tab > Authorize.net gateway;
- Replace your live API Login ID, Transaction Key, Signature Key, Public Key, and Webhook URL with the Sandbox ones;
- Check the “Use Authorize.net Sandbox” checkbox;
- Click the “Update Options” button to apply changes.
Now you can submit test registrations through your membership registration pages and test if subscriptions and transactions are properly recorded in both Authorize.net and MemberPress. If your connection works well, you should see the subscriptions (Dashboard > MemberPress > Subscriptions) and transactions (Dashboard > MemberPress > Transactions) in the MemberPress backend created with the proper name format matching the IDs of these subscriptions and transactions in your Authorize.net account.
Please check more details about testing with Authorize.net Sandbox in the Authorize.net Testing Guide. Here, you will also find the testing card numbers you can use for submitting test registrations on your membership registration pages.
Once you're done with testing, you can change your Authorize.net credentials in the MemberPress gateway back to live ones, and uncheck the “Use Authorize.net Sandbox” checkbox, to start receiving live payments on your site.
Manage Subscriptions And Transactions
Once Authorize.net is connected to MemberPress, you're ready to receive live payments from your members. You can find more details on how to manage subscriptions and transactions with Authorize.net in our related document.
Troubleshooting Common Issues
Error “Email Required”
If you get an error that the Email field is required, edit your Payment Form settings in your Authorize.net account, and make sure “Email” is not a required field.
If you've done that, and you still get the error, your processor may require an email address. This custom snippet of code will help: https://gist.github.com/cartpauj/220884f8a69704b30c685e2ef3a5166c
The above code can be pasted into a plugin like the WPCodeplugin (please check this article for details: How to add custom code snippets in WPCode).
Error “The merchant login ID or password is invalid or the account is inactive”
If your customers are getting that error while trying to pay for a membership, and if the login ID and password are entered correctly, you'll need to check whether your Authorize.net account is in the Test (Sandbox) Mode. If it is, make it live.
Please refer to this tutorial or contact Authorize.net support.
Transaction Not Being Received After Recurring Subscription Signup
Recurring Subscriptions are billed through ARB at around 2 AM PST. As long as you've configured your integration as outlined in the setup instructions above, your transactions should come through sometime around or just after 2 AM PST. MemberPress validates the user's credit card before setting up the subscription, so payment failures are uncommon, though still possible.
Verify that your gateway is set up properly, then contact support if you continue to have trouble.
Subscriptions And/or Transactions Aren’t Updating Correctly
Please make sure you follow all Authorize.net recommendations for domains and IP addresses.
MemberPress will need to communicate with Authorize.net through designated IP addresses. If any security/firewall plugin (e.g. Wordfence, iTheme Security) is active on your site, it could block access to these IP addresses. Furthermore, your CDN, or your hosting could also filter IP addresses (e.g. WP Engine’s Global Edge Security add-on).
Thus, please make sure that the following IPs are allowed (whitelisted) on all levels (plugin, hosting, and CDN):
198.241.207.104
198.241.206.95
198.241.206.93
198.241.207.102
198.241.206.38
198.241.207.38
198.241.207.97
198.241.206.88
198.241.207.105
198.241.206.96
198.241.206.22
198.241.207.86
198.241.206.25
198.241.207.84
If this does not work, please contact us.


