Covered in this article:
Canceling Subscriptions in Authorize.net
Normally, you'll want to cancel subscriptions directly in MemberPress as outlined here. However, you may need to cancel a subscription directly in your authorize.net account. For example, this would be necessary if you deleted a subscription in MemberPress before correctly canceling it. In such cases, follow these instructions to cancel directly in authorize.net:
- Login to your Authorize.net account
- Click on Tools > Recurring Billing
- View active subscriptions
- Find the user's subscription in the list, and click on its Subscr ID link
- Click “Edit Subscription” at the top
- Click “Cancel Subscription” at the top
- Click “OK” on the pop-up to confirm the cancellation
Handling Failed Payments
If a member's payment fails and Authorize.net's Automatic Retry feature isn't enabled, then you will need to manually recharge the member's payment in Authorize.net. If Automatic Retry is enabled, then the member's subscription will remain in a “suspended” state until they update the card tied to their subscription in MemberPress. Once updated, Authorize.net will automatically retry the failed payment for the subscription.
Authorize.net's Automatic Retry feature can be enabled by following these steps:
- Sign in to your Authorize.net account;
- Access the Recurring Billings page under the Tools section;
- Click the “Enable Automatic Retry” link, and then the “Enable Automatic Retry” button.
Adding a Missing Payment
Follow these instructions if you see a completed payment in your Authorize.net account, but that payment is not reflected on the MemberPress > Transactions page and/or is not connected to its subscription on the MemberPress > Subscriptions page *.
* If you see a Subscription ID on the MemberPress > Subscriptions page for the user, but it looks like mp-sub-xxxxxxxxxxx, you'll need to follow these instructions before proceeding to Step 1.
Step 1 – Find the Transaction ID for the Payment in Authorize.net
To begin, you'll need to find the payment (if you are not already aware of it). Information you can use to search for it includes:
- The subscription ID (if a recurring subscription) as it appears on the MemberPress > Subscriptions page (look for a string of numbers)
- The user's email, which can be found on the WordPress > Users page OR the MemberPress > Members page
- The date the billing occurred
With that information in hand, you can find the transaction ID in Authorize.net by doing the following (note: these steps come directly from an authorize.net's support page; for the full page. please click here):
- Log into the Merchant Interface at https://account.authorize.net.
- Click Transaction Search from the main toolbar.
- Click Search for a Transaction in the main left-side menu.
- Enter one or more search parameters in the fields provided.
- Click the Show drop-down to choose how many results per page to display:10 (default), 15, 20, or 25 results.
- Click Search to display your Transaction Summary. This will pull up your results:
![]()
Copy the Transaction ID you see under the Trans ID column. You'll use this in Step 2.
Step 2 – Manually Add the Transaction
To manually add the missing payment, you can follow these steps based on the type of payment you received:
A Single One-Time Payment (NOT associated with an existing recurring subscription):
- Go to MemberPress > Transactions.
- Select Add New at the top of the page.
- Paste the Transaction ID you identified in Step 1 into the Transaction number.
- Select the user you'd like the transaction to be associated with. You can start typing in the username, and available options will pop up.
- Select which Membership the transaction should be associated with.
- Add the transaction Sub-Total amount. This should be what the user paid you.
- Add in any data related to taxes as applicable.
- Set the Status of the transaction to Complete.
- Set the Gateway to Authorize.net.
- Leave the Subscription field blank.
- Add the Created Date. The date you set here will be the date when the user paid you.
- Add the Expiration Date. The date you set here will be the date the user's payment is set to expire.
- Select Create.
If you want to add a transaction to an existing recurring subscription:
- Go to MemberPress > Subscriptions.
- Search for the user's subscription to which you'd like to add the missing payment.
- Hover over the subscription's unique ID and click on the “Add Txn” link.
- Paste the Transaction ID you identified in Step 1 into the Transaction number.
- Select the user you'd like the transaction to be associated with. You can start typing in the username, and available options will pop up.
- Select which Membership the transaction should be associated with.
- Add the transaction Sub-Total amount. This should be what the user paid you.
- Add in any data related to taxes as applicable.
- Set the Status of the transaction to Complete.
- Set the Gateway to Authorize.net.
- Leave the Subscription field as is (it should have been auto-populated with the correct ID).
- Add the Created Date. The date you set here will be the date when the user paid you.
- Add the Expiration Date. The date you set here will be the date the user's payment is set to expire.
- Select Create.
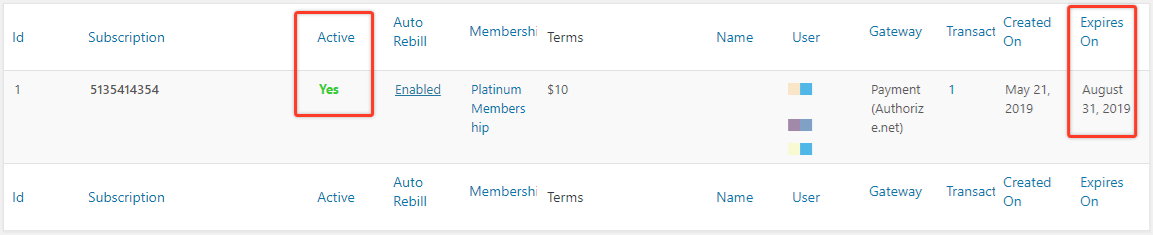
Step 3 – Verify
After completing these steps, the payment should be correctly added, and the user's subscription should be marked active, as highlighted here :