Understanding how members interact with ClubSuite™ profiles and directories helps administrators create engaging community features and provide better support.
This document explains the member journey through profile and directory participation, enabling you to develop your communities and guide users.
MemberPress ClubSuite™
ClubSuite™ is the community and networking pack for MemberPress, consisting of ClubDirectory™ and the ClubCircles™ add-on.
When you install and activate the ClubDirectory™ add-on, you can configure user profiles and create directories on your website.
Now, your members can edit their profiles, opt in for different directories (and opt out), and connect with other members.
Accessing and Setting Up Member Profiles
When members log into your site, they can access their personal profile space. The profile system provides them with options to customize their presence within your membership community and set their privacy preferences.
Finding Member’s ClubSuite™ Profile
Members access their profiles through their MemberPress Account page, which serves as the central hub for all member-related activities.
Each member can access their profile by following these steps:
- Log in to the website and navigate to the Account page.
- Click the Directories tab to access the ClubDirectory™ features.
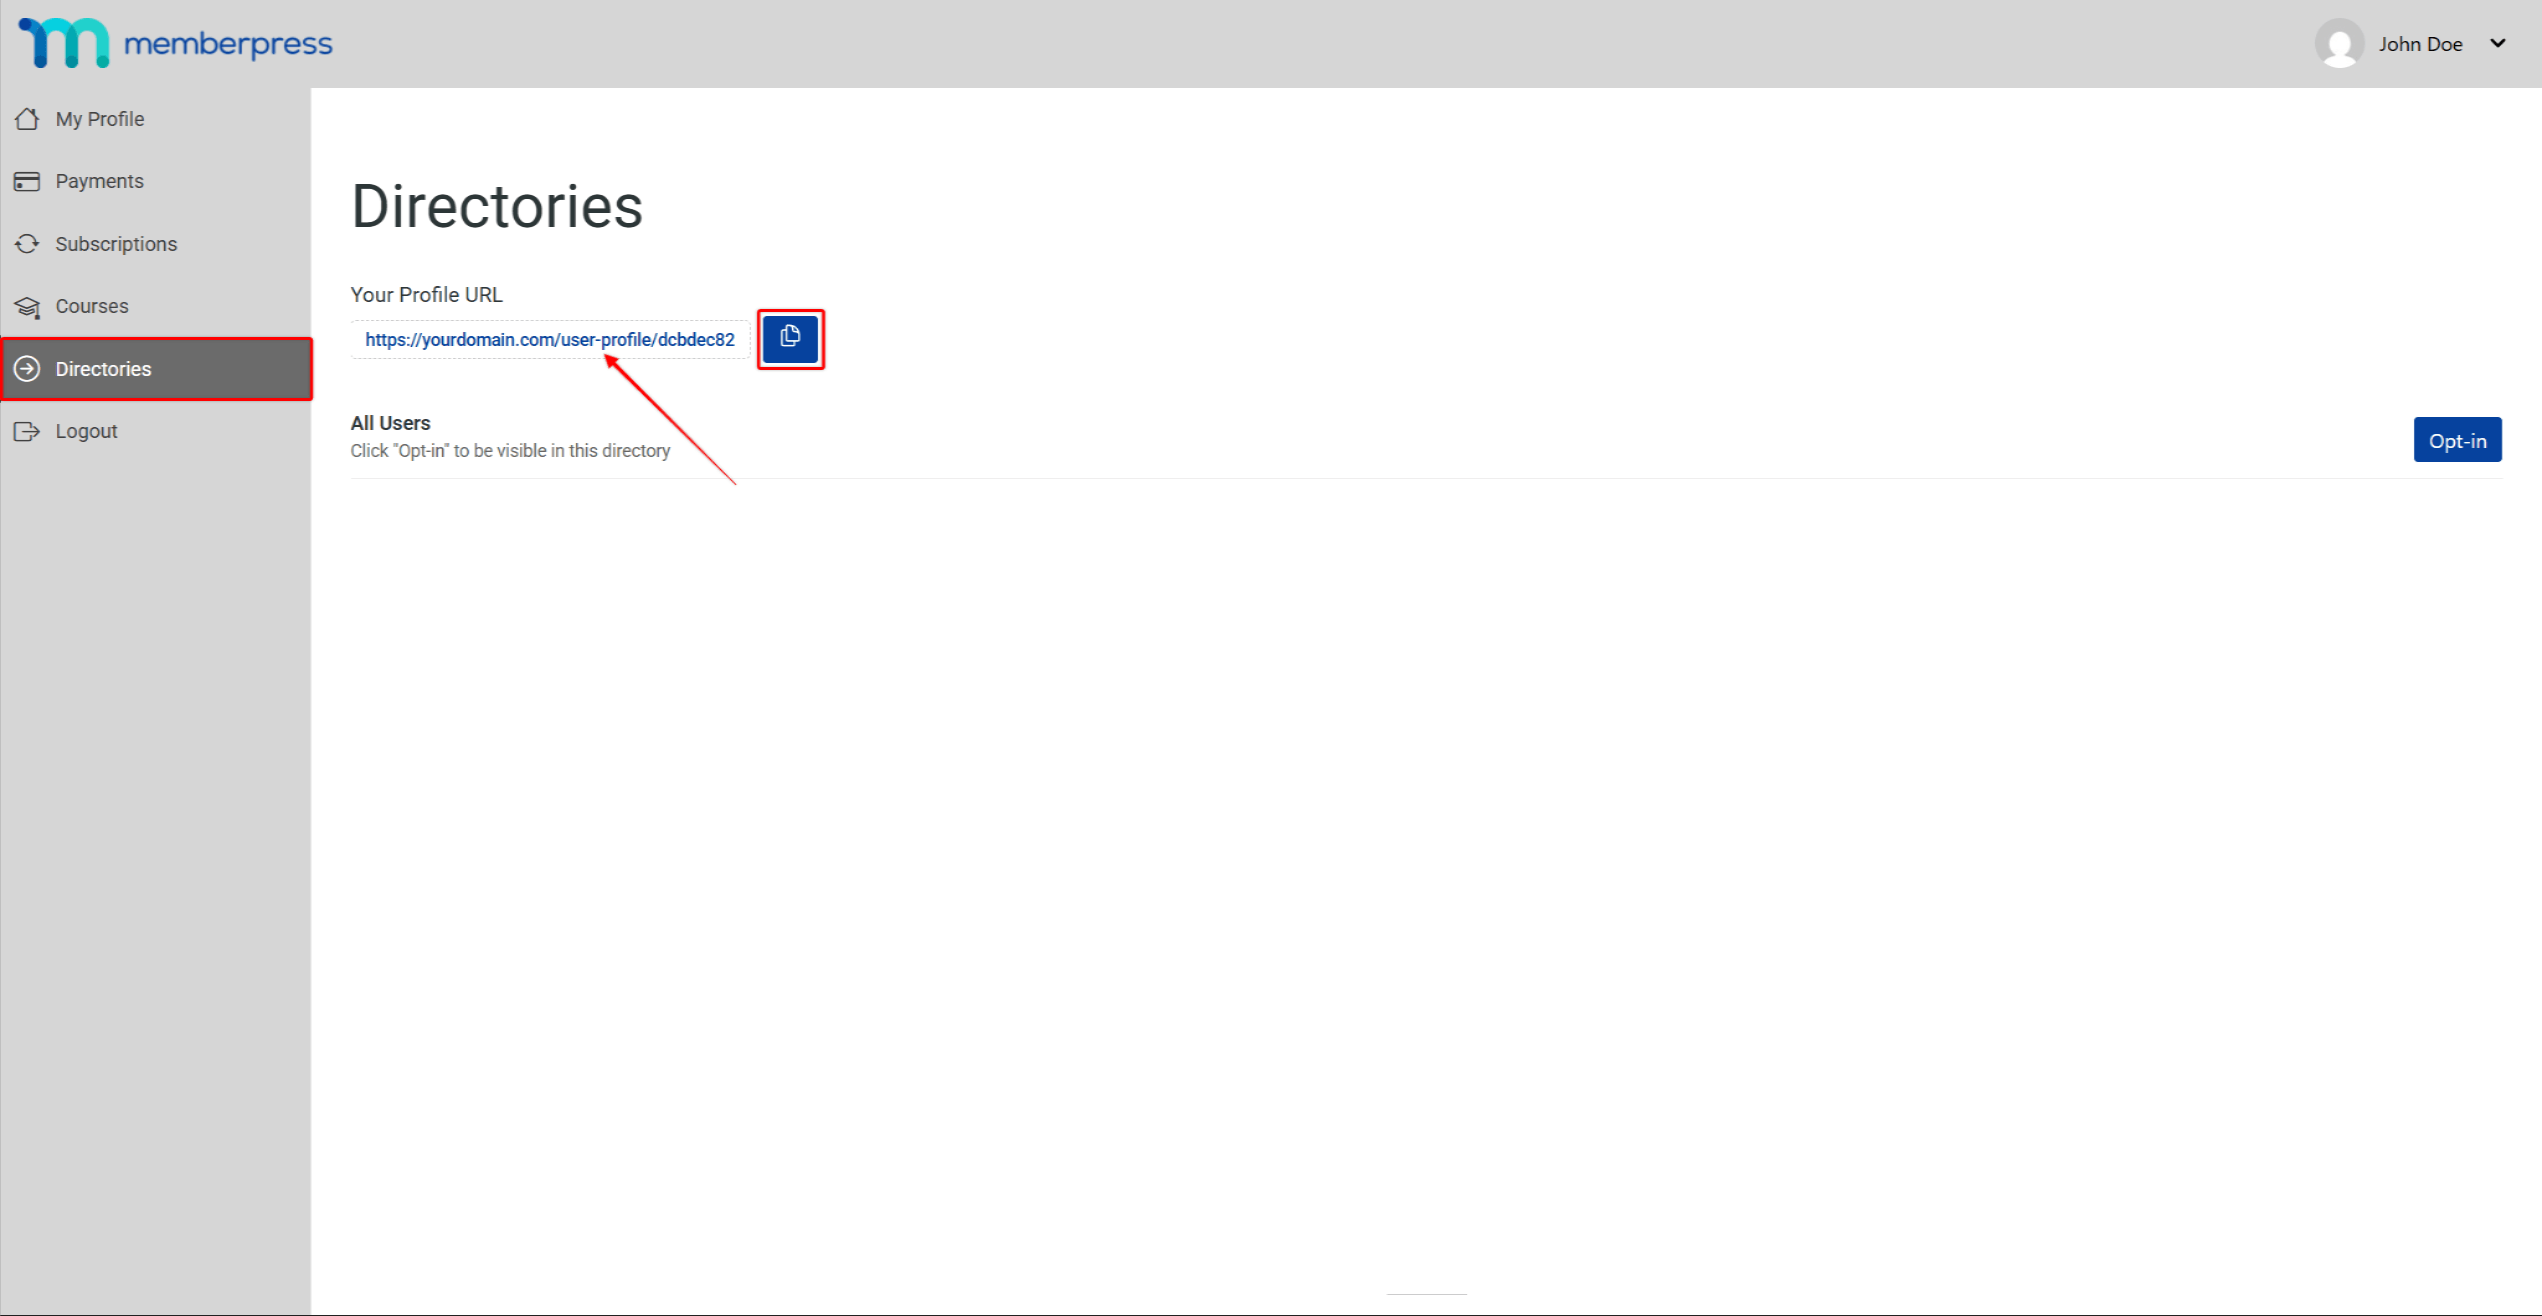
- Under the Your Profile URL option, click on the profile URL to access the profile page. You can also copy the profile URL by clicking the copy icon next to the URL field.
The profile will display the design and options based on the Profile type assigned to the user's membership.
Editing Profiles
Building a complete profile helps members connect with others in their communities.
Basic Profile Information
Once on their profile page, members can edit their basic profile information:
- Access the profile page.
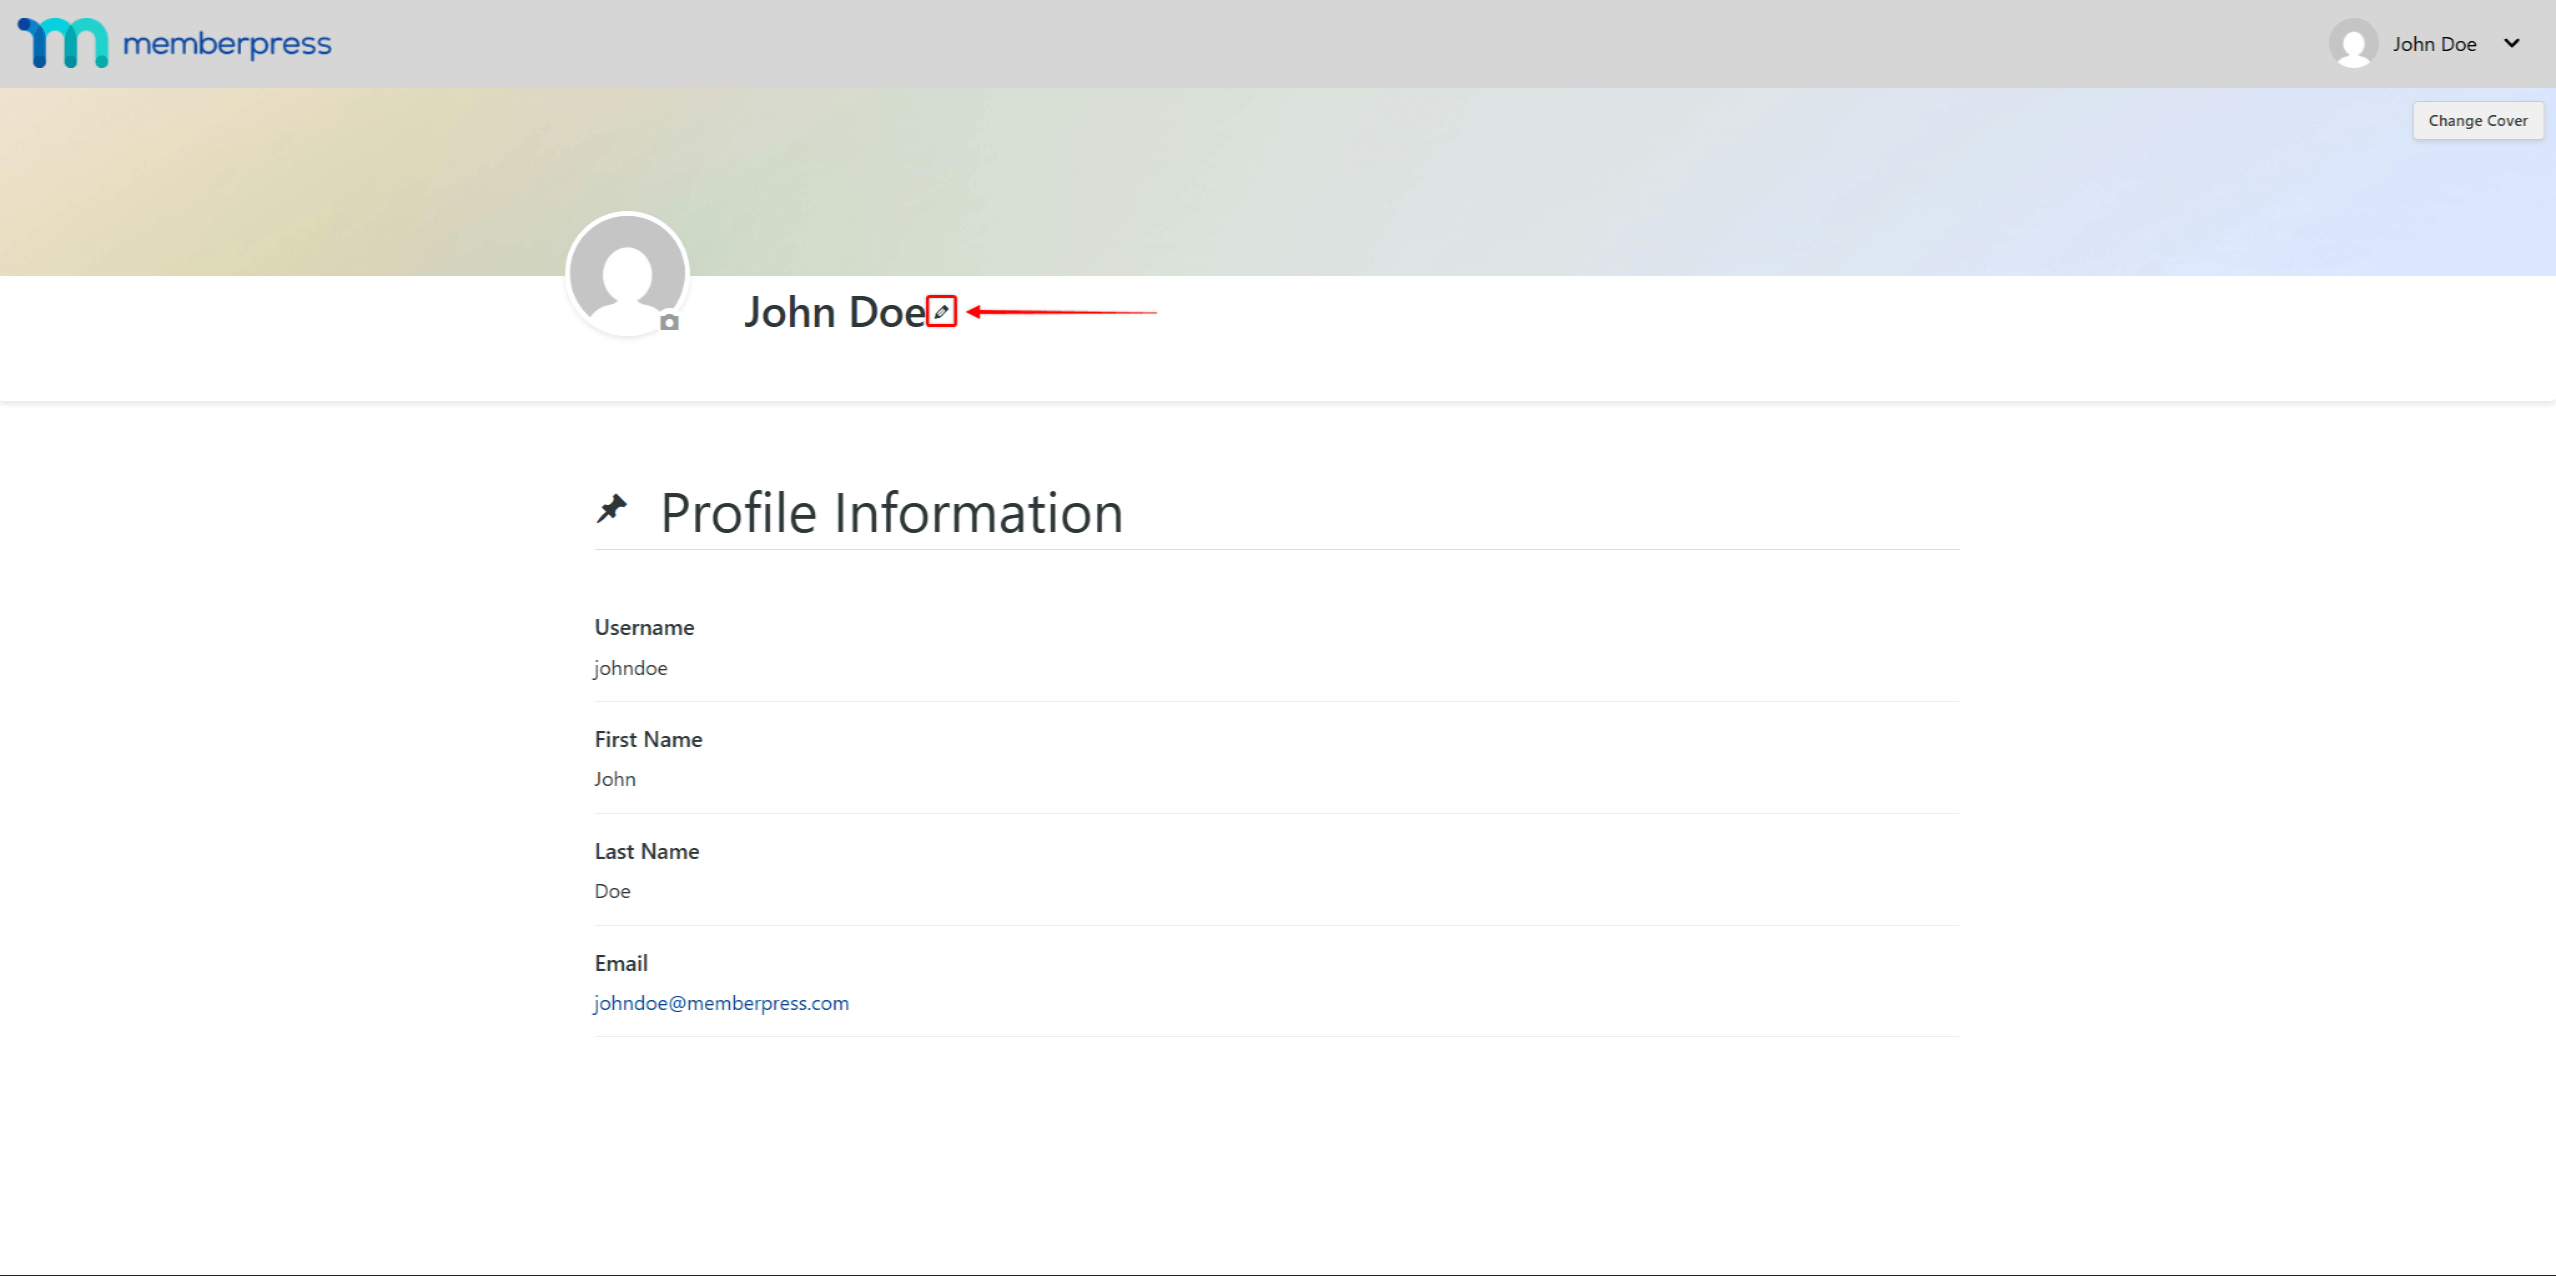
- Click the pencil icon to start editing the profile information. This will open a pop-up.
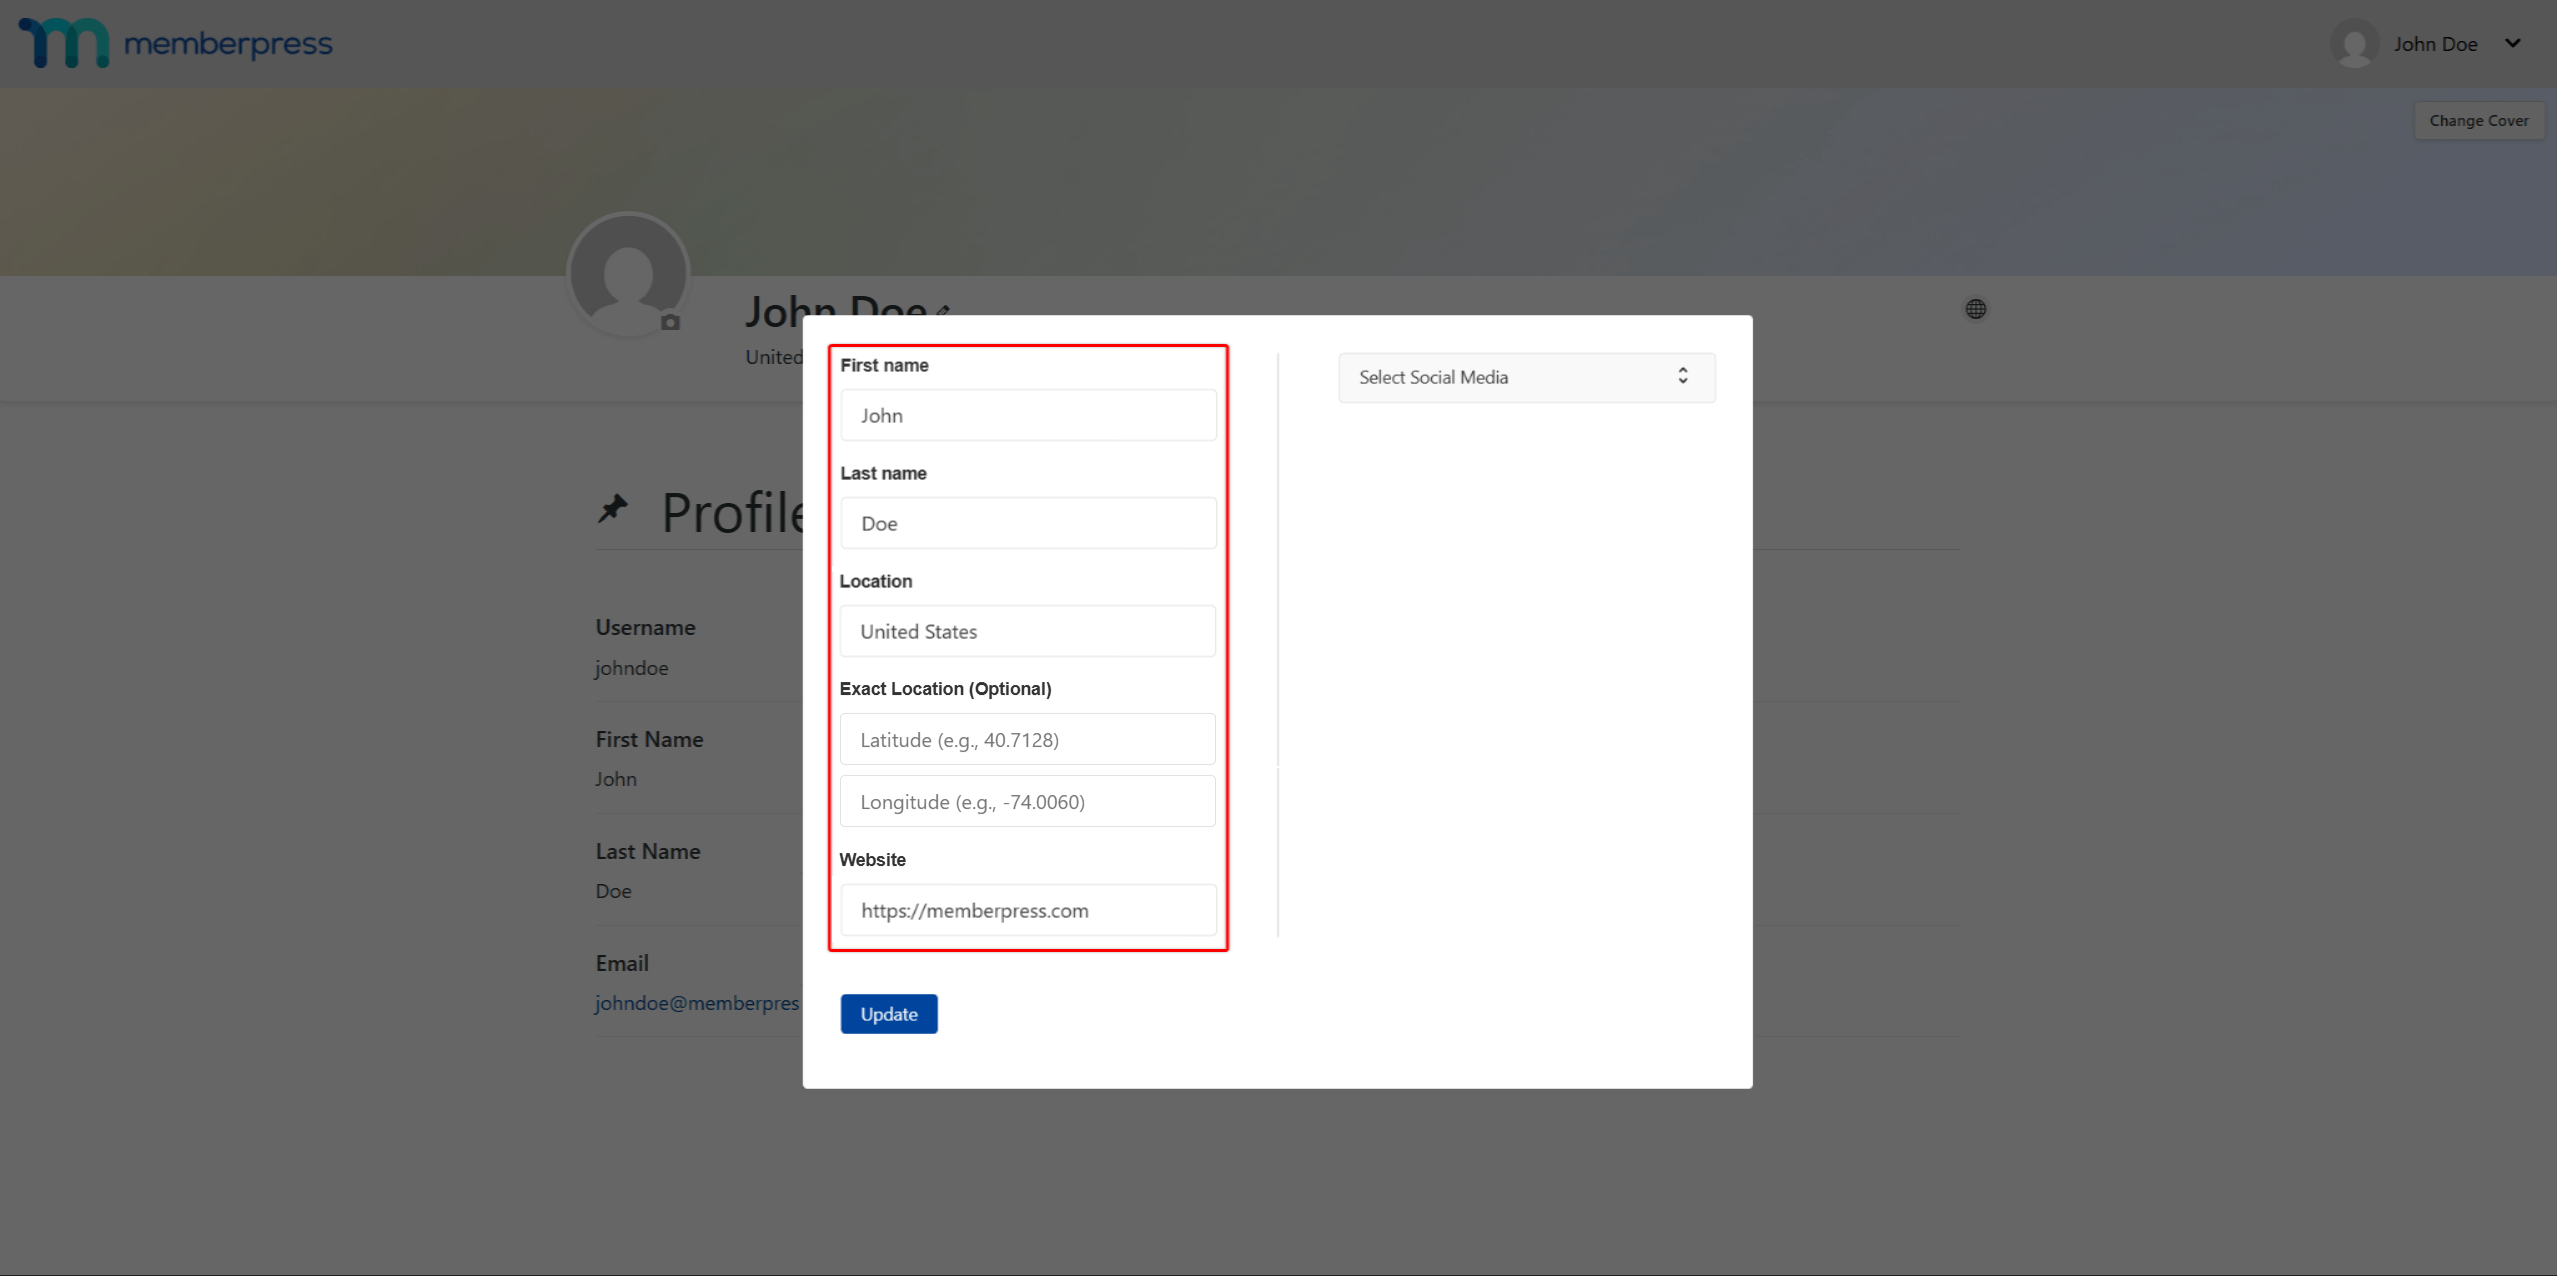
- To edit a profile, add or modify the following pop-up fields:
- Edit the First Name and Last Name fields to modify the name that appears on the profile.
- Add or modify the Location to show on the profile.
- Add the Website address.
- Next, click the Select Social Media dropdown and enable the social media you want to display on the profile. This will add the link field for each enabled social media platform.
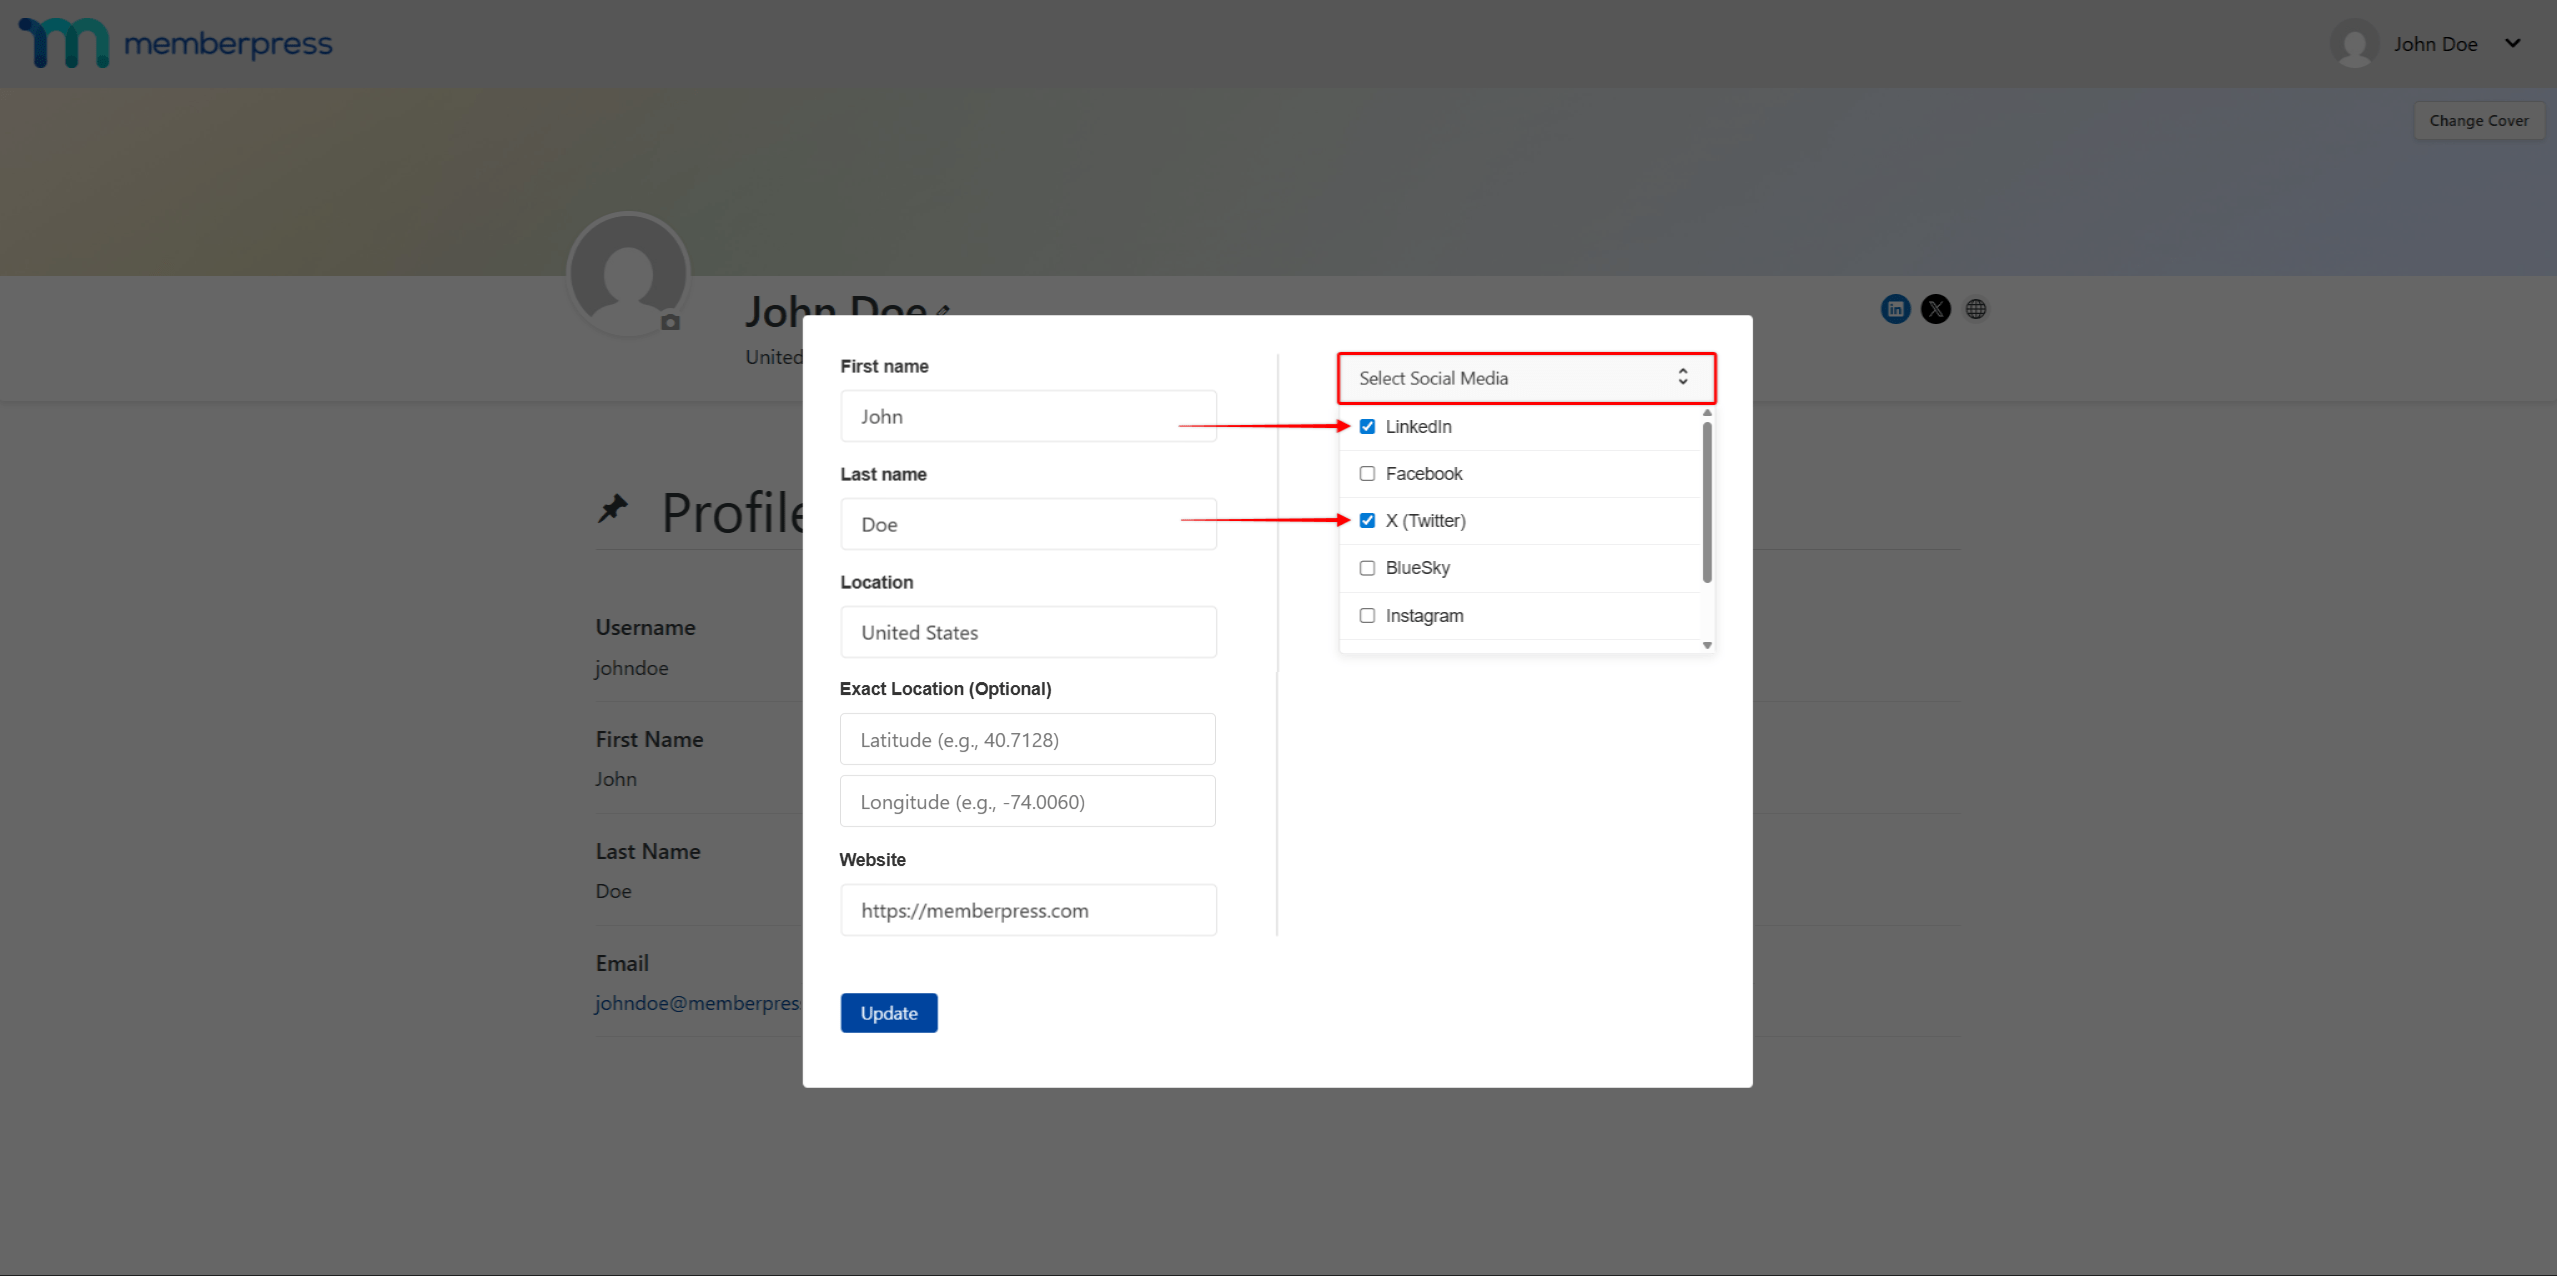
- Add the profile URL on each of your social media platform fields to the matching field.
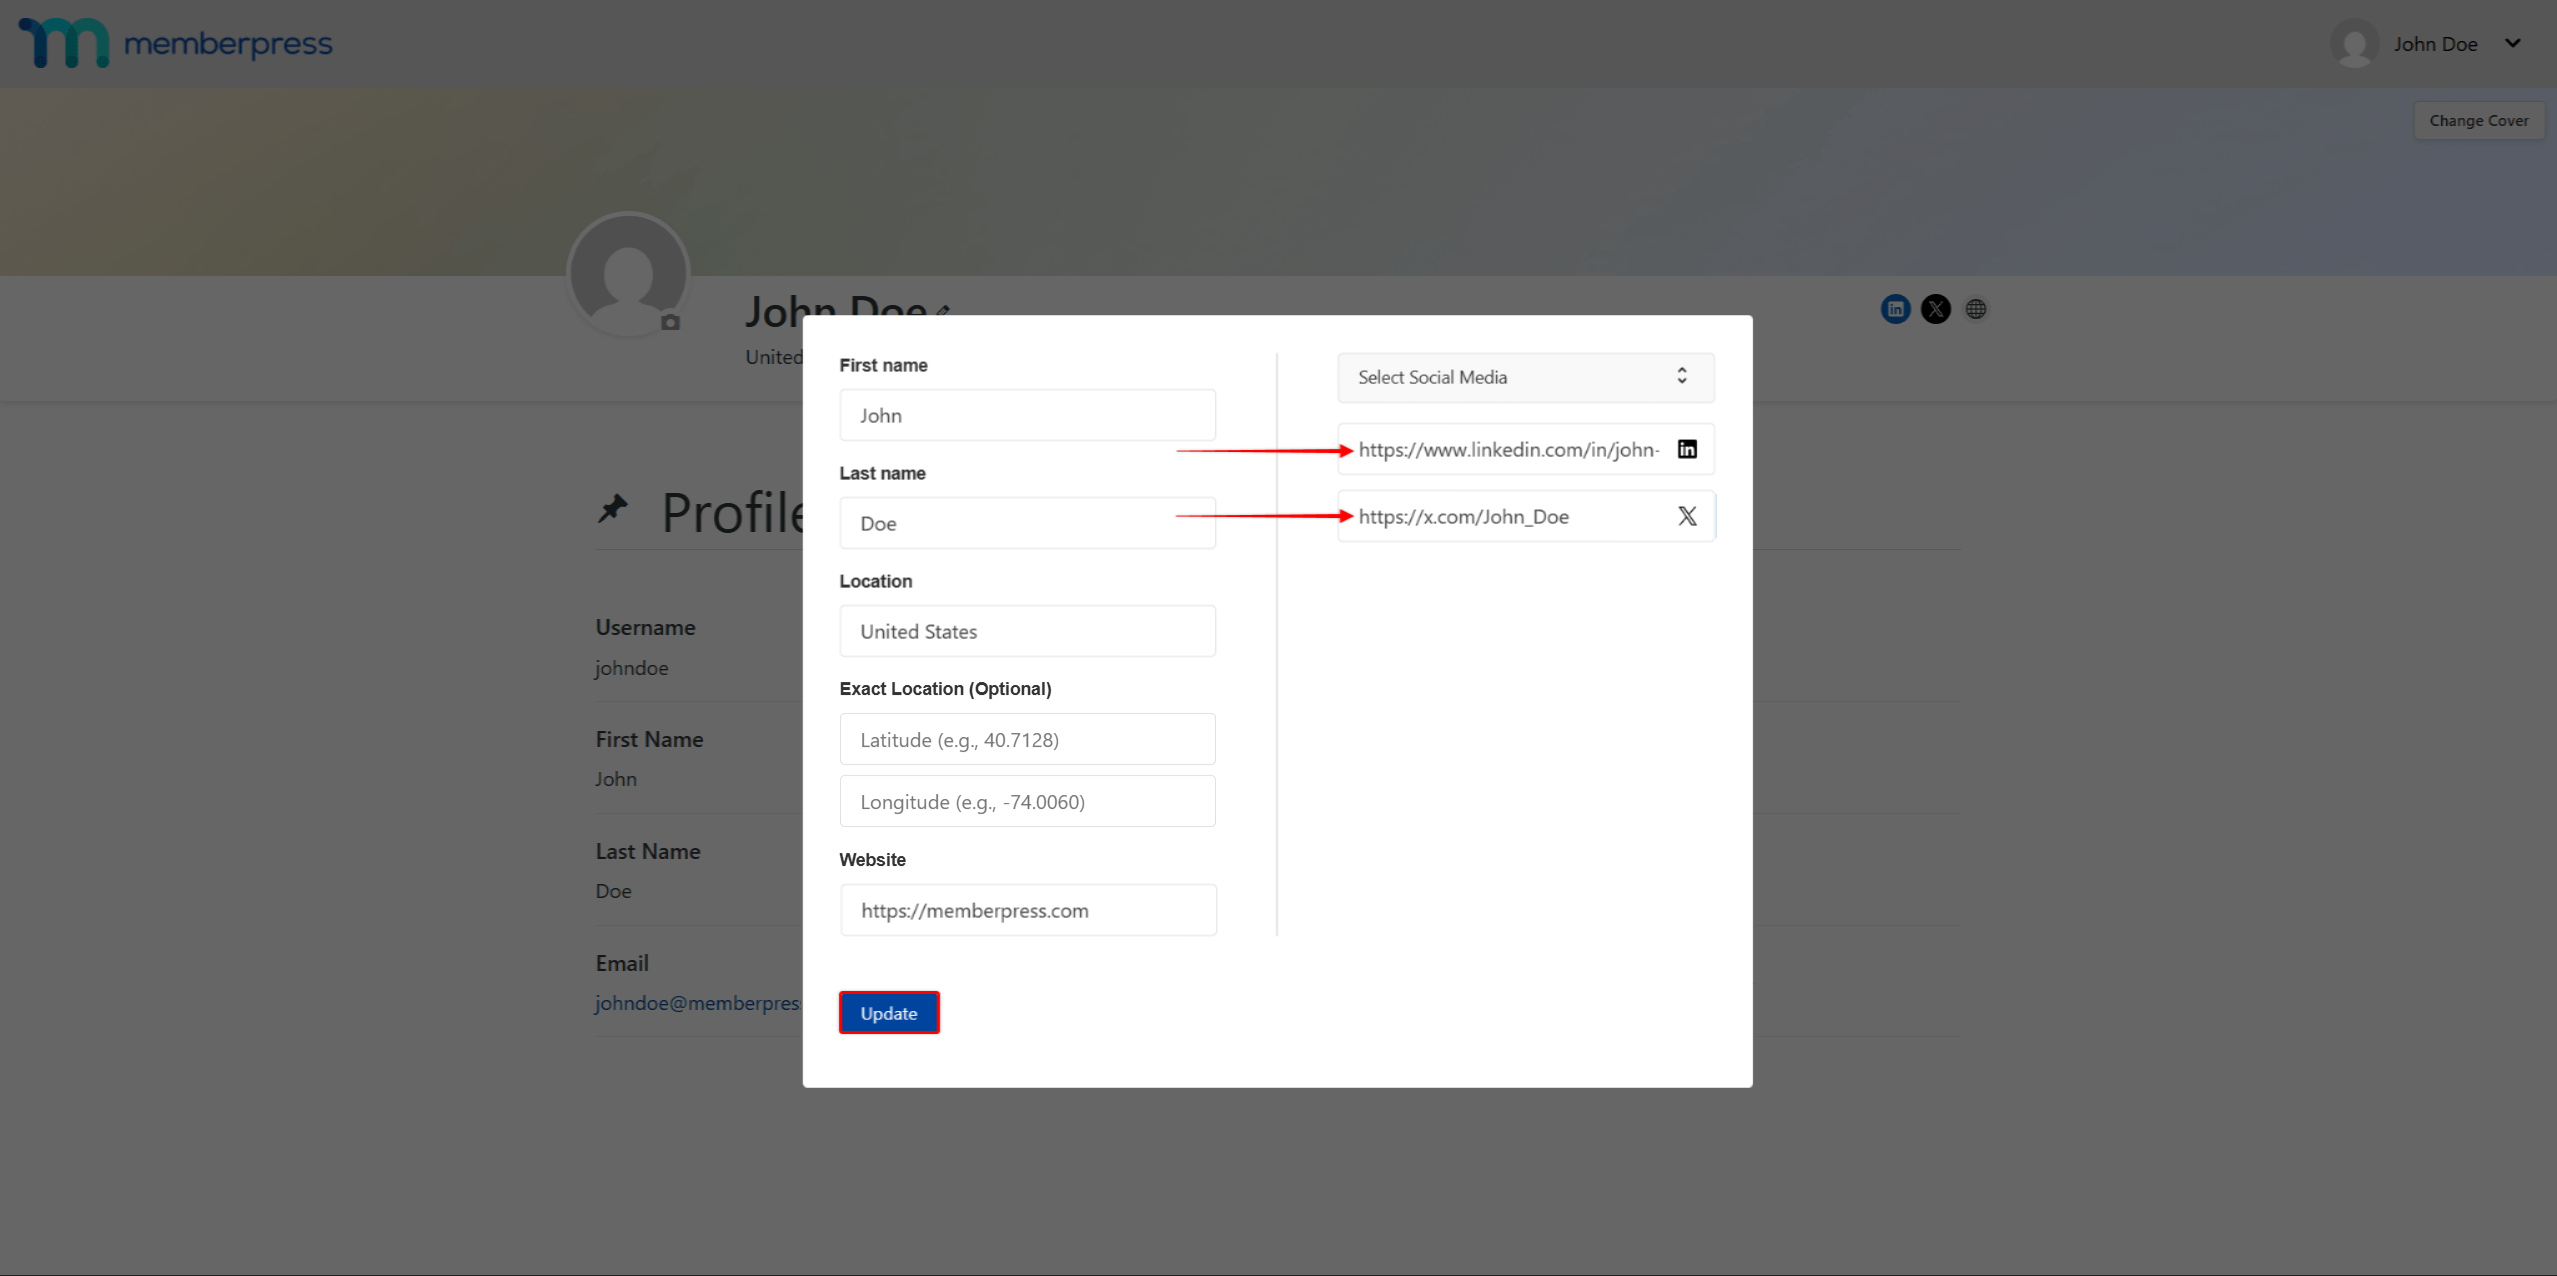
- Click Update to save changes.
Members can return at any time to update their information as their situations change. Empty fields remain hidden on their public profile, preventing incomplete sections from appearing.
Profile Media
Furthermore, members can upload their profile image and replace the default cover image:
- Access the member’s profile page.
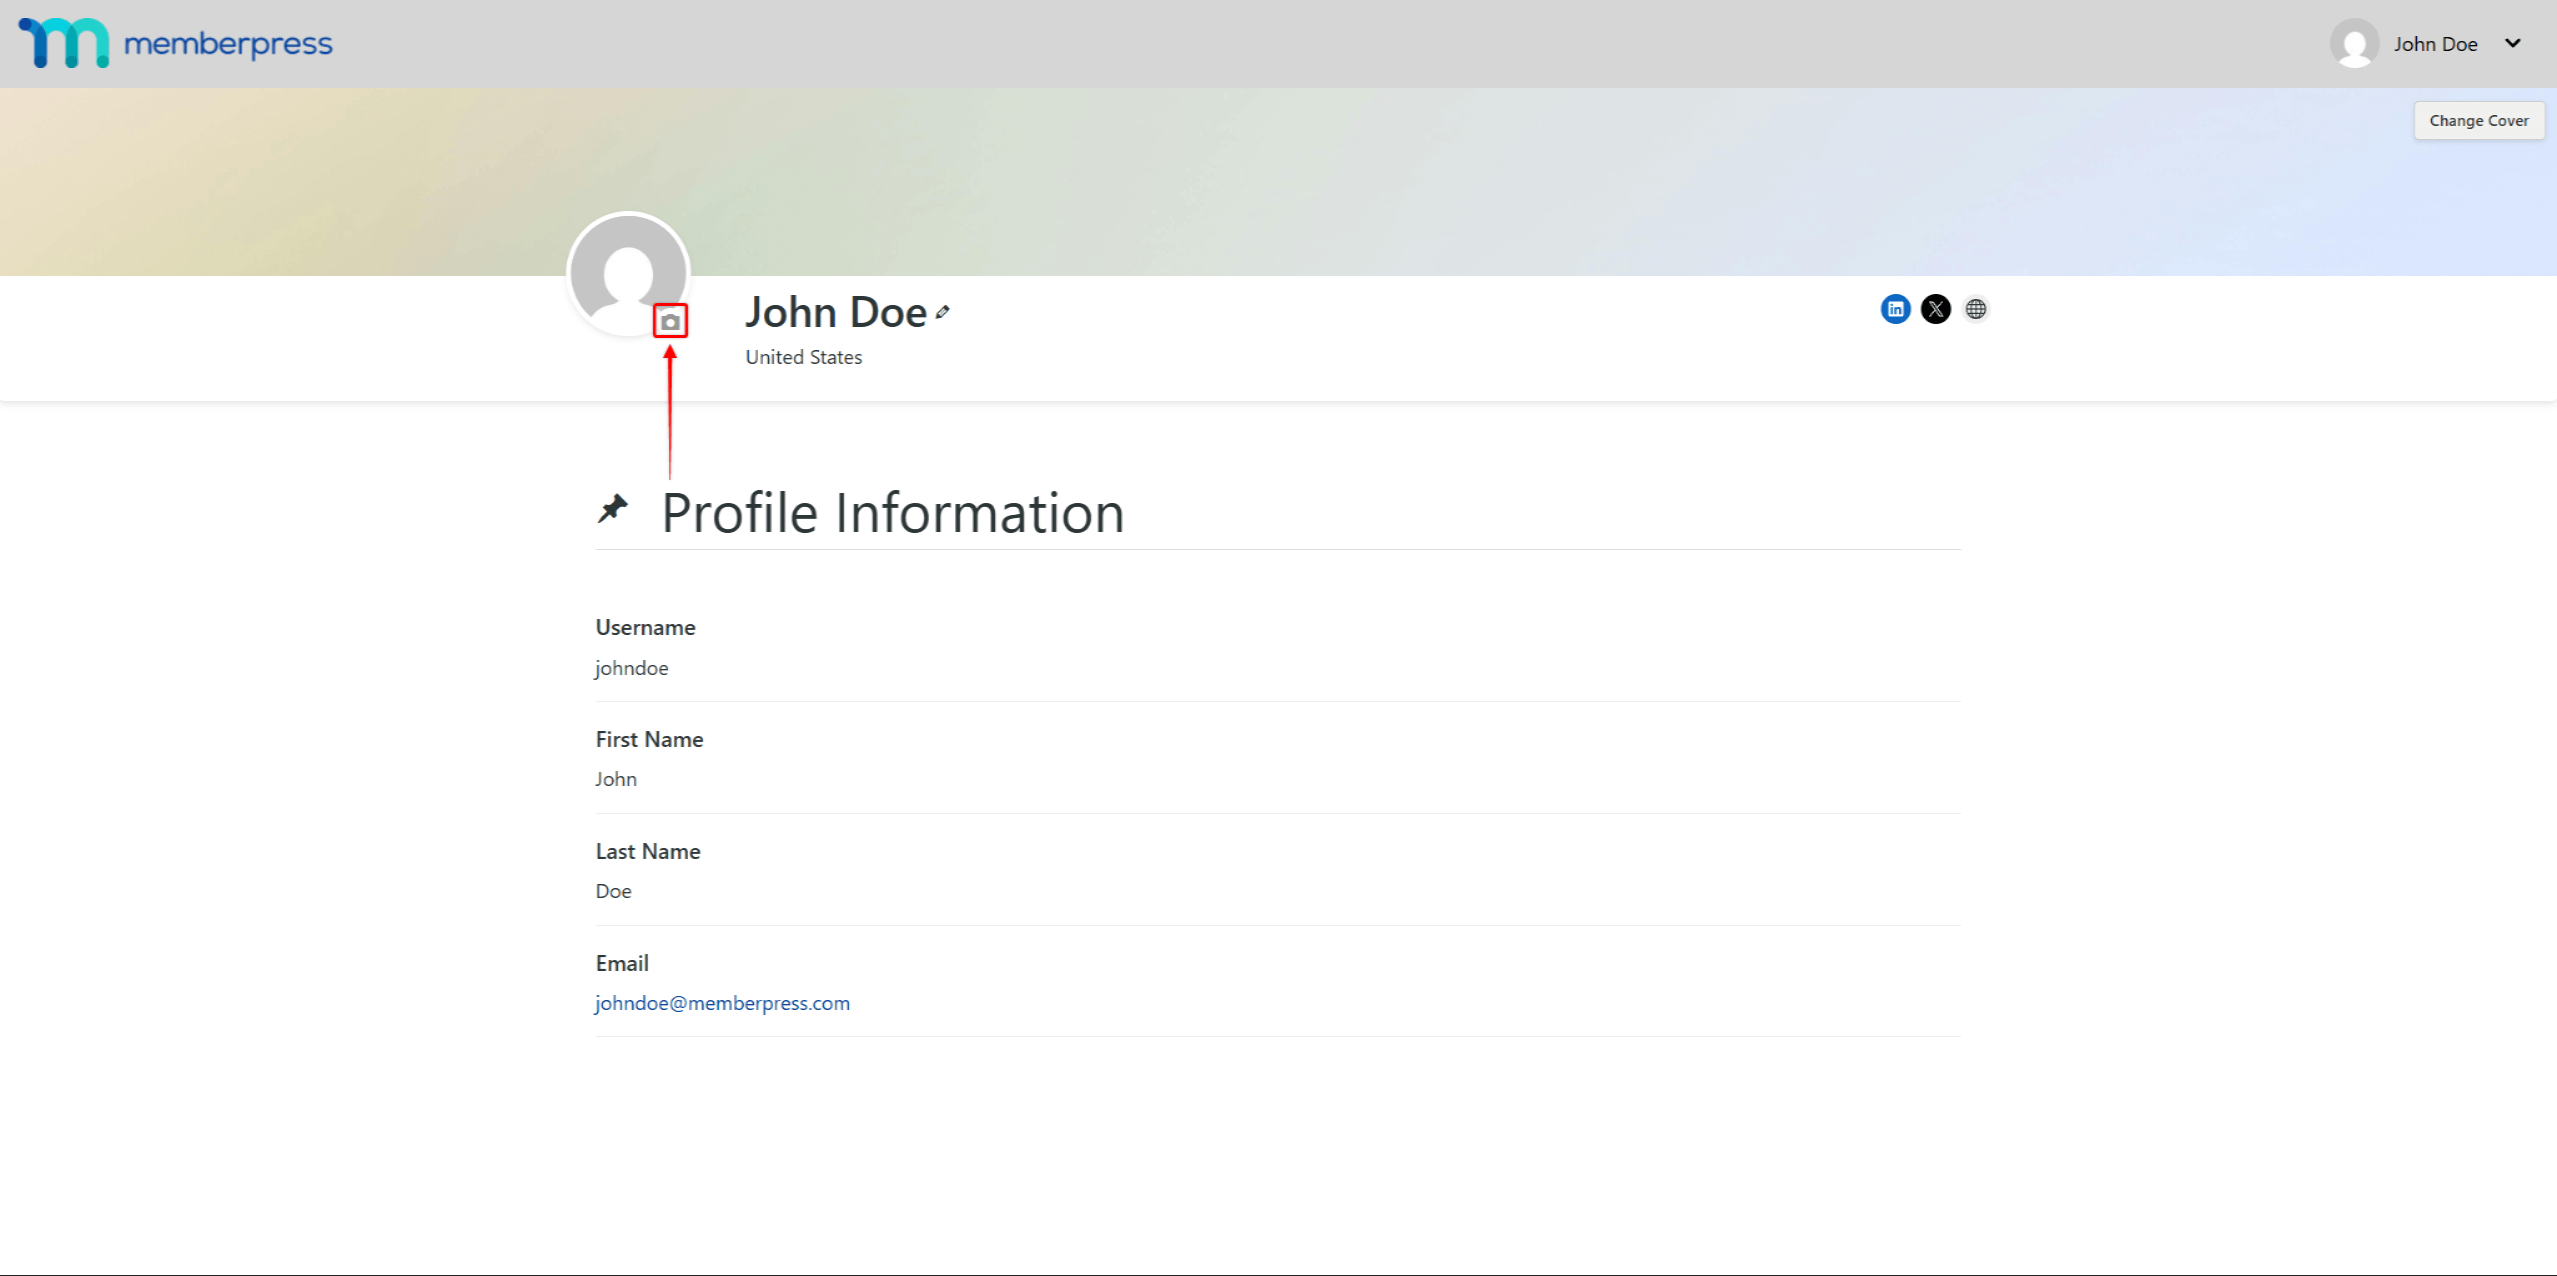
- On the avatar image rim, click the camera icon to add or change the profile image. Upload the profile image (JPG or PNG format) from your device.
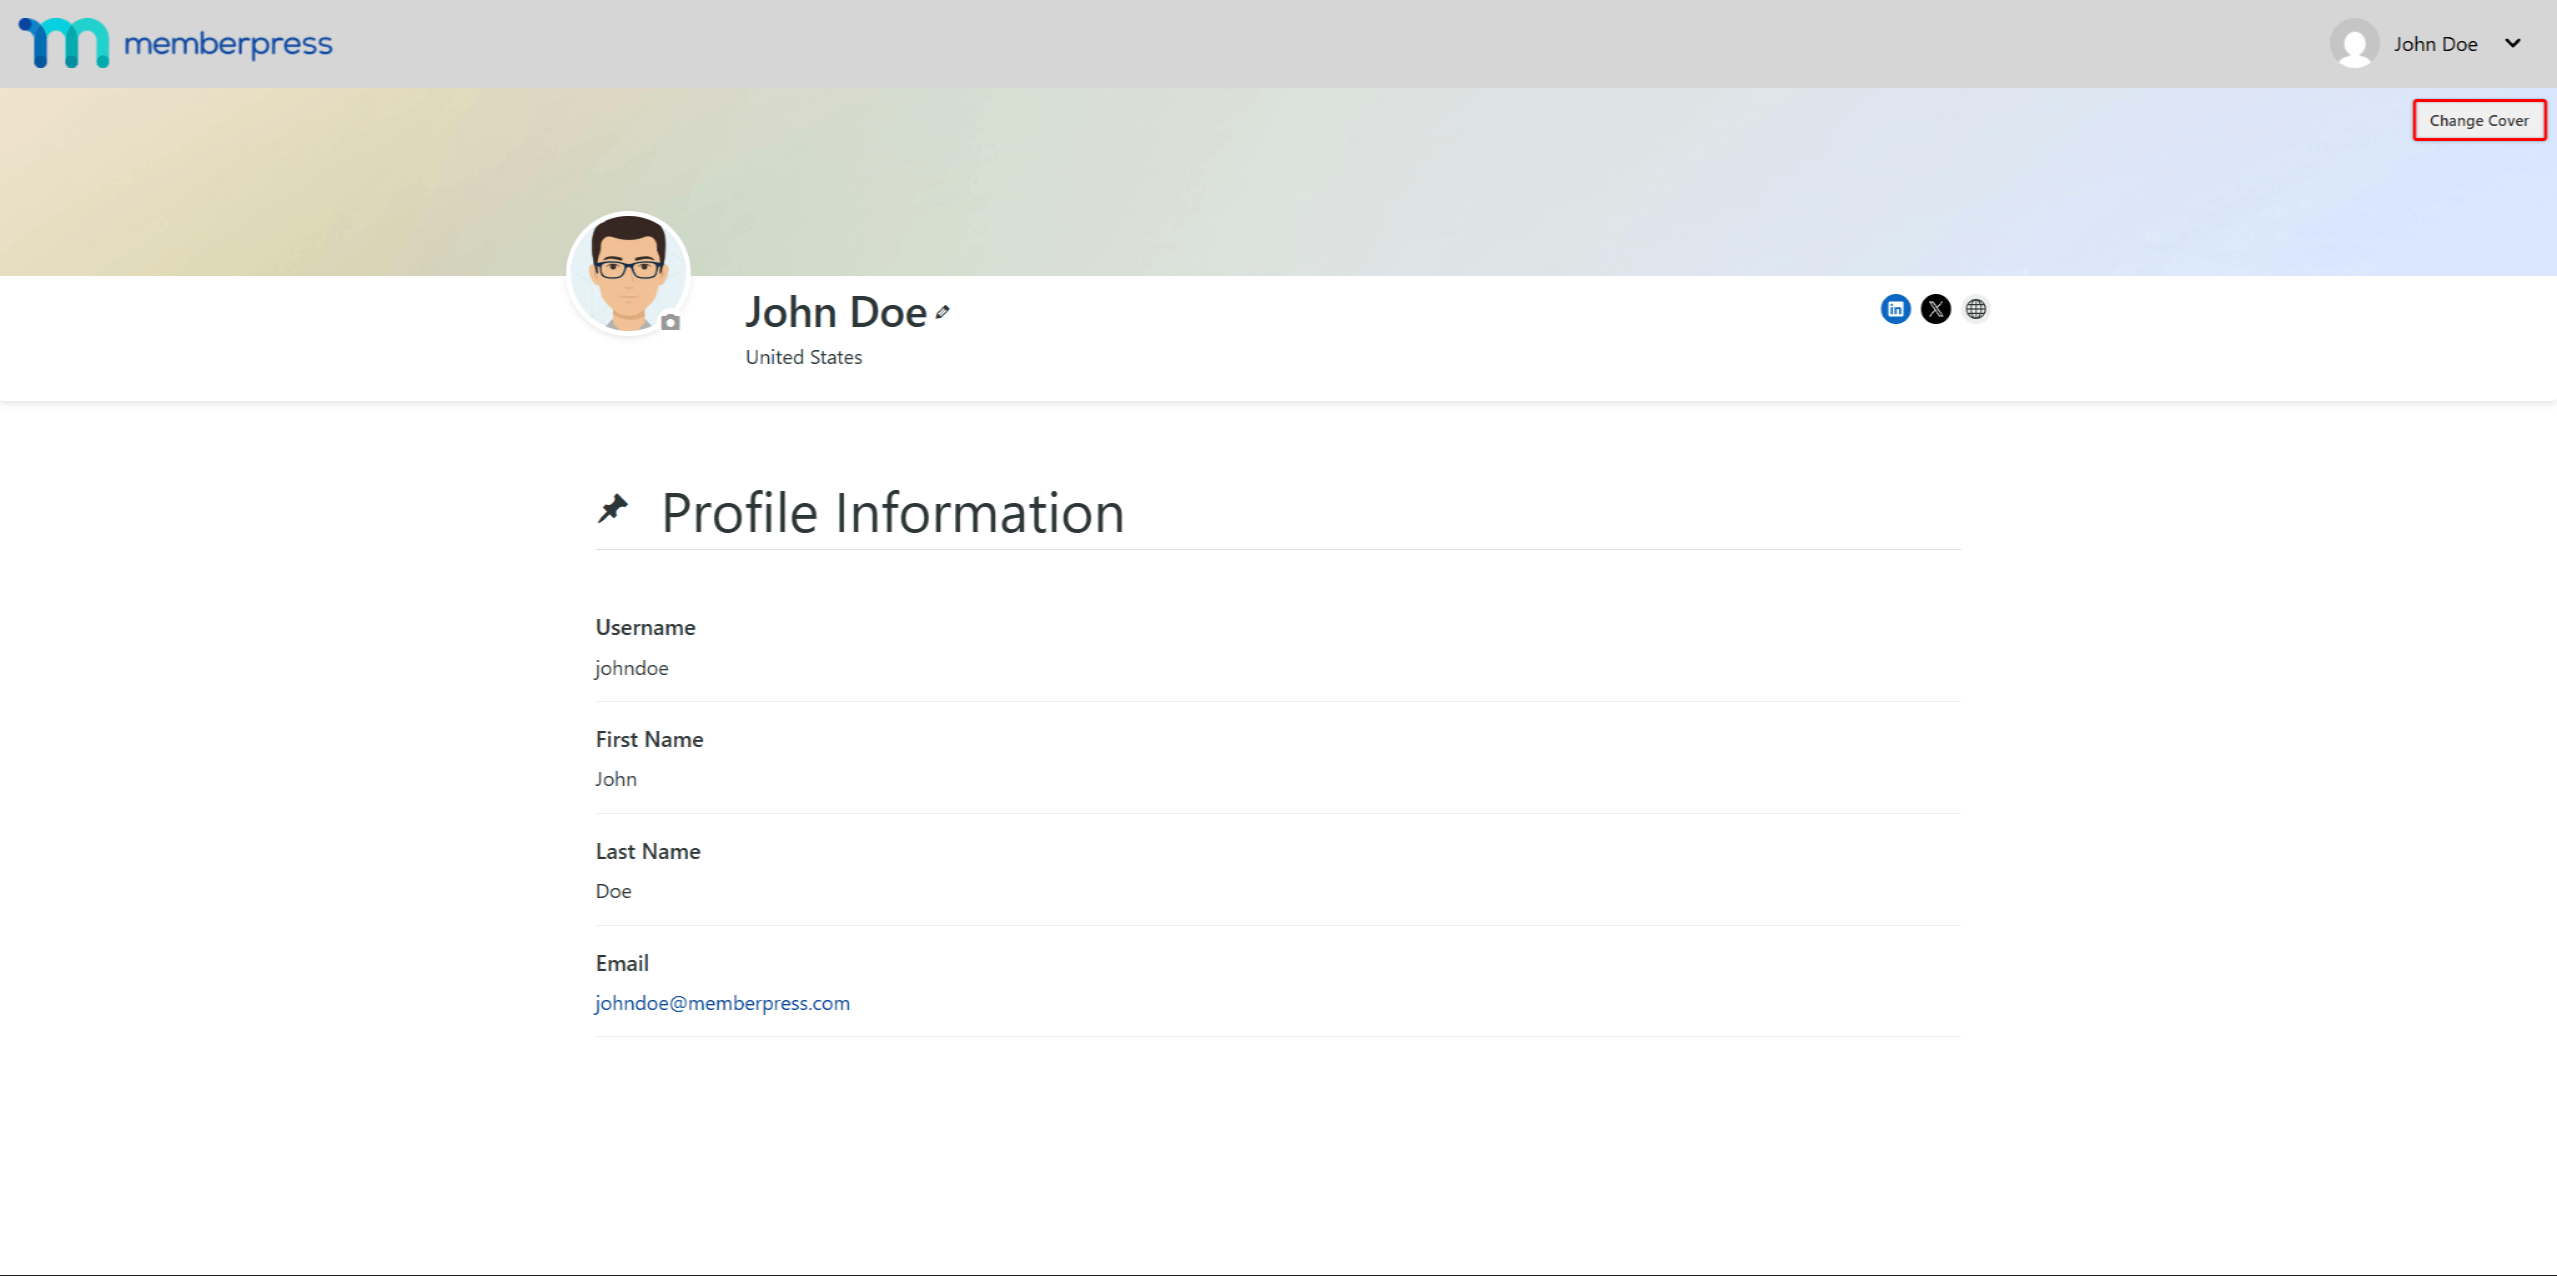
- Next, in the top-right corner of the profile page, click the Change Cover button to change the cover image. You might need to crop or adjust the image before uploading it to ensure it fits perfectly.
When profile moderation is enabled, uploaded images are placed in a review queue. Members will see the “pending approval” message until administrators review and confirm submissions.
Their previously approved image remains visible during this process, ensuring profiles never appear broken.
Visual elements make profiles more engaging and help members recognize each other.
Understanding Profile Visibility
Profile visibility settings give members control over their community presence. They can adjust how much information appears to different viewer categories.
Based on your Profile settings, members can hide their entire profile or hide specific information.
Allow Users To Hide Their Profiles
You can enable the Allow Users To Hide Their Profiles option under Dashboard > ClubSuite™ > Settings > Profile tab.
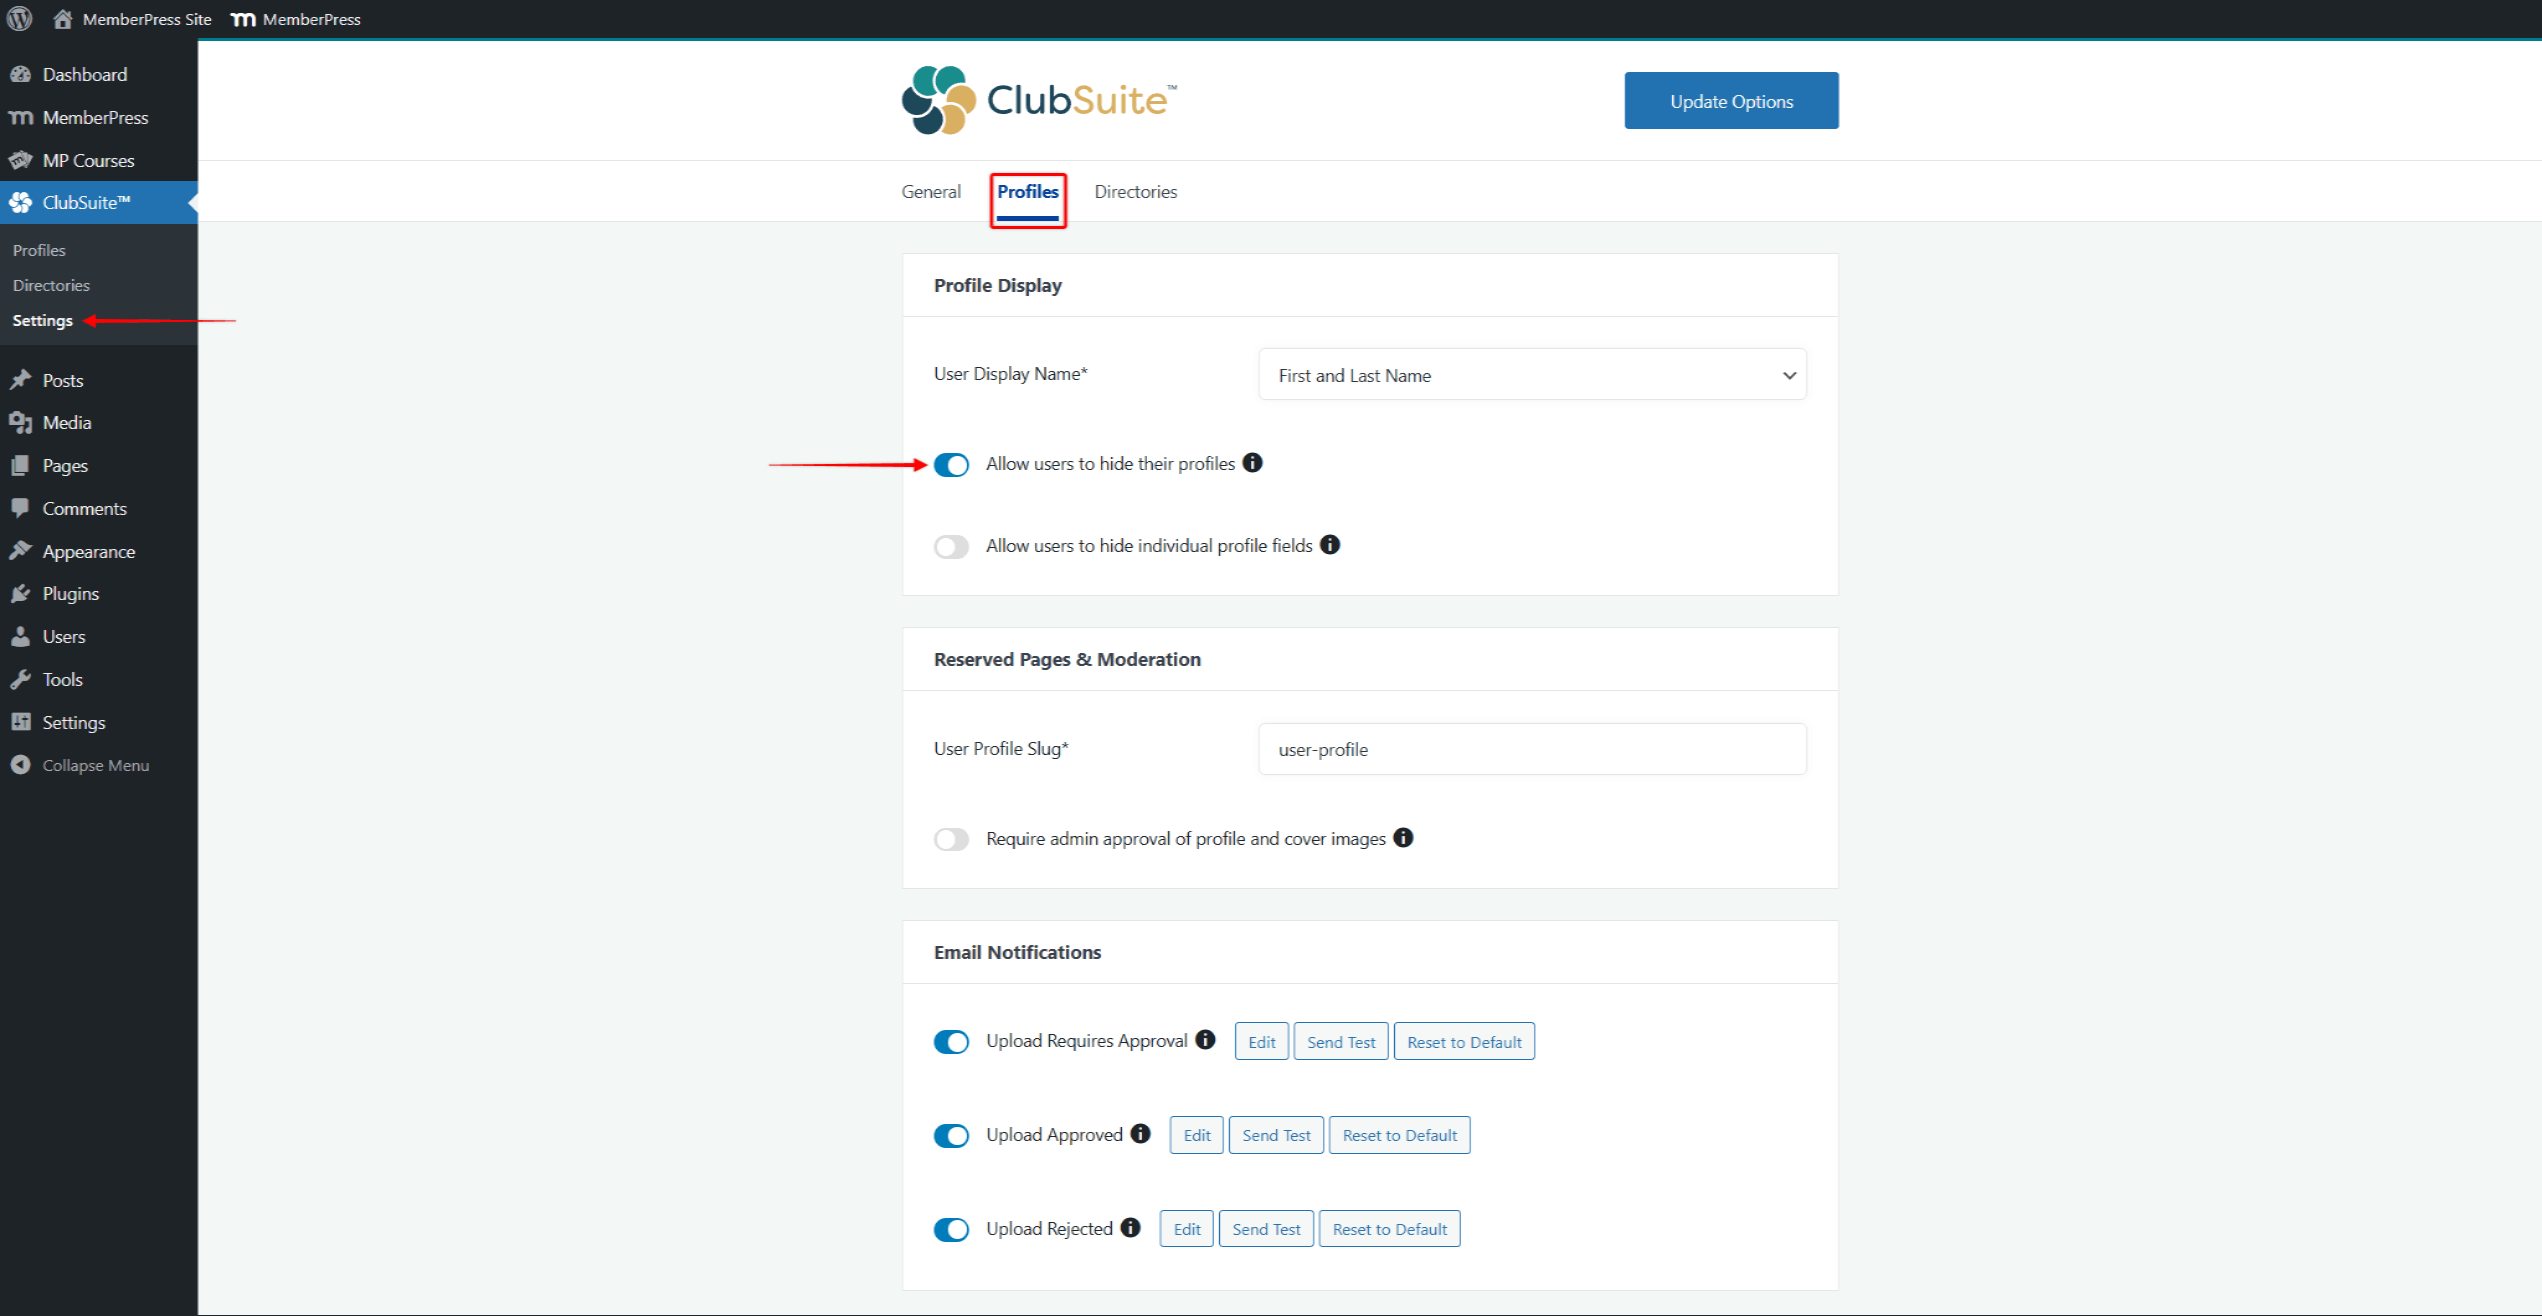
When this option is enabled, your users can choose to hide their profile:
- Access the profile page.
- Click the pencil icon to start editing the profile information. This will open a pop-up.
- In the pop-up, check the Make this profile private option.
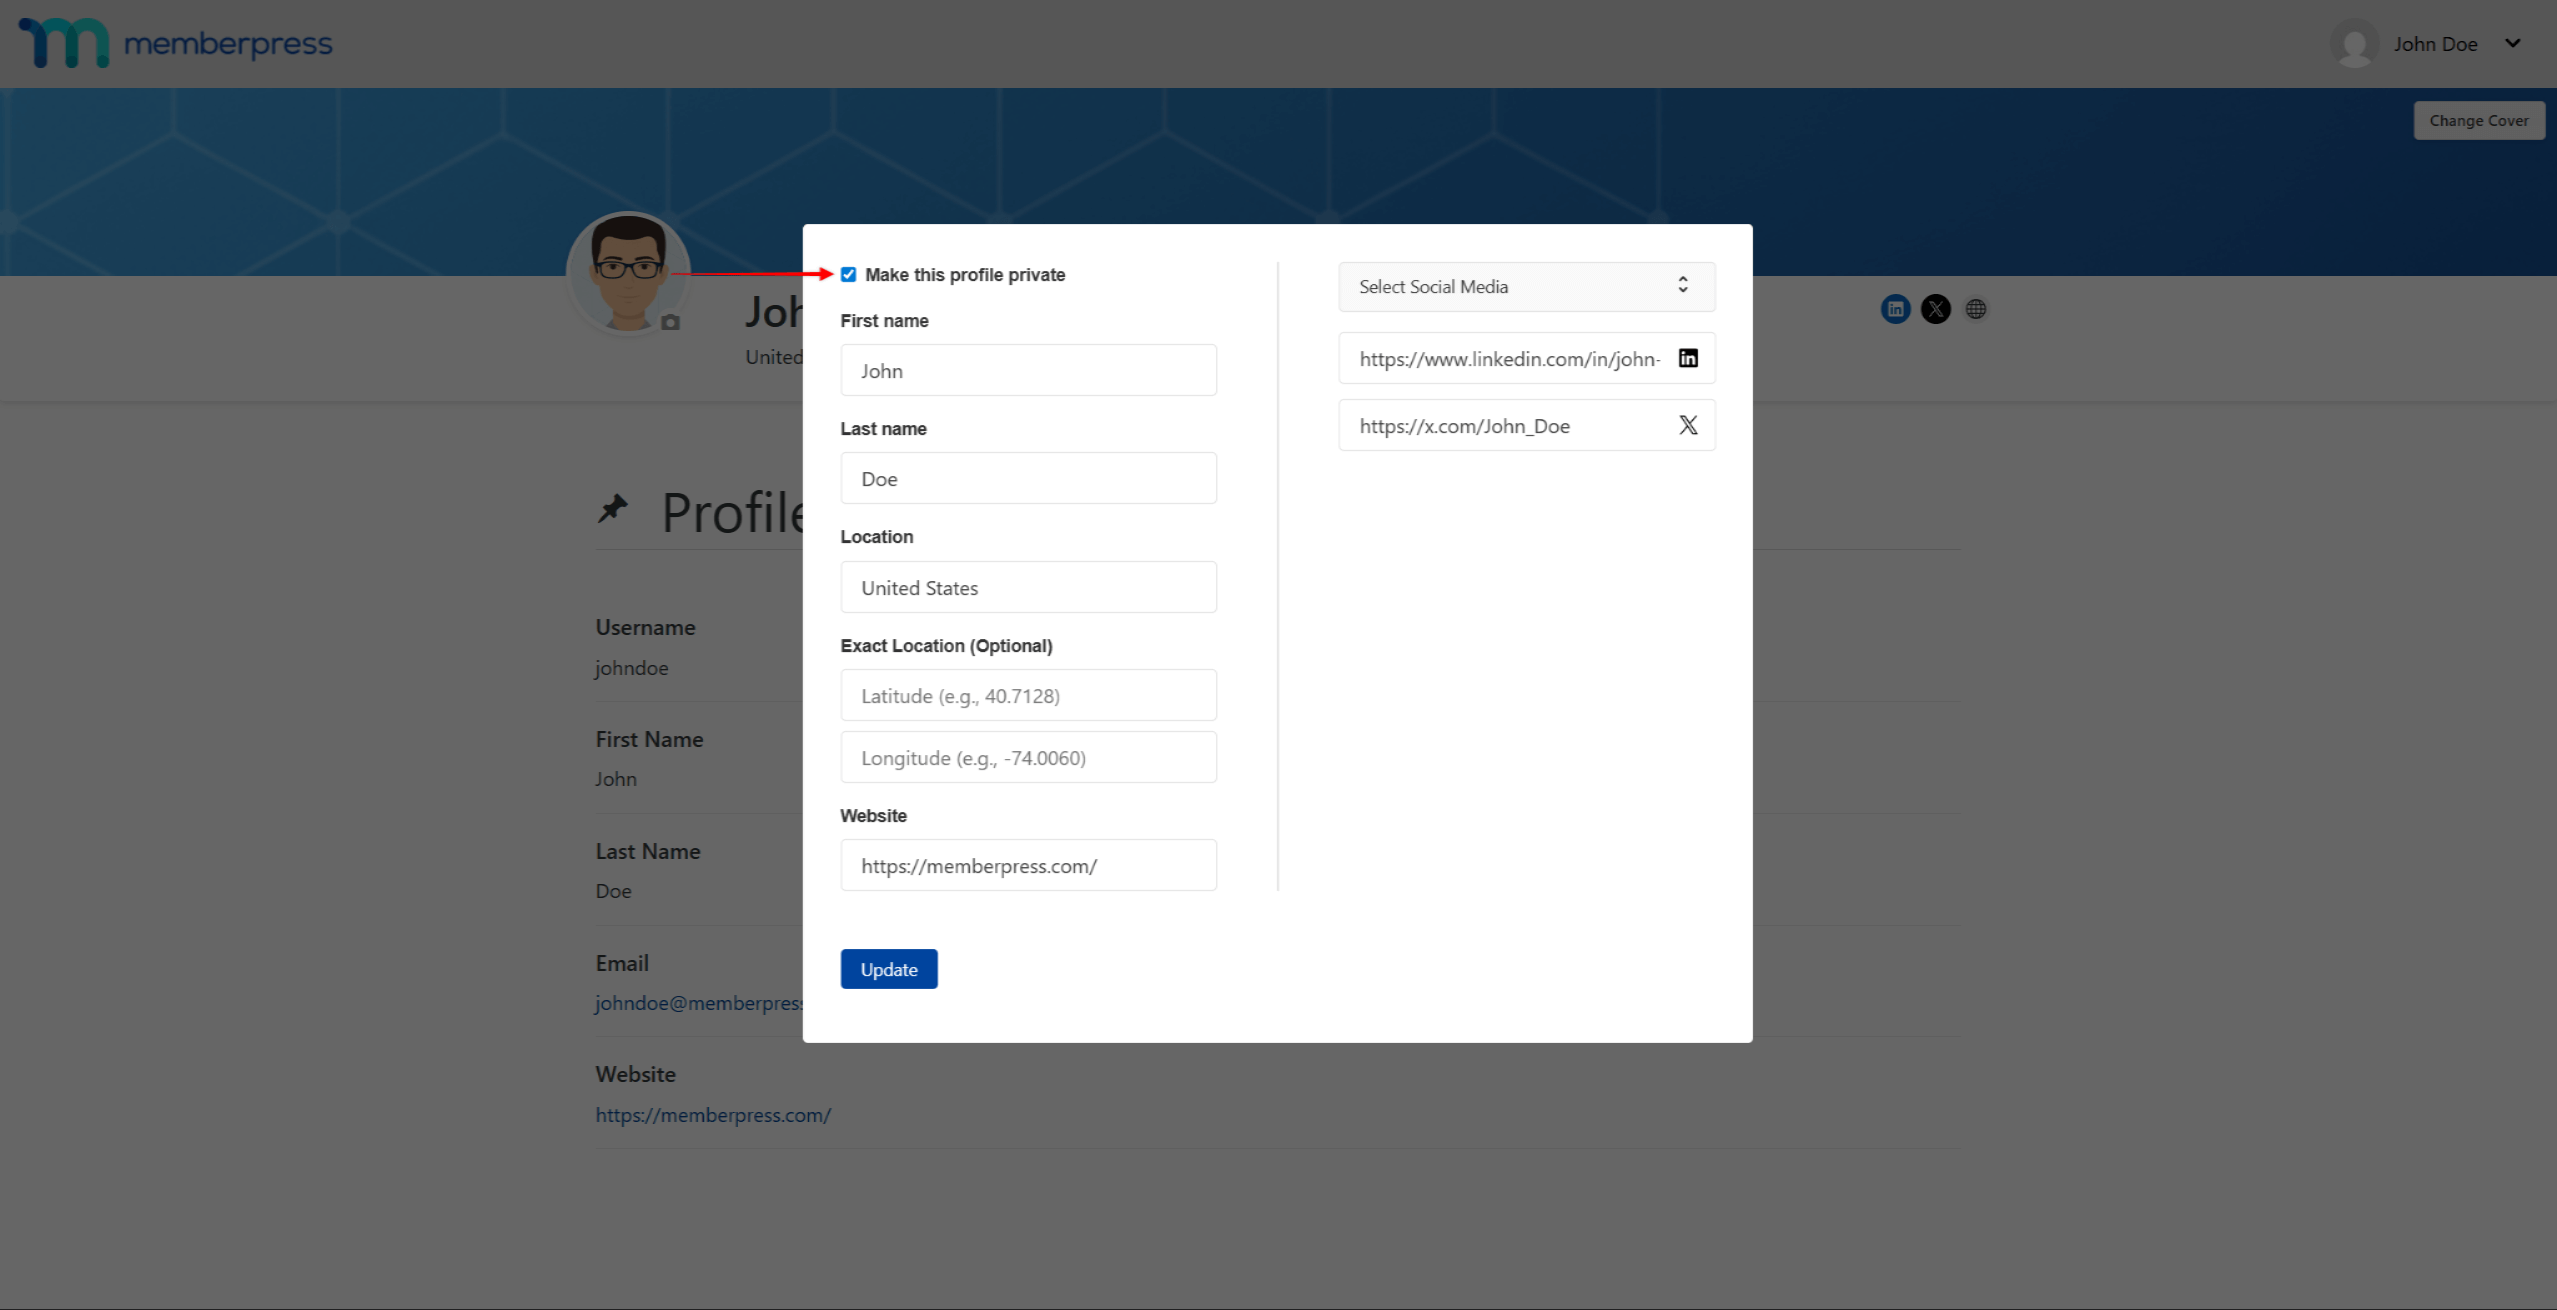
As a result, the member's profile will be hidden from all other members.
Allow Users To Hide Individual Profile Fields
Also, members can hide only specific data on their profiles. To allow this, enable the Allow Users To Hide Individual Profile Fields option under Dashboard > ClubSuite™ > Settings > Profile tab.
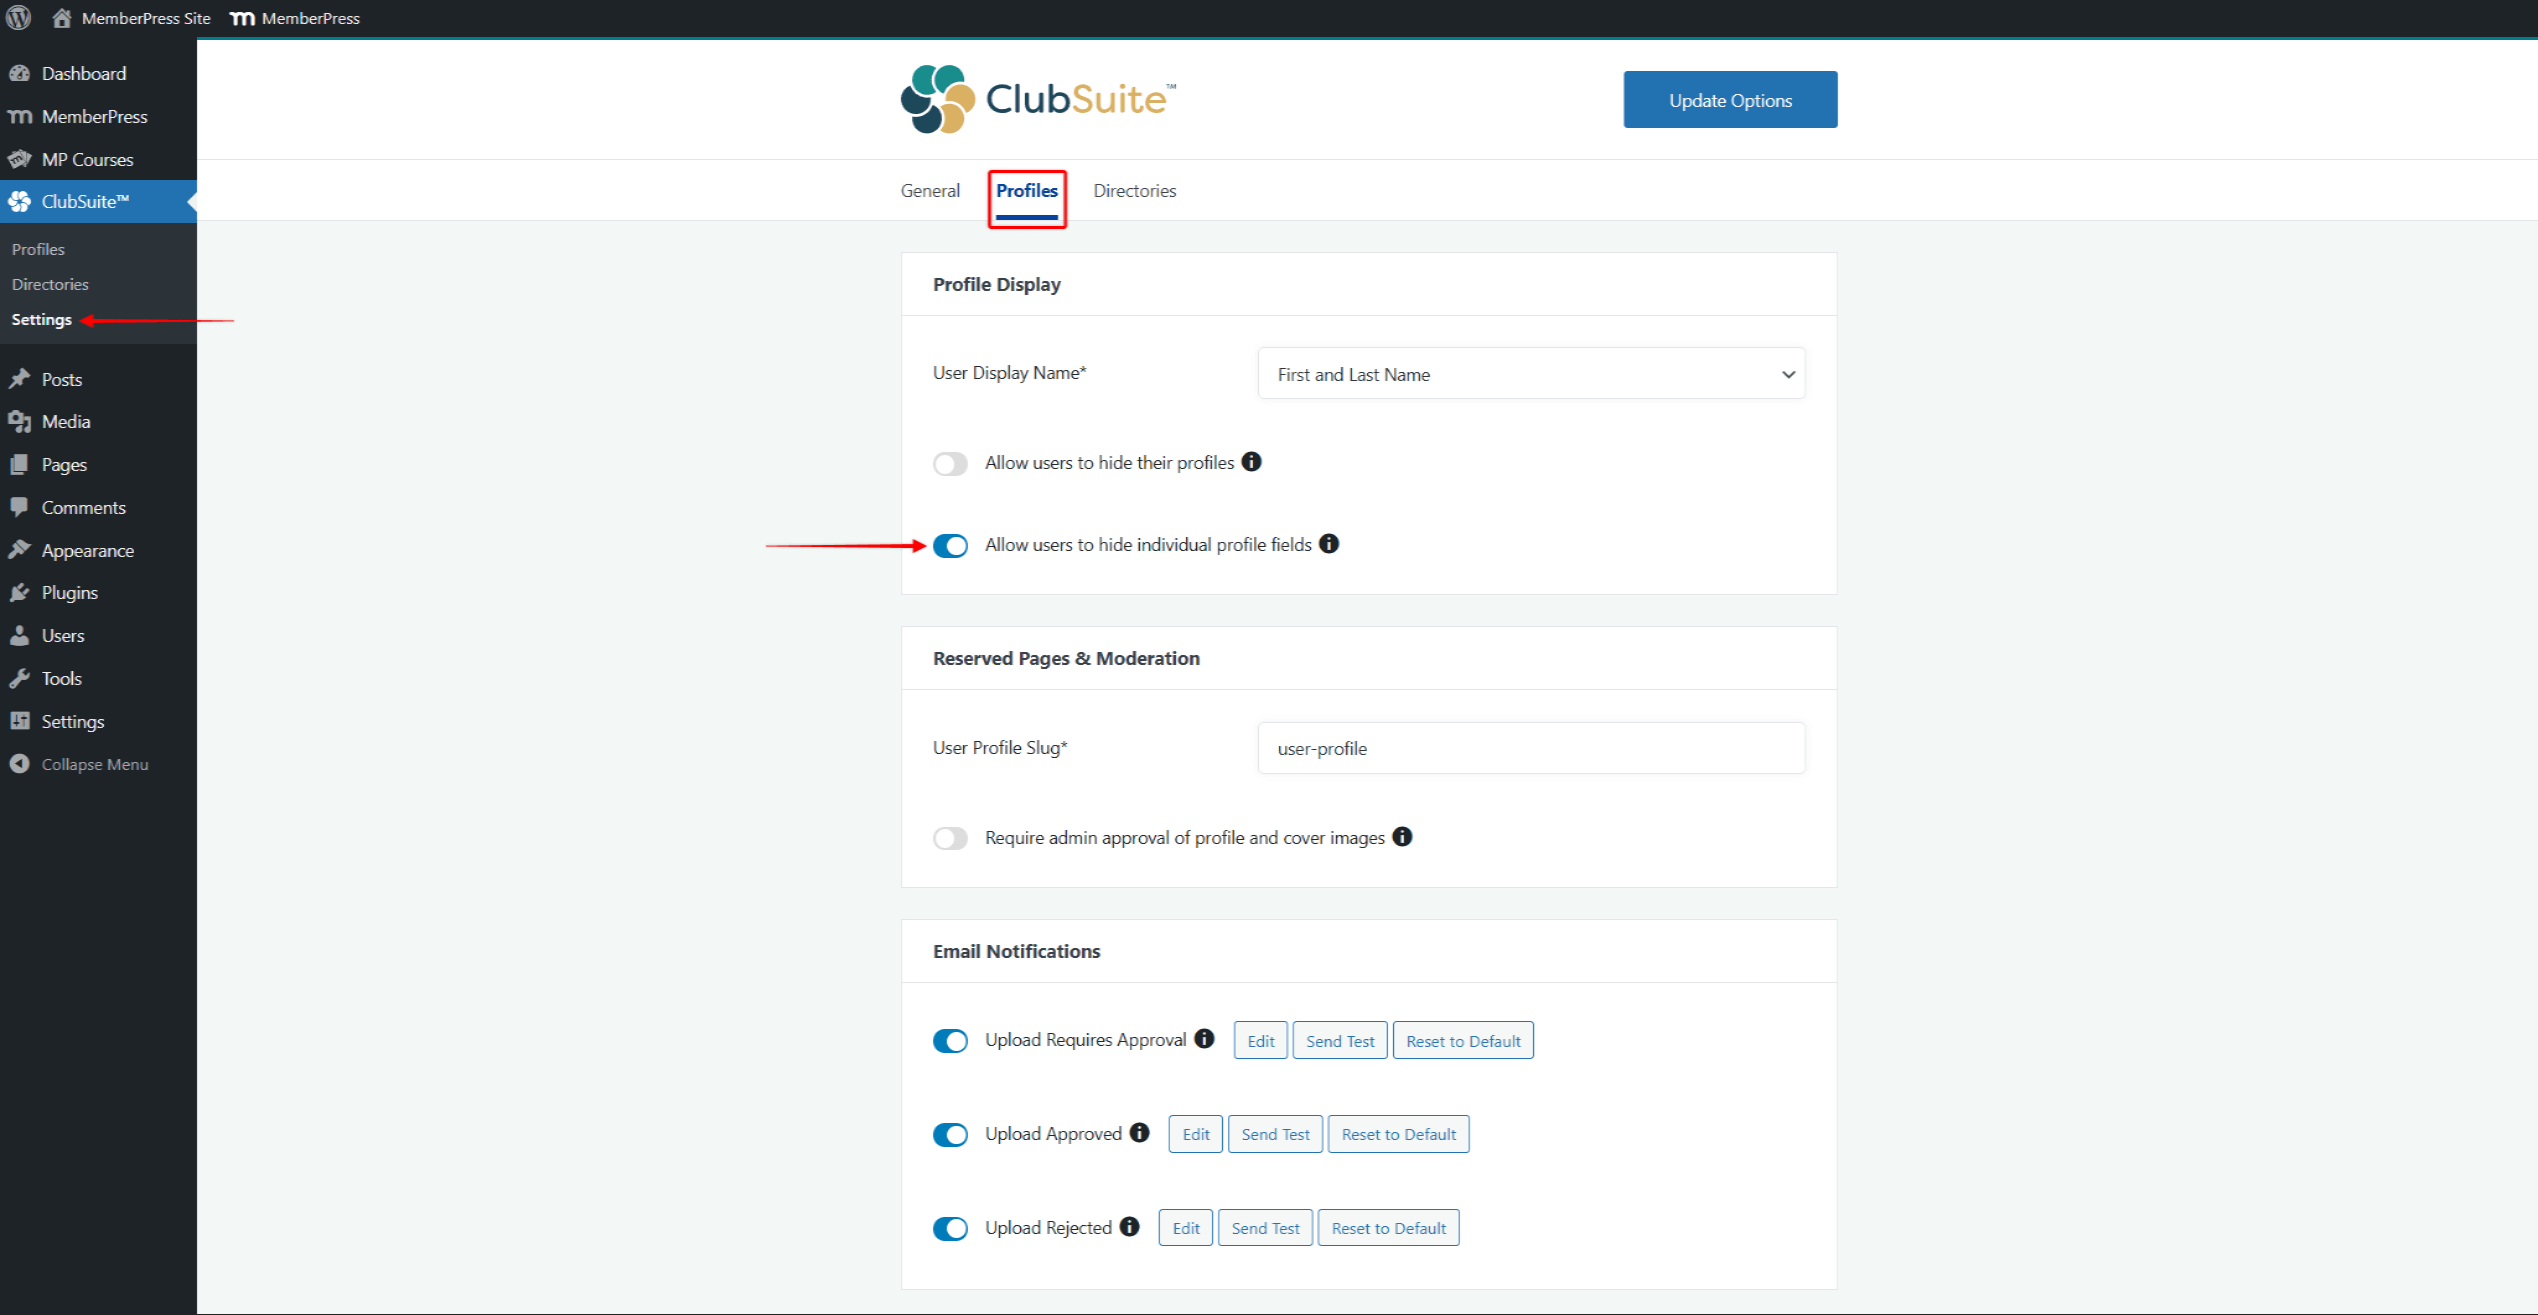
Members can hide individual fields by following these steps:
- Access the member’s profile page.
- Scroll down to the Profile Information section.
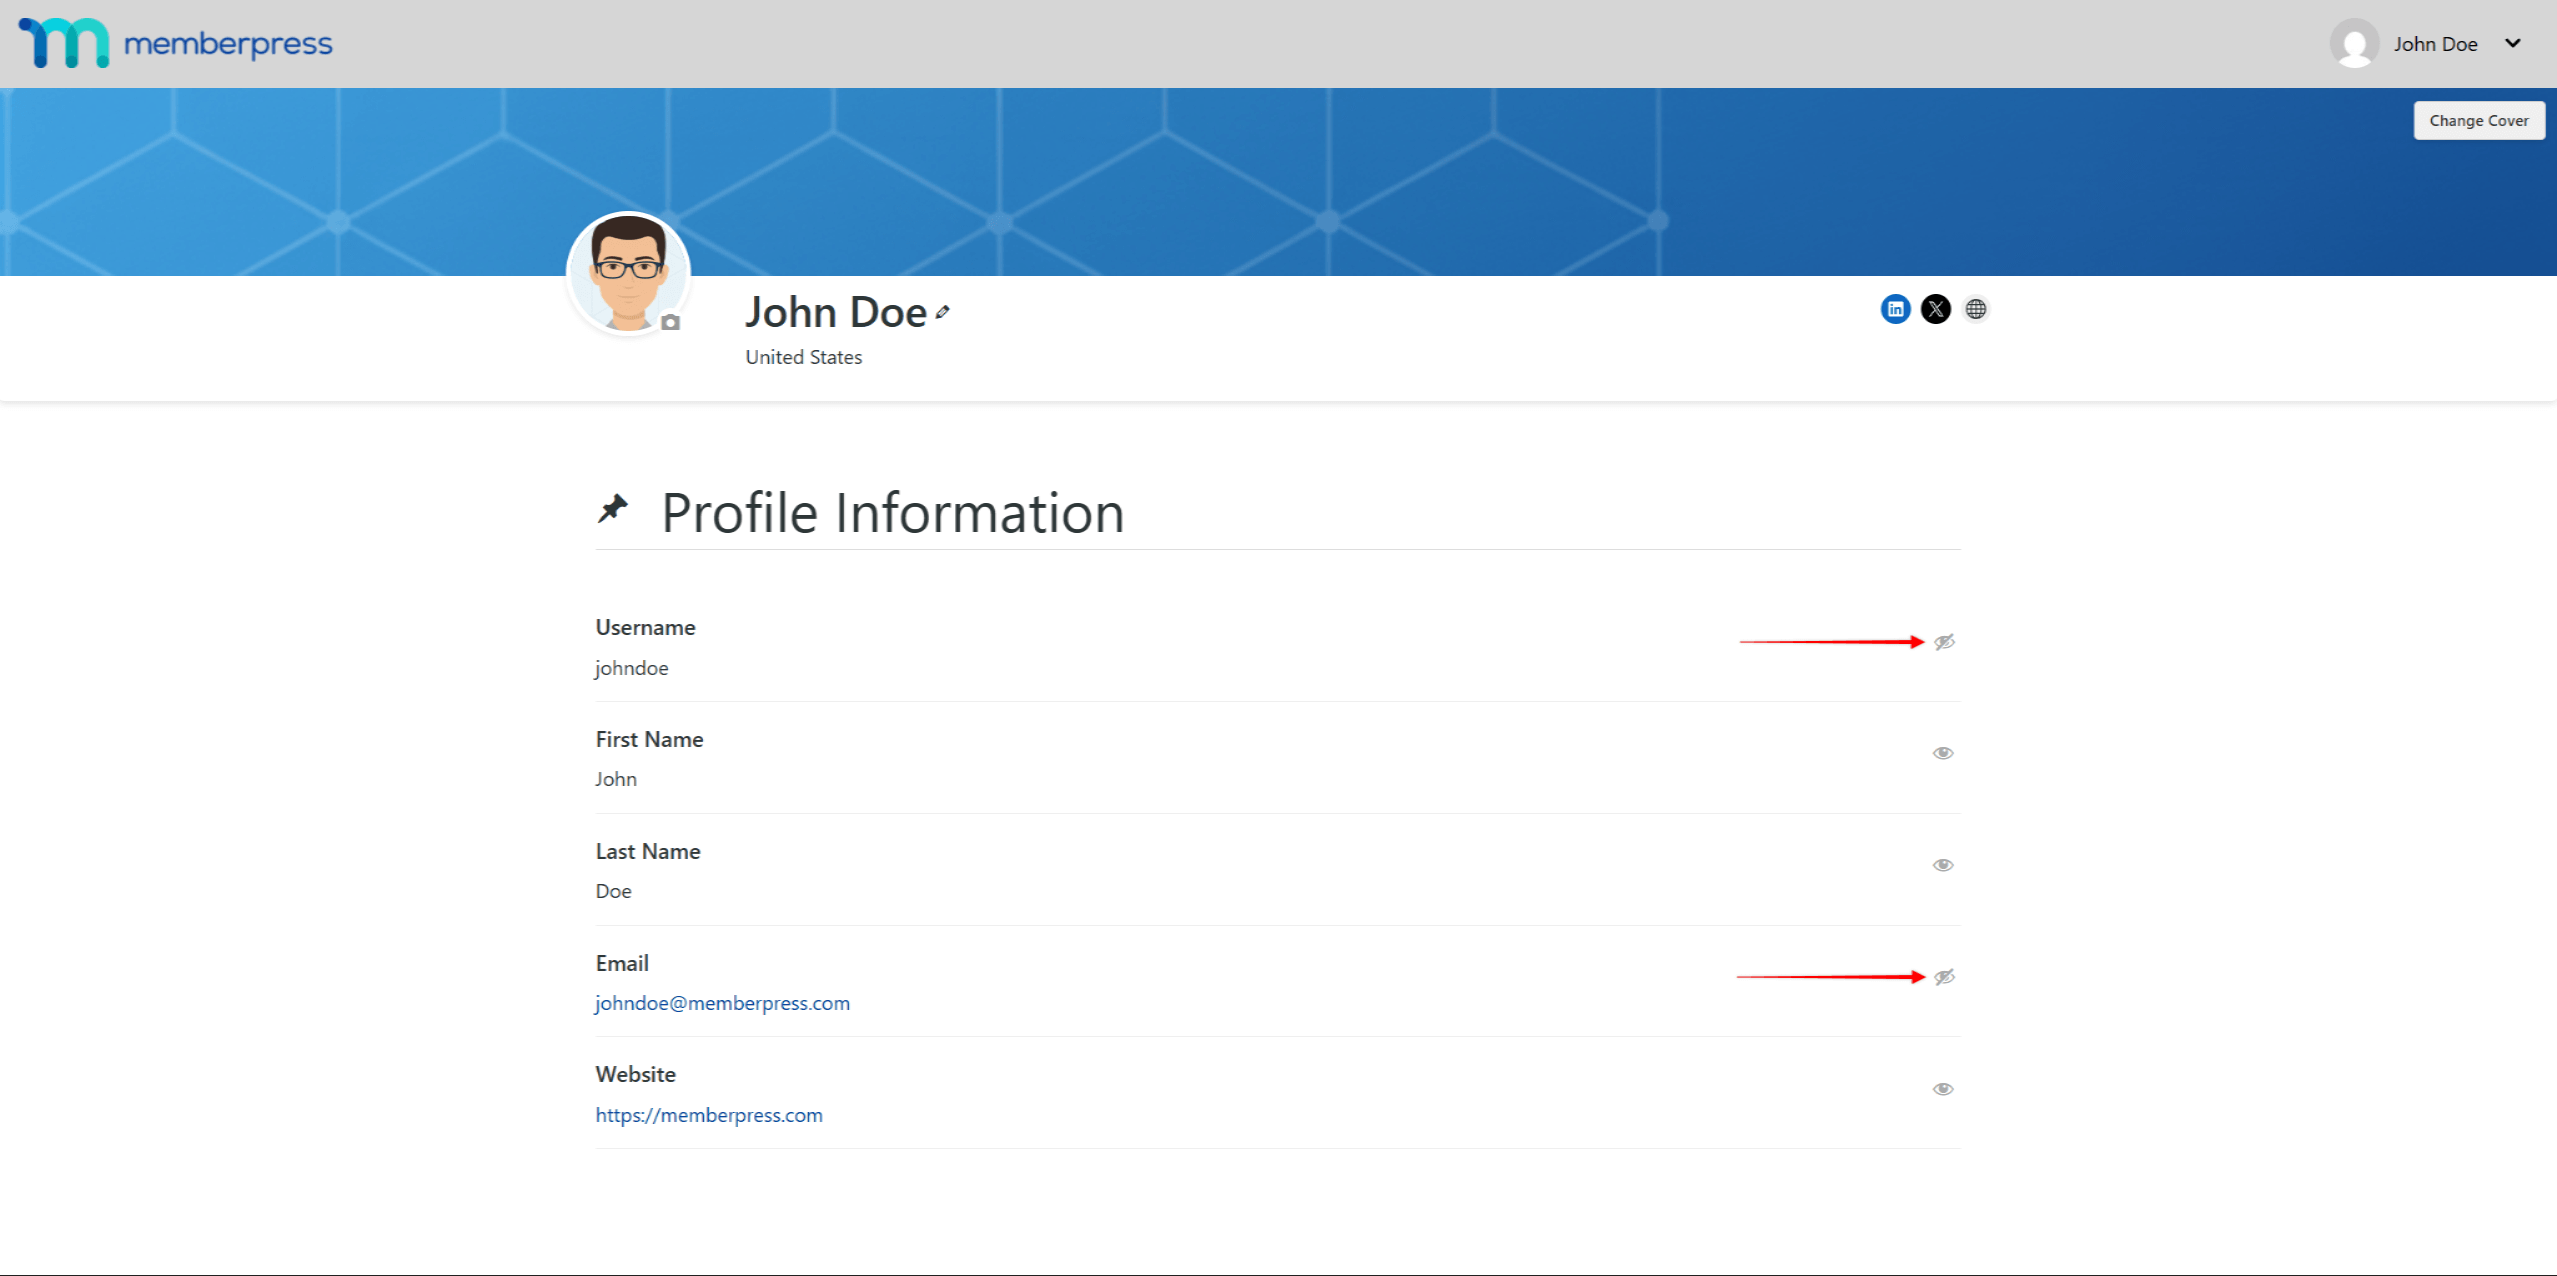
- Click the eye icon next to each option that should be hidden.
The fields that members can hide are:
- Username;
- First Name;
- Last Name;
- Email.
Map View Profile Visibility
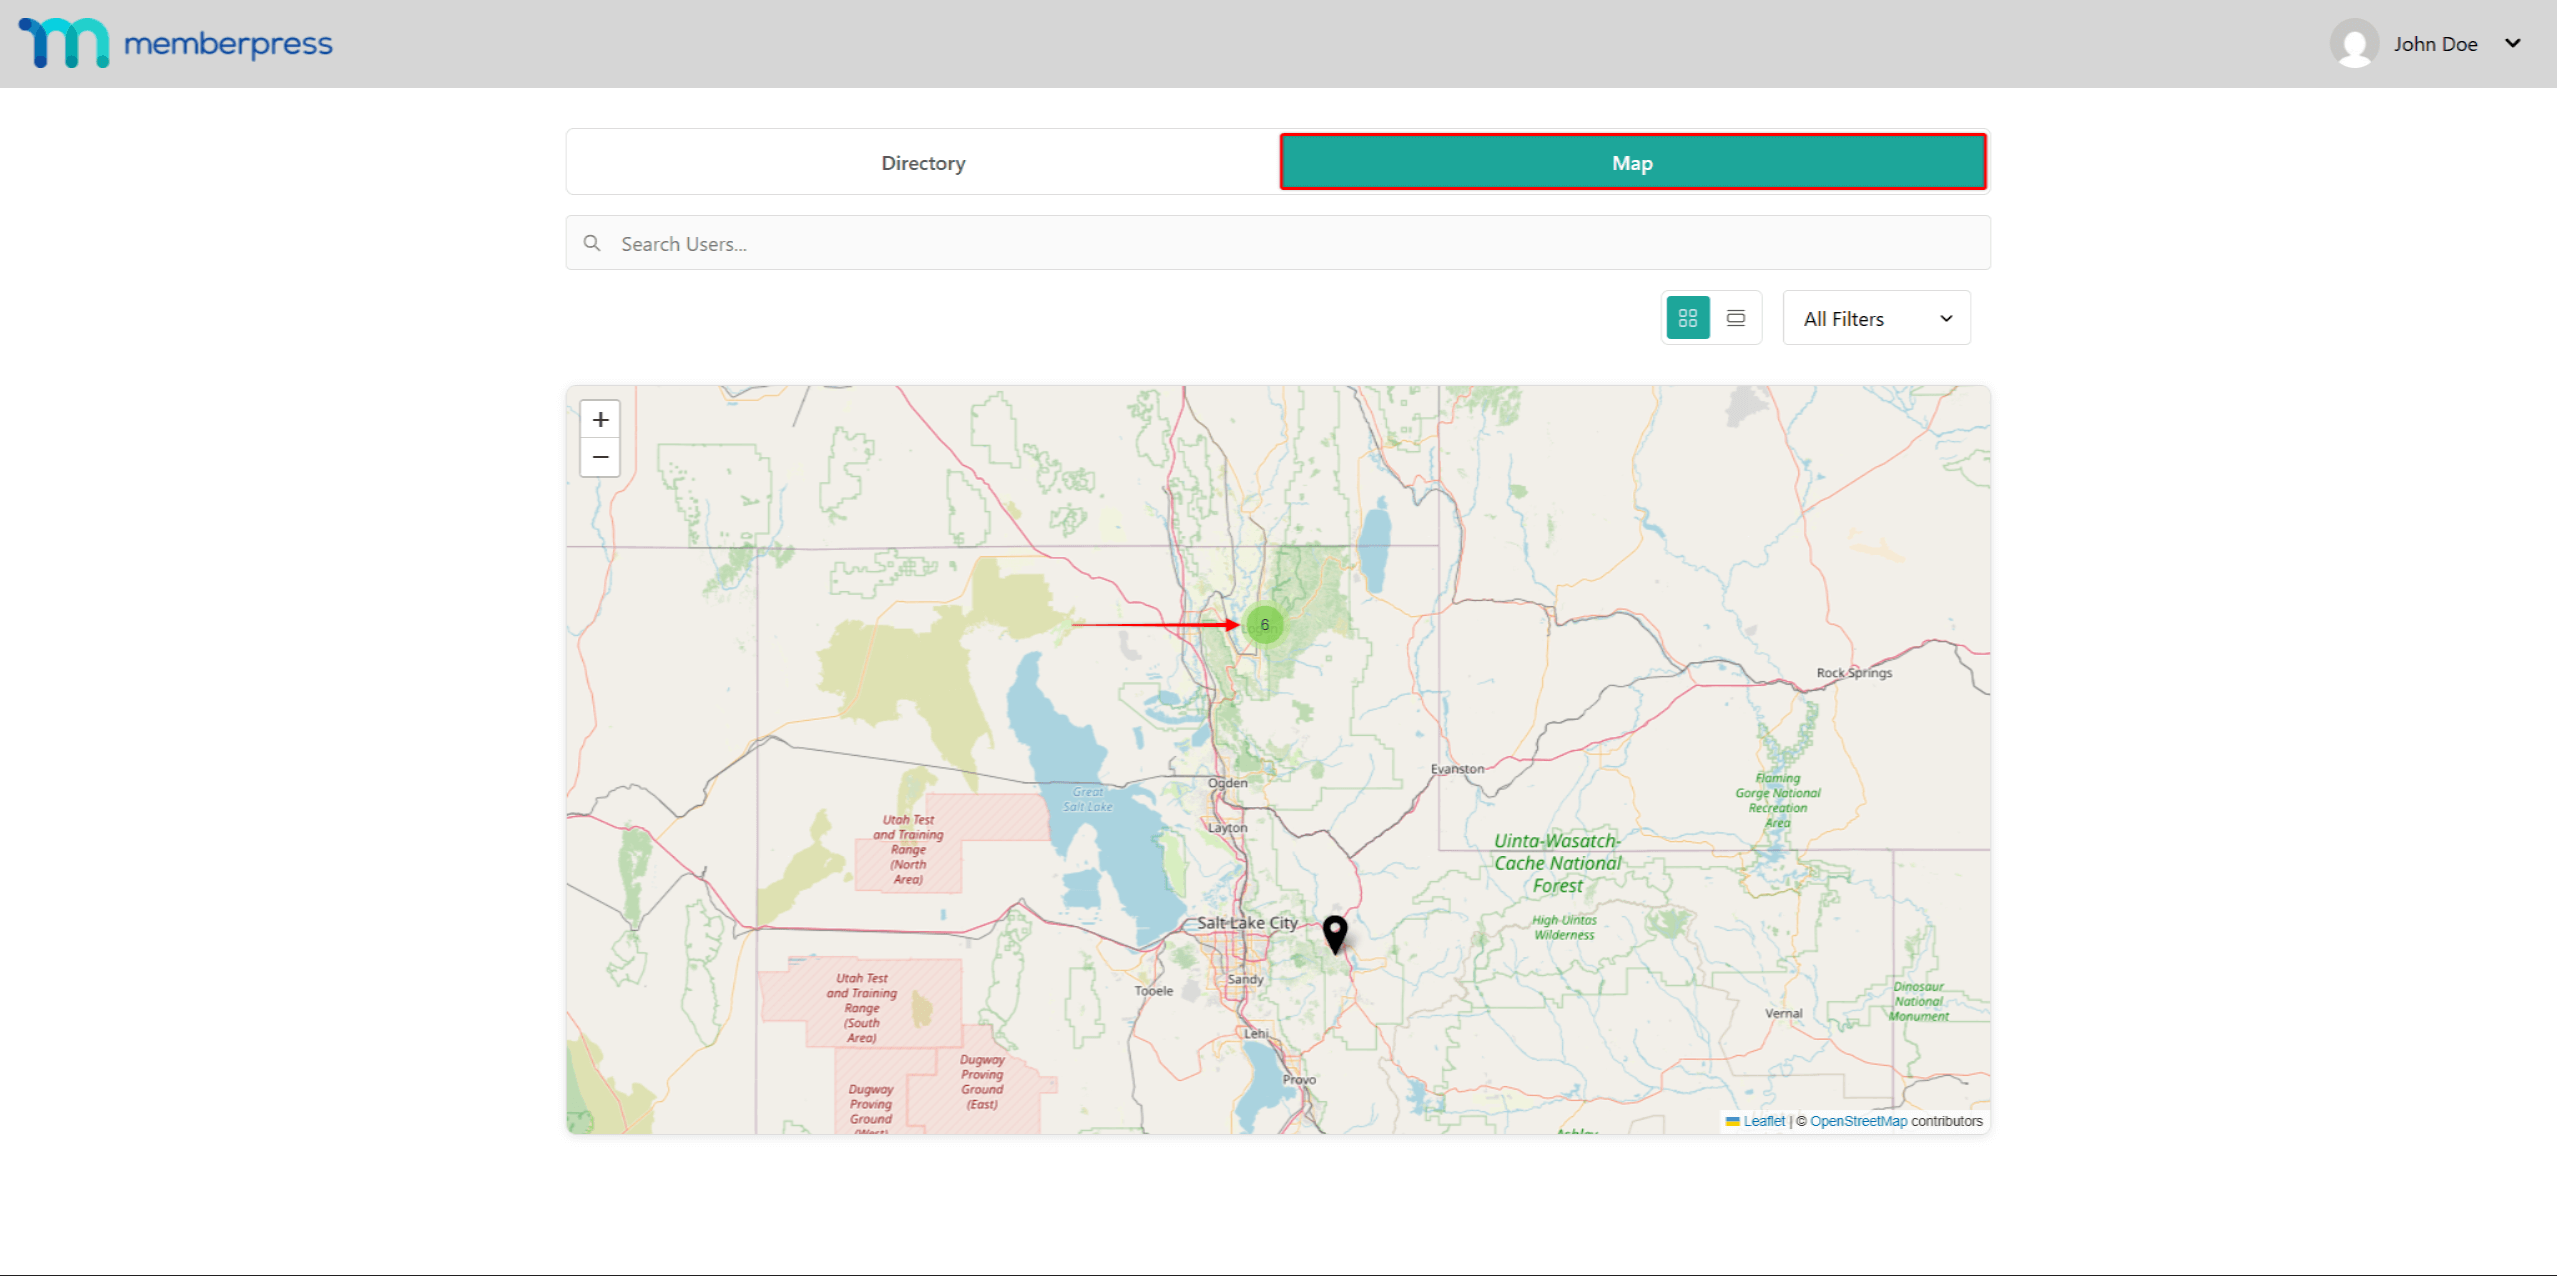
When the Enable Map View option is enabled for a directory, members can switch to Map View. The Directory Map View will show all directory members' locations based on their Exact Location settings in their profiles.
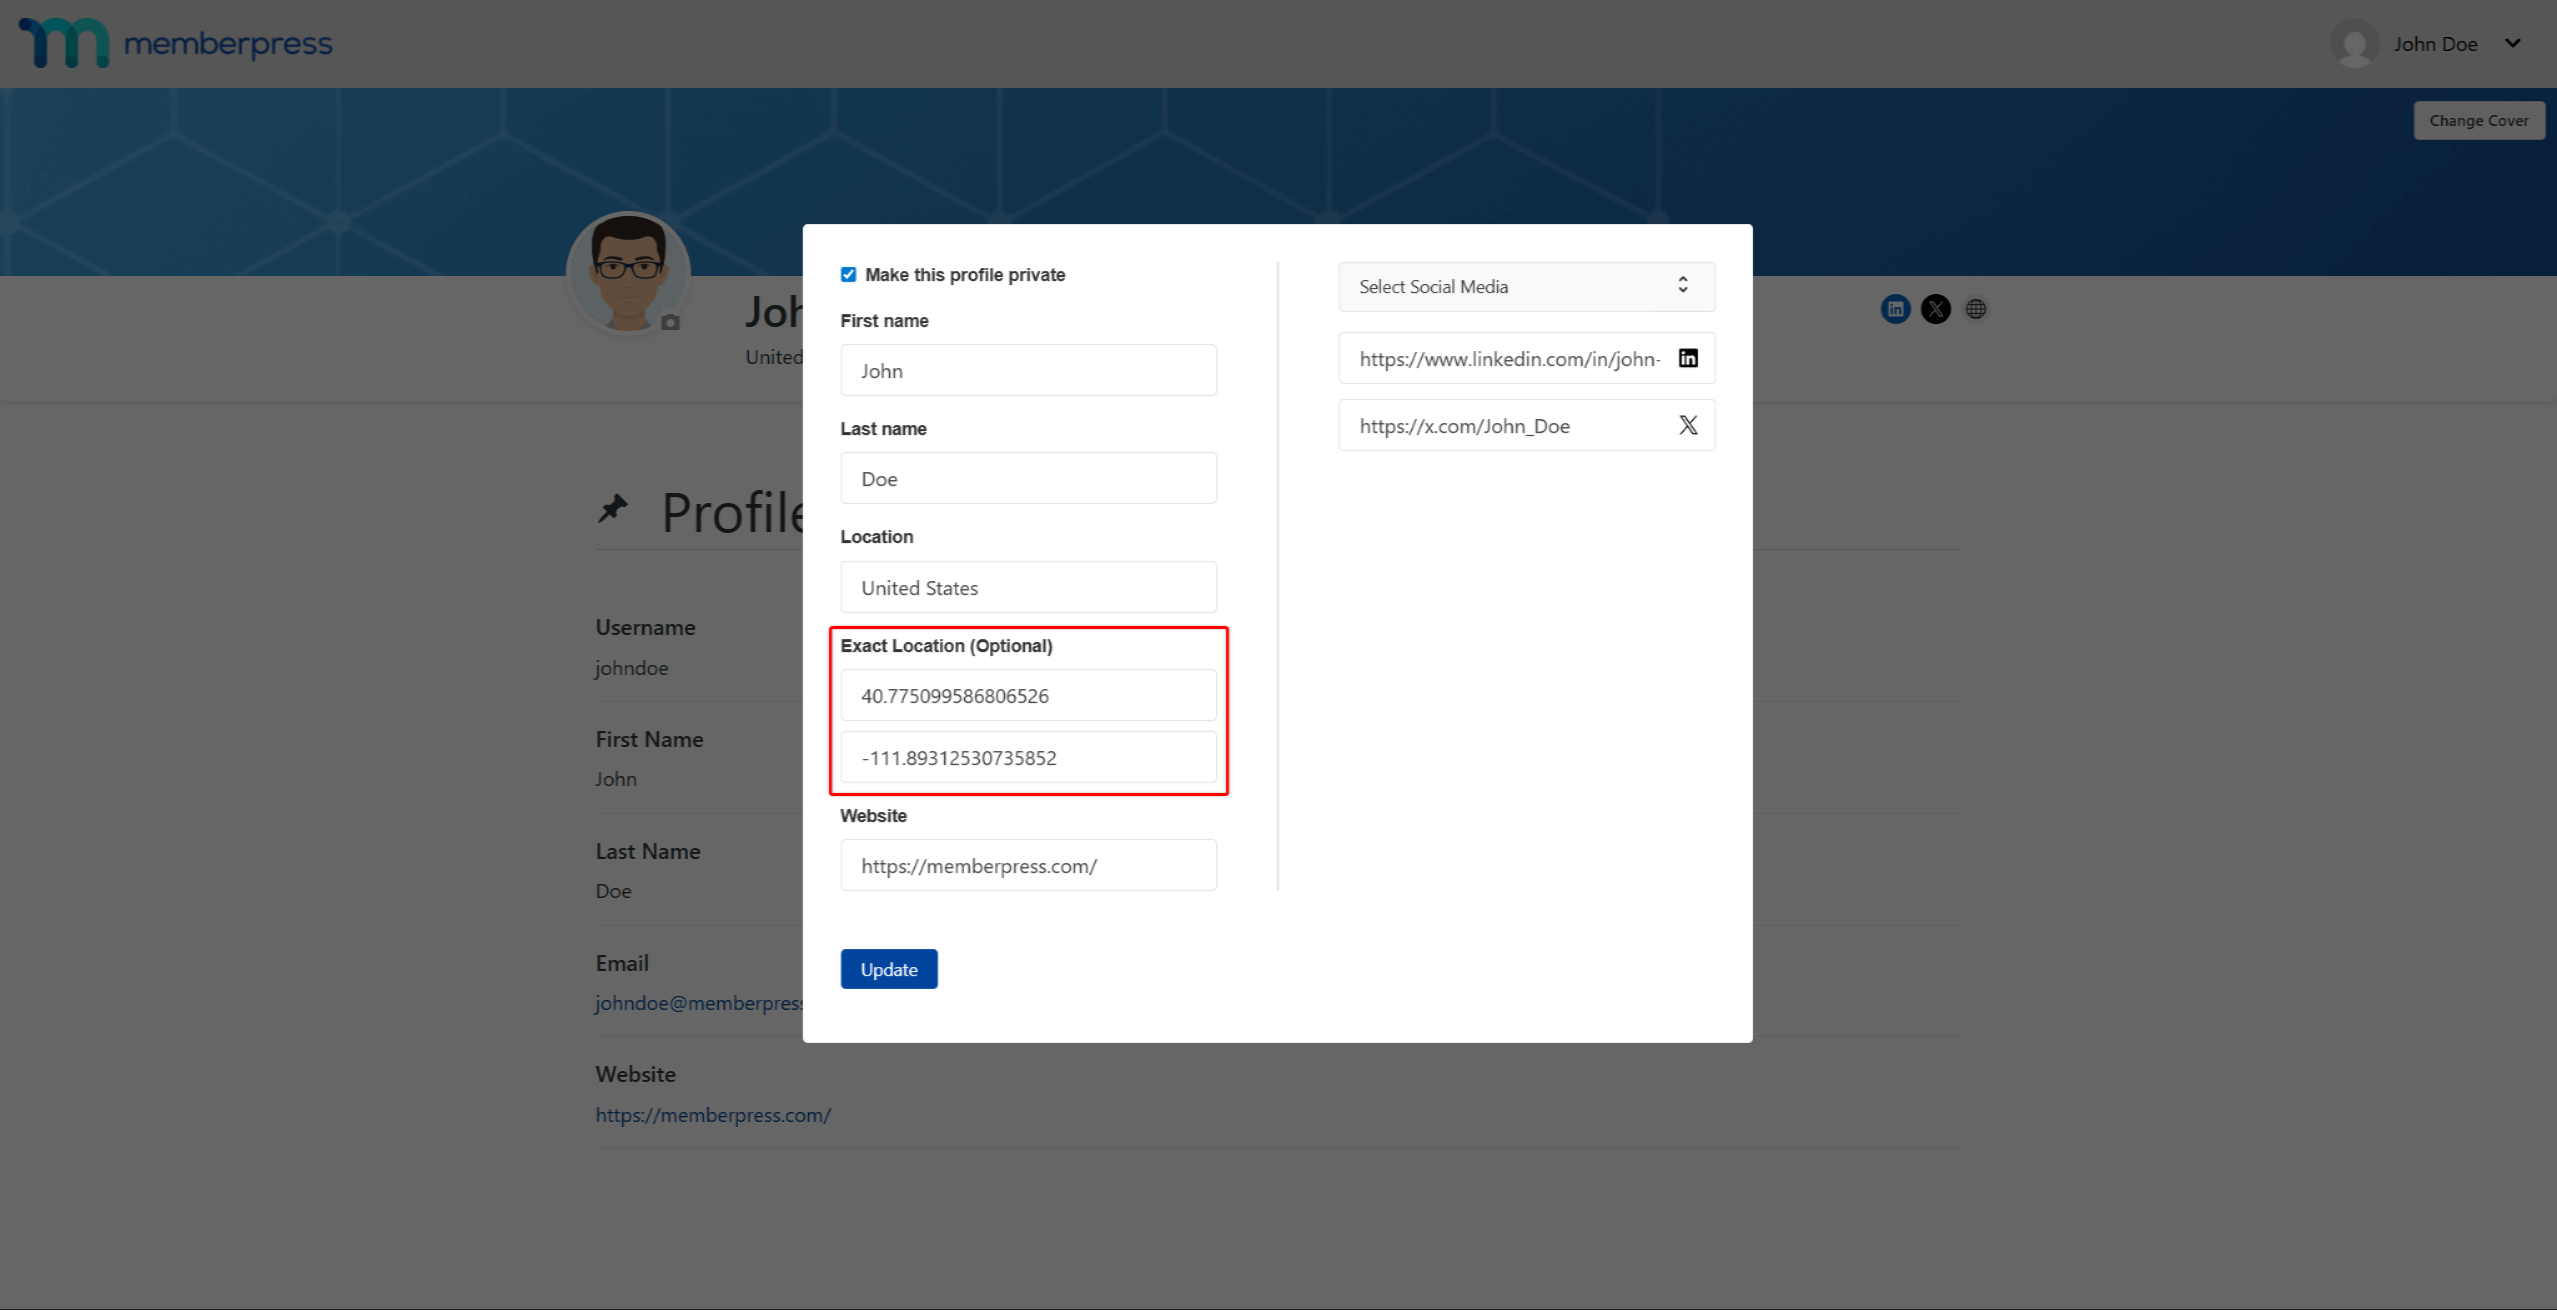
If Location Privacy is enabled in the directory settings, Exact Location will be displayed as approximate nearby locations.
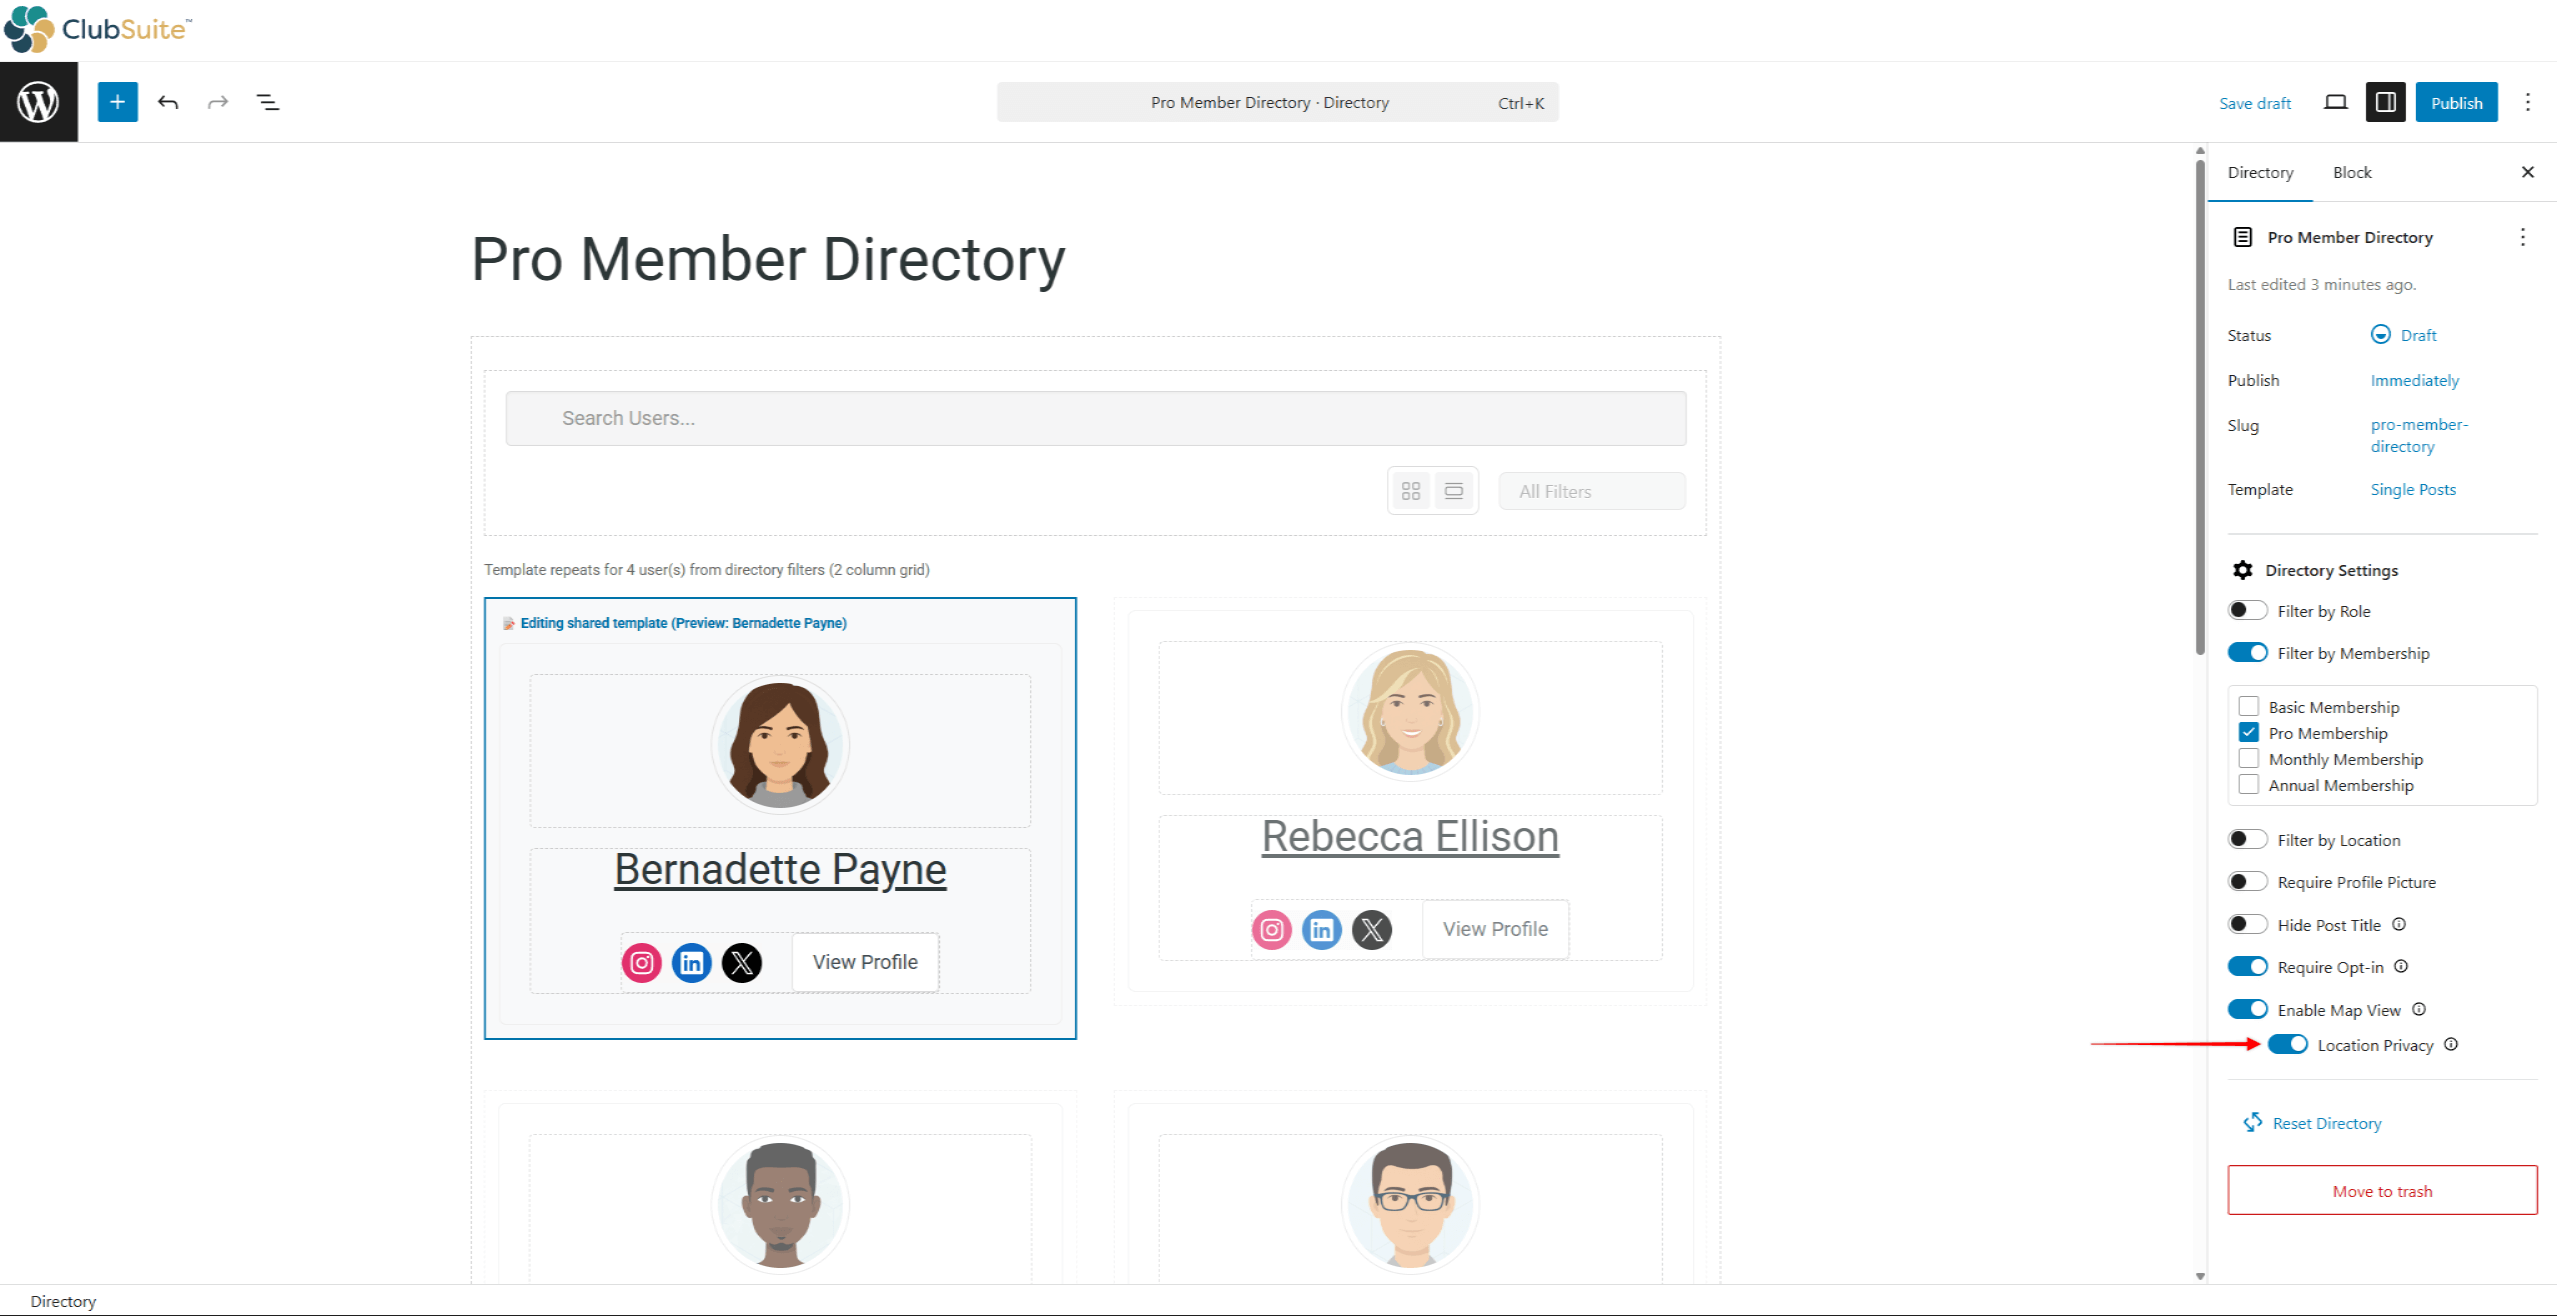
Furthermore, to protect their privacy in the Map View, members can set their approximate location instead of their exact coordinates.
Also, members can leave the Exact Location fields blank. In this case, their map location will be based on the city they set in their profiles.
Participating in Member Directories
Directories showcase community members and facilitate connections. Understanding directory participation helps members maximize networking opportunities while maintaining desired privacy levels.
Opting Into Directory Listings
When directories require explicit opt-in, members must actively choose participation:
- Navigate to Account > Directories.
- Browse the list of available directories to find the desired directory.
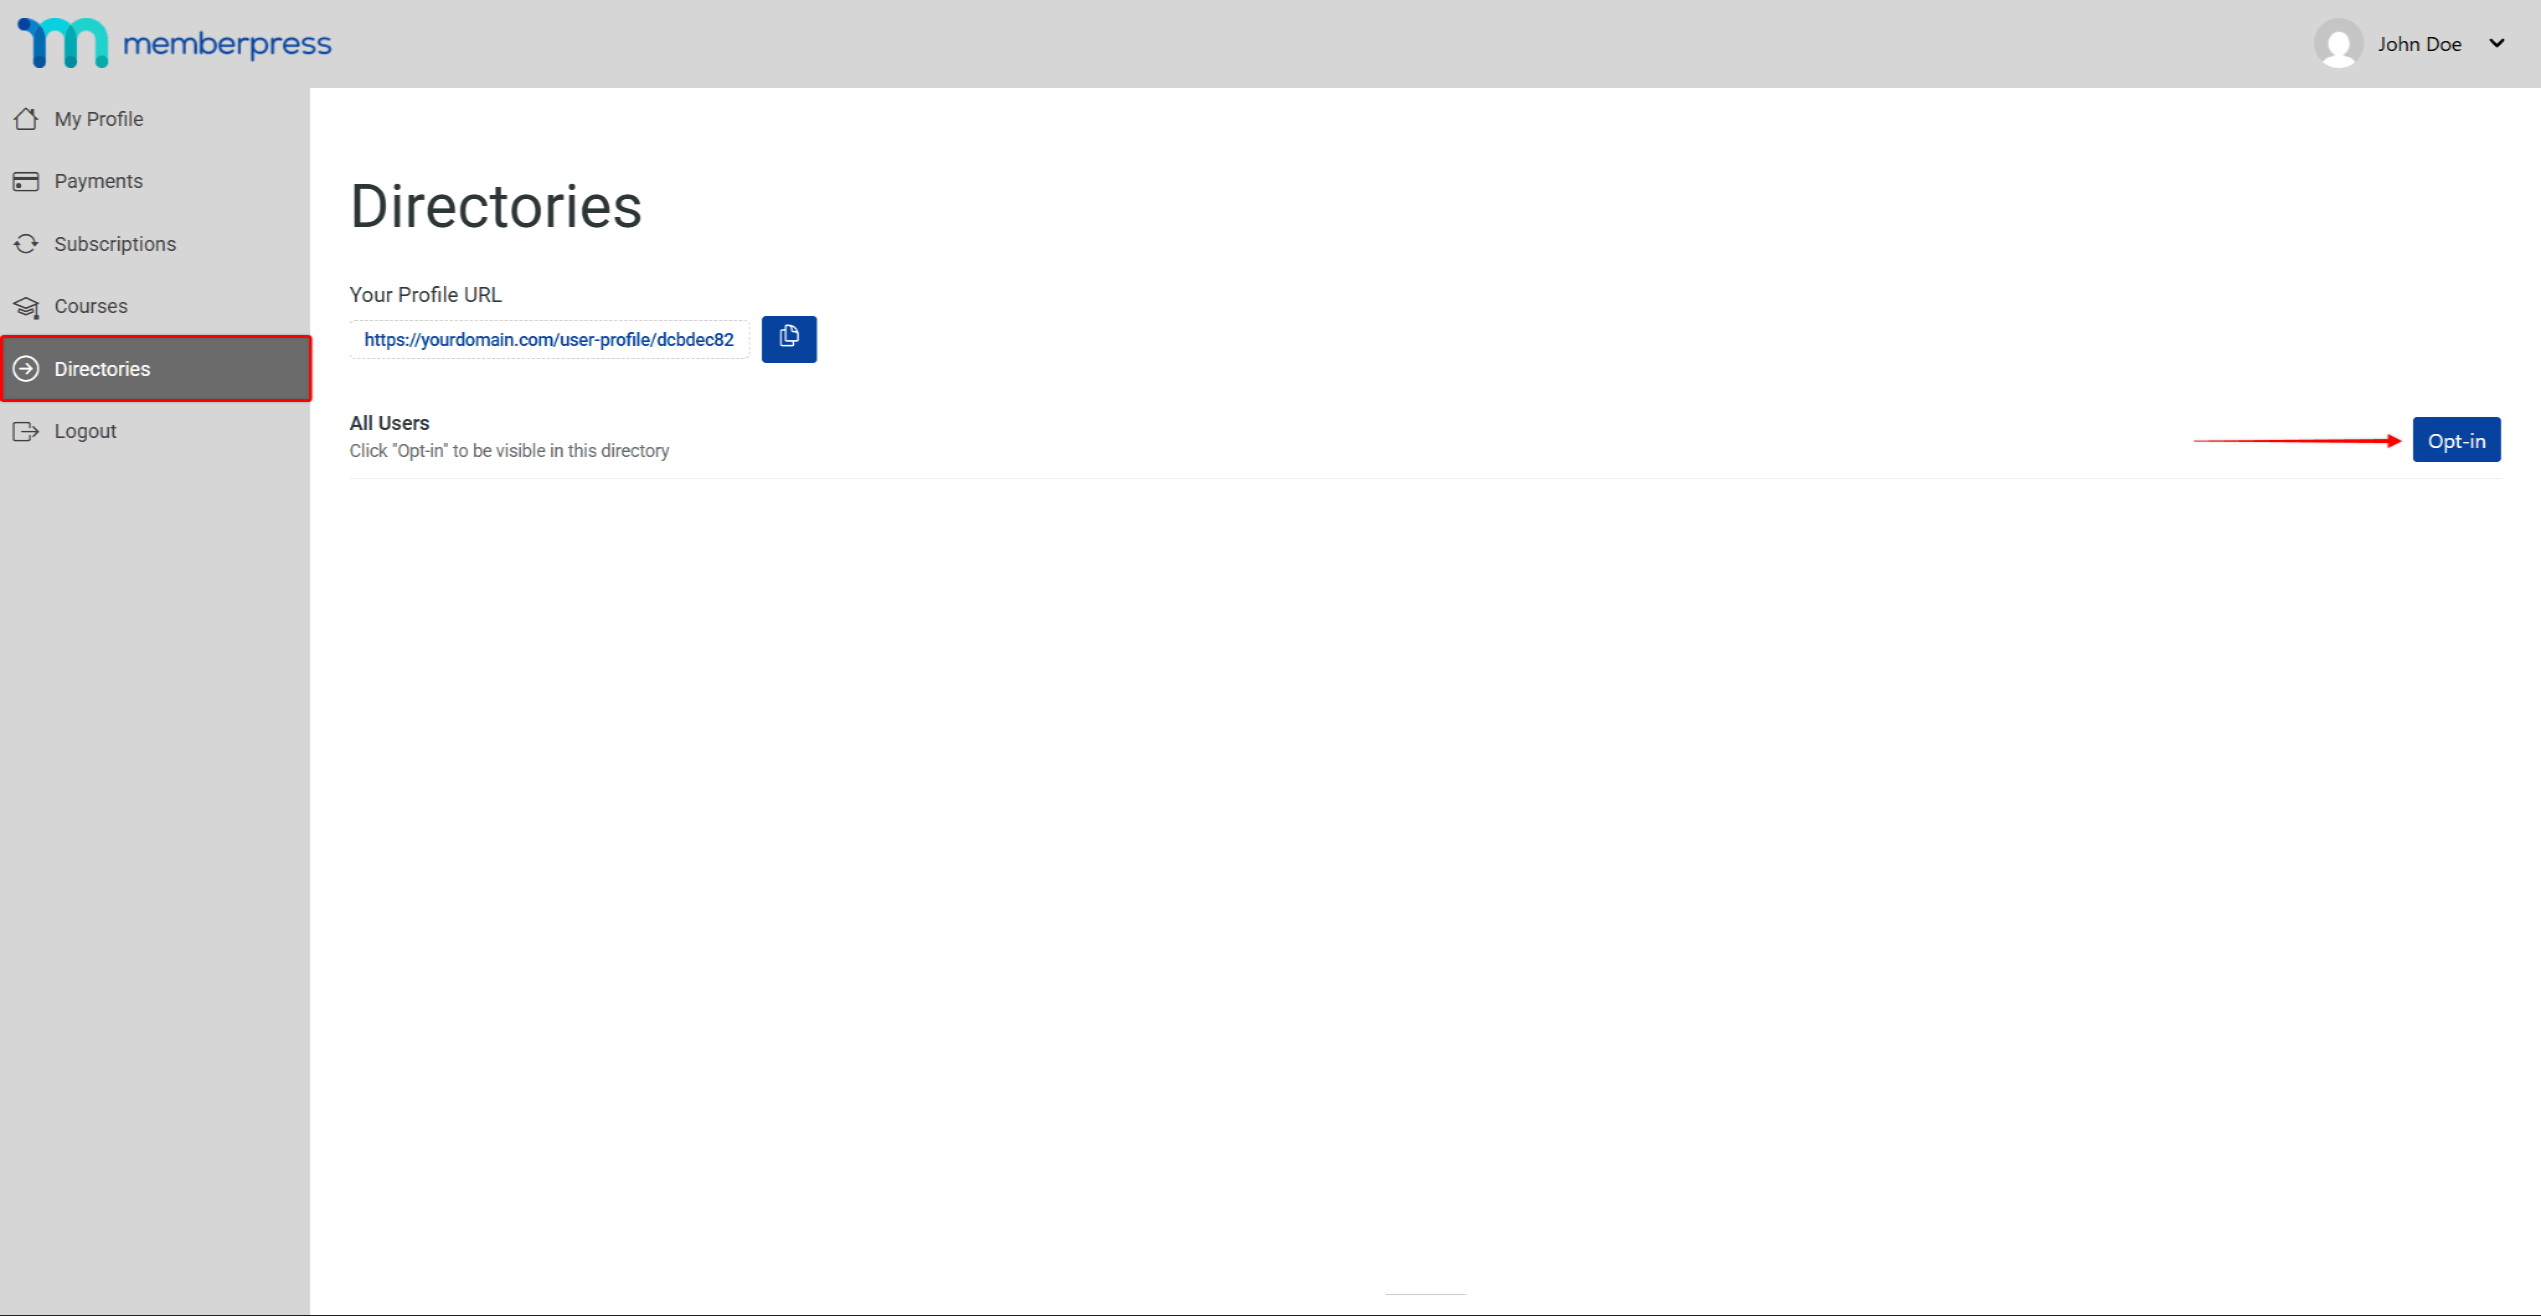
- Click the Opt-in button for that directory to join.
Some directories use automatic enrollment based on membership levels. Members might already be listed in directories matching their subscription tier. They can opt out if they prefer privacy over visibility.
Member Interaction Through Directory Listings
Directories facilitate member connections through various interaction methods:
Viewing Member Profiles:
- Click on any member card to access their full profile.
- View shared information based on privacy settings.
- See mutual connections or shared memberships.
- Access their social media links if provided.
Initiating Contact:
- Connect through the listed social media platforms.
- Note their listed interests for conversation starters.
- Save favorite profiles for future reference if bookmarking is available.


