If you're looking to grow your accounting business or start an online accounting business, a membership site is a great option. Given the increasing popularity of online personal finance services, it's understandable that you’d want to find innovative ways to attract new clients and increase your revenue.
Starting a membership site for your accounting services can enable you to earn additional income. For instance, you could set up an annual subscription to your digital products and services. Offering subscriptions is also an effective way of retaining customers and therefore keeping them away from your competitors.
In this post, we’ll outline the benefits of having a membership site for your online accounting business. We’ll also show you how to start an online accounting business using the MemberPress plugin. Let’s jump right in!
The Benefits of Having a Membership Site for Your Accounting Business
Whether you’re starting a new company or looking to grow your existing one, there are several benefits to having a membership site for your accounting business. For instance:
- You can increase your profits by charging users for access to your accounting services, such as self-assessment and bookkeeping software.
- You can nurture a community of clients by publishing content that helps them with their personal finance needs, such as how-to guides and videos.
- You can retain clients with a members dashboard where they can easily access their digital records, such as recent audits and tax files.
A professional membership site can help you gain consumer trust, resulting in a steady flow of subscribers and a passive income stream. If you think your accounting business can benefit from a membership site, you’ll be pleased to know that setting one up doesn’t require a lot of effort.
How to Start a Membership Site for Accounting Services (In 4 Steps)
Starting a membership site with the MemberPress plugin is a quick and simple process. It also offers several features to help you grow your business and manage your subscribers, including course creation, content dripping, and a self-serve dashboard for users.
Note that in order to create a membership platform with MemberPress, you first need to have your own WordPress site. If you don’t yet have one, you can learn how to build one in this step-by-step guide.
Step 1: Install the MemberPress Plugin on Your Website
The first step is to sign up for an account with MemberPress. There are three paid plans available, so choose the one that best suits your needs and budget.
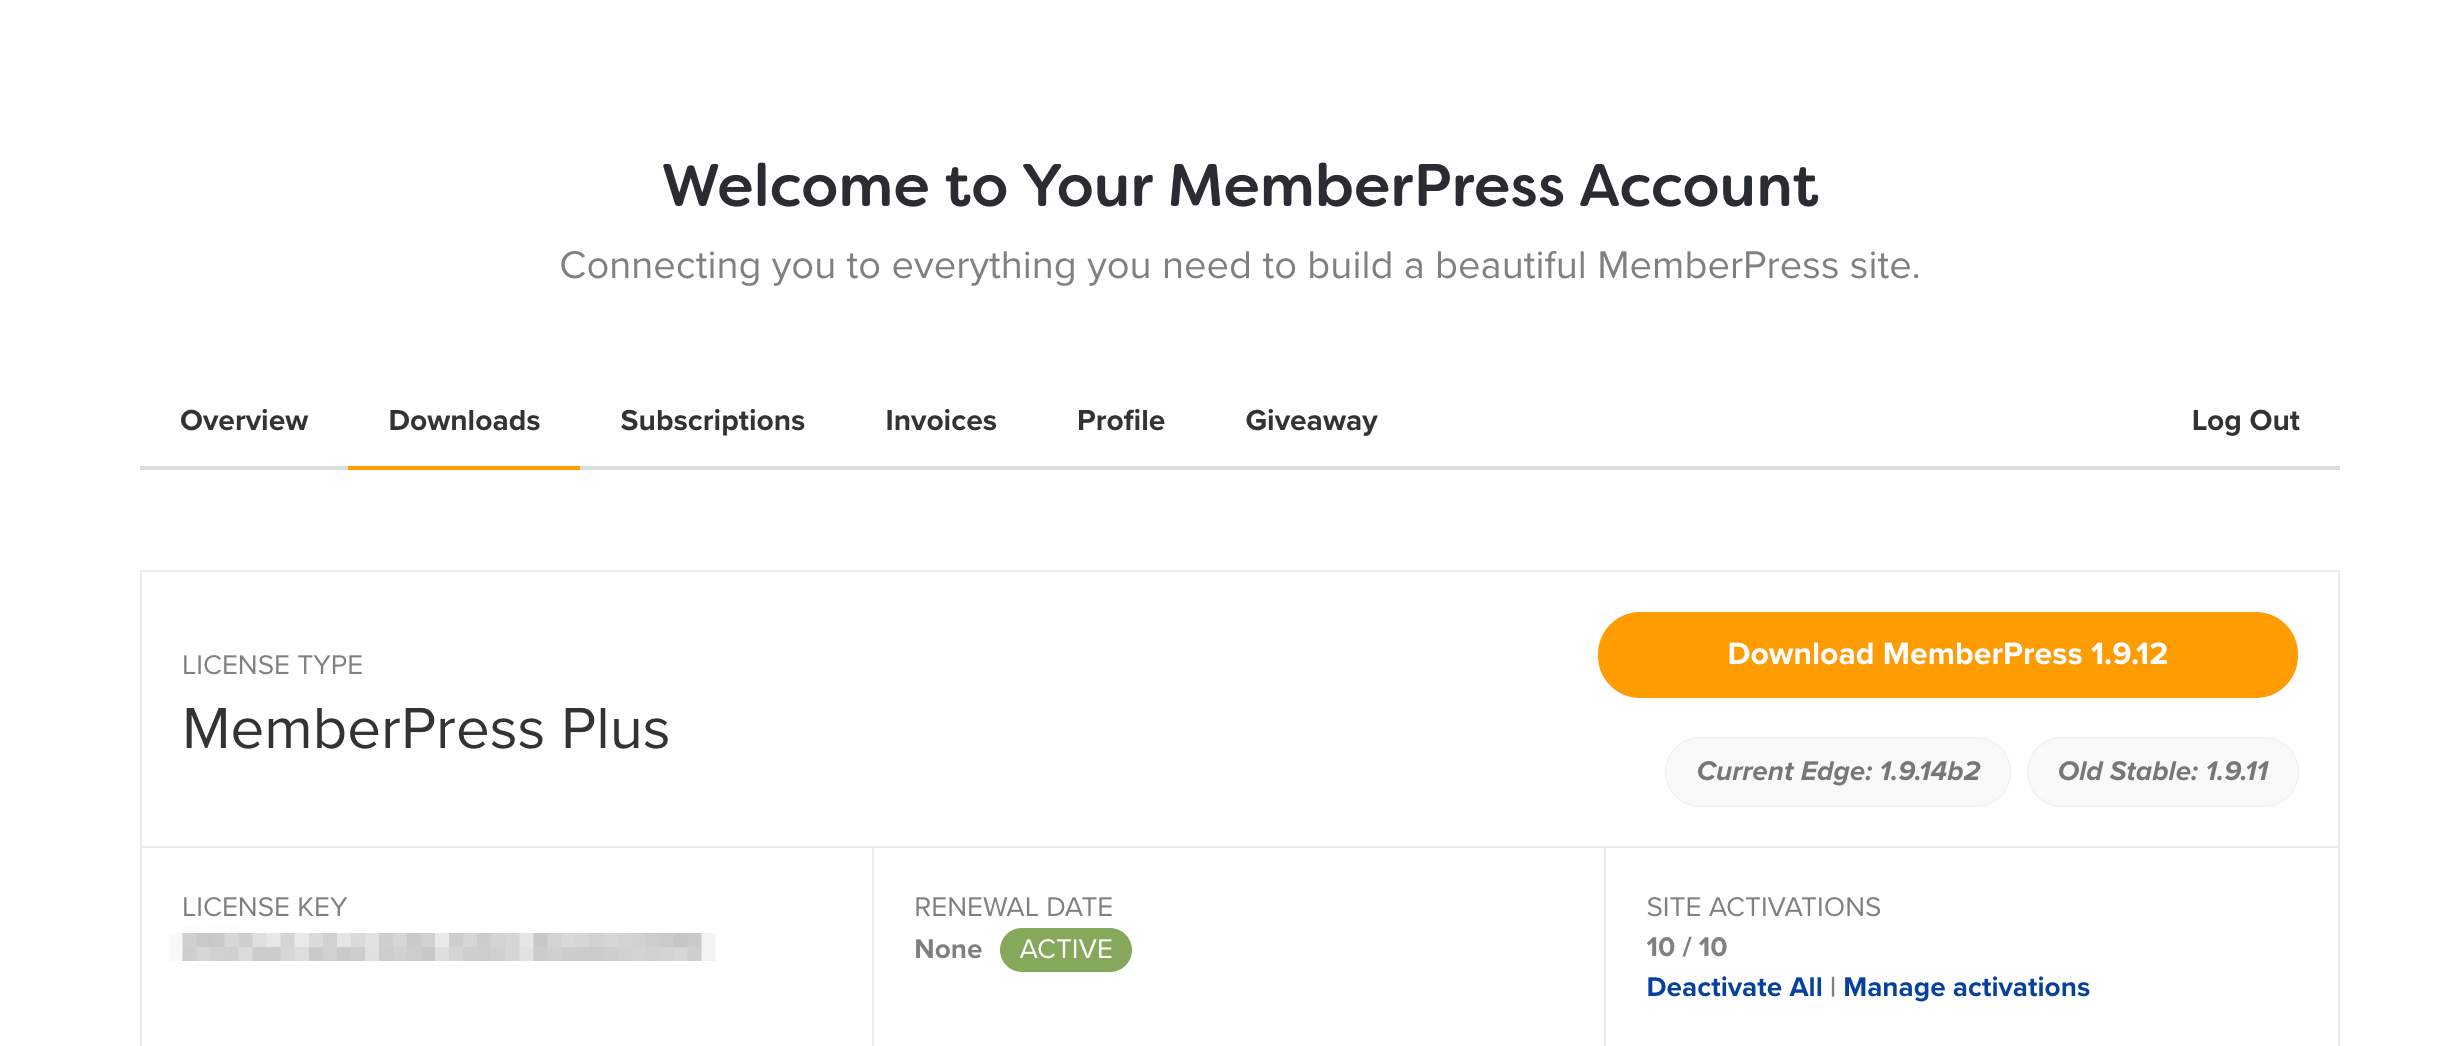
After purchasing a plan, head to the Downloads section of your MemberPress account and click on Download MemberPress to get the plugin's .zip file:
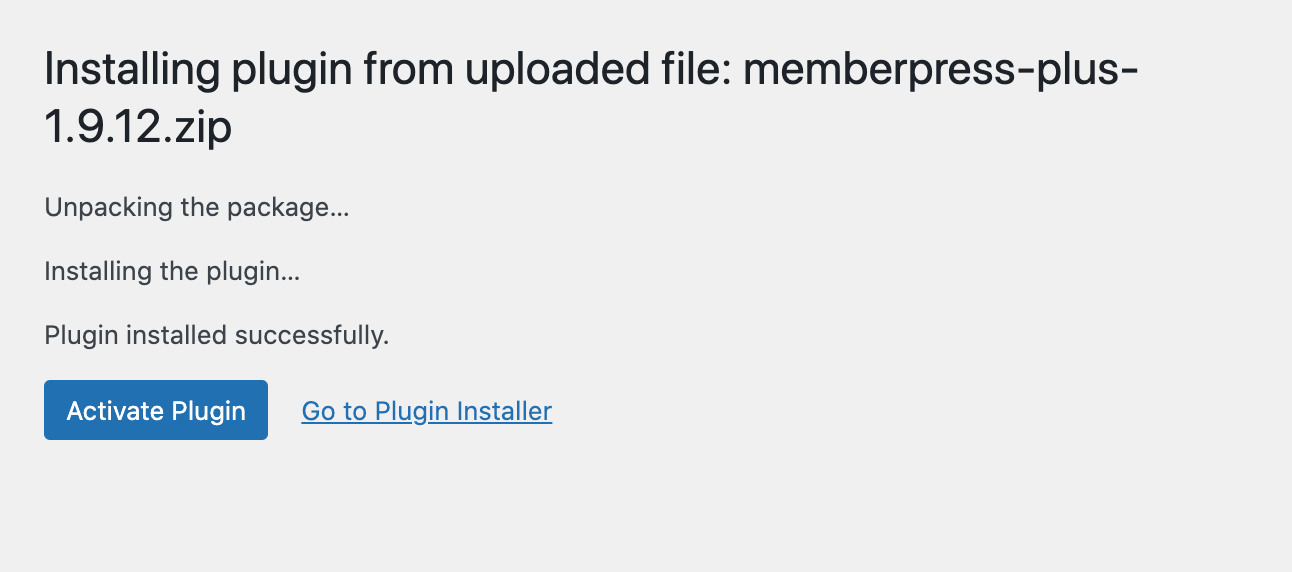
Next, log in to the WordPress dashboard of your site and go to Plugins > Add New > Upload. Select the MemberPress plugin .zip file you’ve just downloaded and click on Install Now. Give it a few seconds to install, then click on Activate Plugin:
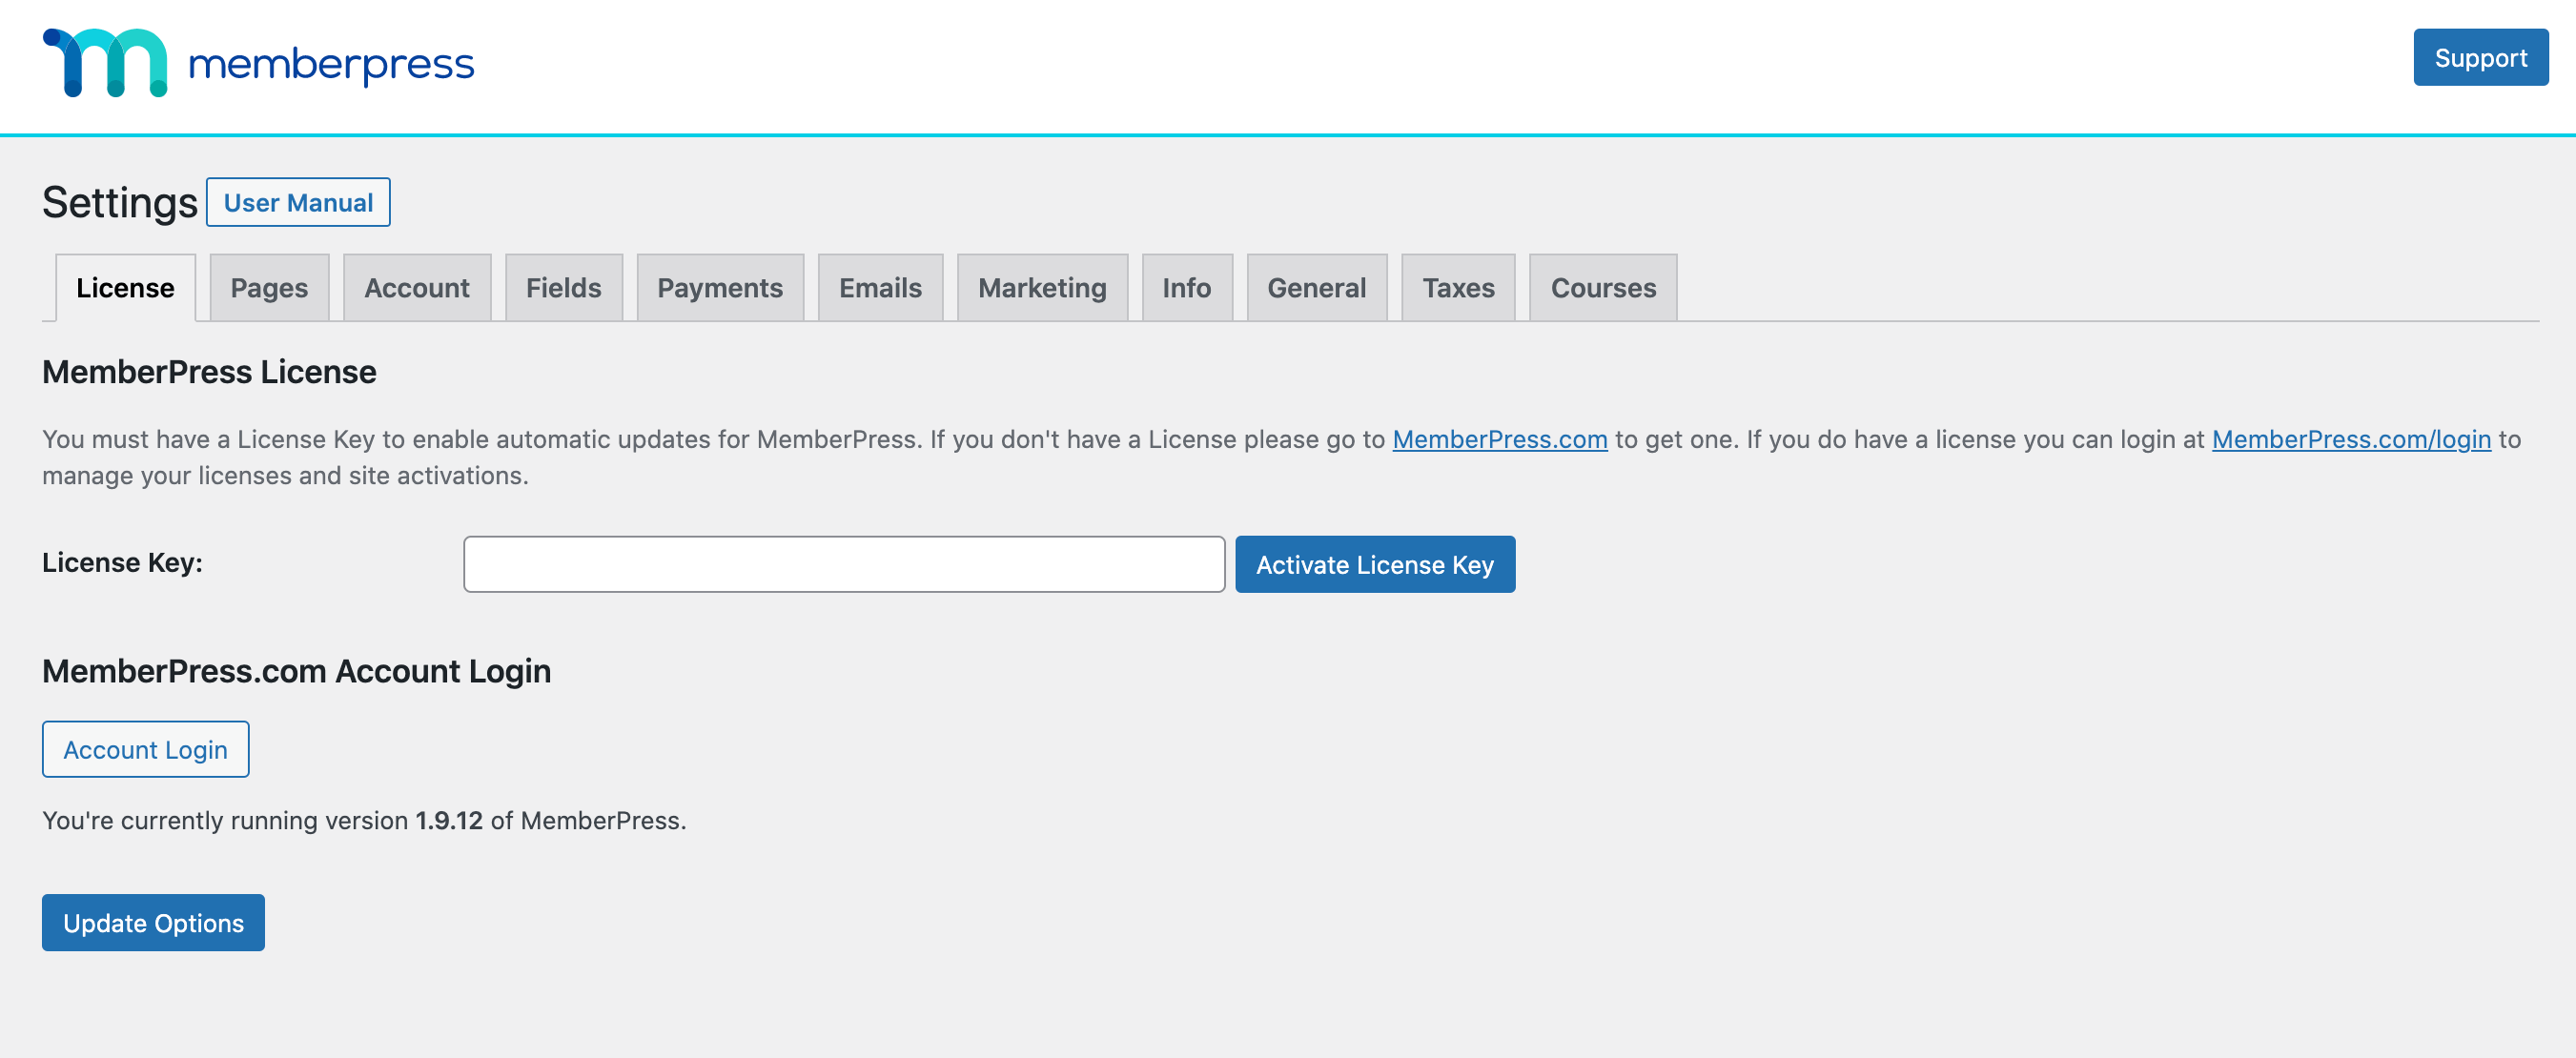
Once you’ve activated the plugin, you should be able to see a new item in your site’s dashboard menu called MemberPress. Click on it, then go to Settings and enter your activation key, which you can copy from your MemberPress account page:
Finally, click on Activate License Key. Your MemberPress plugin is now fully activated and ready to use.
Step 2: Create a Membership for Your Website
Next, you need to create your first membership. Navigate to MemberPress in your site’s dashboard, then go to Memberships and click on Add New.
Start by choosing a title. If you’re planning to create multiple memberships, the first one could be your ‘Basic’ plan.
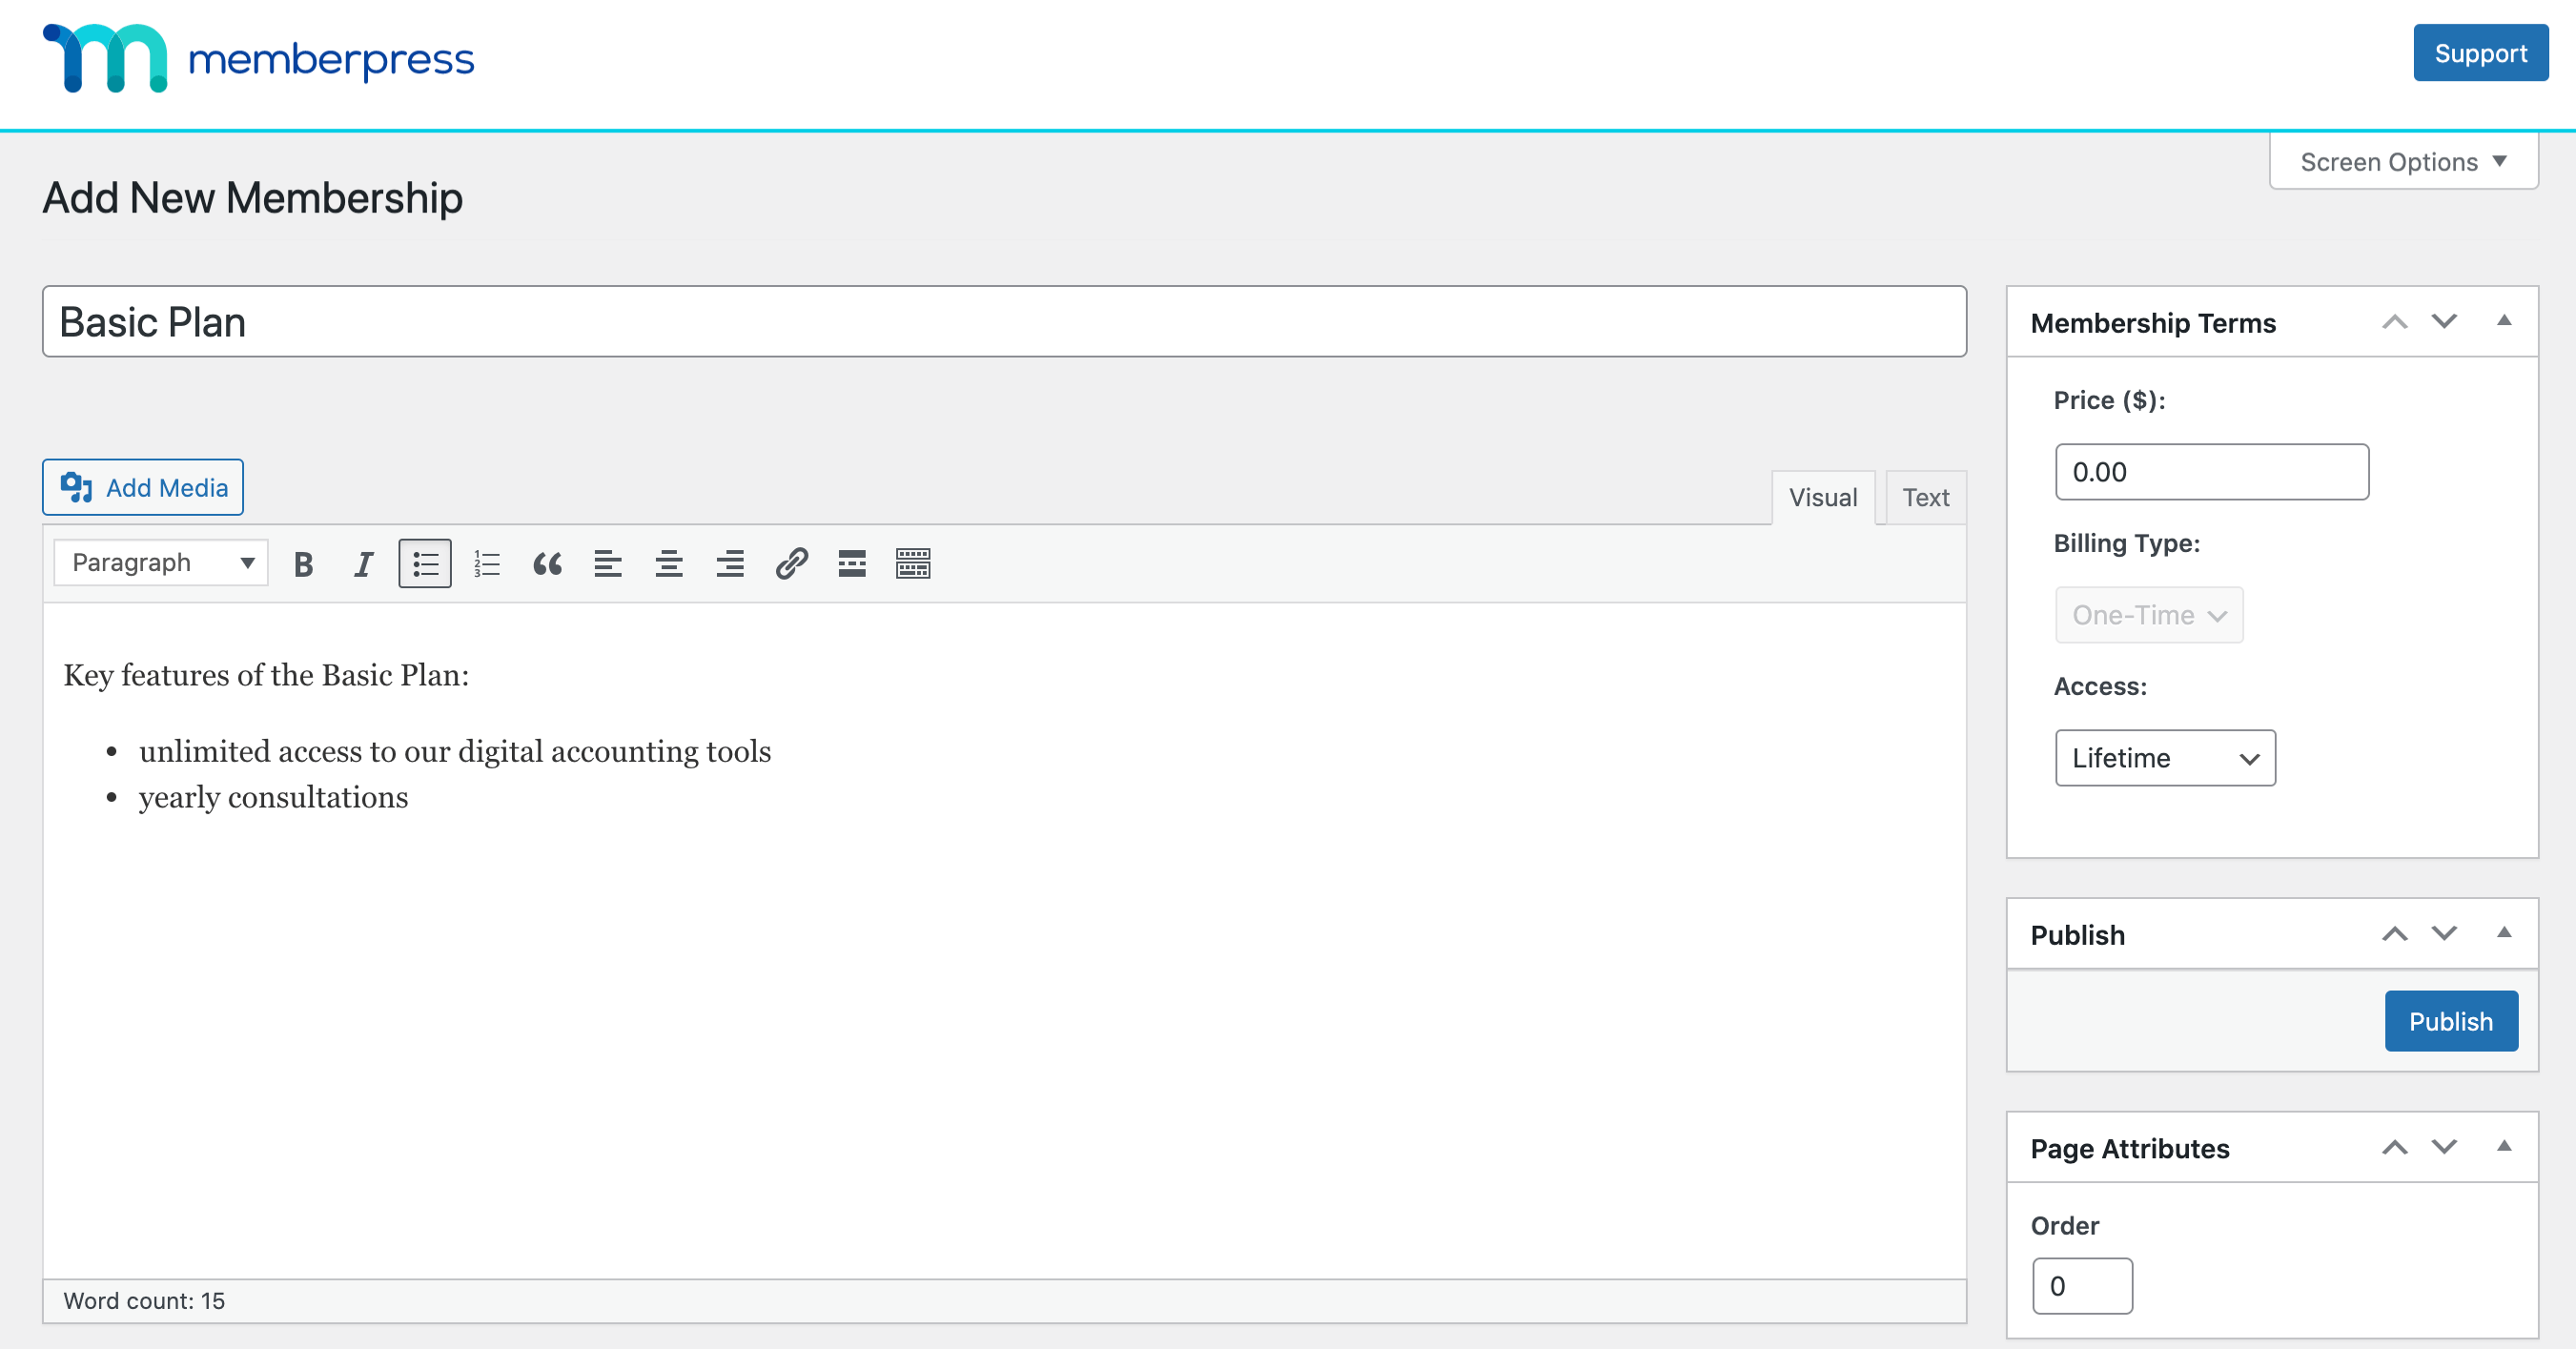
In the text field, add some information about your membership plan. Remember that this page will be visible to your site visitors, so you might want to highlight the main features and benefits of your products or services to attract new customers:
Then, go to Membership Terms on the right-hand side of the screen and set your plan's price. The Billing Type option lets you choose between one-time payments or recurring subscriptions.
If you select one-time payment, you can give members lifetime access or set an expiration date for their membership. Meanwhile, if you set the billing type to Recurring, you can specify an interval for subscription renewals (e.g., weekly or monthly). You can also establish a trial period.
Once you're happy with your plan's terms, click on Publish to make it available to clients.
Step 3: Set Up Access Rules for Your Membership Content
You'll also need to create access rules to define who can access what content on your accounting membership site. To do this, go to MemberPress > Rules and click on Add New.
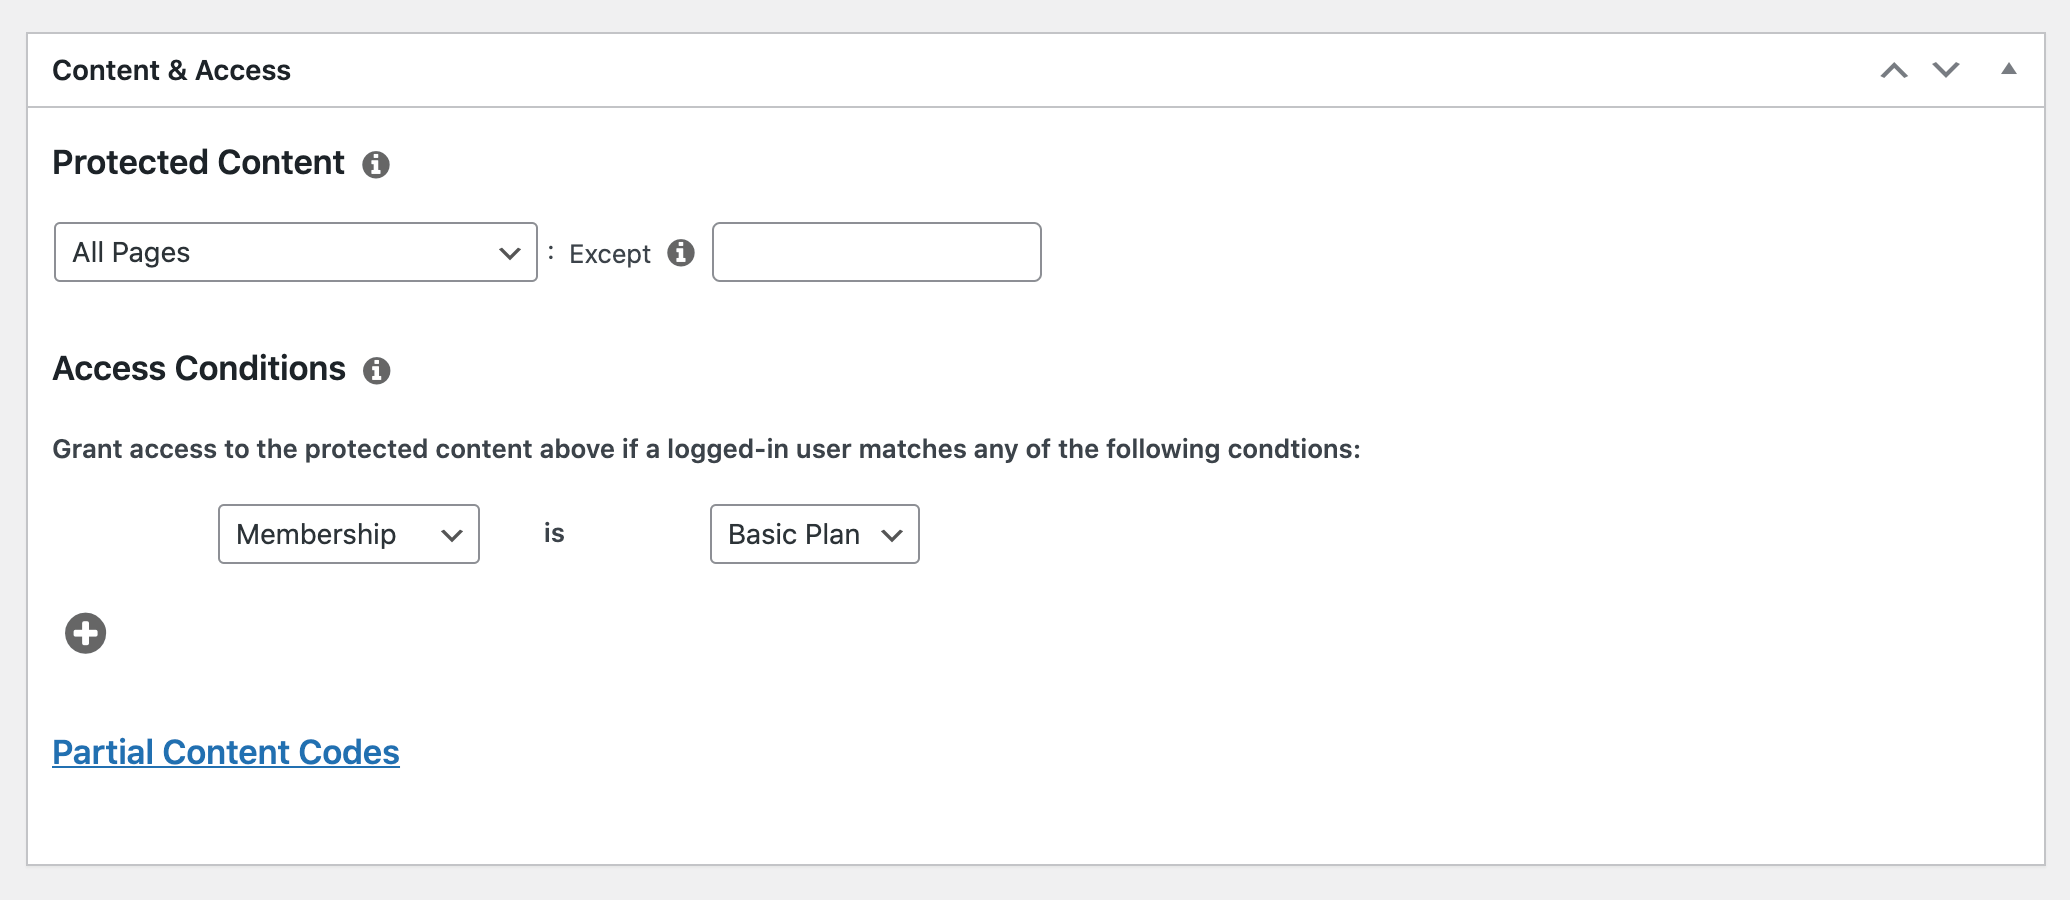
Use the dropdown menu under Protected Content to select the pages and posts that you want to hide from non-members. Then move to Access Conditions and choose who can view your protected content.
To make this content available to your members, select Membership and choose the name of the membership plan (if you have more than one) that should grant users permission to view the specified content:
The Drip/Expiration section gives you the option to choose when your protected content becomes available to your subscribers, and when it expires. For instance, you can choose to drip your content three days after a member registers and make it expire one month after they register:
When you’re done, navigate to the Publish box on the right and click on Save Rule.
Step 4: Add a Members Login Page
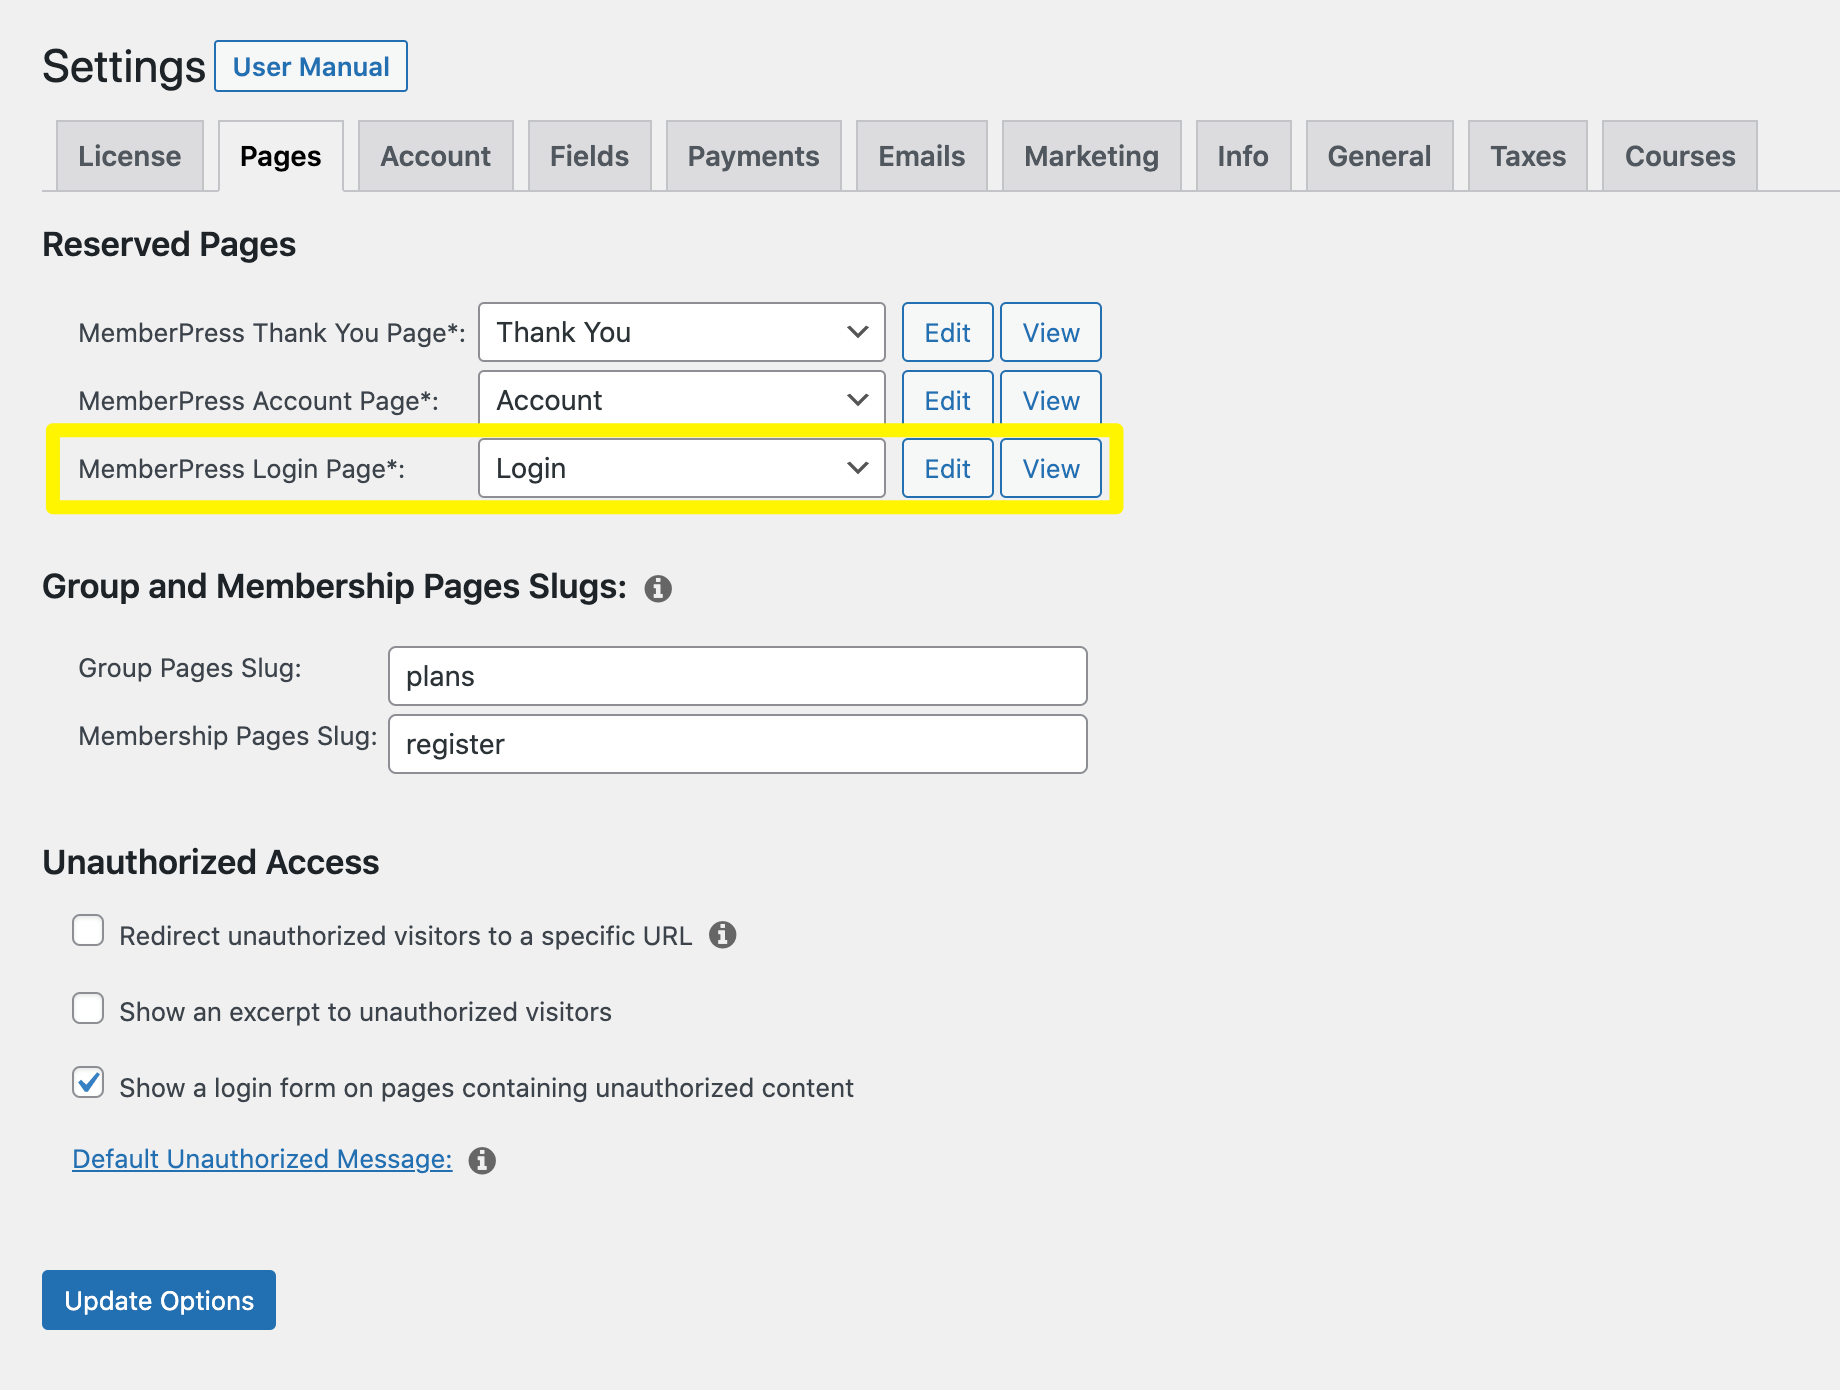
The final step is to add a login page for your members. Go to MemberPress > Settings > Pages. Find MemberPress Login Page and from the dropdown menu choose Auto Create New Page. Alternatively, you can select an existing page on your website as the login page:
To save your changes, click on Update Options at the bottom of the page. Your subscribers can now log into their accounts through your website.
Conclusion
If you want your accounting business to have a steady revenue stream and a loyal customer base, setting up a membership site is an excellent idea. You can retain clients by offering members-only services, such as digital accounting tools and products, and giving them access to their records.
The MemberPress plugin makes it super easy to create a dedicated membership site in just four steps:
- Install MemberPress on your website.
- Create your first membership.
- Set up access rules for your membership content.
- Add a login page.
Do you have any questions about setting up an accounting membership site? Let us know in the comments section below!
If you liked this article, be sure to follow us on Facebook, Twitter, Instagram, and LinkedIn! And don't forget to subscribe in the box below.





Add a Comment