Students enroll in MemberPress courses by simply accessing a course and starting learning. Thus, with MemberPress, enrolling students can be as simple as merely providing access to a specific course. On the other hand, your protected courses will require users to register before enrolling.
This comprehensive guide will walk you through the entire process of enrolling students in your courses. It also provides detailed instructions on managing your courses and students effectively.
Enrolling Students To MemberPress Courses
MemberPress allows you to create multiple methods and flows for enrolling students in your courses.
When created, your MemberPress courses will be publicly available to any (logged-in) user or (logged-out) visitor. Thus, creating courses on your site is enough if you plan to deliver only publicly available courses.
Further, you can charge users for your courses or allow them to register for free before enrolling. MemberPress controls access to courses through memberships and membership-based rules protecting content. Accordingly, to limit access to registered members (free or paid), you need to protect your courses with MemberPress rules.
Enrolling Students Via Direct URL Or Course Listing Page
Once you create and publish your MemberPress courses, your users can start enrolling. When creating courses, enabling the Include in Course Listing option will make the course visible on the Course Listing page.
![MemberPress Course Listing Page](https://memberpress.com/wp-content/uploads/2024/05/mpcs-1-3-course-listing-page.png)
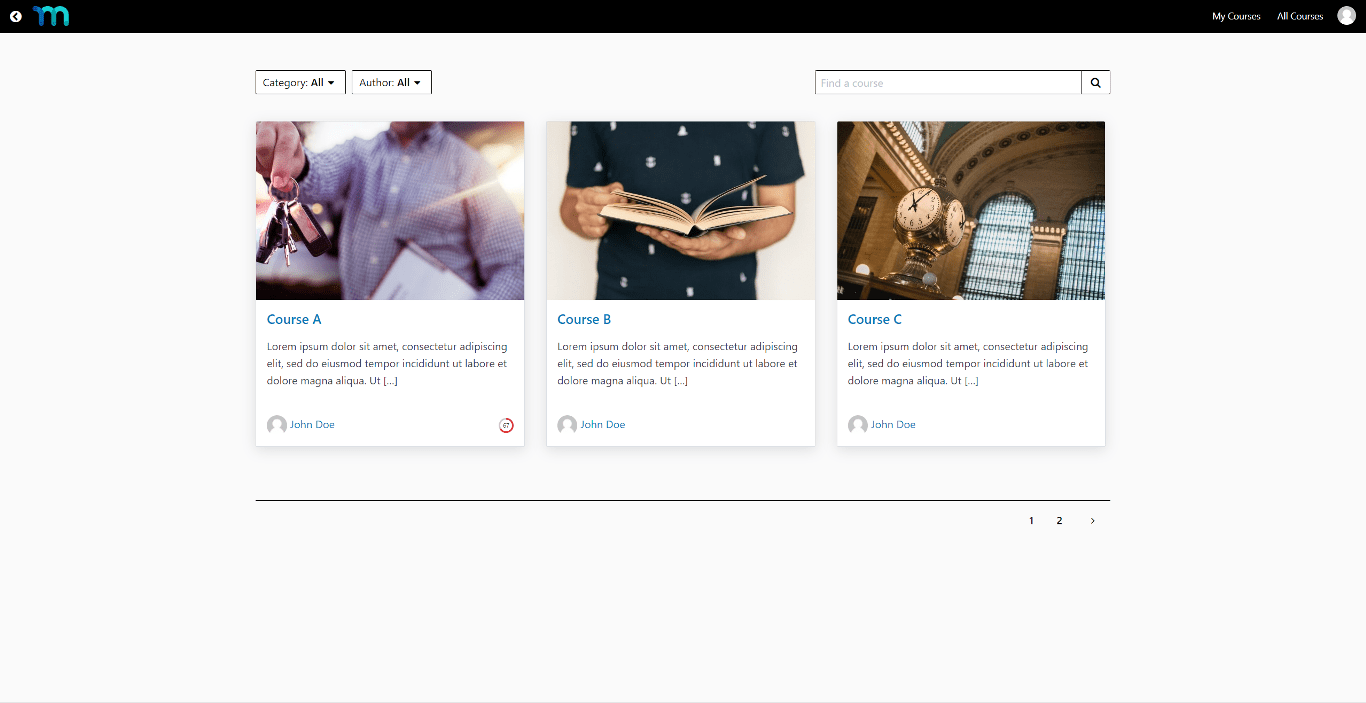
The Courses Listing page is where your members can find all public courses on your site. For most sites, this will be https://yoursite.com/courses/. Users can click on the course of their choice on this page to enroll.
Alternatively, users can enroll in the course by directly visiting the course URL. This would be the case if you shared the course URL as a link (e.g. within a promotional email). Further, if a course is not listed, sharing a direct URL would be the only way for users to enroll.
In addition, when logged in, students can visit the My Courses page to access courses. Here, based on the memberships they are subscribed to, students will find all the courses available to them. The My Courses menu item will be added to your courses menu by default.
Requiring Registration To Enroll
Users must register for the required membership and log in to enroll in protected courses. Once they log in as active members, they can access all courses available for the membership they registered for.
Therefore, you should set a rule for every course requiring membership registration (free or paid). When setting up rules, set the Access Conditions to allow access only to users with active subscriptions to specific memberships.
As an example, to protect “Course A” and request users to register for “Membership A” to enroll, the rule would look something like this:
![mpcs-enroll-protecting-courses | MemberPress Enrolling Students to MemberPress Courses](https://memberpress.com/wp-content/uploads/2024/06/mpcs-enroll-protecting-courses.png)
Further, you could enable a default or custom message and a login form for this rule.
![mpcs-protecting-courses-custom-message | MemberPress Unauthorized Access Message
For Protected MemberPress Courses](https://memberpress.com/wp-content/uploads/2024/06/mpcs-protecting-courses-custom-message.png)
You can add any course-related information to your custom message by adding course shortcodes.
![mpcs-protecting-courses-unauthorized | MemberPress Protected MemberPress Course](https://memberpress.com/wp-content/uploads/2024/06/mpcs-protecting-courses-unauthorized.png)
This way, you can redirect users to register for the required membership or have them log in immediately.
Sales Page Redirection
Alternatively, you could redirect users to the membership registration page by adding the page URL to the Sales Page field. This field is available under the Settings tab while editing the course. Thus, based on the previous example, the steps to add the redirection would be:
- Navigate to Dashboard > MP Courses > Courses and find the Course A.
- Edit the course, and click on the Settings tab.
![mpcs-course-sales-page | MemberPress MemberPress Course Sales Page](https://memberpress.com/wp-content/uploads/2024/06/mpcs-course-sales-page.png)
- Add the URL of the Membership A registration page to the Sales Page field.
- Click the Update button to save changes.
Here, if unauthorized users try accessing the course, MemberPress will immediately redirect them to the required membership registration page.
Running a Learning Platform With Memberpress Courses
As a website administrator, you can manage all courses on the site and track your students' progress.
You can easily update your courses anytime by updating the course information and managing your lessons and quizzes. Both lessons and quizzes can be added, edited, or removed.
Student Progress
When running a learning platform, you’ll want to track your students' progress. The student’s course progress is available in the user’s profile.
You can check the list of all students enrolled in a specific course:
- Navigate to Dashboard > MP Courses > Courses and find the course you want to check.
- Under the Participants column, you will find a number of students currently enrolled in the course. Click on the number to access the list of enrolled students.
![mpcs-course-participants-number | MemberPress MemberPress Courses Participants](https://memberpress.com/wp-content/uploads/2024/06/mpcs-course-participants-number.png)
- In the list, click on the username of the student whose user profile you wish to access.
![mpcs-course-participants-list | MemberPress Enrolled Students List](https://memberpress.com/wp-content/uploads/2024/06/mpcs-course-participants-list.png)
Alternatively, you can search for the student in the user list at Dashboard > Users page. When you find the user in the list, hover over the user, and click Edit to access the user’s profile.
Once you access the student’s user profile, scroll down until you see the Course Information section. Here, you’ll find the student’s progress for all the courses on your site:
![mpcs-student-progress-2 | MemberPress Student Progress](https://memberpress.com/wp-content/uploads/2024/07/mpcs-student-progress-2.png)
You can also reset a student's course progress within the user's profile. To do this for any course the user started, click the Reset Progress link next to the course name.
![mpcs-reset-student-progress | MemberPress Reset Student Progress](https://memberpress.com/wp-content/uploads/2024/07/mpcs-reset-student-progress.png)
Resetting students' course progress will permanently remove their progress on the specific course. Thus, when students access the course next time, they will have to redo the entire course.
Managing Students' Progress With MemberPress Quizzes
You can preview, edit, check student's answers, or delete quizzes in any course by accessing the curriculum of that course:
- Navigate to Dashboard > MemberPress > Courses.
- Find the course you wish to manage, and click the Edit link under the course name. This will open the course editor.
- Click on the Curriculum tab.
- Hover over the quiz name to access the quiz options: Preview, Edit, Delete, and View Attempts.
![mpcs-manage-quizzes | MemberPress Managing MemberPress Quizzes](https://memberpress.com/wp-content/uploads/2024/04/mpcs-manage-quizzes.png)
If students have already submitted answers to the quiz, editing the quiz will require deleting all existing answers. When you try to edit such a quiz, MemberPress will display a pop-up asking for confirmation to delete quiz attempts.
Quiz Attempts
You can access students' quiz attempts for any quiz through the course Curriculum. The View Attempts link next to every quiz will open the Quiz Attempts page for that specific quiz.
If a student submits answers for the quiz, the student will be listed on the Quiz Attempts page.
View Student Answers
You can access the answers of each student who submitted the quiz on the quiz's attempts page:
- Access the Quiz Attempts page of the specific quiz.
- Find the student in the attempts list.
- Hover over the student's name, and click the View link.
![mpcs-view-quiz-attempts | MemberPress View Student Answers](https://memberpress.com/wp-content/uploads/2024/04/mpcs-view-quiz-attempts.png)
- This will trigger a popup, showing you the quiz answers that the student submitted.
![mpcs-quiz-answers | MemberPress Quiz Answers](https://memberpress.com/wp-content/uploads/2024/04/mpcs-quiz-answers.png)
When students submit a quiz, they won’t have access to their answers, nor will they be able to modify them.
Reset Quiz Attempts
As mentioned, it's possible a student reached the quiz attempt limit without reaching a passing score.
In this case, the student will be blocked, and you'll need to remove the attempts to enable additional attempts:
- Access the Quiz Attempts page of the quiz that is blocking the student.
- Hover over the student's name, and click the Reset Attempts button in the popup to reset the student's attempts. This will unblock a student allowing additional retakes.
![mpcs-reset-delete-quiz-attempts | MemberPress Reset Quiz Attempts](https://memberpress.com/wp-content/uploads/2024/04/mpcs-reset-delete-quiz-attempts.png)
- Alternatively, you can completely delete the answers a student submitted by clicking the Delete link.