The MemberPress PDF Invoice add-on automatically creates invoices for all MemberPress transactions on your website. Your members can download their invoices directly from their accounts.
This document guides you through the MemberPress PDF Invoice add-on installation and setting up invoices on your website.
Install the PDF Invoice Add-on
The MemberPress PDF Invoice add-on must be installed and activated first.
Before you begin, make sure you have:
- MemberPress Growth or Scale plugin installed and activated on your website;
- The MemberPress plugin is activated with your active license key;
- Access to your WordPress Dashboard with Administrator user credentials;
- A logo file for your invoices (optional).
Now, to install the add-on, follow these steps:
- Navigate to Dashboard > MemberPress > Add-ons.
- Browse add-ons or use the search tool to search for the “PDF Invoice” in the list.
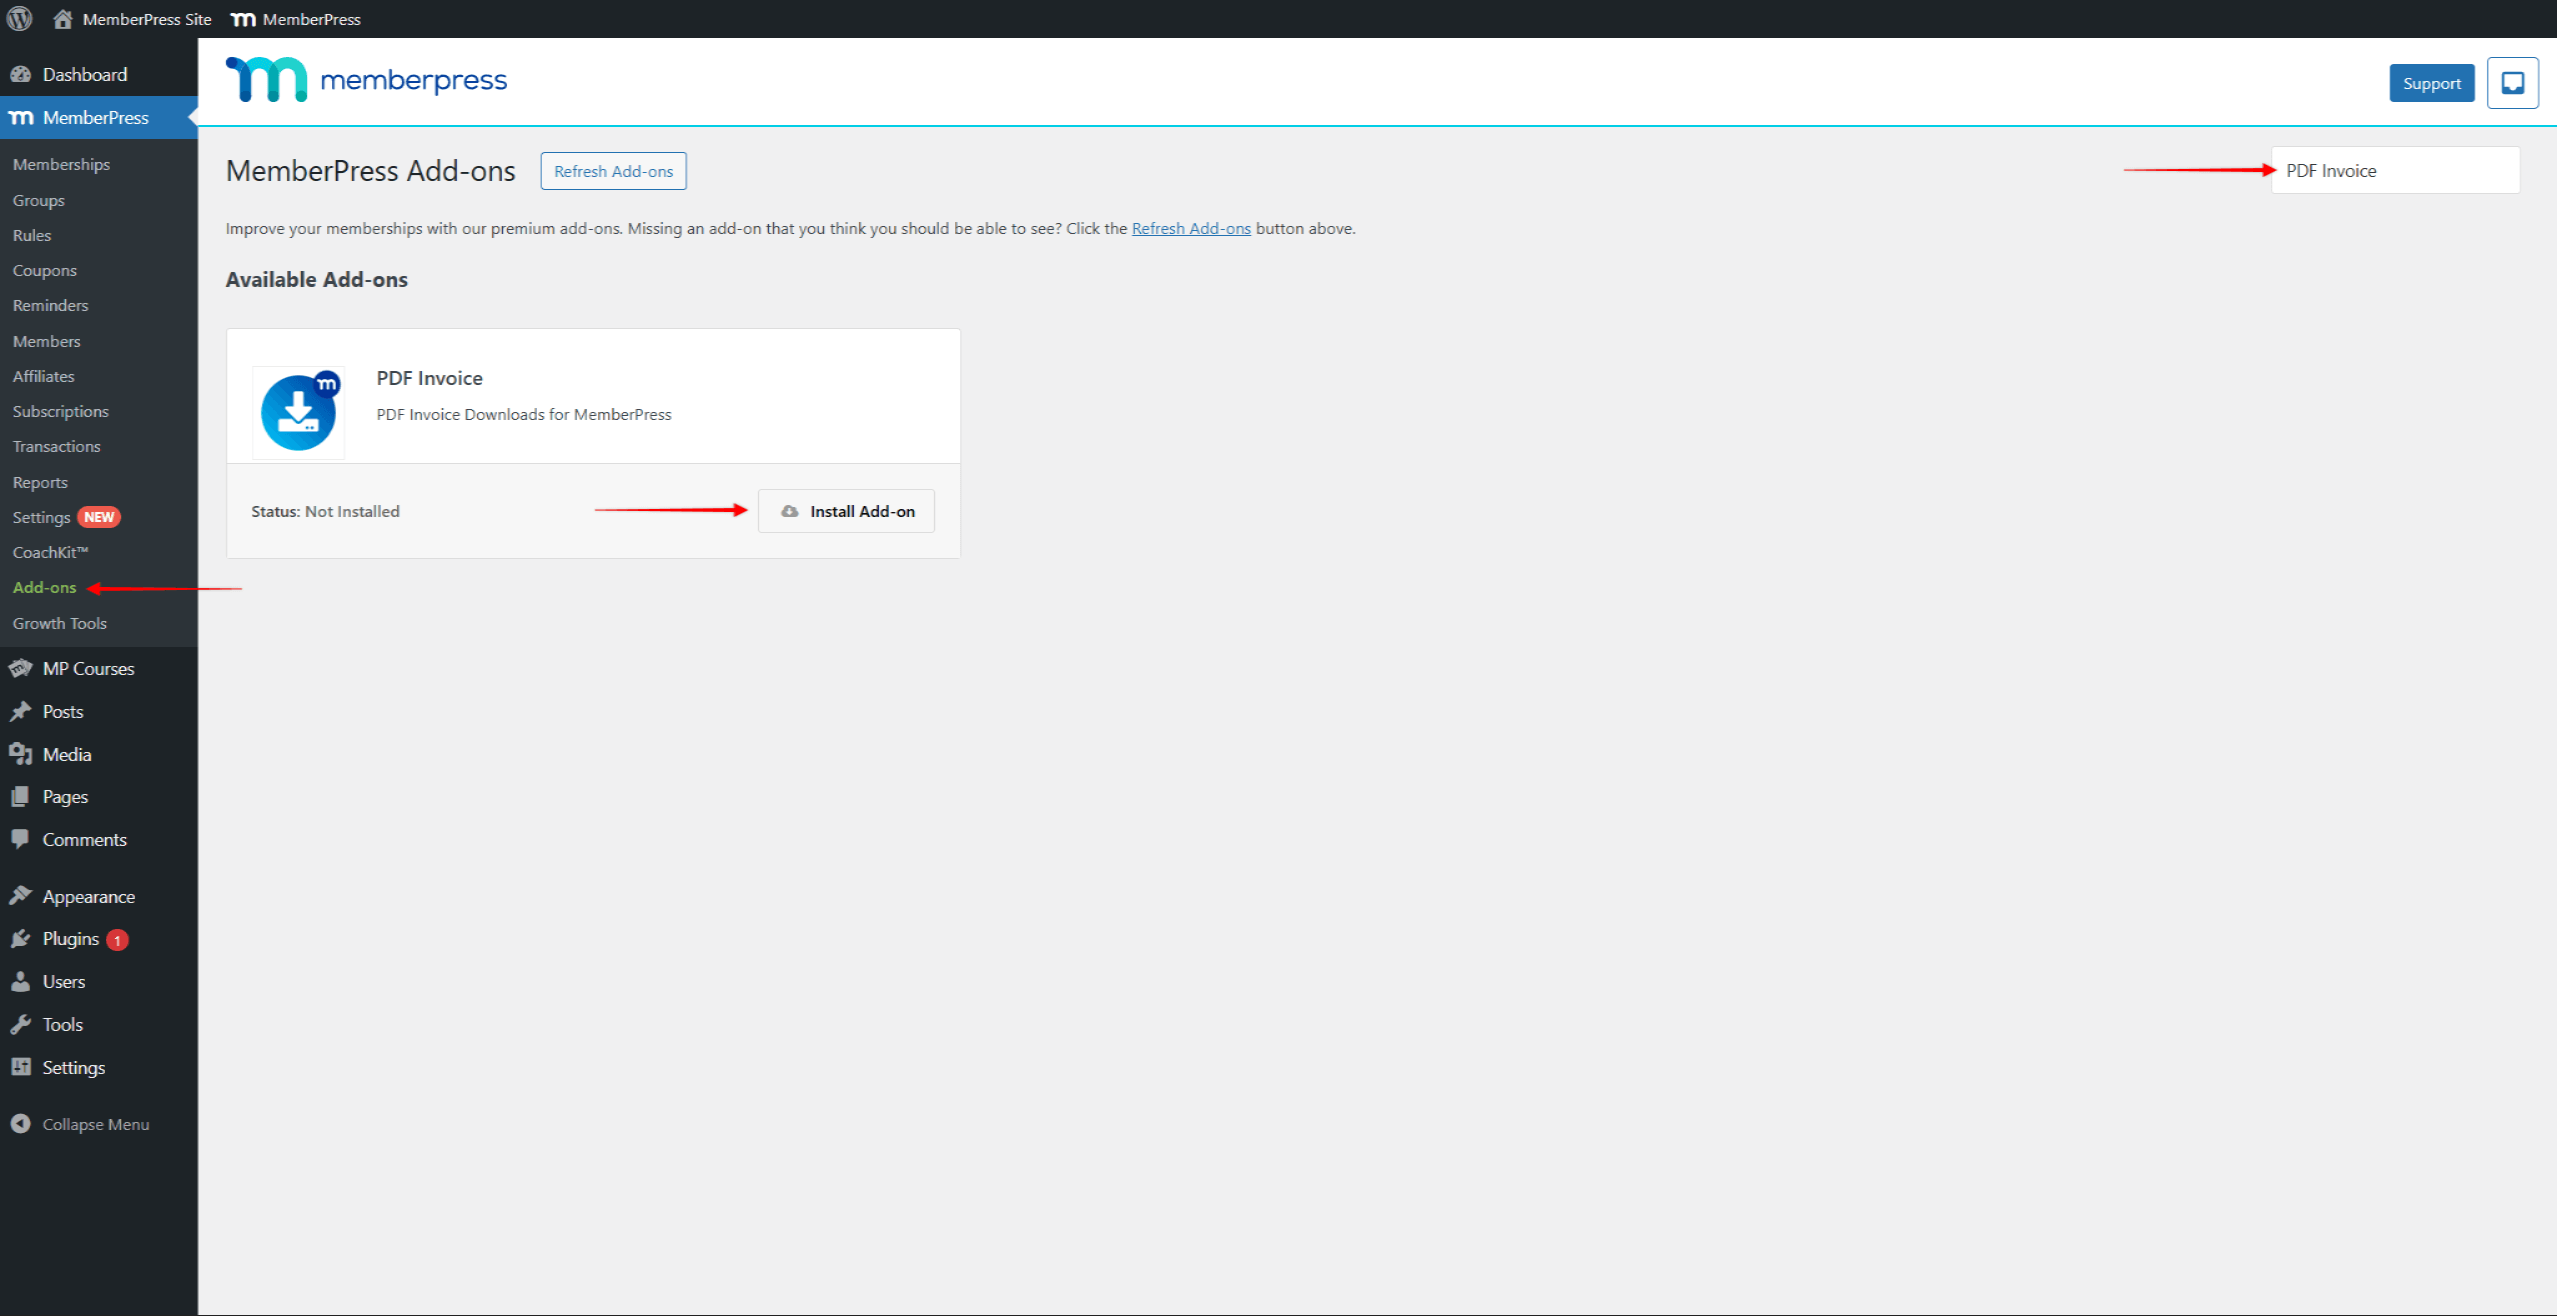
- Click the Install Add-on button. This will automatically install and activate the add-on.
After installation, new invoice-related settings will become available in your MemberPress settings.
Configure Your PDF Invoice Settings
MemberPress PDF Invoice add-on allows you to automatically generate invoices (receipts) for all successfully processed online and offline payments. In addition, it can also automatically generate pro-forma invoices for renewals of recurring subscriptions purchased through the offline gateway.
Following the add-on activation, you need to configure invoices and pro-forma invoices for them to be generated for MemberPress transactions.
To configure your invoices, you need to add your business information and customize how invoices look:
- Navigate to Dashboard > MemberPress > Settings.
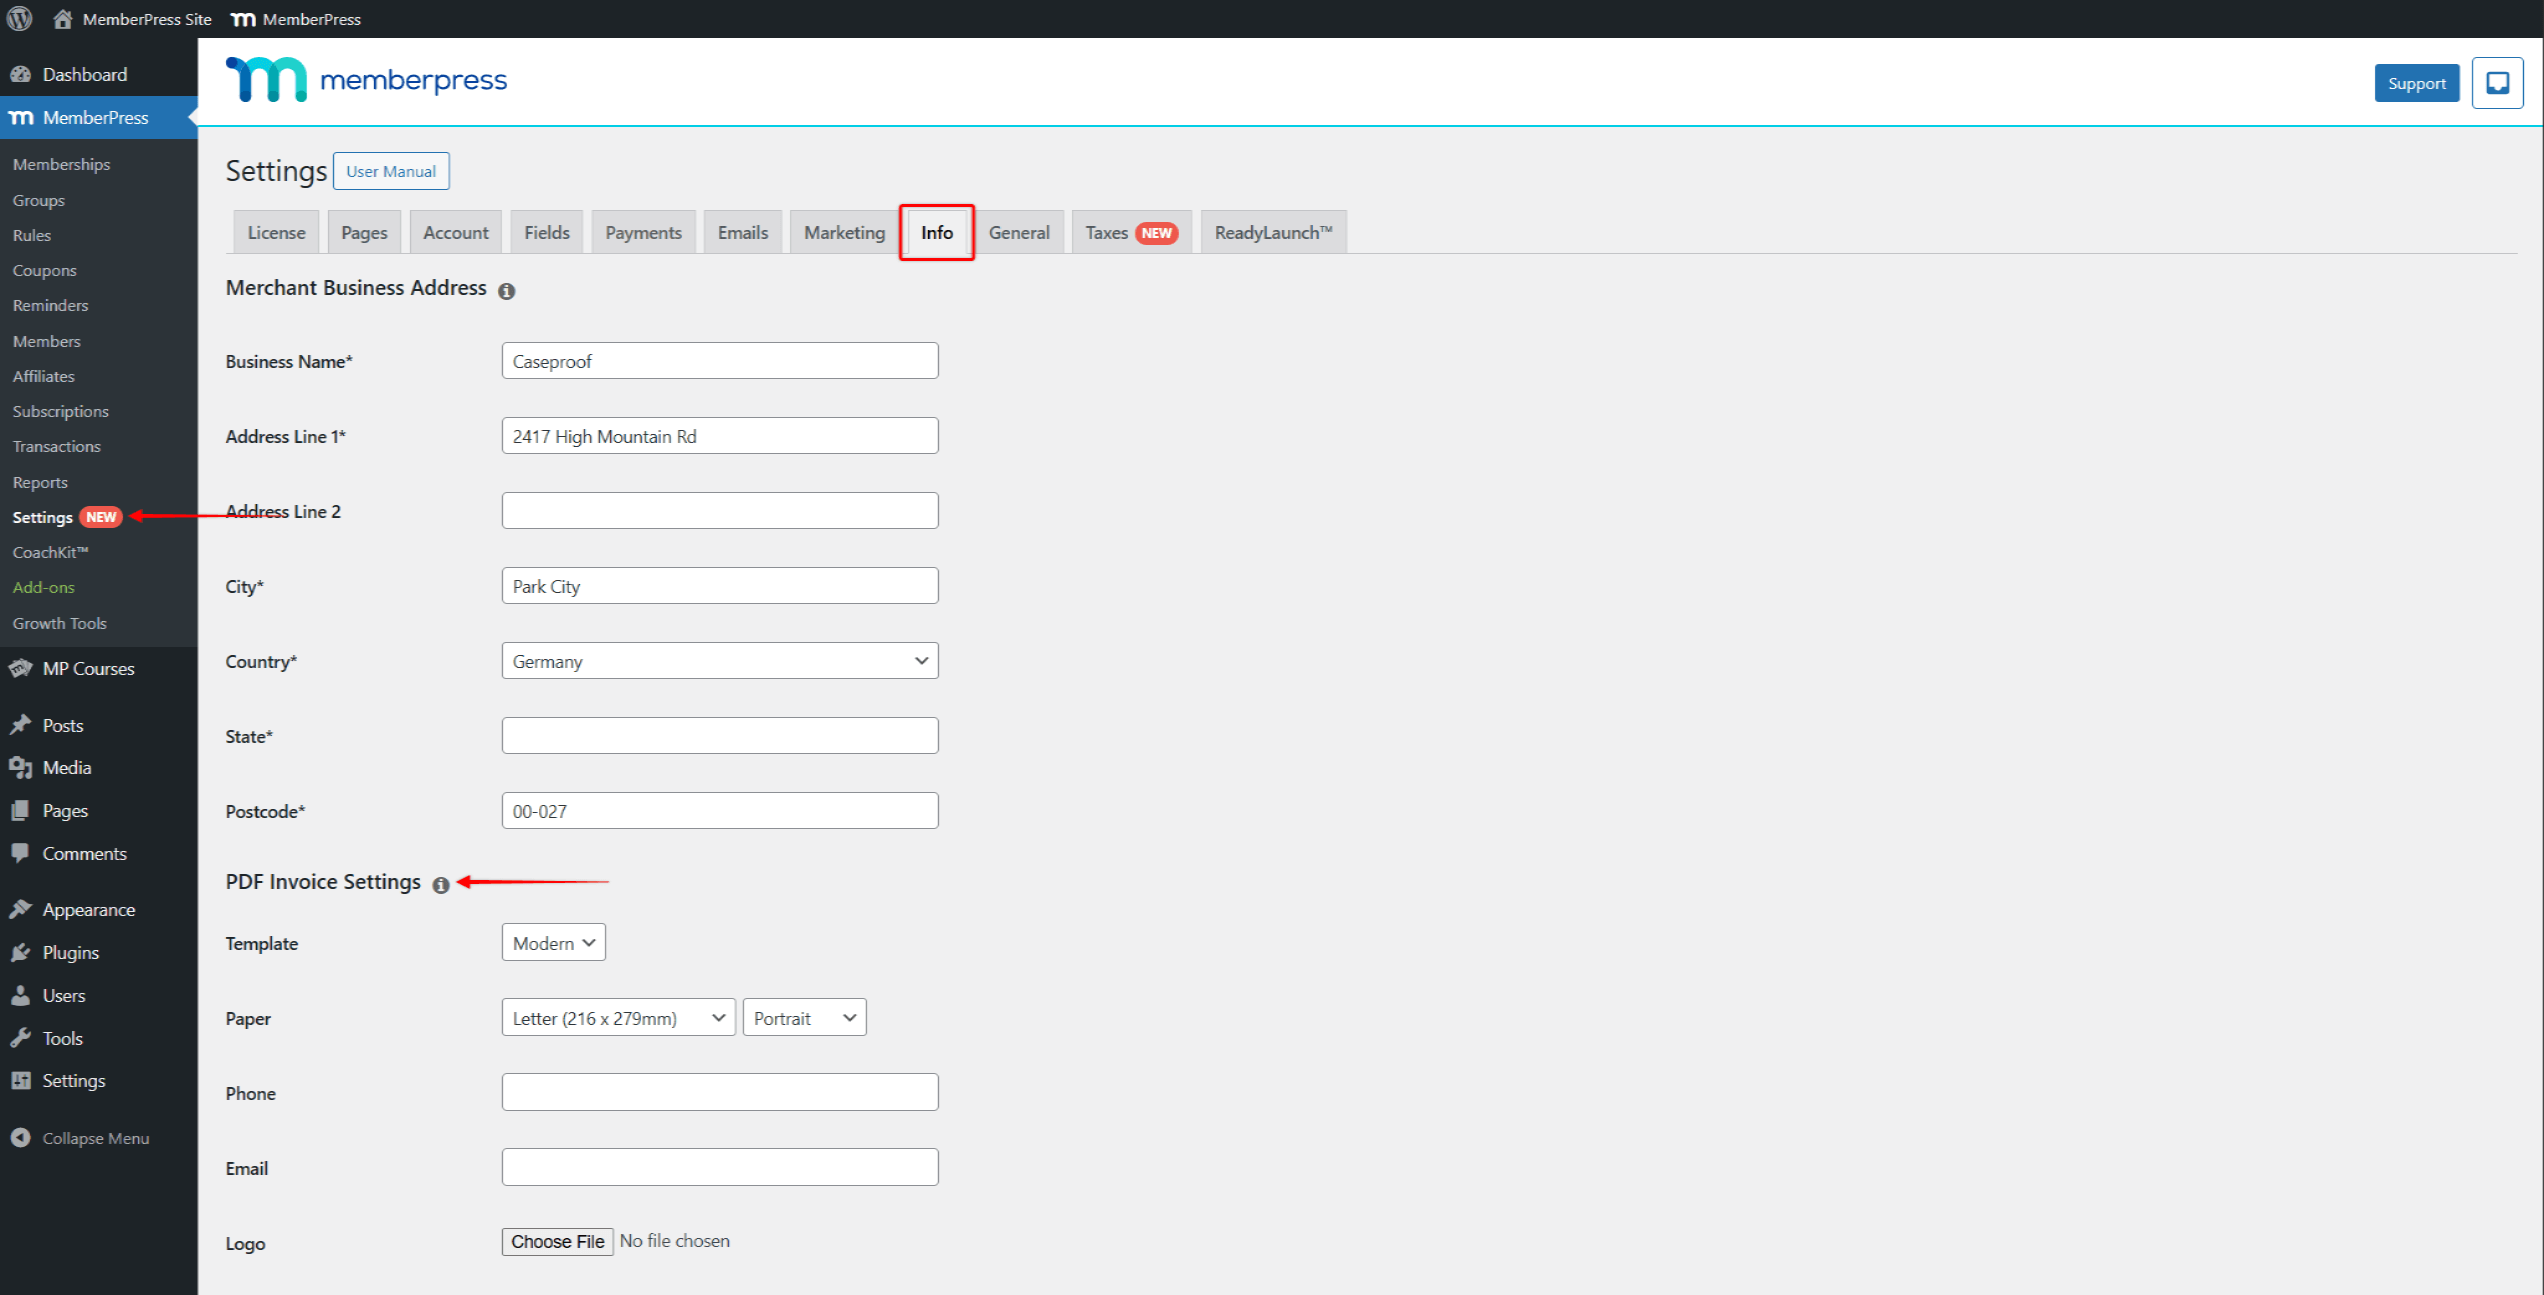
- Click the Info tab.
- Scroll down to find the PDF Invoice Settings section.
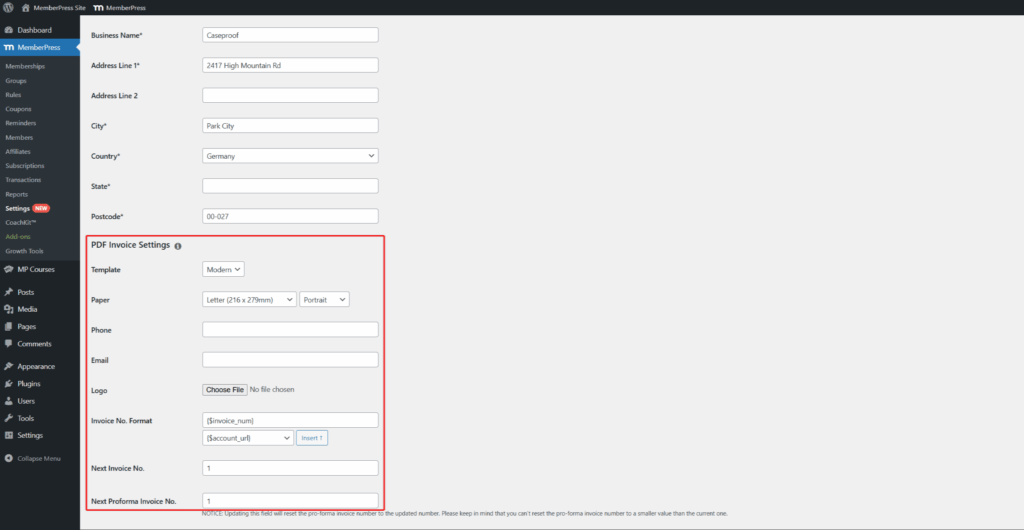
- Under Template: Choose between two styles:
- Simple: A clean, basic design
- Modern: A more stylish layout
- Under the Paper option, select the invoice size and orientation;
- Next, add the business contact information (Phone and Email) and your Logo (JPG, PNG, or GIF image; use an image at least 400 pixels wide).
- Optionally: You can modify the format of invoice numbers by editing the Invoice No. Format option. This option is used to define how the invoice numbers should be generated. By default, this option will use the {$invoice_num} parameter, which will add simple consecutive numbers to your invoices. You can add suffixes or prefixes to this parameter, insert additional parameters, or replace the parameter entirely.
- Finally, you need to set the starting number for your invoices (receipts) under the Next Invoice No. option.
- If you enabled pro-forma invoices, you’ll also need to set the starting number for your pro-forma invoices. Set the number under Next Proforma Invoice No. option.
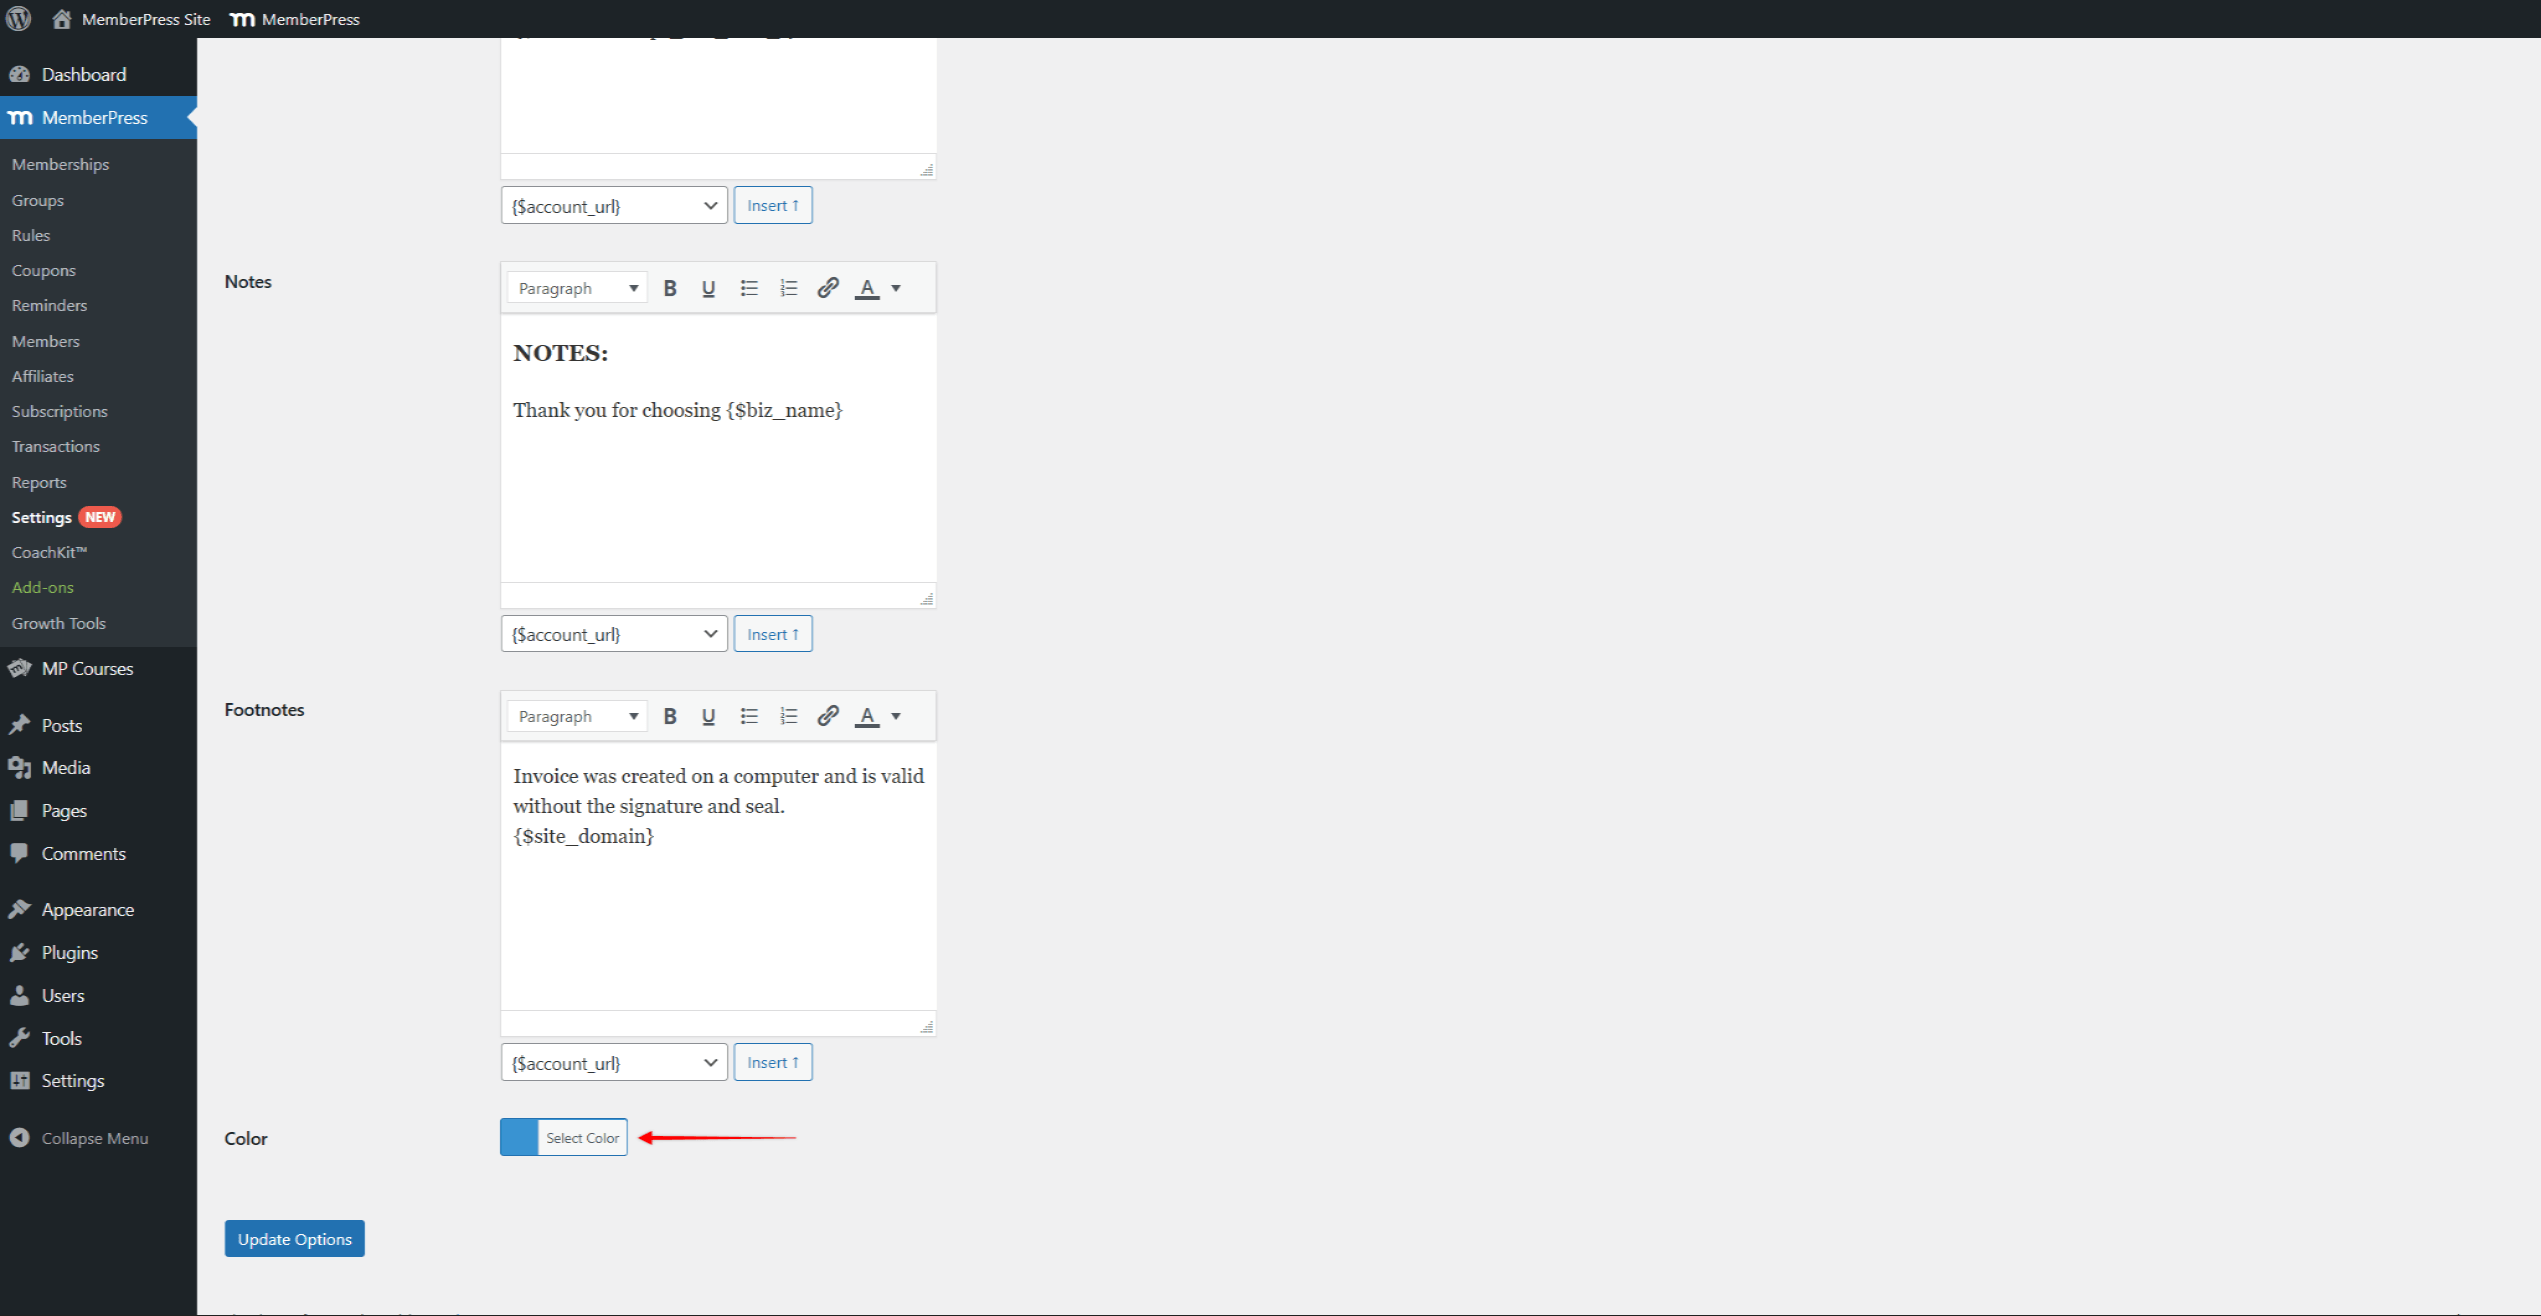
Furthermore, MemberPress invoices are styled using one base color. To change the default color, scroll down to the Color option and pick a color.
Content Areas
In addition, under the PDF Invoice Settings section of the Info tab, you can also edit content areas for invoices.
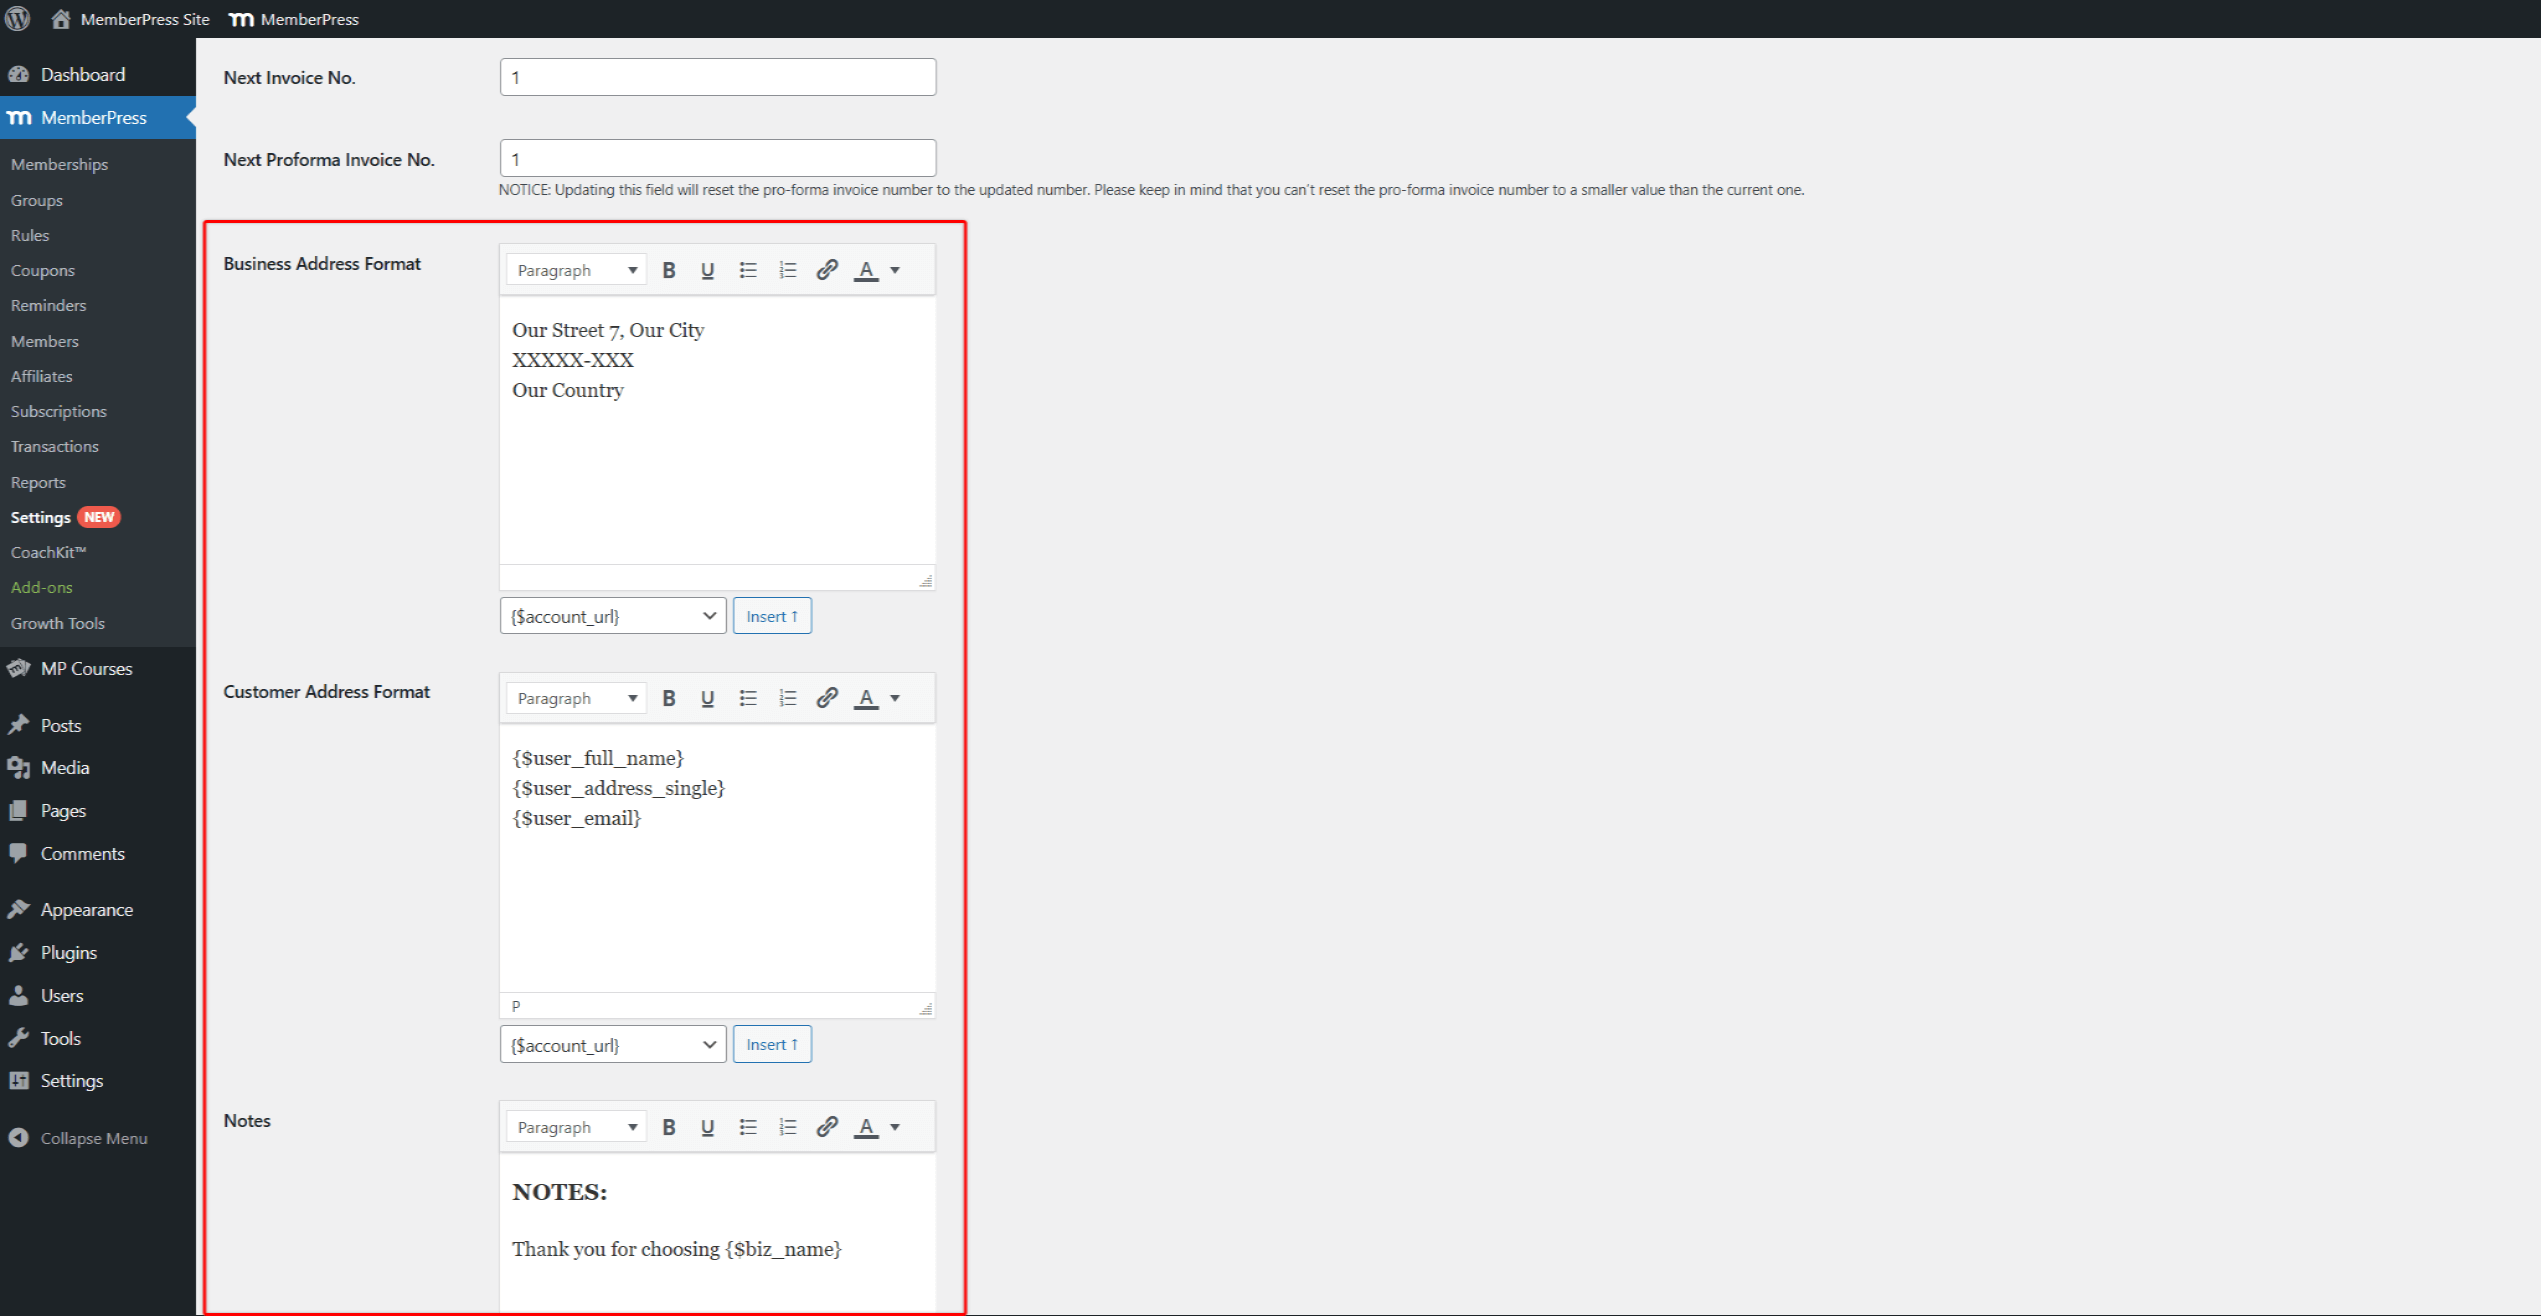
By default, these areas are populated with the basic and necessary information using parameters. Parameters will automatically import your business information and user details to your invoices.
Although editing these areas is not required, you can modify the default information and add significant details to your invoices.
Here, for each available area, you can type any text you wish to add to invoices using the text editor. Also, you can add other existing data from MemberPress by inserting additional parameters.
You can edit the following areas:
- Business Address: This area is used to display your business details on invoices. By default, you will find the parameters that will add your Merchant Business Address details. You can add any text you need, and add or remove parameters.
- Customer's Address: This area is by default populated with parameters that will add the user's name, address, and email to your invoices. If needed, you can also edit this area by adding text or adding and removing parameters.
- Notes: This area can be used to add any additional information that should appear after invoice items, such as:
- Payment terms
- Thank you messages
- Special instructions
- Footnotes: This area will be displayed at the bottom of your invoices. You could use it to include:
- Legal disclaimers
- Tax information
- Refund policies
Save Your Settings
Once you’re done configuring invoices, follow these steps to apply changes:
- Scroll to the bottom of the page.
- Click the Update Options button.
Advanced PDF Invoice Customization
For more complex customizations to the invoice designs, you can override the template files. This requires technical knowledge but allows complete customization.
Accessing Invoices
Members can download invoices for all completed transactions from their Account Page:
- Log in and navigate to the Member account page.
- Click the Payments tab.
- Find the payment in the list.
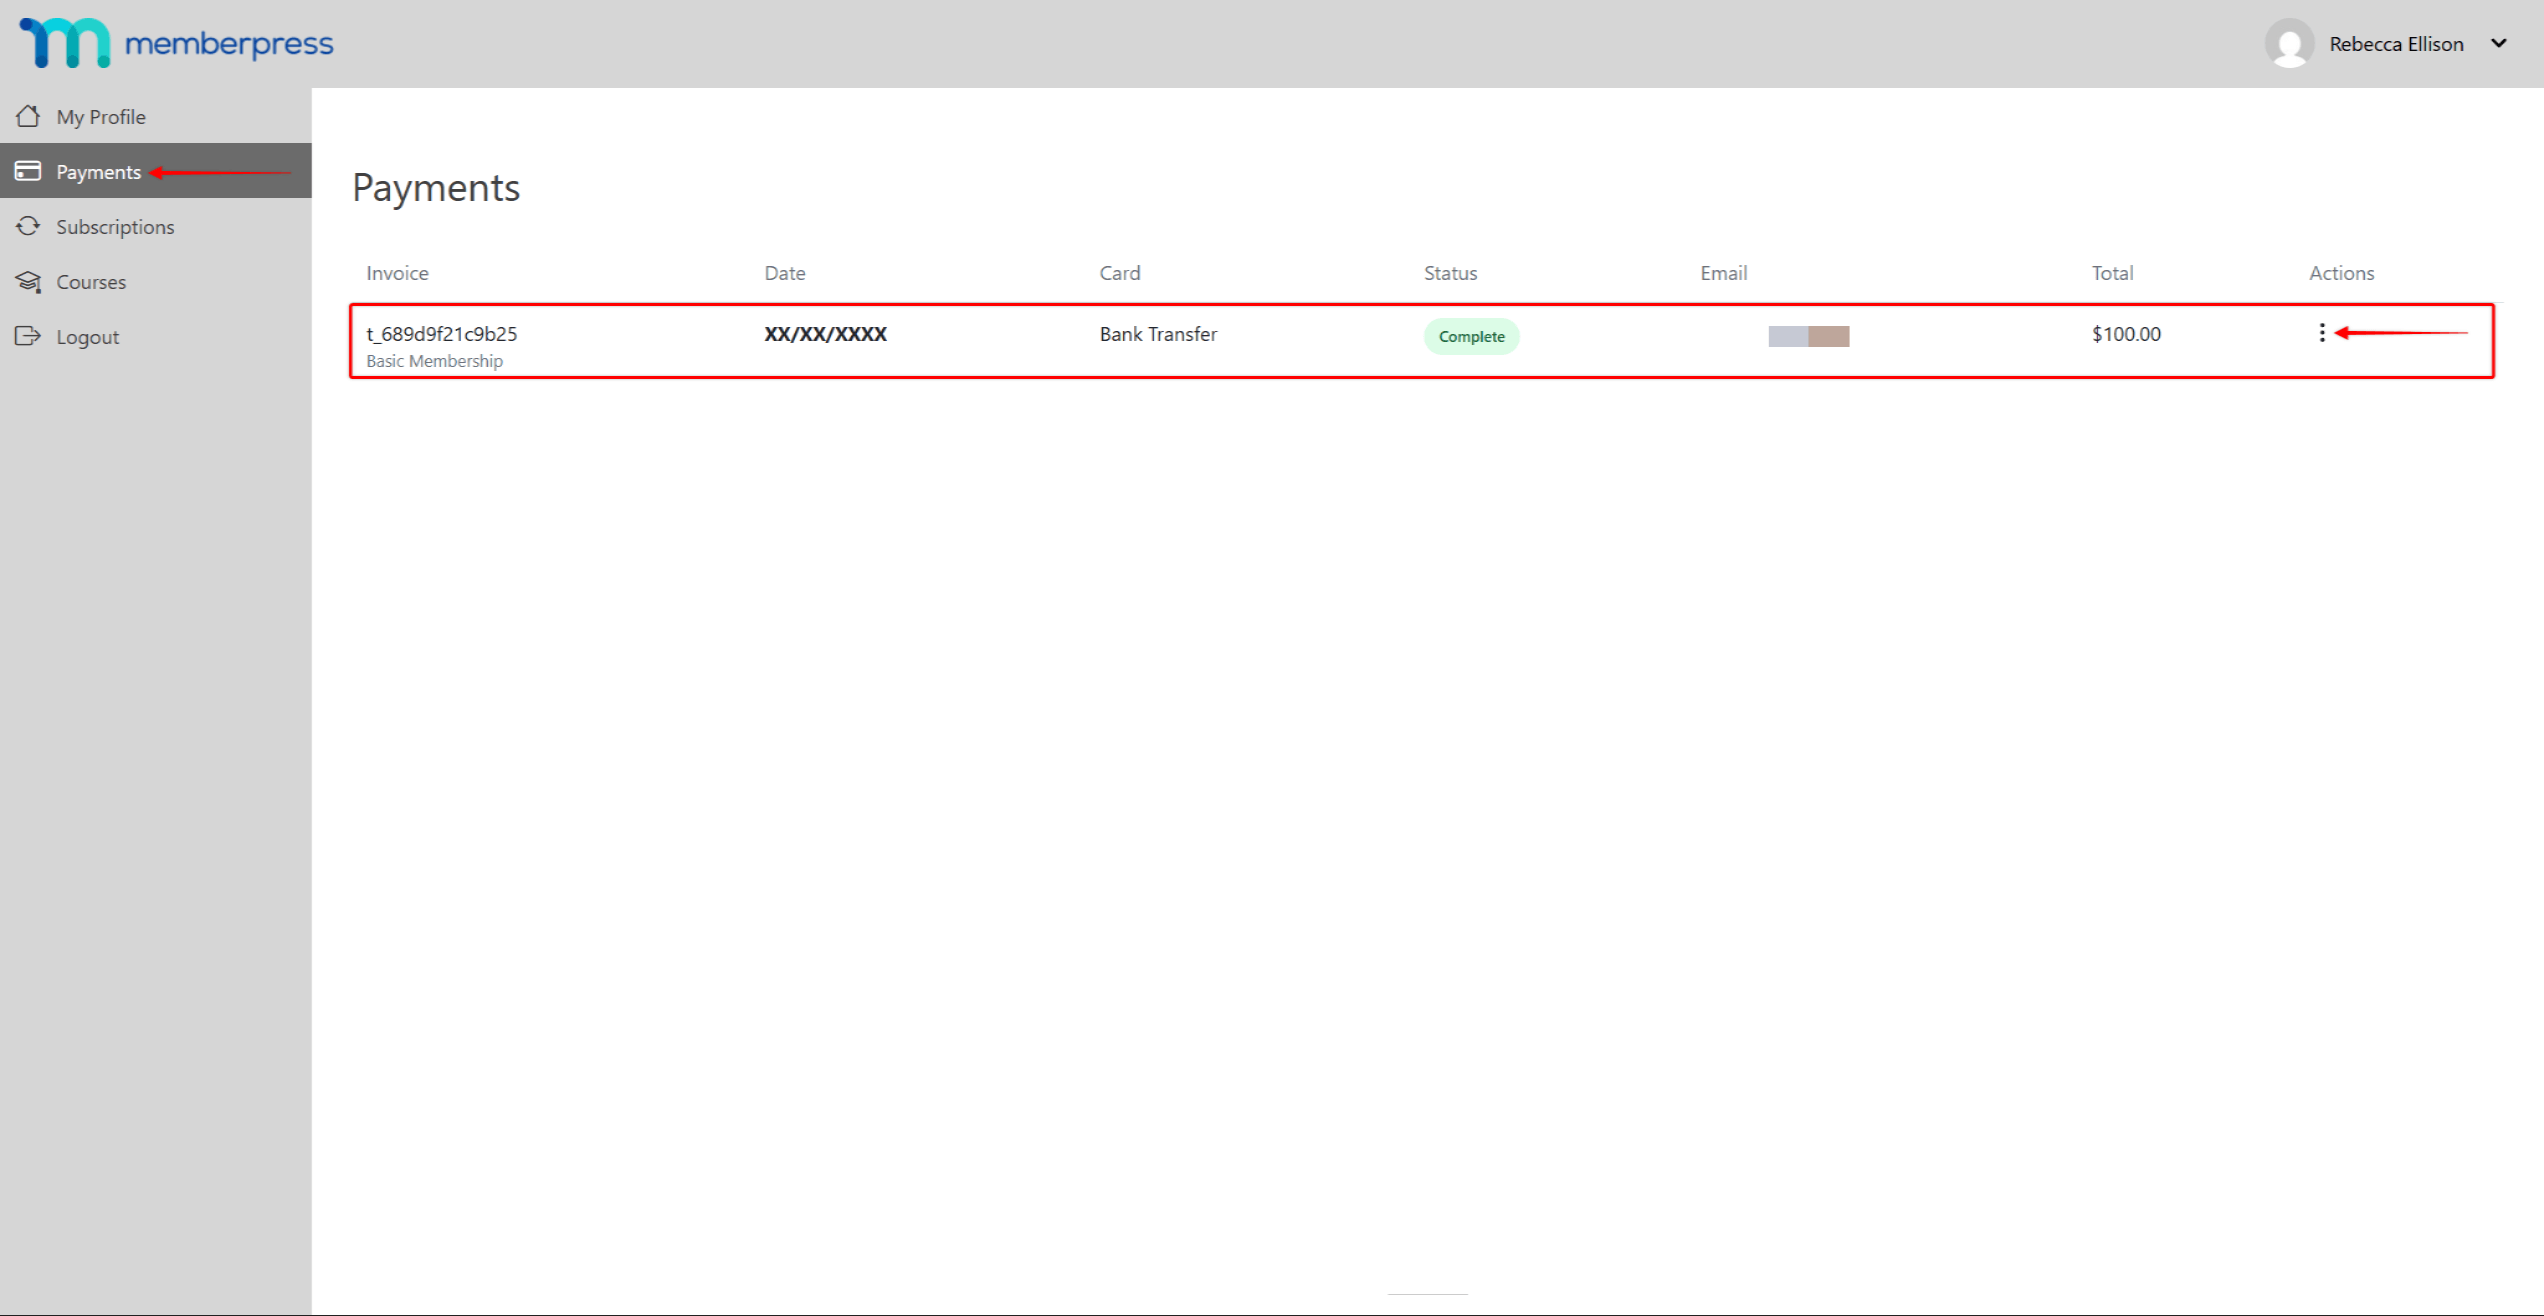
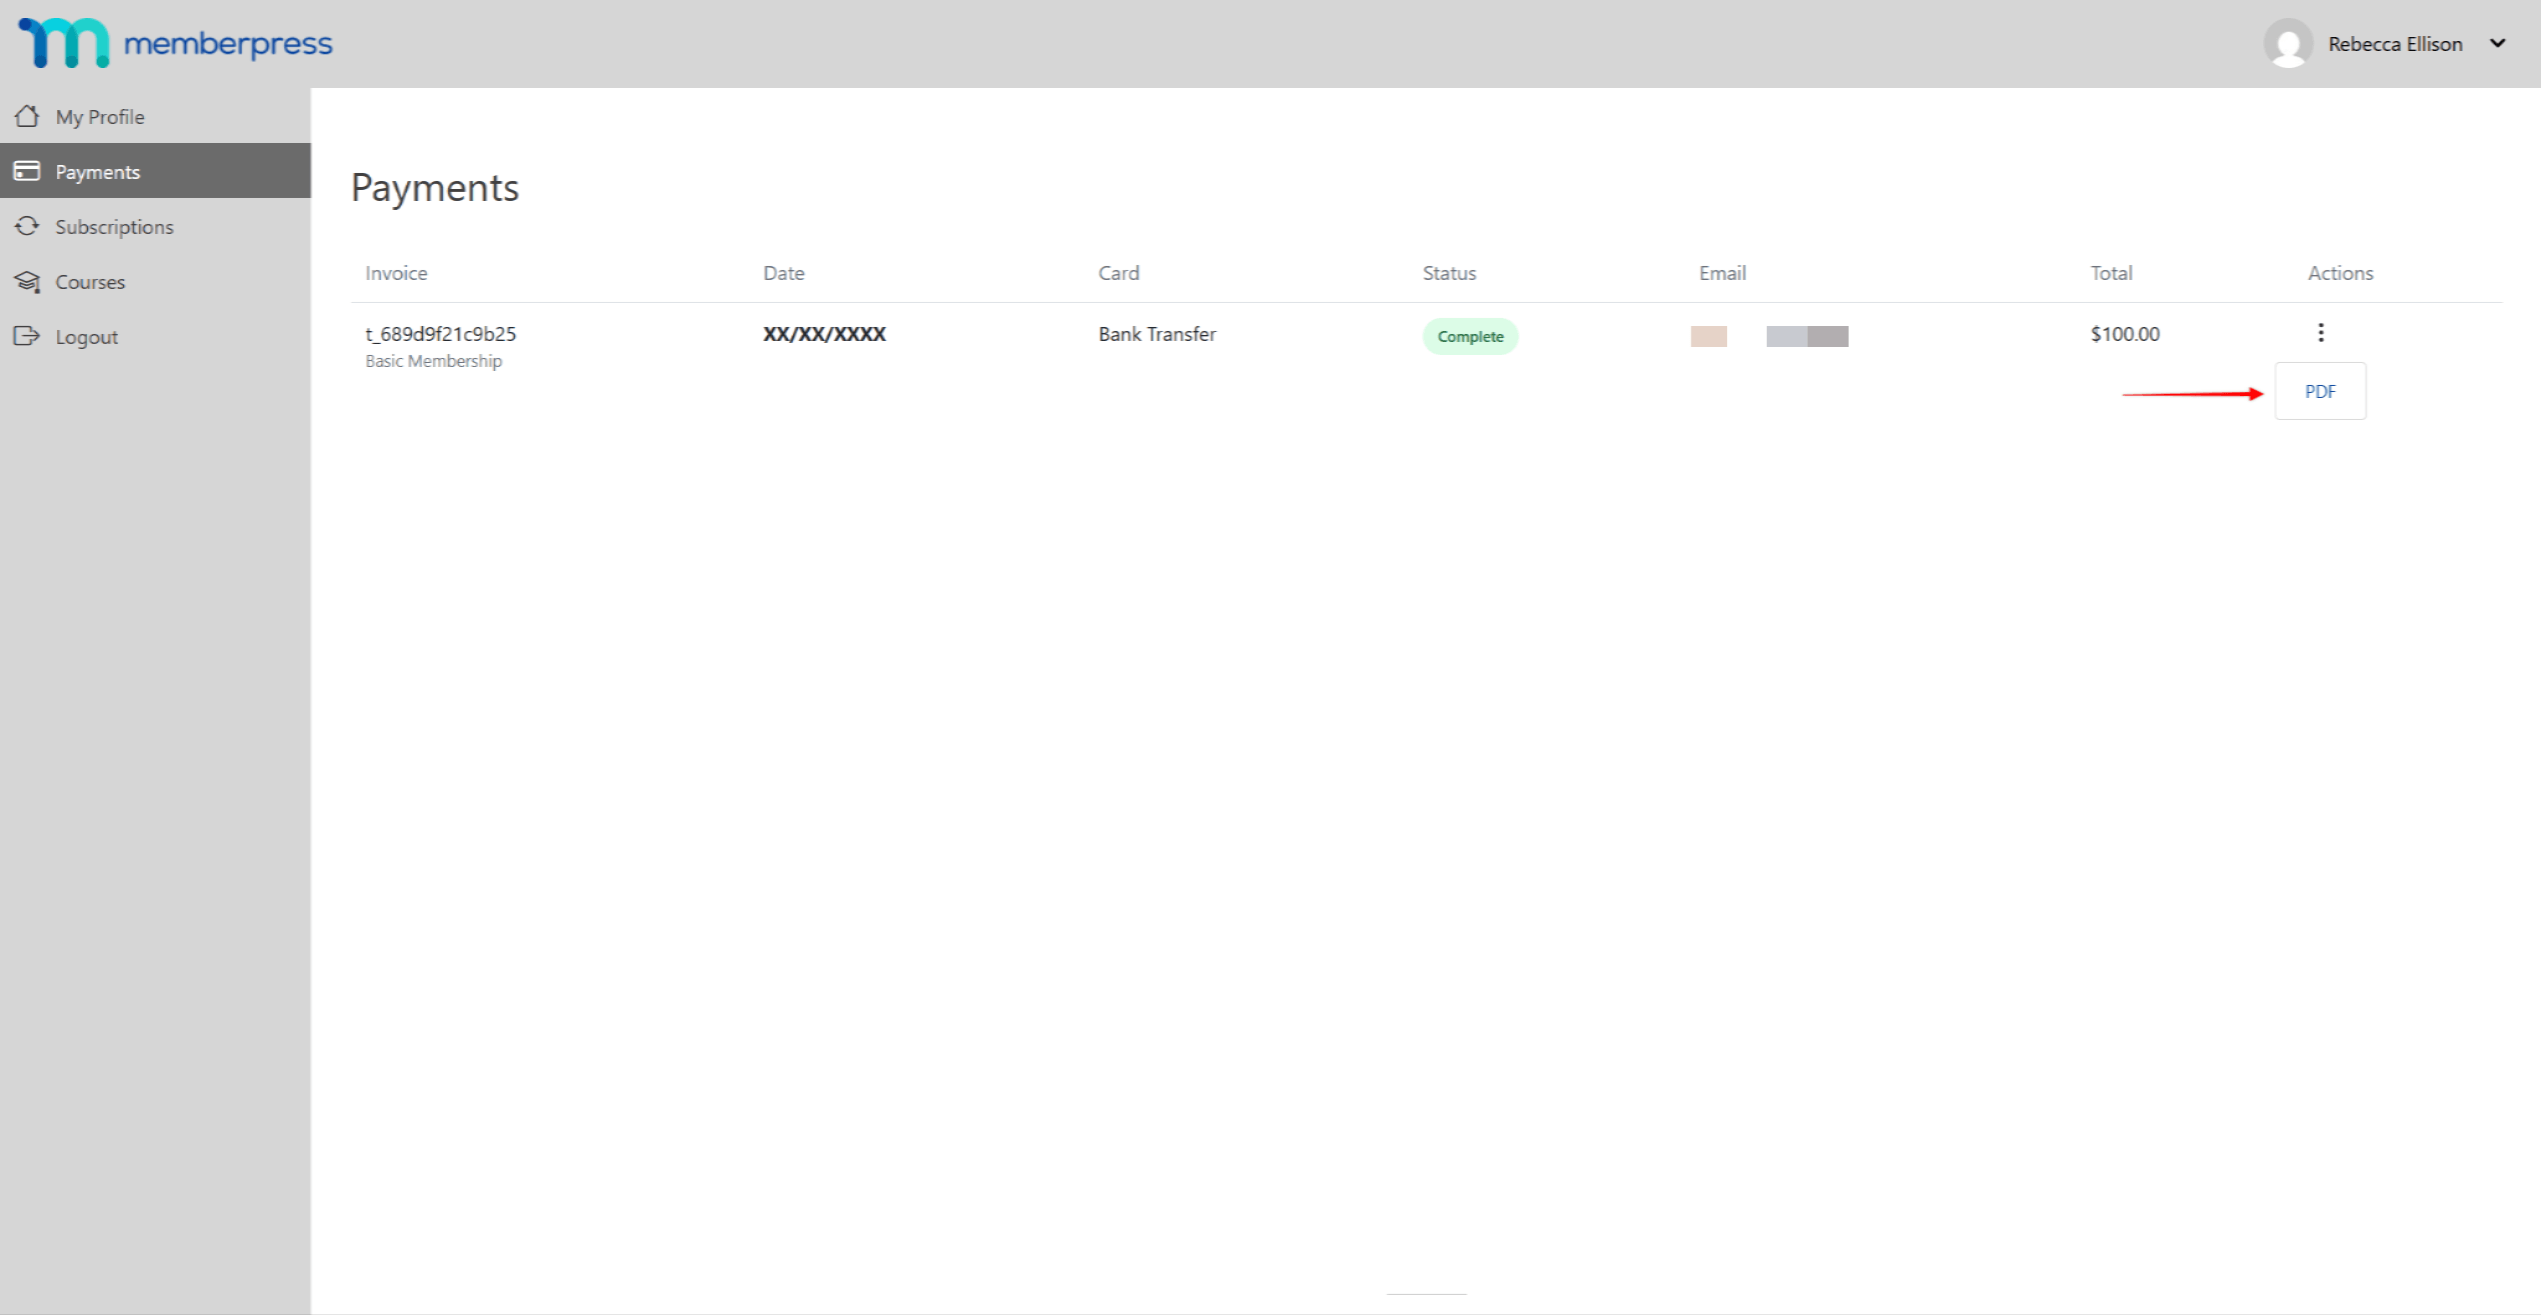
- Under the Actions column, click the 3-dot icon.
- Click the PDF option to download the invoice PDF file.
Payment Receipt Email
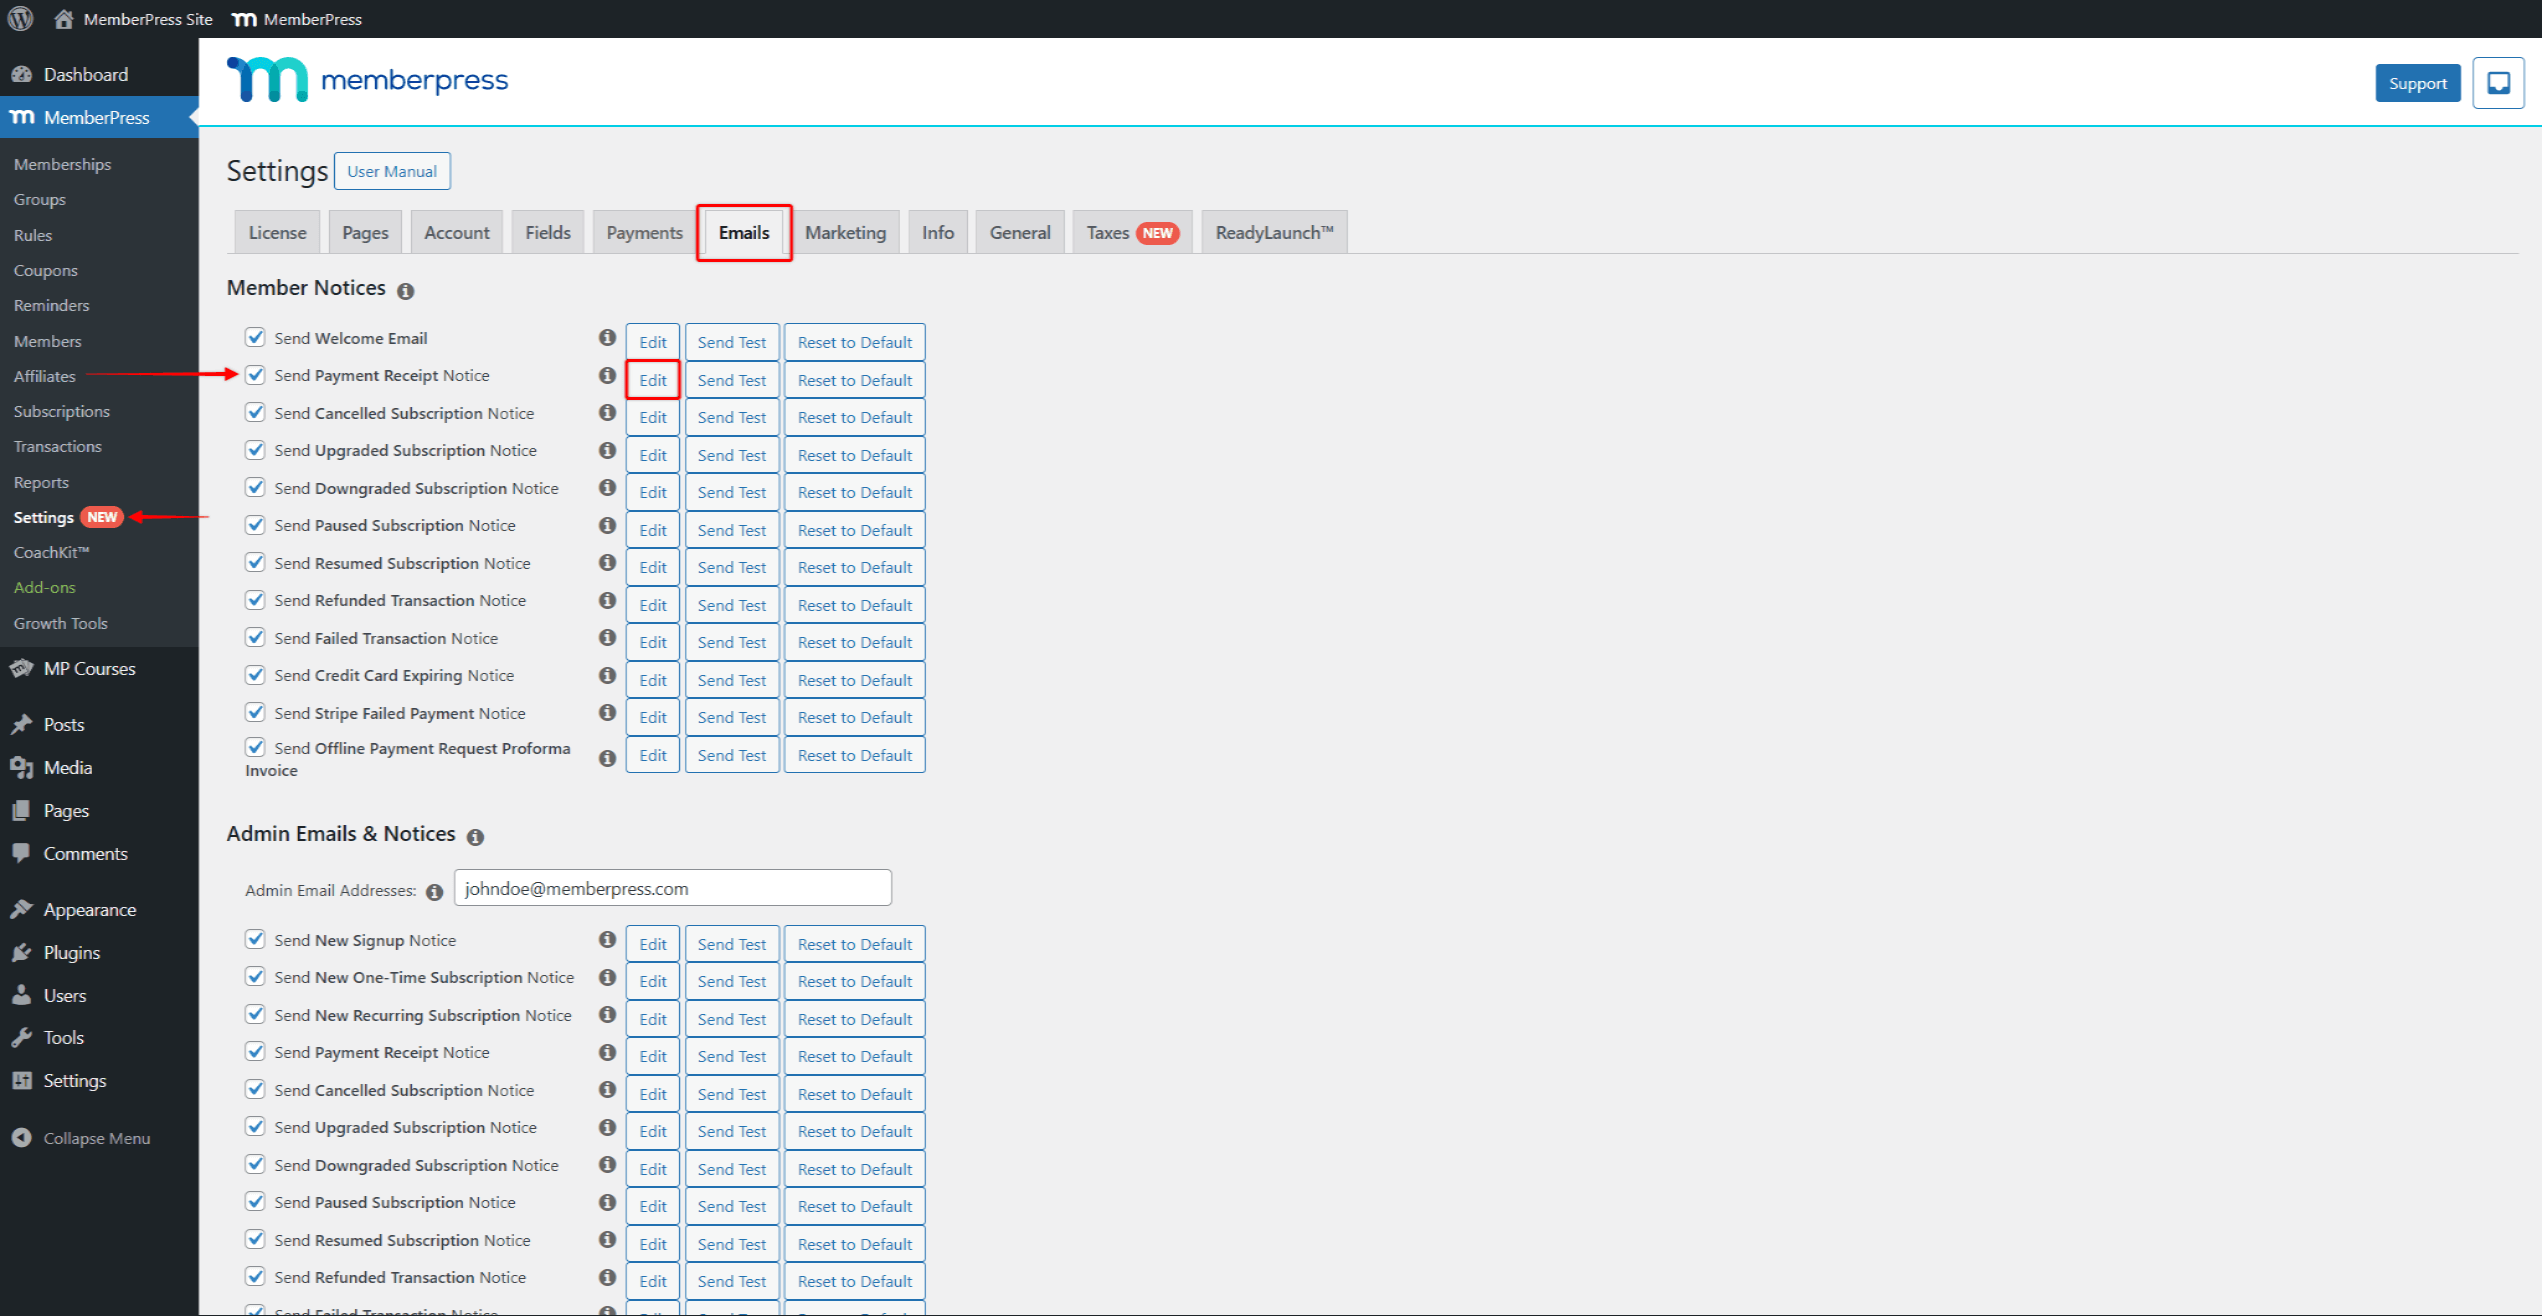
Following every successful purchase, an invoice will automatically be emailed to a member if the Payment Receipt email is enabled.
By default, this email will be enabled under the Member Notices section at Dashboard > MemberPress > Settings > Emails tab.
Here, you can disable this email if needed by unchecking the box in front of it. Furthermore, you can modify the email content by clicking its Edit button.
Accessing Invoices as an Administrator
You can also access and download any invoice through the backend:
- Navigate to Dashboard > MemberPress > Transactions.
- Find the transaction you need, and hover over the transaction name to show additional options.
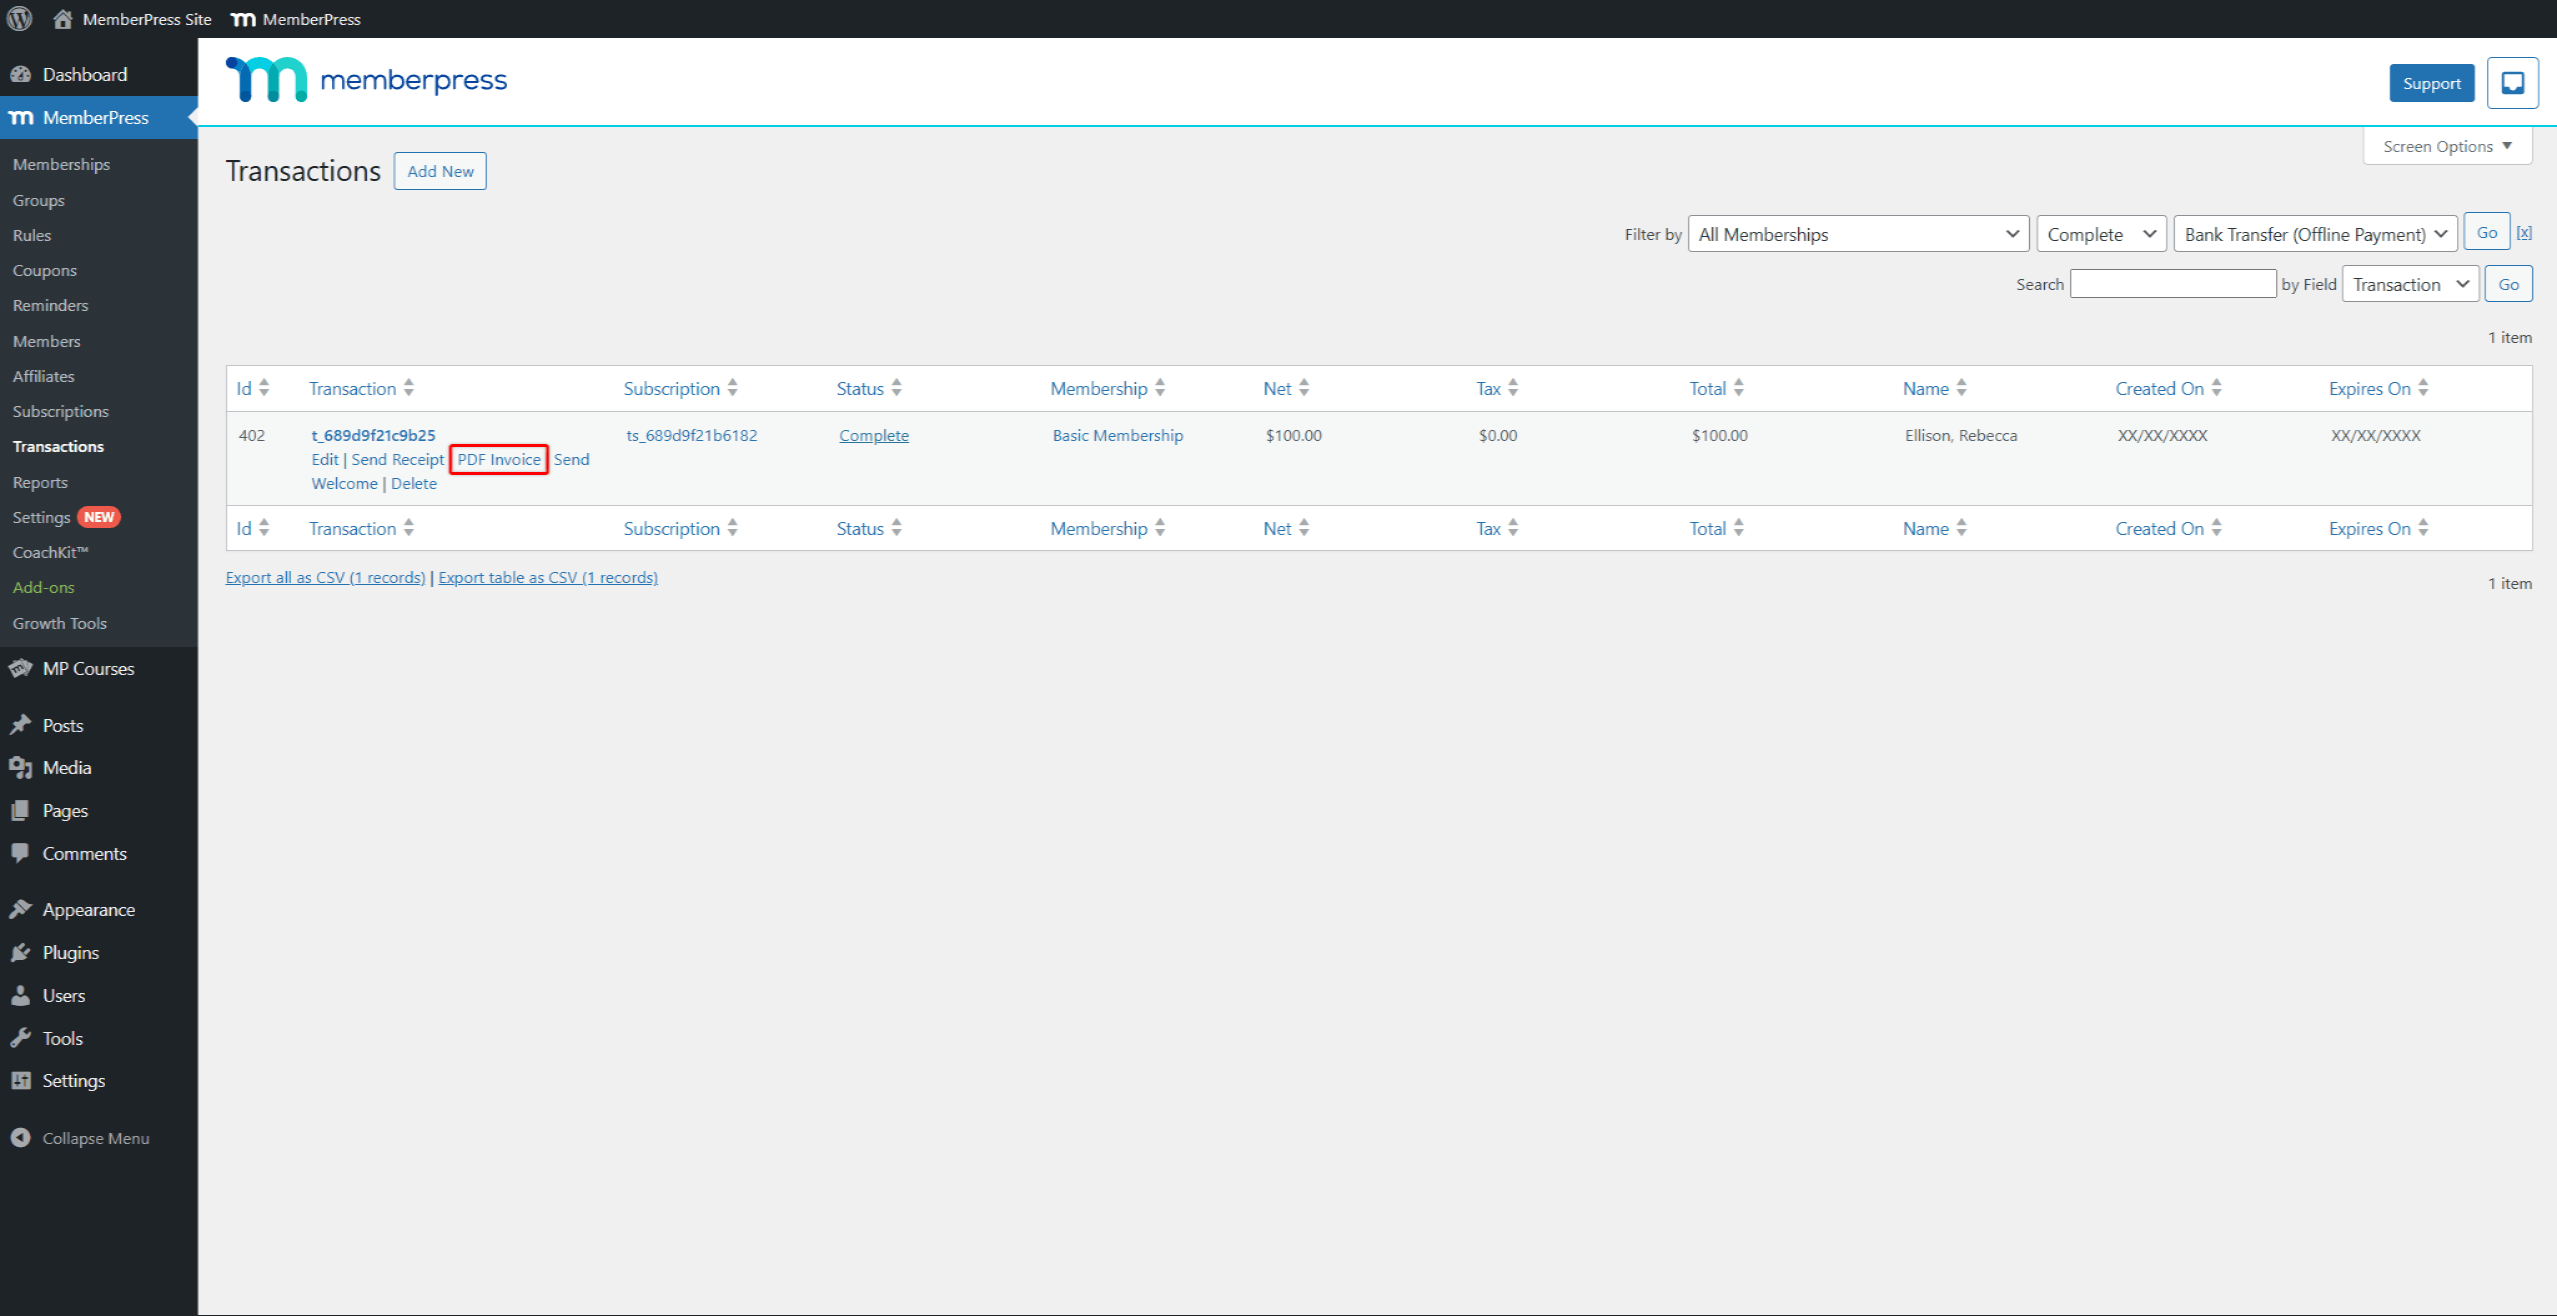
- Click the PDF Invoice link to generate and download the invoice PDF file.
Similarly to members, every invoice will be emailed to the admin email address via the Payment Receipt email.
This email will also be enabled by default under the Admin Email & Notices section at Dashboard > MemberPress > Settings > Emails tab.
PDF Invoice Troubleshooting
Here, you can find some of the situations you should pay attention to when using MemberPress invoices:
- Blurry Invoices: Upload a logo image at least 400 pixels wide.
- Wrong Invoice Numbers: Make sure your starting number is higher than the number of existing transactions.
- Settings Won't Save: Click the Update Options button, and wait for the page to reload fully. If successful, you should see the notification confirming that settings were saved.


