As a music teacher, you’re limited to a certain number of students you can teach in-person per day or week. Imagine how your earning potential could increase if you were able to teach multiple students, all at the same time.
Starting a music school business online with a dedicated membership site is a great way to connect with new students and provide additional music lessons – without working more hours.
In exchange for a fee, members-only sites offer subscribers exclusive access to content, products, or services.
In this post, we’ll take a look at the benefits of starting a music school business online. And we’ll show you how to create your own WordPress membership site using MemberPress in just 7 steps. Let’s get to work!
Why Starting a Music School Business Online Is a Good Idea
The short answer? Passive income.
Even the most committed music teachers only have one pair of hands, and cannot be in two places at the same time. However, if you could find a way to broadcast your lessons to paying students, your client base could expand rapidly.
You can create video music lessons and other teaching resources. What’s more, you don’t have to give these things away for free on unprotected channels, such as your website or YouTube.
Creating a dedicated membership site will enable you to reach many more students than you can in-person, while providing an extra revenue stream for your business.
Example Online Music Schools Made with MemberPress
Take the Bulletproof Musician online music school, for example.

The school offers coaching, courses, and premium resources to musicians who want to hone the art of performance. It specializes in the areas of anxiety, confidence, focus, and resilience in music.
Bulletproof musician uses MemberPress to power its course offerings, which include live group coaching sessions, private coaching, and self-paced courses.
The Ken Tamplin Vocal Academy is another great example.
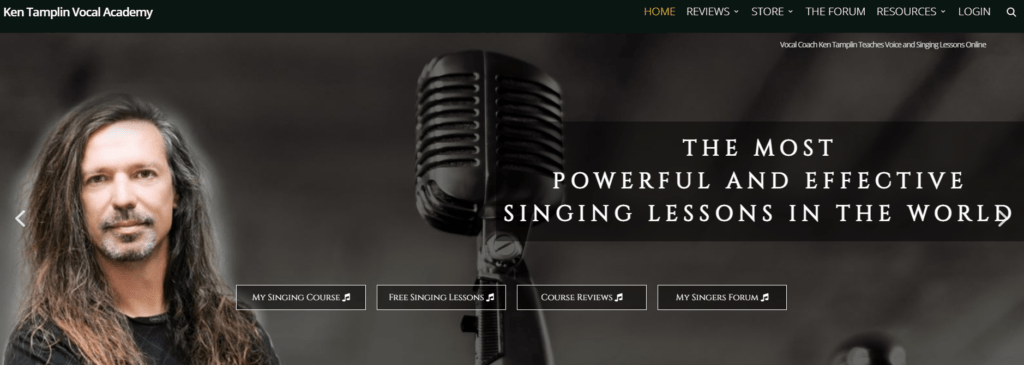
Ken’s wildly successful vocal school is one of the most trusted in the industry. It uses MemberPress to give students premium access to a membership forum where they can participate in discussions and share their progress.
When you create an online music school like Bulletproof Musician or The Ken Tamplin Vocal Academy, students can choose their preferred levels of membership, and access music lessons or practice tips at times that suit them.
You can even create entire online music courses. It’s all possible with MemberPress.
How to Start an Online Music School (In 7 Steps)
To get started, you’ll need to have a WordPress website set up. If you’re not yet at that stage, getting your website up and running is easy. Just check out this where to start with WordPress article.
You’ll also want to choose a theme for your site. One of our favorite things about WordPress is that there are so many great themes out there designed specifically for just about every kind of business.
Get started by checking out this post: The 5 Best Music School WordPress Themes.
Once you’ve got your WordPress site ready to go, you can follow the 7 steps below to turn it into a legit online music school business using MemberPress.
Step 1: Purchase and Install the MemberPress Plugin
First, you’ll want to visit the MemberPress website and choose your pricing plan. Packages range from Basic, which is great for beginners, to Pro – the extra benefits of that package include the bundled Easy Affiliate plugin.
The Basic package supports one website, unlimited members, and the course builder add-on, so it’s a solid choice if you’re just starting your first online business.
Once you’ve registered and chosen your plan, you’ll be sent to a Downloads page where you can grab the plugin as a zip file. Then, navigate to the Plugins section of your WordPress dashboard, and click on Add New. Select the MemberPress zip file and the plugin will install.
The final step of the installation process is to activate your license by inputting your license key. This combination of digits and letters is found on your Downloads page as well.
Step 2: Install the MemberPress Courses Add-on
Next, go to MemberPress > Settings > Add-ons in your WordPress dashboard, then click to install it.
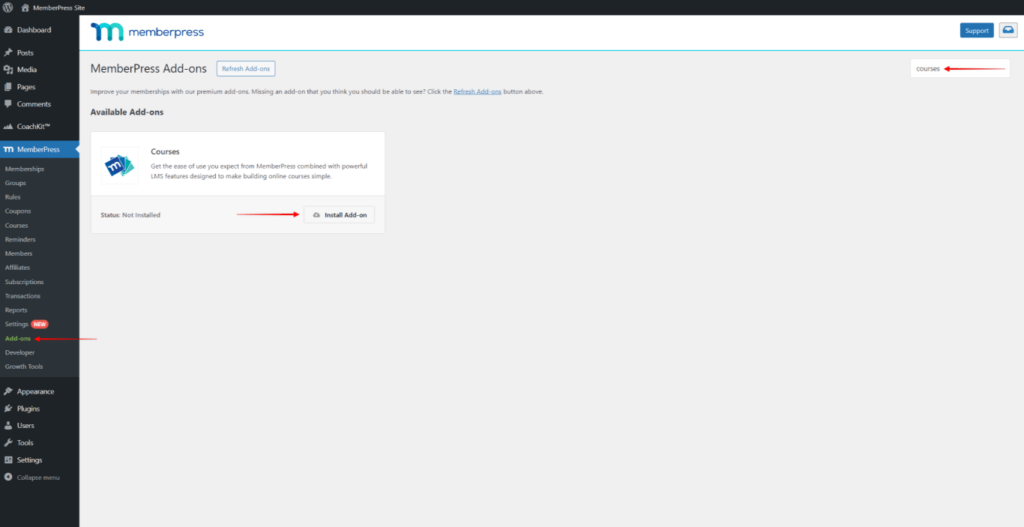
The add-on should now be activated on your site, and you can create your first music course.
Step 3: Create Your First Course
Before you create your first course, you’ll want to take some time to write down your course title, section headings, and a name for each lesson.
Once that’s all set, visit your new MP Courses > Courses page, and you’ll see the following buttons at the top:

Just click Add New to add a new Course.
Course Page
Next, give your course a title and add some descriptive content below the title. This content will serve as the course overview/description on the front-end.

Curriculum
Once you’ve wrapped up your course title and description, click on the “Curriculum” tab at the top to add your Sections and Lessons.
First, you’ll want to add a Section. You can think of Sections as modules to help you organize your Lessons into groups.

Below is a sample of how you might lay out your Sections:

Then, you can expand each Section to add Lessons and Quizzes as shown below:
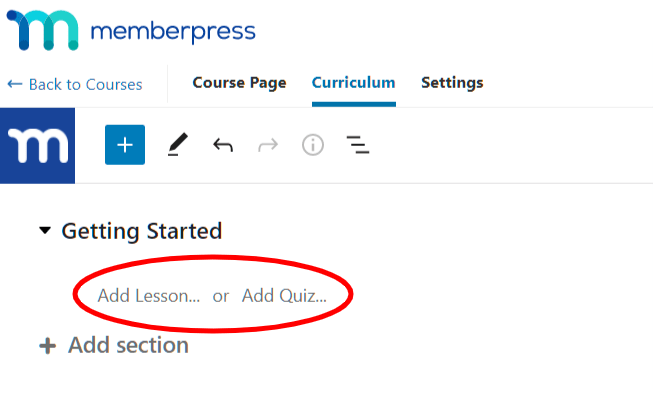
Once you create a Lesson or Quiz, it’ll show up in a list on the right side of the page:

Search for existing Lessons and Quizzes, and use the grid icon on the left to drag them into a Section within your Course. If a Lesson or Quiz already exists in another Course or Section, it’ll be moved to the new location.
To view a Lesson or Quiz, click the view button next to it. Doing so will open it for viewing on the front-end in a new window or tab in your browser:

Watch our full tutorial video on how to create a course using MemberPress Courses:
Expand Your MemberPress Course into an Online Music School Platform with CoachKit™
Are you looking to elevate your online music course into something more expansive? Consider transforming it into a comprehensive Online Music School platform with MemberPress CoachKit™:
This powerful tool integrates seamlessly with MemberPress, providing an enhanced framework for building a full-fledged online music school.
With CoachKit, you can effortlessly manage multiple courses, track student progress, and offer a more structured and interactive learning environment.
It’s the perfect way to scale up your music teaching business, offering a broader range of lessons and resources to students worldwide.
Step 4: Select the Payment Methods Your Members Can Use
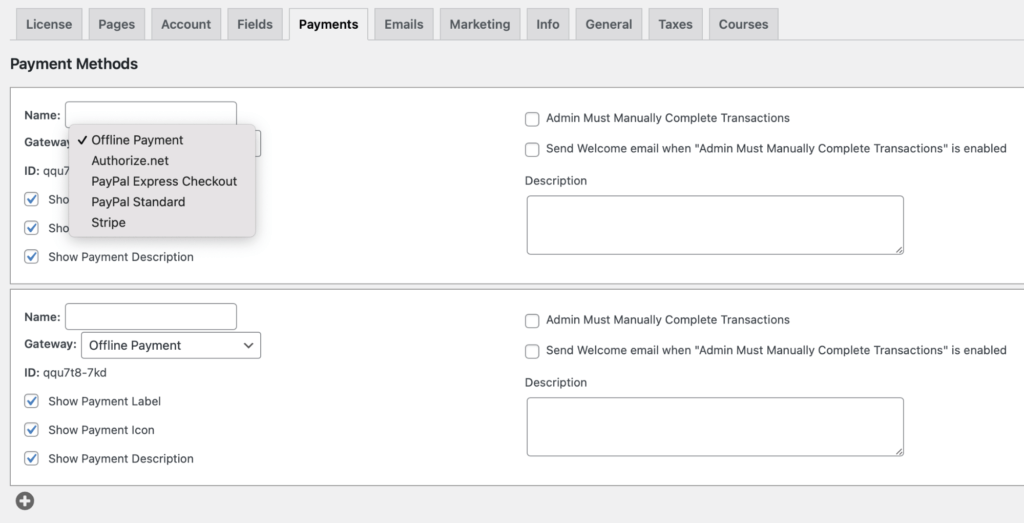
Next, you’ll need to set up a way for students to pay. This means considering what types of payments they may want to use. To do this, head to MemberPress > Settings > Payments.
If you see some students for in-person lessons, they may wish to pay for their memberships with cash or other offline methods. In that case, it would make sense to add the Offline Payment option from the Gateway menu:
Other payment gateways supported by MemberPress are PayPal, Authorize.net, and Stripe.
These gateways allow you to accept online payments via credit cards and digital wallets.
For each gateway, you can add a name and choose whether you would like the payment icon, label, and description to be displayed. You can also require an admin to complete transactions manually, and create a welcome email that will be sent to each new member.
Step 5: Describe and Price Your Membership Levels
Next, you can go to Memberships > Add New to create a page for each membership level you want to offer.
Following is an example of how you might organize your membership levels:
Basic Membership
- Sheet music access
- Unlimited video lessons
- One live lesson per month
Advanced Membership
- Sheet music access
- Unlimited video lessons
- Two live lessons per month
Premium Membership
- Sheet music access
- Unlimited video lessons
- Four live lessons per month
Whatever your specific plan might be, this is where you can add text and images to the body of the page. This will help attract customers to the features of each membership level:
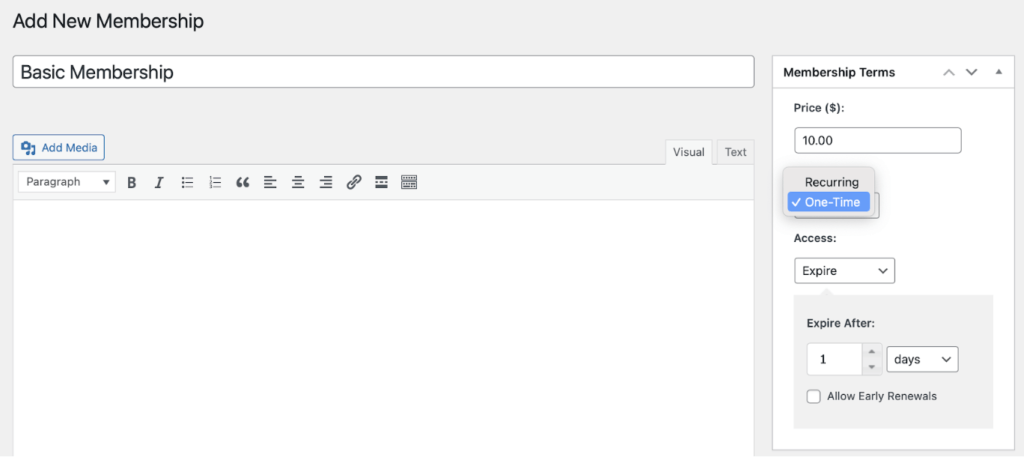
Under Membership Terms, you can select the price, billing terms, and access period you want to apply to this specific tier. Then, in the Membership Options section, you can select registration details and decide how you want the pricing information to appear on the page.
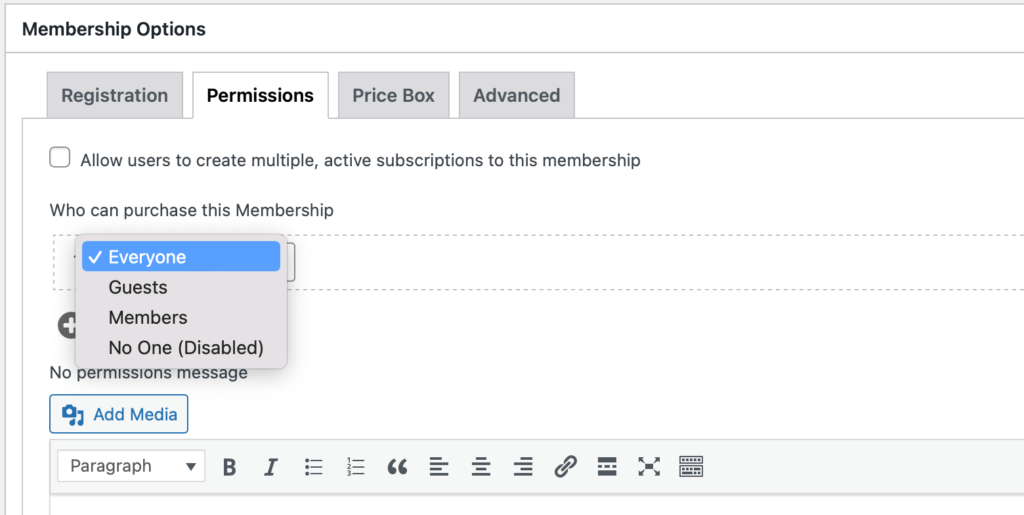
If you want to set limits on who can purchase each type of membership, check out the drop-down menu under Permissions:
You can select Everyone, Guests, or Members – or even disable the purchase option entirely.
Step 6: Create Rules to Protect Members-Only Content From Unauthorized Users
Once you’ve created your members-only content, you’ll probably want rules in place to protect it from unauthorized viewers. This way, each student will only be able to see the content intended for their membership level.
Under MemberPress > Rules > Add New, you can choose which pages to hide from non-subscribed users. These can be identified by a specific category, tag, or other criteria.
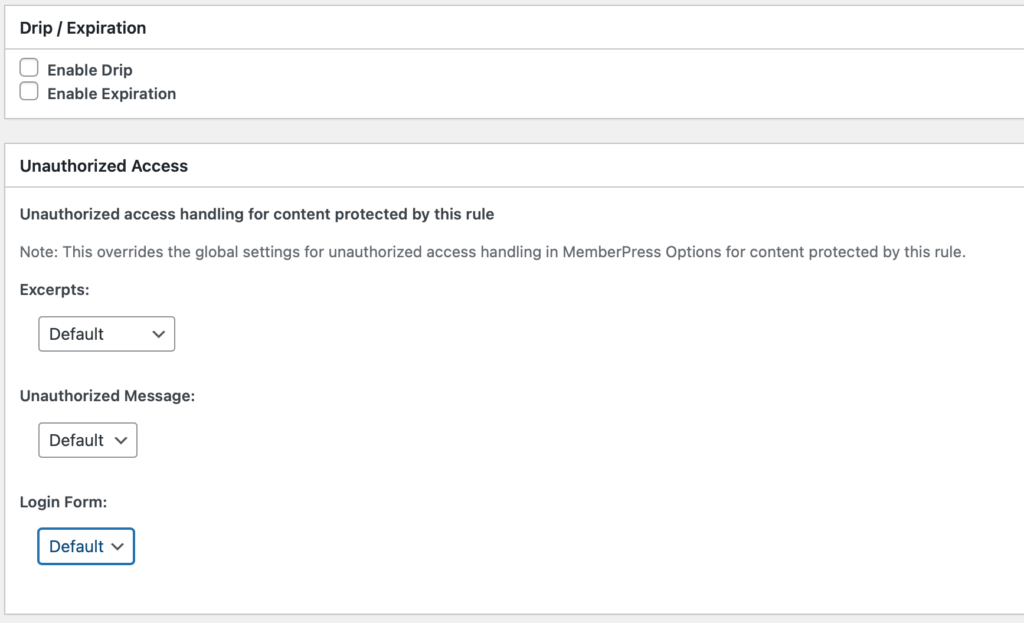
With the Drip/Expiration options, you can make content available to users at certain intervals (for example, you could set up weekly music lessons):
In the Unauthorized Access section, you can choose where unauthorized users will be diverted to if they click on content they can’t access.
For example, if a visitor tries to view a music course that is only available on the Advanced membership plan, a rule could divert them to the pricing page, where they’ll have easy access to upgrade to the next level.
Step 7: Design New User and Login Forms to Give Students Access to Your Site
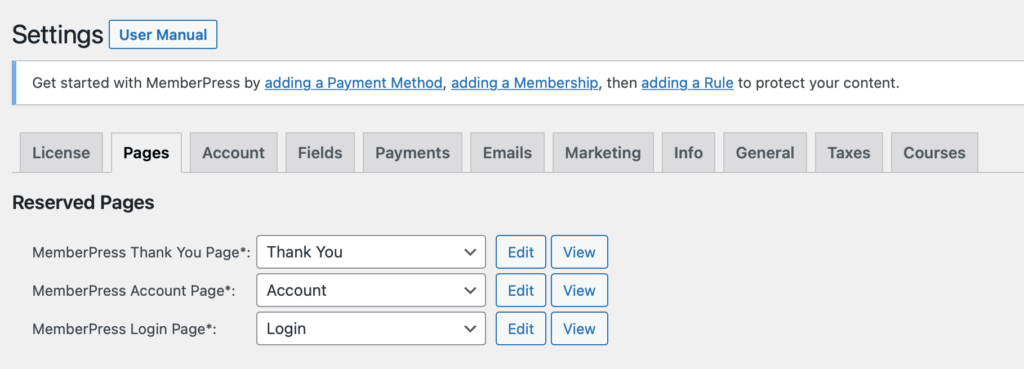
The MemberPress plugin automatically comes with Login, Account, and Thank You pages. To edit these, visit the Pages section under MemberPress > Settings and click on Edit:
You can then use the WordPress block editor to customize these pages however you like.
Conclusion
Monetized membership sites provide the chance to build new revenue streams through subscription fees.
If you provide music lessons, members-only content can support your in-person students and help you to reach a brand new audience of remote music enthusiasts.
With a plugin like MemberPress, you can start building your online music school business today. All it takes are five steps:
- Purchase and install the MemberPress plugin.
- Select your payment methods.
- Describe and price your membership levels.
- Create rules to protect members-only content.
- Design new user and login forms.
Have any questions about starting a music school business online with MemberPress? Let us know in the comments section below!
If you liked this article, be sure to subscribe to the MemberPress blog!




Wow. Great tutorial for musicians. There are many people who want to create music courses and instead of using their own websites, they use some third-party platforms. This guide is very helpful for those who want to create their own course platform.
Hi, great article! Quick question, do you need a business license to have this sort of subscription music lesson service? I know you don’t need one as an individual for just teaching lessons.
Hey Peter 🙂 That’s a great question! It looks like whether you teach lessons in person or online, you’re still considered an individual, private teacher. So whatever the sole proprietor rules are for your locale and industry should apply to your business. Good luck!!