

A location-based member directory lets visitors find members grouped by city, state, or country. It can also display members on an interactive map. This type of directory works well for professional networks, local chapters, alumni groups, and similar communities.
This document walks through the steps for creating a location-based directory. It covers enabling the address data, setting the location options, and adding the front-end filters. For general directory setup, see Creating Member Directories With MemberPress.
How Location Data Powers Directories
Every location feature in ClubDirectory™ reads from one source. That source is the standard MemberPress address fields on each member’s account. When a member fills in their city, state, and country, that data drives several things at once:
- the marker position on the Directory Map View;
- the matches returned by the search box on the Directory Filters block;
- the options available in the country and state filter dropdowns;
- the enrollment in directories restricted to a specific country.
Because everything flows from these fields, the first step is enabling them. The next step is making sure members fill them in.
Enabling MemberPress Address Fields
The address fields are part of MemberPress core, not ClubDirectory™. They need to be enabled before any location feature works.
- Navigate to Dashboard > MemberPress > Settings > Fields tab.
- Scroll down to the Address Fields section.
- Configure the visibility:
- Show on Account: adds the fields to the logged-in member’s Account area, under the My Profile tab as a Billing Address field group;
- Show on Signup: adds the fields to your registration forms;
- Require: makes the fields mandatory.
- Click Update Options.
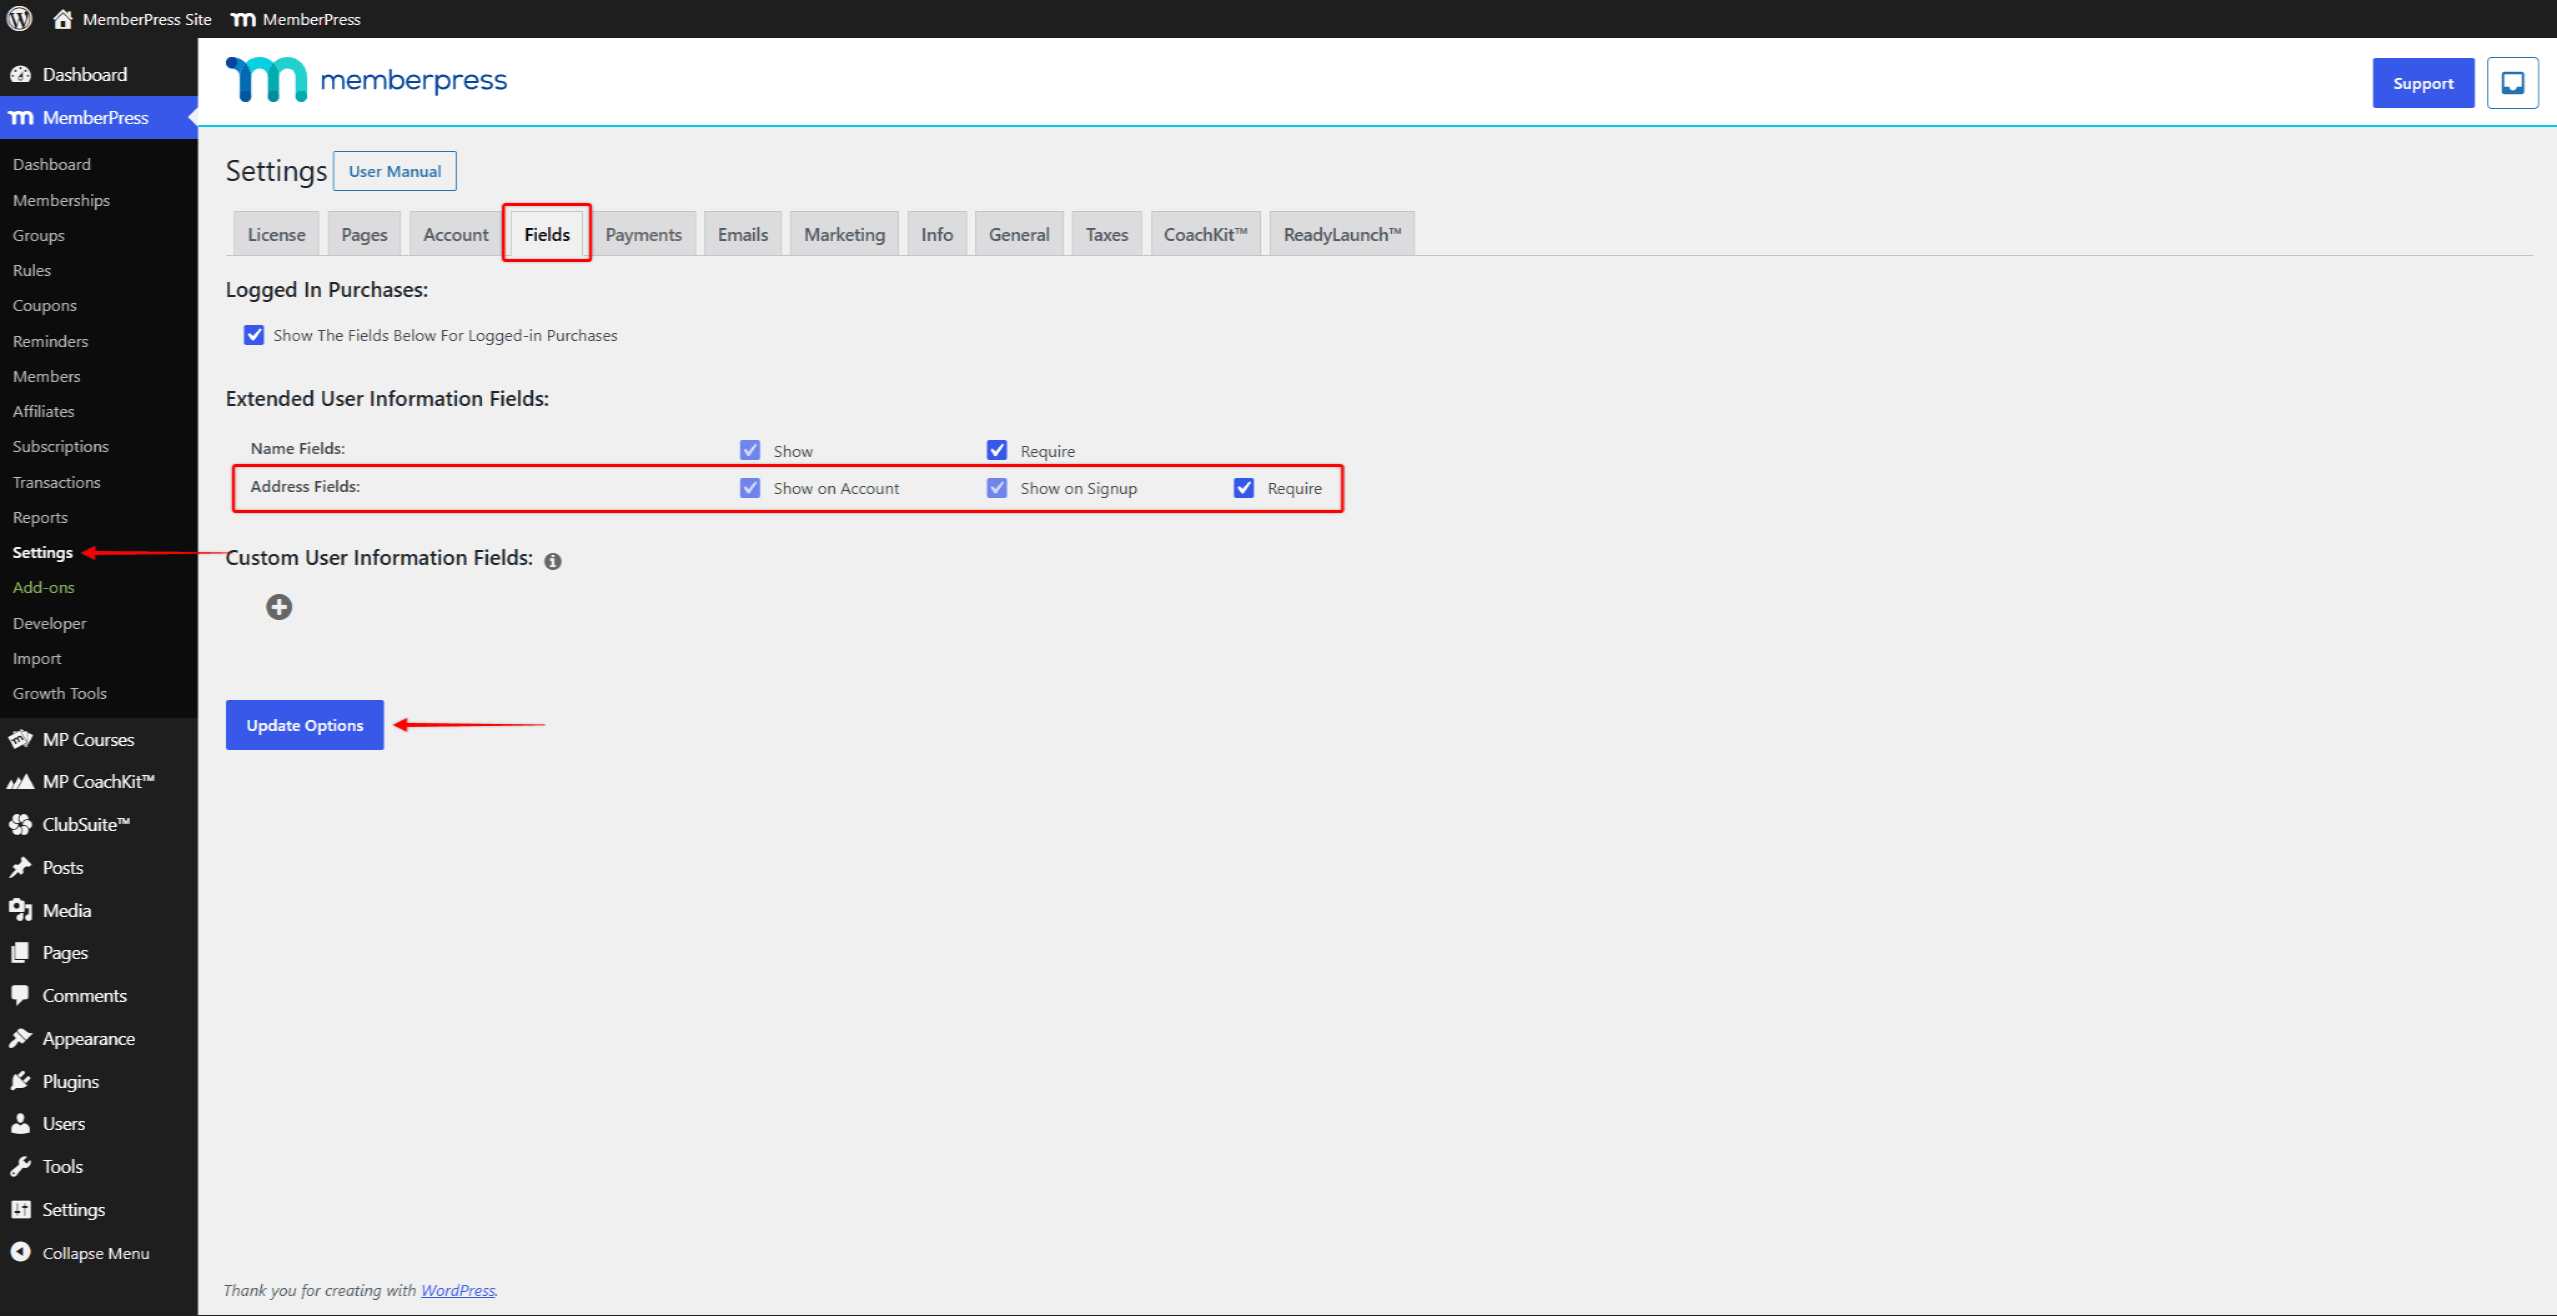
For most location-based directories, enabling Show on Account is enough. After signup, members can go to the My Profile tab in their Account area. There, they fill in the Billing Address field group.
Members without addresses still appear in the directory listing by name. But they won’t appear on the map until they add a city and country. After enabling the fields, encourage existing members to fill in their addresses. A welcome email or in-app reminder can point them to the My Profile tab.
Preparing the Map View
Before publishing the directory, import the City Database at Dashboard > ClubSuite™ > Settings > Directories tab. The City Database improves Map View performance. It resolves member addresses to map coordinates locally, avoiding a slower external lookup. This is a one-time setup step on a new ClubDirectory™ installation.
Creating the Directory
With address fields enabled and the City Database imported, the directory itself can be created. The full process for creating a directory applies here, with specific decisions for the location options:
- Navigate to Dashboard > ClubSuite™ > Directories, and click Add New.
- Enter a directory title (for example, “Italian Members” or “Members Worldwide”).
- In the right-hand Directory Settings panel, choose how to handle location:
- To include members from any location and let visitors filter by country and state from the front end, leave Filter by Location off;
- To restrict the directory to members from a single country, enable Filter by Location and select the country from the dropdown.
- Enable Enable Map View to add the interactive map to this directory.
- With Map View enabled, decide on Location Privacy:
- Enabled (recommended): each marker is randomly offset within about 10 miles of the actual location, so visitors see the general area without an exact pinpoint;
- Disabled: markers show the geocoded location based on the member’s city.
- Click Publish.
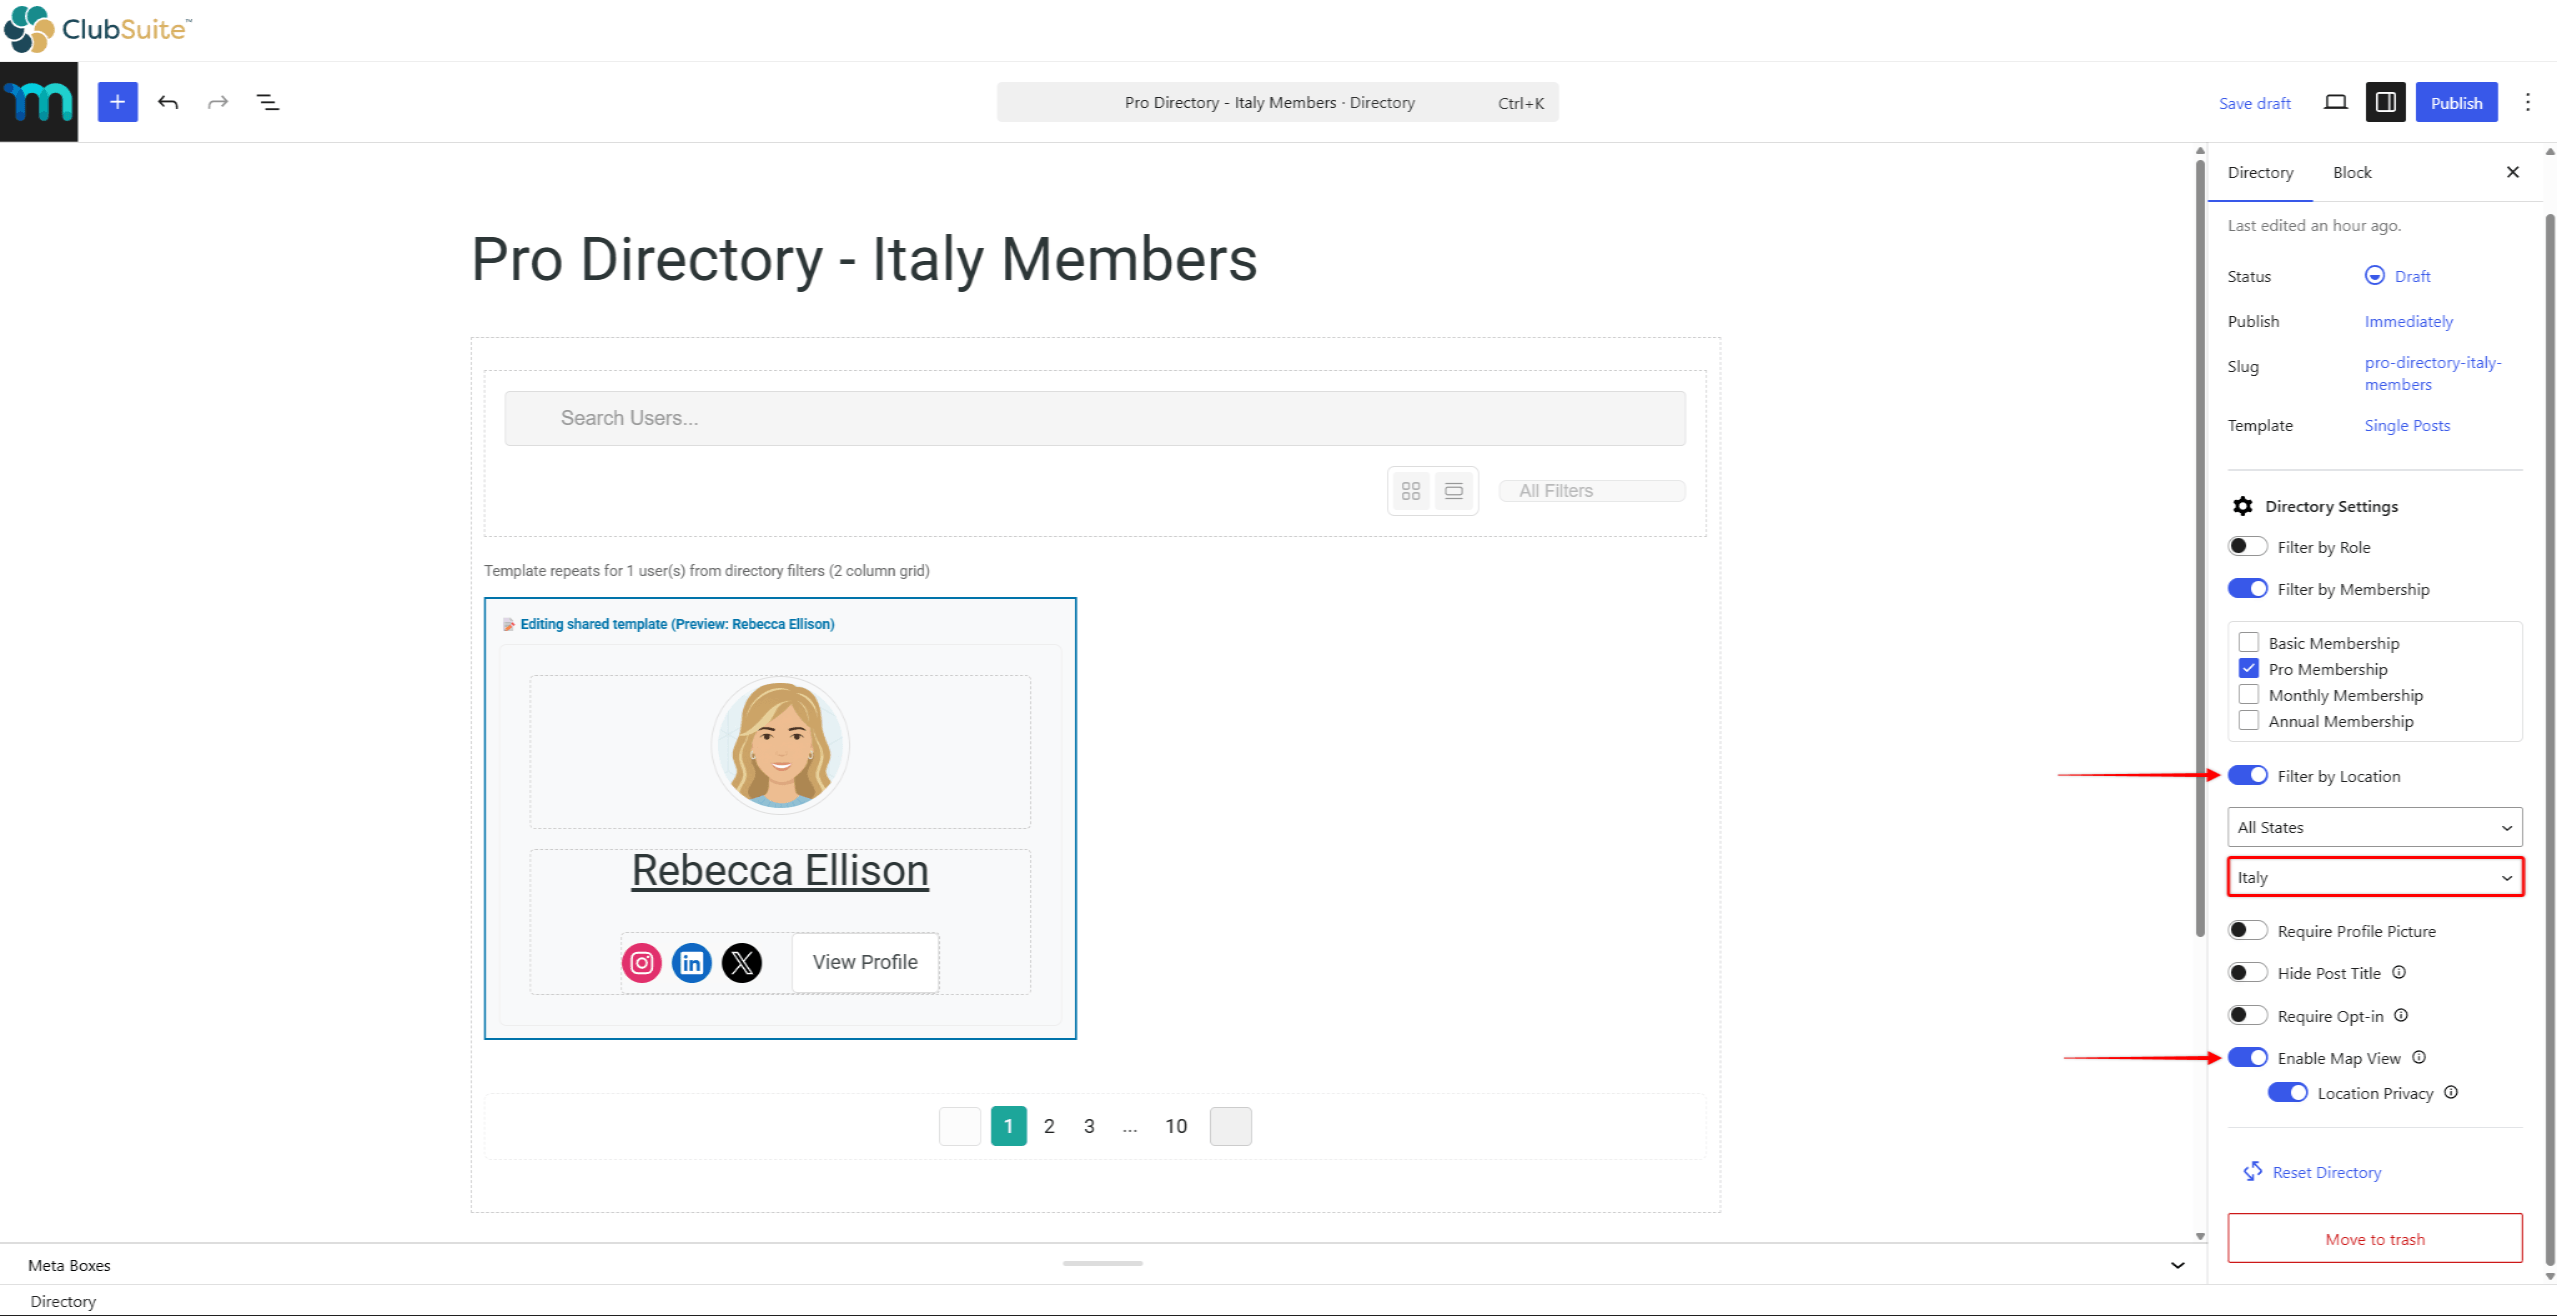
The directory URL is generated automatically. The default URL format is https://yourdomain.com/directories/directory-title/.
Enabling Location Filters on the Front End
The Directory Filters block controls how visitors search and narrow the directory. It’s included in the default directory template. So it’s already on the page when a new directory is created.
For a location-based directory, two of its toggles matter most. Show Search is the search box. It now matches city, state, and country automatically, alongside member names. Show Location Filters adds country and state filter dropdowns to the directory.
- While editing the directory, click the Directory Filters block.
- In the right-hand sidebar, confirm both Show Search and Show Location Filters are enabled.
- Optionally, update the Search Placeholder to guide visitors (for example, “Search by name or city”).
- Click Update to save.
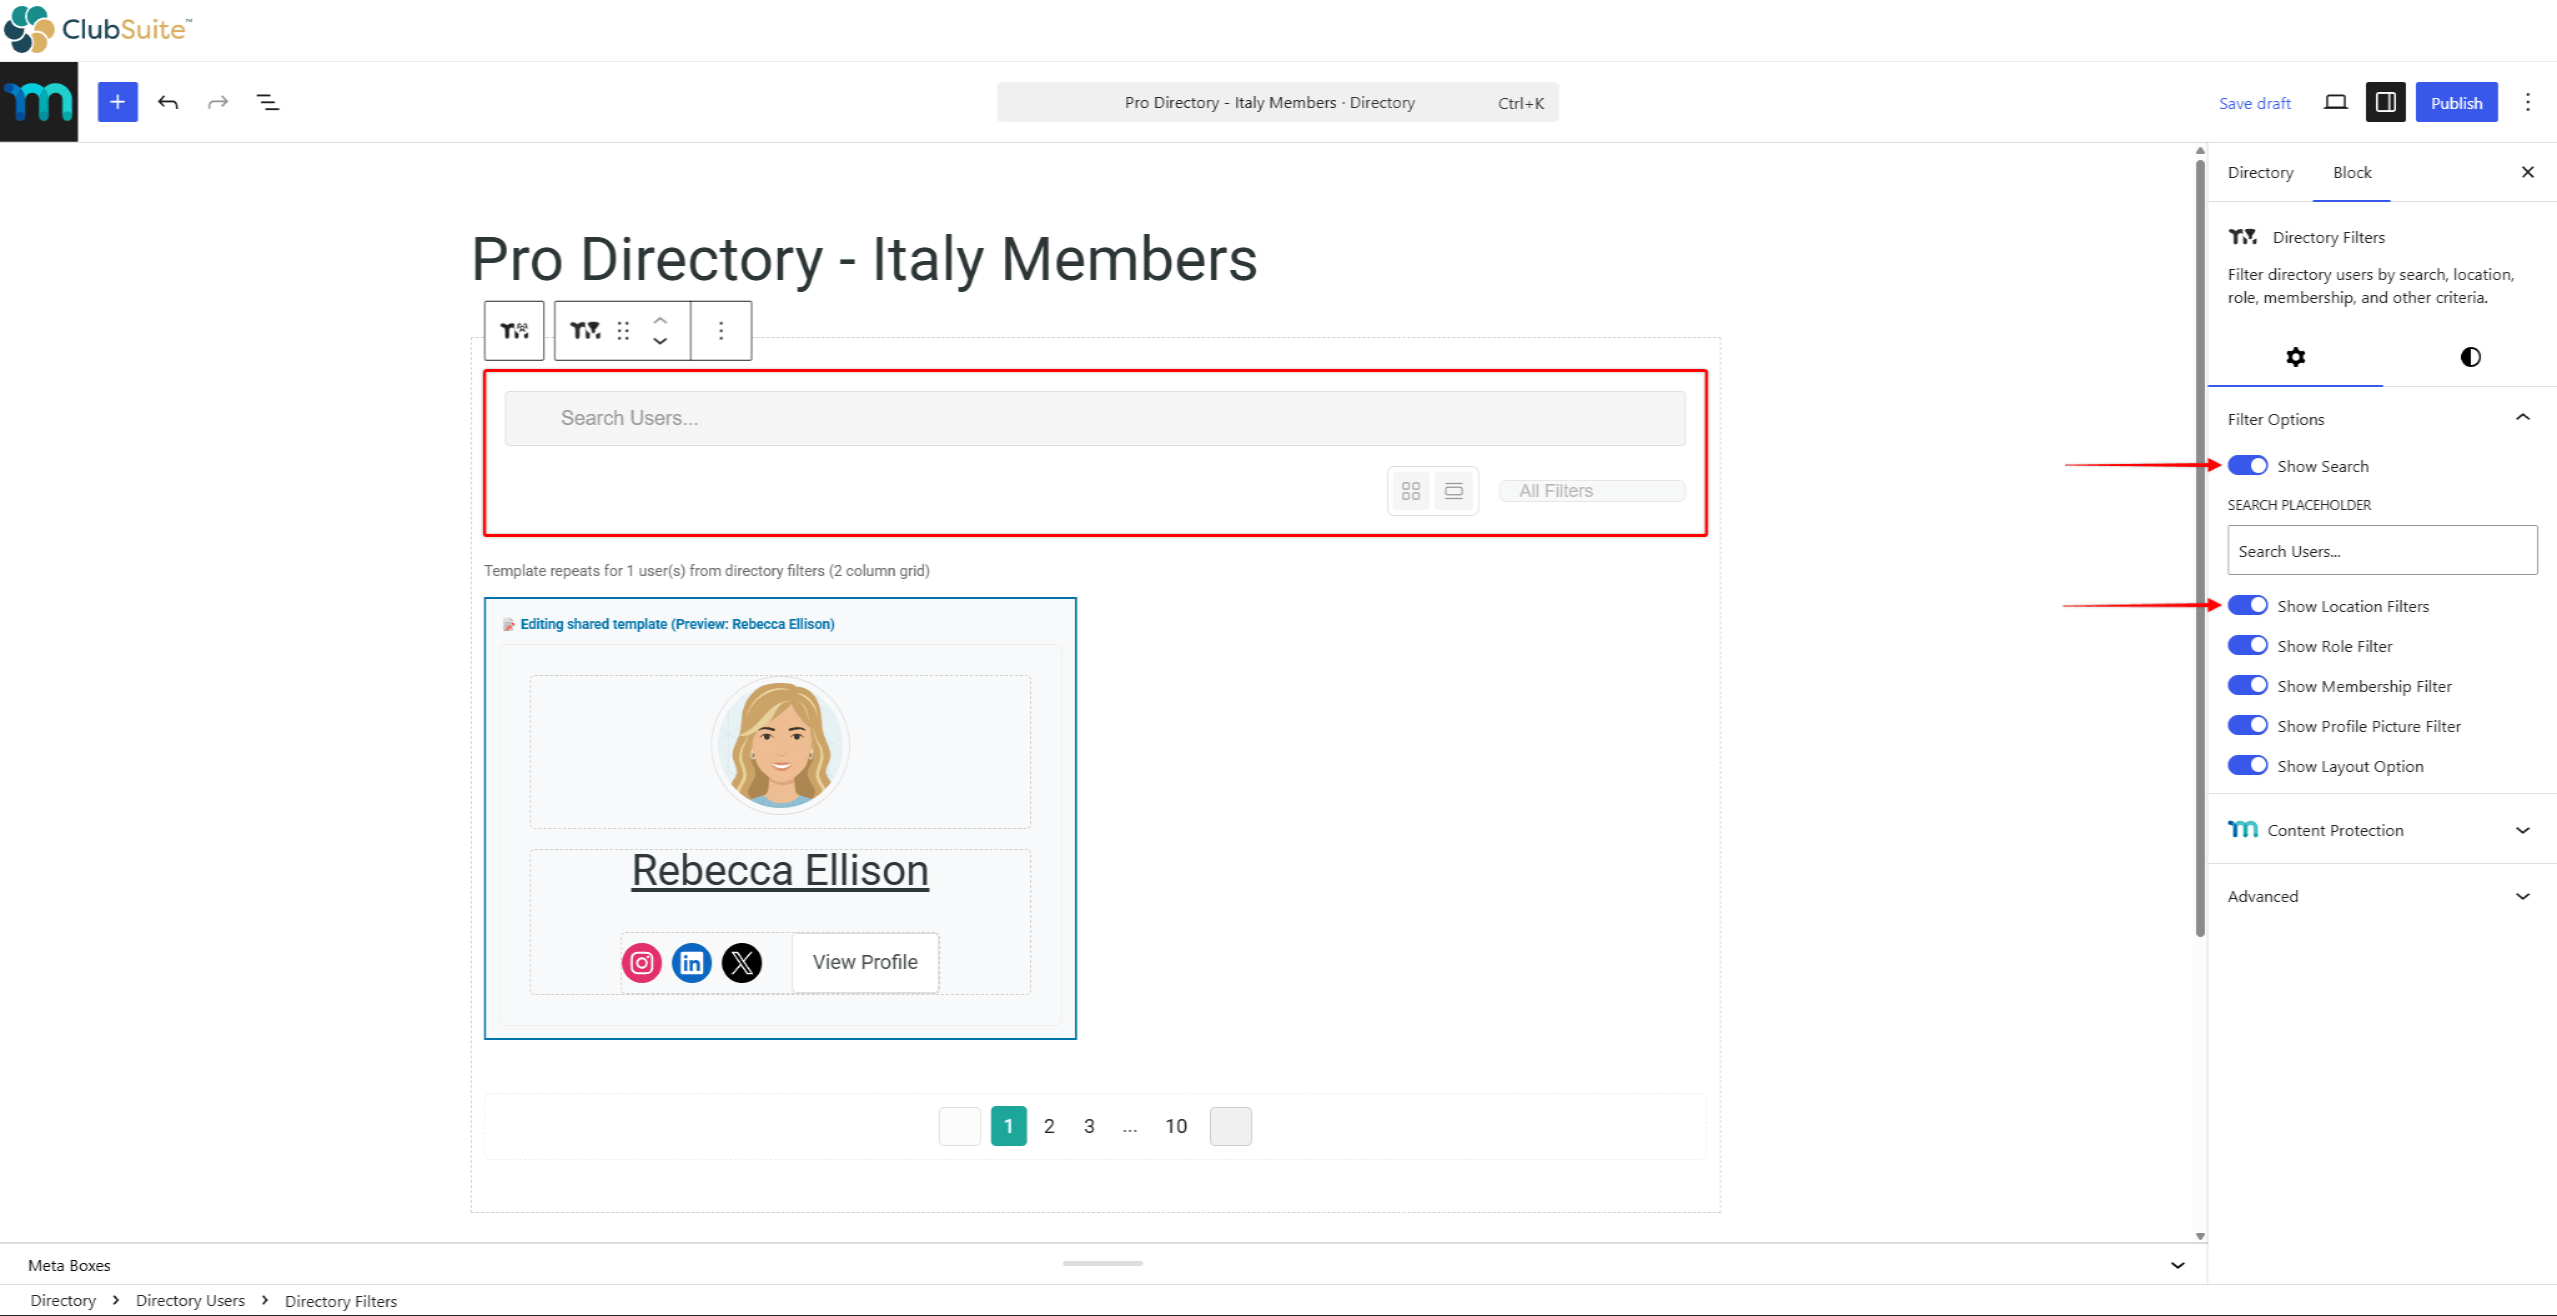
The state dropdown appears only for countries with predefined state lists (such as the United States and Canada). For other countries, visitors can enter state or region text instead. For details on the other Directory Filters block options, see the Creating Member Directories documentation.
Adding the Member’s Address
Once everything is set up, members fill in their address from their Account area. The address can be added in two places:
- On the registration form — if address fields are enabled with the Show on Signup option, members fill in the address as part of signing up;
- From the Account area — members go to the My Profile tab and fill in the Billing Address field group. This is where members who skipped the address at signup, or who signed up before address fields were enabled, can add their address later.
When a member saves a complete address, they appear on the directory map within about a minute. The address needs at least a city and country to count as complete.
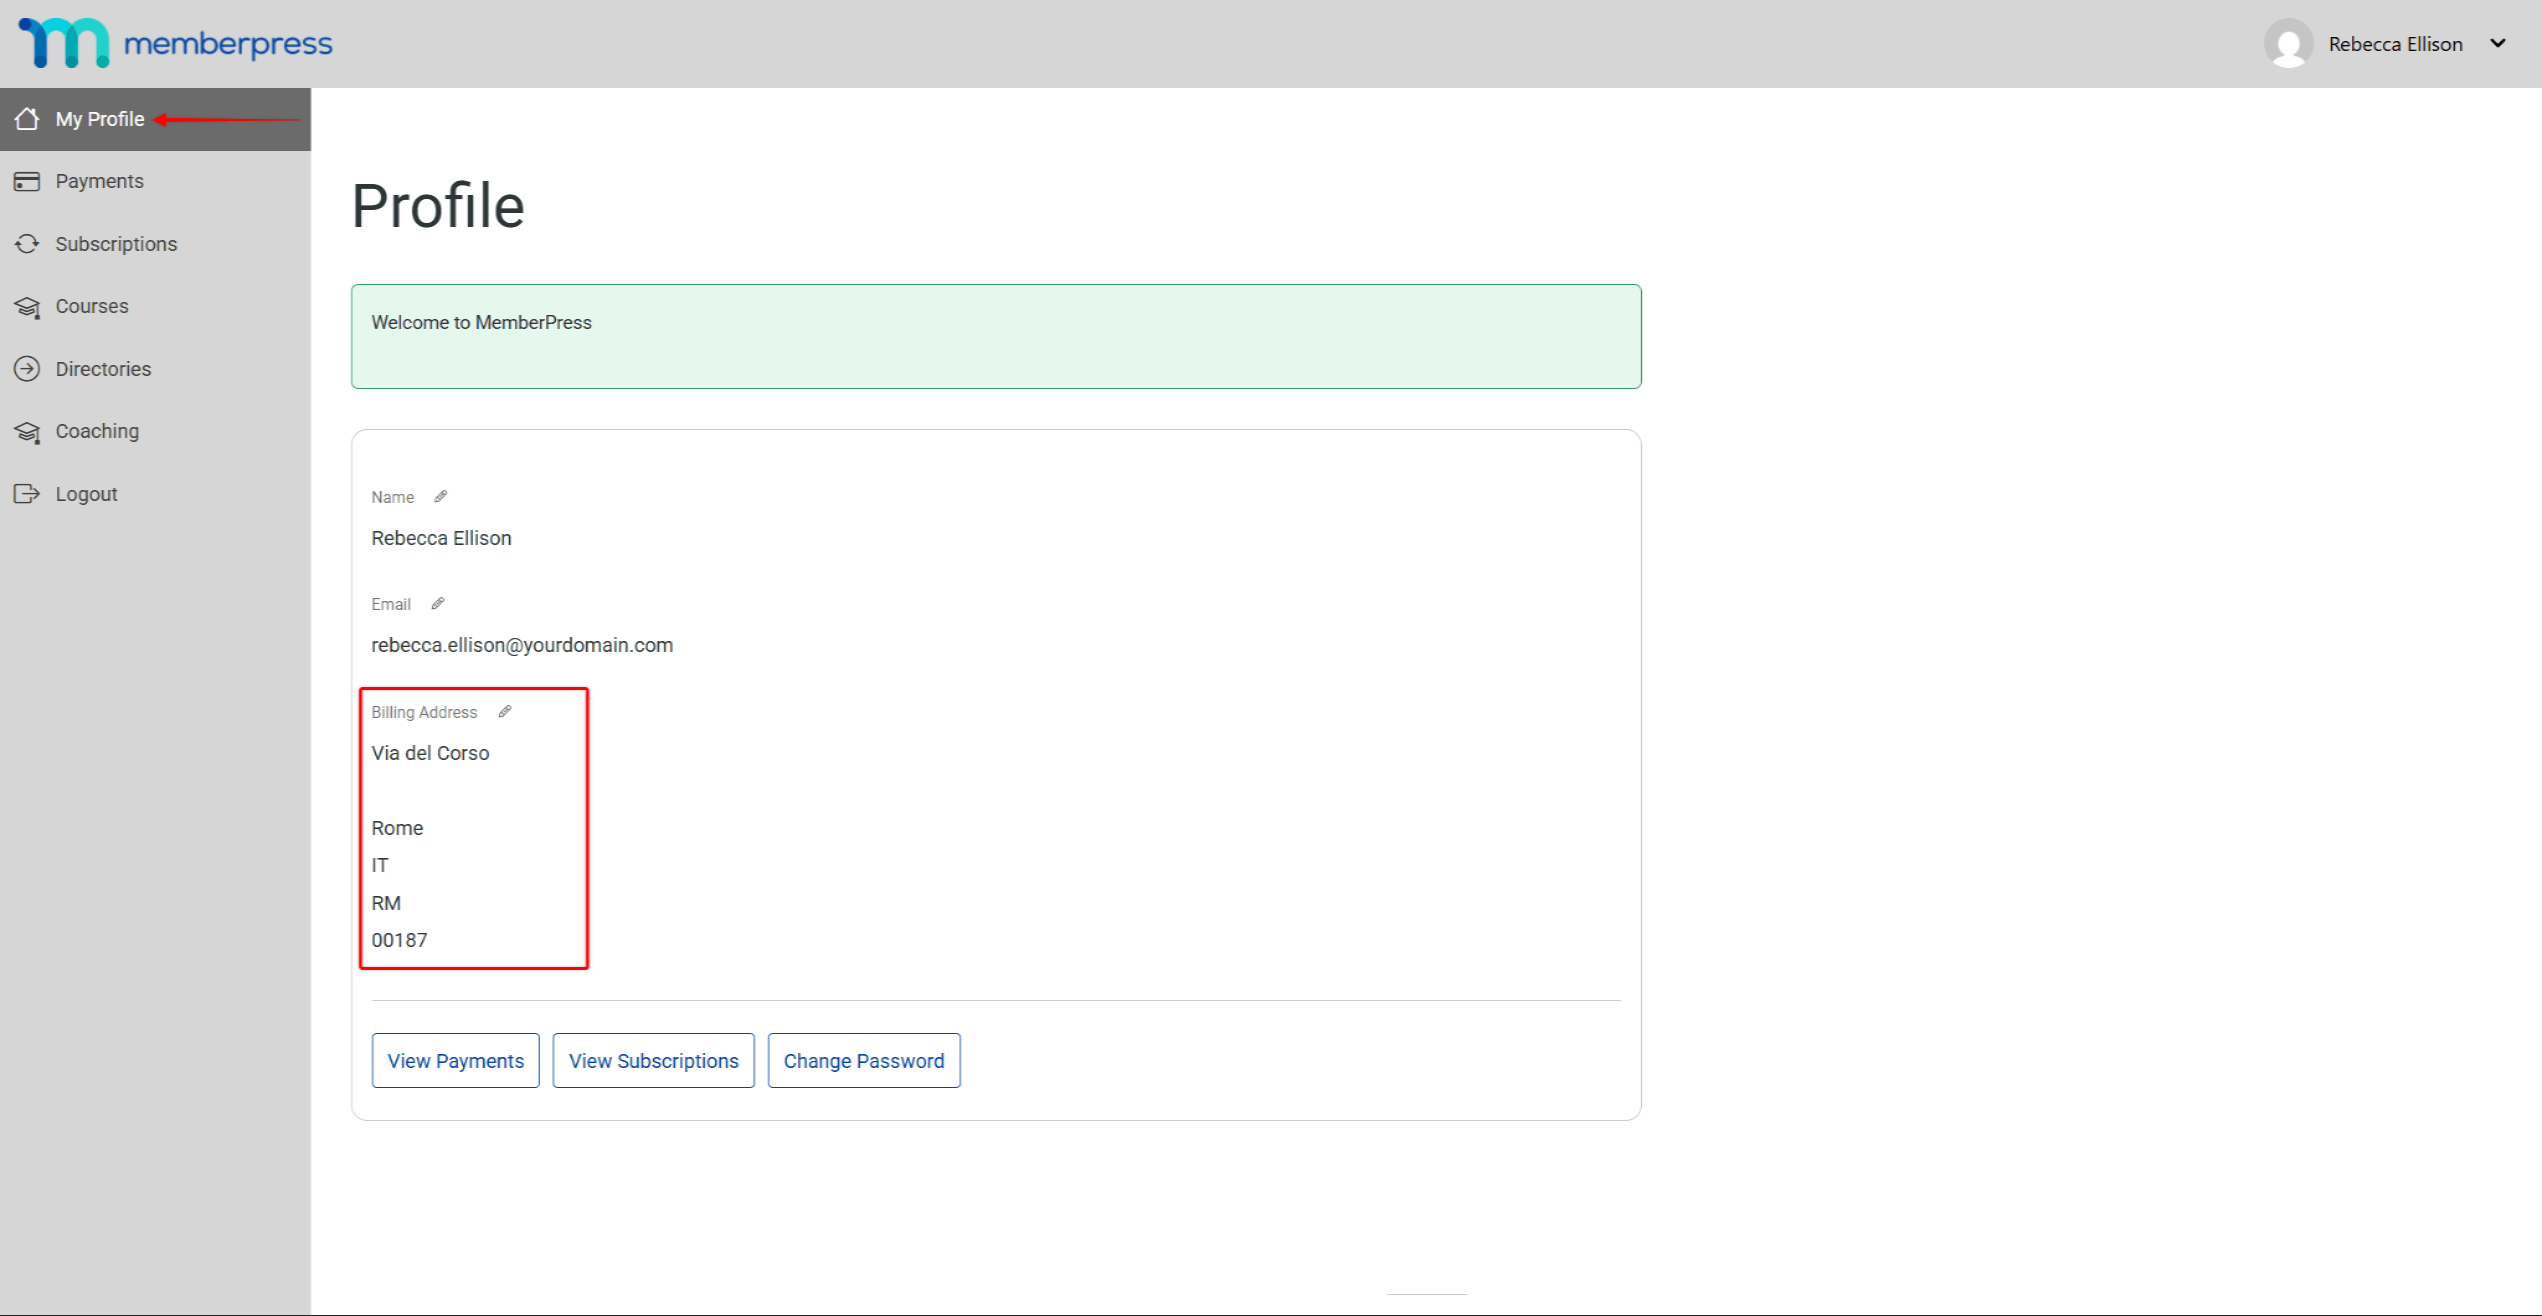
This process runs in the background. Most addresses resolve instantly from the local City Database, while less common cities fall back to an external lookup service. Members with identical addresses share the same coordinates, so groups of members from the same city resolve quickly.
Members can fine-tune their map position using the Exact Location field on their profile page. This optional field accepts precise coordinates that override the geocoded location for the map marker. The directory search and filter dropdowns continue to use the address fields. For more on the member-side experience, see Map View Profile Visibility in the Member Experience documentation.
Troubleshooting an Empty Map
If members aren’t appearing on the map as expected, check these common causes:
- The member hasn’t filled in their address. Members appear in the directory listing by name. But they need at least a city and country to appear on the map;
- Geocoding hasn’t run yet. New addresses take about a minute to process in the background. On a low-traffic site, the map may still seem incomplete after several minutes. Visiting the directory page in a browser typically prompts the process to run;
- The City Database hasn’t been imported. Without it, every address goes through the slower external lookup. Import the database at Dashboard > ClubSuite™ > Settings > Directories > Map Geocoding;
- Enable Map View is off for this directory. Open the directory in the editor. Confirm the Enable Map View option is enabled in the right-hand sidebar;
- The address can’t be matched to a known city. Cities with unusual spellings or non-Latin scripts may fall back to the external lookup. If a specific address consistently fails, the member can use the Exact Location field on their profile. This lets them enter coordinates manually.










