Increasingly more people have taken an interest in home gardening since the start of the COVID-19 pandemic. This activity provides an opportunity to get outside and reduce reliance on supermarket groceries. If you’re a self-proclaimed green thumb, you may be looking to share your tips with these aspiring gardeners.
Starting a membership website is an excellent way to share gardening advice and grow an online community. Fortunately, it’s very easy to set one up thanks to our MemberPress plugin.
In this guide, we’ll discuss the benefits of creating a member’s only site for horticultural tips. Then, we’ll show you how to start a gardening membership site in five easy steps. Let’s get started!
Why You Should Consider Starting a Membership Site for Gardening Advice
Unlike a regular website, a membership site has content that is only available to subscribers. Users will need to pay a subscription fee or register their details in order to access these hidden pages.
A membership site for gardeners may contain content that assists subscribers in improving their horticultural skills and growing different plants. For example, The Gardening Academy helps people grow edible plants:

Starting a gardening membership site could be a lucrative venture if you have horticultural skills. In 2020, the global gardening market was worth approximately $104 billion. Furthermore, gardeners spent 42% more time engaged in the activity during that year.
With a subscription-based membership site, you can make money every time a new user signs up or continues to use your service. You could also start a free registration-based website and generate income via affiliate links. In either case, you can start earning passive income once you set up your membership site.
For inspiration, check out MemberPress-based gardening website School STEM Gardens.

In addition to onsite programs, the organization provides on-demand gardening instruction for students and school staff members.
How to Start a Gardening Membership Site (In 5 Steps)
For this tutorial, you’ll need your own website. If you don’t have one yet, we suggest getting started with WordPress. This popular platform comes with a user-friendly interface and a host of powerful features.
Now, let’s look at how to turn your website into a members-only site.
Step 1: Design Your Gardening Content
First, you should consider what content you want to add to your site. This material will incentivize users to become members, so it’s important that you think about your strengths and what you can offer to subscribers.
For instance, you may want to upload videos demonstrating different gardening techniques like pruning, mulching, and tending to different plants. Additionally, you could create downloadable documents like gardening cheat sheets for common flowers and herbs.
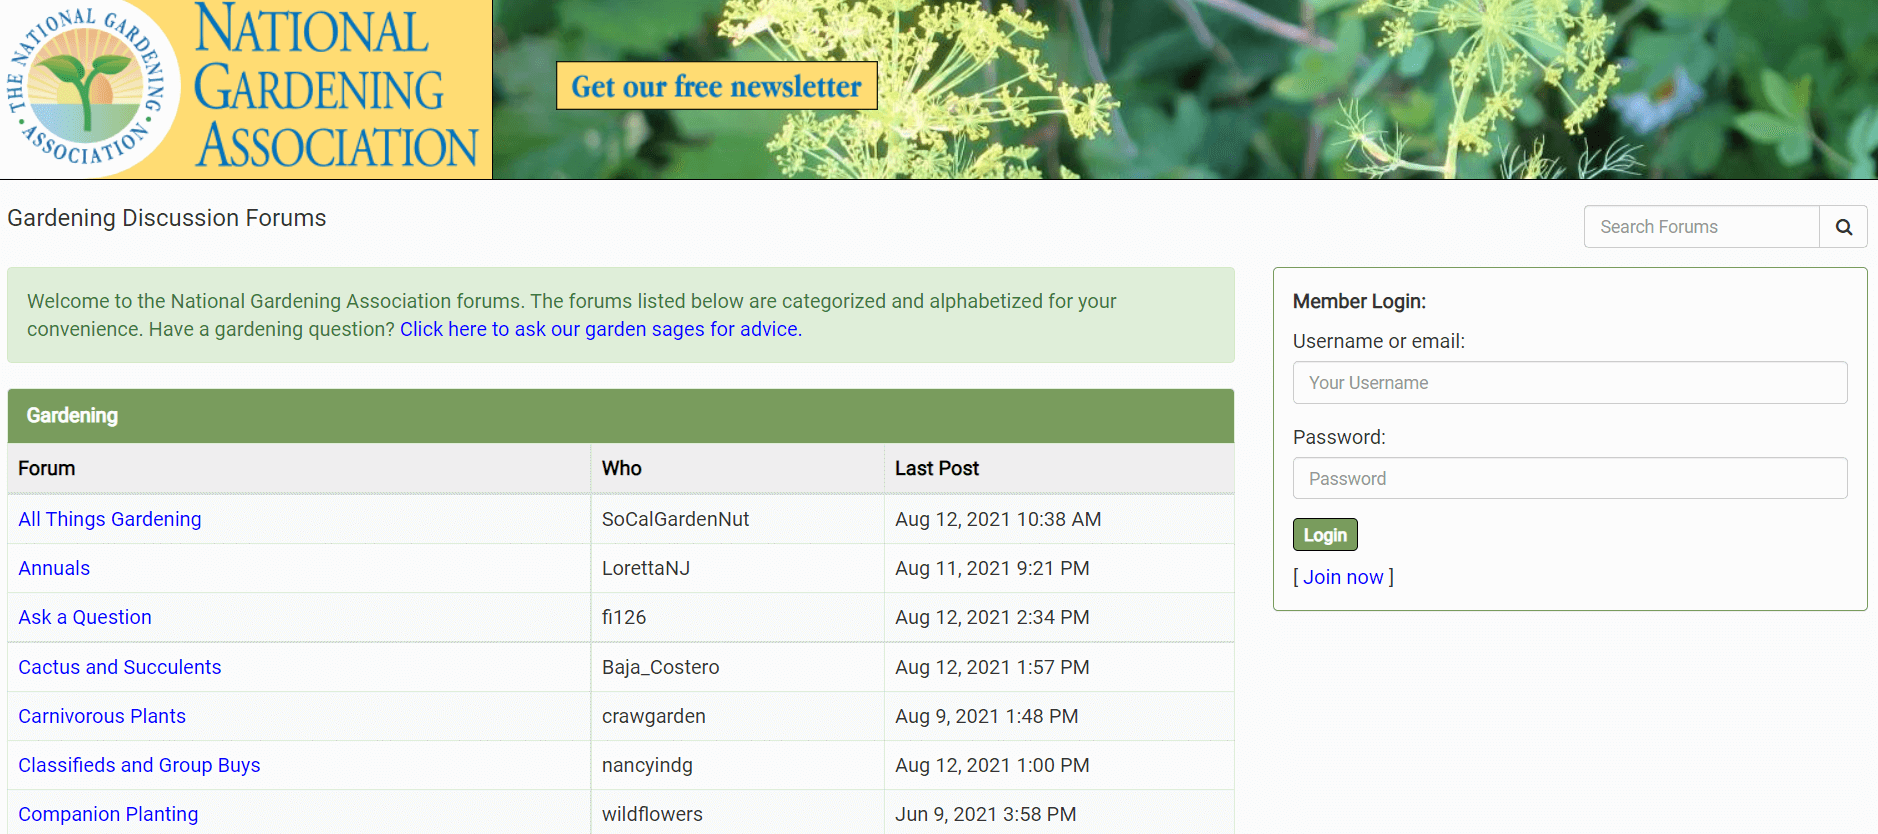
You might also add member discussion forums to allow your subscribers to collaborate and learn new things. For example, the National Gardening Association has members-only threads for gardening advice and achievements:
Finally, you may like to sell products to your subscribers via an ecommerce store. You can do this directly by stocking your favorite brands of gardening tools, seedlings, and fertilizers. Alternatively, you could recommend items and earn money through affiliate links.
Step 2: Install and Activate the MemberPress Plugin
Once you’ve decided on your content, you can start creating your membership site. In this tutorial, we’ll work with our MemberPress plugin as it integrates well with WordPress and makes the setup process super easy.
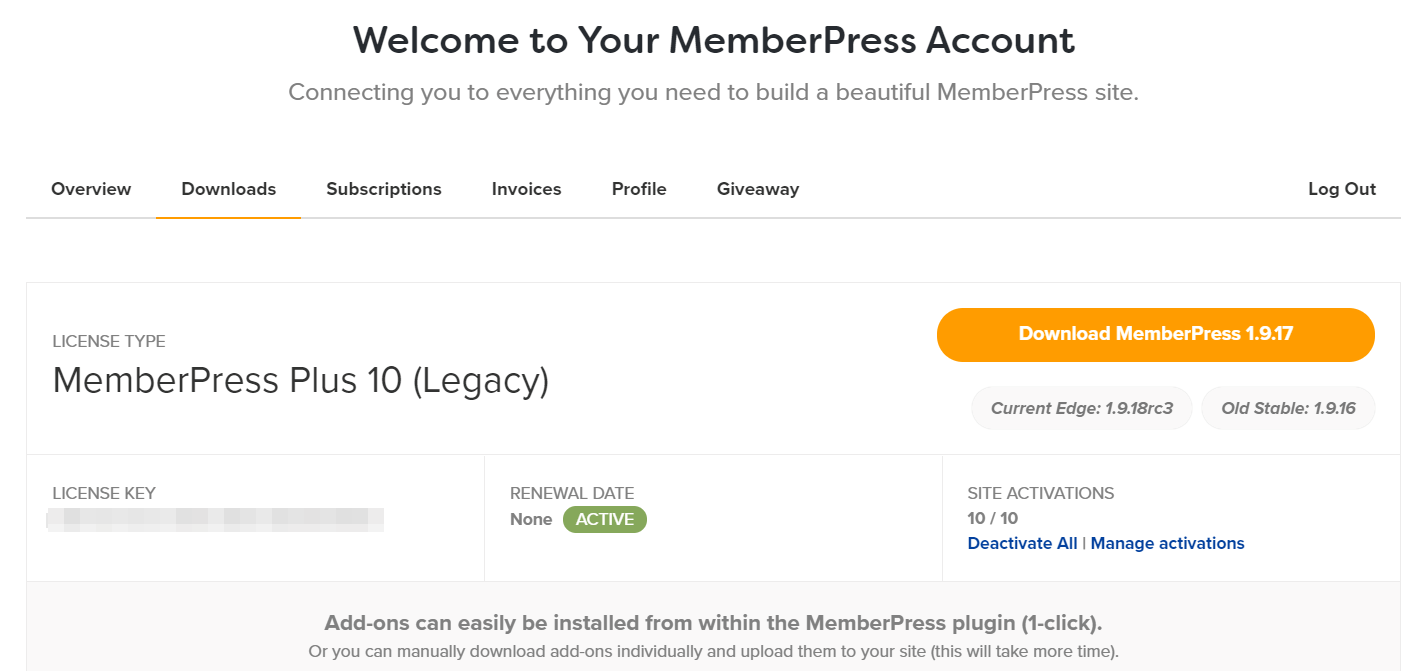
Start by choosing a MemberPress plan and signing up for an account. You’ll then be taken to your account dashboard, where you can download the plugin files and access your license key:
Keep this tab open while you navigate to your WordPress dashboard. Head to Plugins > Add New > Upload Plugin > Choose File:

Select the downloaded MemberPress files (they’re in a .zip folder) from your computer and click on Install Now. Then, activate the plugin and switch back to your MemberPress account dashboard to copy the license key. Enter it in the plugin dashboard in WordPress, and customize your general settings.
Step 3: Set Up Your Gardening Membership Plans
Next, head to MemberPress > Memberships > Add New. This will bring up a new page where you can name your membership plan:
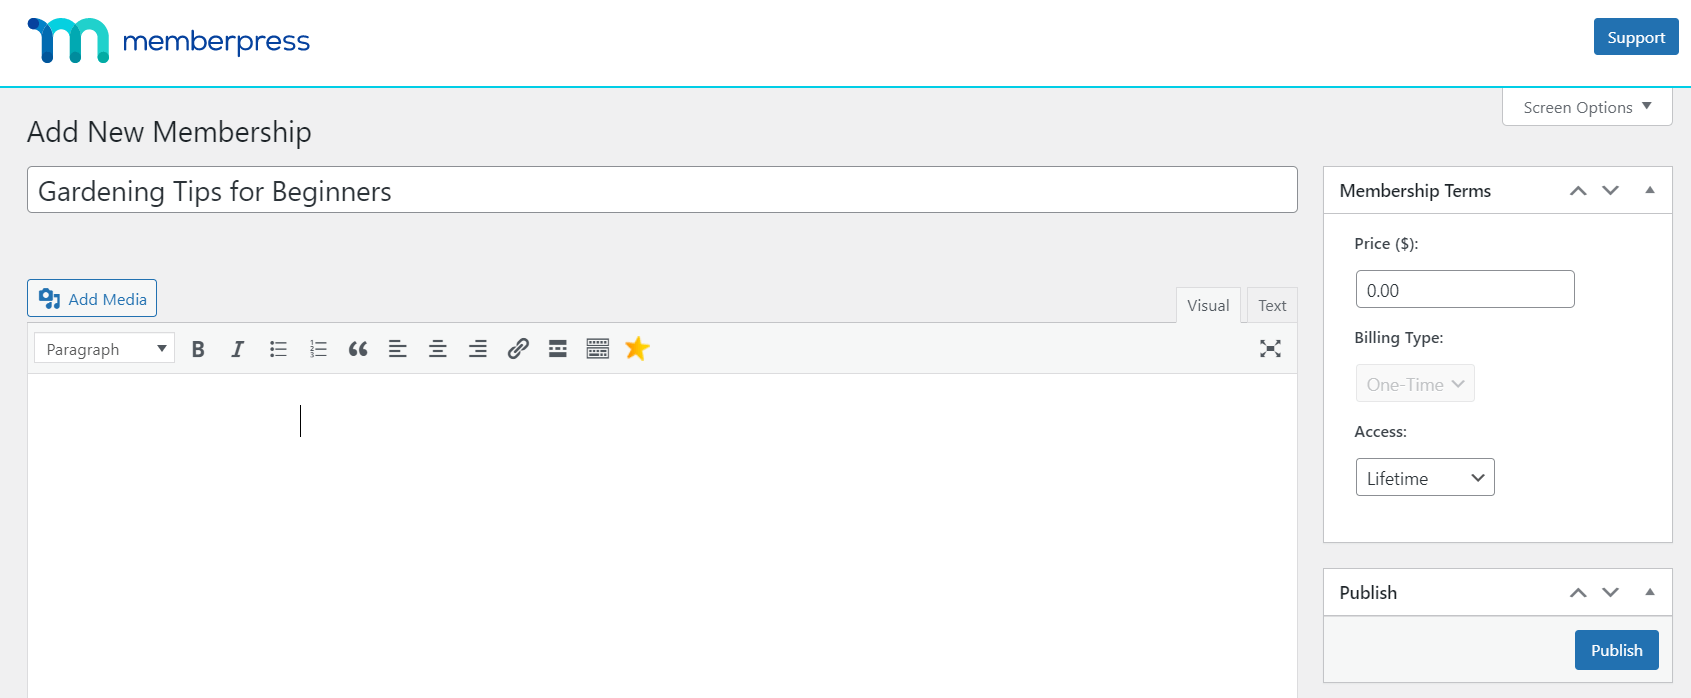
Here, you can customize various membership settings, including the price, billing type, and access period. Additionally, you can scroll down and adjust the advanced membership options. For example, you can set up:
- The registration button and thank you message for new members
- Payment methods
- The appearance of the price box
When you’re happy with your settings, click on Publish. You can come back here at any time to change these settings.
You may also want to set up a few different membership plans. For example, you may offer a cheaper subscription to hobbyist or beginners, and a more expensive option for experienced gardeners. Offering different tiers could help you reach a wider audience.
Step 4: Configure Your Membership Rules
Next, you’ll need to control which content is available to different members. Start by navigating to MemberPress > Rules > Add New. This will bring up a new page that enables you to choose the type of protected content and the access conditions:
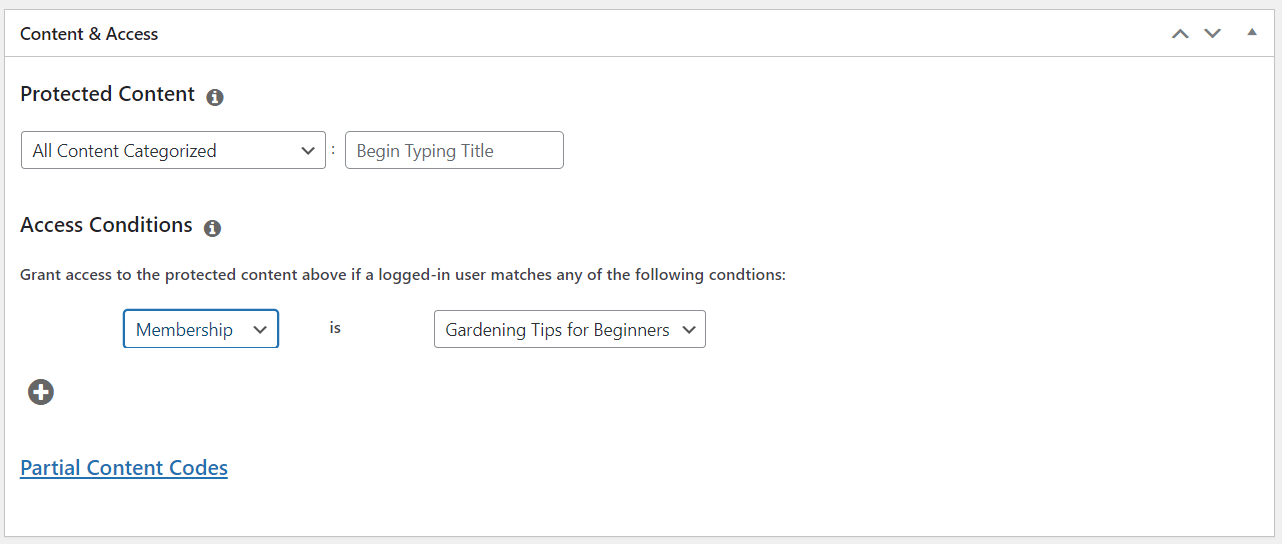
You can select content according to its category, tag, post type, page type, or shipping class. Then, you can determine if a particular membership, member, role, or capability can access that content.
For example, you can establish a rule that only members of your most expensive plan can access pages with a premium category tag.
Once you’re ready, click on Save Rule. If you have different membership plans, you’ll need to set up access conditions for each one.
Step 5: Add Your Membership’s Registration Link and Login Page
Finally, you’ll need to create a menu that directs visitors to your registration page. This step is essential as it enables users to find your plans and sign up as subscribers.
You can start by heading to Appearance > Menus and clicking on Manage with Live Preview. Scroll down and select Menus > All Pages > + Add Items. Open the dropdown menu called Memberships and choose your membership plan:
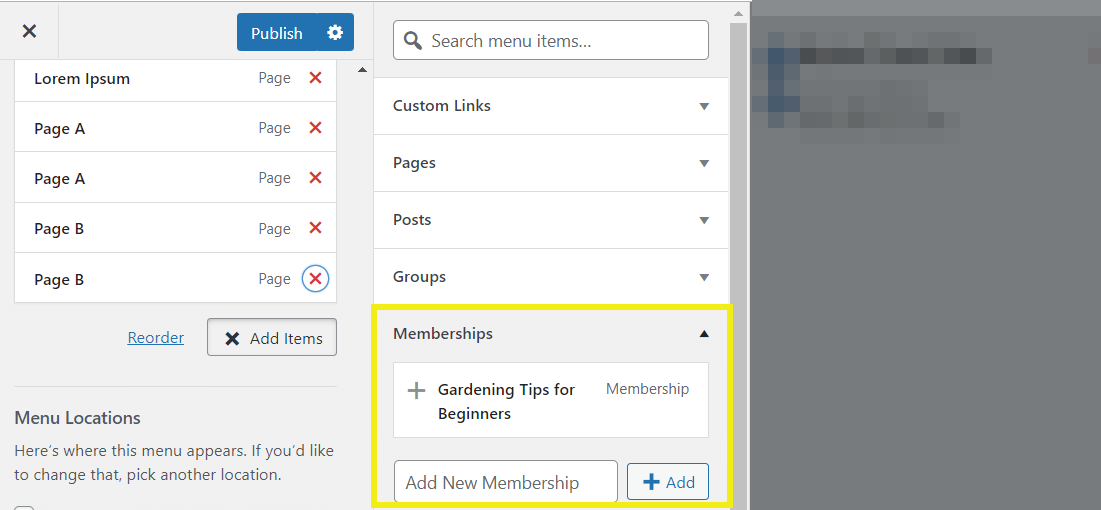
Then, click on Publish. This will add the signup menu to all of your pages.
The last step is to set up a login page, so that members can access their accounts. Navigate to MemberPress > Settings > Pages. Then, click on the dropdown menu next to MemberPress Login Page and select Auto Create New Page:
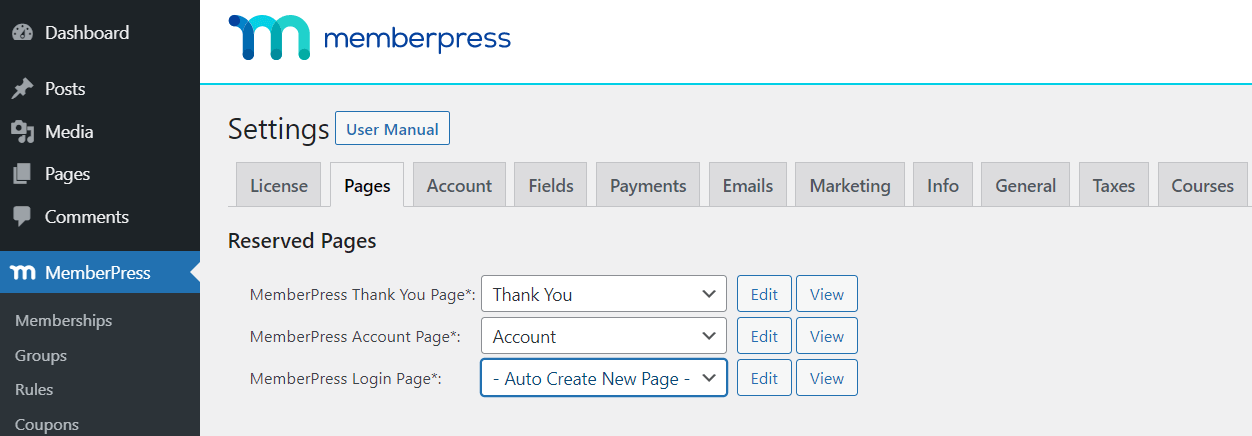
If you want to change the appearance of this page, click on the accompanying Edit button. When you’re happy with your changes, scroll down and select Update Options. Now you’ve finished setting up your gardening membership site!
Need a Hand? Let the Experts Plant the Seeds
Starting a gardening membership site with WordPress and MemberPress is as rewarding as nurturing a thriving garden.
But if you’d rather focus on sharing your gardening expertise than managing tech details, we’ve got you covered.
Our affordable Done For You services take care of the entire site setup.
Let our MemberPress Pros prepare the “soil” of your site, so you can focus on growing a community of passionate gardeners with the world’s top membership platform.
Conclusion
Home gardening has increased in popularity since the start of the pandemic, and the trend doesn’t seem to be dying down any time soon. If you’re an experienced gardener, you can take advantage of this market by creating a horticultural advice site.
Here’s a recap of how to start a gardening membership site:
- Design your gardening content, such as videos and cheat sheets.
- Install and activate our MemberPress plugin.
- Set up your gardening membership plans.
- Configure your membership rules.
- Add your membership’s registration link and login page.
Do you have any questions about setting up a membership site with gardening content? Let us know in the comments section below!
If you liked this article, be sure to subscribe to the MemberPress blog!




Add a Comment