Do you want to create a monetized membership site to sell courses on WordPress? If so, this article is tailor-made for you!
The online education industry is booming. Based on reports, the global online education industry will be worth well over $465 billion by 2028. Wouldn’t you like a piece of that pie?
Selling courses online is a great way to bring in passive income month after month. You put in the work of creating a single course, then promote it to bring in recurring income. Then, the more courses you create, the more income you make!
Self-Hosted is Better
Some creators use hosted platforms like Udemy and Skillshare to promote their courses. The problem with that is third-party fees. Hosted platforms take a large cut of your profits, and they own your data.
When you run your online course business on WordPress with MemberPress, you keep your profits, and you keep control over your data.
In this article, we’ll cover what a membership site is and how to monetize it even more with online courses.
Then, we’ll take you step-by-step through how to create your very own membership site as the perfect platform for selling your online courses. Let’s get started!
What is a WordPress Membership Site?
A membership or monetized site allows you to charge users for access to certain content on your website. This content could be…
- Premium images,
- Infographics
- Case studies
- Cheat sheets
- Other downloadable resources
- Tutorials
- Courses
- Podcasts
- Webinars
- …and just about anything else!
When you monetize your site, users will be required to subscribe to a subscription plan (monthly, quarterly, yearly) or pay a one-time fee to access premium content.
Whether you’re a coach, educator, or trainer, creating a membership site is a great way to monetize your WordPress website. There you can publish your course material (videos, assignments, quizzes, and so on) restricted to paid subscribers.
Why Sell Online Courses on WordPress?
Online education is a multi-billion (yes, billion with a B) industry. The pandemic played a major role in increasing the industry’s worth. It forced many coaches, trainers, and educational institutions to adapt to online teaching.
But far from being a short-term fix, online educators learned the benefits of creating an online course.
It’s a great way to monetize your website. As long as your course content is up-to-date and relevant to the changing times, creating a course is, more or less, a one-time thing.
Create it once, and unlike a physical product, you can sell it to just about anyone, anywhere in the world. You needn’t worry about a procurement cycle, packaging, or shipping like you would with a physical product.

Here are a few more benefits of building an online course:
- A great way to establish yourself as an authority in your niche.
- When you sell your course, you are building an email list and a community. This opens up a sea of opportunities, such as future online course sales, income from affiliate sales by recommending products, and so on.
- You are opening multiple streams of income for yourself through your blog.
A look at income reports of some of the top bloggers worldwide will show a substantial income (high 6-figure income) coming in from the sale of online courses.
How to Create a WordPress Membership Site for Selling Courses
Now, let’s run through the 10 essential steps on how to create a membership site and sell your online courses on WordPress. Follow the video above to get a step-by-step guide with visuals.
Step 1: Purchase a Domain Name and Website Hosting
The first step is to get yourself a domain name. You’ll need to put quite a bit of thought into your name, as it will reflect your company brand, not to mention, you’ll be promoting it a lot.
While you could select any domain name, you should consider one that includes the keywords you’re targeting.
For instance, if you were creating online courses on digital marketing, your domain could be something along the lines of digitalmarketingacademy.com, digicourses.com, or something similar.
You can purchase a domain name service from a top company, like Domain.com or Namecheap.
Some web hosts such as DreamHost, or Bluehost also offer domain registration.
Alternatively or you can purchase managed hosting separately through a platform like Rapyd Cloud, which offers specific LMS and membership site hosting.
These more bespoke hosting services ensure key membership pages on your site aren’t automatically cached, which can cause performance issues on your site.
You can read more in our blog post on the best web hosts for WordPress membership sites for more info.
Step 2: Install WordPress
If the thought of installing WordPress scares you, you’re going to be pleasantly surprised. Most hosting providers offer an easy WordPress installation process. It’s as easy as clicking a button. Literally.
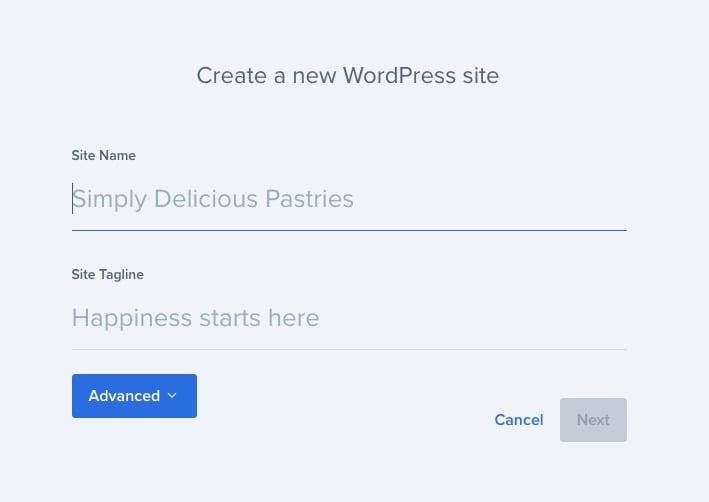
For instance, once you’ve purchased a hosting plan with Bluehost, there’s an easy setup process to create a WordPress site.
Simply answer a few straightforward questions, such as site name, tagline, and login credentials, then your WordPress installation will be completed for you.
Take note of the login credentials you enter. You will need them to log into your WordPress admin area once it has been installed.
Also, if you find yourself in need of troubleshooting throughout the process, we suggest reaching out to WP Tech Support, a team of skilled experts for all your support needs.
Step 3: Install a WordPress Theme
Now that we’ve installed WordPress, it’s time to give our site a facelift by installing a WordPress theme. We’ll go ahead and install one of our favorite themes here at MemberPress – Divi.

And it’s not just us that have a favorable opinion of Divi, its WordPress theme and page builder are used on over 2.5 million websites.
First, you’ll need to sign up for either yearly or lifetime access. You can do that here.
Once you’ve logged into the members’ area, head to the downloads tab, look for the Divi theme and click the Download button.
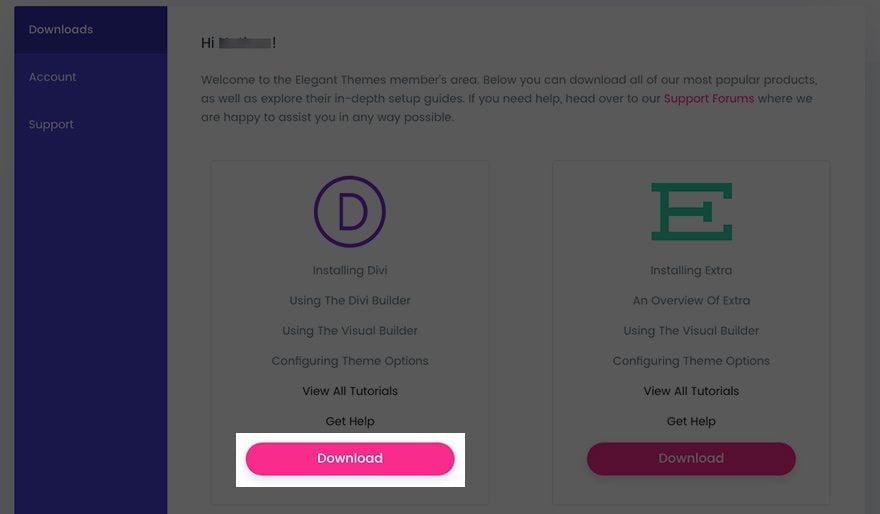
Now you’ve downloaded the theme, which should be in a .zip format, open up WordPress and head over to Appearance > Themes > Add New, and click on the Upload Theme button:

Select the file you just downloaded and click Install Now. Once the installation is complete, refresh the front end of your website. Looks better, doesn’t it?
Step 4: Install Memberpress
So far, you’ve purchased the domain and hosting, installed WordPress along with the Divi WordPress theme.
It’s now time to install a learning management system (LMS) plugin to convert your WordPress website into an online course-selling machine.
There’s no better choice than MemberPress!
Once you’ve purchased MemberPress, you can log in to your account and download the latest version of the plugin. Again, the file downloaded will be in a .zip format.
From your WordPress dashboard, head over to Plugins > Add New and click on the Upload Plugin button:

Select the memberpress.zip file you just downloaded and click Install Now, then activate the plugin.
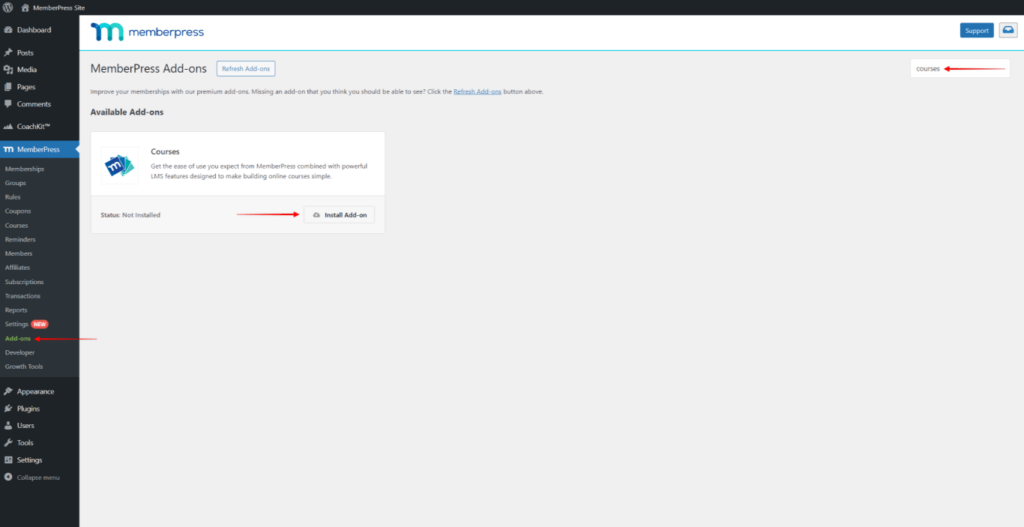
Once activated, you’ll notice a new set of links under MemberPress, including Memberships, Courses, Add-ons, and more.
Speaking of courses, head over to MemberPress > Settings > Add-ons to install the courses add-on. Then click on the Install Add-On button:
Step 5: Create Your First Online Course
Once you have activated the Courses add-on, you’ll automatically be redirected to a page where you can add your courses.
The Memberpress course builder has made the creation process as simple as drag and drop. From the welcome page, the course curriculum, adding lessons, and more, it’s as easy as it gets.
To get started, click on Add New:

This opens up the MemberPress course editor, where you get to add your course title and description. For instance, we’ve titled our course My New Course, as shown below:
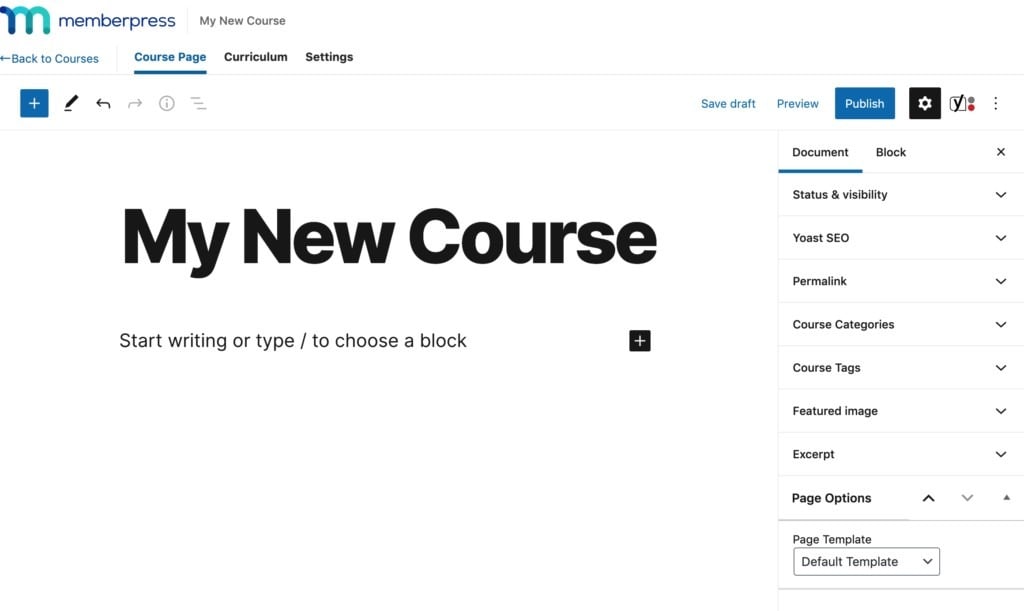
As a WordPress user, you’re probably familiar with the options on the right-hand side. So go ahead and assign a category and add a tag for your course.
Organizing your courses into categories and tags can help you later on when it comes to controlling access to your courses.
You can also edit the permalink to a URL of your choice, add a featured image, an excerpt, and so on. Once you’re done, click Publish.
Step 6: Add Sections and Lessons
Now to add the actual course content. Start by clicking on the Curriculum tab on your MemberPress course editor page:

Here, you can create modules, and under each module, you can create lessons.
Go ahead and click on Add Section to create the first module.
Enter a title for your module, such as “My First Module” or “Module #1”. Click Add when you are done. You can repeat this step to create as many sections and modules as you like.
Next, under each module, you need to add your lessons. To do so, click on Add Lesson under the corresponding section or module:
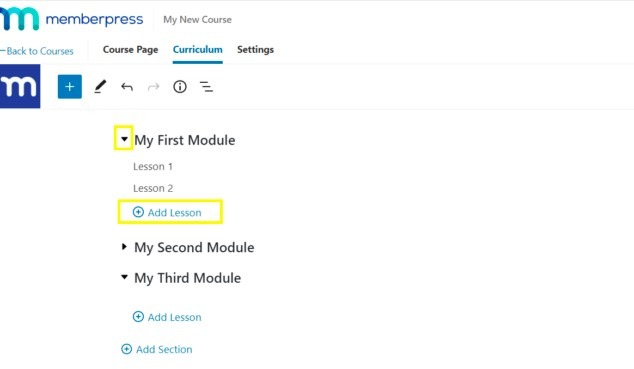
Add a title for your lesson, such as “Lesson 1”, or “Chapter 1”, and click Add when you’re done.
When you’re ready to add the actual content, hover over the lesson you want to add content to and click on the pencil icon:
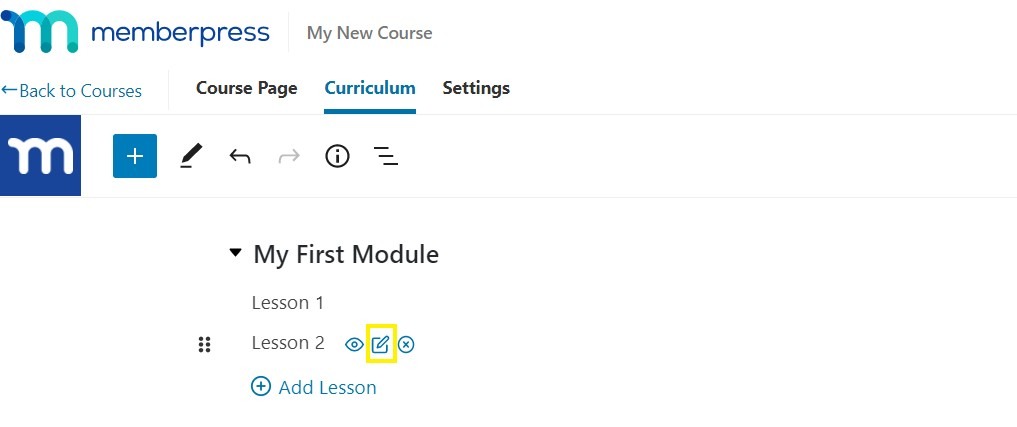
This will open up the lesson editor, which is similar to your WordPress block editor:
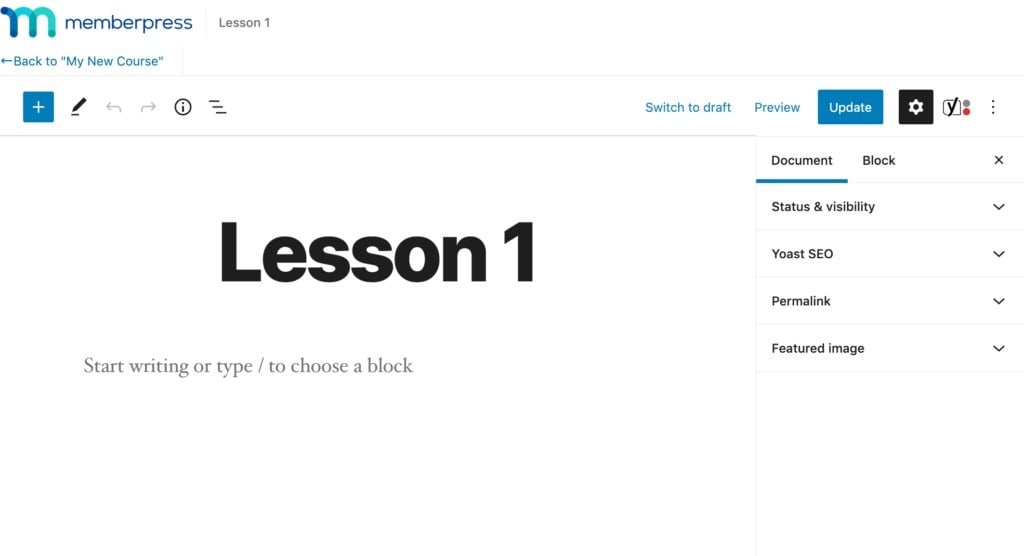
From the lesson’s title to the actual contents, go ahead and include your course contents here. Once you are done, and everything looks good, click Update.
Repeat this process and add lessons to all your modules.
Want to rearrange the order of your lessons? You can do this easily by dragging the lessons around.
To delete a lesson, head back to the Curriculum tab in the course editor, and you’ll notice a list of all the lessons under the Document tab on the right-hand side.
Hover over the lesson you want to be removed and click on the delete icon that appears.
Once you’re done, don’t forget to click on the Update button.
Step 7: Restrict Course Access to Membership Plans
After you’ve completed adding your course content, there are a few more things we need to cover. The most important of which is restricting access to the course.
Head over to the Settings tab in your course editor:

Enable the Include in Course Listing option. Doing so, MemberPress automatically creates a URL where users can access all of your online courses. It’s like an archive page that has a list of all your content.
By enabling the Include in Course Listing option, you are technically telling MemberPress to include this course you’ve just created in your list of courses.
Of course, the course page also has to be included in your main menu (Appearance > Menus) if you want it to be seen by your users.
Then, the following field you see is for your Sales Page.
If you are selling your online course, you’ll want your users to take some additional steps. For instance, subscribe to a membership plan, or pay a one-time fee.
Whatever the case may be, you’ll want to direct them to an action page.
This is where you’ll include the URL of the page where users should be directed to access your course. It can be a registration page, a membership plan page, or something else.
If you already have a membership plan page ready, head over to MemberPress > Memberships to copy the URL to include the link here.
Moving on, how do we restrict access to our courses?
It’s simple. Head over to MemberPress > Rules:

Remember we mentioned adding a tag or a category for your courses? Well, this is where it’s going to help us.
The easiest way to restrict access to your courses is by using the tags or categories we created. Click on Add New:
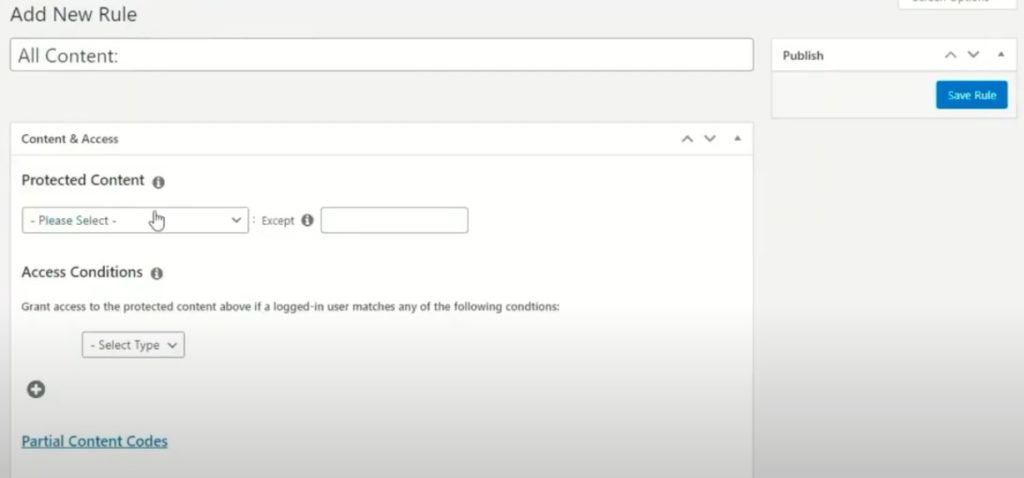
Give a name for your rule. For instance, you could name it “All Courses”, “$99 Courses”, you get the drift. It can be just about anything.
Select an option from the Protected Content drop-down menu, such as: All Pages, A Single Page, All Courses, Courses with Course Tag, and more.
Select one that you feel is appropriate for the rule being created.
Considering you’d like to create a rule based on the tag, select the appropriate option, i.e., Courses with Course Tag. Here, a field opens up where you can include the tag you created while creating the course.
Proceed to Access Conditions and grant access to either membership plans or individual members. The corresponding membership plans would appear if you’d created them earlier (MemberPress > Memberships):
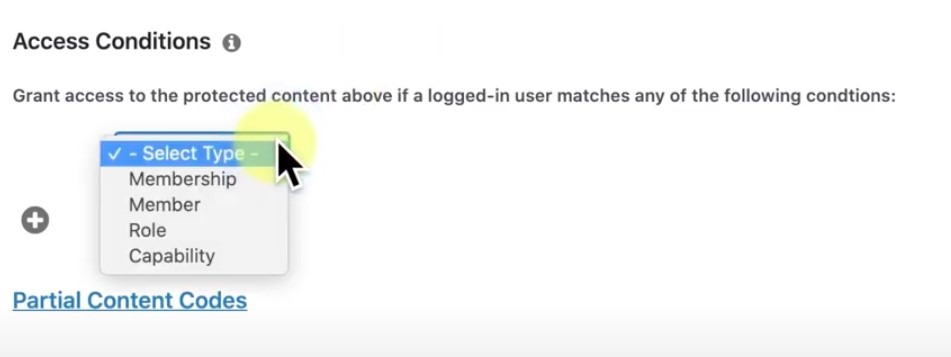
Once you’re done, click on Save Rule.
Head back to MemberPress > Courses, and you’ll notice the rule assigned against the corresponding course(s).
While on this topic, if you’d like to know more about role-based content, check out our article on How to Protect Content Based on Roles and Capabilities.
Step 8: Preview and Customize Course View
We mentioned that MemberPress automatically creates your courses page. It’s like an archive page where all your courses are listed.
This can be accessed by adding /courses to your domain. E.g., type out the URL https://yourdomain.com/courses to access your courses page.
You could add the same as a custom link in your menu from Appearance > Menus. If you access the page, you’ll notice your course(s) listed. You’ll probably agree that the look is not very impressive.
To have a much more appealing course page, just enable ReadyLaunch™ – the built-in page maker for MemberPress (more on that later on).
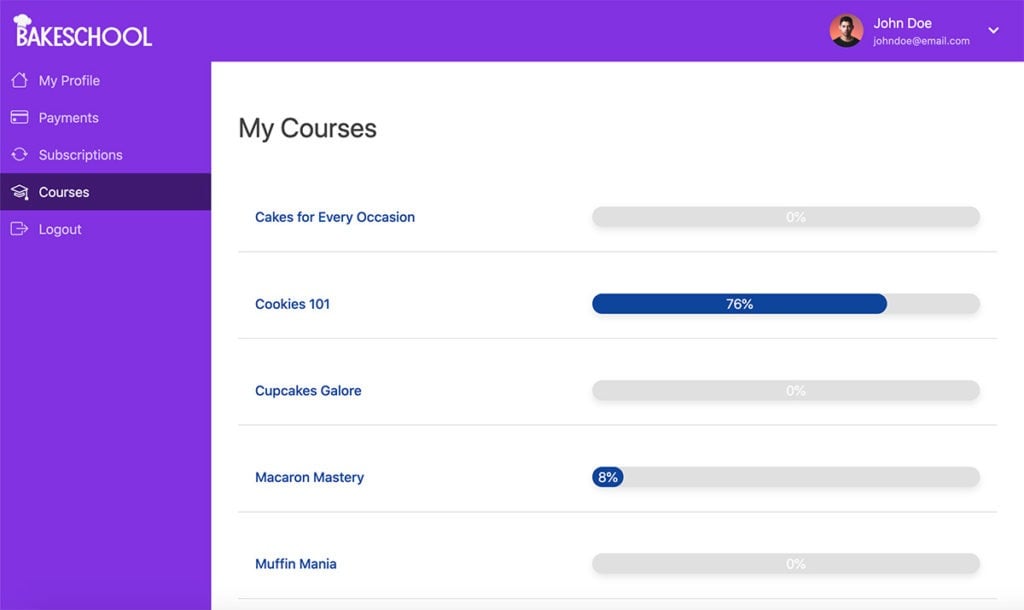
Looks way better now, doesn’t it?
Step 9: Add a Registration Page
When a user lands on your courses page and selects a particular course, they’d be directed to the course registration page if they are not a registered user.
You could also direct them to a membership plan, which entitles them to access your courses. You’ll need to ensure the user purchases one of your plans to proceed and access your courses.
We have got a detailed article on How to Build an Online Membership Site Using WordPress, in which we cover how to add a membership plan, integrate payments, and more.
Nevertheless, we’ll cover a few details here.
Before you even start creating your membership plans, it’s essential to be clear of the plans you’d like to create.
For instance, you could create plans such as Bronze, Silver, and Gold. Or maybe even monthly, quarterly, and yearly subscription plans.
Once you have it all planned out, head over to MemberPress > Memberships and click on Add New.
Give the membership plan a name. For this example, let’s create a Silver Membership plan:
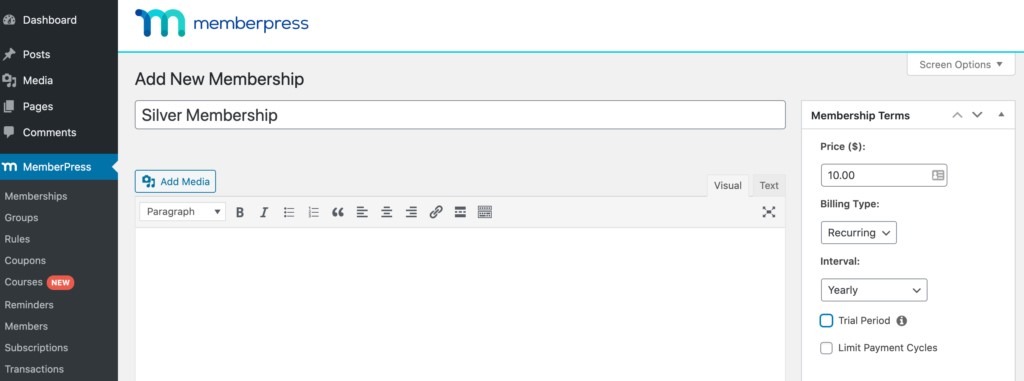
On the right-hand side, you have the option to include the price, the billing type (recurring, one-time), and the interval (monthly, yearly).
Want to offer your users a trial period before signing up for your course? Go ahead and select the “Trial Period” option to have this feature enabled.
Once you’ve completed all the steps, go ahead and save your changes.
The next, and probably most crucial, aspect of making money selling your online courses is integrating a payment gateway.
Head over to MemberPress > Settings and click on the Payment tab:
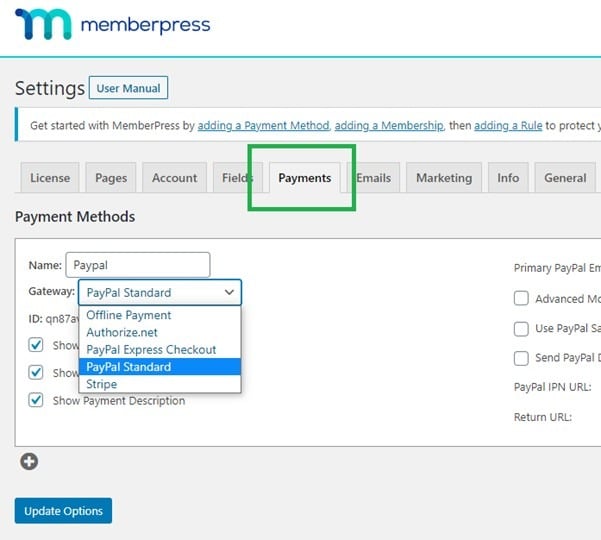
MemberPress has built-in integrations with popular payment gateways, such as PayPal and Stripe. Additionally, you can also add alternate payment methods.
Based on the payment method you select, you’ll be prompted to fill in some additional details. For instance, if you select PayPal, you’ll need to enter your PayPal email address, PayPal IPN URL, and a return URL.
Once you’ve completed all the payment settings, click on the Update Options button. Head back to MemberPress > Rules and create a new rule that applies to your membership plan.
Now, the next time a new user clicks on your course, they’ll be directed to the registration page. Once they’ve signed up, they’ll land on their course page:
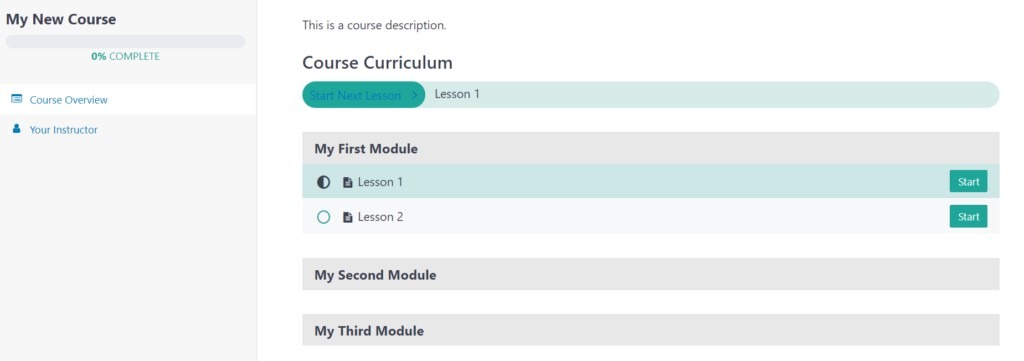
With MemberPress Courses, not only can users see their progress on each class, but as site admin, you can also see the user’s progress.
As an online course creator and marketer, you get valuable insights into what courses are working and what aren’t.
Step 10: Promote and Sell Your Online Course
You may have a great course, but if you don’t spread the word, no one will know about it. Instead of cash registers ringing, you’d probably hear crickets!
Here’s a checklist of some tried and tested methods you could consider to promote and sell your online course.
1. Create a Coming Soon Page
Have a coming soon page up on your website. You could even consider promoting it across various channels.
Include a rough idea of the course contents and don’t forget to include an email opt-in. Ask users to chip in by asking them what they expect to learn from the course.
Not only are you building your email list, but you’ll also get first-hand feedback from potential customers. User feedback could offer valuable insights into the type of content they expect.
You can create a coming soon landing page easily using plugins such as SeedProd. The information you gather can help you plan your course content accordingly.
2. Build an Email List
Email marketing is by far the most effective way to reach out to your audience. It offers you the maximum return on investment (ROI).
Mail your list about the upcoming course and look out for suggestions and tweak your course to incorporate those suggestions. You could even launch the course to your email list first. Consider offering an early bird discount, just to entice them.
3. Run Ads
If you’ve earmarked a budget for online promotions, you could try running ads online.
Whether it’s on Google or social media platforms, running targeted ads can help you gain an immediate sense of the market.
4. Promote on Social Media
Like your email list, promoting on social media works well if you have an engaged audience.
Building an audience takes time. Plan your social media marketing strategies well in advance, and you can leverage the huge audience base these platforms have.
5. Create a Free Mini-course
Have you ever purchased a product just because you liked the free or mini-version?
It’s like giving your users a feel of what’s to be expected in the main course. It works in most cases and is a strategy well worth considering.
6. Run a Weekly Webinar
Webinars convert well. More so, if it’s a live webinar conducted by the trainer.
Users feel connected with the trainer when they get on a live webinar and you can use this increased engagement to help convert.
It’s also a great way to convince the audience that you know your craft.
Run through the key elements of the course, how the course would add value to their lives, showcase testimonials and social proof, and make the sales pitch towards the end. You could throw in a special offer too!
7. Guest Post
While you wouldn’t necessarily get a chance to push your sales page on a guest post, you could earn yourself a backlink to your course website.
Look out for opportunities to guest post on blogs that are in the same niche as yours. This is not an option for immediate results but one that will surely pay dividends in the long run.
8. Offer a Discount
Whether it’s through your emails, the ads you run, or even on live webinars, offering a discount strikes the right cord when it comes to forcing a sale.
Run a limited period offer or a discounted sale for the first X amount of visitors. It could be just what you need to get the ball rolling!
9. Influencer Marketing
An influencer is one whose words are taken as gospel. Well, almost!
Look out for influencers in your niche. Influencers have a huge following and are often seen as authority figures. They’ve built this over time, and if they feel your course can add value to their audience, they’d be sure to recommend it.
ReadyLaunch™ | Get Set Up and Ready to Sell in Under a Day
If all of this seems daunting, there’s now a much quicker, simpler way to launch a website for your course.

ReadyLaunch™ is the built-in pagemaker for MemberPress. And it pulls everything together – enabling you to go from no-site to sale-ready in under one day.
If you’re a non-techie, couldn’t design your way out of a paper bag, or you’re just in a hurry to get selling (and who isn’t?), ReadyLaunch™ is your best friend.
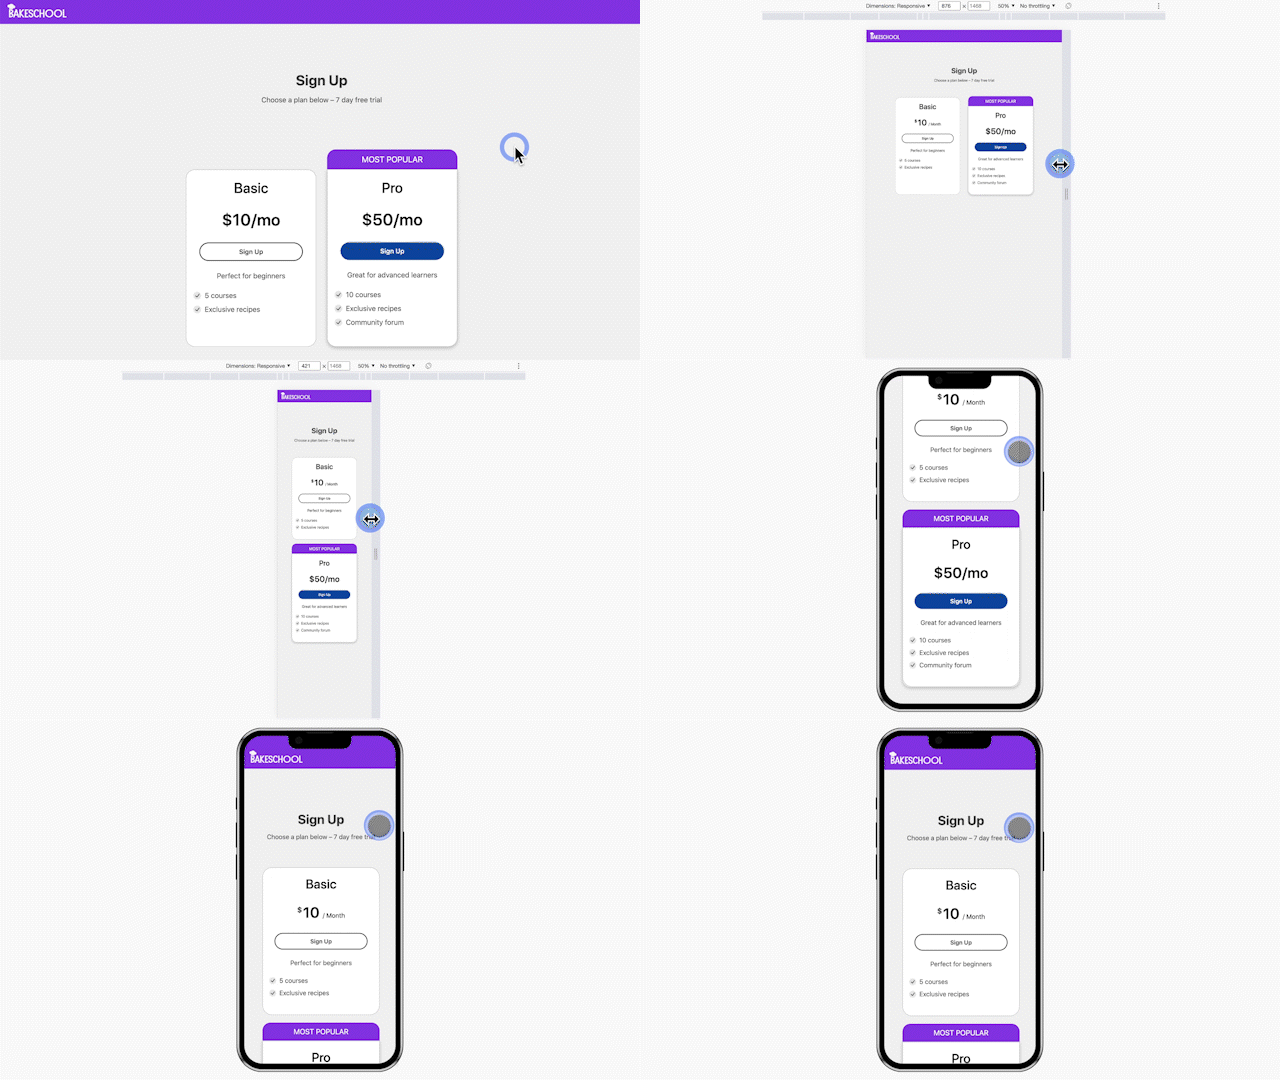
With just a few quick clicks, this built-in feature gives you MemberPress pages that are…
- Mobile-responsive
- Optimized to sell
- Branded
And beautiful. All with zero coding.
MemberPress DFY Services | Leave it to the Pros
MemberPress, particularly with the ReadyLaunch™ setup, is so easy to follow and use that we’re confident anyone can successfully set up their site.
But if you’d still rather leave it to the pros (because let’s face it, sometimes peace of mind is worth the investment) we also offer Done For You membership site services.
After an initial consultation, you’ll be paired with a project manager who will oversee the creation of your ideal site.
Choose from our plans to get a simple membership site setup all the way through to a full coaching site. We’ll take care of creating a beautifully branded, fully-responsive site complete with all the functionalities you need.
Get started here or read more but clicking the image below:
Conclusion
Creating an online course is also an excellent way to generate income from your blog. With the education industry being so lucrative, why miss out on this opportunity?
Creating an online course is pretty straightforward. Platforms such as WordPress and plugins like MemberPress do most of the heavy lifting for you.
With its easy drag and drop functionality, a built-in MemberPress Course add-on, and more, creating an online course on WordPress is easy as pie.
And as if it couldn’t get any simpler, ReadyLaunch™ streamlines the process even further. Now you have the option to create a fully responsive, branded course website in a matter of hours.
We hope this article covered everything you need to know about creating a WordPress membership site for selling courses.

Get MemberPress Today!
Start selling courses on WordPress. It’s fast and easy!
Have you created your WordPress membership site on MemberPress? Are you selling an online course? Let us know in the comments below!
If you liked this article, be sure to subscribe to the MemberPress blog!



Hey guys! Curious about a hosting feature on video – I have over 30+ courses with about 750 videos.
Are hosting limits from you, or are you just an LMS and I am still tied to a WordPress 50GB limit?
Thanks,
Jacob
Course selling create website