What This Add-on Does
Our BuddyPress integration will allow you to integrate the powerful social features of BuddyPress into your Membership site created with MemberPress! This integration makes it easier for your users to connect with each other right from their account pages). Here is a rundown of how you can get this add-on up and running on your site and what you can expect from it.
Enabling The Add-on
- Install the BuddyPress Plugin: You can find the plugin by going to Plugins > Add New > Search for BuddyPress > Install and Activate.
- Install the BuddyPress Integration Add-on by MemberPress: Do this by going to MemberPress > Add-Ons > BuddyPress Integration.
Enable the BuddyPress Integration: Go to MemberPress > Settings > BuddyPress tab, and select the “Enable BuddyPress Integration: checkbox: 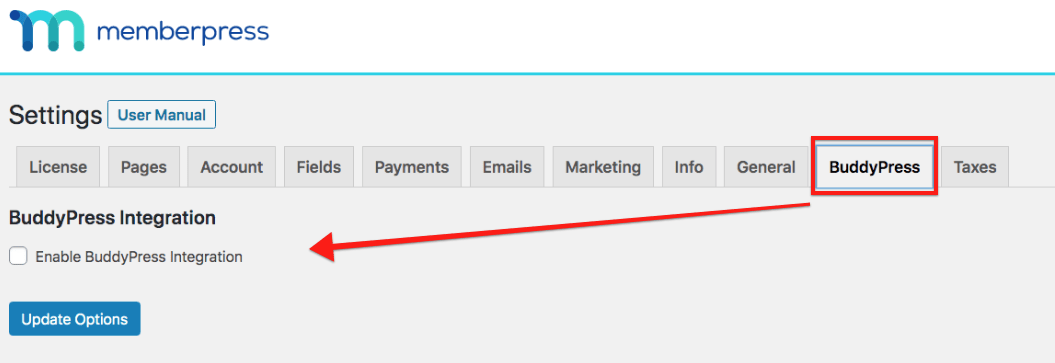
Enabling this option will transform your normal MemberPress account page into the BuddyPress profile page.
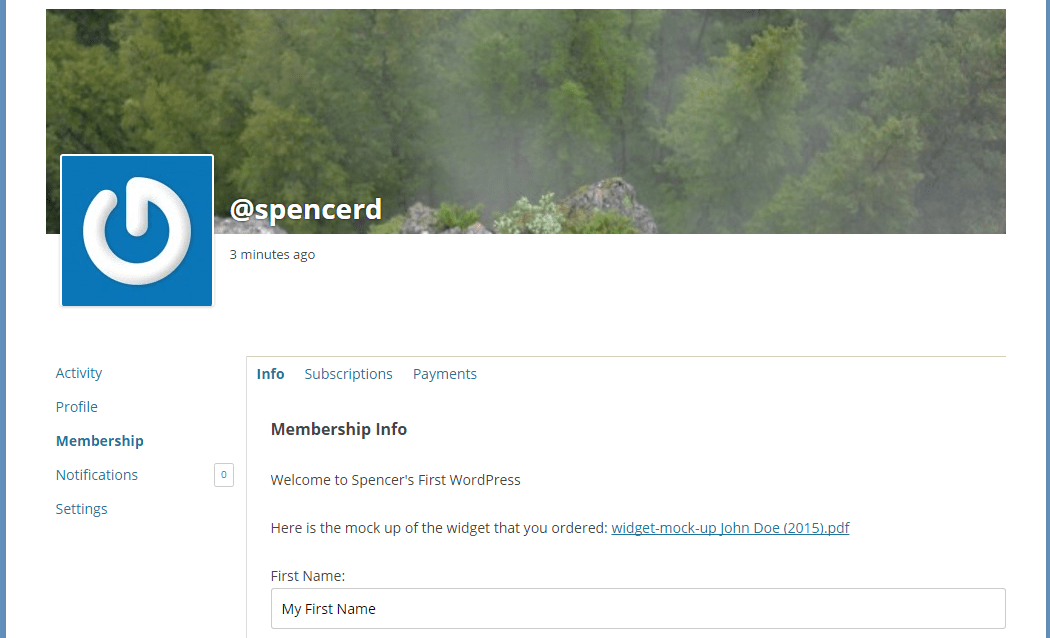
Now, when a user goes to access their account page, they will see something like the page below (Here we've used the WordPress Twenty Twelve Theme. Results will vary depending on your theme. Contact your theme developer for customizations.):
BuddyPress Signups
IMPORTANT NOTES:
- For signups to work properly, you must enable the “Anyone can register,” option in your WordPress General Settings.
- You can configure your BuddyPress Options however you'd like, except when using BuddyPress alongside MemberPress. In this case, you should disable the Account Deletion option. If enabled, this option allows registered members to delete their own accounts. That is, a member can easily (and accidentally) delete their user profile and lose access to MemberPress.
- Enabling BuddyPress creates a default registration page with the slug /register/. If you're also using MemberPress' default Registration Page slug (which is also /register/), you'll need to change one or the other. Otherwise, your MemberPress registration pages will throw a 404 error page. You can edit the MemberPress registration slug in MemberPress > Settings > Pages tab > Group and Membership Pages Slugs section. Or you can change the BuddyPress slug when editing that page in WordPress.
You should now be shown an option that allows you to control BuddyPress signups:

From there, you can use the dropdown to select one of your existing MemberPress Memberships to serve as your BuddyPress Free Lifetime Membership. Use this option if you'd like users to be able to still sign up via the BuddyPress sign up page. This setting is necessary if you'd like to have users sign up via BuddyPress, but don't want to give them access to your site's premium content. Whatever membership you select here will be free, regardless of the current price. Therefore, we suggest creating a new free membership for your selection here.
Protecting BuddyPress Profile and Members listing
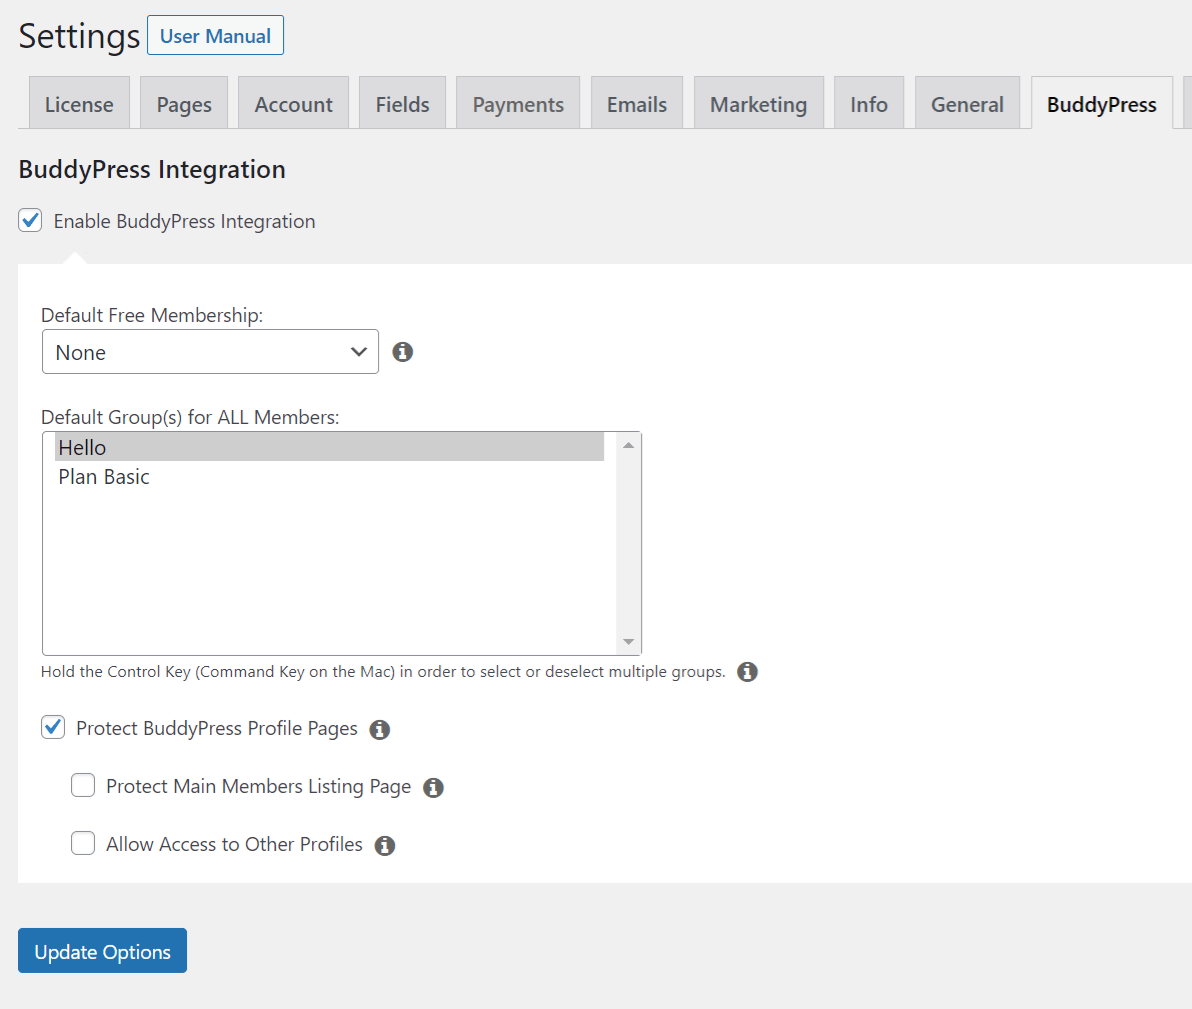
Once the “Protect BuddyPress Profile Pages” option is enabled, not-logged-in users cannot access Members and users' profile pages. Users without active membership can access only Members page and MemberPress-related subpages of their own Account. This allows them to upgrade or resume subscriptions, and update profiles or credit cards. Users with at least one active membership can access Members page and users' profile pages and all Account subpages.
In order to protect the main Members page with the list of all members' profiles from users without active membership, you need to enable the “Protect Main Members Listing Page” option. Once this option is enabled, it also protects users' profile pages from users with at least one active membership, so to grant access to those pages for those users, you need to enable the last “Allow Access to Other Profiles” option.
BuddyPress Groups
To fully utilize the power of this integration, we recommend that you enable the BuddyPress Groups. This can be customized globally or per-membership. You can look at BuddyPress groups like collections of User content. If you are new to BuddyPress we highly recommend that you check out their explanation of BuddyPress Groups here.
Global
To start, you need to make sure that you enable Groups in BuddyPress. You can do this by going to your WordPress Dashboard -> Settings -> BuddyPress -> select User Groups. This will enable the features of BuddyPress groups for every user on your site.
With this enabled, all users on your site will now see a Groups link on their profile page. From this link, they will be able to see the Groups that they are apart of, and that are available to them.
If you'd like to only enable the groups feature for a specific membership, please see the Per-Membership instructions below.
Per-Membership
Just as was explained for the Global option, for Per-Membership BuddyPress Groups, you first have to enable Groups globally. Again, to do this go to your WordPress Dashboard -> Settings -> BuddyPress -> select User Groups.
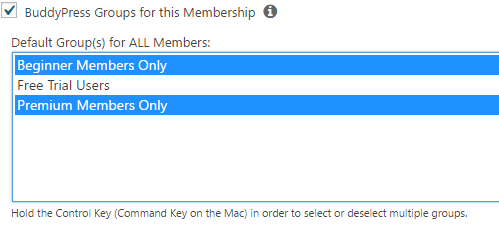
With that enabled, you will see a new option appear in the Advanced tab of your MemberPress Membership Options as can be seen here:
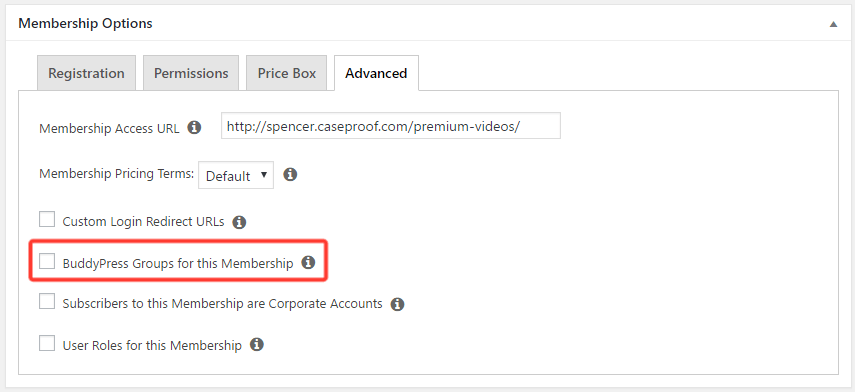
You can then use the box that appears to select the BuddyPress Group or Groups that you would like to be available to active subscribers to your membership. Simply repeat for each membership you want to be associated with a specific group.
Hide BuddyPress From Guests
MemberPress Custom URI Rules seem to work best for protecting BuddyPress pages. However, they can be somewhat complicated to set up for non-technical users, so another alternative is the use of a plugin like LH Private BuddyPress which protects BuddyPress from being accessed by non-members.


