You can start creating MemberPress courses once you have activated and set up the MemberPress Courses add-on.
This document will cover the steps for creating MemberPress courses and explain available options.
How To Create a Course?
When creating MemberPress Courses, the following outline covers the basic steps you would need to go through:
- Navigate to Dashboard > MP Courses > Courses.
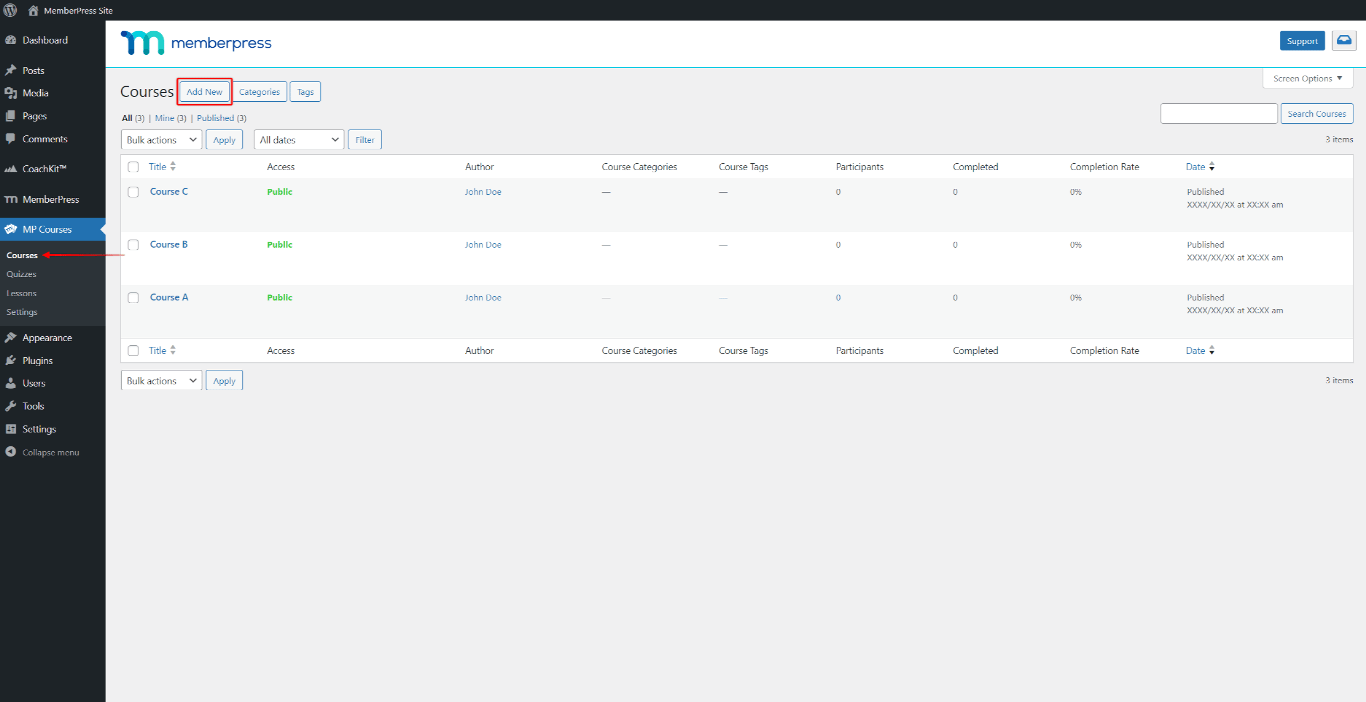
- Click the Add New button to add a new course and start editing it.
- The course editor will open the Course Page tab first. Here, add content and course title to your course page.
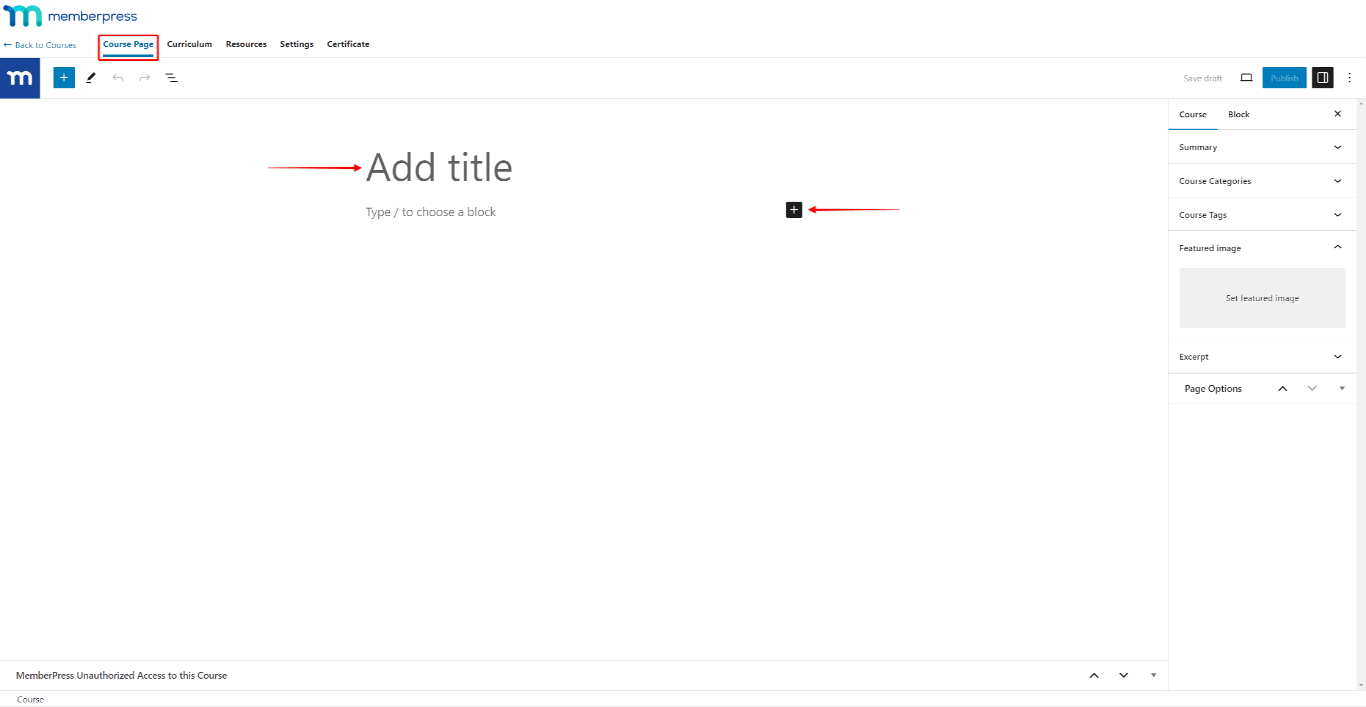
- Optionally, you can add the featured image to the course.
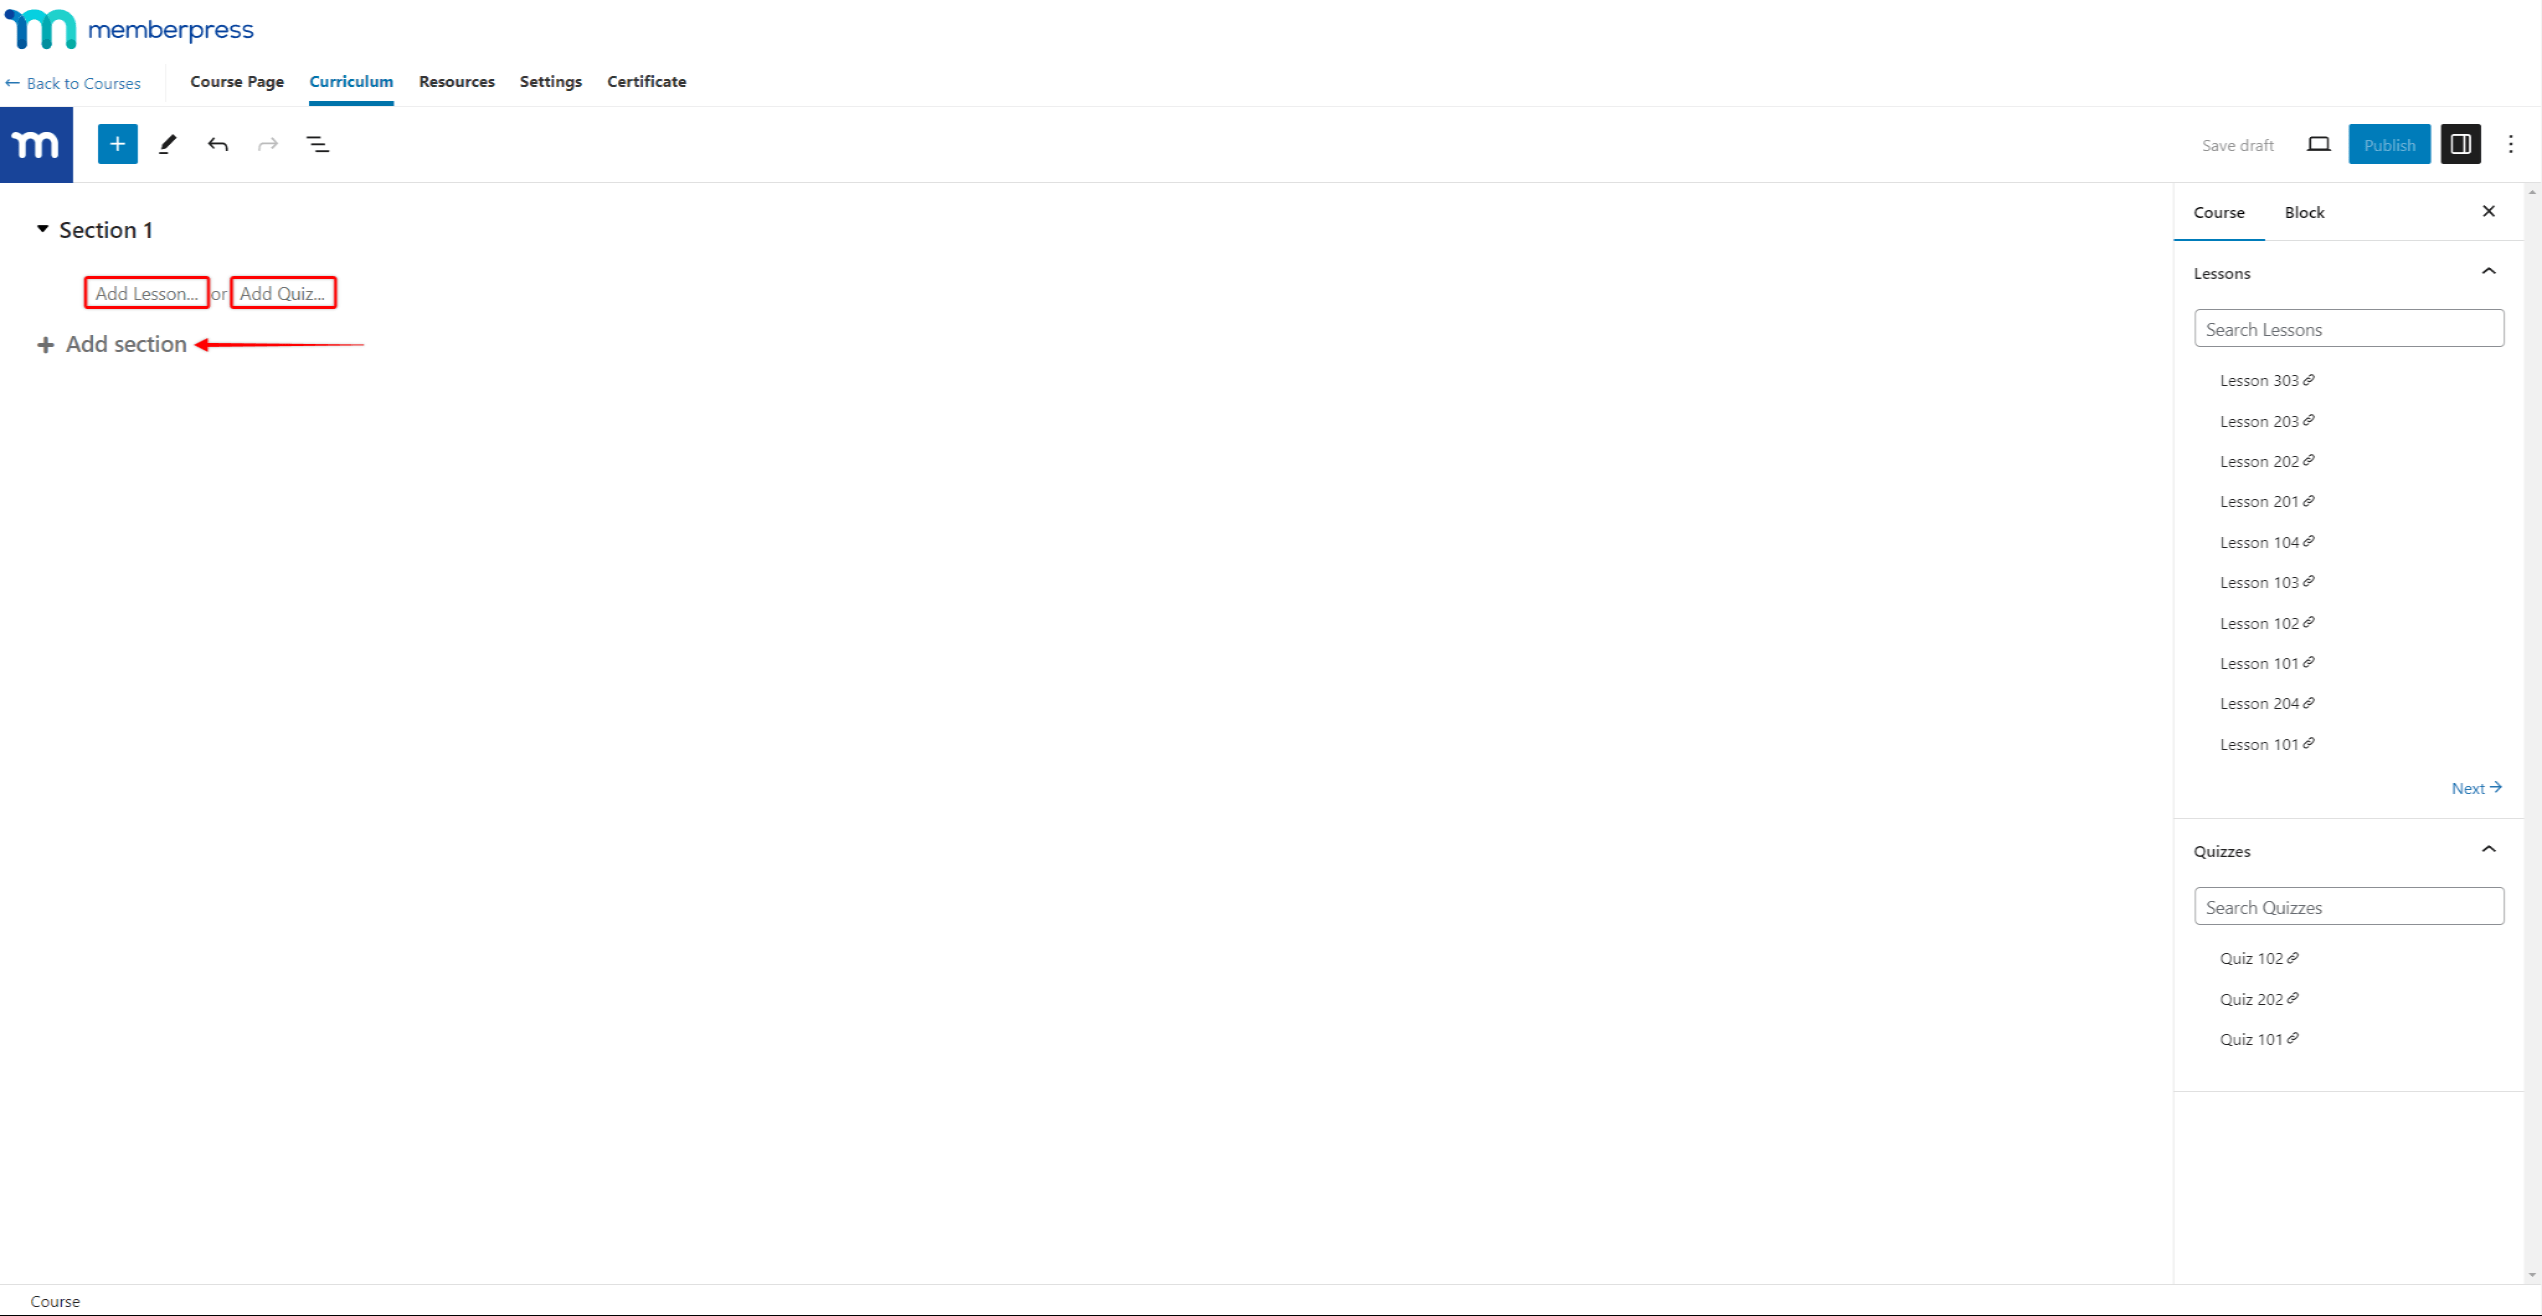
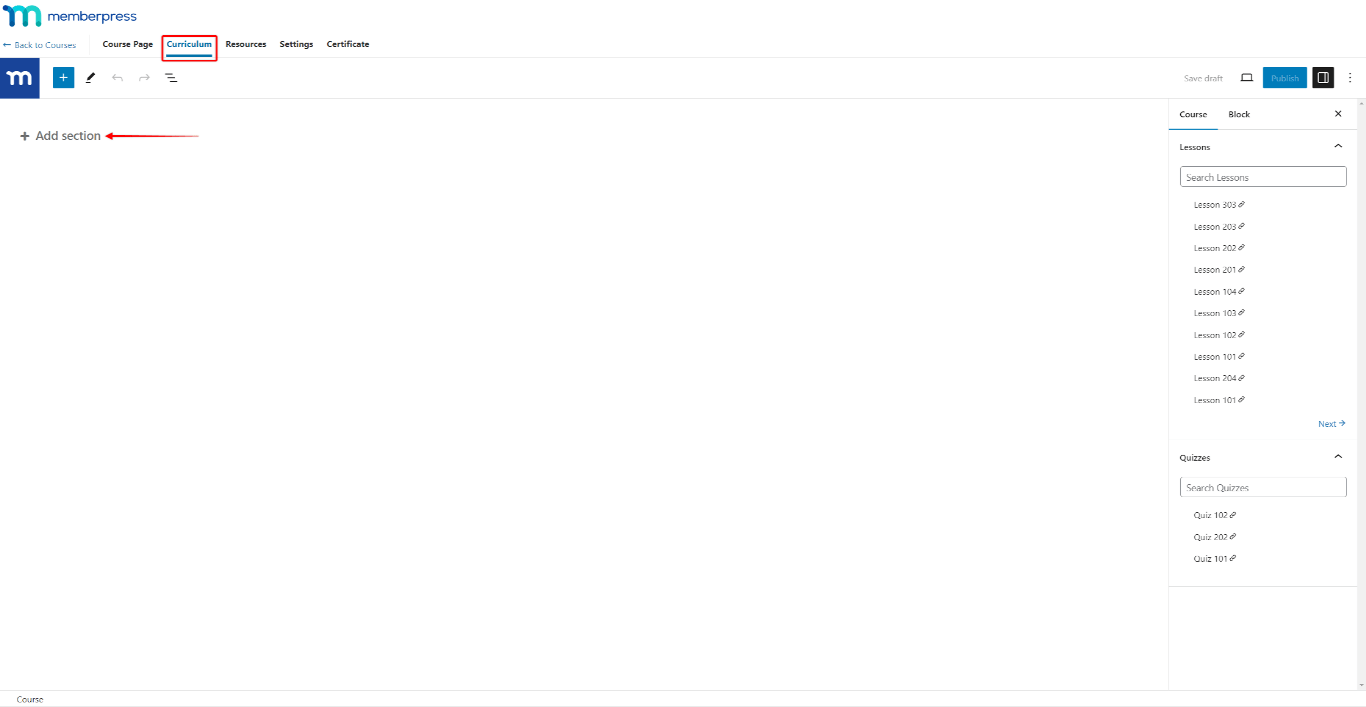
- Click the Curriculum tab to build the course curriculum. Add sections by clicking the +Add section link. Within each section, add lessons, quizzes or assignments.
- Under the Resources tab, add additional resources to this course, if any.
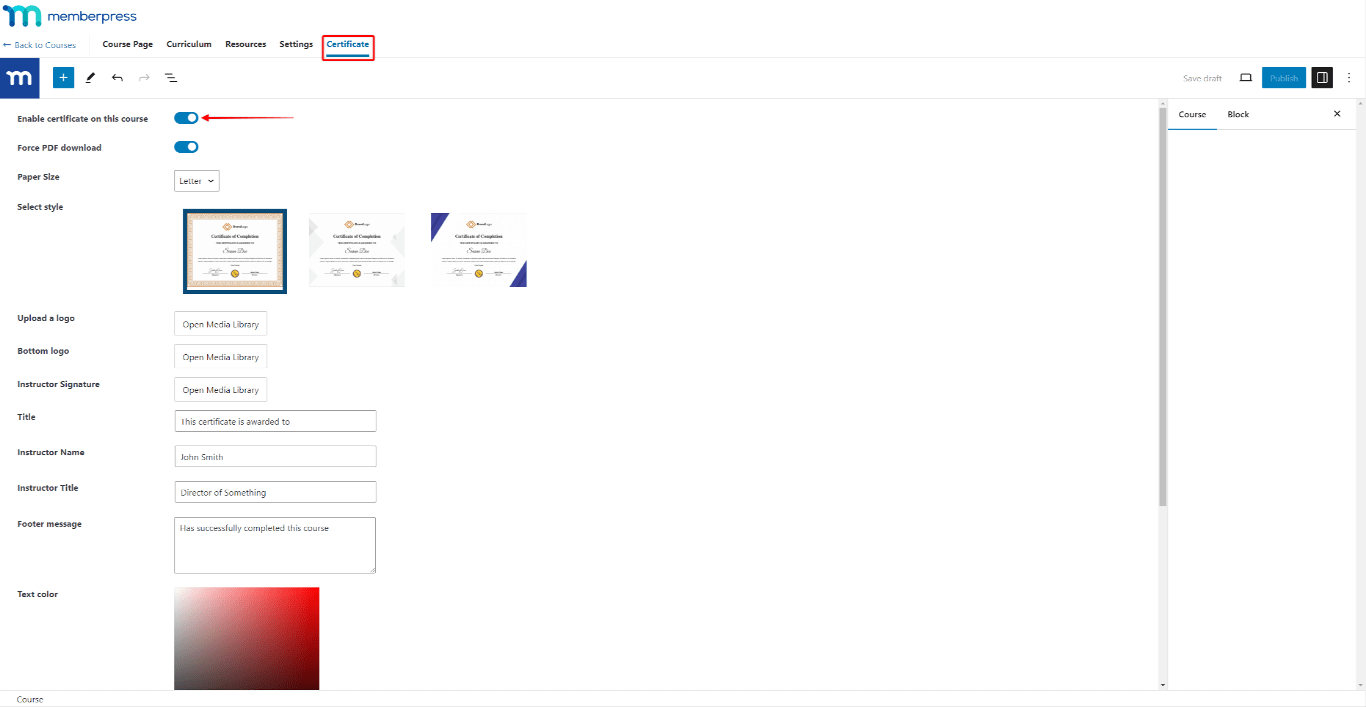
- Finally, under the Certificate tab, if needed, toggle on the Enable certificate on this course option to add certificates. Further, you can modify the certificate settings to suit your needs.
- Click the Publish button in the upper right corner of the screen. This will save the data you added and publish the course.
Further down, you can find more information about each step and available options.
Title And Course Page Tab
The first page, when creating MemberPress courses, will be your Course Page. This page will serve as a course homepage, providing all the information about your course, including the course overview (curriculum).
Start by adding the course title to name your course. Next, you can add and design the content of this page using the default Block (Gutenberg) editor.
The content added to this page will be used as the course description on the Course Listing page. Also, this page should be publicly available to all your users and visitors, explaining the contents of the course.
Featured Image
Same as with other WordPress posts, you can add a Featured Image to MemberPress courses:
- While editing the course, click on the Course Page tab at the top menu.
- In the right sidebar, scroll down to the Featured Image panel and expand it.
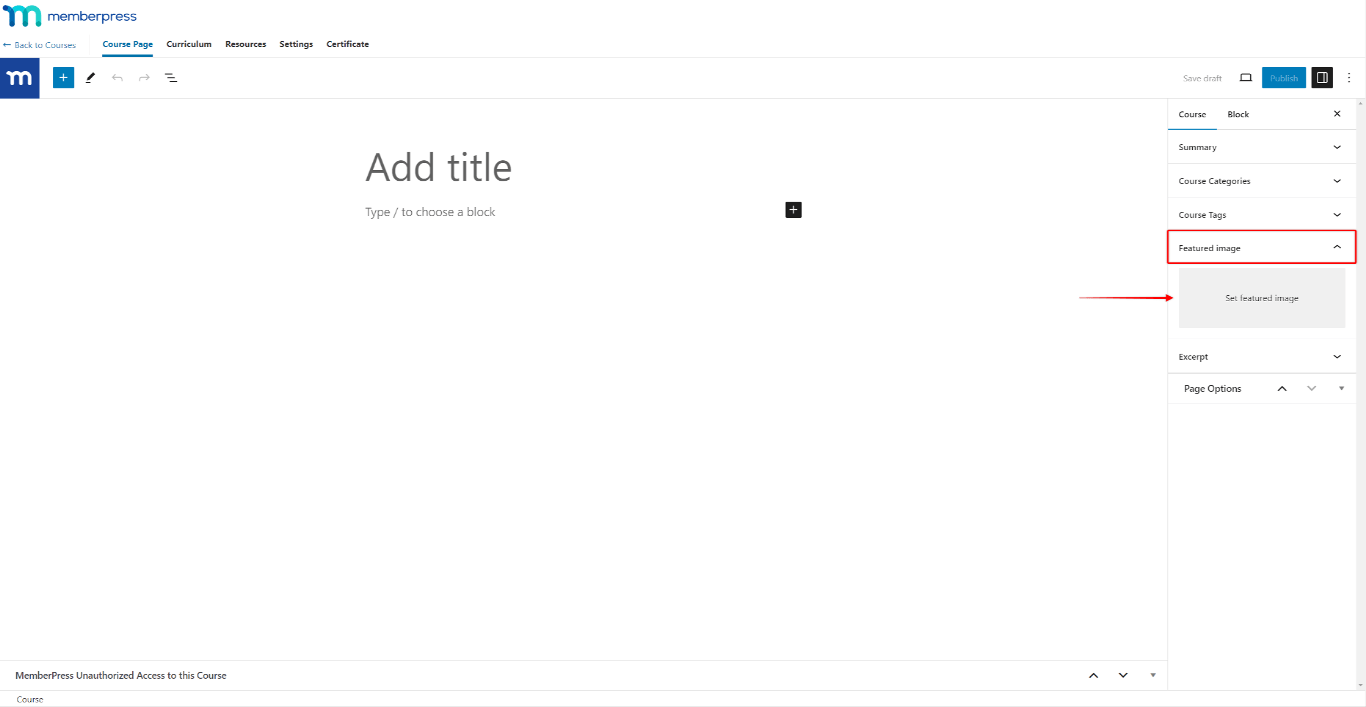
- Click Set featured image.
- Next, choose an image from your library or upload a new one. After selecting the desired image, click the Set featured image button to add it to your course.
This image will be used as the cover image for this course on your Course Listing page.
Curriculum Tab
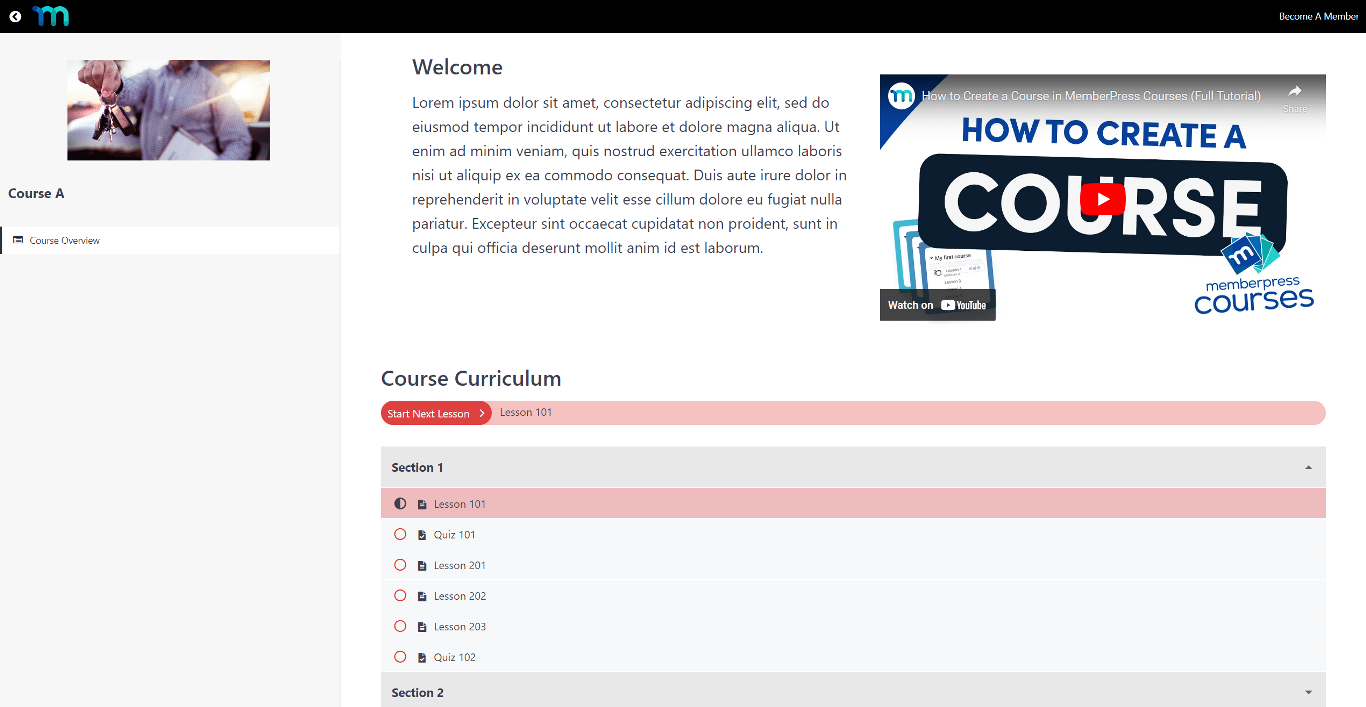
The MemberPress Courses Curriculum is the central element of every course. With the curriculum editor, you can add sections, lessons, and quizzes to your courses.
The curriculum will be available for students on the course page and in the course sidebar for lessons and quizzes.
Building A Course Curriculum
The MemberPress Courses have a two-level structure:
- The top-level are Sections.
- The second level contains the Course Items: Lessons, Quizzes, and Assignments. The course items should be assigned to Sections.
Thus, when creating MemberPress courses, you must add your sections and assign course items to each section. The order of sections and course items in the Curriculum determines the order in which students progress through the course.
In addition, you can manage your courses and course items anytime.
Adding Sections to MemberPress Courses
Sections don’t have a content of their own. Instead, they serve as containers for groups of your lessons and quizzes. This way, you can organize the content of each course into multiple modules.
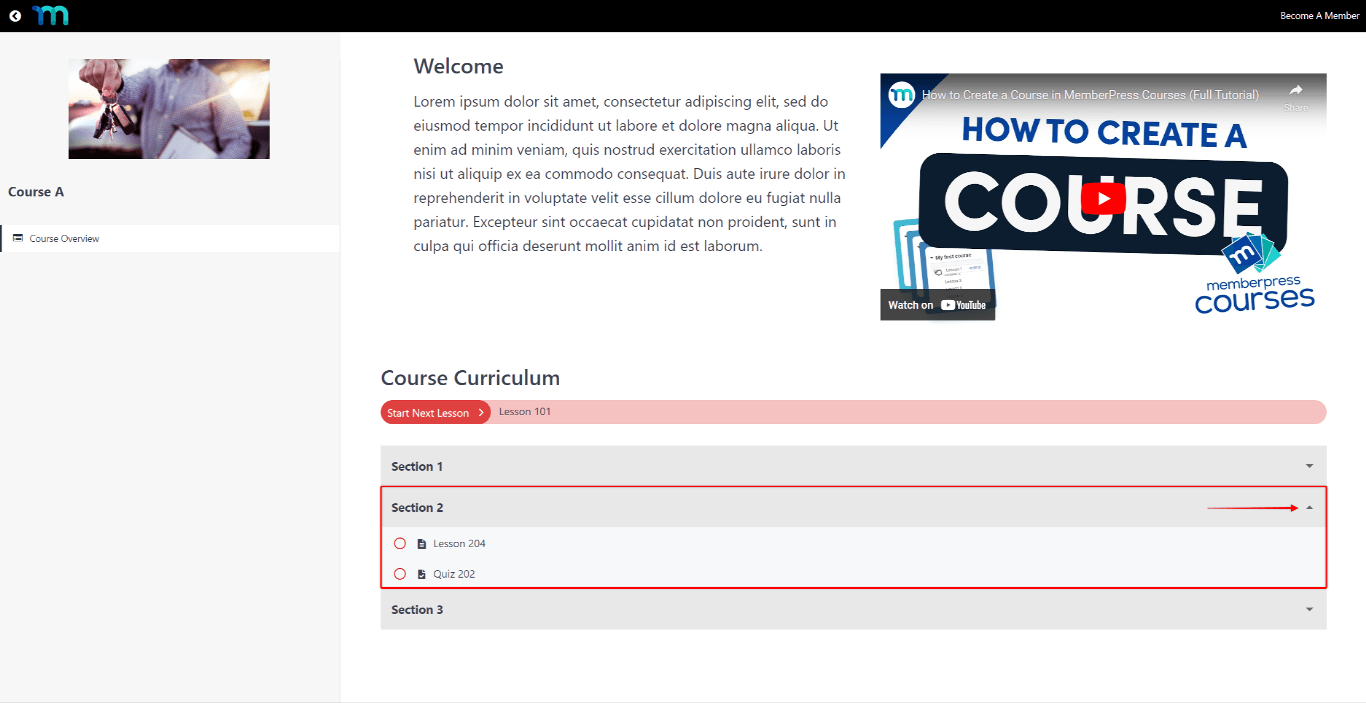
Once you add your sections, start adding lessons and quizzes to each. By default, these sections will be displayed as the accordion in the curriculum on the front end. Each section can be then expanded to access the contents of each section.
Adding Course Items to Sections
To add a lesson, quiz, or assignment, follow these steps:
- Expand the section.
- Click the Add Lesson link to create a new lesson and add it to this section. Similarly, click the Add Quiz link to create a quiz or the Add Assignment link to create an assignment.
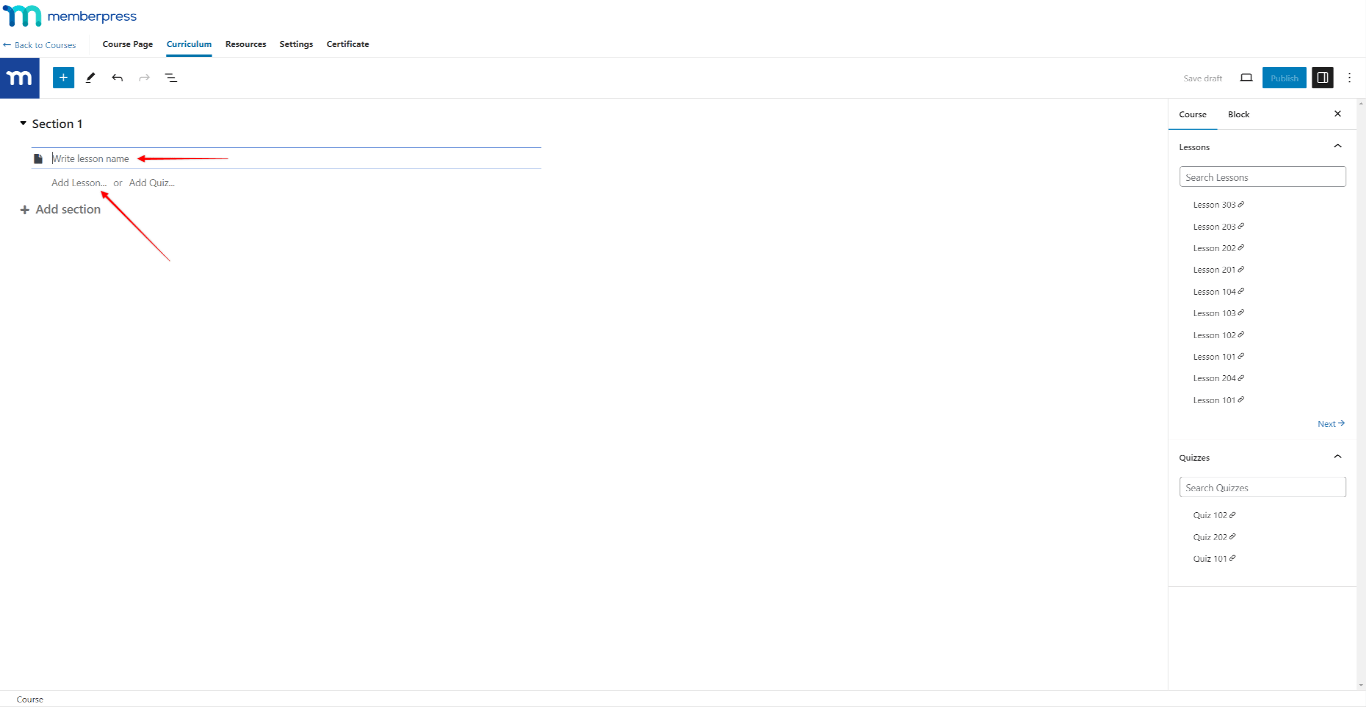
- Name the lesson, quiz, or assignment you're adding.
- Click Update to save changes to the Curriculum. If the course has not been published yet, you can save changes by clicking Publish or Save draft.
Adding Content To Course Items via Curriculum
Lessons, quizzes, and assignments have Gutenberg-based editors, which allow you to edit the content and create any design.
When created, your new content will be saved as drafts. The content will be visible on the course front end only when published.
As an example, you can follow these steps to add content to your lessons directly through the Course Curriculum:
- Navigate to the Curriculum tab and expand the Section where the lesson is located.
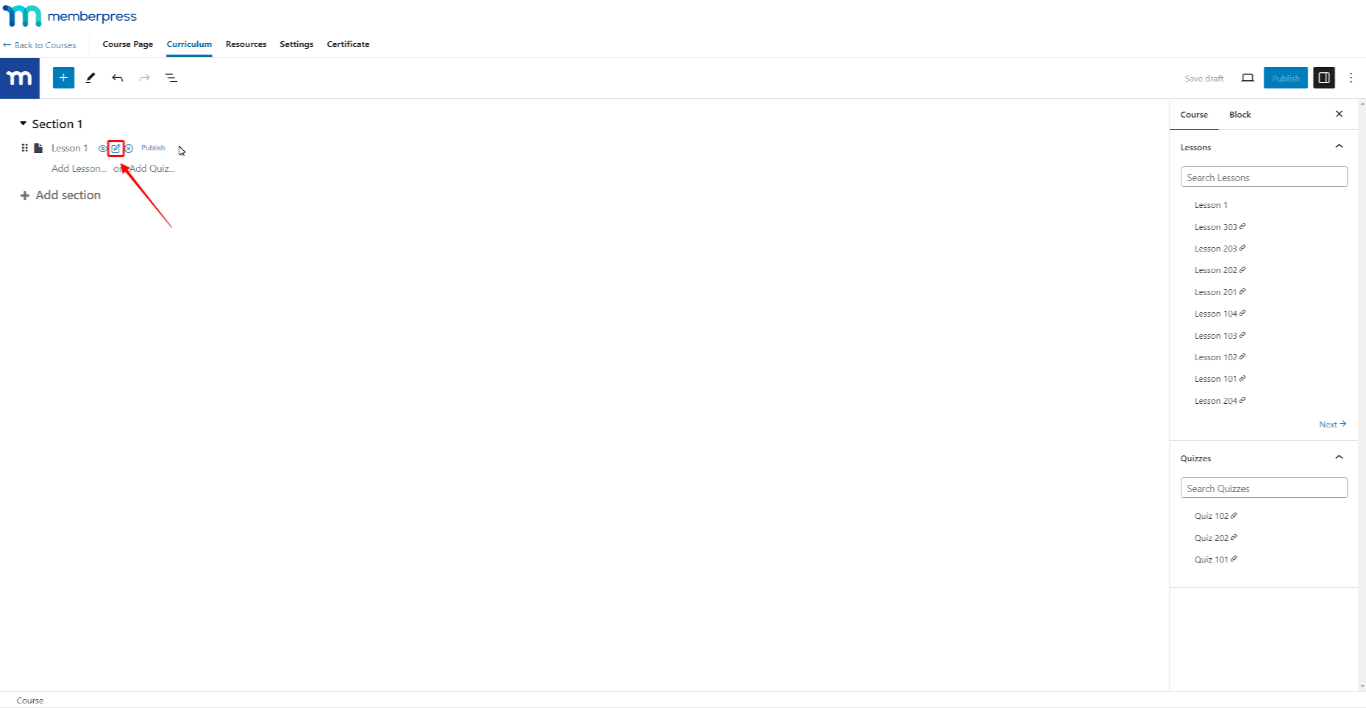
- Hover over the lesson you wish to edit to show additional lesson options.
- Click the Edit option (pencil icon) to start the lesson editor.
- Add content for your new lesson using any Gutenberg block.
- Once you add content, you can save changes without publishing the lesson by clicking Save draft.
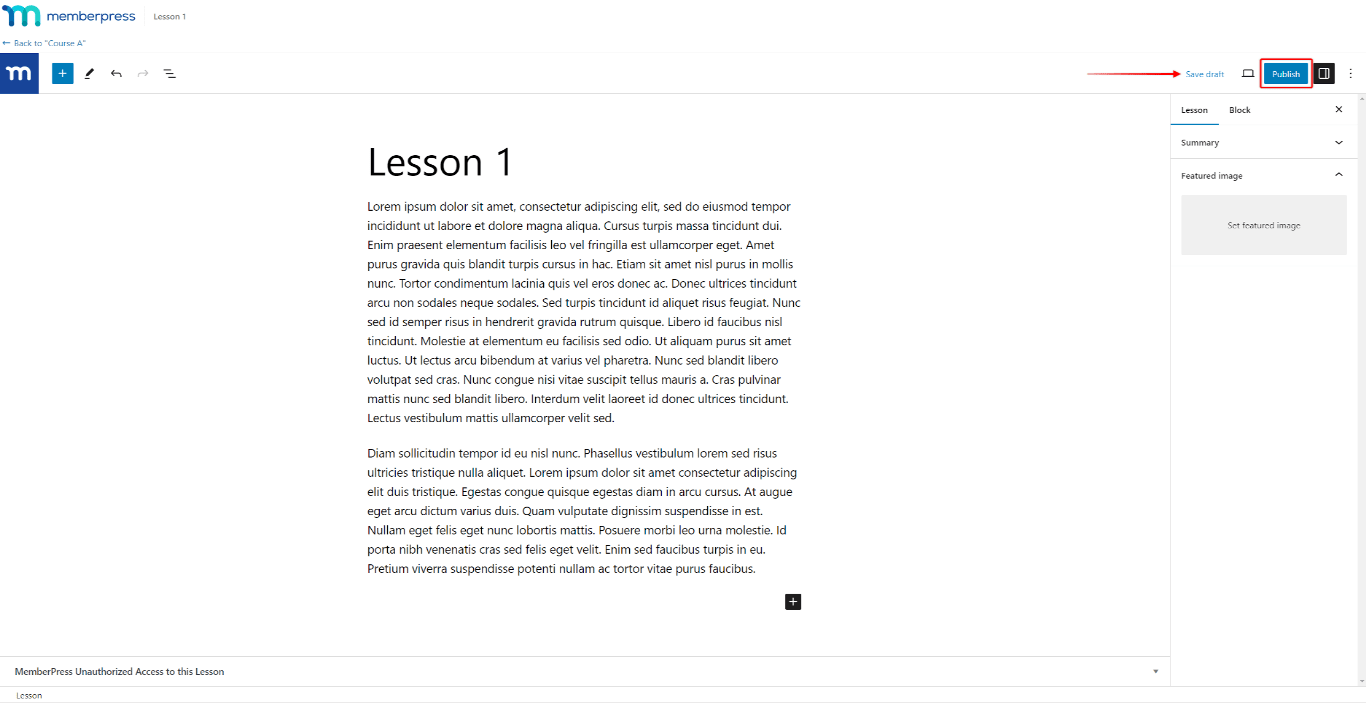
- Alternatively, you can click the Publish button to save changes and publish the lesson straight away.
All drafted lessons will have the additional Publish link when you hover over them. This link allows you to publish lessons directly from the Curriculum editor.
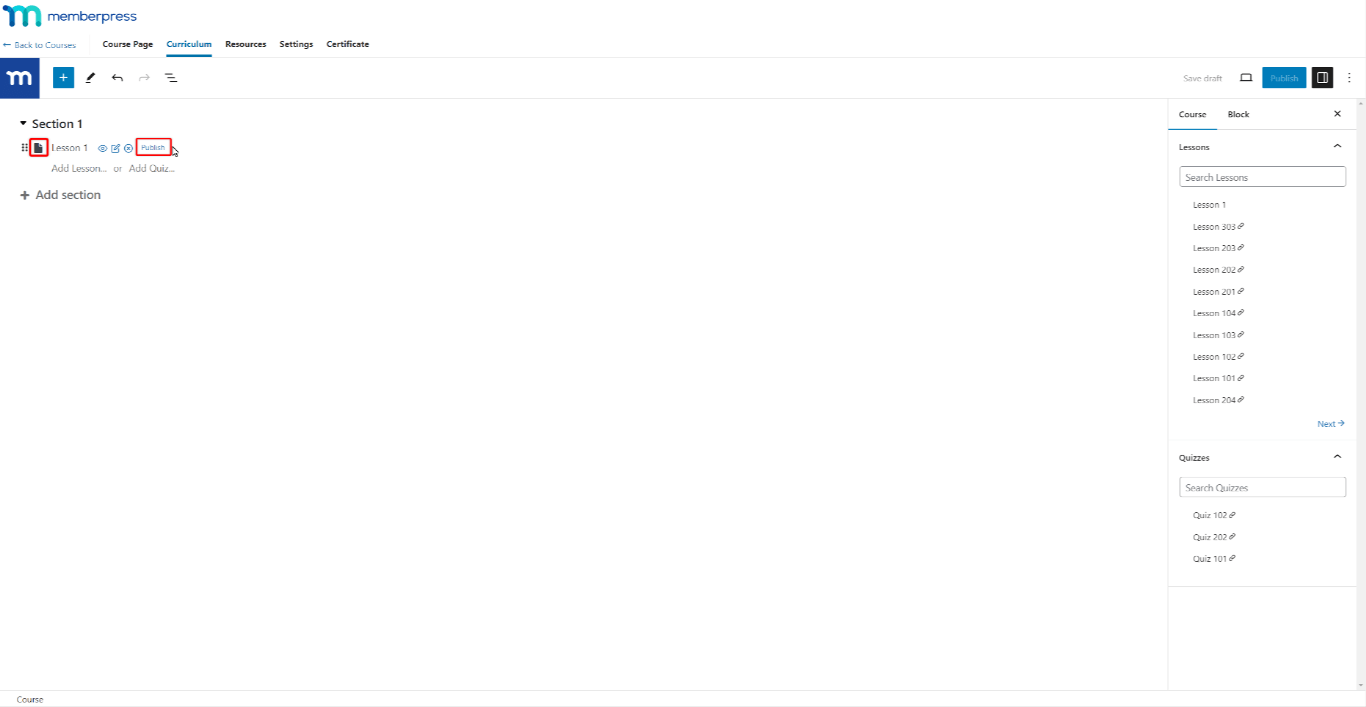
Similarly, you can add content to a quiz or an assignment in the same way as your lessons.
Adding Course Items to Multiple Courses
Creating any course content item automatically adds it to the Lessons, Quizzes, or Assignments list. These lists are available in the sidebar of every course on the right side of the Curriculum editor.
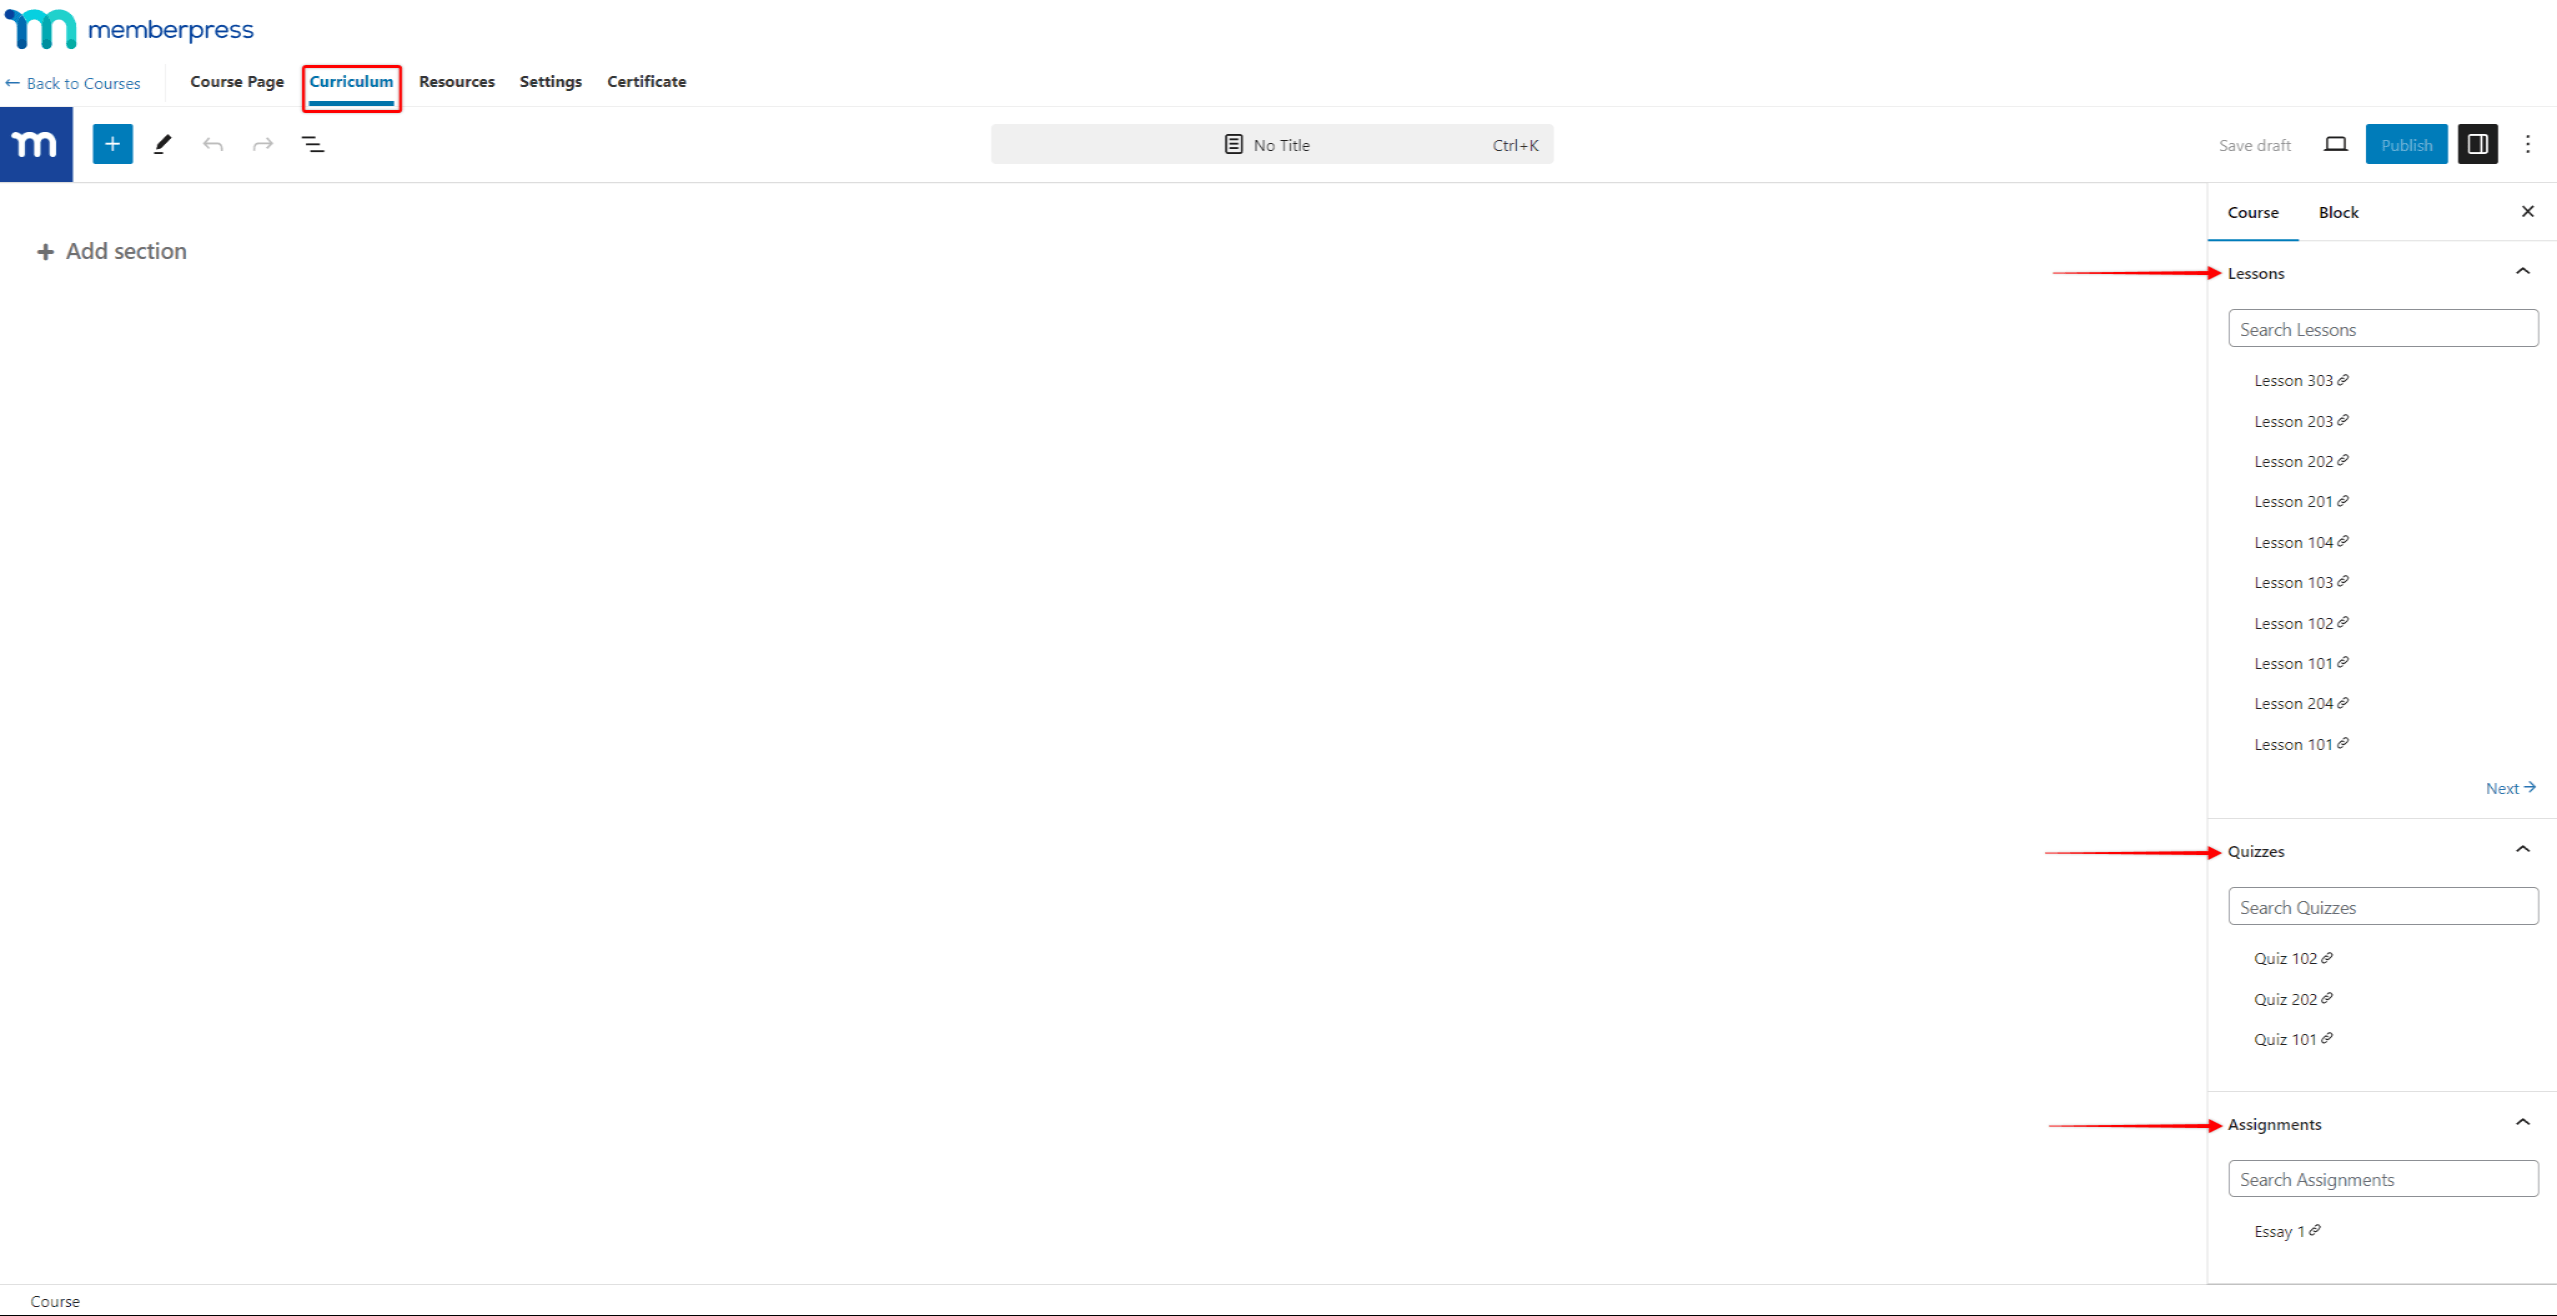
Existing course items can be added to your MemberPress courses using these lists.
For example, you could create multiple individual course items outside the Course Curriculum Editor. Then, you could use the Lessons, Quizzes, and Assignments lists to add them all in bulk to a new course.
Follow these steps to add existing course items to the Curriculum:
- Search for course items or browse through the list.
- Once you find the item you need, hover over the item and hold the grid (6-dots) icon.
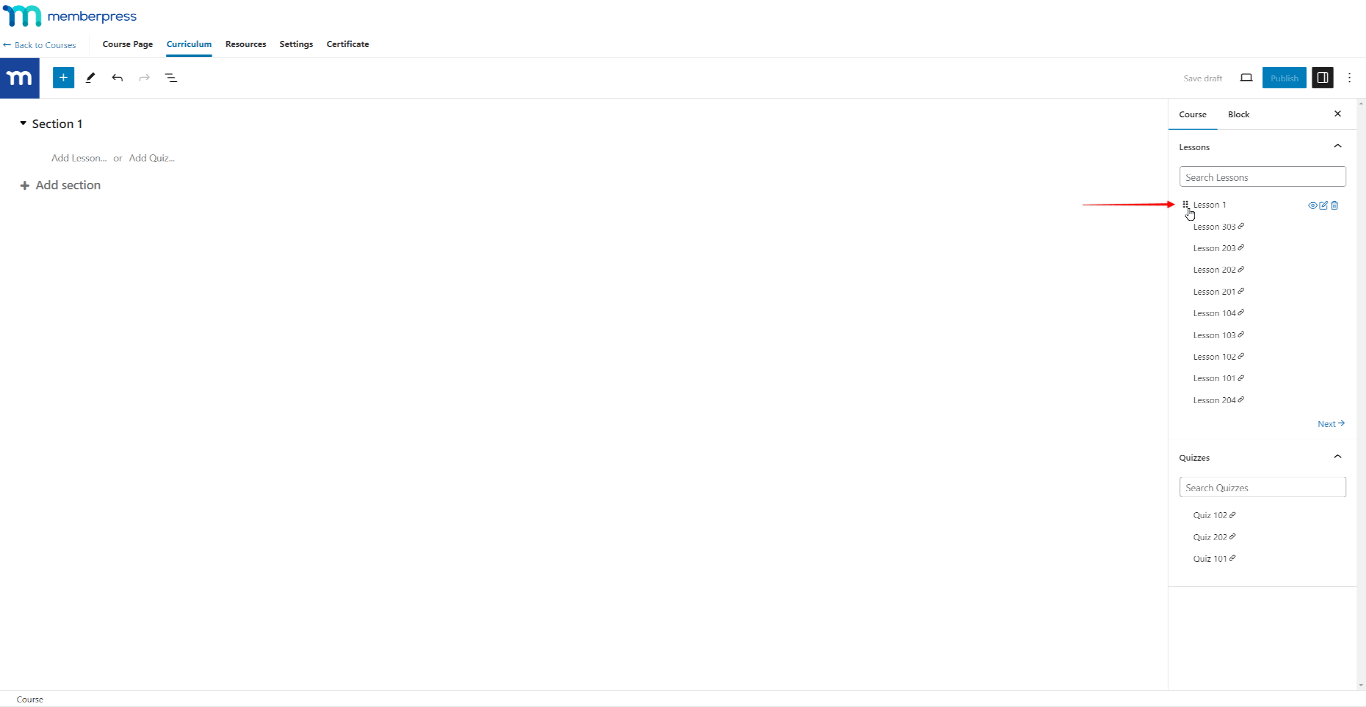
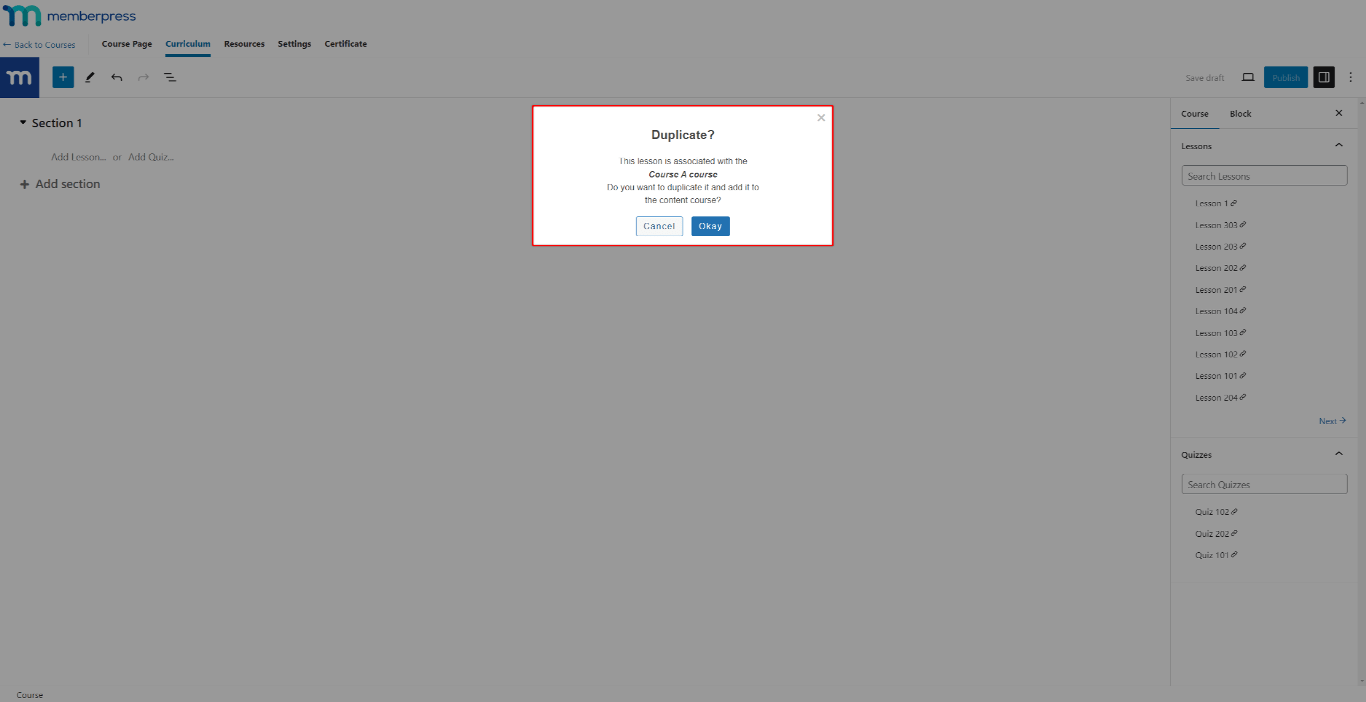
- Now, drag and drop the item into a section within your course. When adding an item that has already been added to some course, MemberPress will show a notification popup. The popup will offer to automatically duplicate the item and add that duplicate to your current course.
- Click the Update button to save changes to the Curriculum.
Resources Tab
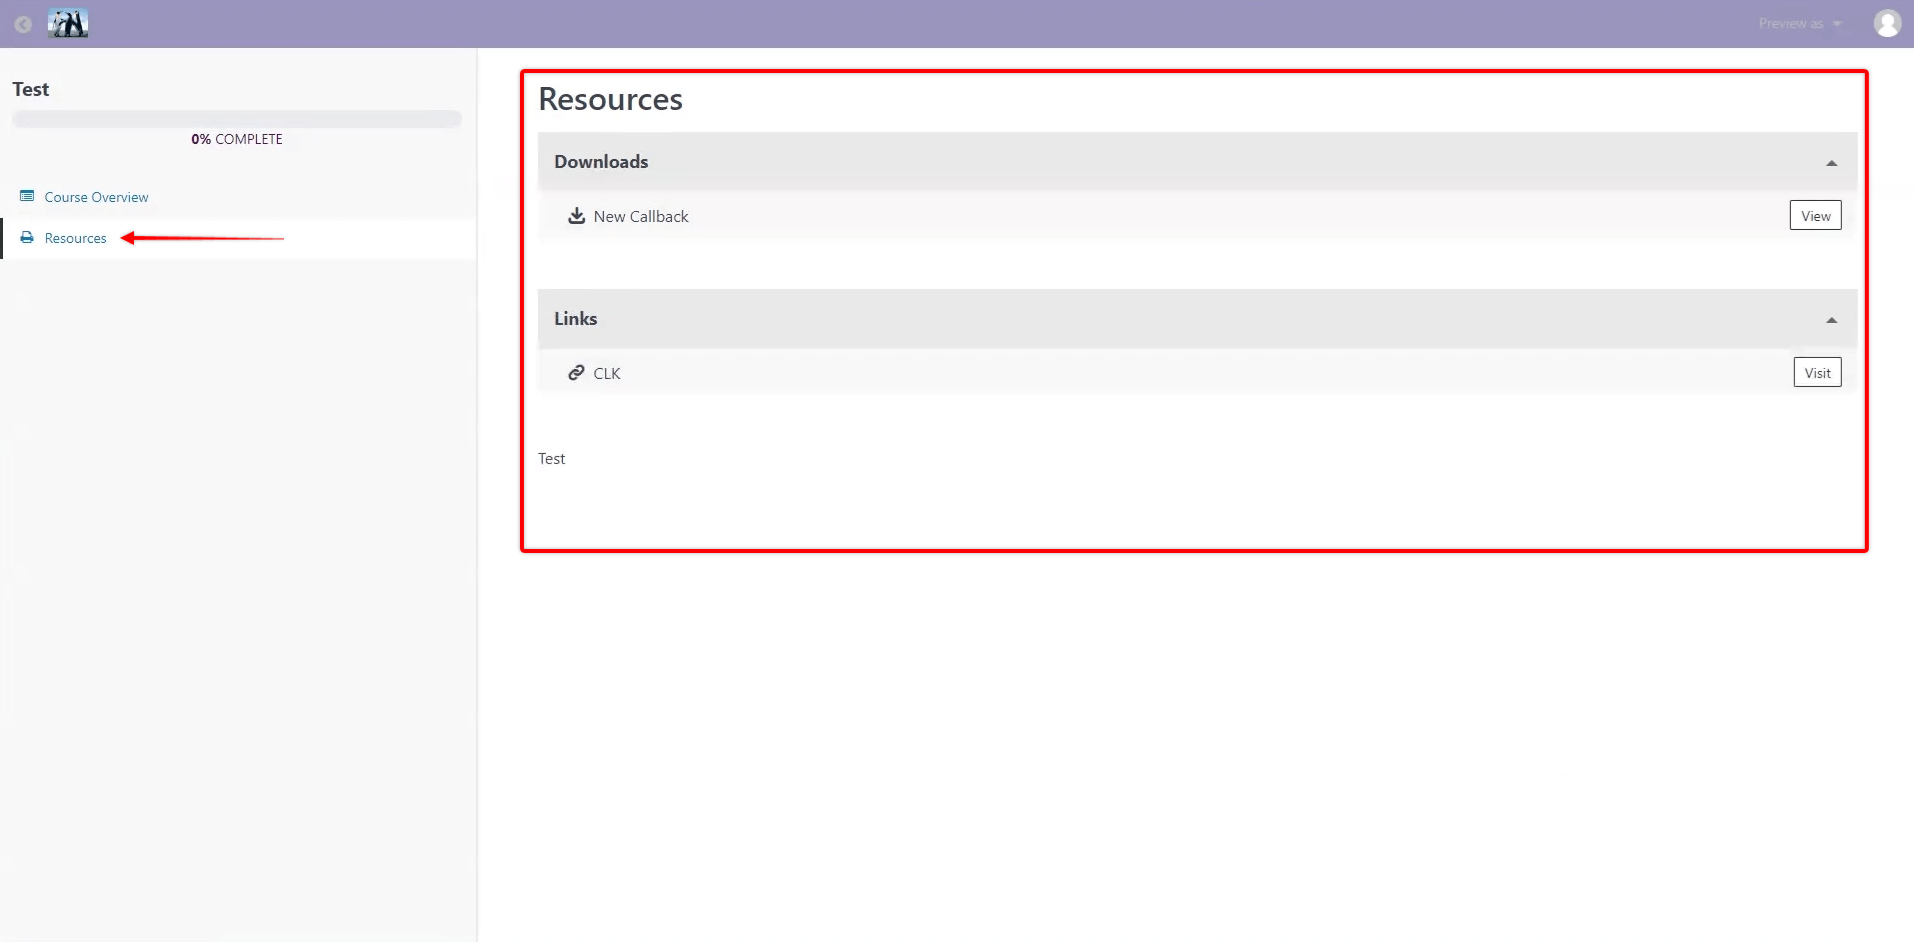
You can use the Resources tab to add downloadable materials, links, or custom content to your courses:
- In your course editor, click on the Resources tab.
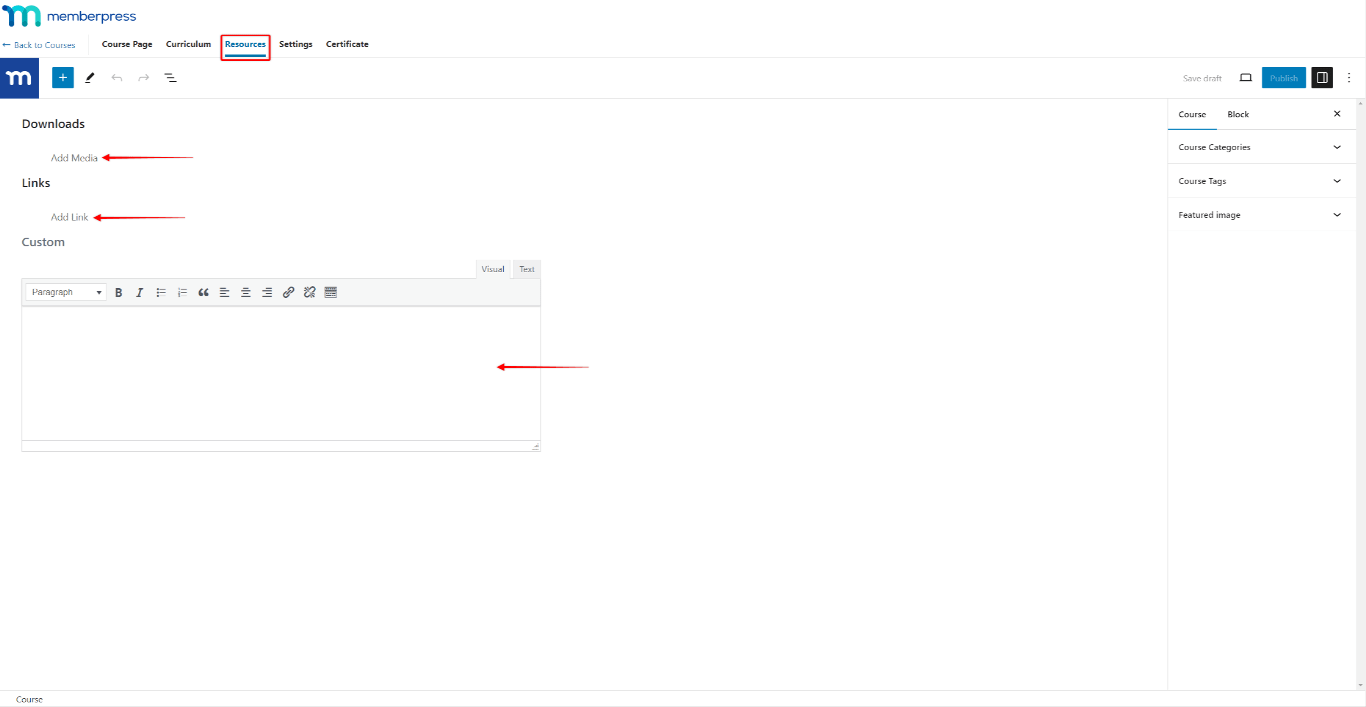
- Under the Resources tab, you can add different types of resources:
- Downloads: you can add files (e.g., PDF, doc/docx, etc.) your students will be able to download directly from the course;
- Links: you can add links to online resources that your students can access by clicking the link on the Resouces pages;
- Custom: the editor will allow you to add any text or HTML to this area. Also, you can give this section a custom heading.
- Click Update to save changes.
Your students can access the course Resources under the Course Overview through the course sidebar.
Settings Tab
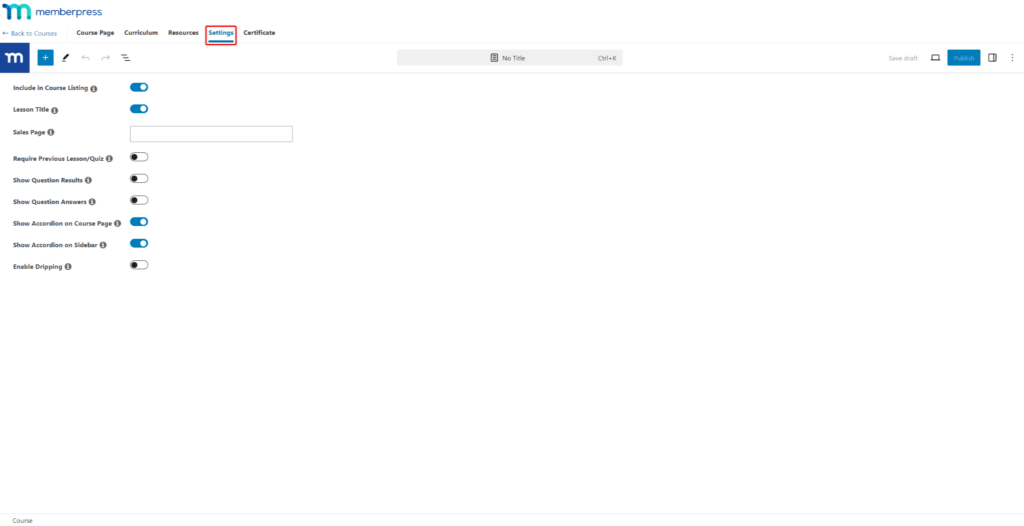
Under the Settings tab, you will find settings related to the course you’re currently editing. These course-specific settings will not be applied to any other course:
- Include in Course Listing: enabling this option will display the course on the Course Listing page. This option will be enabled by default. If disabled, the course will be hidden on this page, and accessible only through the course URL;
- Lesson Title: by default, this option will be enabled, and Lesson and Quiz titles will be displayed on the front end. You can toggle this option off to hide Lesson and Quiz titles;
- Sales Page: in this field, you can add the URL of the MemberPress Membership registration page. This should be the registration page URL of the membership required to access this course (if the course is protected);
- Require Previous Lesson/Quiz: this option will be turned off by default. If enabled, MemberPress will require students to complete the previous lesson or quiz before proceeding to the next one;
- Show Question Results: if enabled, students will be notified whether their answer to the quiz question was correct or not.
- Show Question Answers: if enabled, students will have answers provided to all quiz questions upon submitting the quiz.
- Show Accordion on Course Page: by default, the Curriculum will display all sections as accordions on the Course Page. Turning off this option will change the Curriculum style. In this case, all sections will be expanded, and all lessons and quizzes will be listed.
- Show Accordion on Sidebar: As with the previous option, the Curriculum will display all sections as accordions in the Course Sidebar. You can turn off this option to switch to the Curriculum style with all sections expanded.
- Enable Dripping: toggling on this option will show additional options for setting the course dripping.
Certificates Tab
Under the Certificates tab, you can enable and design certificates for the course.
Certificates need to be enabled and designed separately for each course.


