By default, memberships in MemberPress can have only one price, which is how many membership businesses work. However, this is not the ideal setup if you use any strategy where members can pay variable amounts for memberships. For example, these would be cases where members pay as much as they want (name your price). Further, this is often the case when accepting donations.
Though MemberPress doesn't support custom donations (name your price) out of the box, this document will show you several workaround options. You can apply these workarounds to create the name-your-price setup and use MemberPress to accept donations.
Name Your Price With MemberPress
The name-your-price strategy means that users can choose the amount they want to pay for the membership. Accordingly, this strategy requires variable pricing.
With MemberPress, each membership can have only one price added to the membership terms. Thus, the possibility of having only one membership price is often a limitation when using MemberPress for donations.
At the same time, MemberPress comes with a coupon feature that can be used to modify the membership price at registration. In addition, you can automatically load coupons on your registration pages using links. Thus, coupons can be used as a workaround for the name-your-price setup.
Here, you would allow users to choose one of the predefined amounts and apply that price through coupons.
Coupon Workaround
To create the workaround using MemberPress coupons you would need the following:
- A membership;
- A discount coupon for each predefined payment amount;
- A custom membership page for donations.
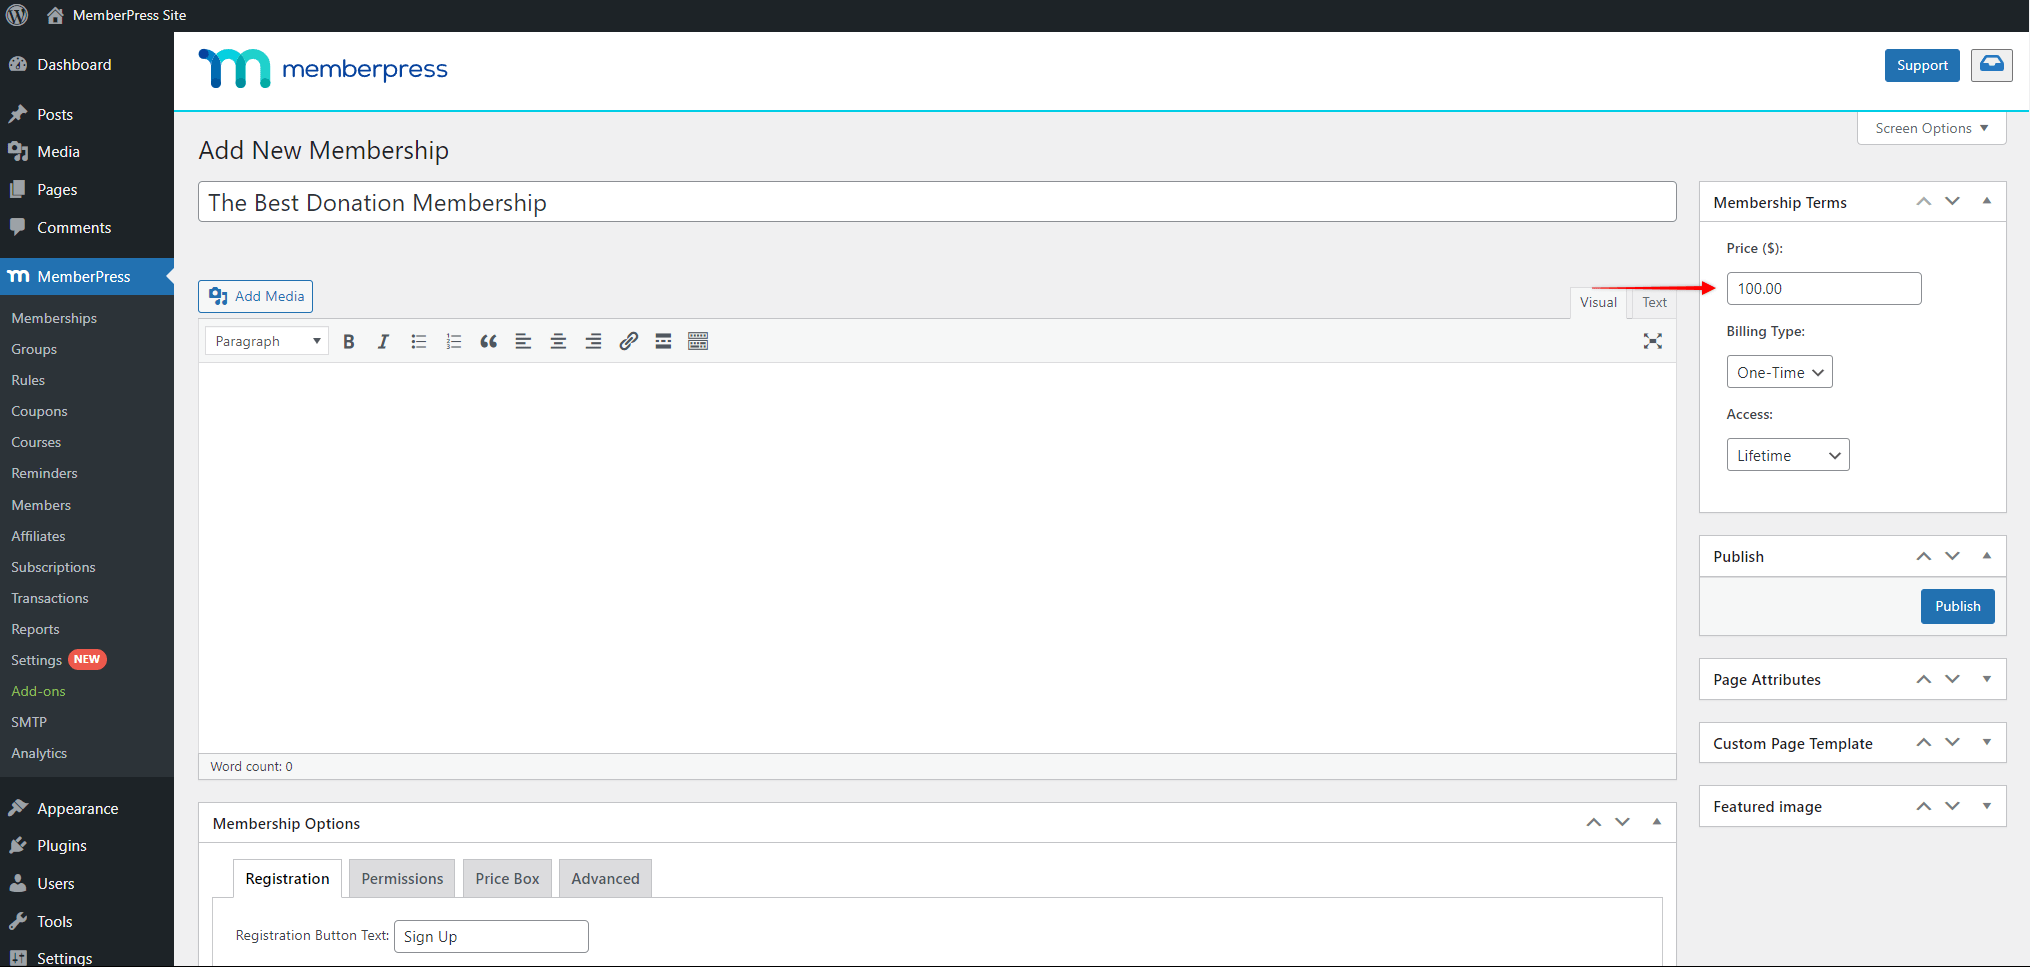
To illustrate this setup, we will create a lifetime one-time membership with five donation amounts: $100, $70, $50, $40, and $30.
Creating a Membership and Coupons
We will start by creating our one-time membership. You can apply the same steps if you wish to use a recurring membership instead.
When creating a membership, in your membership terms, set the biggest donation amount as your membership price. The reason for this is that your coupons will provide discounts based on this membership price. Thus, in our example, the membership price would be set to $100.
Next, create a coupon for each additional donation amount you wish to use. In our example, we want to provide four additional amounts next to the regular membership price. Thus, we'll create four coupons in total.
Each coupon should be set like this:
- Discount: The discount should be set to a currency. The amount should be set according to how much the discount should be given. For example, if we want a user to pay $70 for our $100 membership, we would set the discount to $30;
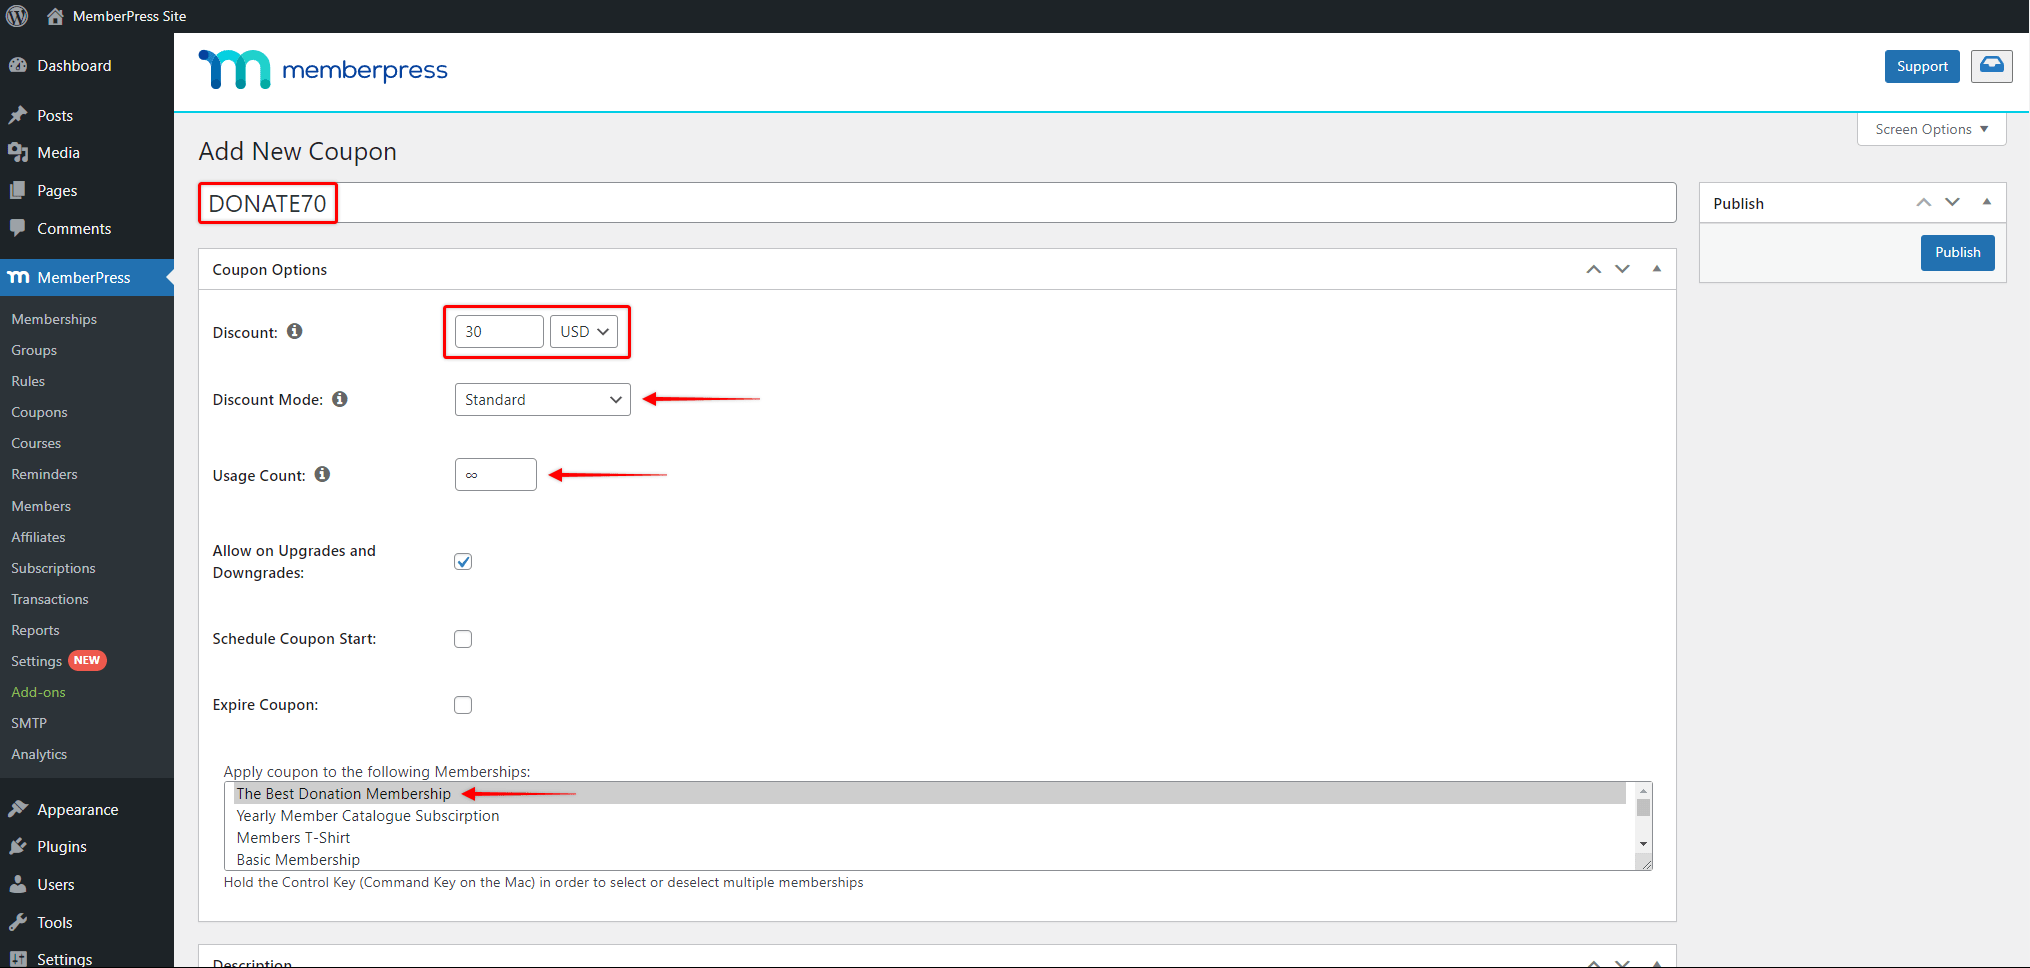
- Discount mode: This should be set to Standard;
- Usage Count: The usage should be set to 0 (unlimited);
- Allow on Upgrades and Downgrades: This option should be enabled, so discounts work also in cases of upgrades and downgrades;
- Apply coupon to the following Memberships: You should select the membership you created previously.
Now that we have created the membership and coupons, we can proceed to creating our custom membership page.
Creating Donations Page
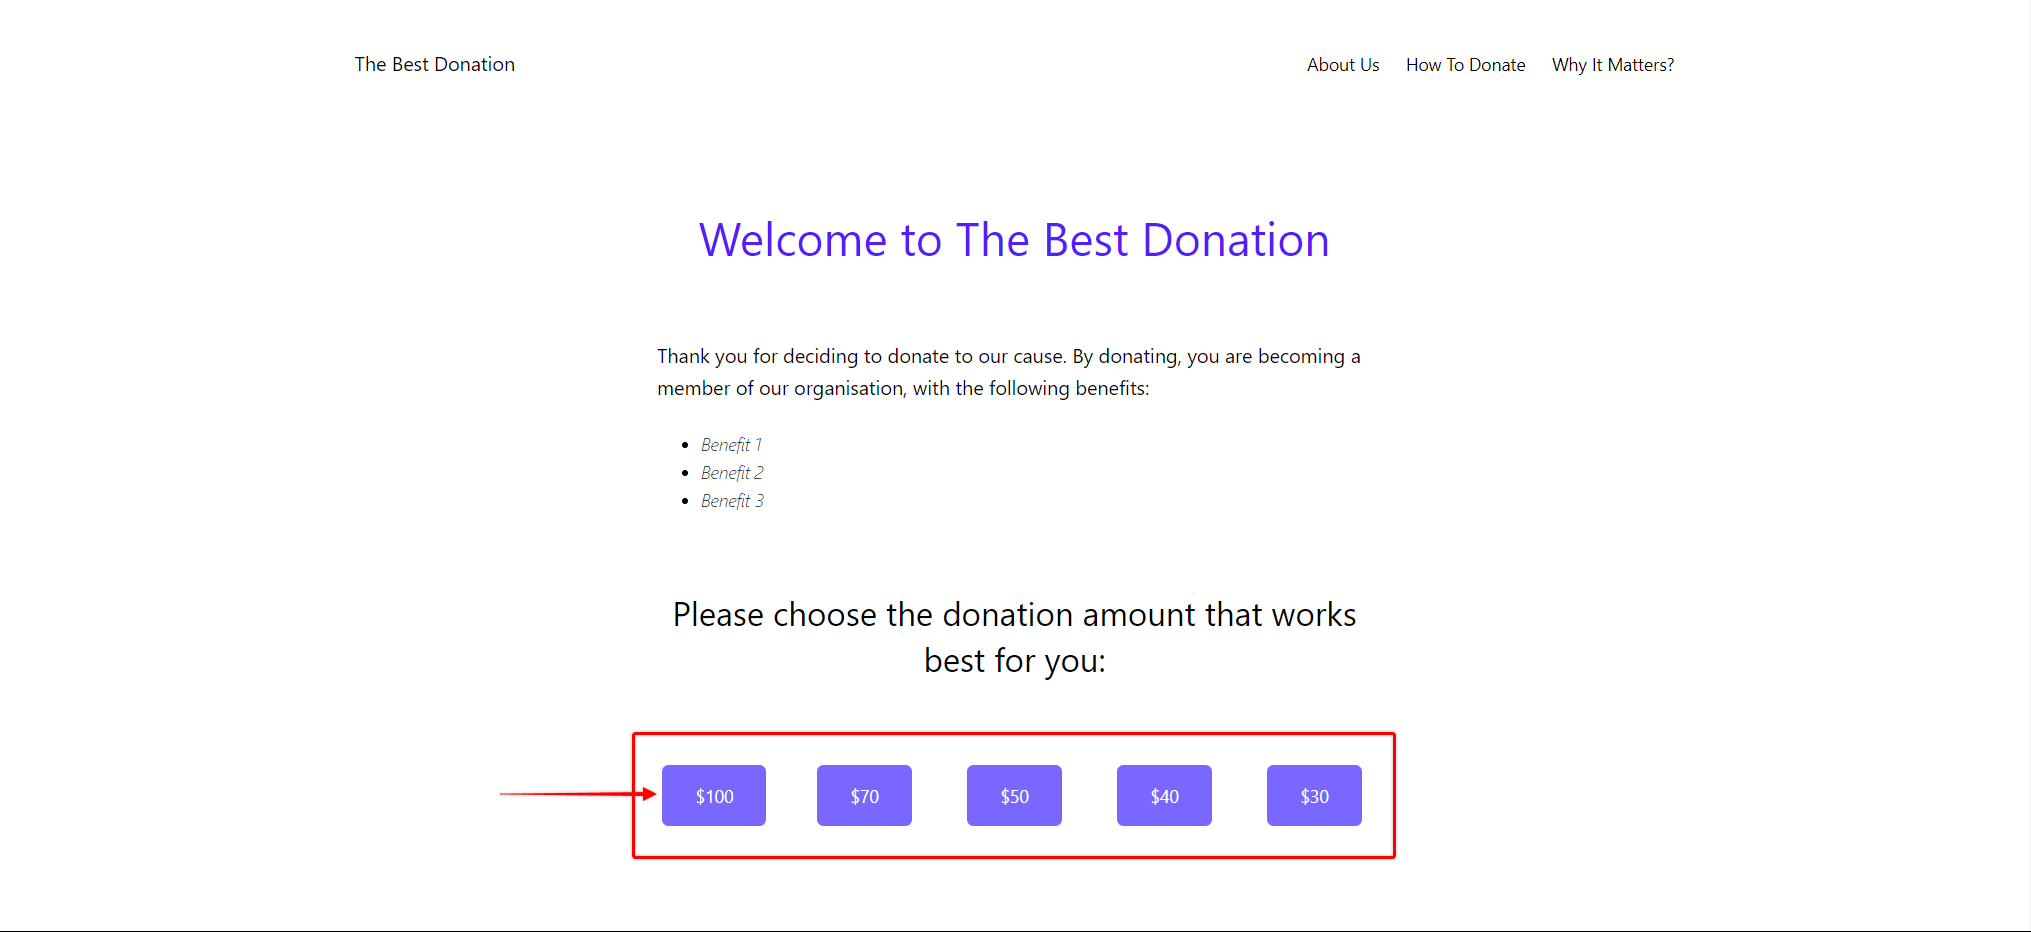
The custom membership page should contain a call-to-action link for each predefined amount. Further, you could add membership benefits and any other related information important for users donating money to become a member.
Also, you can design this page in any way you want. For example, use some page builder and add your predefined amounts as buttons or points on the slider. Based on your preferences, you can use some other design solution (e.g. custom code).
For the example in this document, we used the default block editor and the Button blocks. We created five buttons for five different amounts.
Creating Registration Links With Coupons
Next, we need to create links that auto-populate coupons to connect our custom page to the membership registration page.
These links can be created by adding ?coupon=CODEHERE to the end of the membership registration page URL. Instead of the CODEHERE part, you would use the coupon name, like this:
https://yourdomain.com/register/your-membership?coupon=XXXXXXXXX.
In our example, we must create four links, which will be used for the four discounted-price buttons.
Regarding our maximum available amount, it's actually the regular membership price we set in the membership terms. Thus, we'll use the membership registration URL without a coupon applied for our maximum-amount button.
These URLs would then be used as links for our payment buttons on the custom membership page. Accordingly, the five payment buttons would use the following links:
- $100 button: https://yourdomain.com/register/your-membership
- $70 button: https://yourdomain.com/register/your-membership?coupon=DONATE70
- $50 button: https://yourdomain.com/register/your-membership?coupon=DONATE50
- $40 button: https://yourdomain.com/register/your-membership?coupon=DONATE40
- $30 button: https://yourdomain.com/register/your-membership?coupon=DONATE30
Donations Workaround Flow
Finally, you should create a user flow that would match this setup. This means that your users should be landing on the custom membership page you created. Thus, you would link this page to your menus and other pages which should be taking users to registration.
Once they land on the custom membership page, users should see all the information about the membership, and call-to-action buttons/links.
In our example, users would see the page with our five payment buttons. When users click on any of these buttons, they will land on the same membership registration page. Since we appended coupons to our button links, this registration page will be loaded with different discounts applied.
Accordingly, users would be paying a different amount for the same membership depending on the button they clicked:
- $100 button: No coupon will be applied, the user will subscribe at the full membership price of $100 (this is the fixed maximum amount);
- $70 button: A $30 discount coupon (DONATE70) is applied, and the user will subscribe at the price of $70;
- $50 button: A $50 discount coupon (DONATE50) is applied, and the user will subscribe at the price of $50;
- $40 button: A $60 discount coupon (DONATE40) is applied, and the user will subscribe at the price of $40;
- $30 button: A $70 discount coupon (DONATE30) is applied, and the user will subscribe at the price of $30 (this is the fixed minimum amount).
Additional Options For Donations
When using this workaround for your setup, some additional options might be important to consider. Though these options are not required to create this workaround, they might be essential for the functioning of your organization.
Firstly, by default, MemberPress allows each user to have only one active subscription to the membership. If you plan on using one-time memberships for individual donations, each user will be able to donate only once.
Thus, you might want to allow users to have multiple subscriptions to your donation membership, and donate multiple times. To do this, please follow these steps:
- Start editing your donation membership;
- Scroll down to Membership Options and click on the Permissions tab;
- Enable the Allow users to create multiple, active subscriptions to this membership option.
Secondly, you might consider prorating when changing plans. You might want to offer several memberships with the above-mentioned setup (name your price). To allow users to upgrade/downgrade, you would need to add them to a MemberPress group.
In this case, you might want to disable prorating. When active, the prorating feature will calculate unused funds from the user’s previous payment. Next, MemberPress will apply this amount as a discount or free days when users upgrade or downgrade their plan.
To disable prorating, navigate to Dashboard > MemberPress > Settings > Account tab and make sure the Pro-rate subscription prices when a member upgrades option is not enabled.
Alternative Setup
The coupon workaround requires you to use predefined amounts. If you require a solution where your users can pay any amount, setting hundreds or thousands of coupons wouldn’t be a good solution. Also, you would still need to set the membership price, which would automatically become your maximum payment amount.
Thus, you could use a 3rd-party plugin and custom integrations to enable users to pay any amount they want.
Here, you would need a 3rd-party plugin with the name-your-price feature. In addition, the 3rd-party plugin would need to support integrations through Zapier or UncannyAutomator.
In this case, you can use MemberPress Zapier or UncannyAutomator add-ons to integrate MemberPress and your 3rd-party plugin.
This way, using the 3rd-party plugin, you could create WordPress users for your members and charge them custom amounts. Each purchase would trigger the transaction (and subscription if membership is recurring) creation in MemberPress through Zapier or UncannyAutomator integration.


