

MemberPress Groups display selected memberships on a single pricing page. Members compare options side by side and pick the plan that fits their needs.
Groups also enable upgrade and downgrade flows. Members switch between memberships in the same group through the Change Plan pop-up.
This document covers how to create a group, configure options, apply coupons, and style the pricing page.
Overview
A MemberPress group page works like any WordPress page. The page title is required, and the content area is optional.
Any content added to the group page appears above the membership pricing table. By default, only the pricing table appears on the front end.
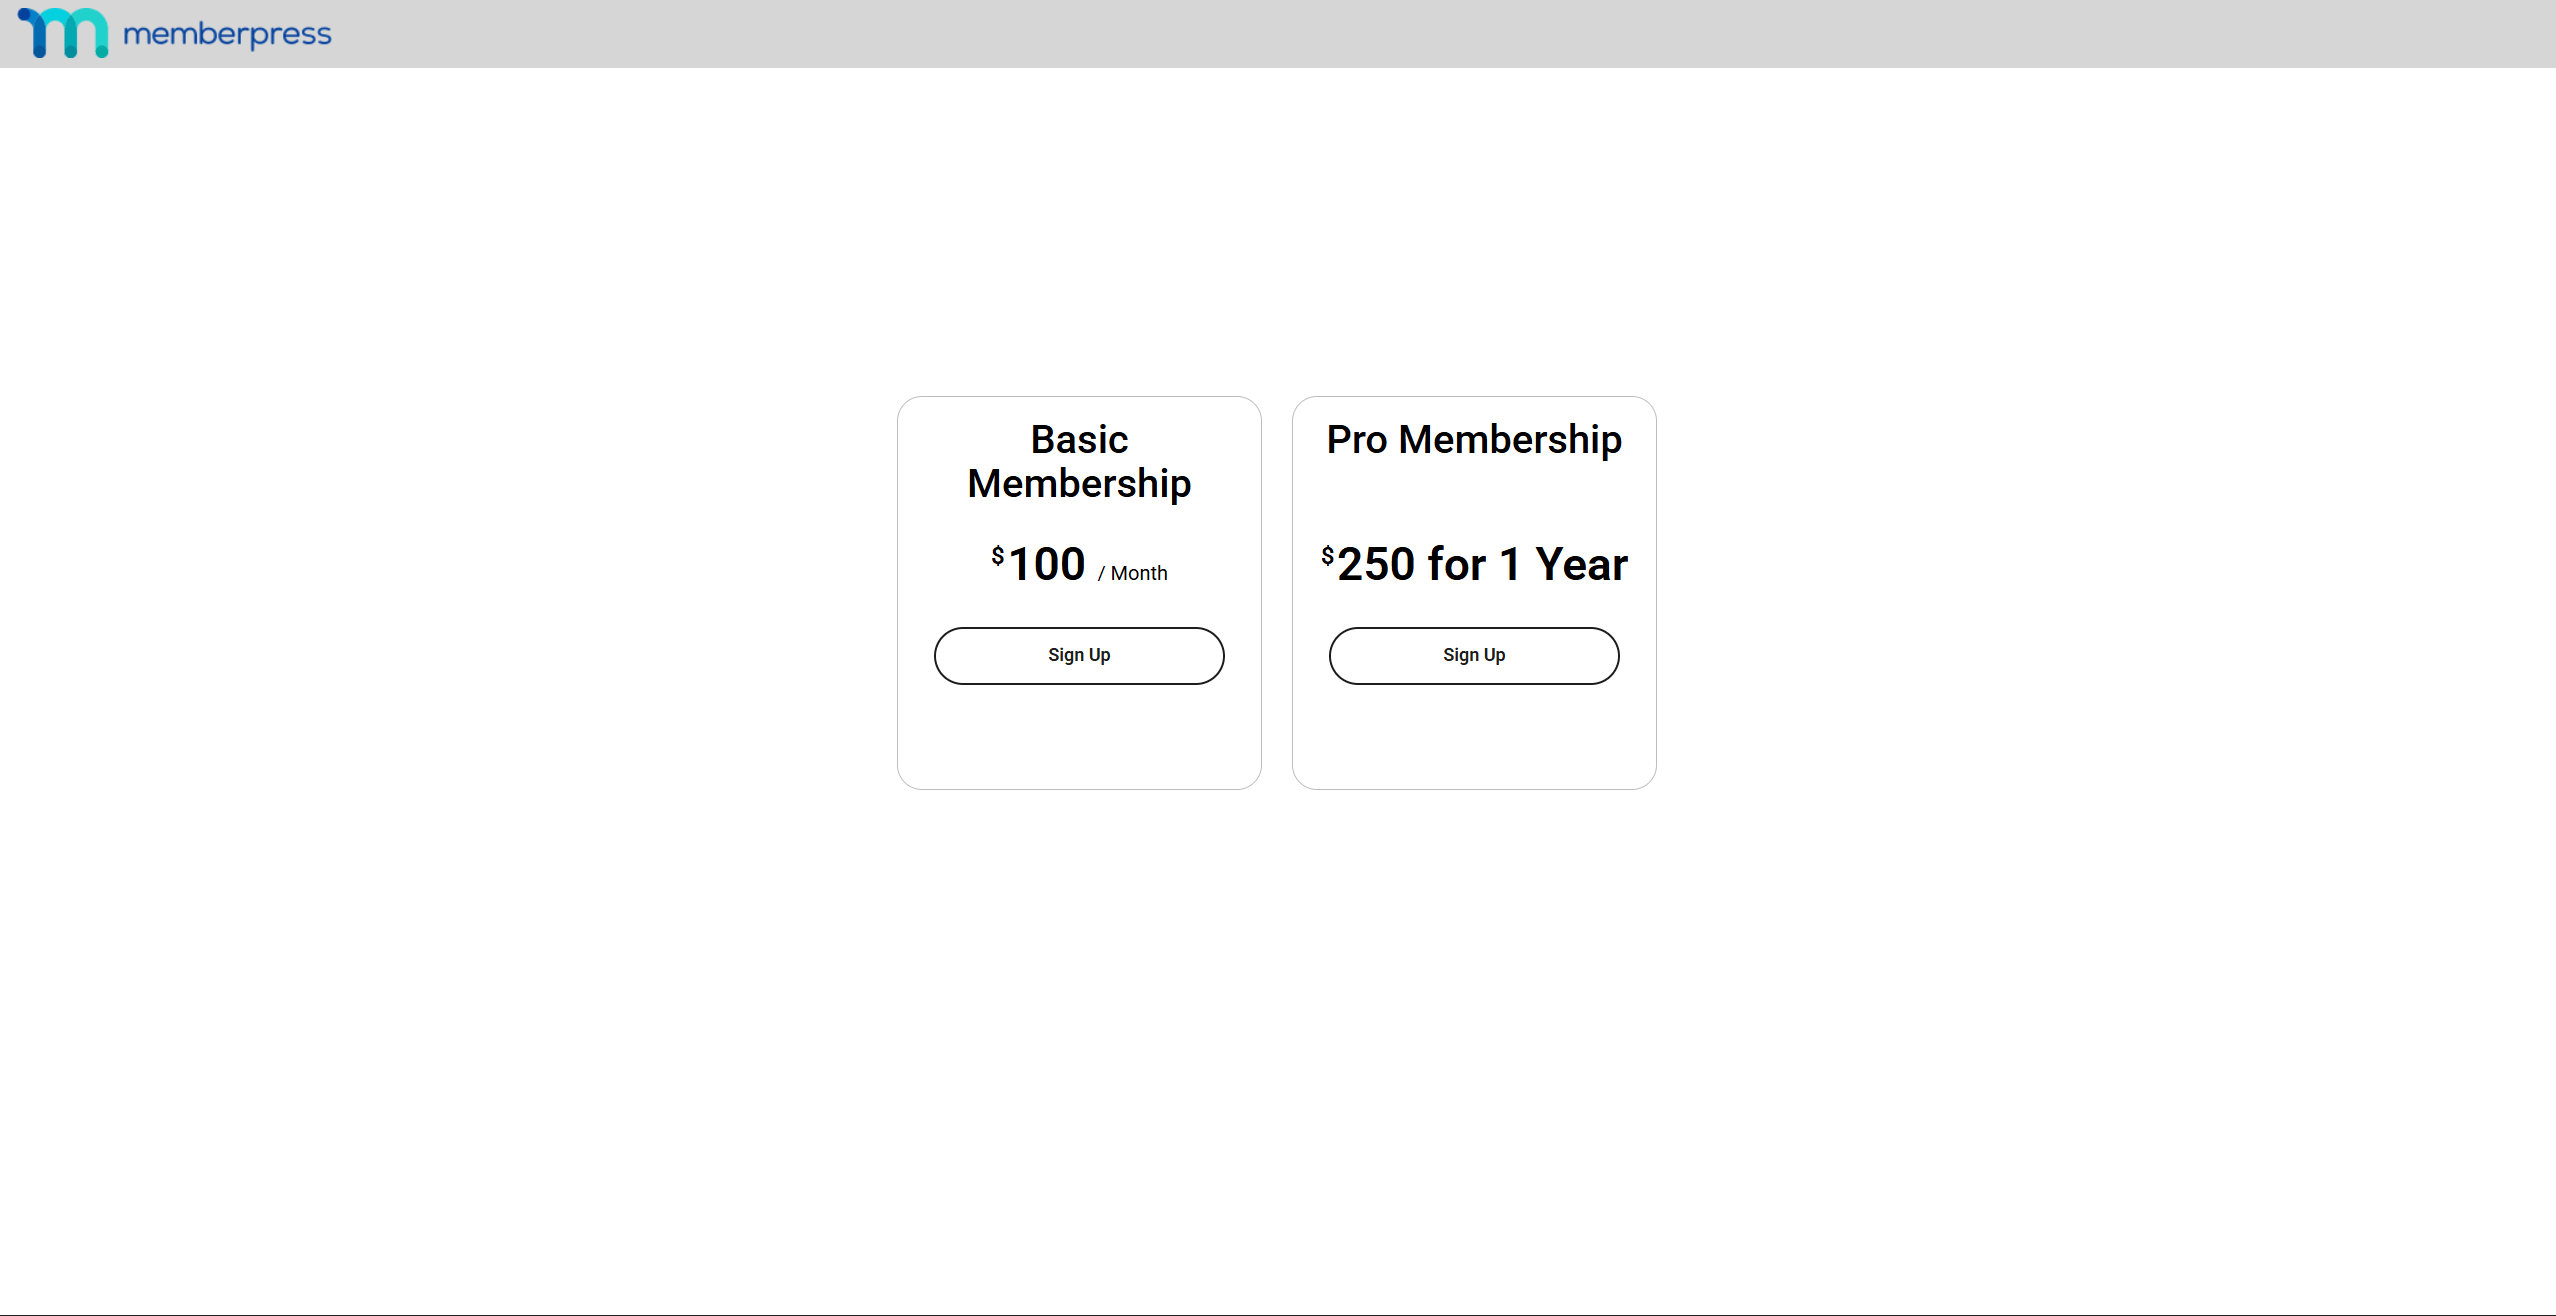
Creating a New Group
Before creating a group, set up the memberships that will appear in it.
To create a new MemberPress group, follow these steps:
- Navigate to Dashboard > MemberPress > Groups.
- Click the Add New Group button at the top of the page.
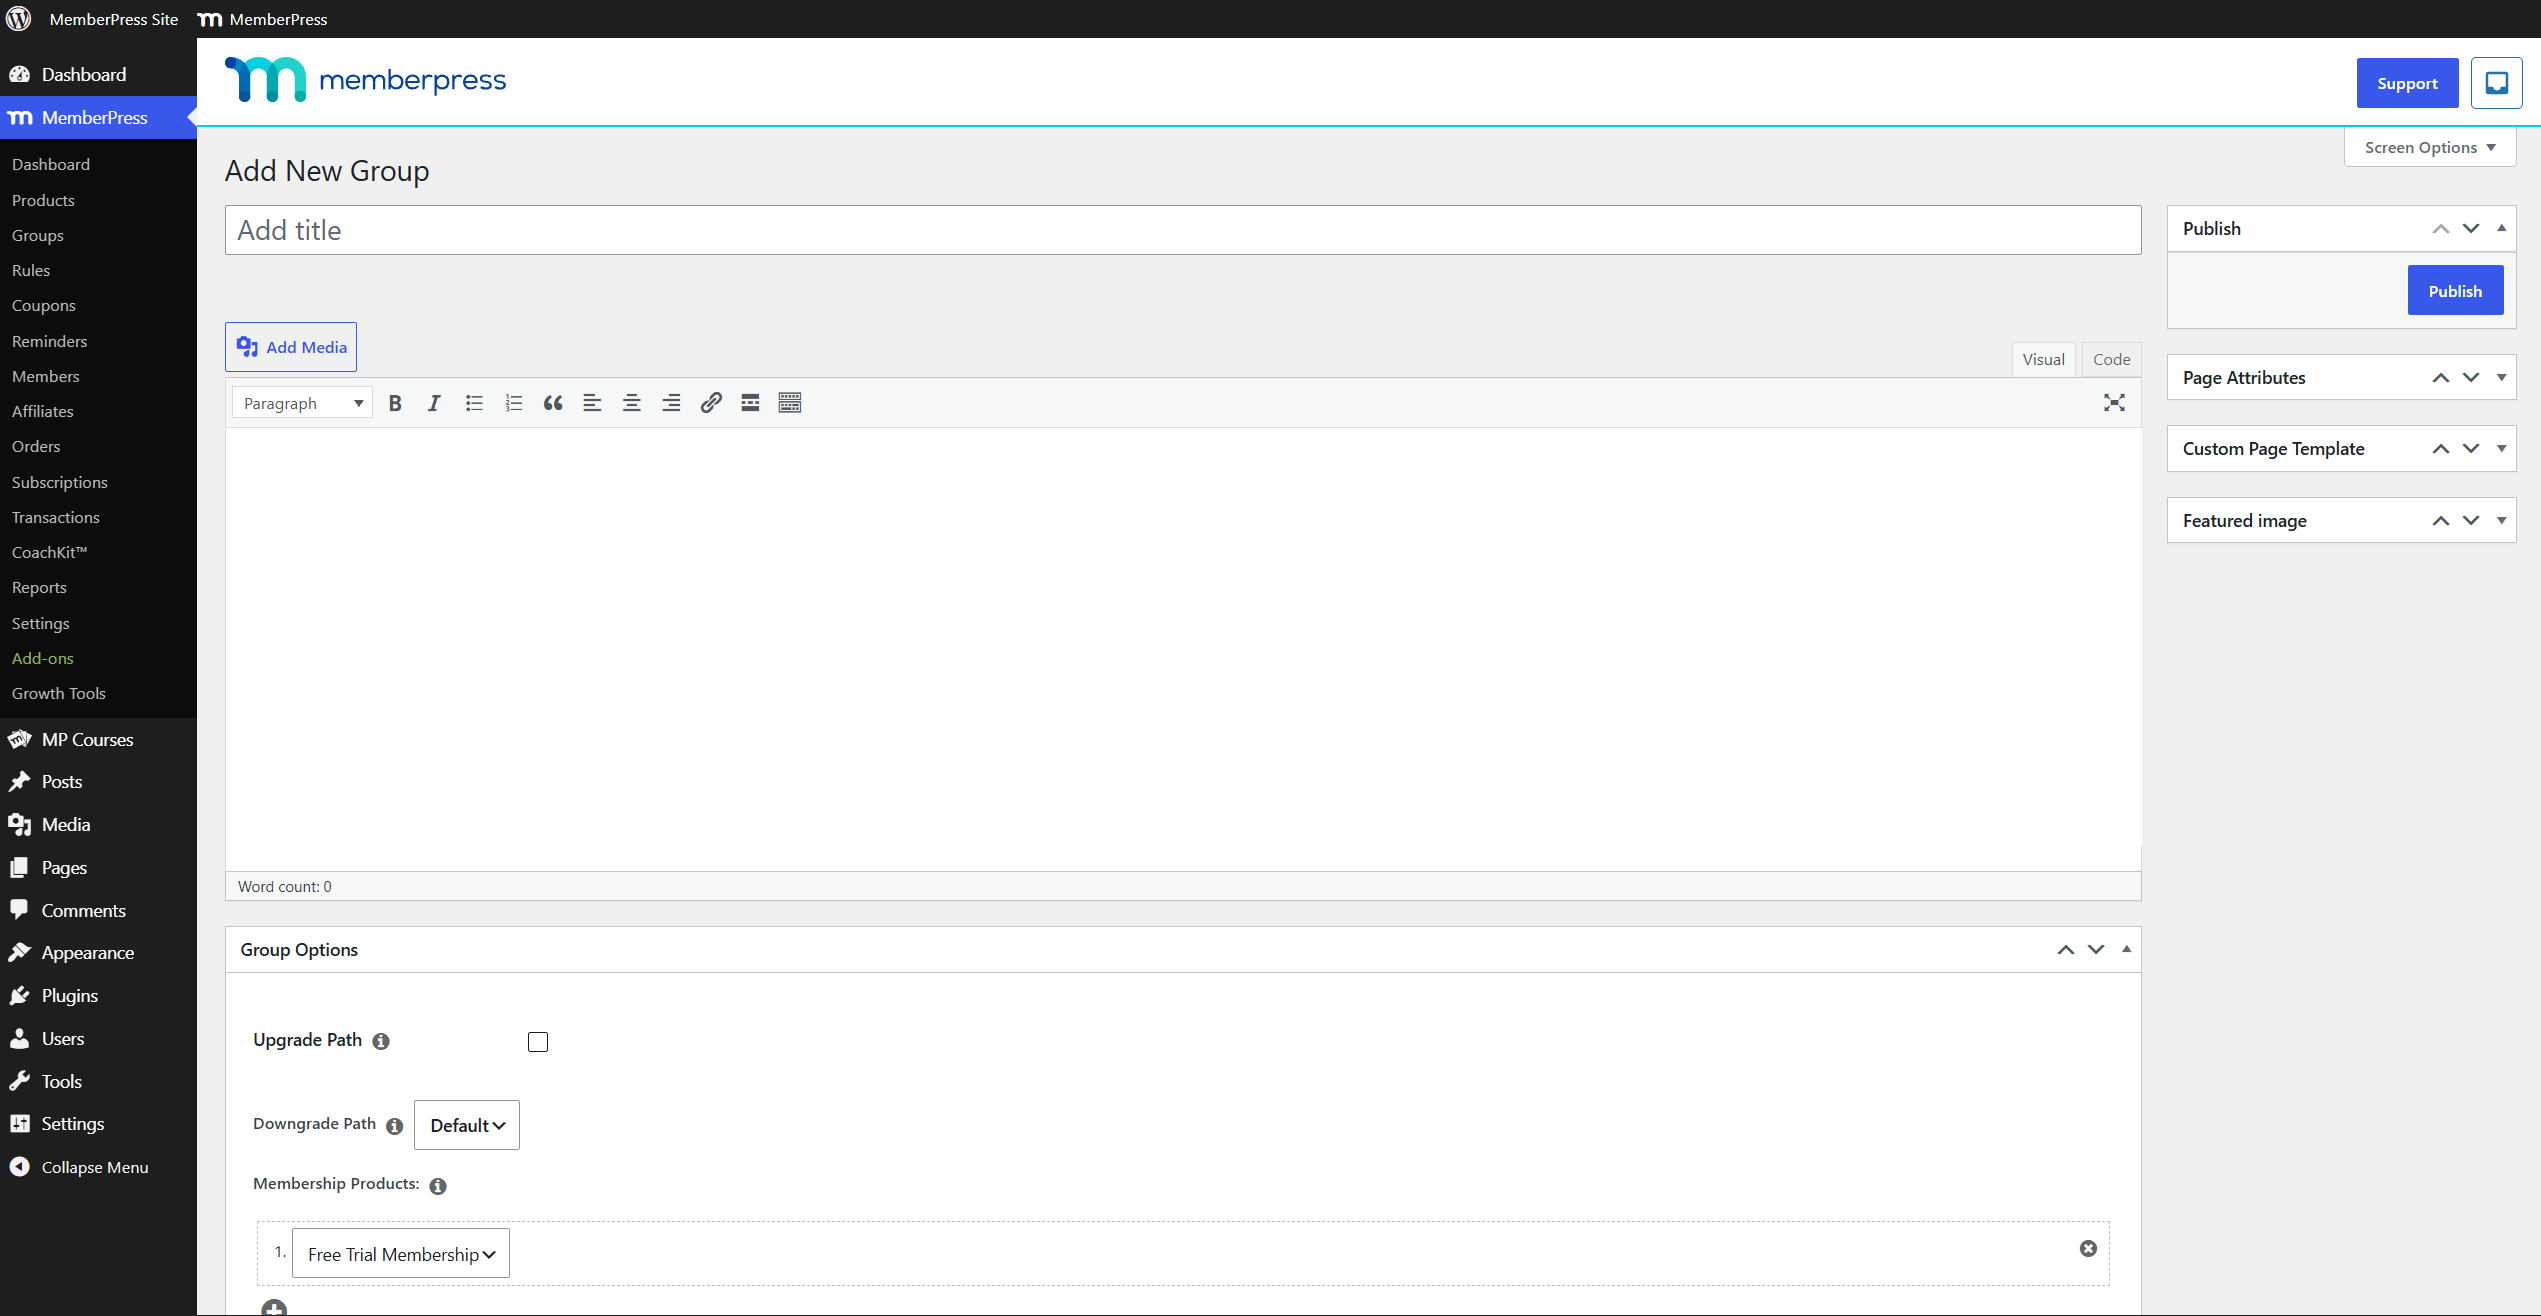
- Enter a title for the group.
- (Optional) Add content in the editor to display above the pricing table.
- In the Group Options section, add at least one membership to the group:
- Select a membership from the dropdown under Membership Products.
- (Optional) Click the plus icon below the dropdown to add another membership row, then select another membership.
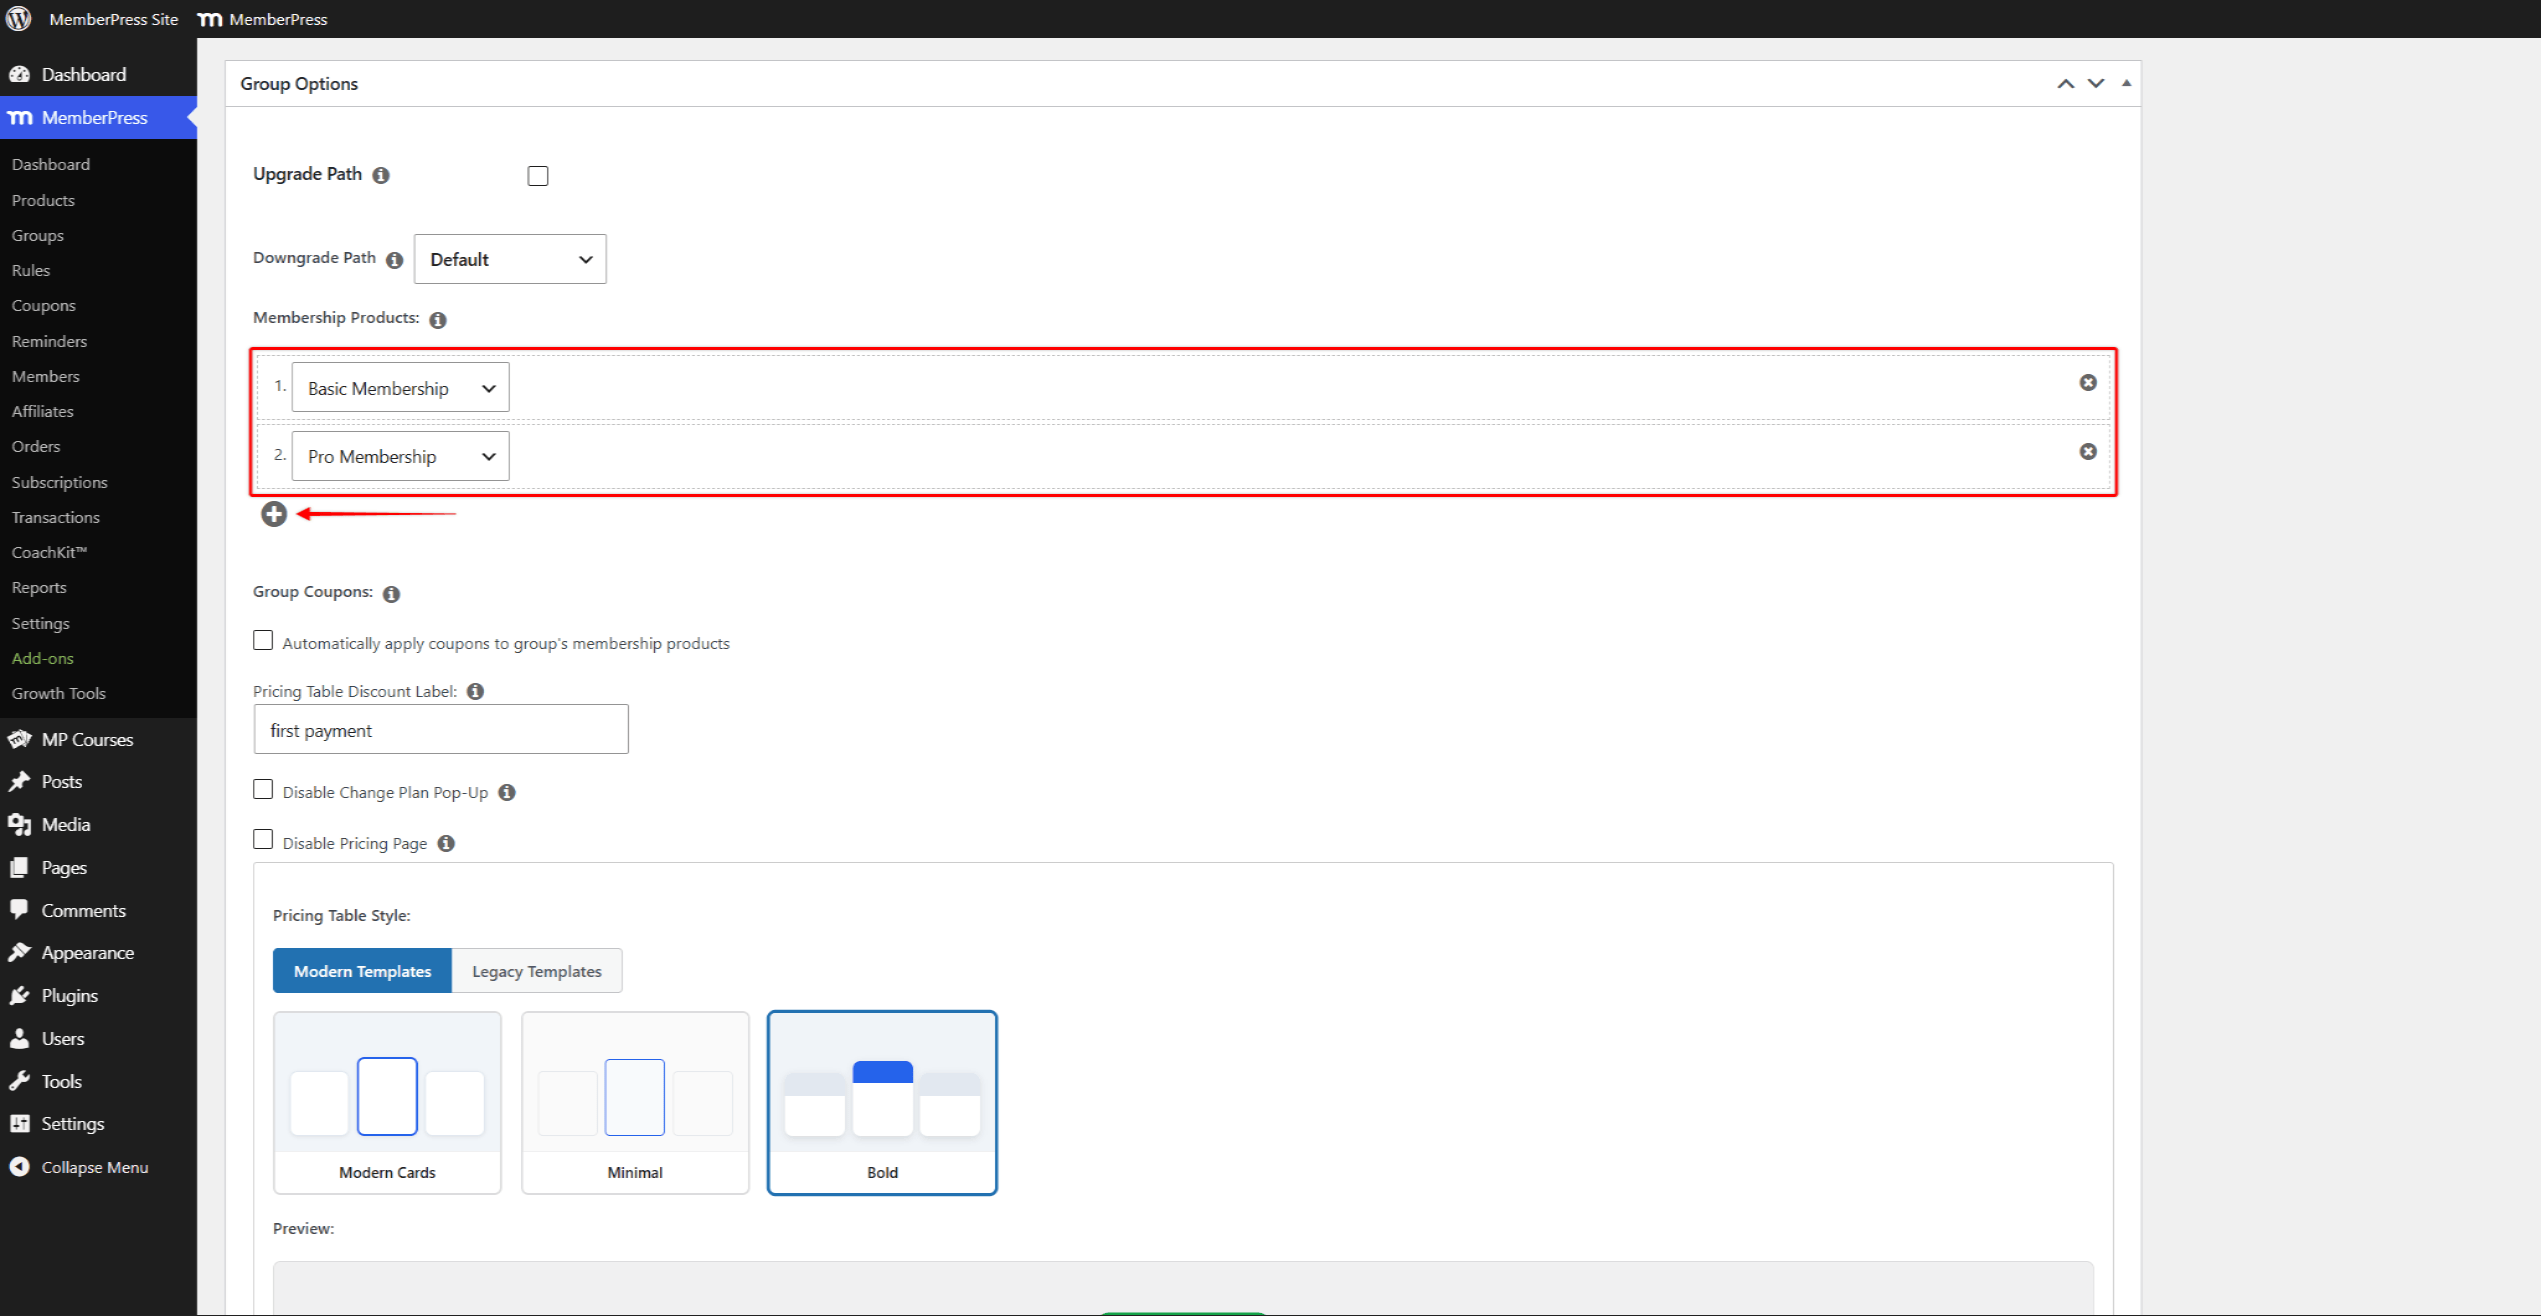
- (Optional) Configure the remaining options in the Group Options section.
- Click the Publish button.
The group page becomes available at the URL based on the page title.
Group Options
The Group Options section contains the configuration settings for the group. Each option controls a specific group behavior.
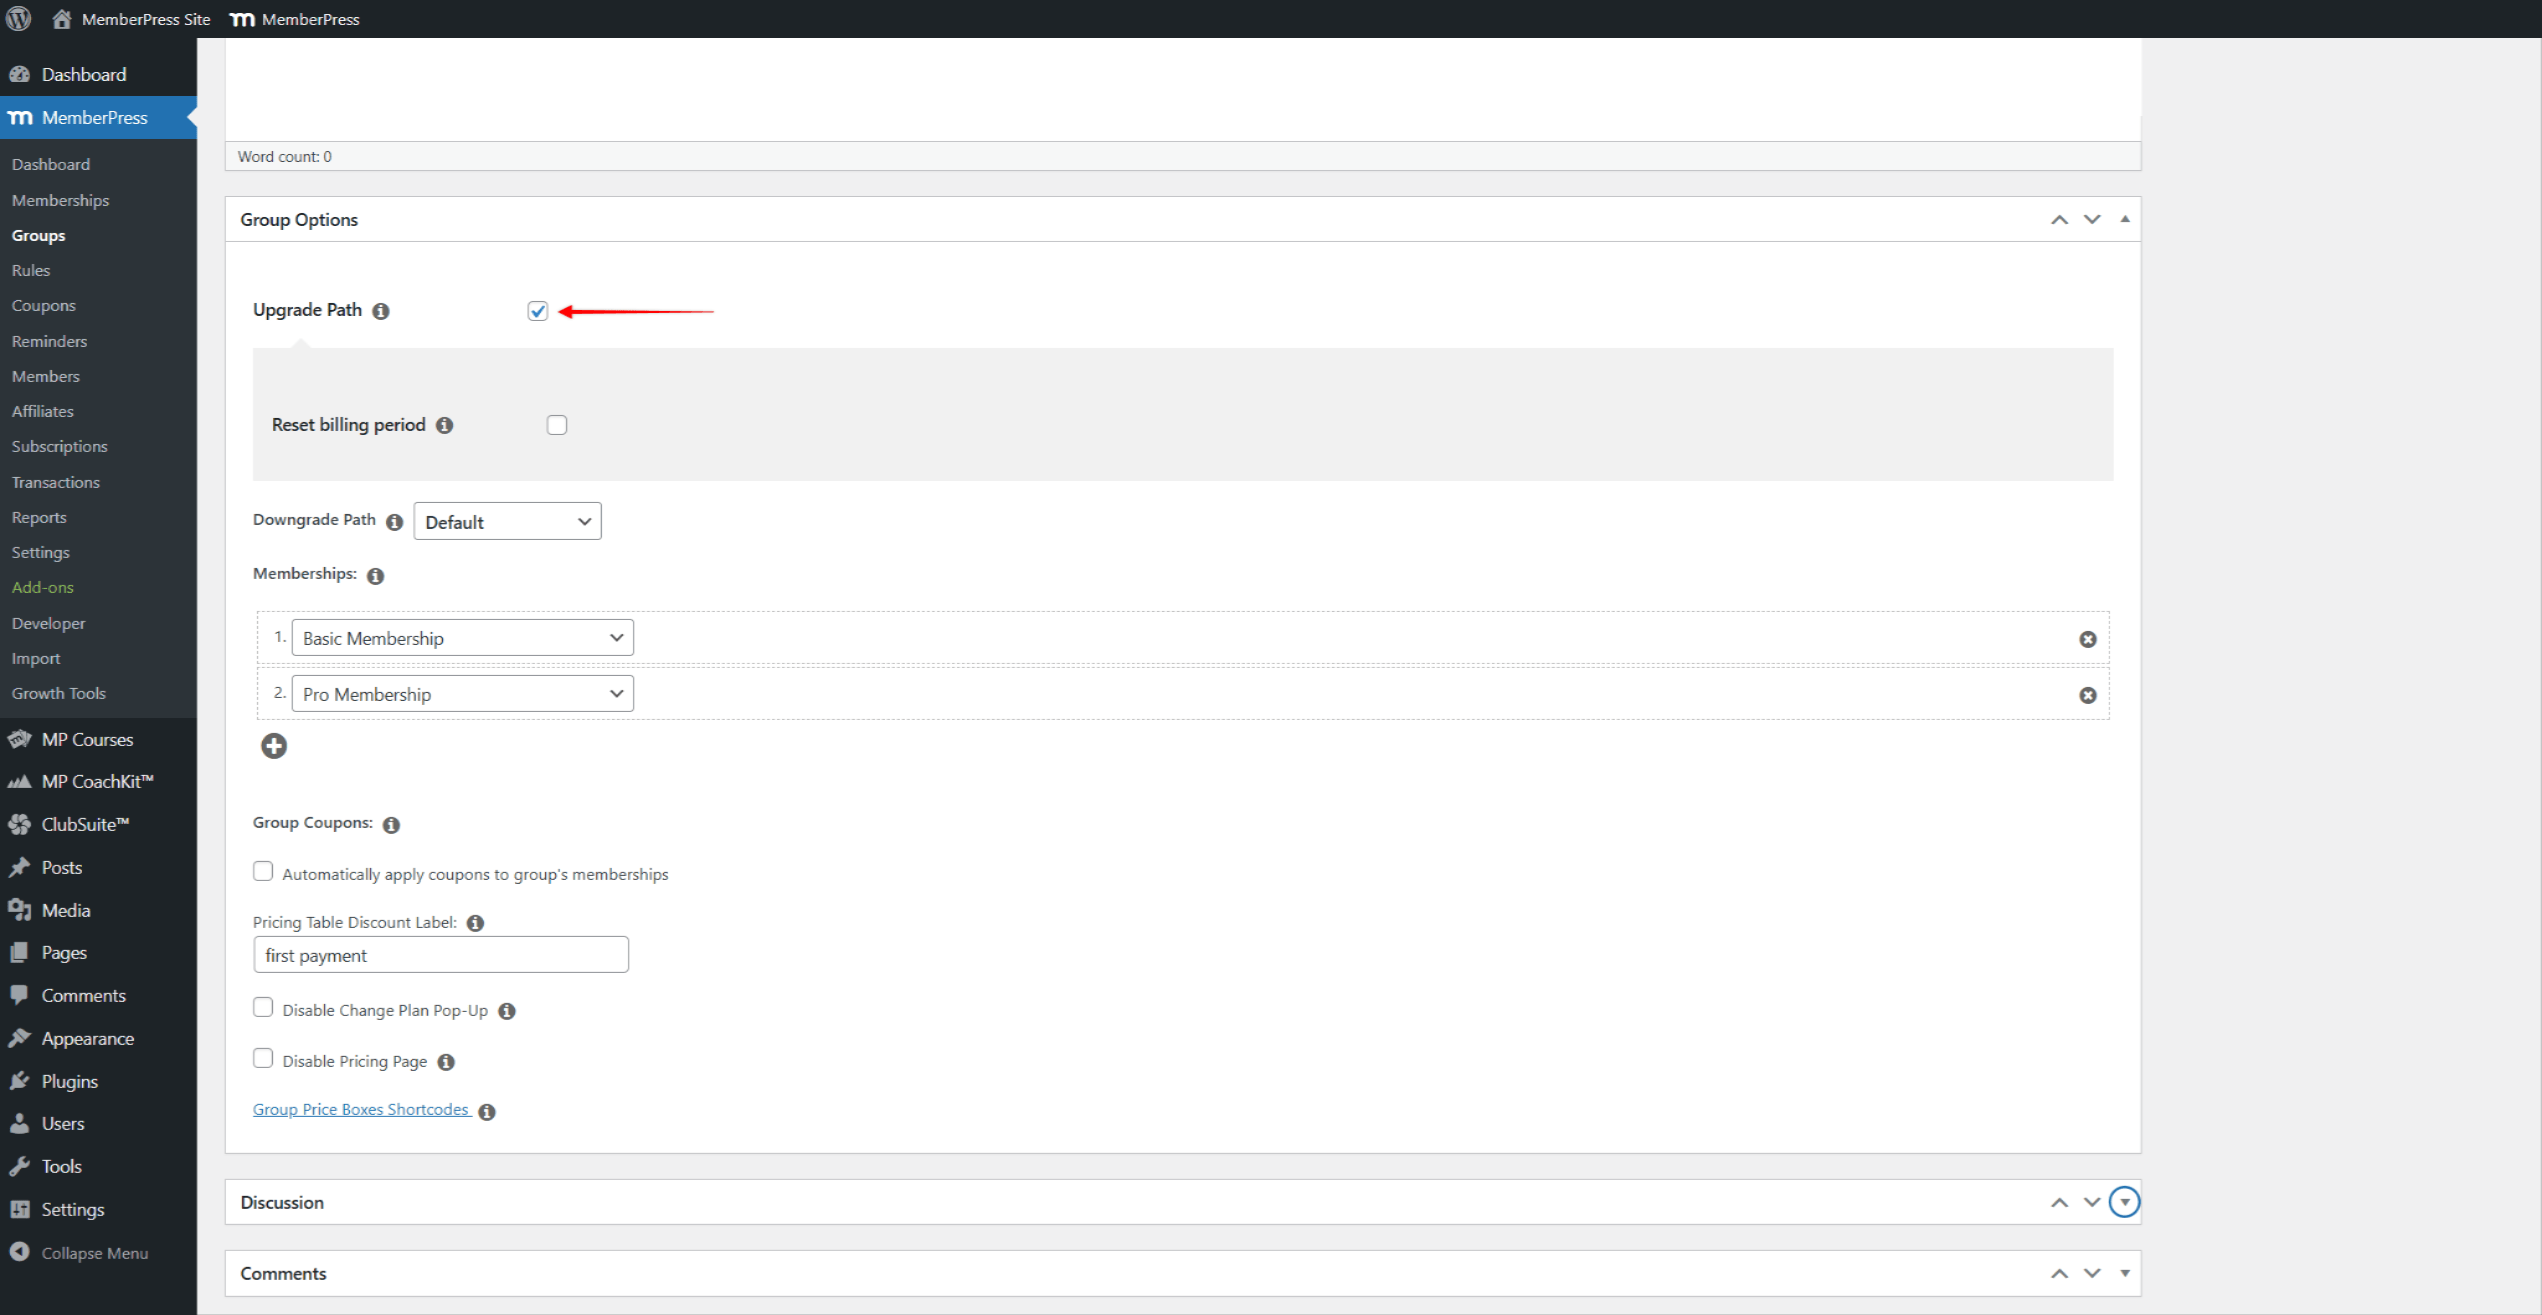
Upgrade Path — When enabled, members can subscribe to only one membership in the group at a time. When disabled, members can subscribe to several memberships in the group at once. Enable this option to allow members to upgrade or downgrade between memberships in the group.
Reset billing period — This option appears after enabling Upgrade Path. When enabled, the billing period resets to the upgrade date. For example, a subscription bought on the 1st and upgraded on the 15th renews on the 15th going forward.
Downgrade Path — This dropdown controls how downgrades within the group behave. The Default option follows the standard MemberPress downgrade flow.
Membership Products — This setting controls which memberships appear on the group pricing page. Drag and drop the entries to set the display order. A membership can only belong to one group at a time.
Pricing Table Discount Label — This field sets the text shown below the discounted price on the pricing table. The label appears when a coupon applies to a recurring membership. Leave the field blank to hide the label. The default value is first payment.
Disable Change Plan Pop-Up — When enabled, the Change Plan option sends members to the group pricing page instead of opening the popup. Enable this option when the group page serves as the upgrade page.
Disable Pricing Page — When enabled, the front-end group pricing page returns a 404 error. Enable this option when displaying the price boxes on a custom page through a shortcode. Enabling this option also reveals a field for an alternate pricing page URL.
Group Coupons
The Group Coupons feature applies one or more existing MemberPress coupons automatically to every membership in the group. Members do not need to enter a coupon code at checkout.
Before adding a group coupon, create the coupon at Dashboard > MemberPress > Coupons.
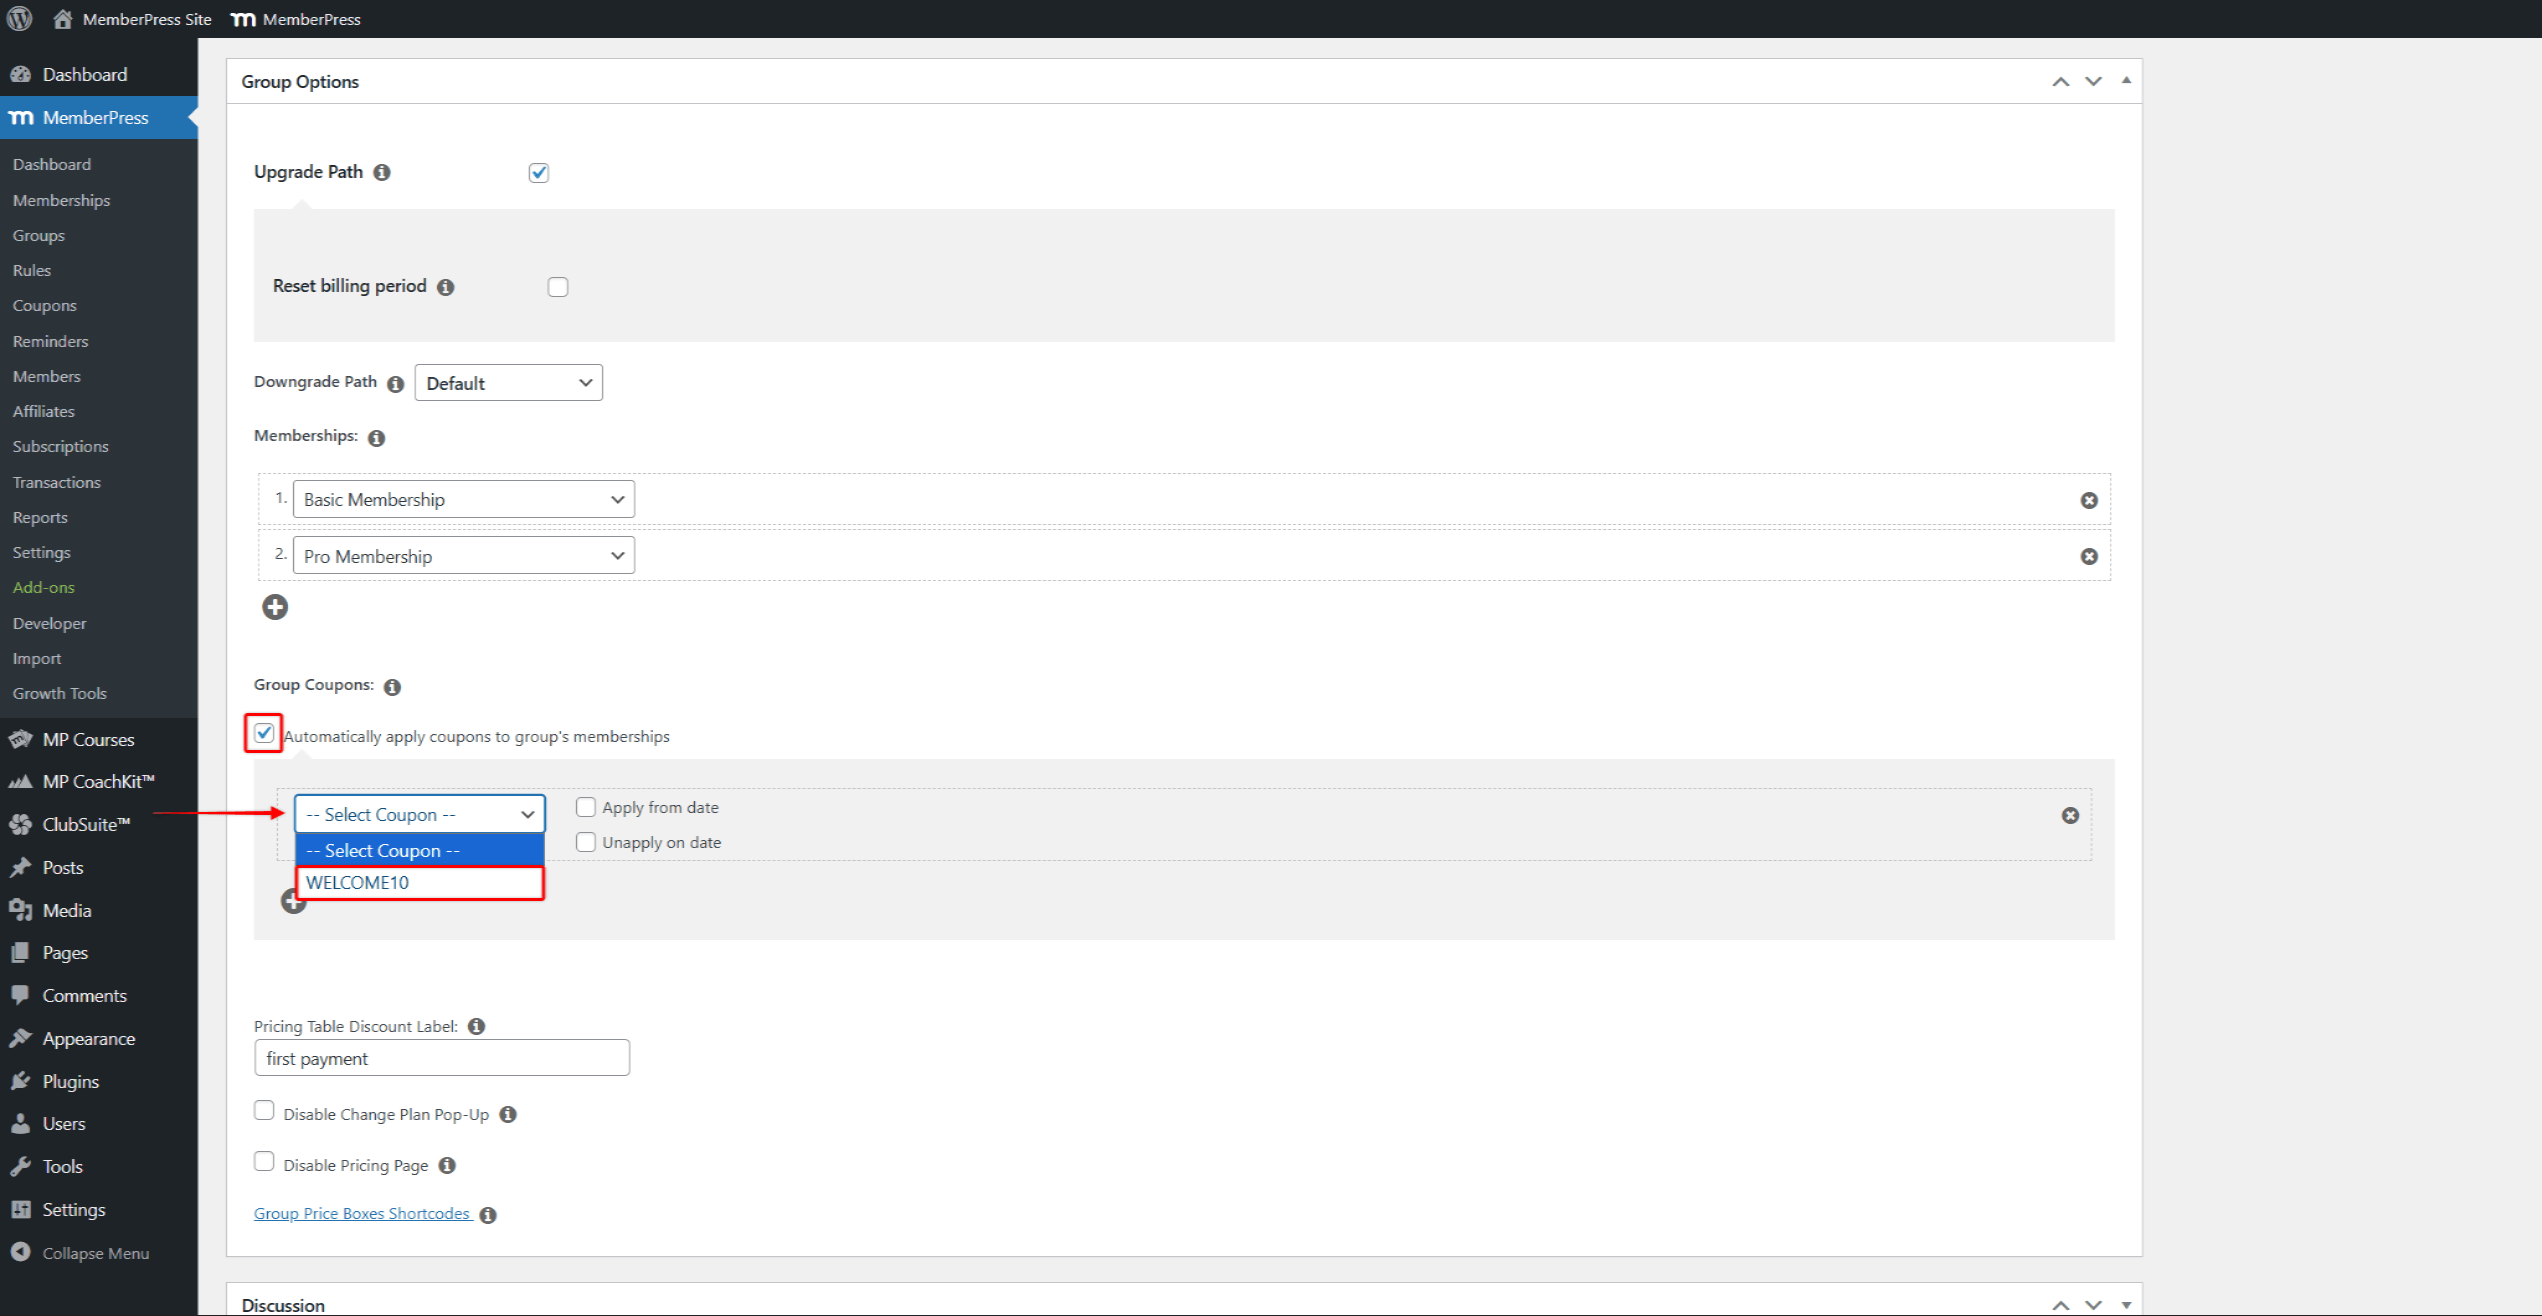
To add a group coupon, follow these steps:
- Check the Automatically apply coupons to group’s membership products box.
- Select a coupon from the coupon dropdown.
- (Optional) Check the Apply from date box to schedule a start time. Then select the month, day, year, hour, minute, and timezone.
- (Optional) Check the Unapply on date box to schedule an end time. Then select the month, day, year, hour, minute, and timezone.
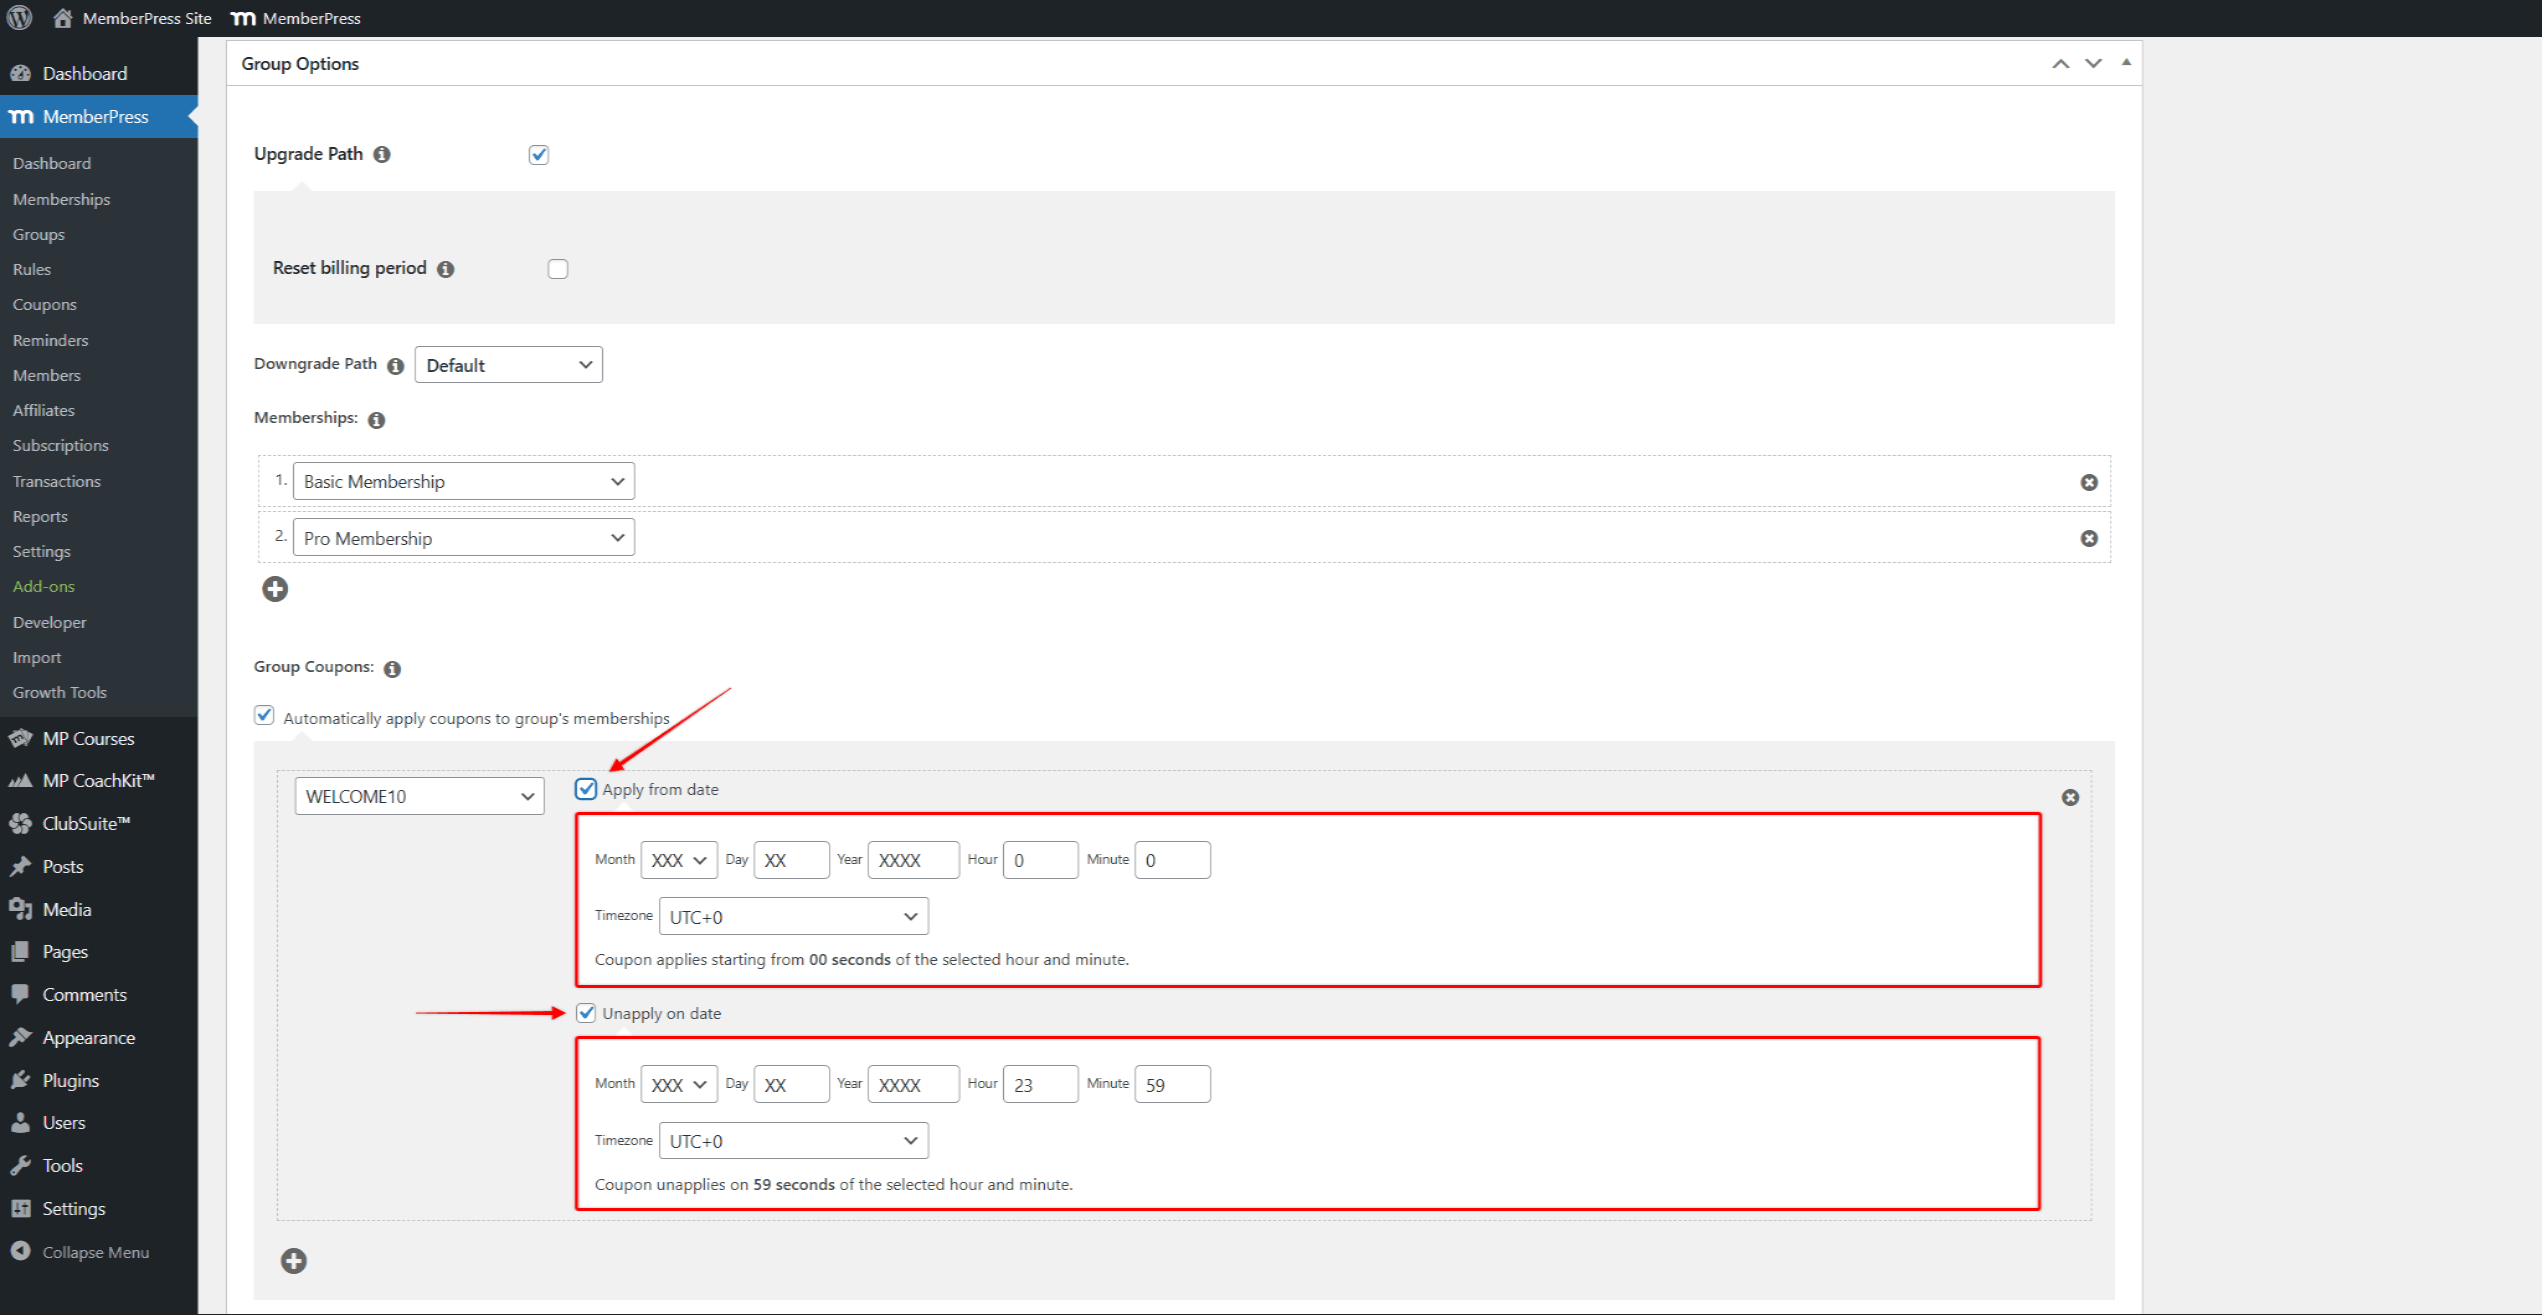
- (Optional) Click the plus icon to add another coupon row.
- Click the Update button to save the group.
Each coupon row supports independent date settings. Add the same coupon several times with different date ranges to apply that coupon across separate periods.
Pricing Page Styling
MemberPress offers two approaches for styling the group pricing page:
- The ReadyLaunch Pricing Page template applies the same style to every group pricing page on the site;
- The Pricing Table Style options style each group pricing page independently.
The ReadyLaunch Pricing Page template is enabled by default. To use per-group styling, first disable the ReadyLaunch Pricing Page template under Dashboard > MemberPress > Settings > ReadyLaunch™.
After disabling the ReadyLaunch Pricing Page template, the Pricing Table Style section appears in the group editor. This section offers two template types: Modern Templates and Legacy Templates.
Legacy Templates
The Legacy Templates option uses the traditional MemberPress pricing table themes. Select this option to keep the previous pricing table appearance.
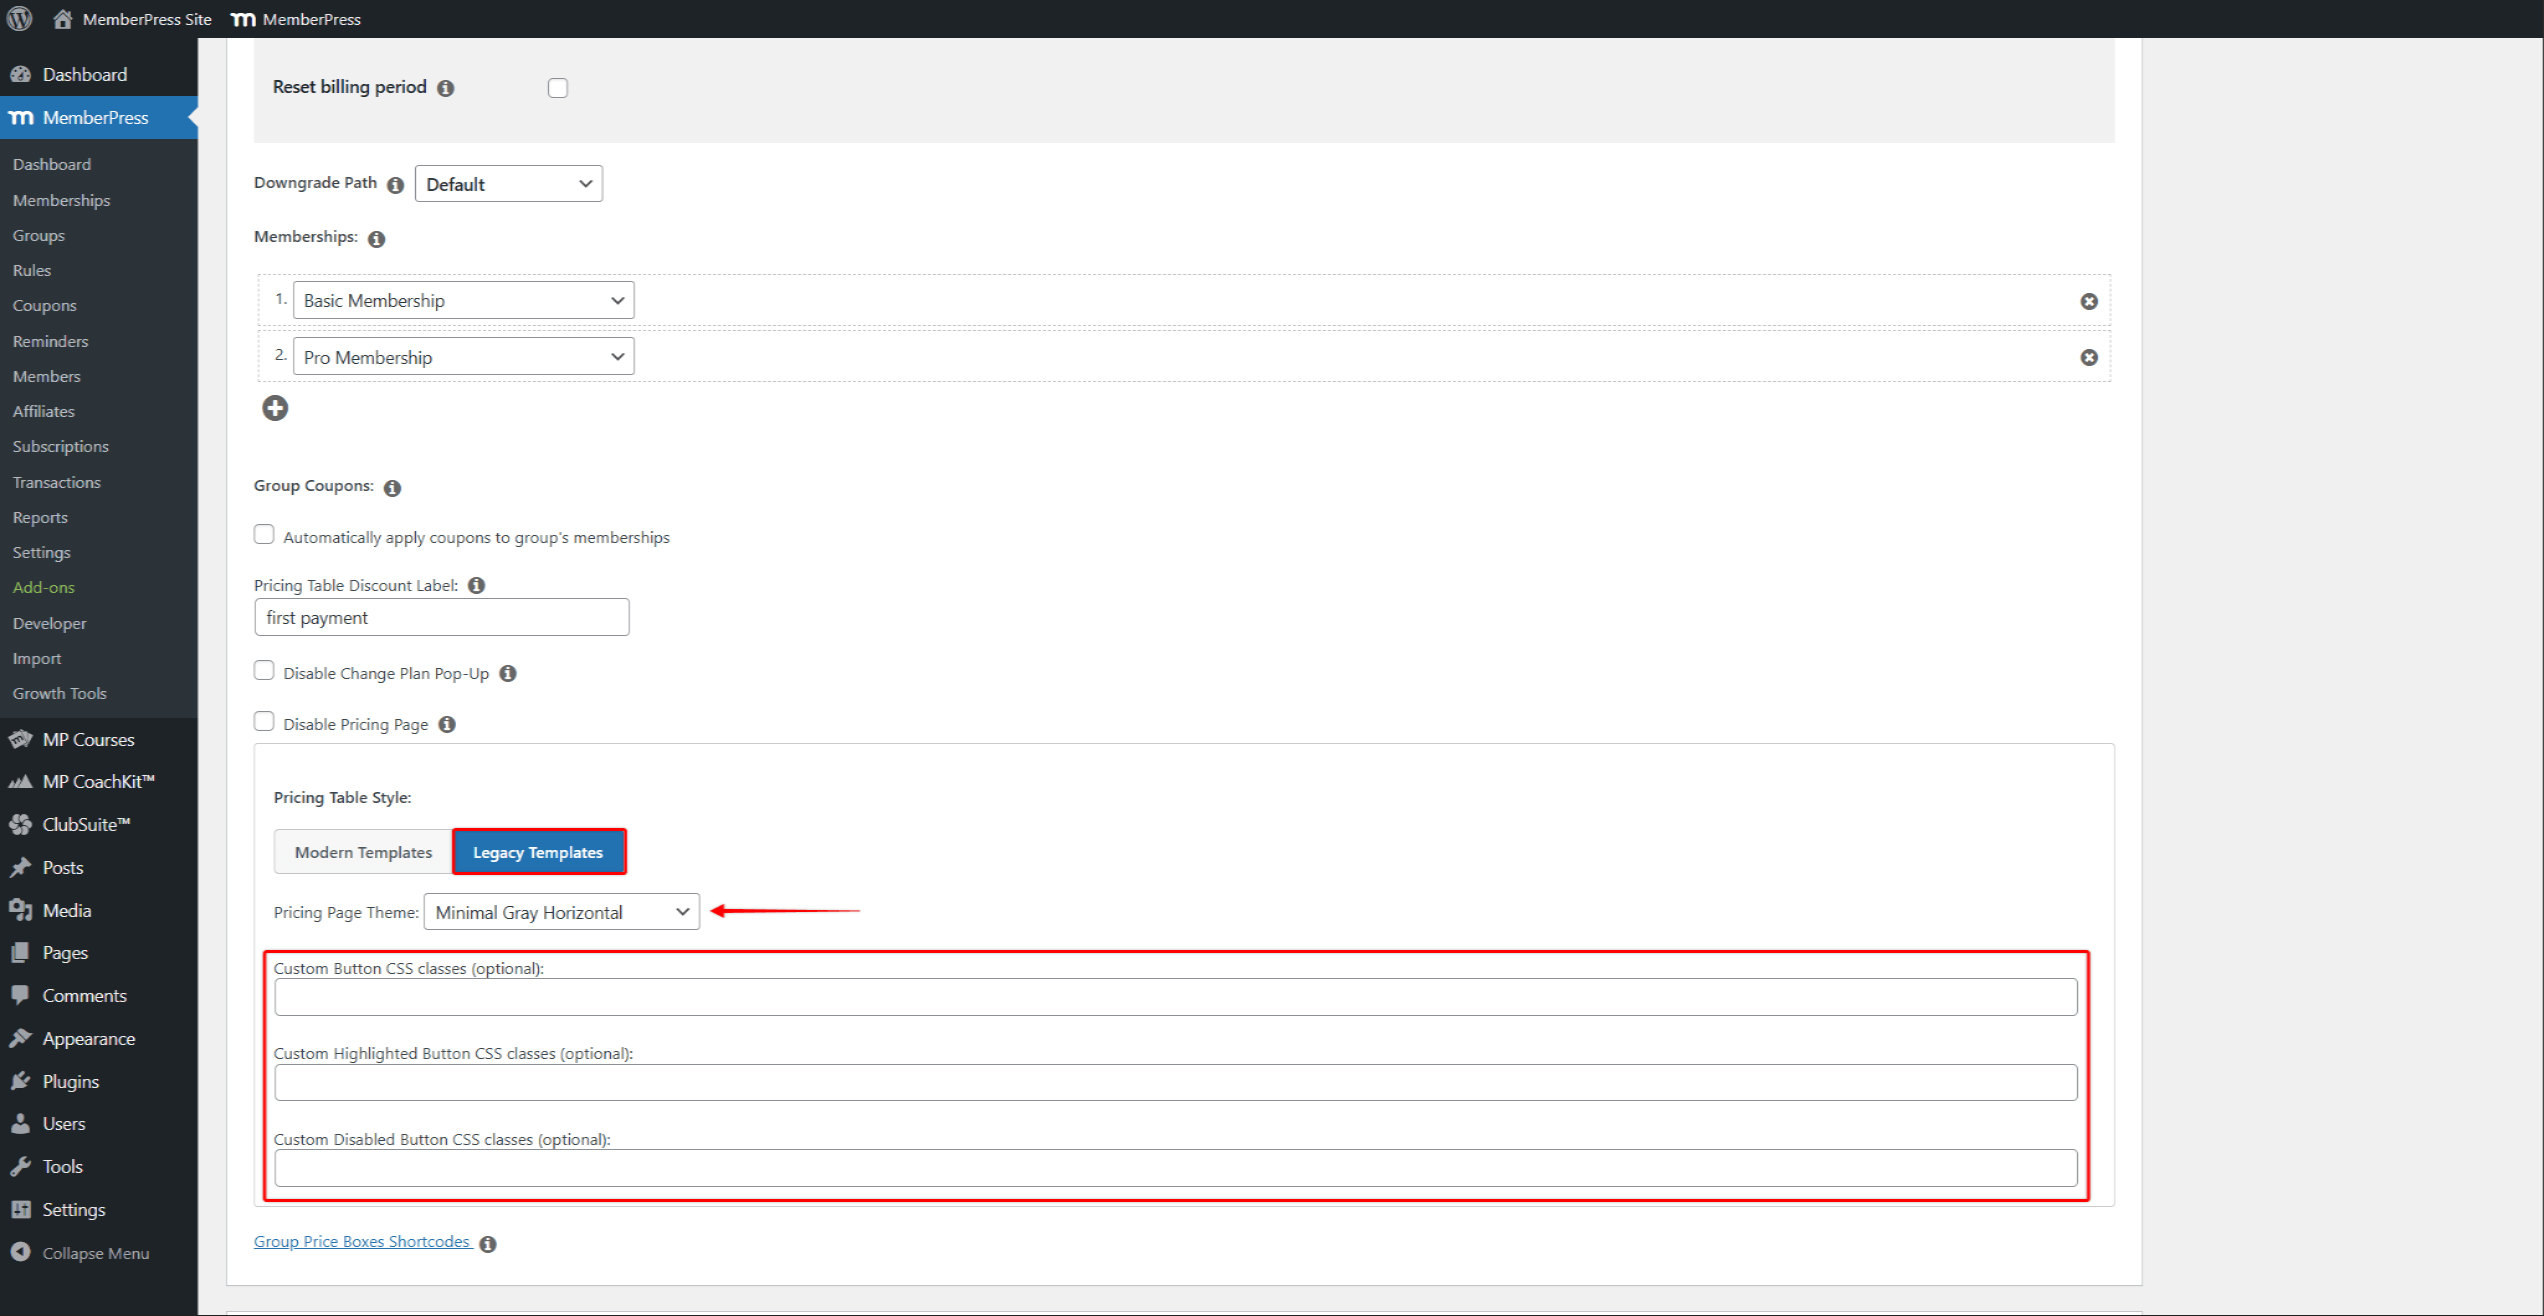
Selecting Legacy Templates reveals these settings:
- Pricing Page Theme sets the visual style from a list of preset themes;
- Custom Button CSS classes applies CSS classes to the standard sign-up button;
- Custom Highlighted Button CSS classes applies CSS classes to the highlighted membership button;
- Custom Disabled Button CSS classes applies CSS classes to the disabled button.
Modern Templates
The Modern Templates option provides customizable card layouts with a live preview. Three card styles are available: Modern Cards, Minimal, and Bold.
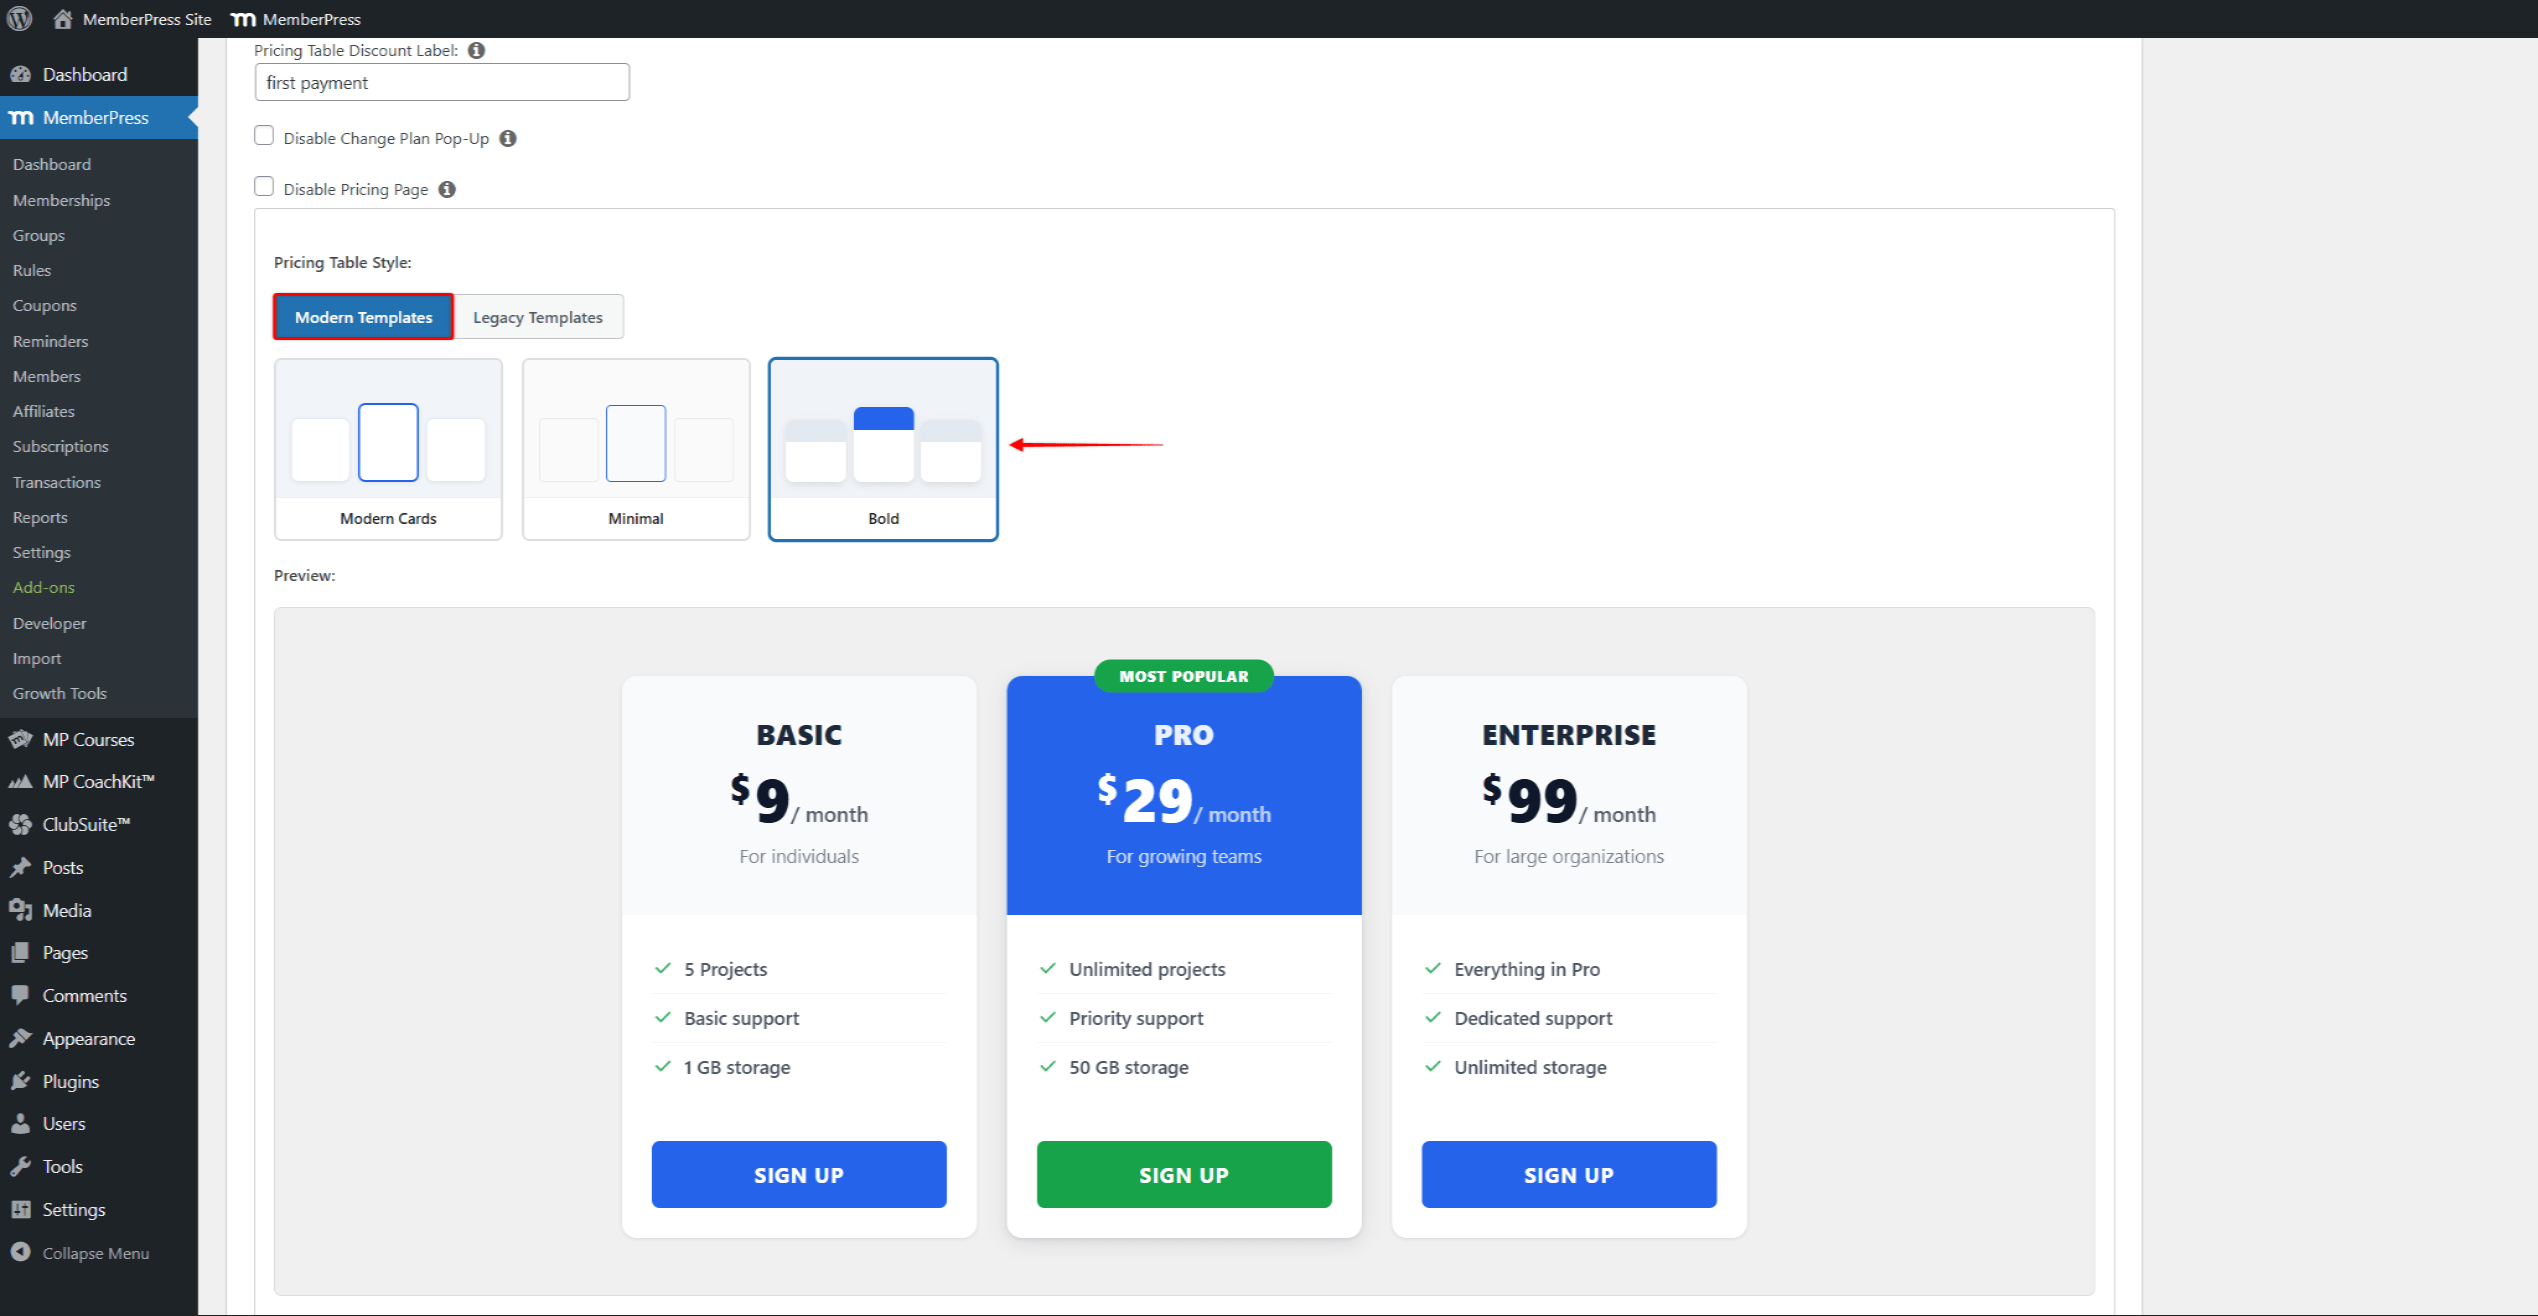
To select a Modern Template, click one of the three style cards. The preview below the selector updates to reflect the choice.
Below the preview, the Customize Template section provides styling controls for the selected template.
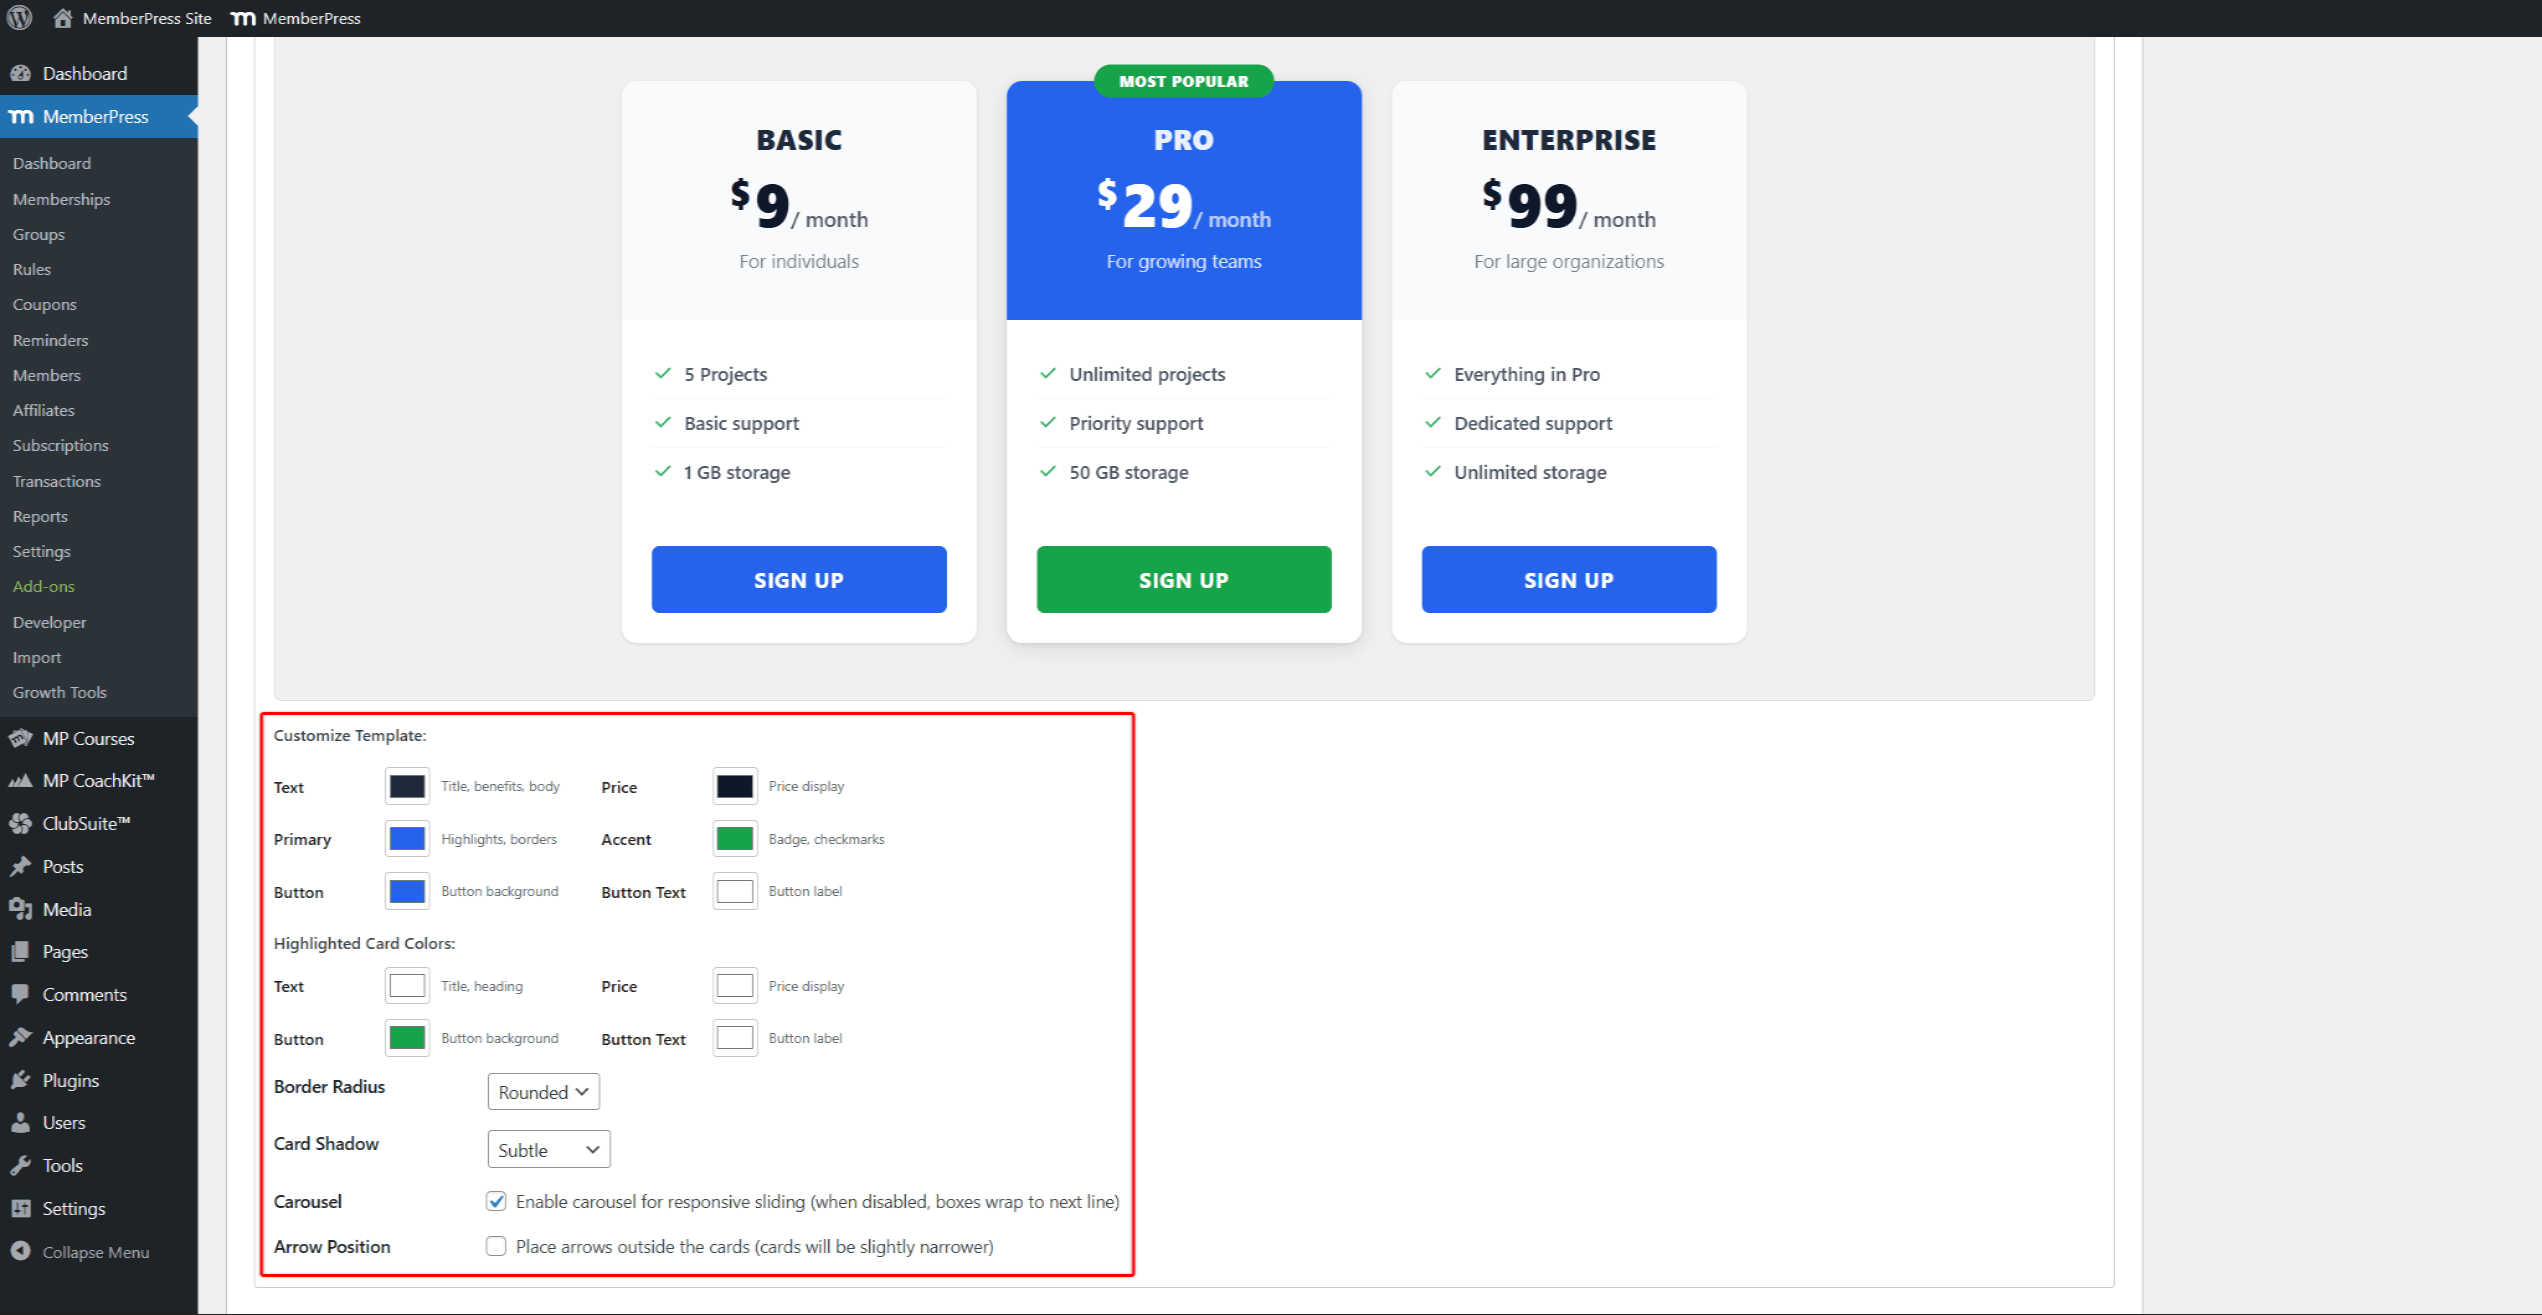
The base color controls set the appearance of standard cards:
- Text sets the color for titles, benefits, and body copy;
- Price sets the color for the price display;
- Primary sets the color for highlights and borders;
- Accent sets the color for badges and checkmarks;
- Button sets the button background color;
- Button Text sets the button label color.
The Highlighted Card Colors controls set distinct colors for the highlighted (most popular) membership card:
- Text sets the title and heading color on the highlighted card;
- Price sets the price display color on the highlighted card;
- Button sets the button background color on the highlighted card;
- Button Text sets the button label color on the highlighted card.
The remaining controls adjust layout and behavior:
- Border Radius sets how rounded the card corners appear;
- Card Shadow sets the depth of the card drop shadow;
- Carousel enables responsive sliding for the price boxes. When disabled, the boxes wrap to the next line;
- Arrow Position places the carousel navigation arrows outside the cards when checked. The cards narrow slightly to fit the arrows.
Click the Update button to save the styling changes.
Group Price Boxes Shortcodes
MemberPress provides two shortcodes for displaying group price boxes outside the default group page. Click the Group Price Boxes Shortcodes link in the group editor to reveal the available shortcodes.
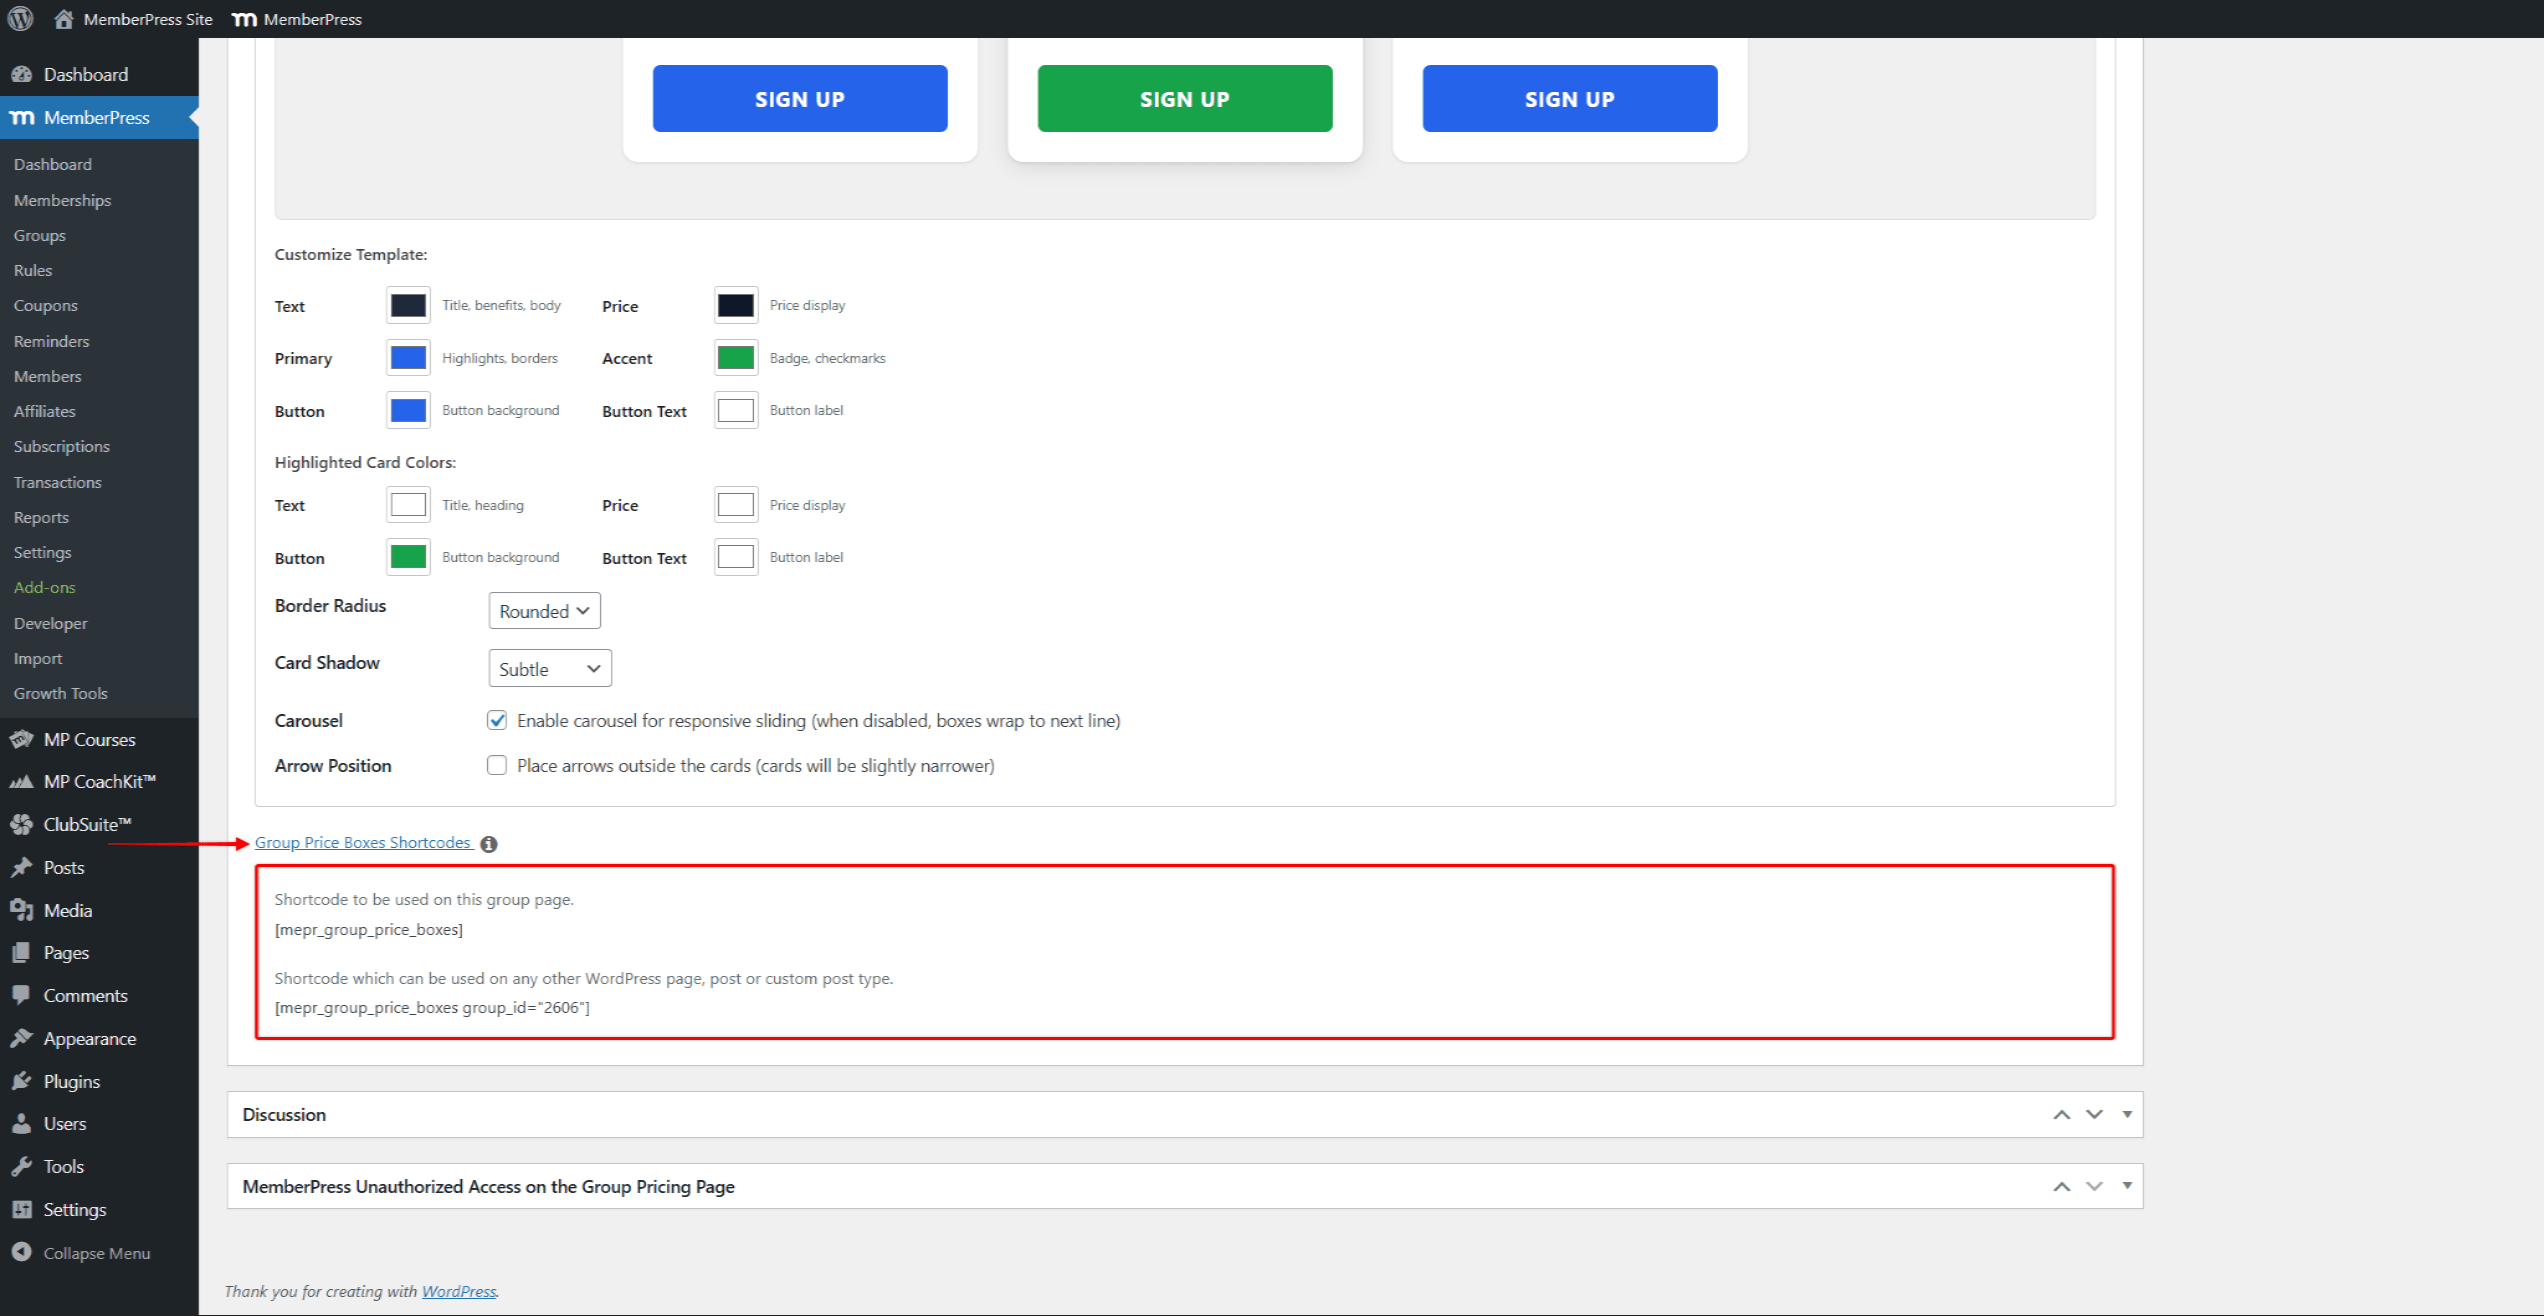
The following shortcode displays the price boxes on the current group page. Place content above and below the shortcode to control the layout:
[mepr_group_price_boxes]The following shortcode displays a specific group’s price boxes on any page, post, or custom post type. Replace 123 with the group ID:
[mepr_group_price_boxes group_id="123"]Change Plan Popup
After creating a MemberPress group with memberships, subscribers can switch plans from the Subscriptions section of their member account. Each active subscription has an actions menu containing the Change Plan option.
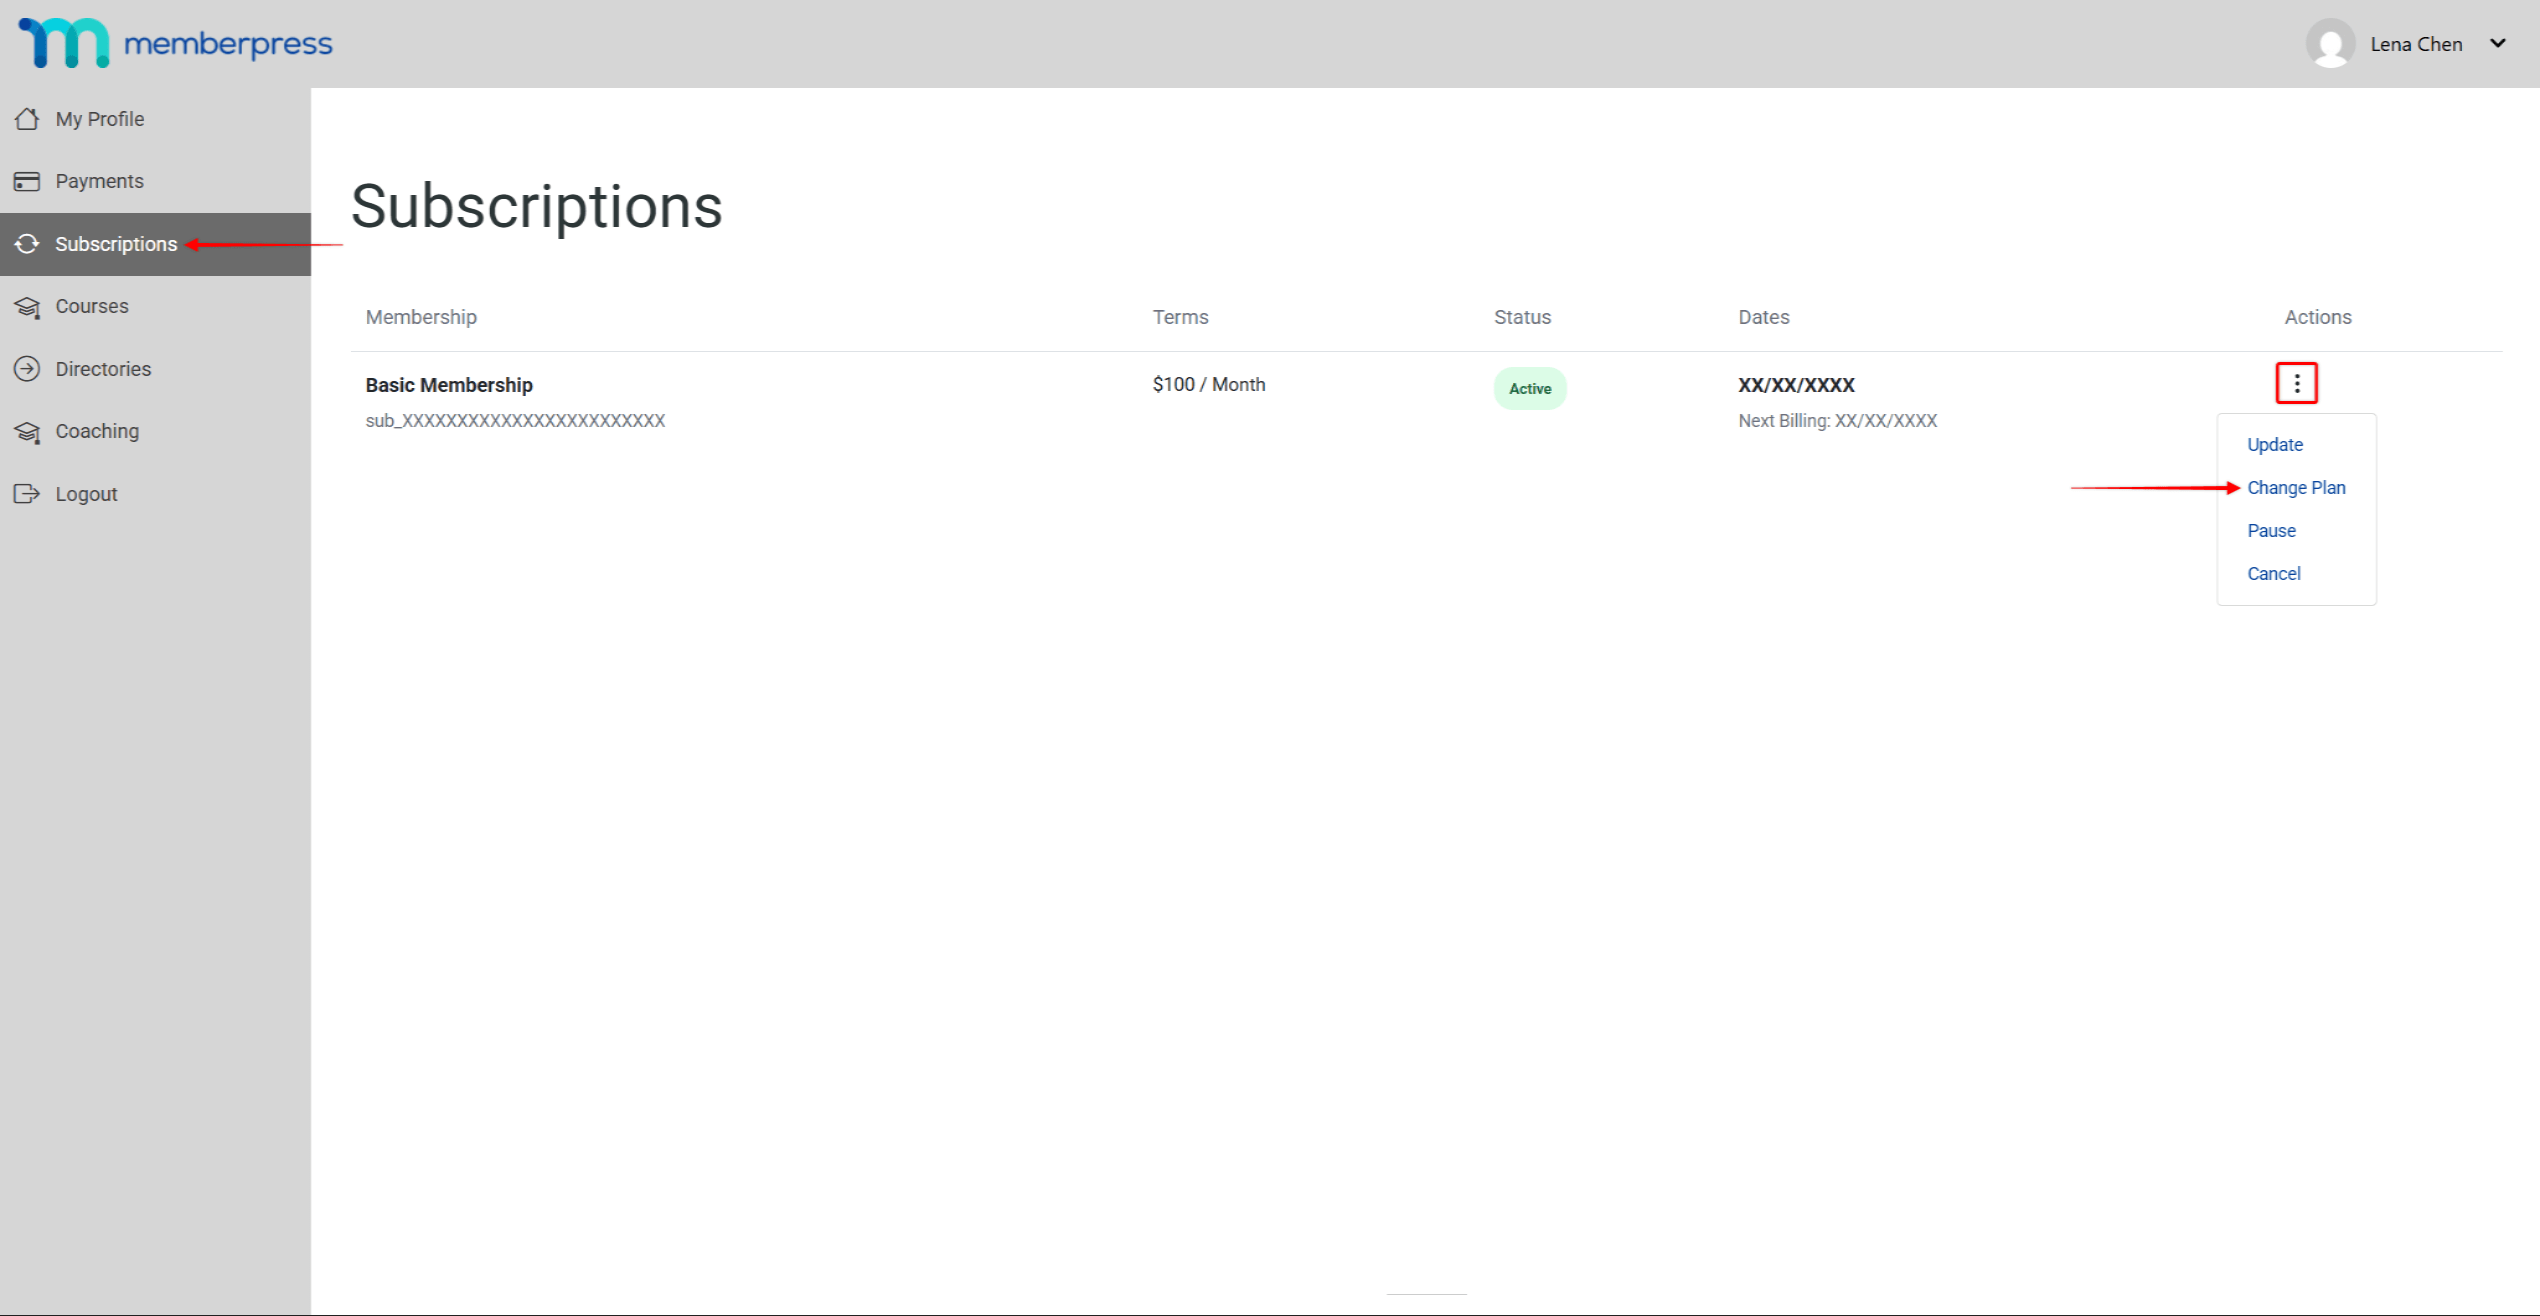
To change plans, the subscriber follows these steps:
- Navigate to the Subscriptions section in the member account.
- Click the three-dot icon in the Actions column next to the active subscription.
- Click Change Plan in the dropdown menu.
The “Please select a new plan” popup opens.
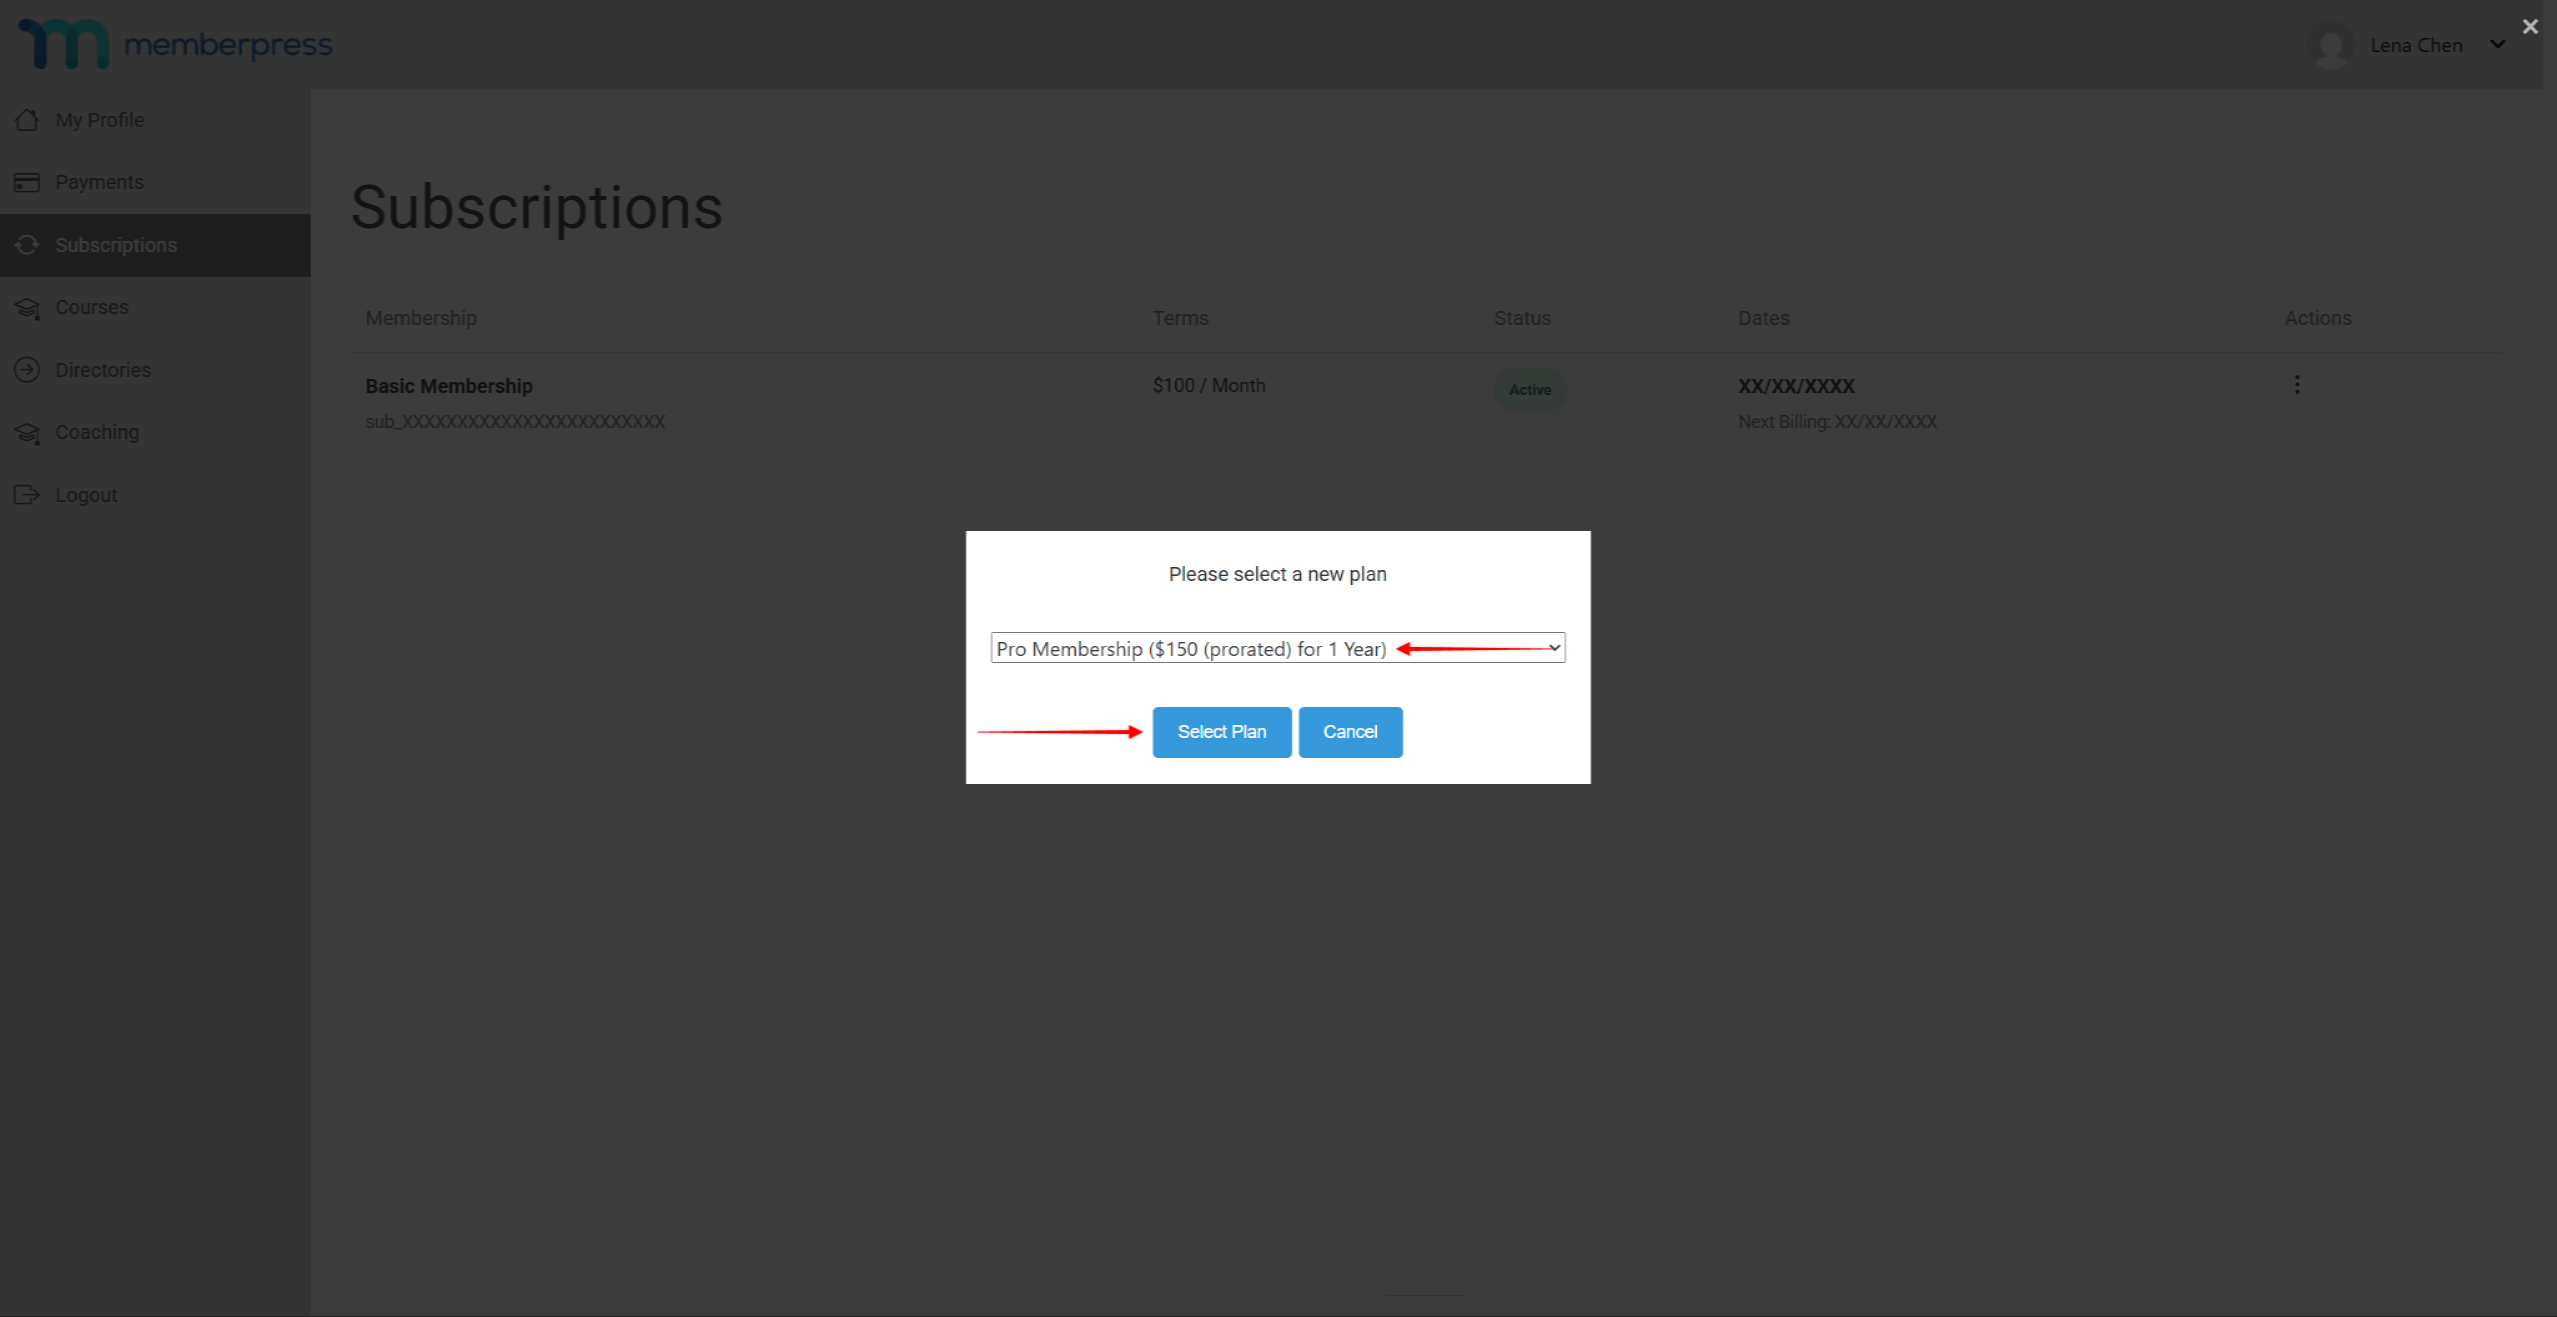
The popup shows the available upgrade and downgrade options in a dropdown. The list shows the group’s upgrade path settings. To confirm the change, the subscriber selects a new plan and clicks the Select Plan button.
When prorations are enabled for an upgrade-path group, MemberPress calculates the prorated amount. The prorated amount displays next to the plan name in the popup dropdown. Enable prorations at Dashboard > MemberPress > Settings > Account > Registration. Check the Pro-rate subscription prices when a member upgrades option.
Summary
MemberPress Groups display memberships on a unified pricing page. Groups also enable upgrade and downgrade flows between memberships. Group coupons apply discounts automatically to every membership. The styling options control the pricing page appearance.
MemberPress coupons can also apply at checkout without group settings. The ReadyLaunch Pricing Page template styles every pricing page site-wide.










