You have noticed an increase in payments, either failed or successful over a short period of time, and upon investigation, realize that your site is being used for card testing – what do you do now?
Switching to Stripe Checkout
First, if you use Stripe Elements, you could try switching to Stripe Checkout:
- Navigate to Dashboard > MemberPress > Settings > Payments tab.
- Find the Stripe payment gateway.
- Here, click the checkbox next to the Stripe Checkout option.

Switching to Stripe Checkout won't prevent card testing by itself. The purpose of this switch is to try interrupting card testers attacking your website. Switching to Stripe Checkout will shut down the endpoints testers might be using to run attacks through Stripe Elements. Once you applied all other security updates mentioned in this document and the attack is over, you can re-enable Stripe Elements.
Turn on Card Testing Protection
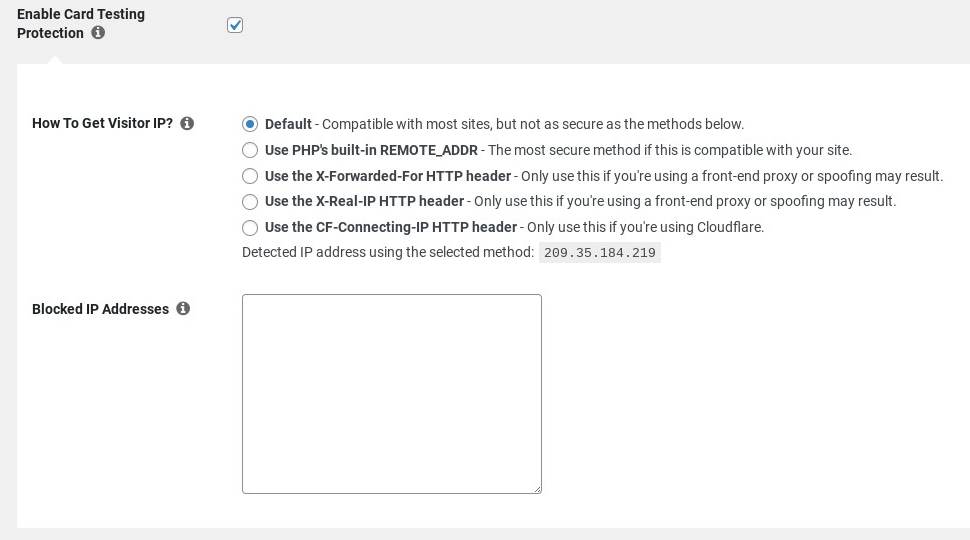
Go to Dashboard > MemberPress > Settings > General and ensure that Enable Card Testing Protection is checked.

It is enabled by default, but it is good to check. If it is enabled, you can change the method of getting the user's IP Address.
If your site uses a Front-End Proxy:
- Enable Use the X-Forwarded-For HTTP header OR Use the X-Real-IP HTTP header
If your site uses CloudFlare:
- Enable Use the CF-Connecting-IP HTTP header
If your site DOES NOT use CloudFlare or a Front-End Proxy:
- Enable Use PHP's built-in REMOTE_ADDR
Enable Radar Settings in Stripe
Stripe has the Stripe Radar feature to help detect and block fraudulent activity. Learn more about these settings on Stripe's Risk Settings page.
Stripe Radar offers several card verification checks:
- Card verification code check (CVC): this check will prevent any charges that fail the CVC verification check. The CVC is the verification code printed directly on a user's card. Users need to add the correct CVC code to the MemberPress registration form, for Stripe to process the payment.
- Address verification (AVS): this check will prevent charges if the postal address check fails. When registering, users need to add the postal code and the street address to the MemberPress registration form. If this data doesn't match the billing address on file with the card issuer (e.g. bank), the payment will fail.
Install and Activate the Captcha Add-On
Card Testing is based on the (usually) automated bots that will repeatedly submit the membership registration form (spam sign-ups). Each time the bot submits the registration form, it will use different (stolen) payment data to check if the data is correct. Adding a captcha to your registration forms should help prevent spam sign-ups
Go to Dashboard > MemberPress > Add-Ons and install and activate our Math Captcha add-on. This will add a simple math captcha to the registration and login page.
You can also use the Simple Cloudflare Turnstile – CAPTCHA Alternative or another captcha plugin.
Furthermore, you can use the MemberPress Math Captcha add-on with Cloudflare Turnstile (or another captcha plugin) at the same time.
Simple Cloudflare Turnstile Add-On
Cloudflare Turnstile should also help in case your website gets compromised (hacked). If your website is hacked, it's possible for hackers to get a hold of your Stripe API client secret. This key can then be used for card testing even in other locations unrelated to your website.
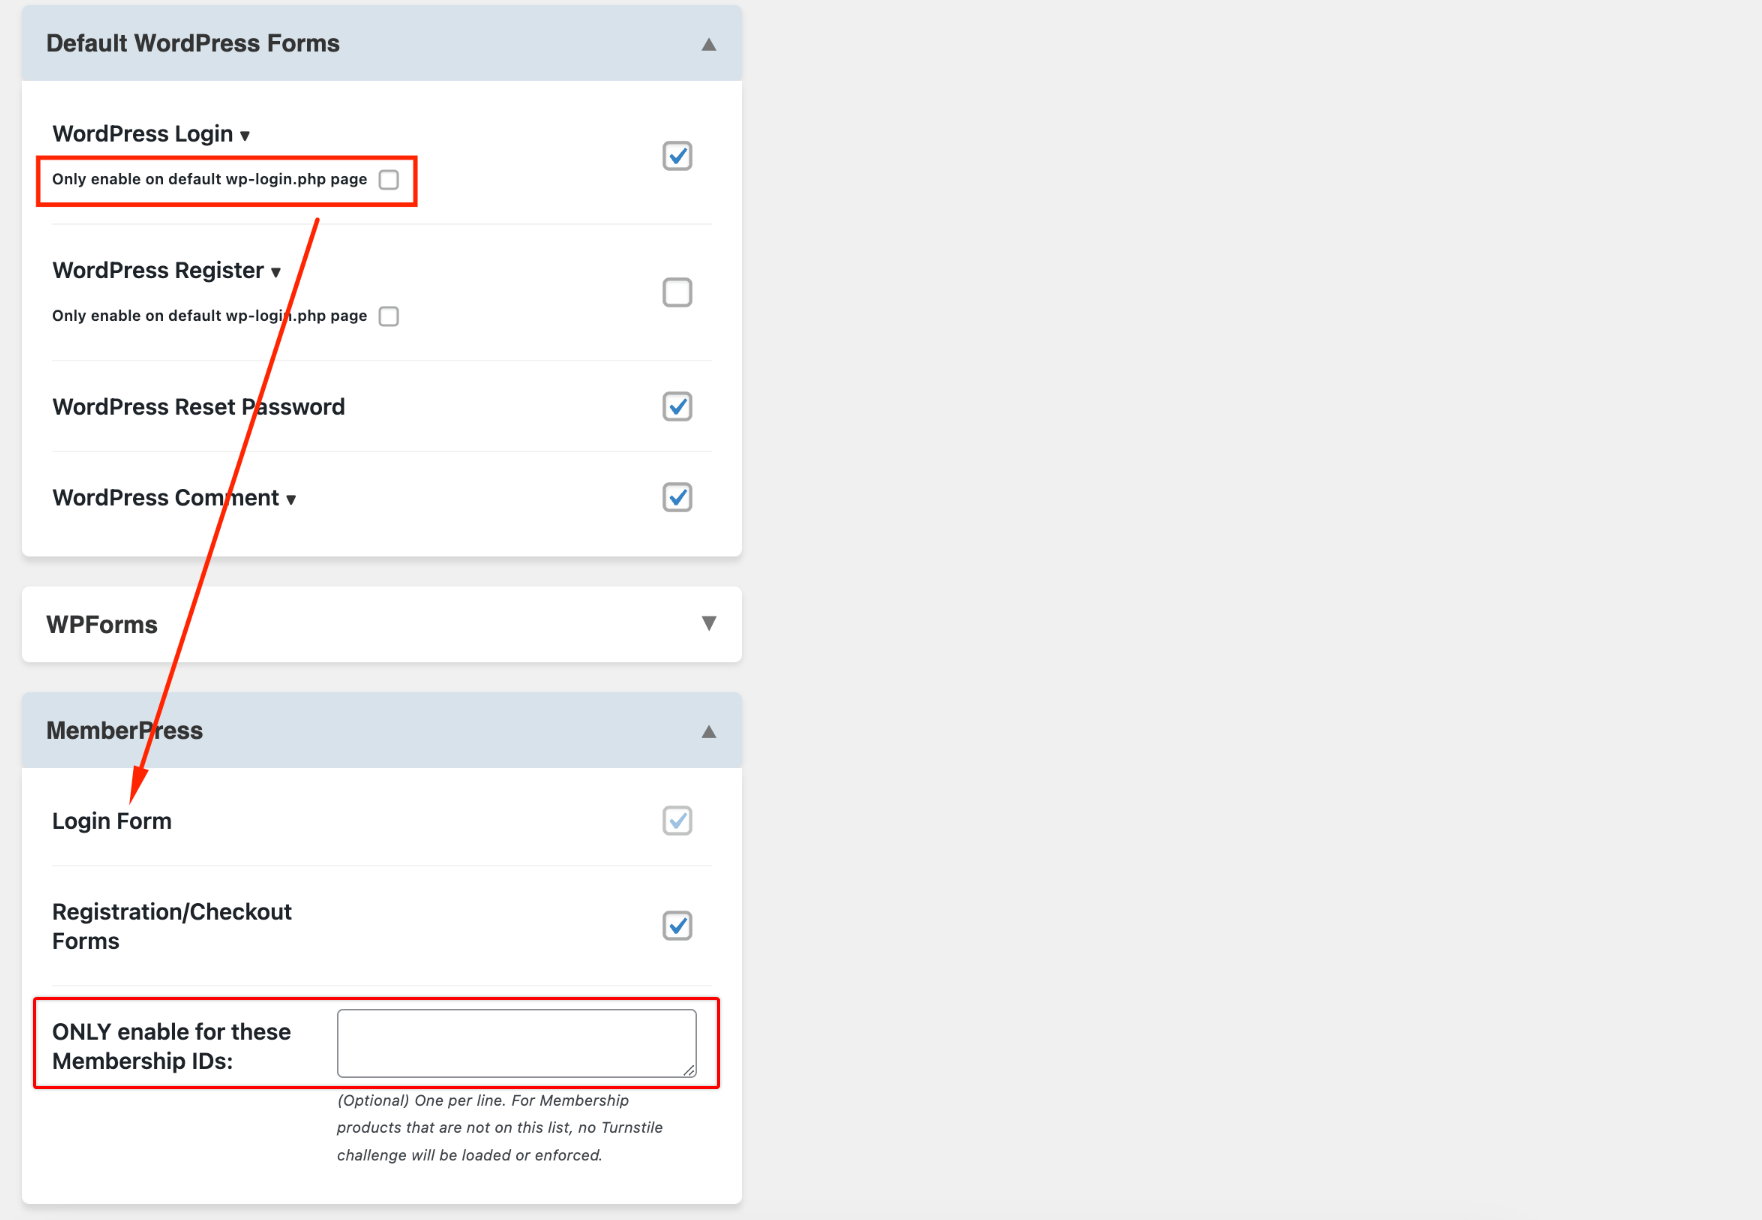
As mentioned, you should use the Simple Cloudflare Turnstile – CAPTCHA Alternative plugin to add the Cloudflare Turnstile on your site. The built-in MemberPress integration allows you to enable Cloudflare Turnstile on MemberPress login and registration forms.
To set up the plugin, navigate to Dashboard > Settings > Cloudflare Turnstile and follow the plugin guide.

In addition, you can add MemberPress membership IDs to the dedicated field to apply Turnstile only on specific registration forms.
Refresh Your API Keys
If you applied all the above-mentioned suggestions and card testing is still ongoing, please try refreshing your Stripe API credentials. To do this, please follow these steps:
- Log in to your website as an administrator. After logging in, the URL in your browser's address bar should be like this: https://yourdomain.com/wp-admin/.
- Add the following to the end of your current URL: admin.php?page=memberpress-options&display-keys (e.g. https://yourdomain.com/wp-admin/admin.php?page=memberpress-options&display-keys). While still in the address bar, press the enter key on your keyboard.
- This will take you to the MemberPress Settings page (Dashboard > MemberPress > Settings). Click the Payments tab.
- Under the Stripe payment gateway settings, you should see a new Refresh Stripe Credentials button. Click this button to refresh your Stripe credentials.

Refund and Cancel any Fraudulent Payments
If any payments were successfully created during the card testing, refund and cancel these subscriptions. You can do this either from MemberPress on your site – or through Stripe. If you do it through Stripe, you can mark the refund reason as “Fraud.”
There is no way to cancel and refund in bulk in MemberPress. So, these will need to be done one at a time.
We also recommend recording the email addresses and any other information about the charge and card that were used so that if customers email in complaining, you can assure them that you have already refunded the fraudulent charge. If you have the ability to contact the customer directly, let them know what has happened.


