Your members can use their Facebook account credentials to log into your website. You can enable this using the MemberPress Social Login add-on connected to the Facebook App.
This document will provide step-by-step instructions on creating and connecting the Facebook App to the MemberPress Social Login add-on.
Facebook App
The custom Facebook App is required to connect Facebook to MemberPress. You will need your Meta for Developers account to create a Facebook app on Meta for Developers.
Once created, add your Facebook App credentials to MemberPress Social Login settings. This will enable your members to log in with Facebook credentials.
Create Facebook App
The following guide will help you create a Facebook App:
- Log in to your Facebook account (if you are not logged in already).
- You must register for the Meta for Developers account unless you have it open.
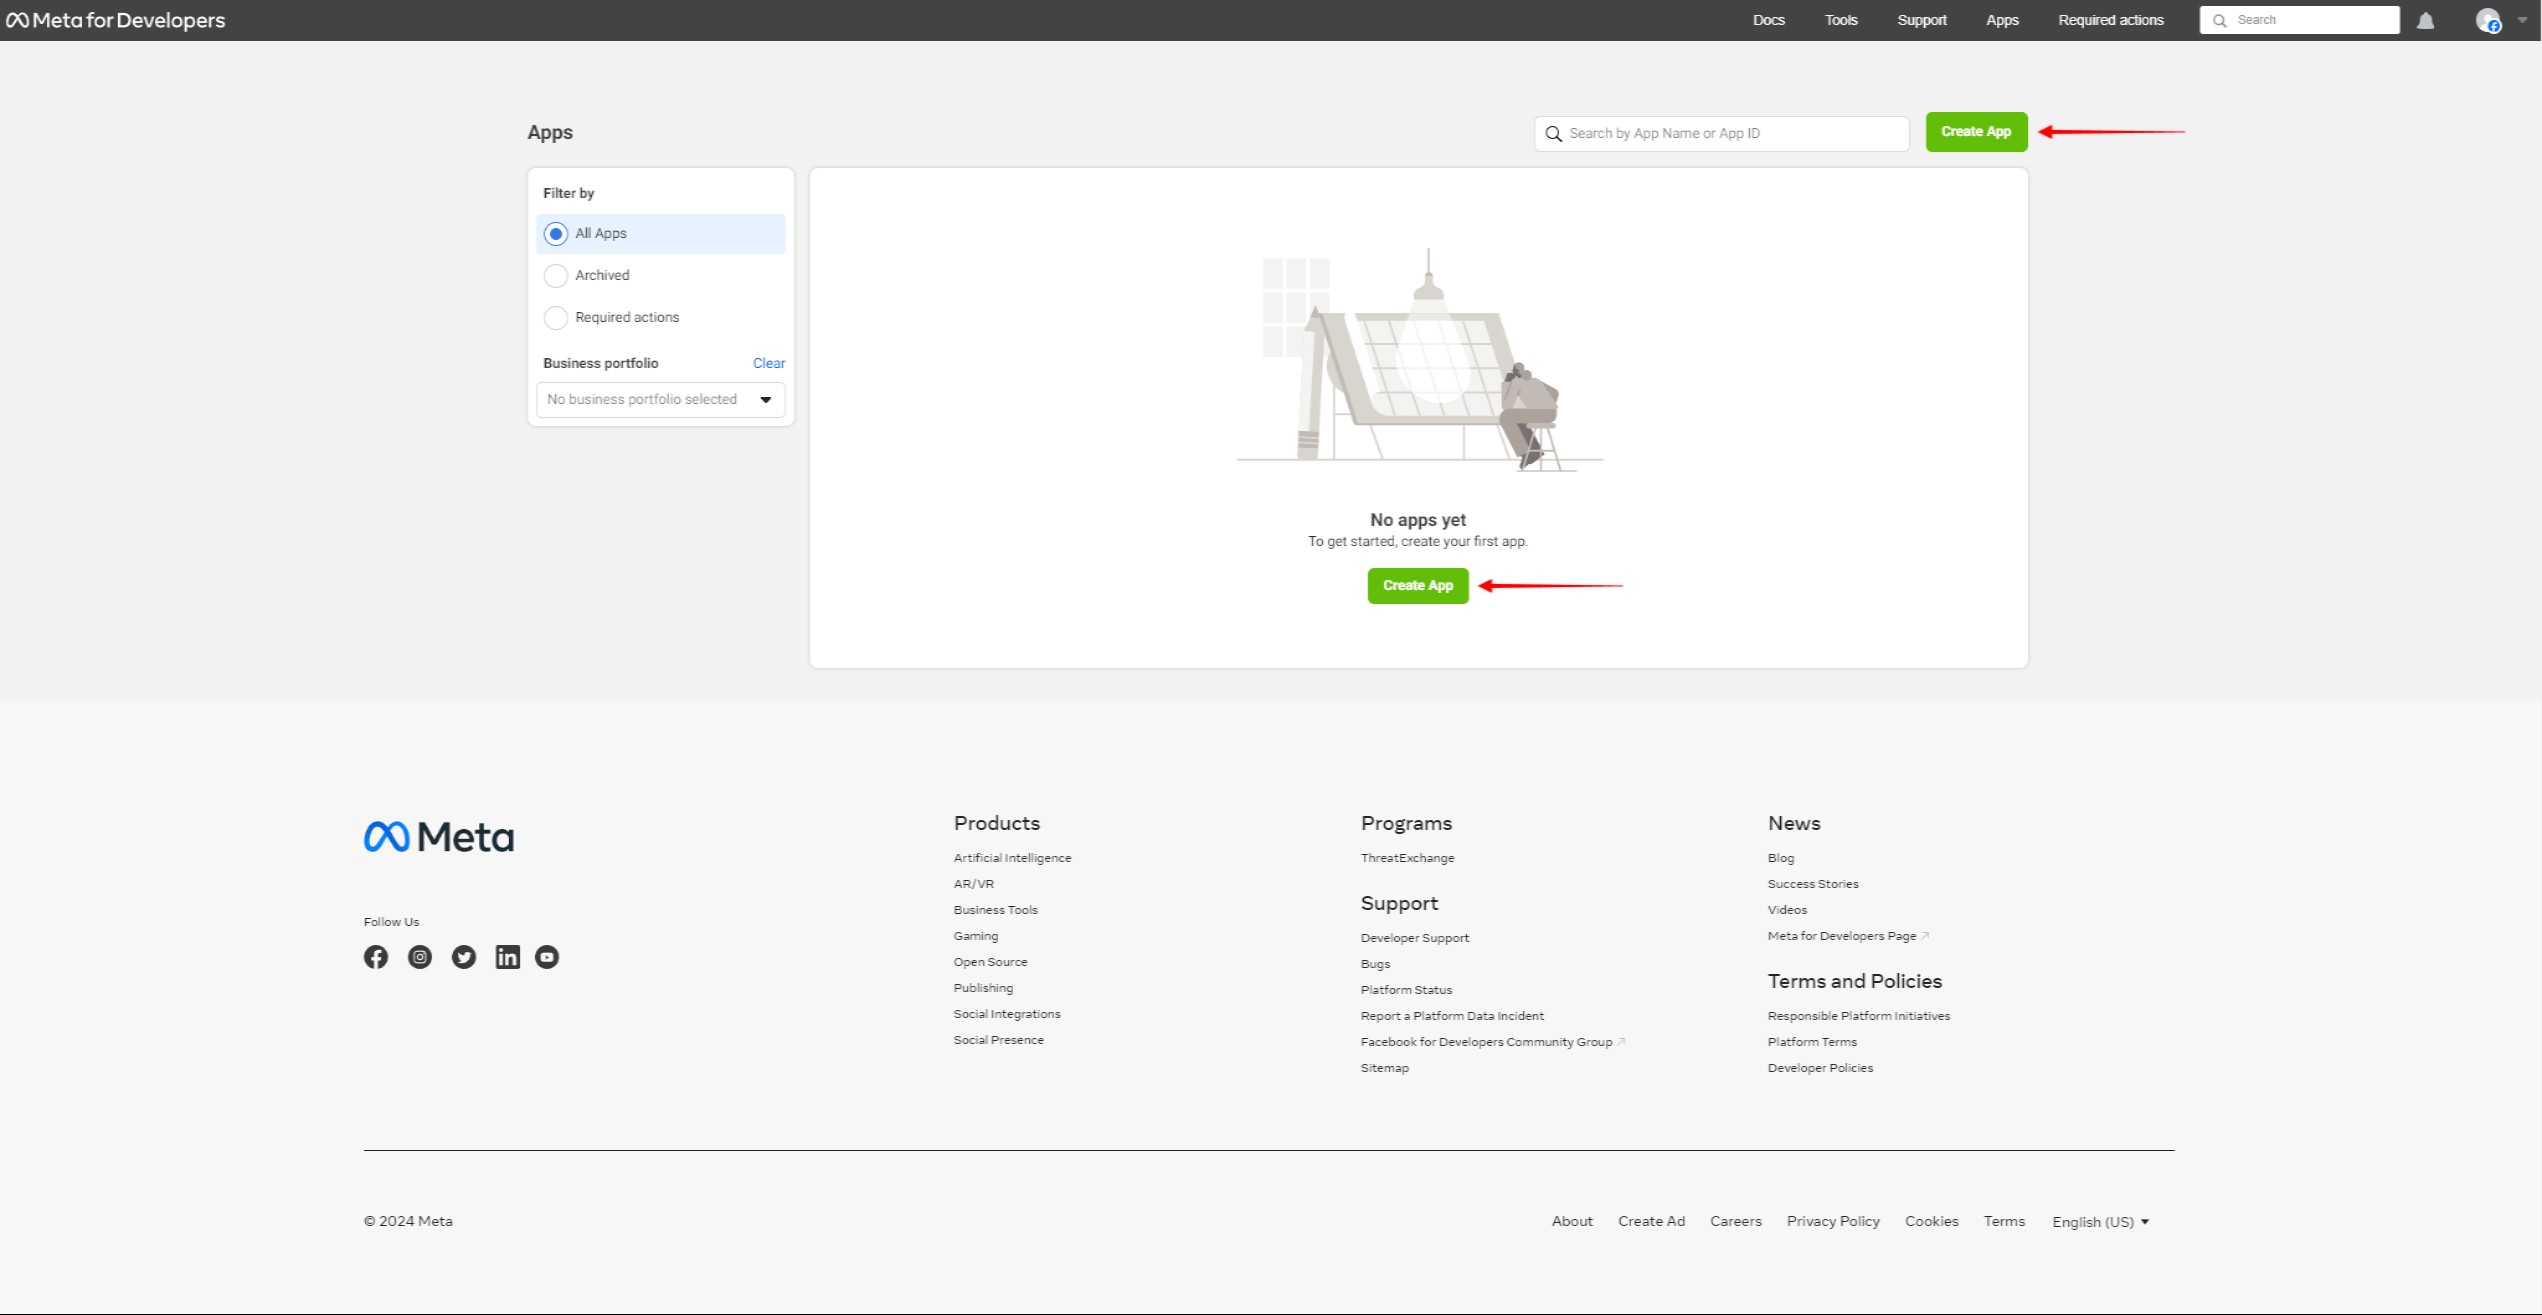
- Navigate to the Apps page on Meta for Developers and click on the Create App button.
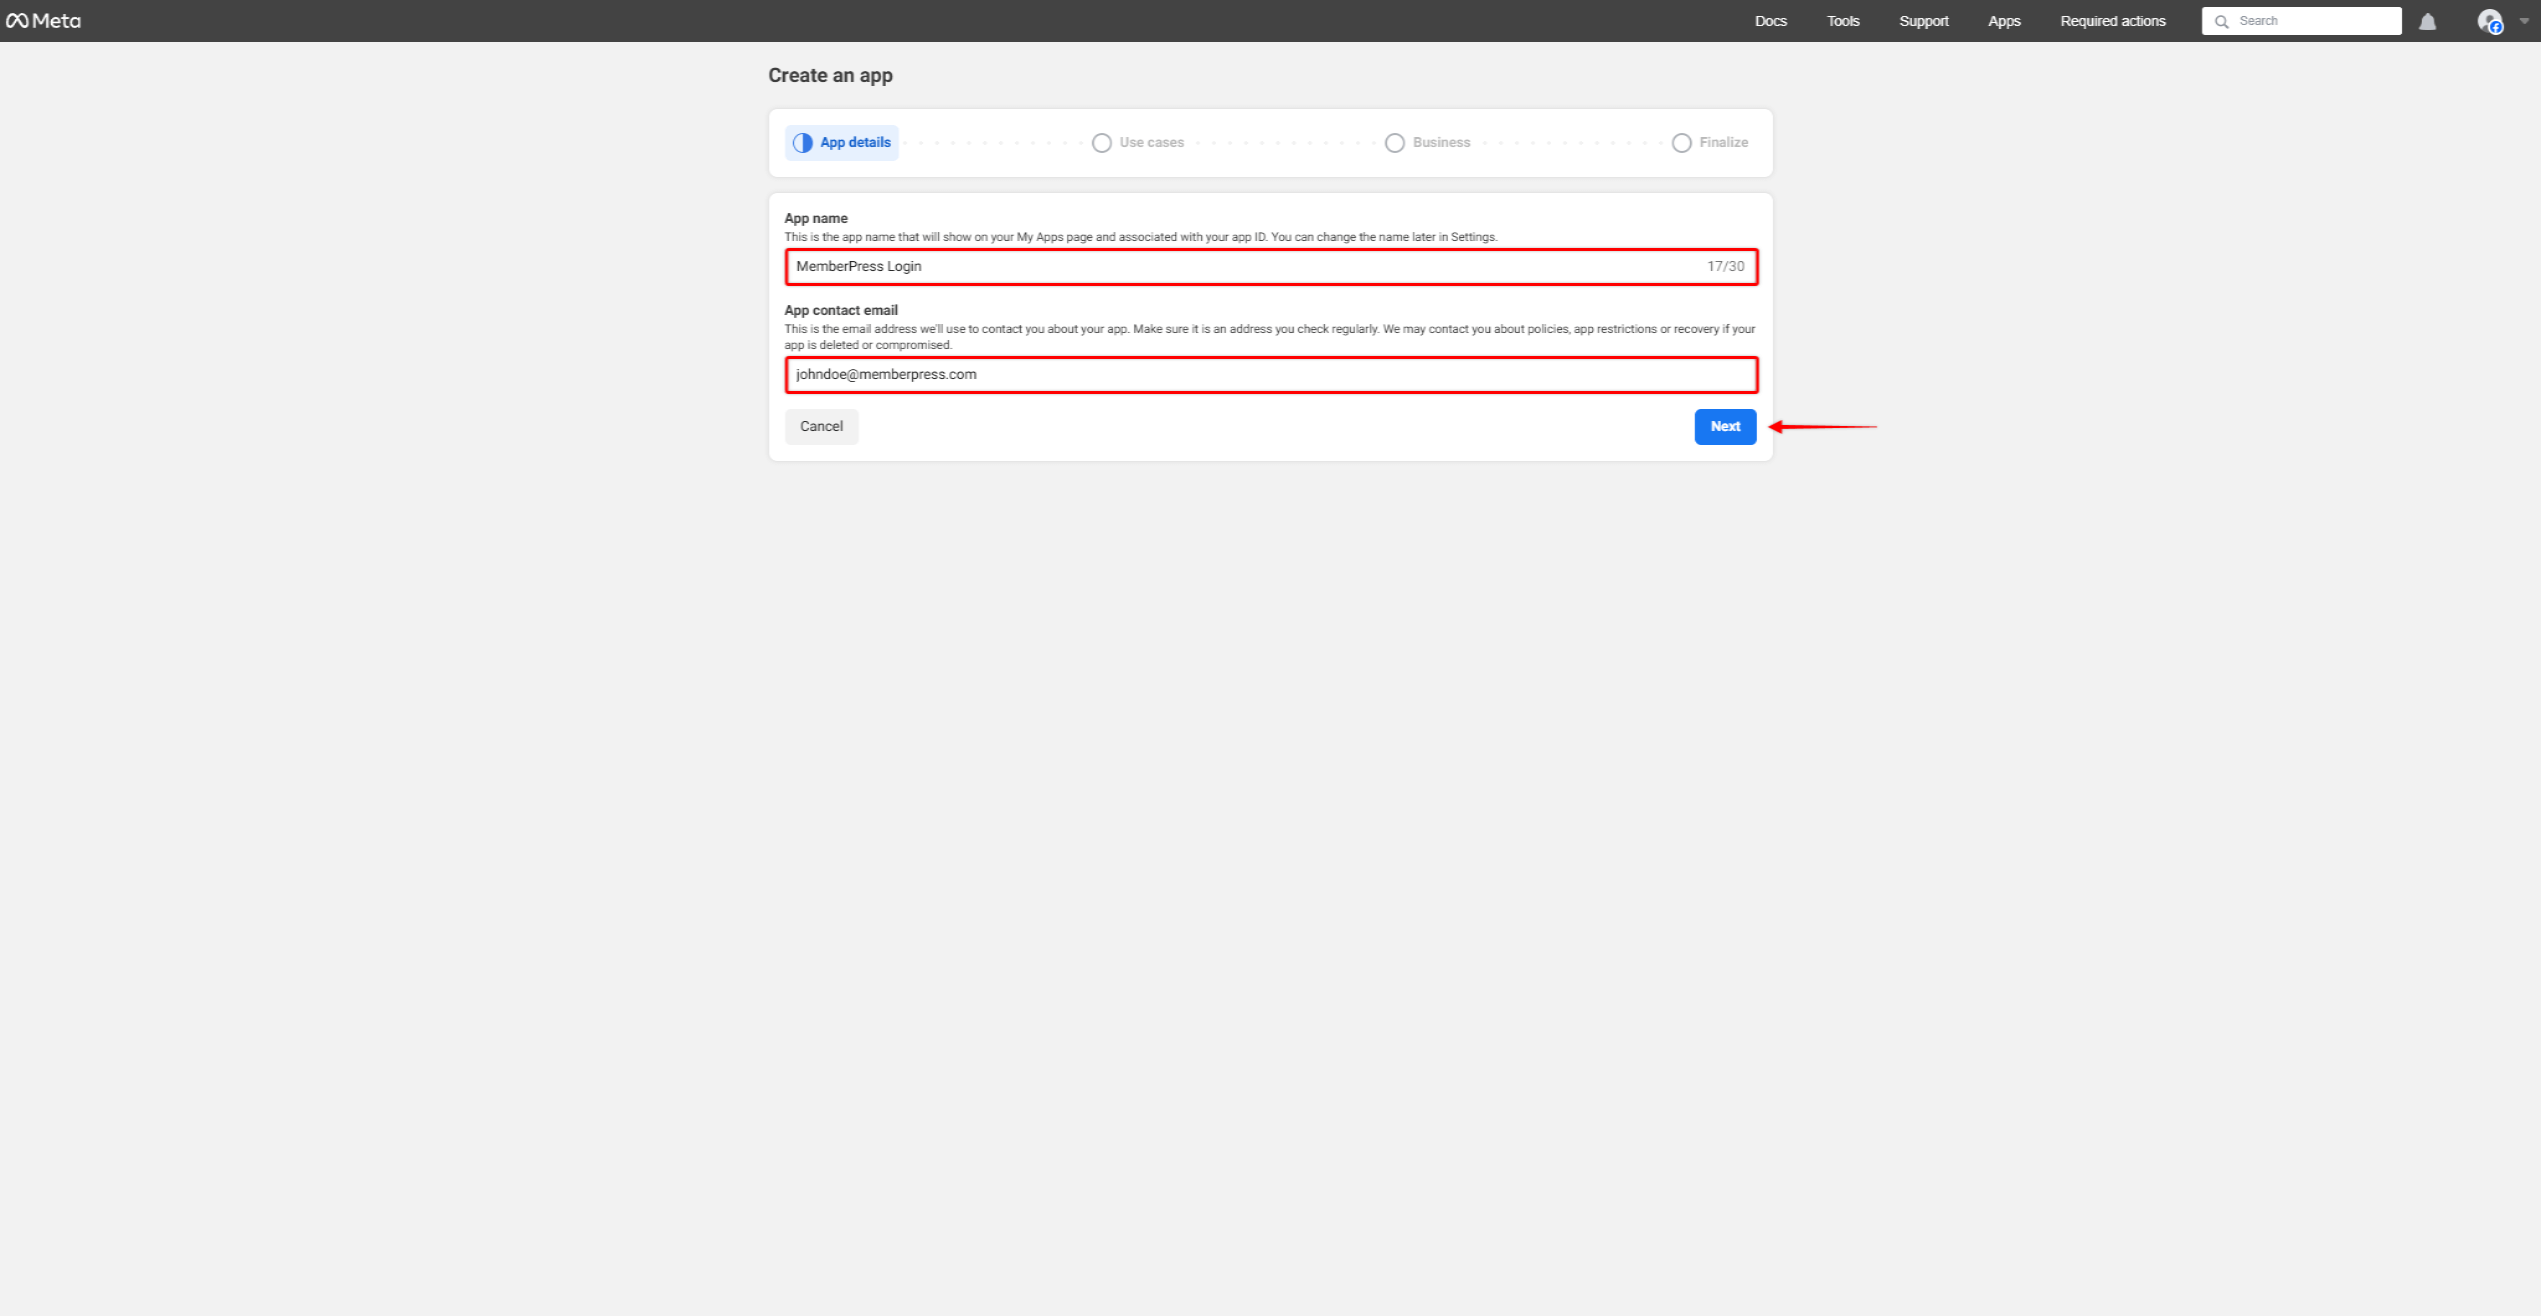
- In the first step (App details), name your app (App name) and add the contact email (App contact email). Keep in mind that the app name you add here will be visible to your members on the Consent Screen.
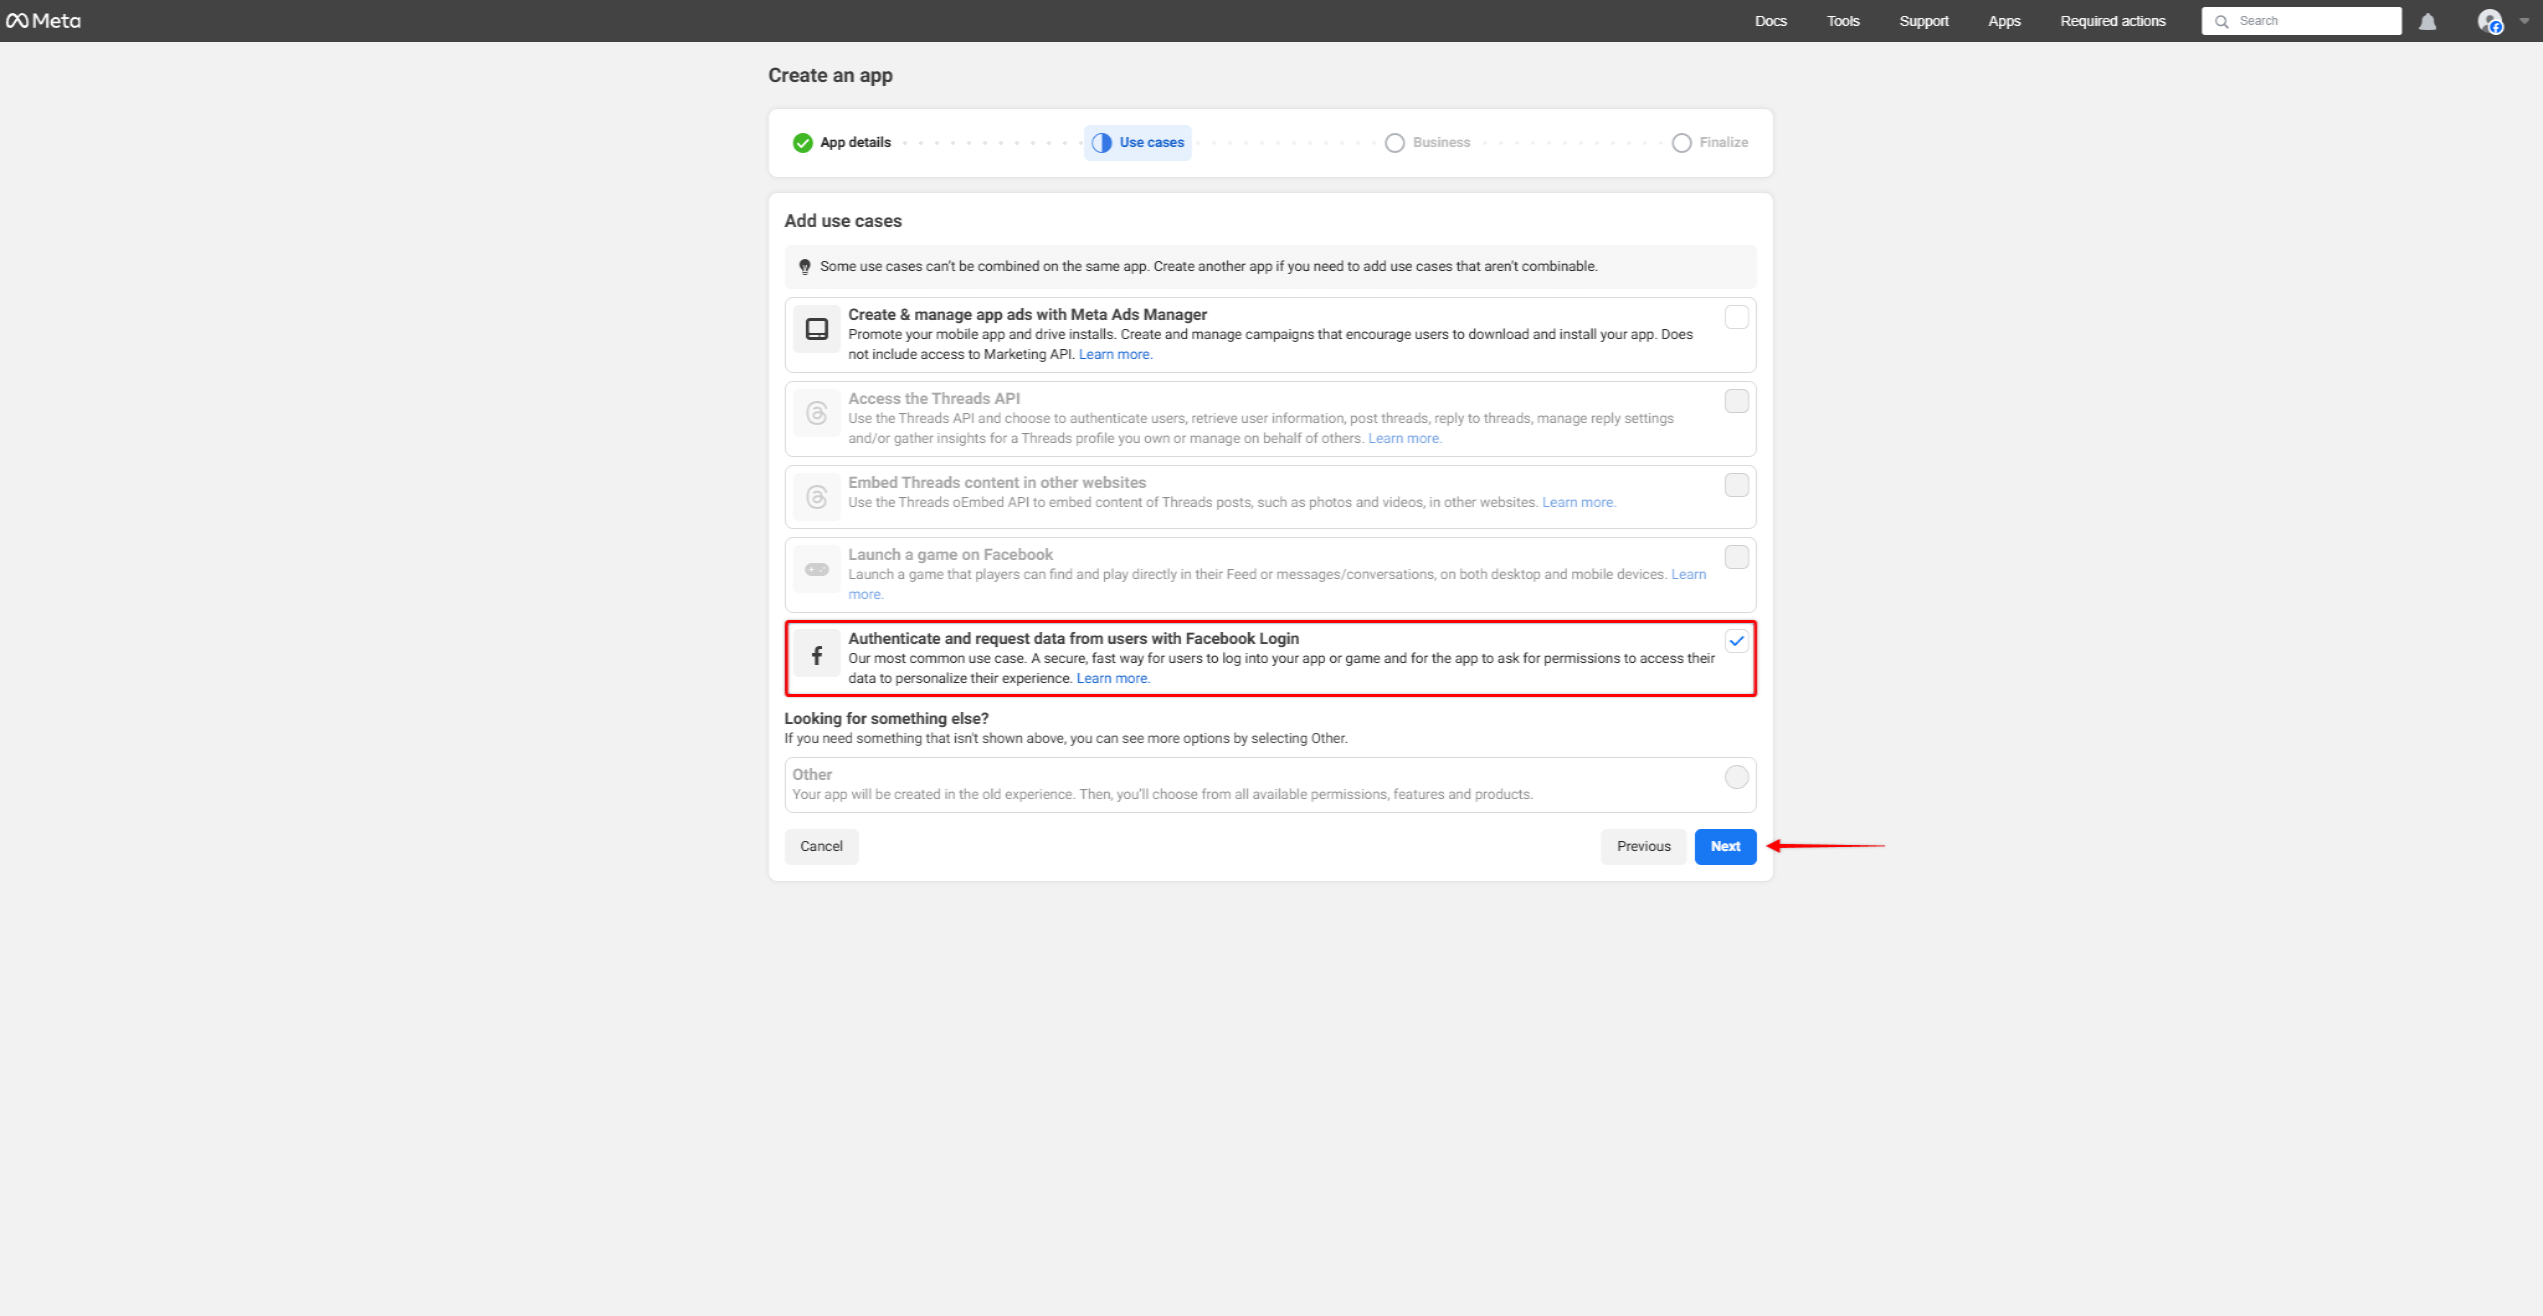
- On the Use cases page, choose the Authenticate and request data from users with Facebook login option and click Next.
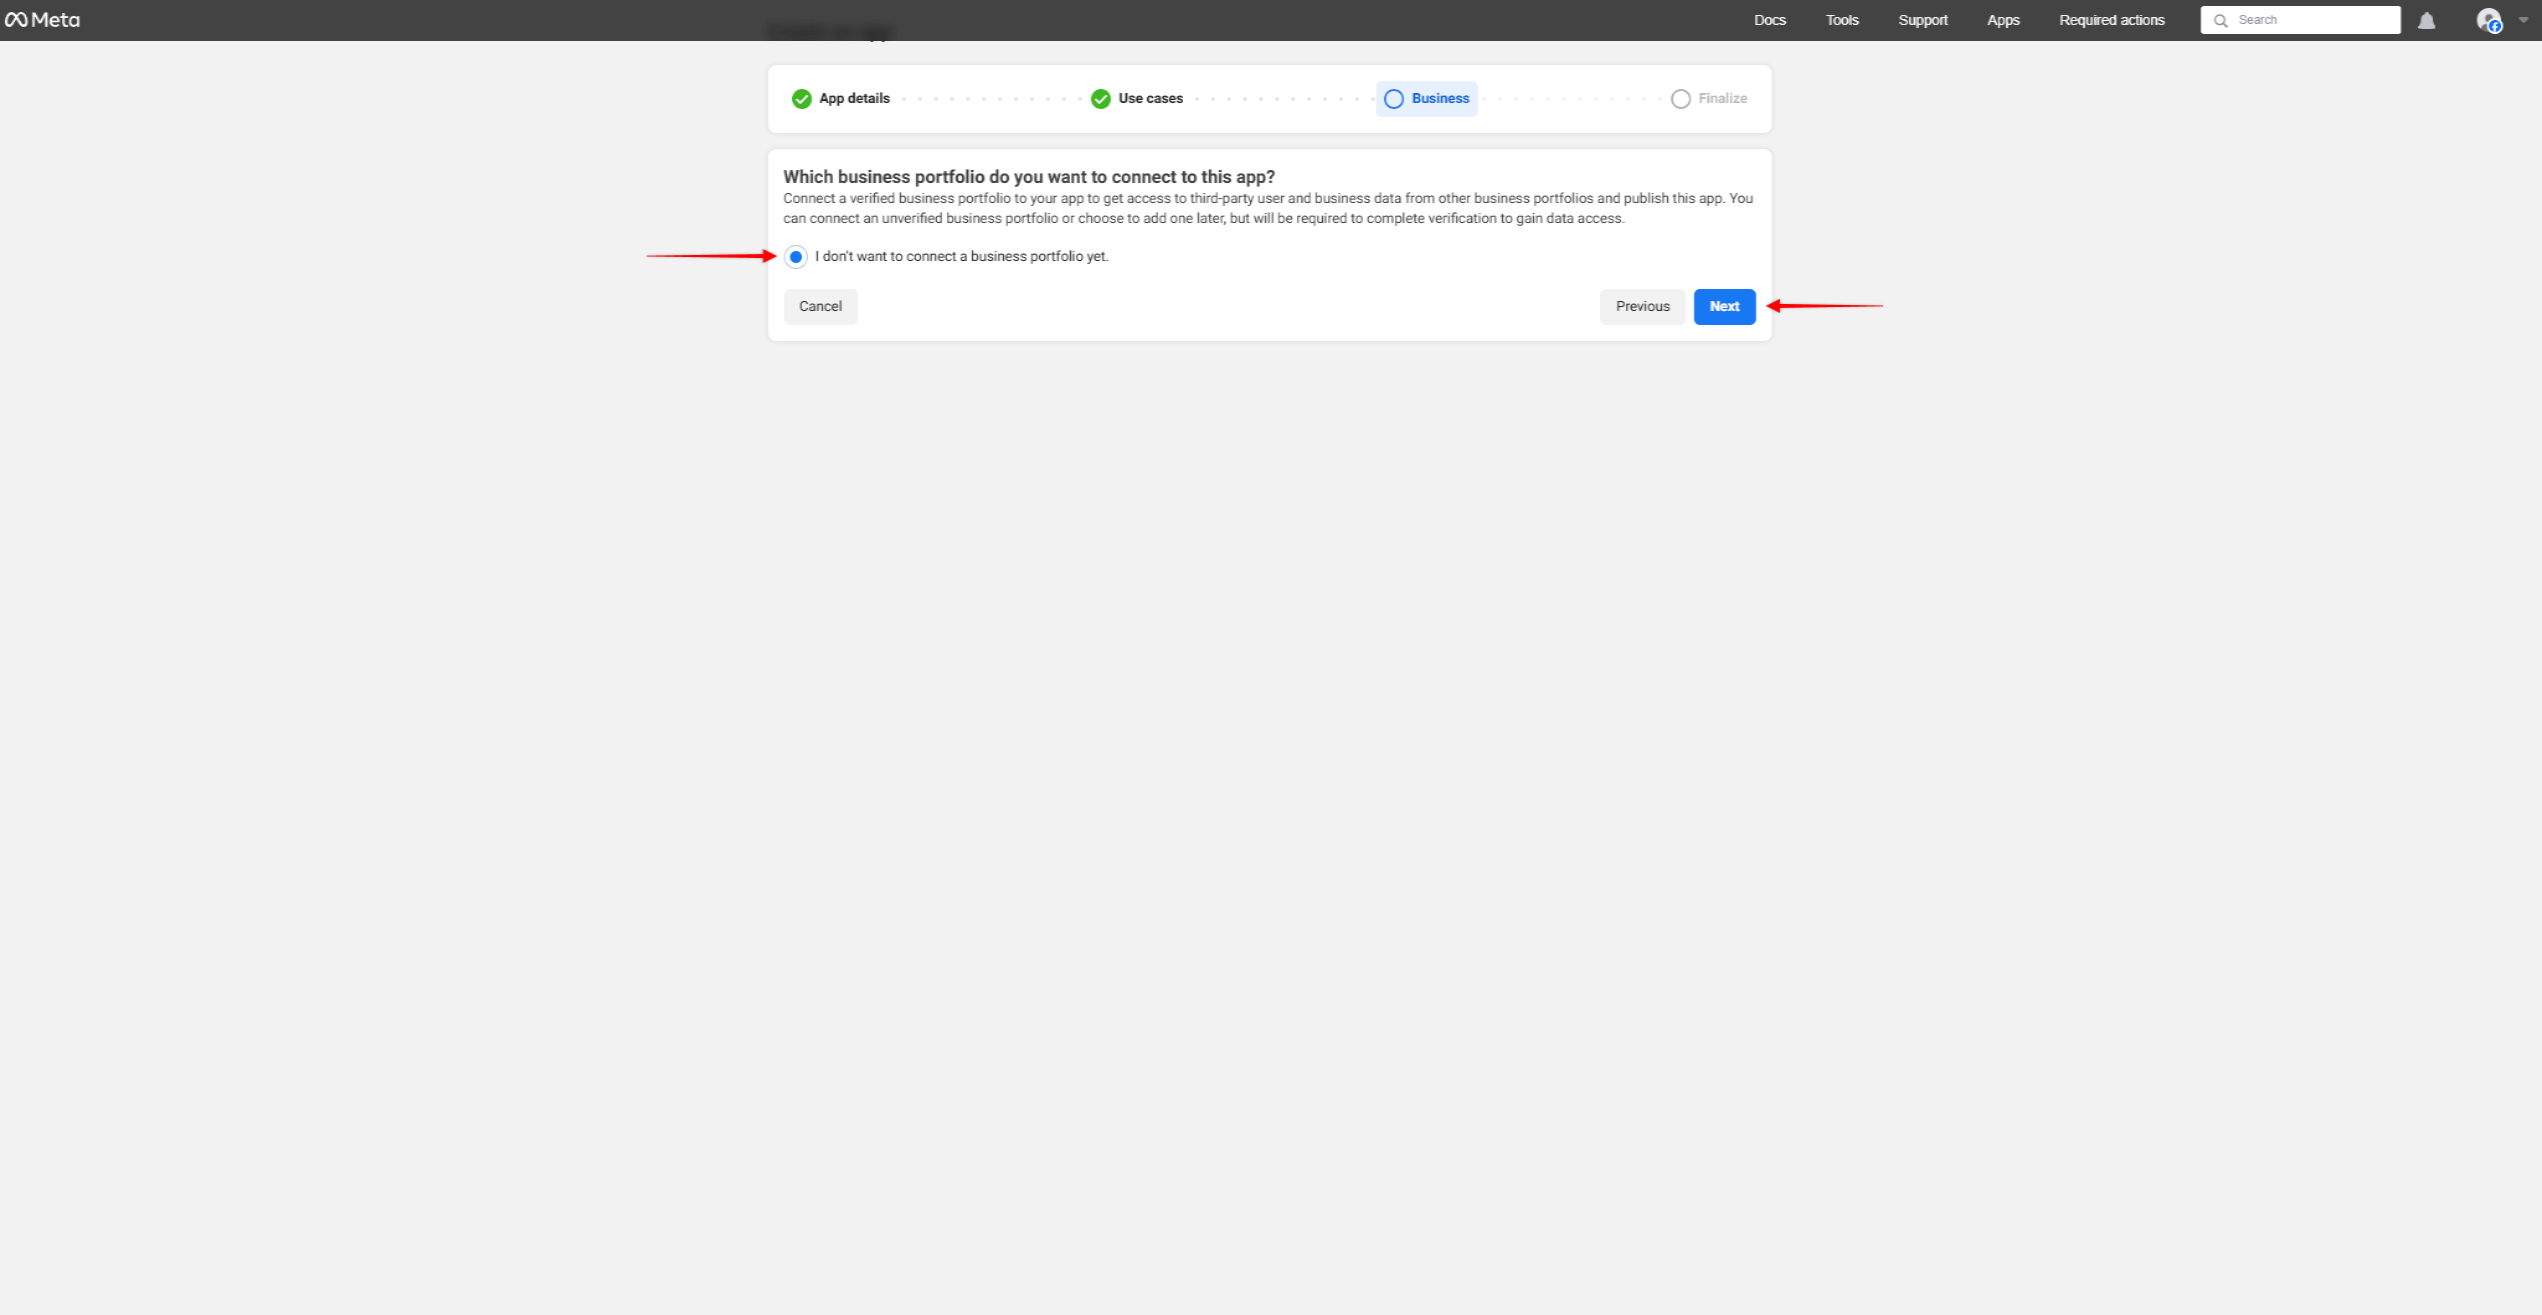
- On the next page (Business), you can connect a verified business portfolio to your app or choose to connect it later. Click Next.
- In the end, on the Finalize page, click the Go to dashboard button.
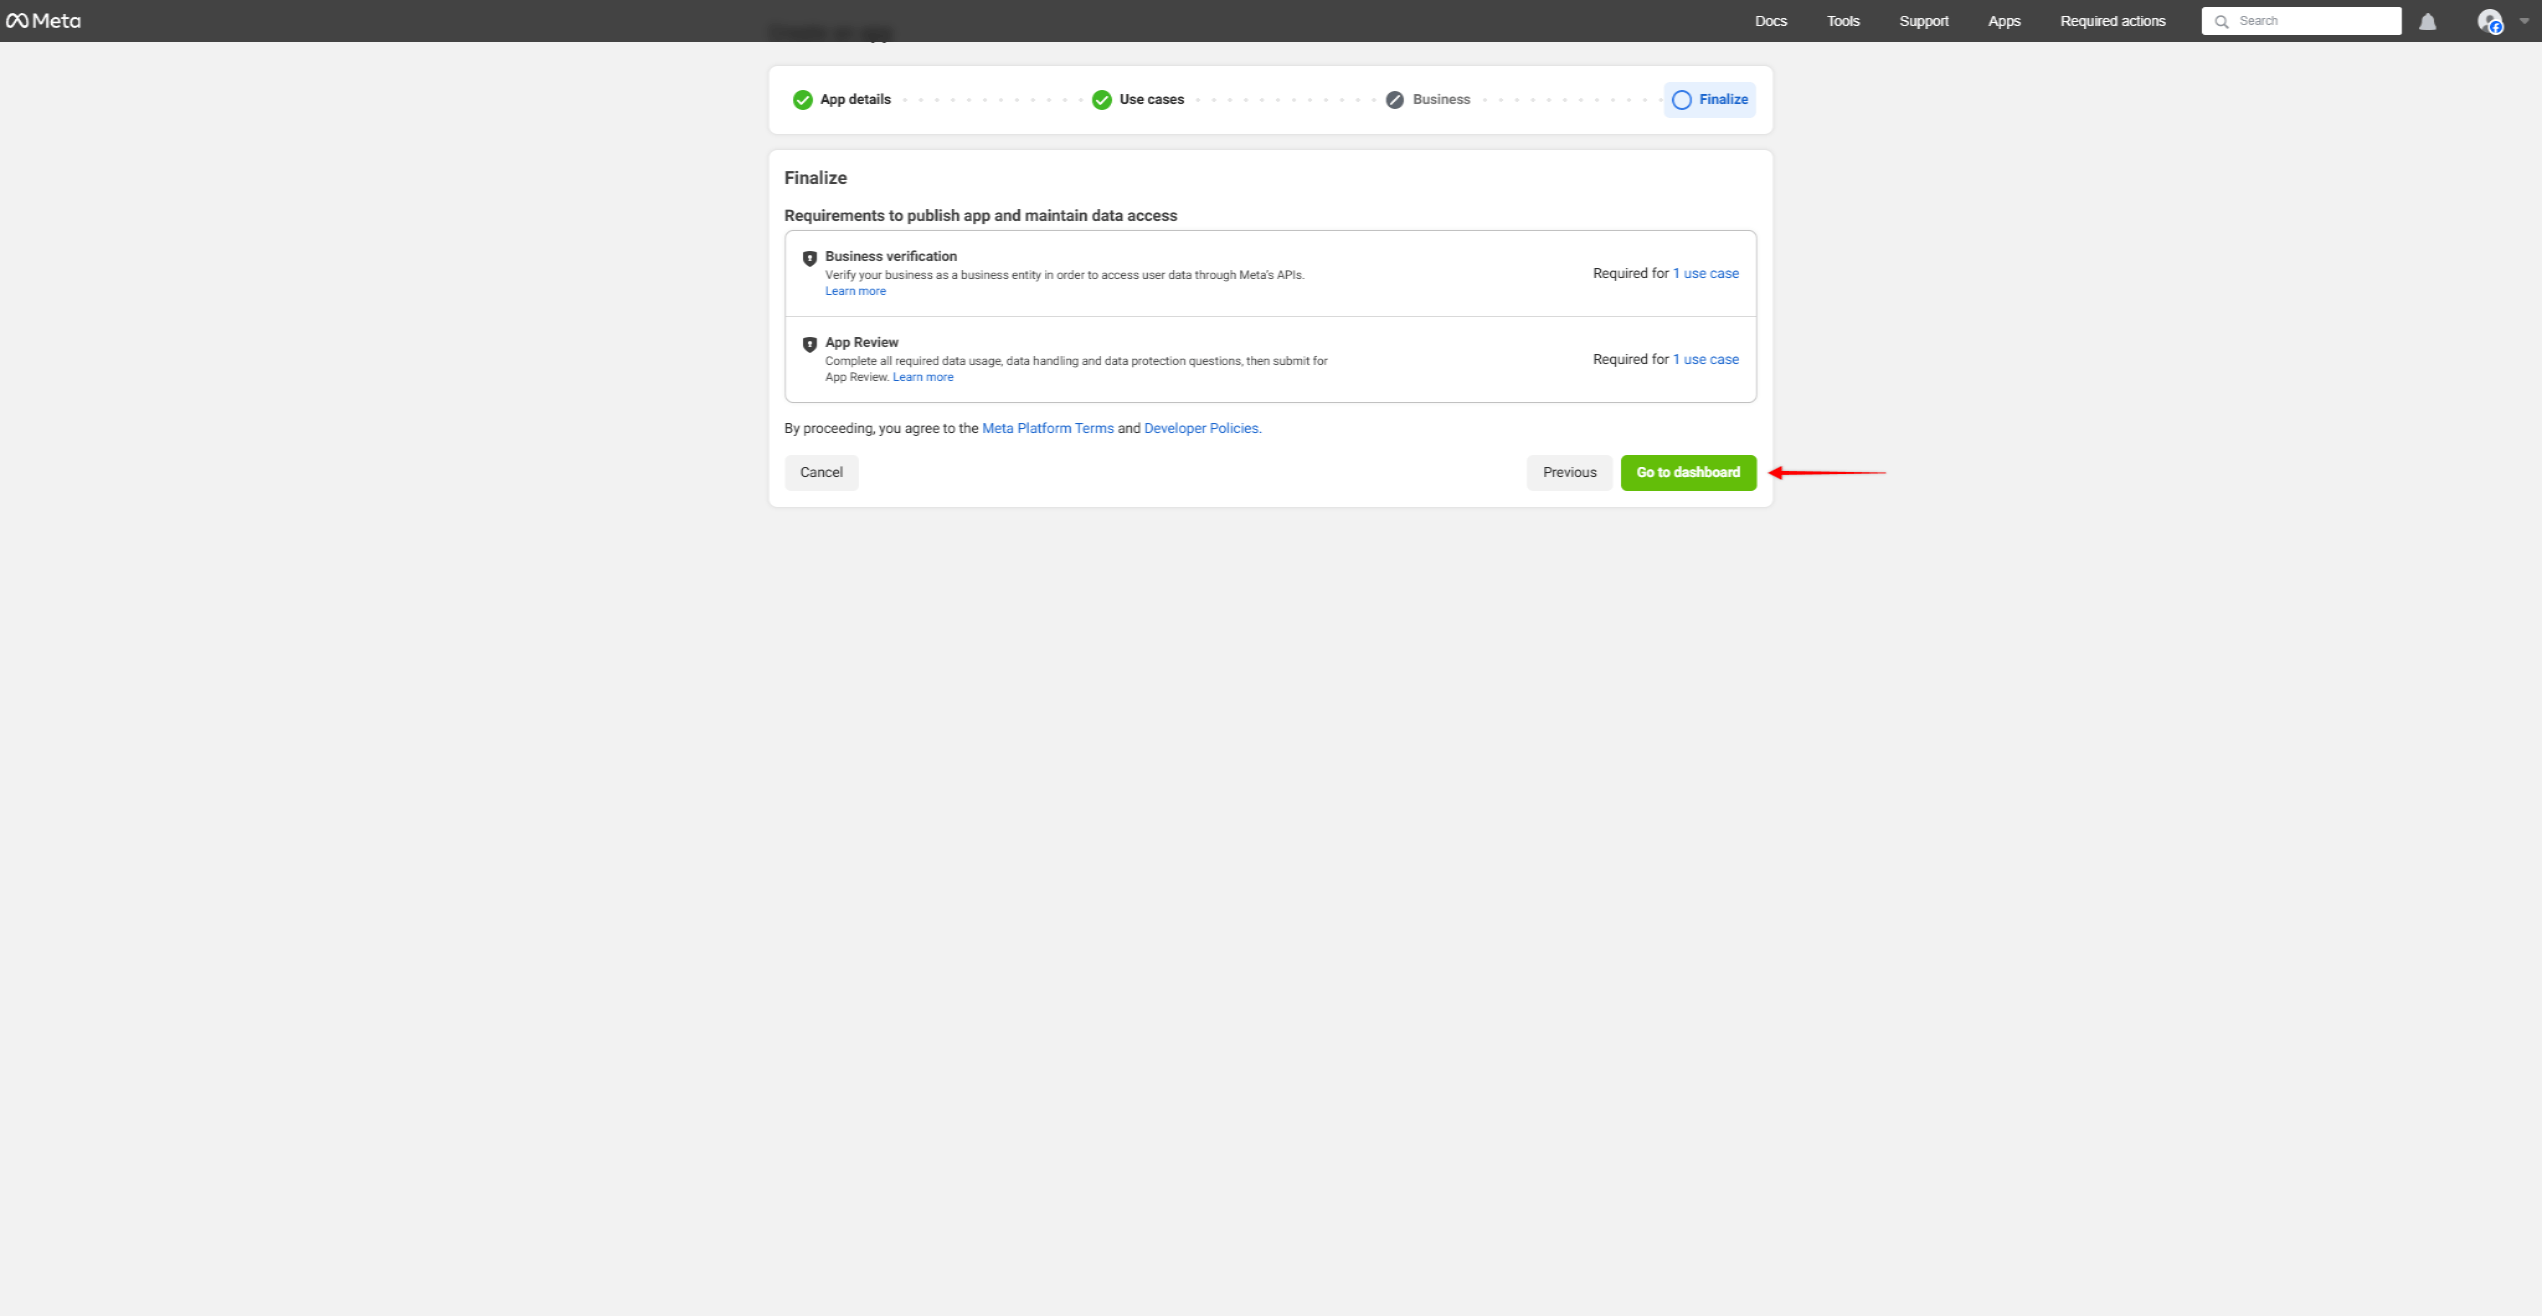
Your app will be created, and you'll be transferred to the dashboard to customize your app.
Customize Facebook App
Here, you need to configure your Facebook app.
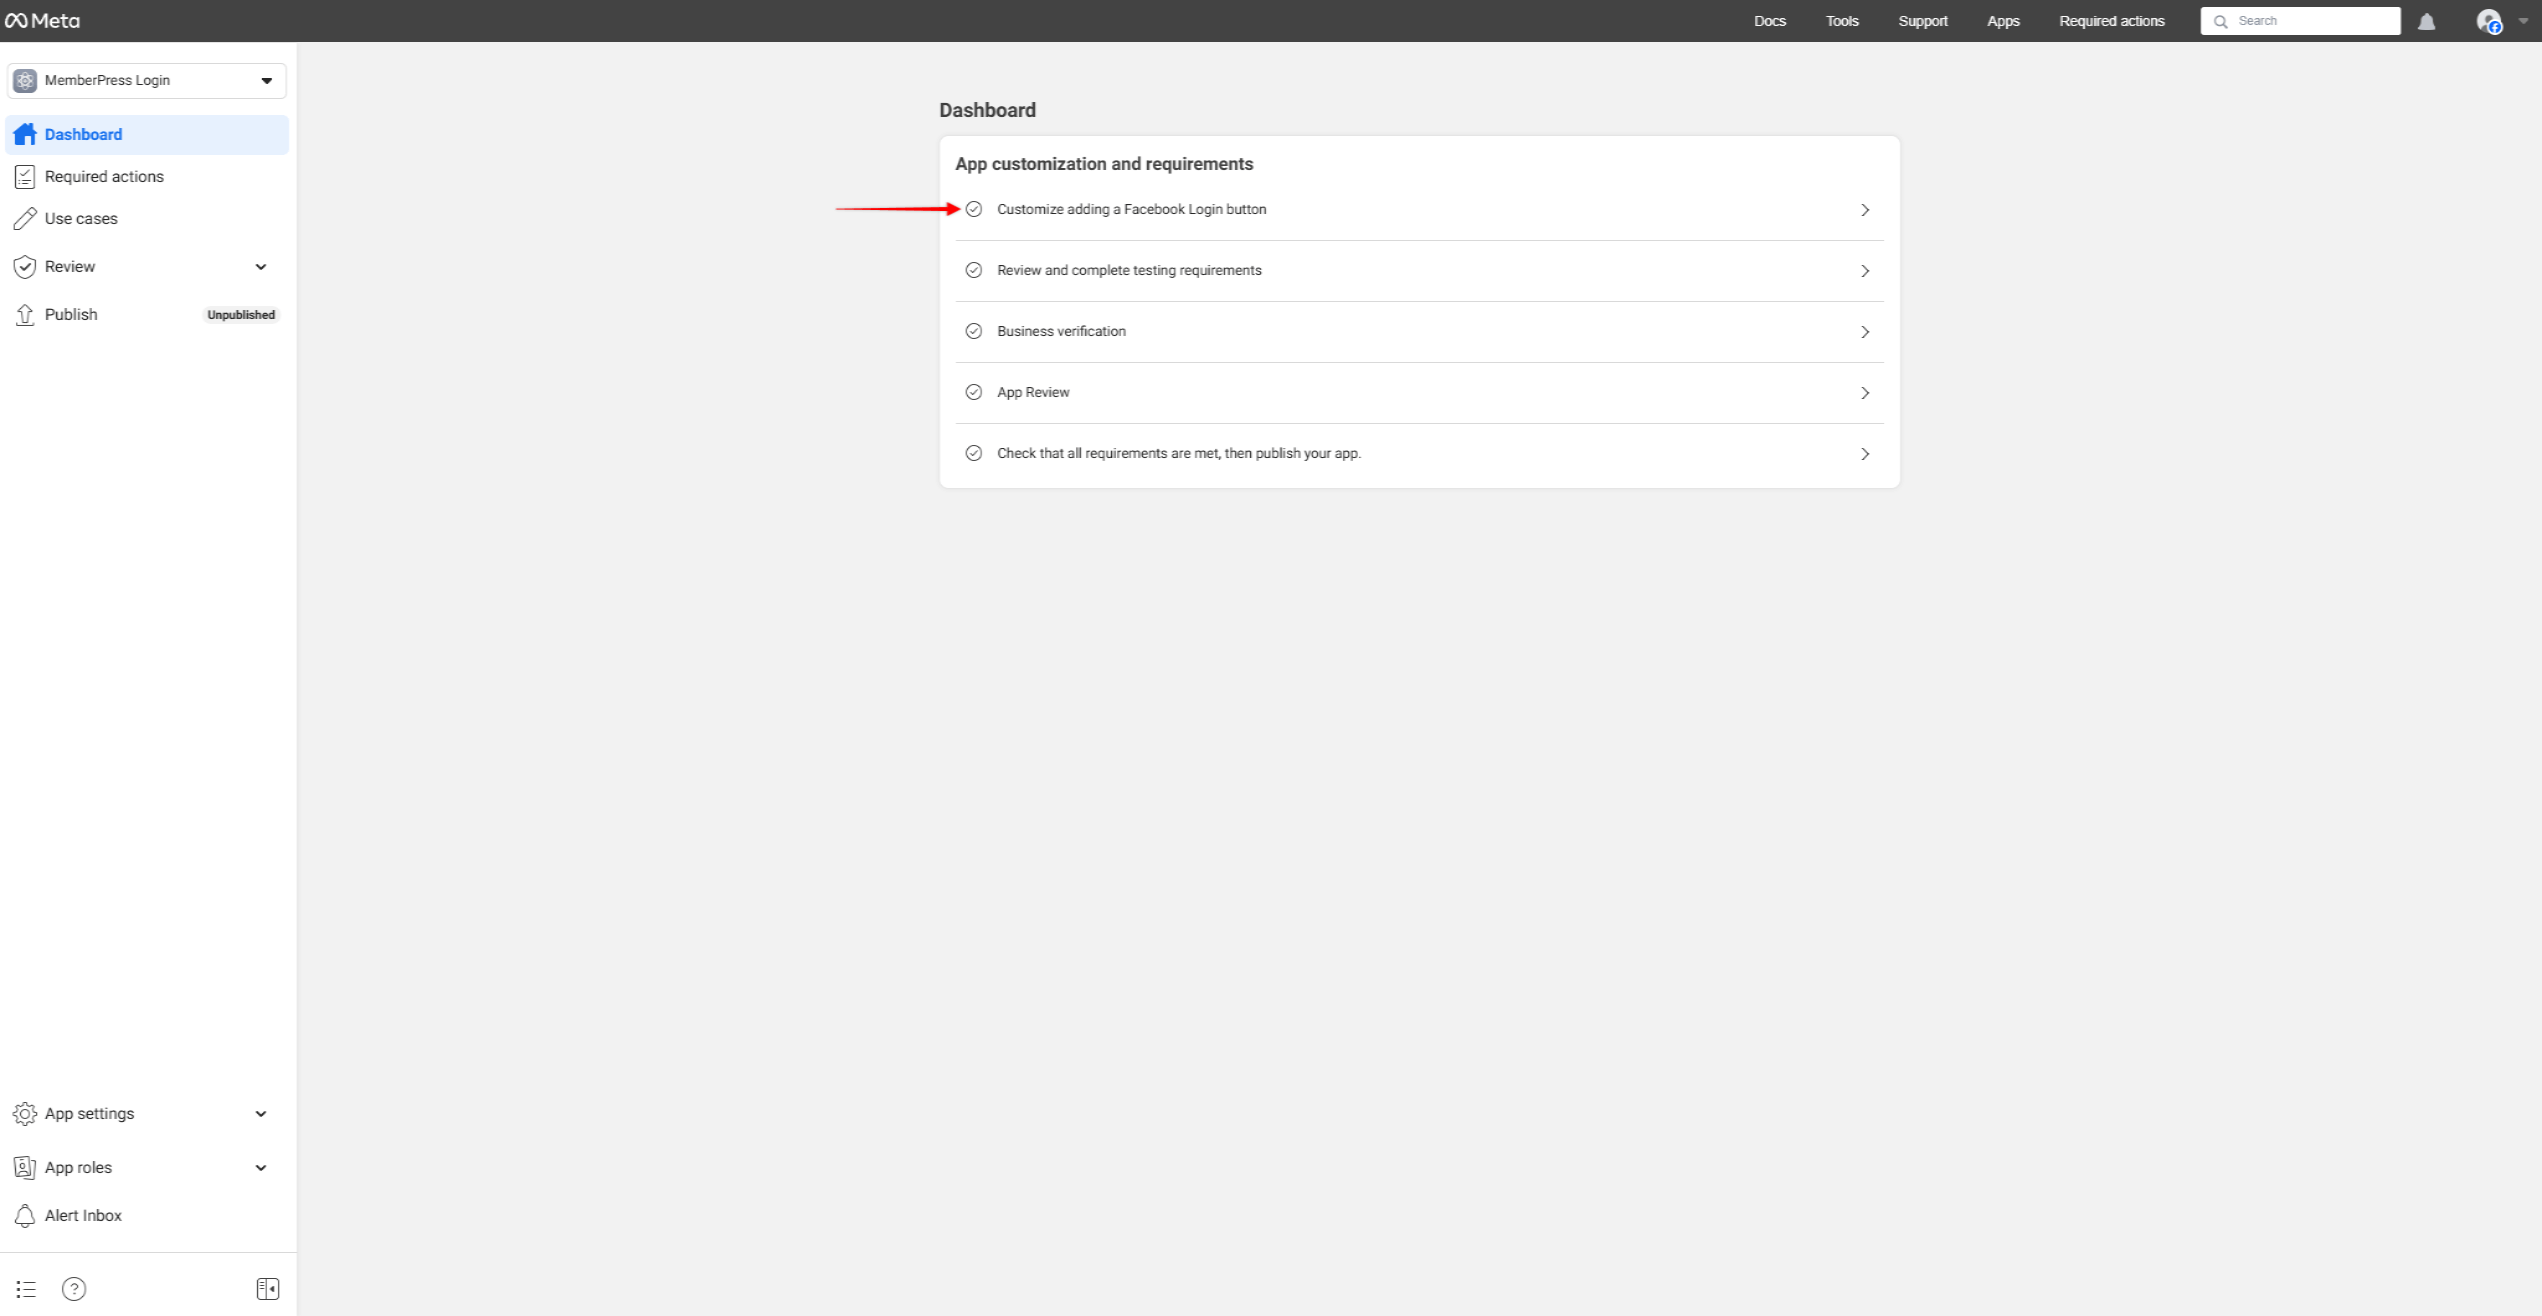
- Upon creating your app, you’ll be automatically transferred to your app's Dashboard. If you’re accessing the existing application from the Apps page, click on your app to access the app's Dashboard.
- On the app’s Dashboard, you’ll see the App customization and requirements setup wizard. Click on the Customize adding a Facebook Login button item.
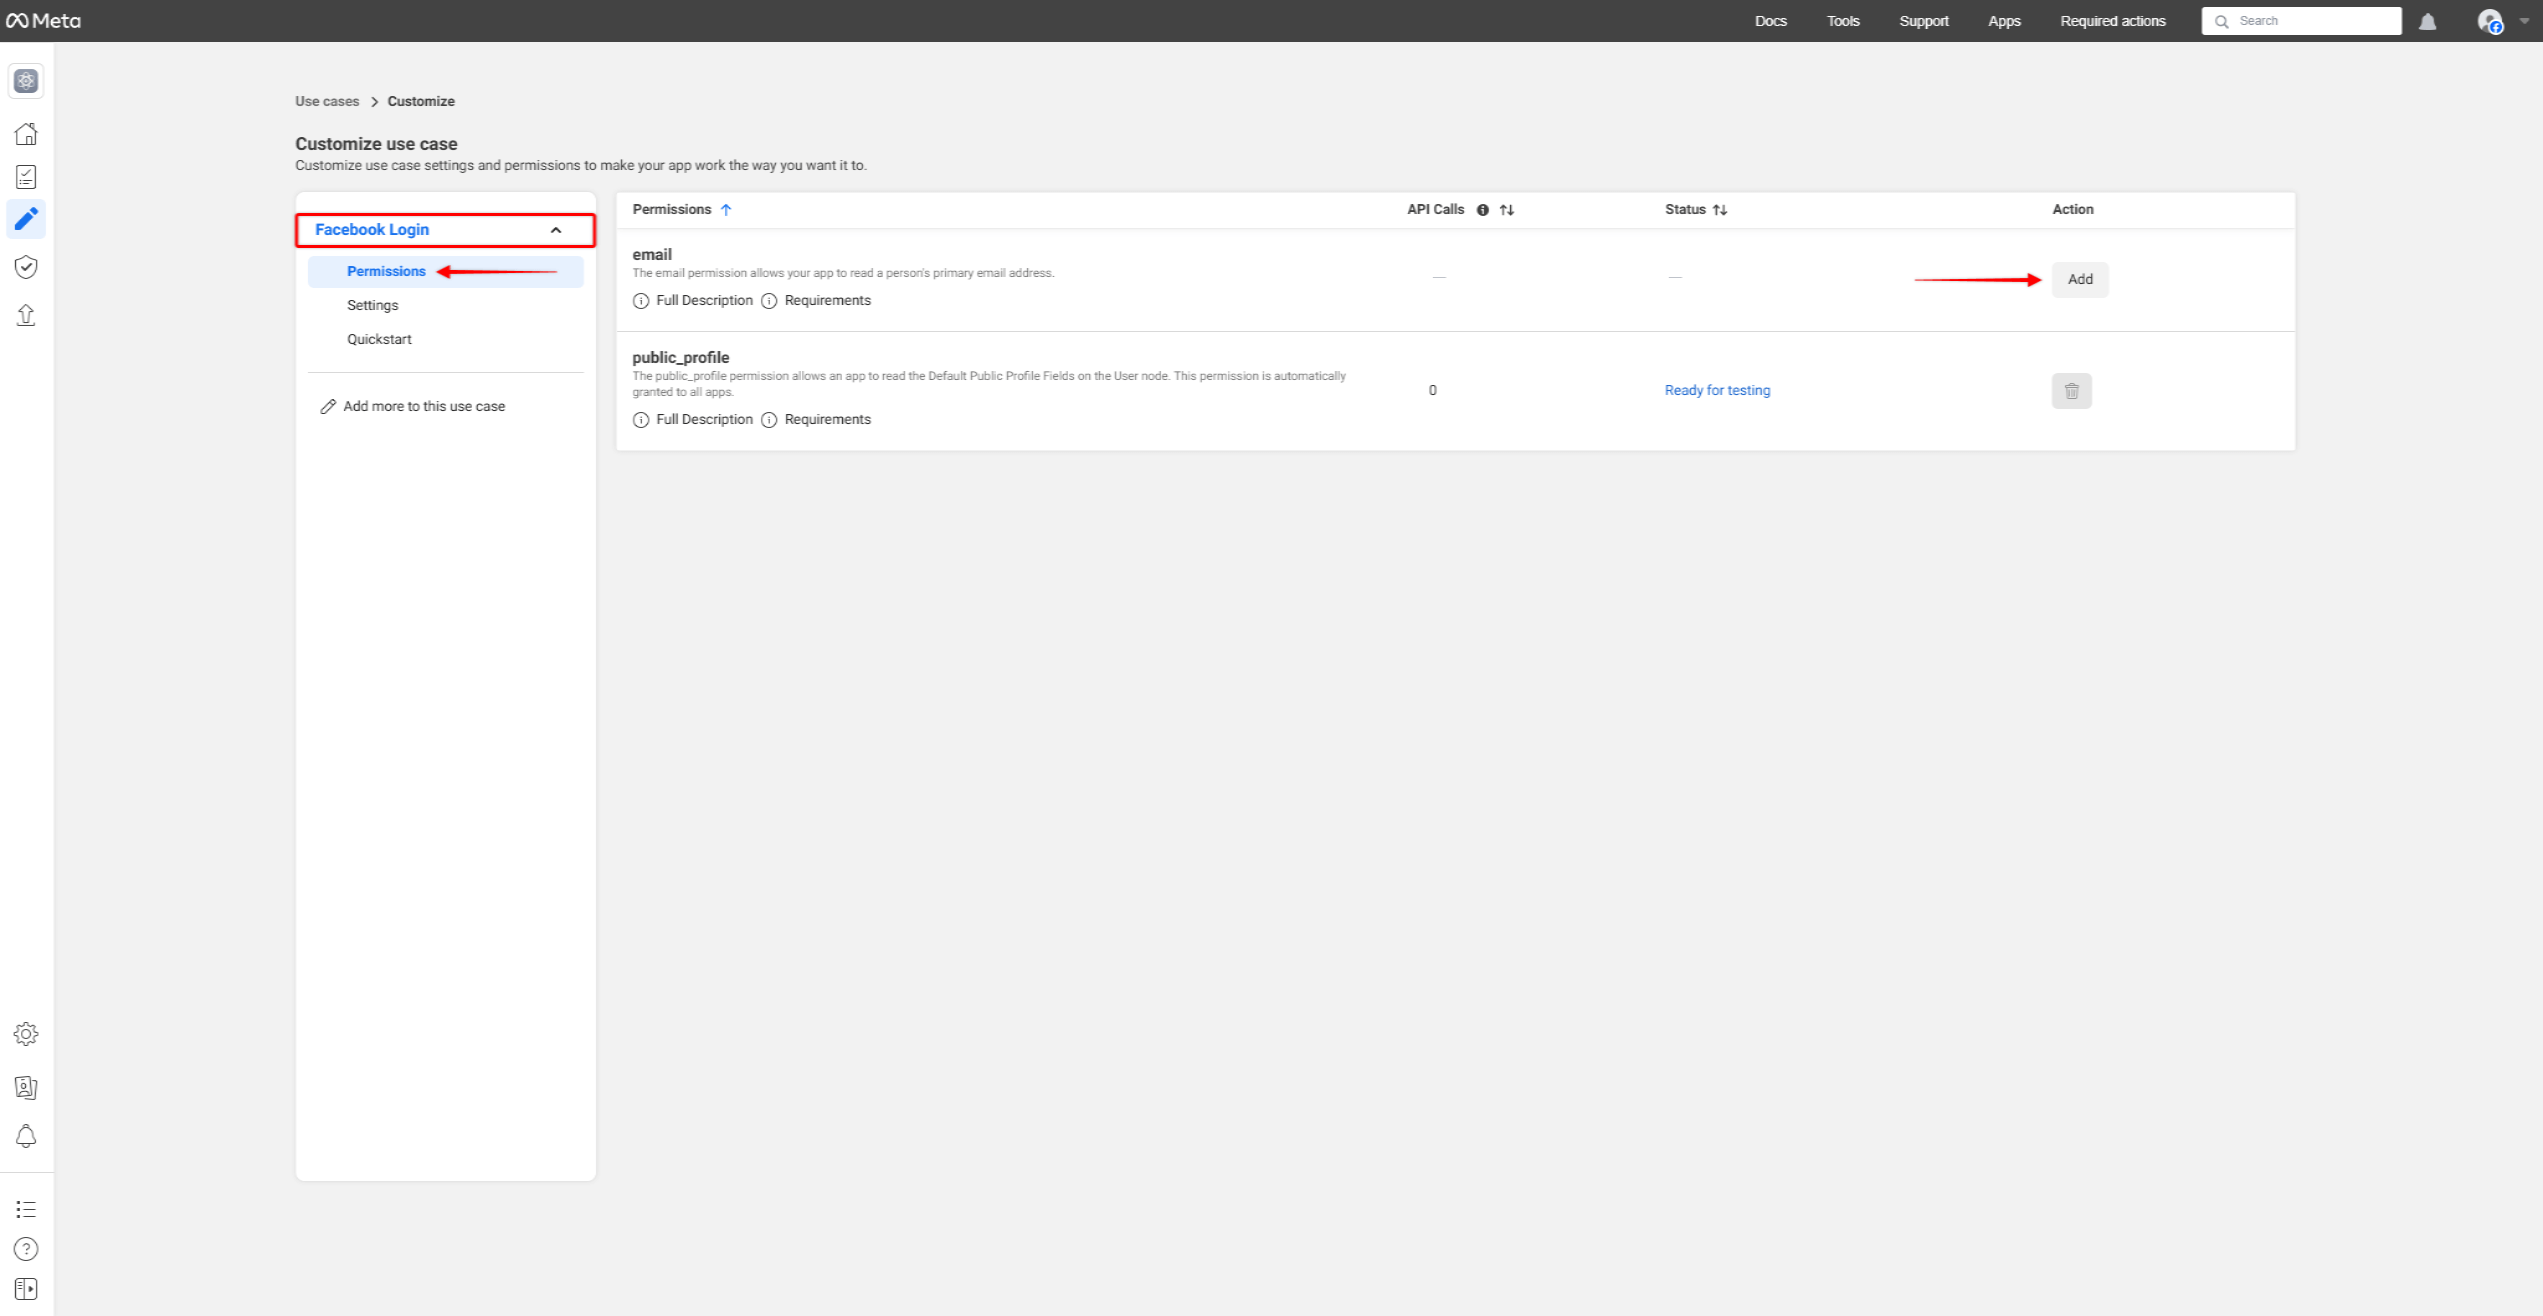
- Next, on the Customize use case page, find and expand the Facebook Login section. Click on the Permissions option.
- Under the email permission, click the Add button.
- Under the Settings option, add your callback URL to the Valid OAuth Redirect URIs field. You can create the callback URL by adding the ?memberpress-sl-callback=facebook to the URL of your website (e.g., https://yourdomain.com?memberpress-sl-callback=facebook). This should be the URL of the website on which you want to enable social login.
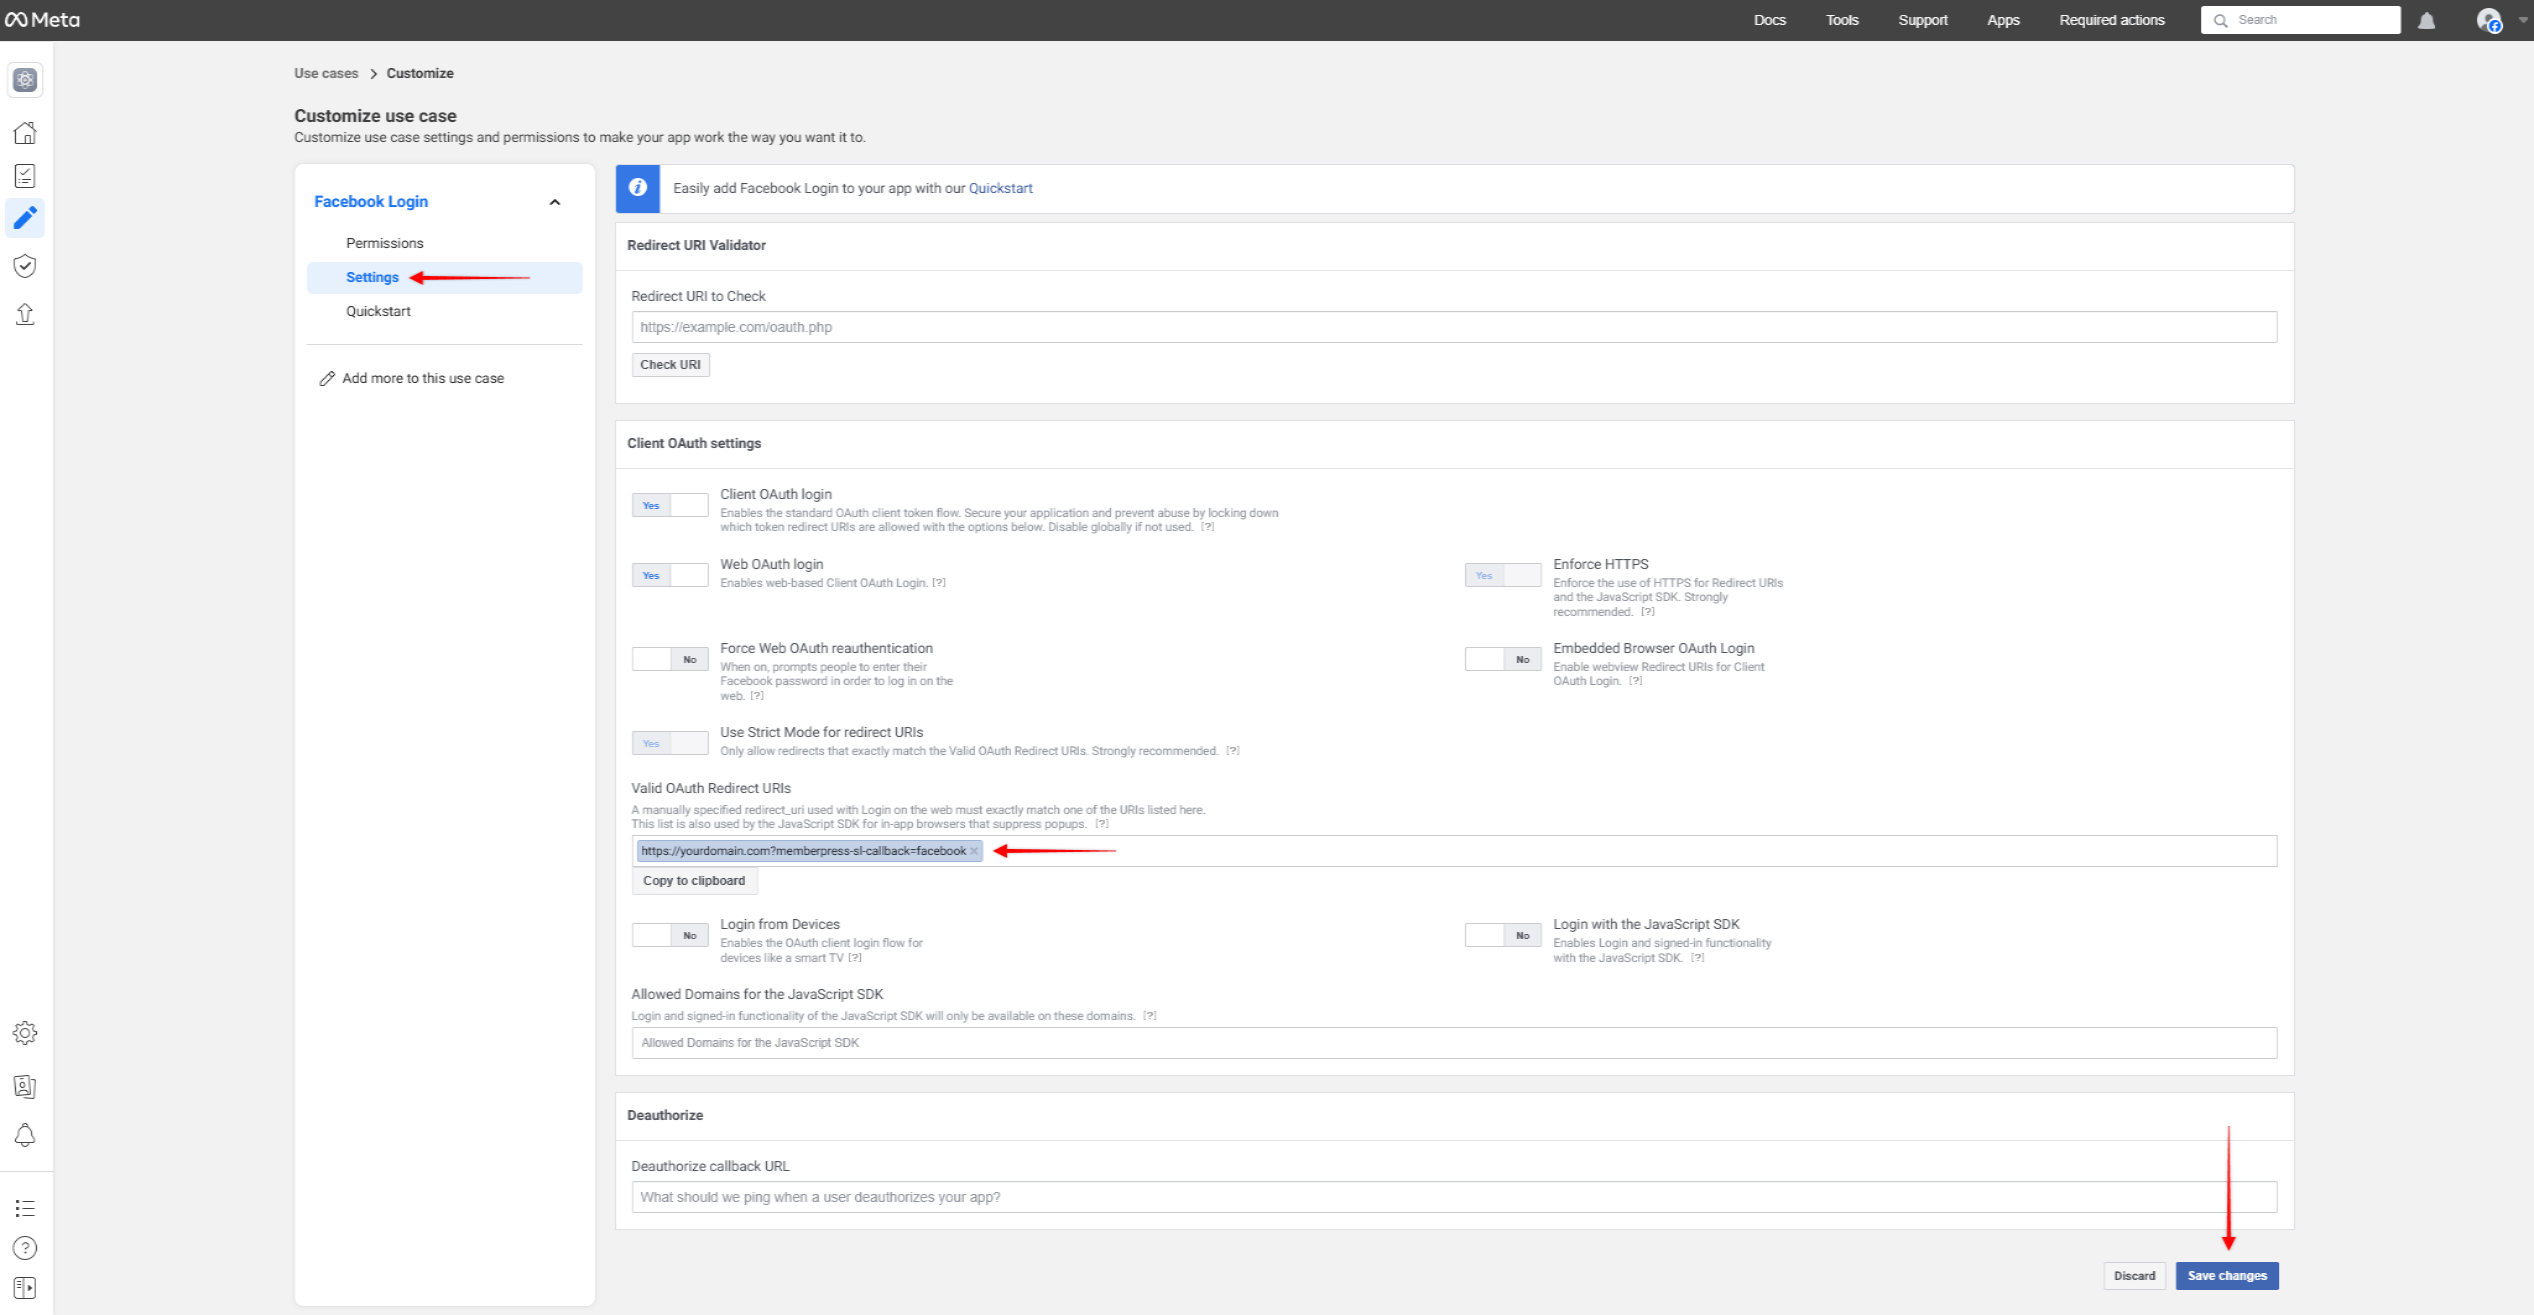
- Click on the Save changes button.
Facebook App Settings and Credentials
Next, you will need to add data related to data privacy and your Application use.
To comply with GDPR, you should allow users to delete their data on your site. This should be possible by users removing data themselves or by the website administrator. Thus, before setting up your Facebook App, please make sure you have the data deletion instructions available on your website:
- The first case is where users can delete their accounts and data themselves. In this case, you'll need your website's data deletion instructions page, which explains how to do that to your users.
- The other case is where user accounts and data can be removed only by an administrator. Here, you will need a data deletion instructions section (e.g., within the Privacy Policy) or a page containing the contact details. Users should be able to submit the account and data deletion requests using these contact details.
Facebook Basic App Settings
Now, continue with your App setup and apply the following settings to your Facebook App:
- In the sidebar on the left side, expand the App settings panel and choose the Basic option.
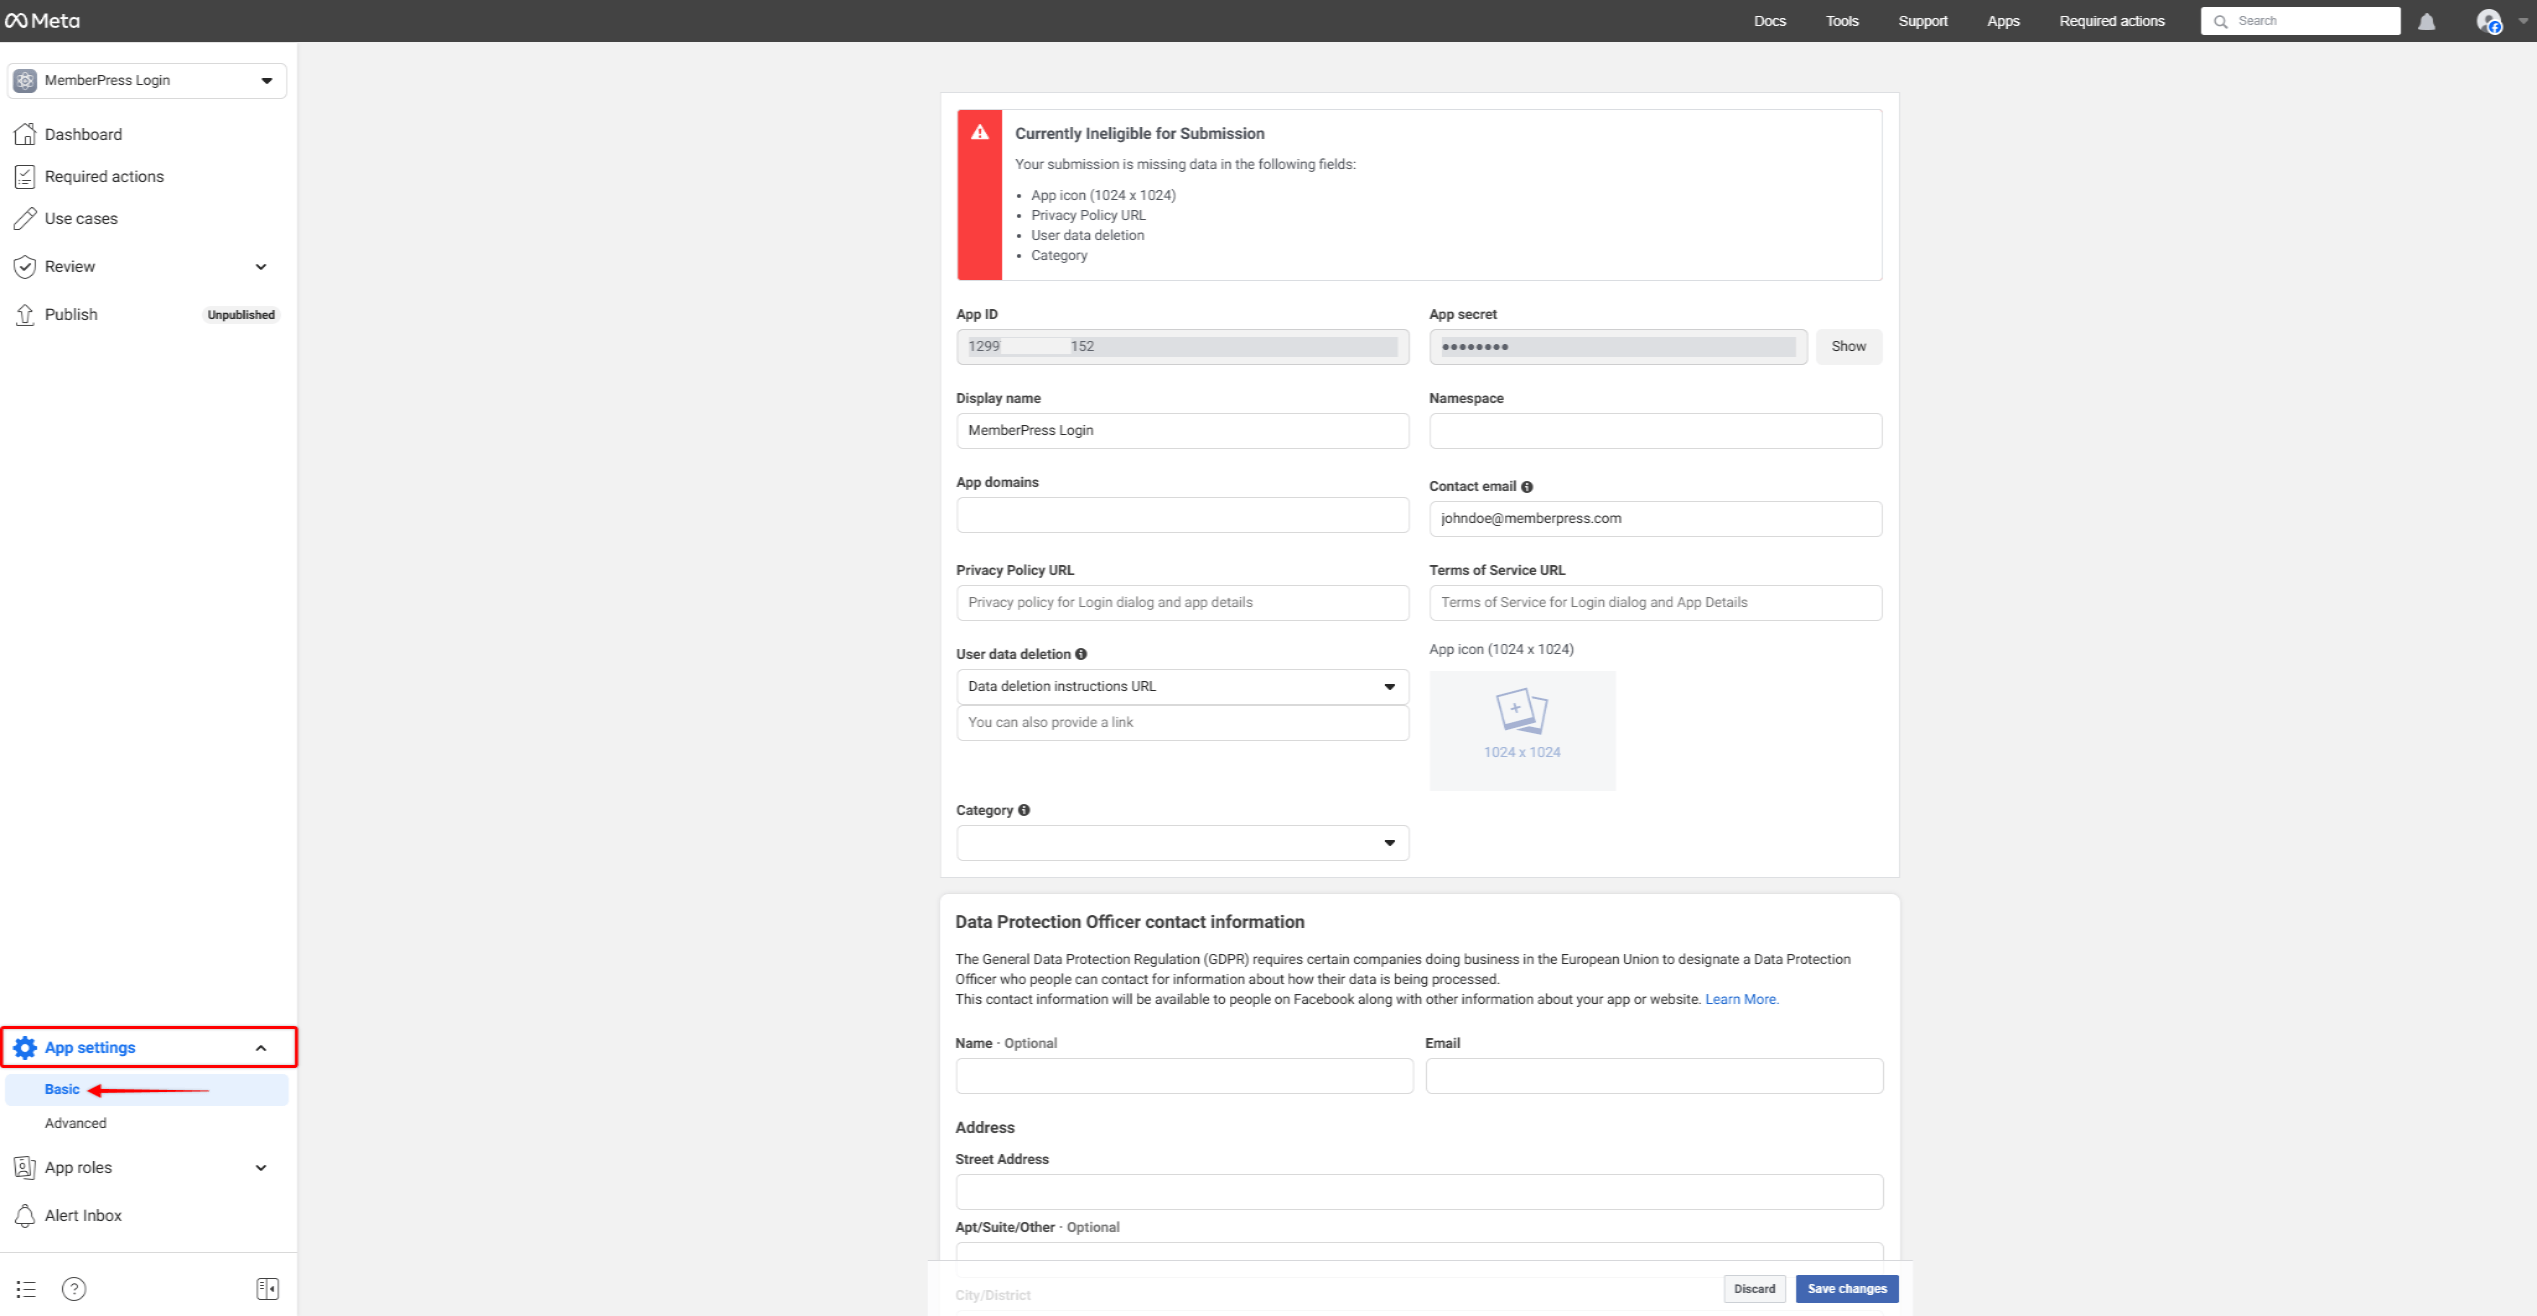
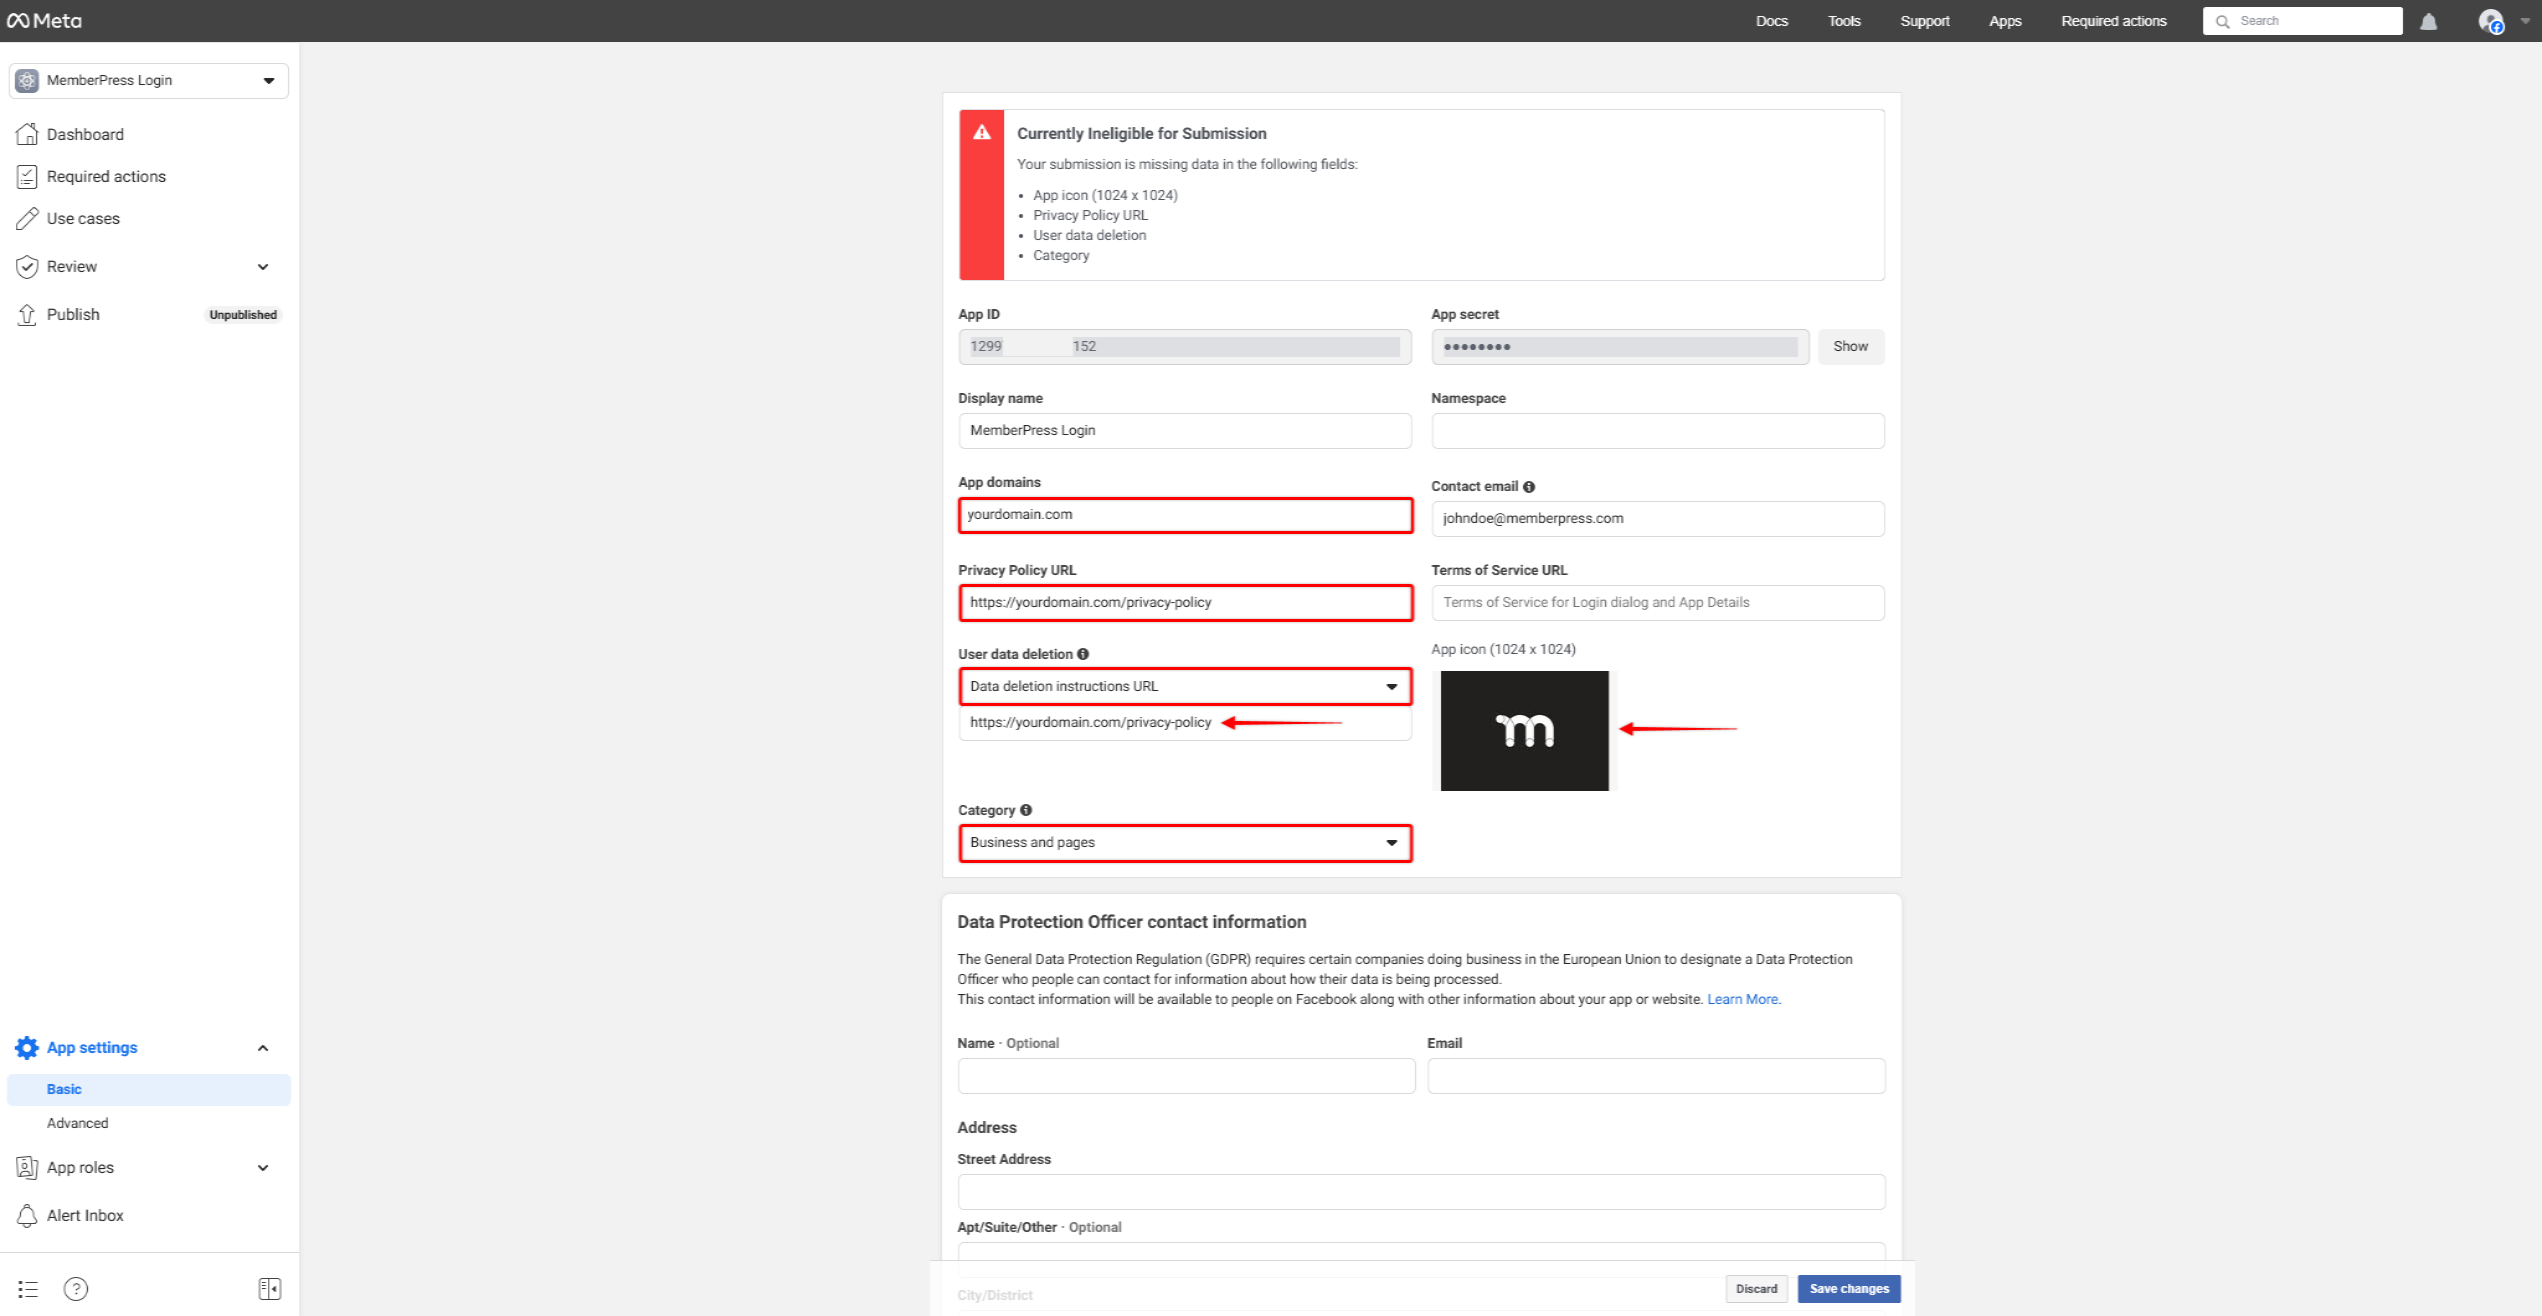
- On the Basic settings page, apply the following settings:
- App Domains: add the domain of your website (e.g. yourdomain.com);
- Privacy Policy URL: the URL of the page on your website that contains your privacy policy. This page should explain what data are collected on your website and how that data is used.
- User Data Deletion: choose the Data Deletion Instructions URL option. Here, you must add the URL of your site's data deletion instructions page or section.
- Category: select the Facebook app category that fits your needs the best.
- App Icon: upload the icon for your Facebook app.
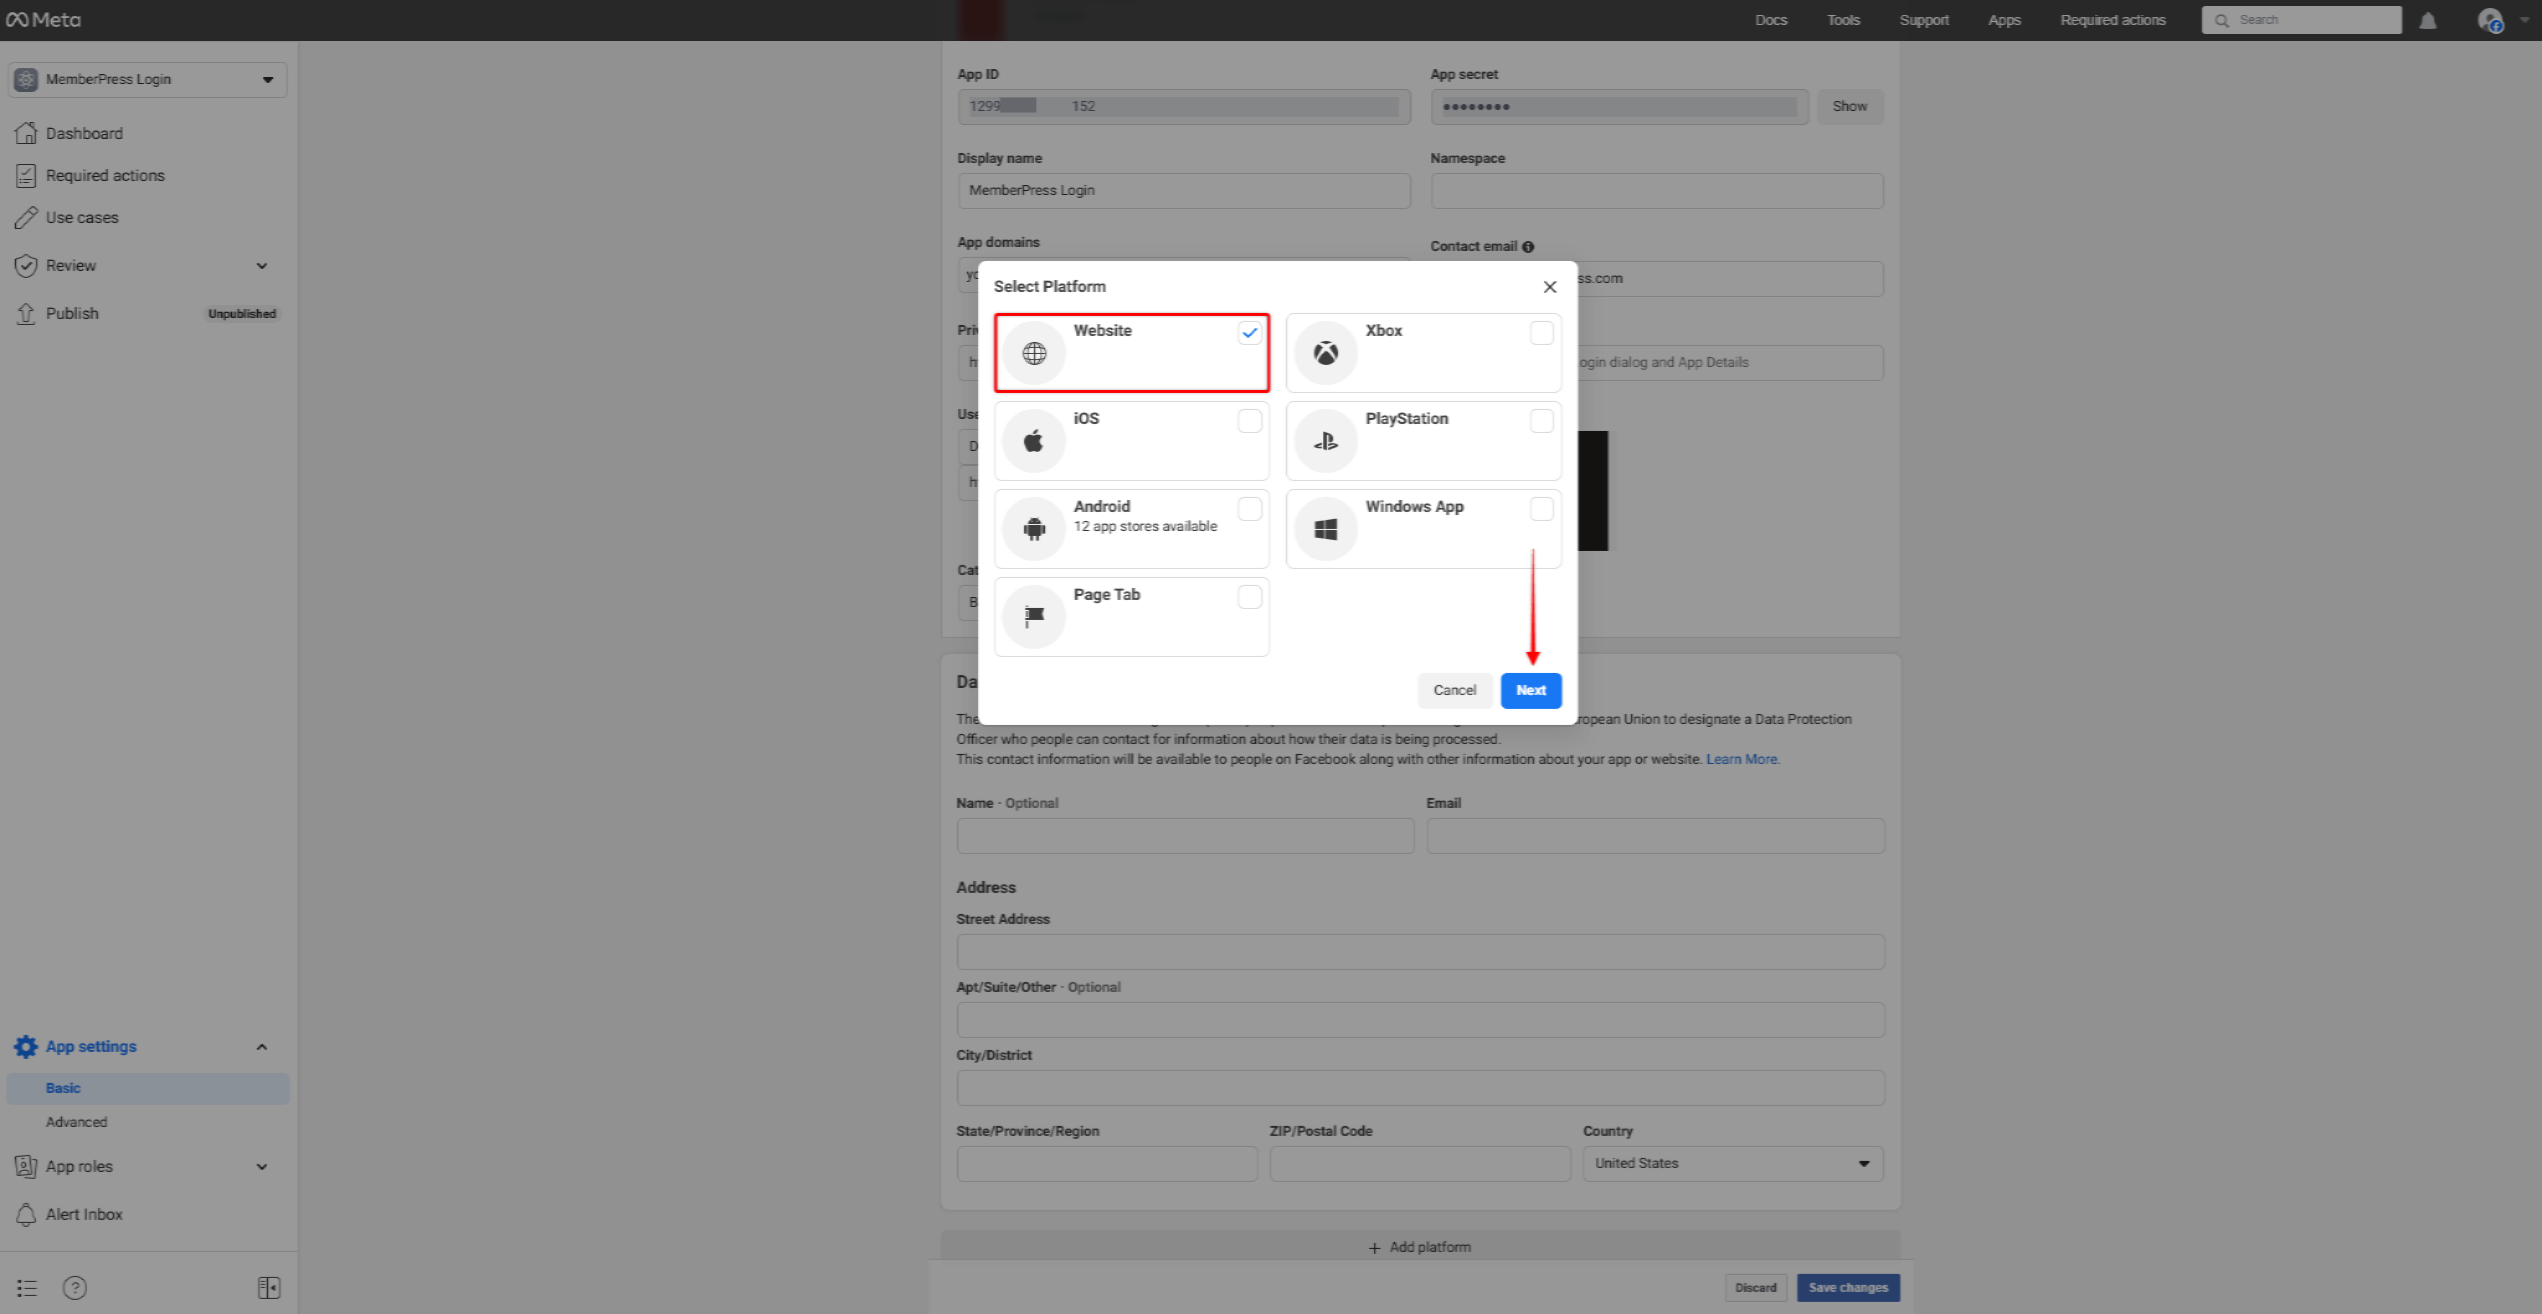
- Scroll down to the bottom of the page, and click the +Add platform button. This will open a popup.
- Select Website, and click Next.
- The new Website section will be added to the page. In this new section, add the URL of your website to the Site URL field (e.g. https://yourdomain.com).
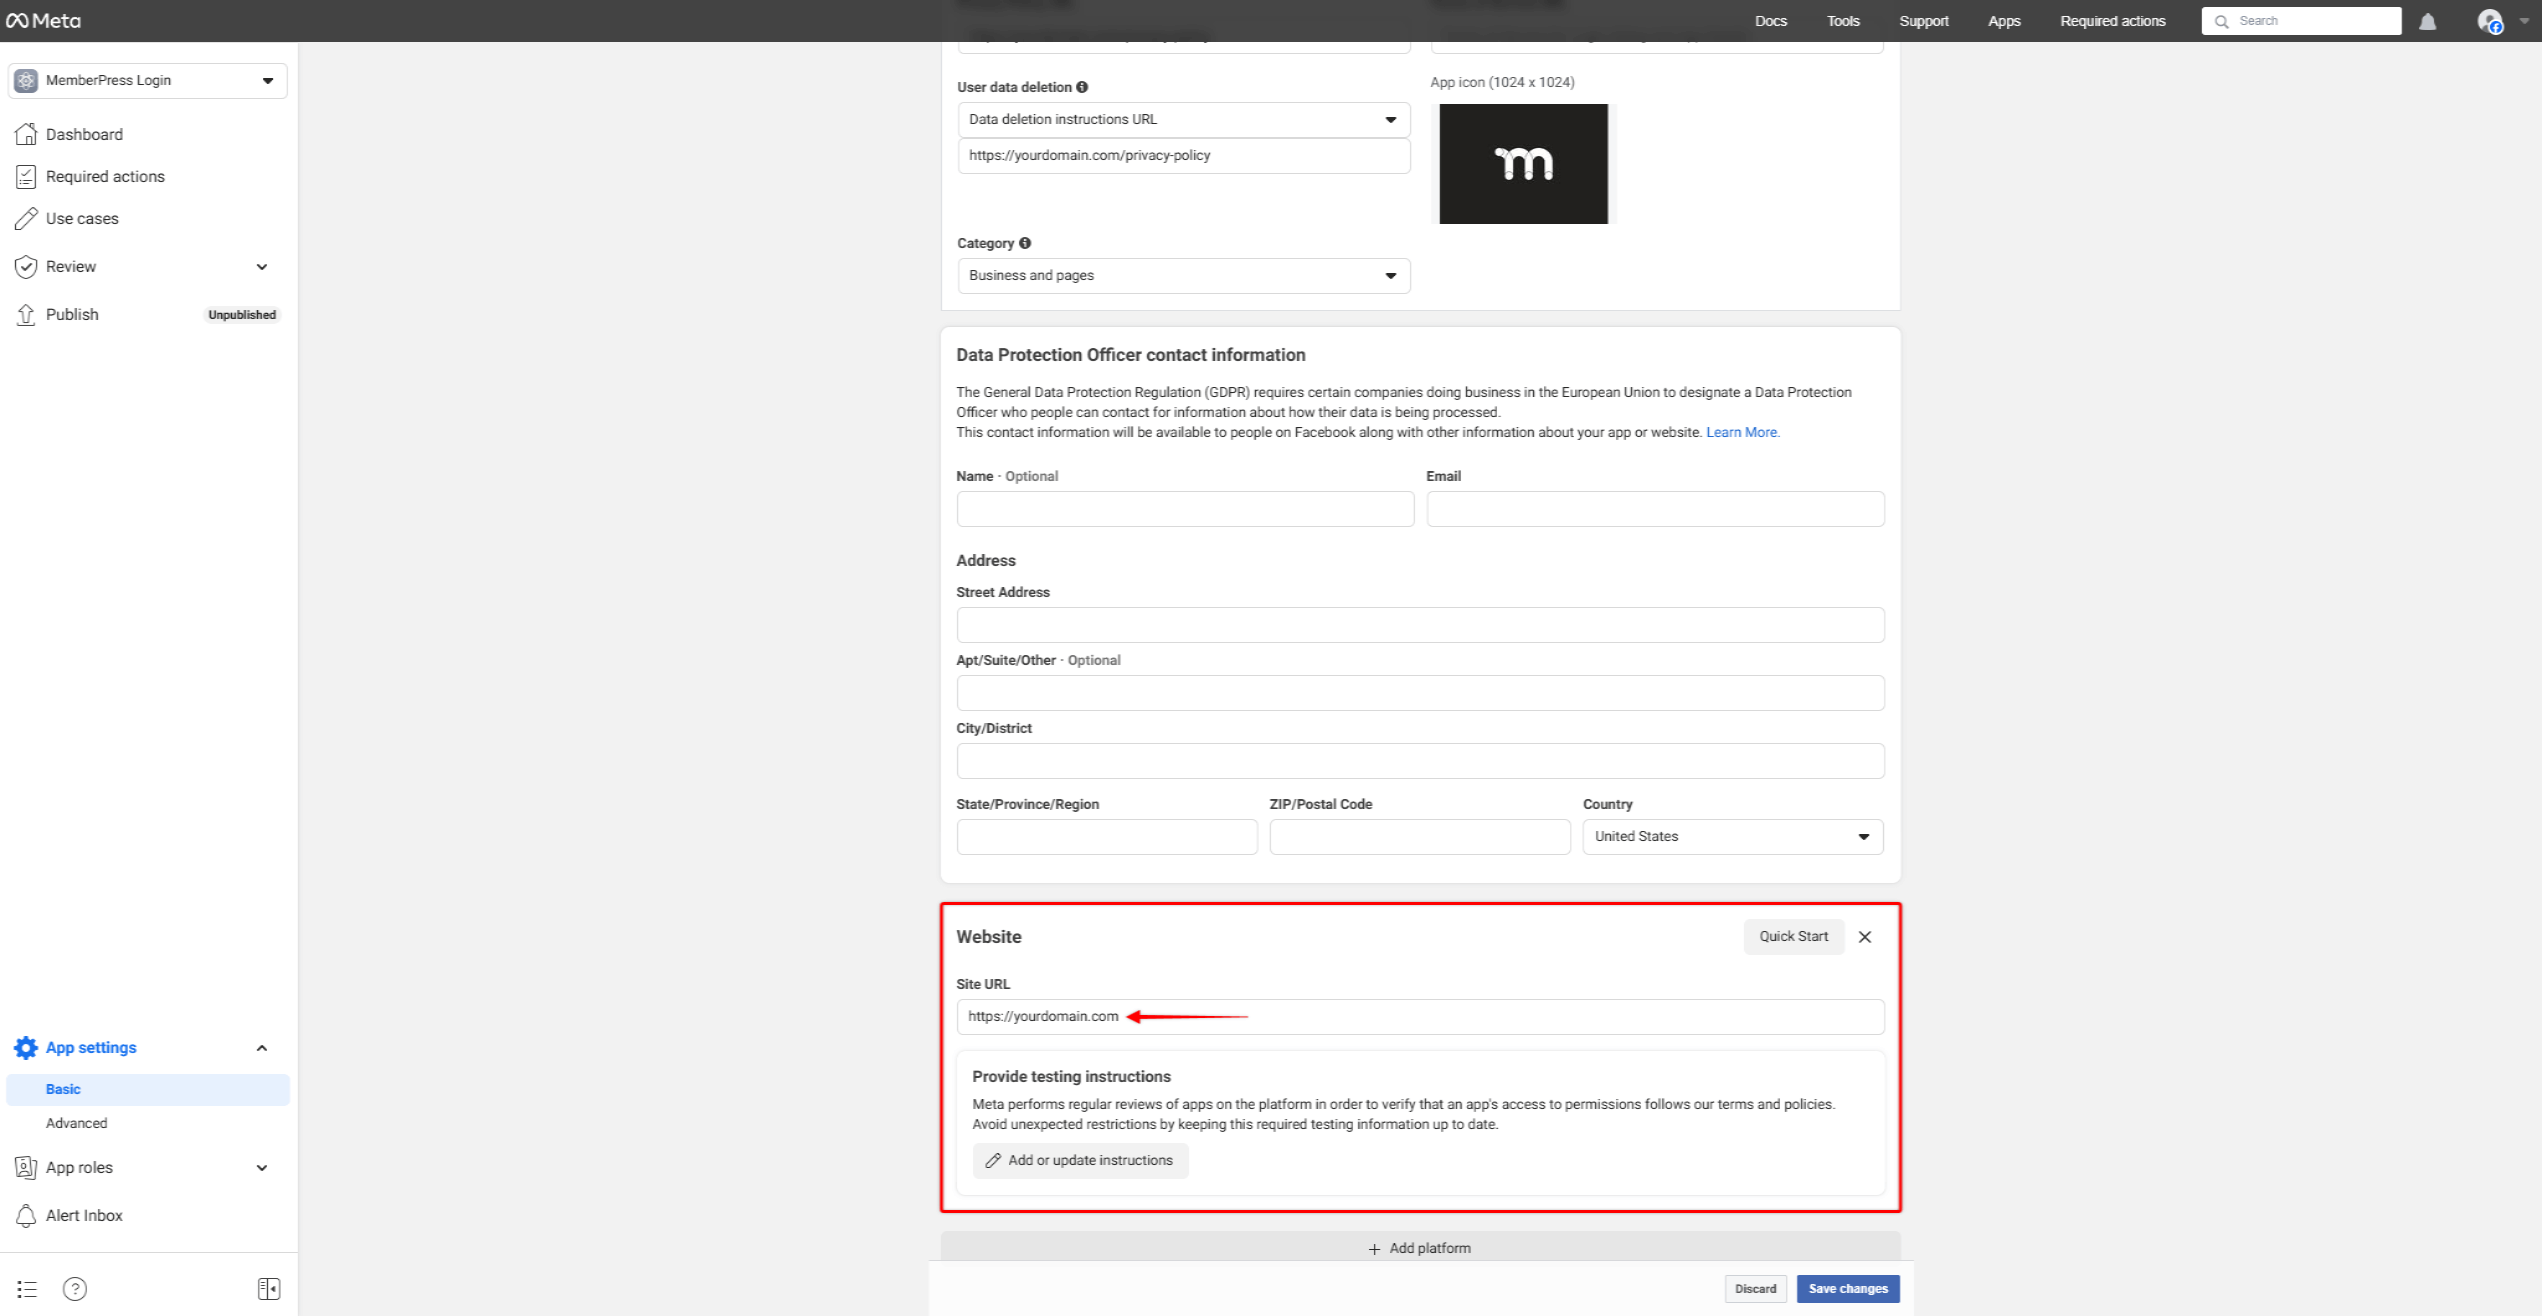
- Press the Save changes button at the bottom of the page to apply these settings.
Now, you can access your App credentials anytime by navigating again to the Basic settings page (App settings > Basic).
Your App credentials, the App ID and the App secret, are located at the top of the page. To display the App secret, click the Show button.
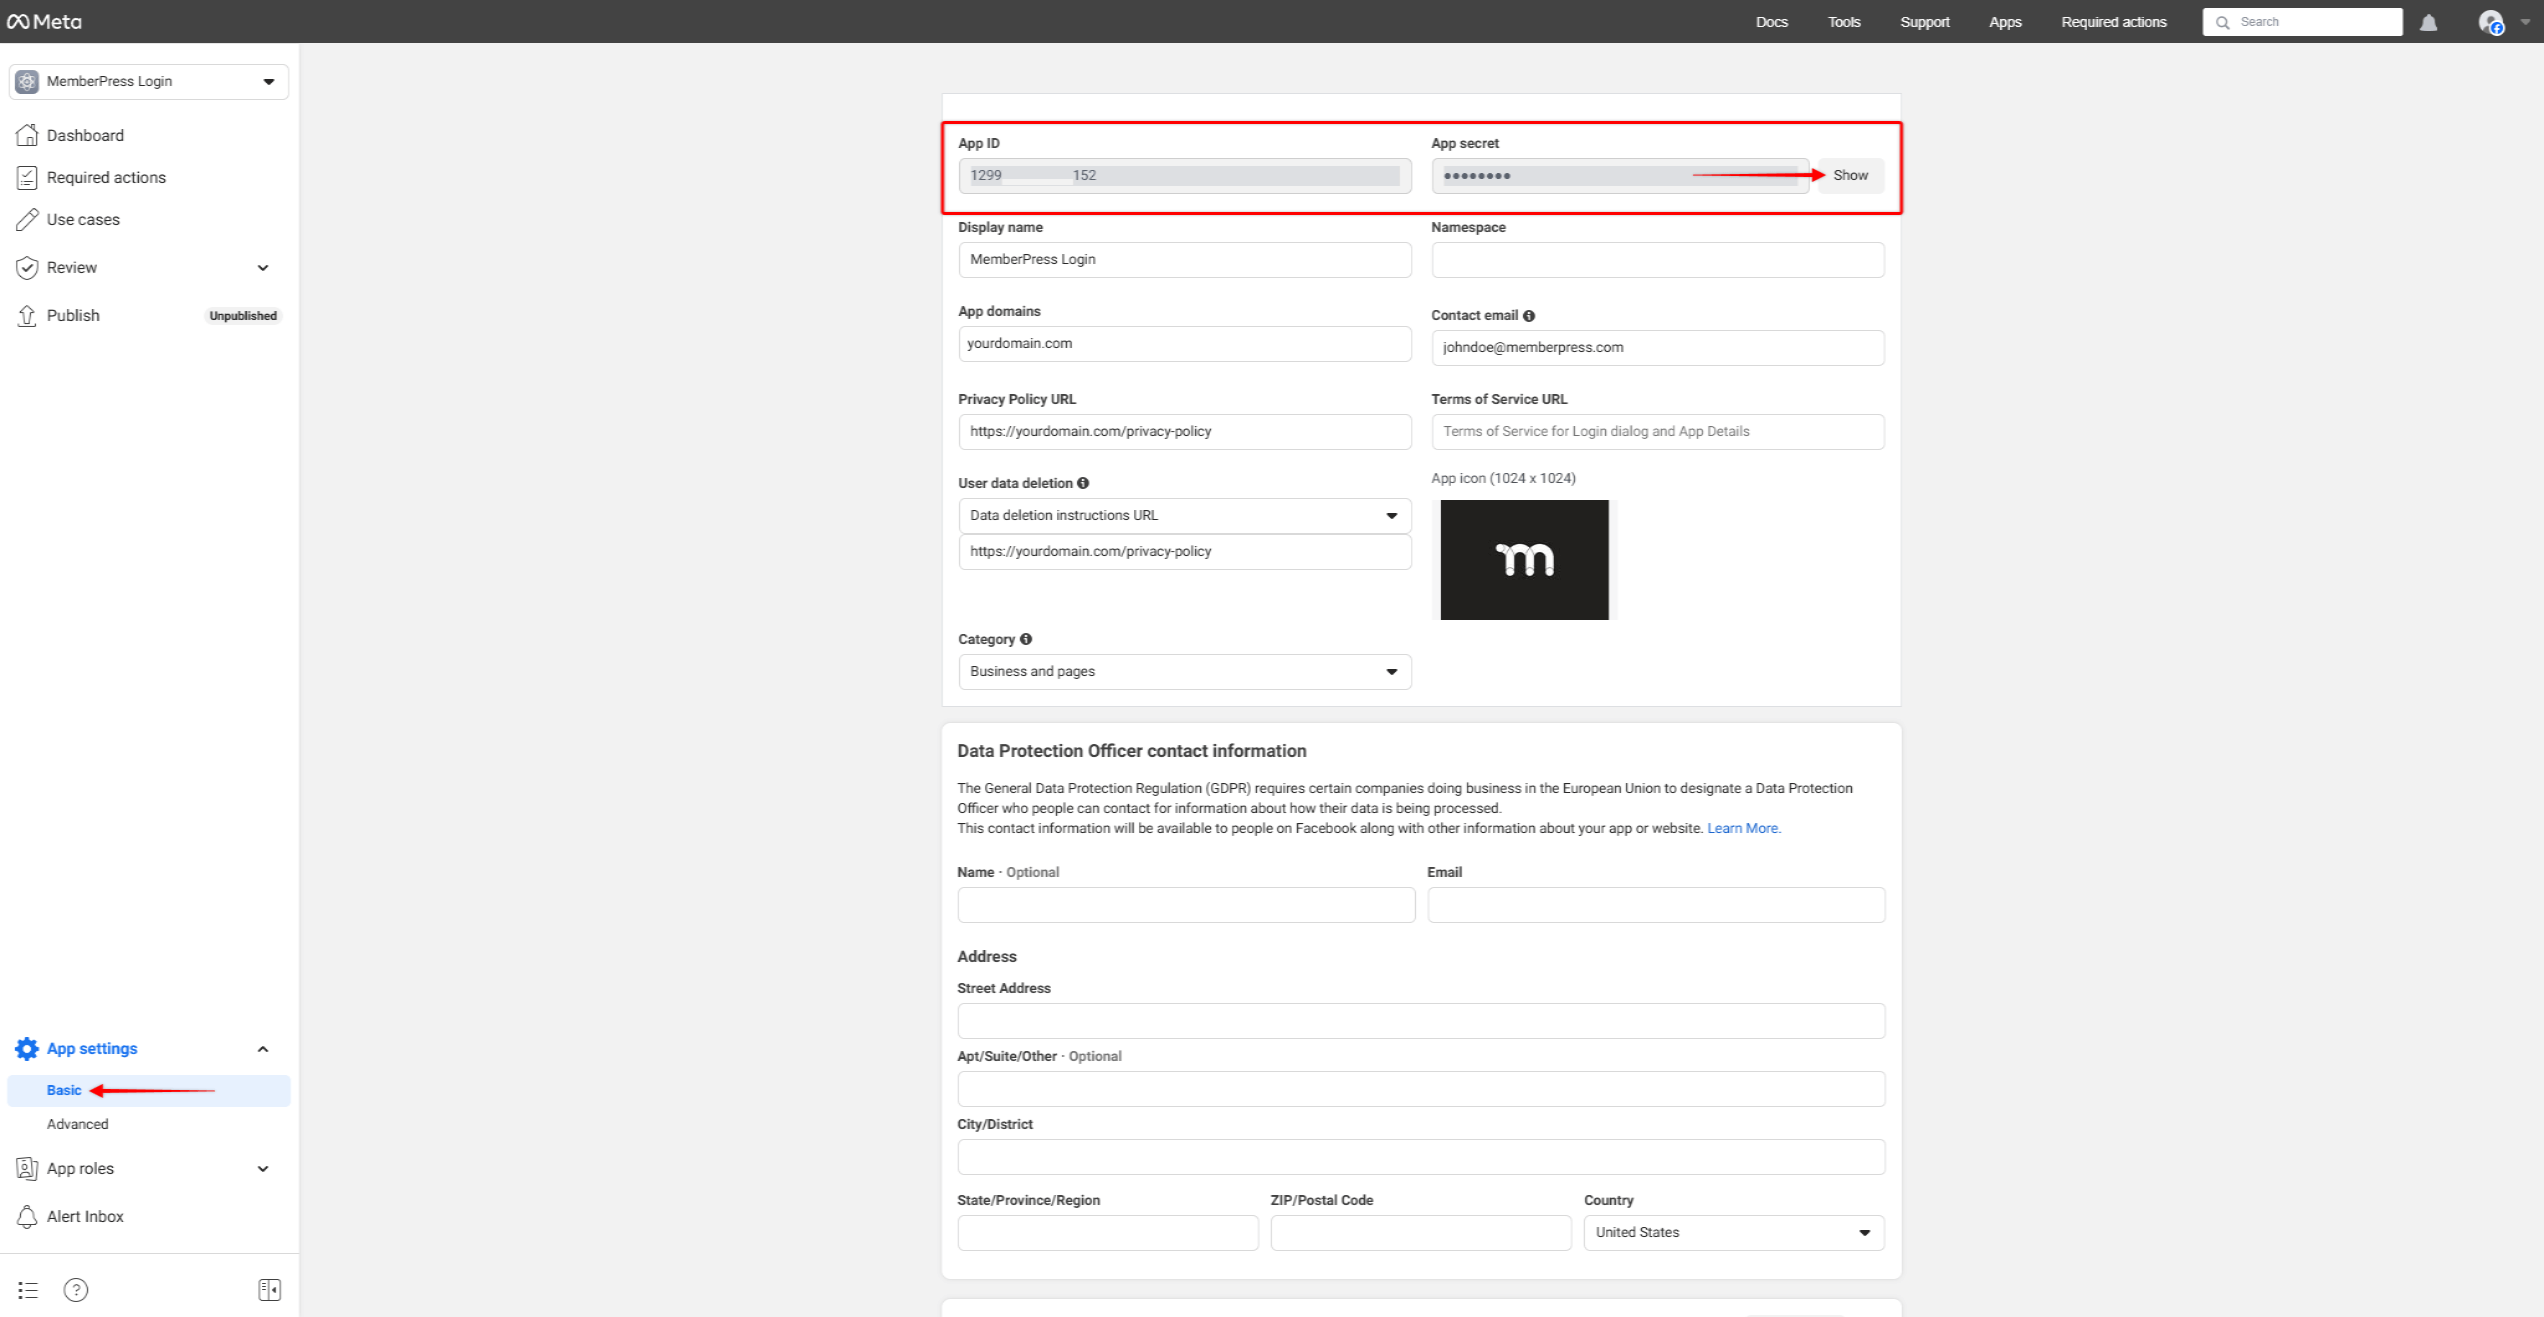
You’ll need to add these credentials to MemberPress to connect it with your Facebook App.
Publishing Facebook App
Currently, your new Facebook App is in Development Mode and only has Standard Access (public_profile and email permissions). This means that you can log in with the App using only your account.
You will need to enable Advanced Access and publish the App to allow your members to log in using your Facebook App. This will require you to complete the Business verification.
To initiate the business verification, follow these steps:
- On the app's Dashboard, expand the Review option on the left-hand sidebar.
- Click the Verification option.
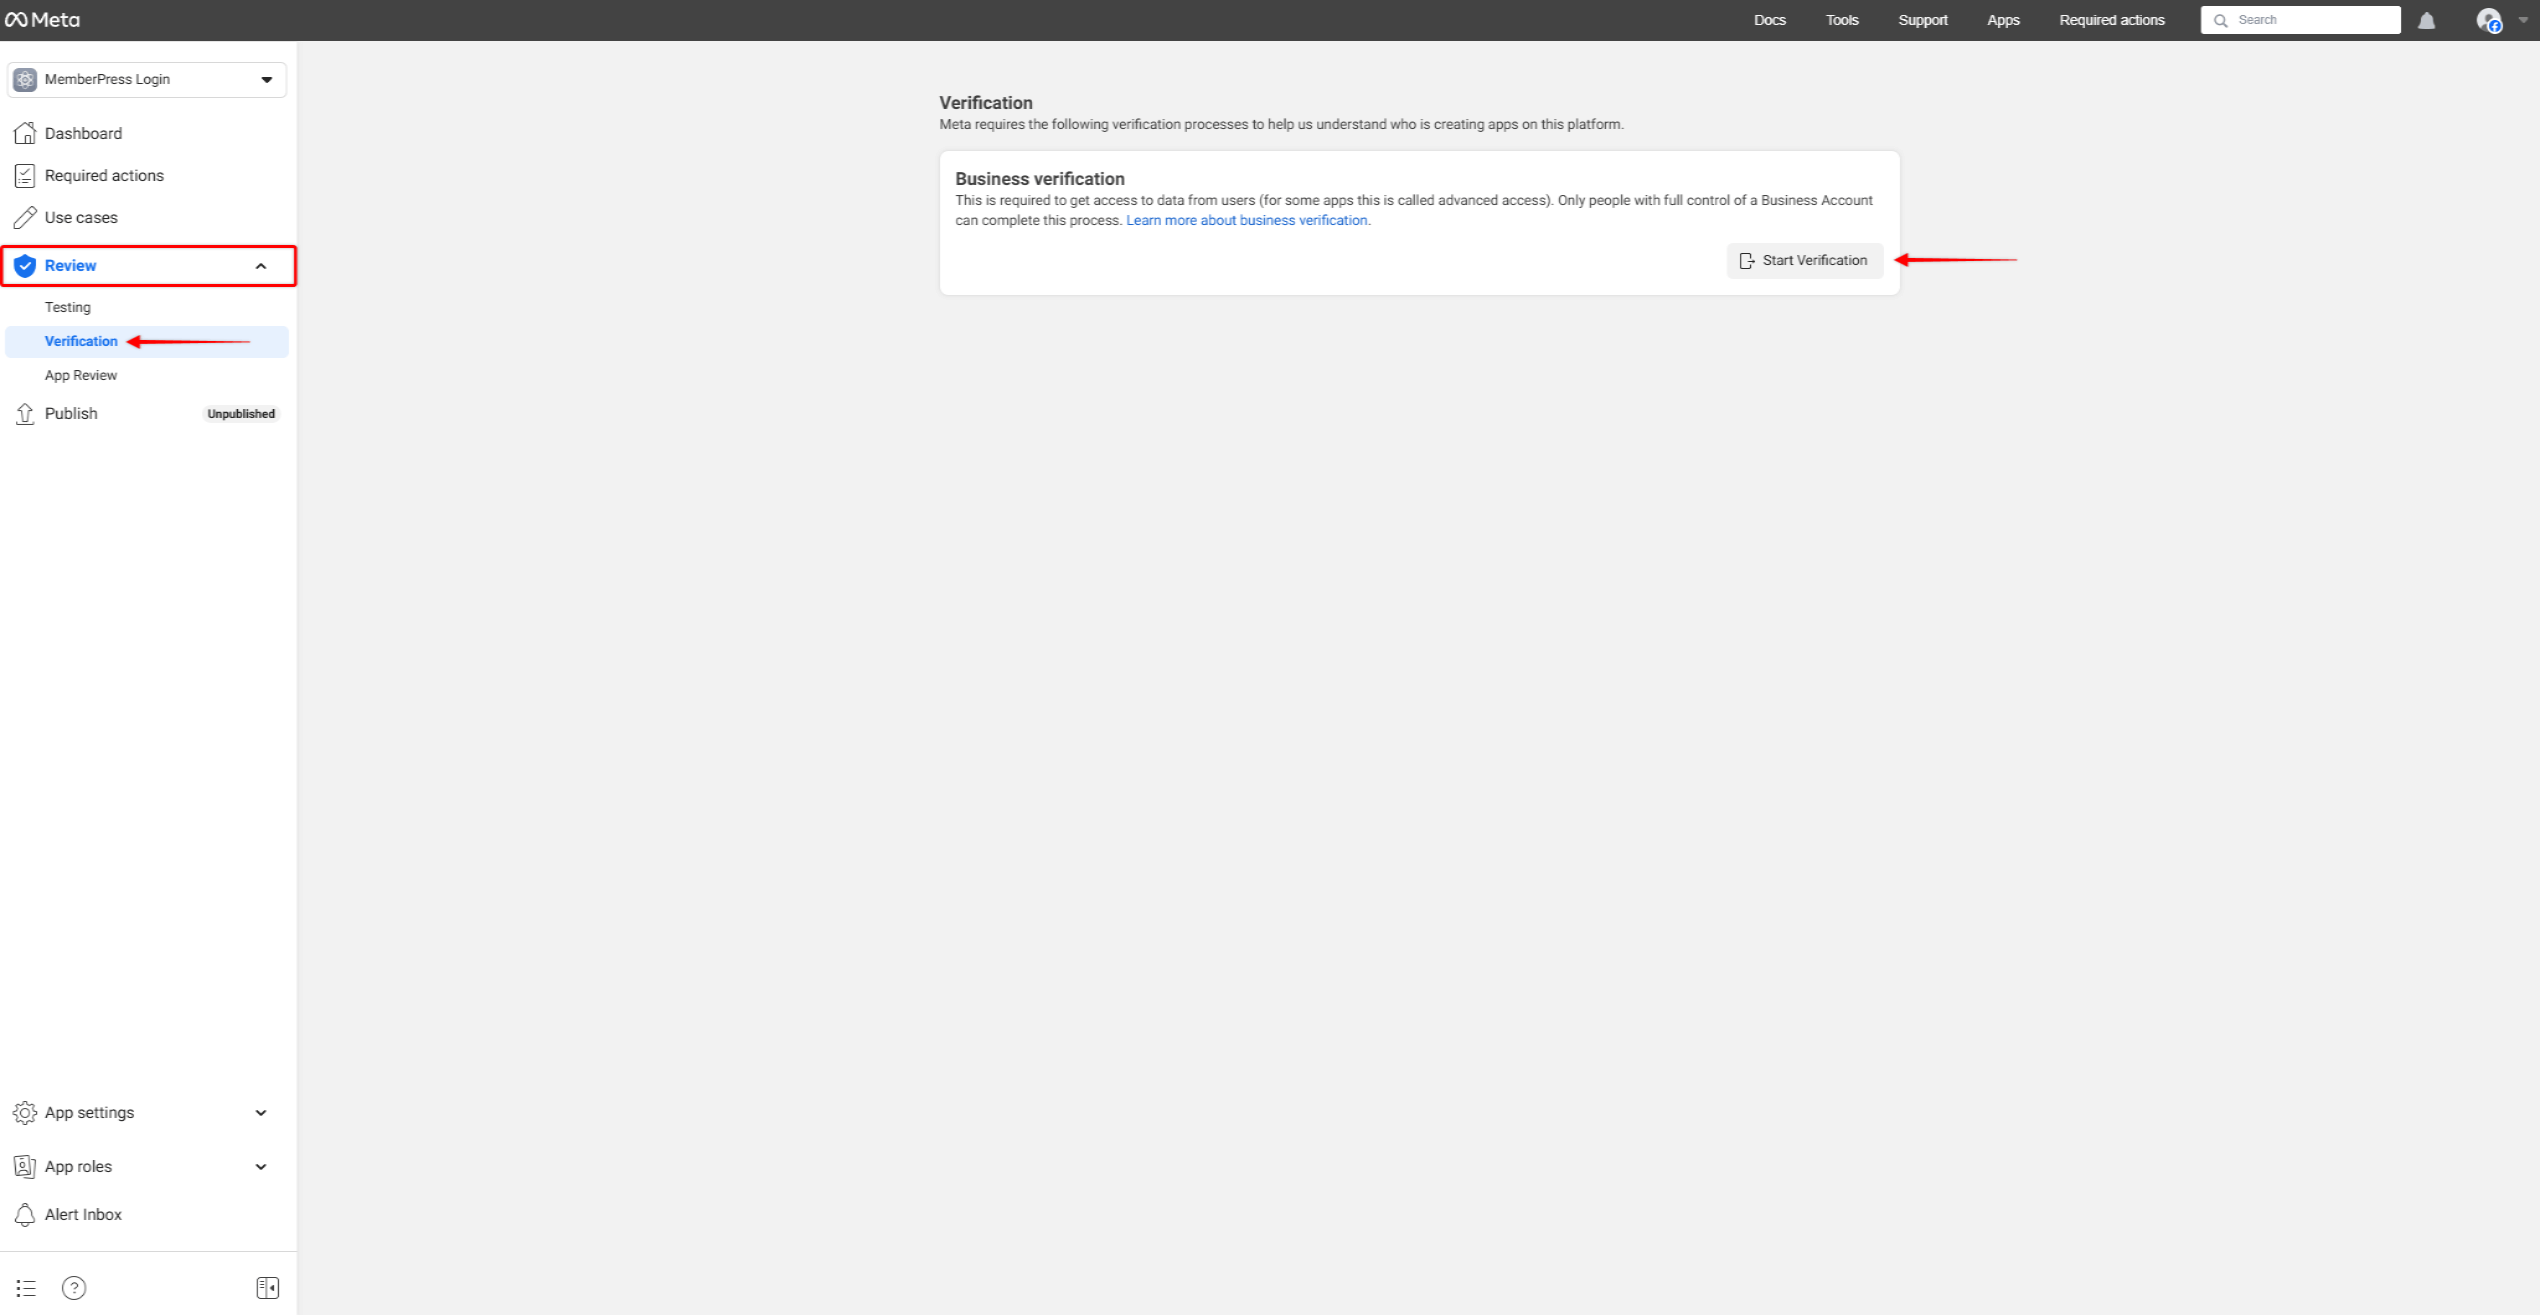
- On the Verification page, click the Start Verification button.
Once your Business verification is completed, you can publish the App.
To do this, click the Publish option on the left-hand sidebar and click the Publish button at the bottom right corner.
Connecting the Facebook App To MemberPress Social Login
Before connecting your Facebook App to MemberPress, you must activate and set up the Social Login add-on on your website.
Once the MemberPress Social Login add-on is set, you can connect your Facebook App with MemberPress:
- Navigate to Dashboard > MemberPress > Social Login.
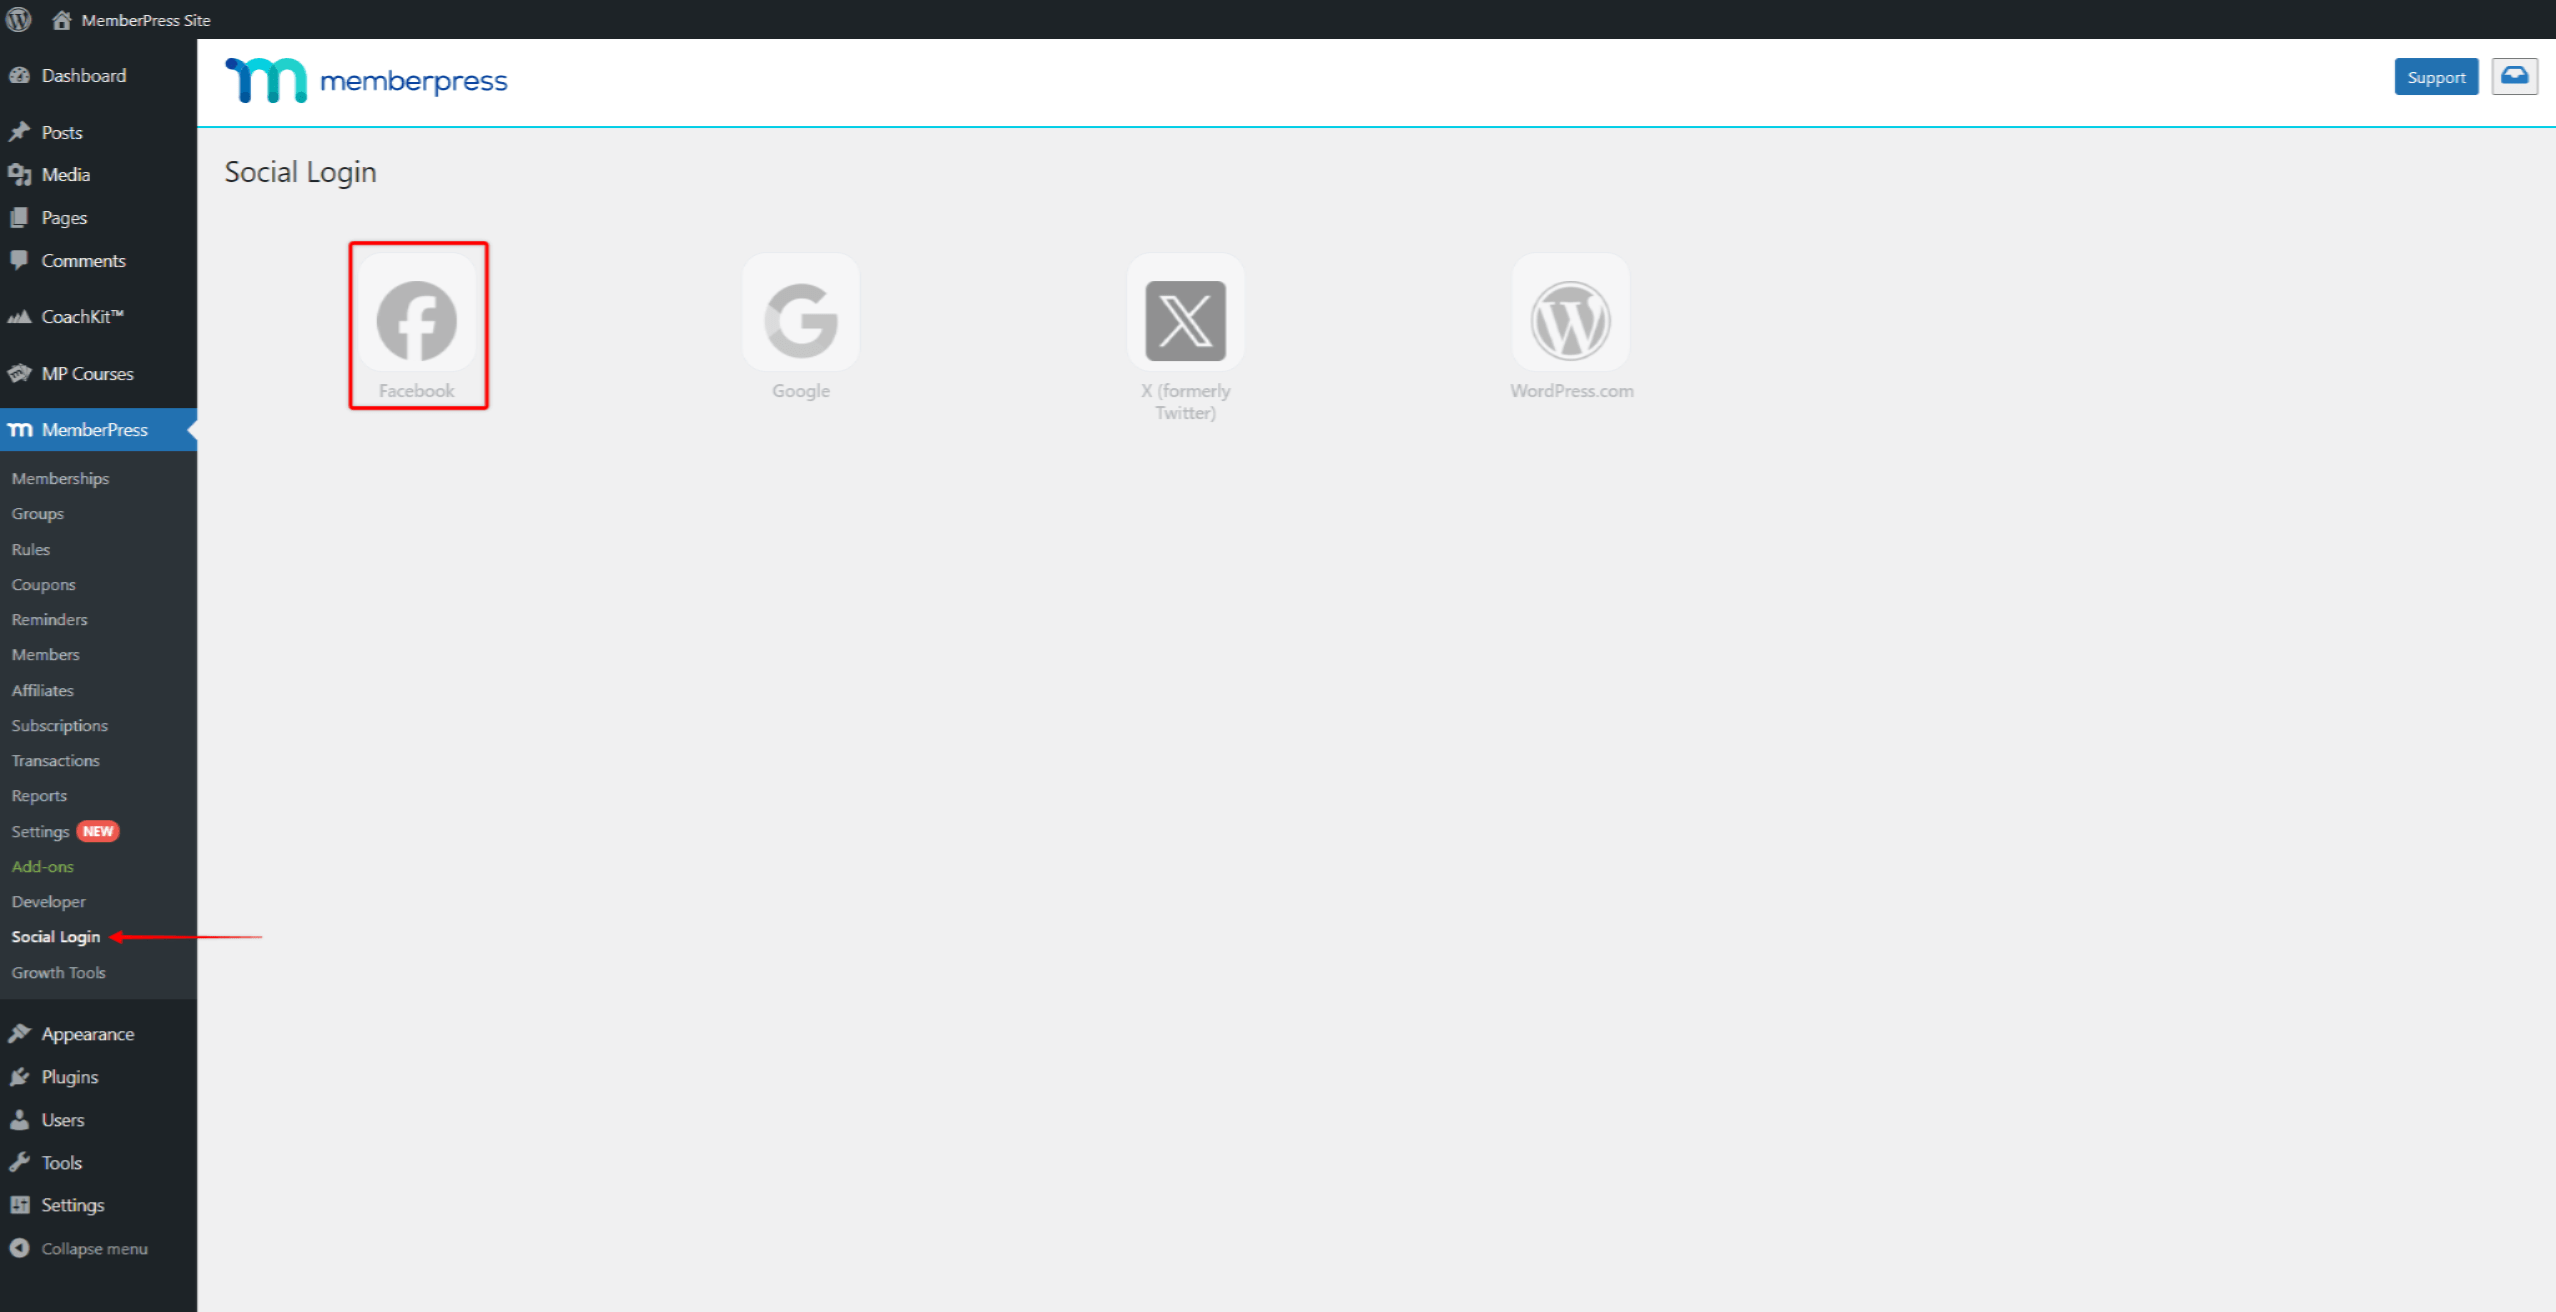
- Click on the Facebook option.
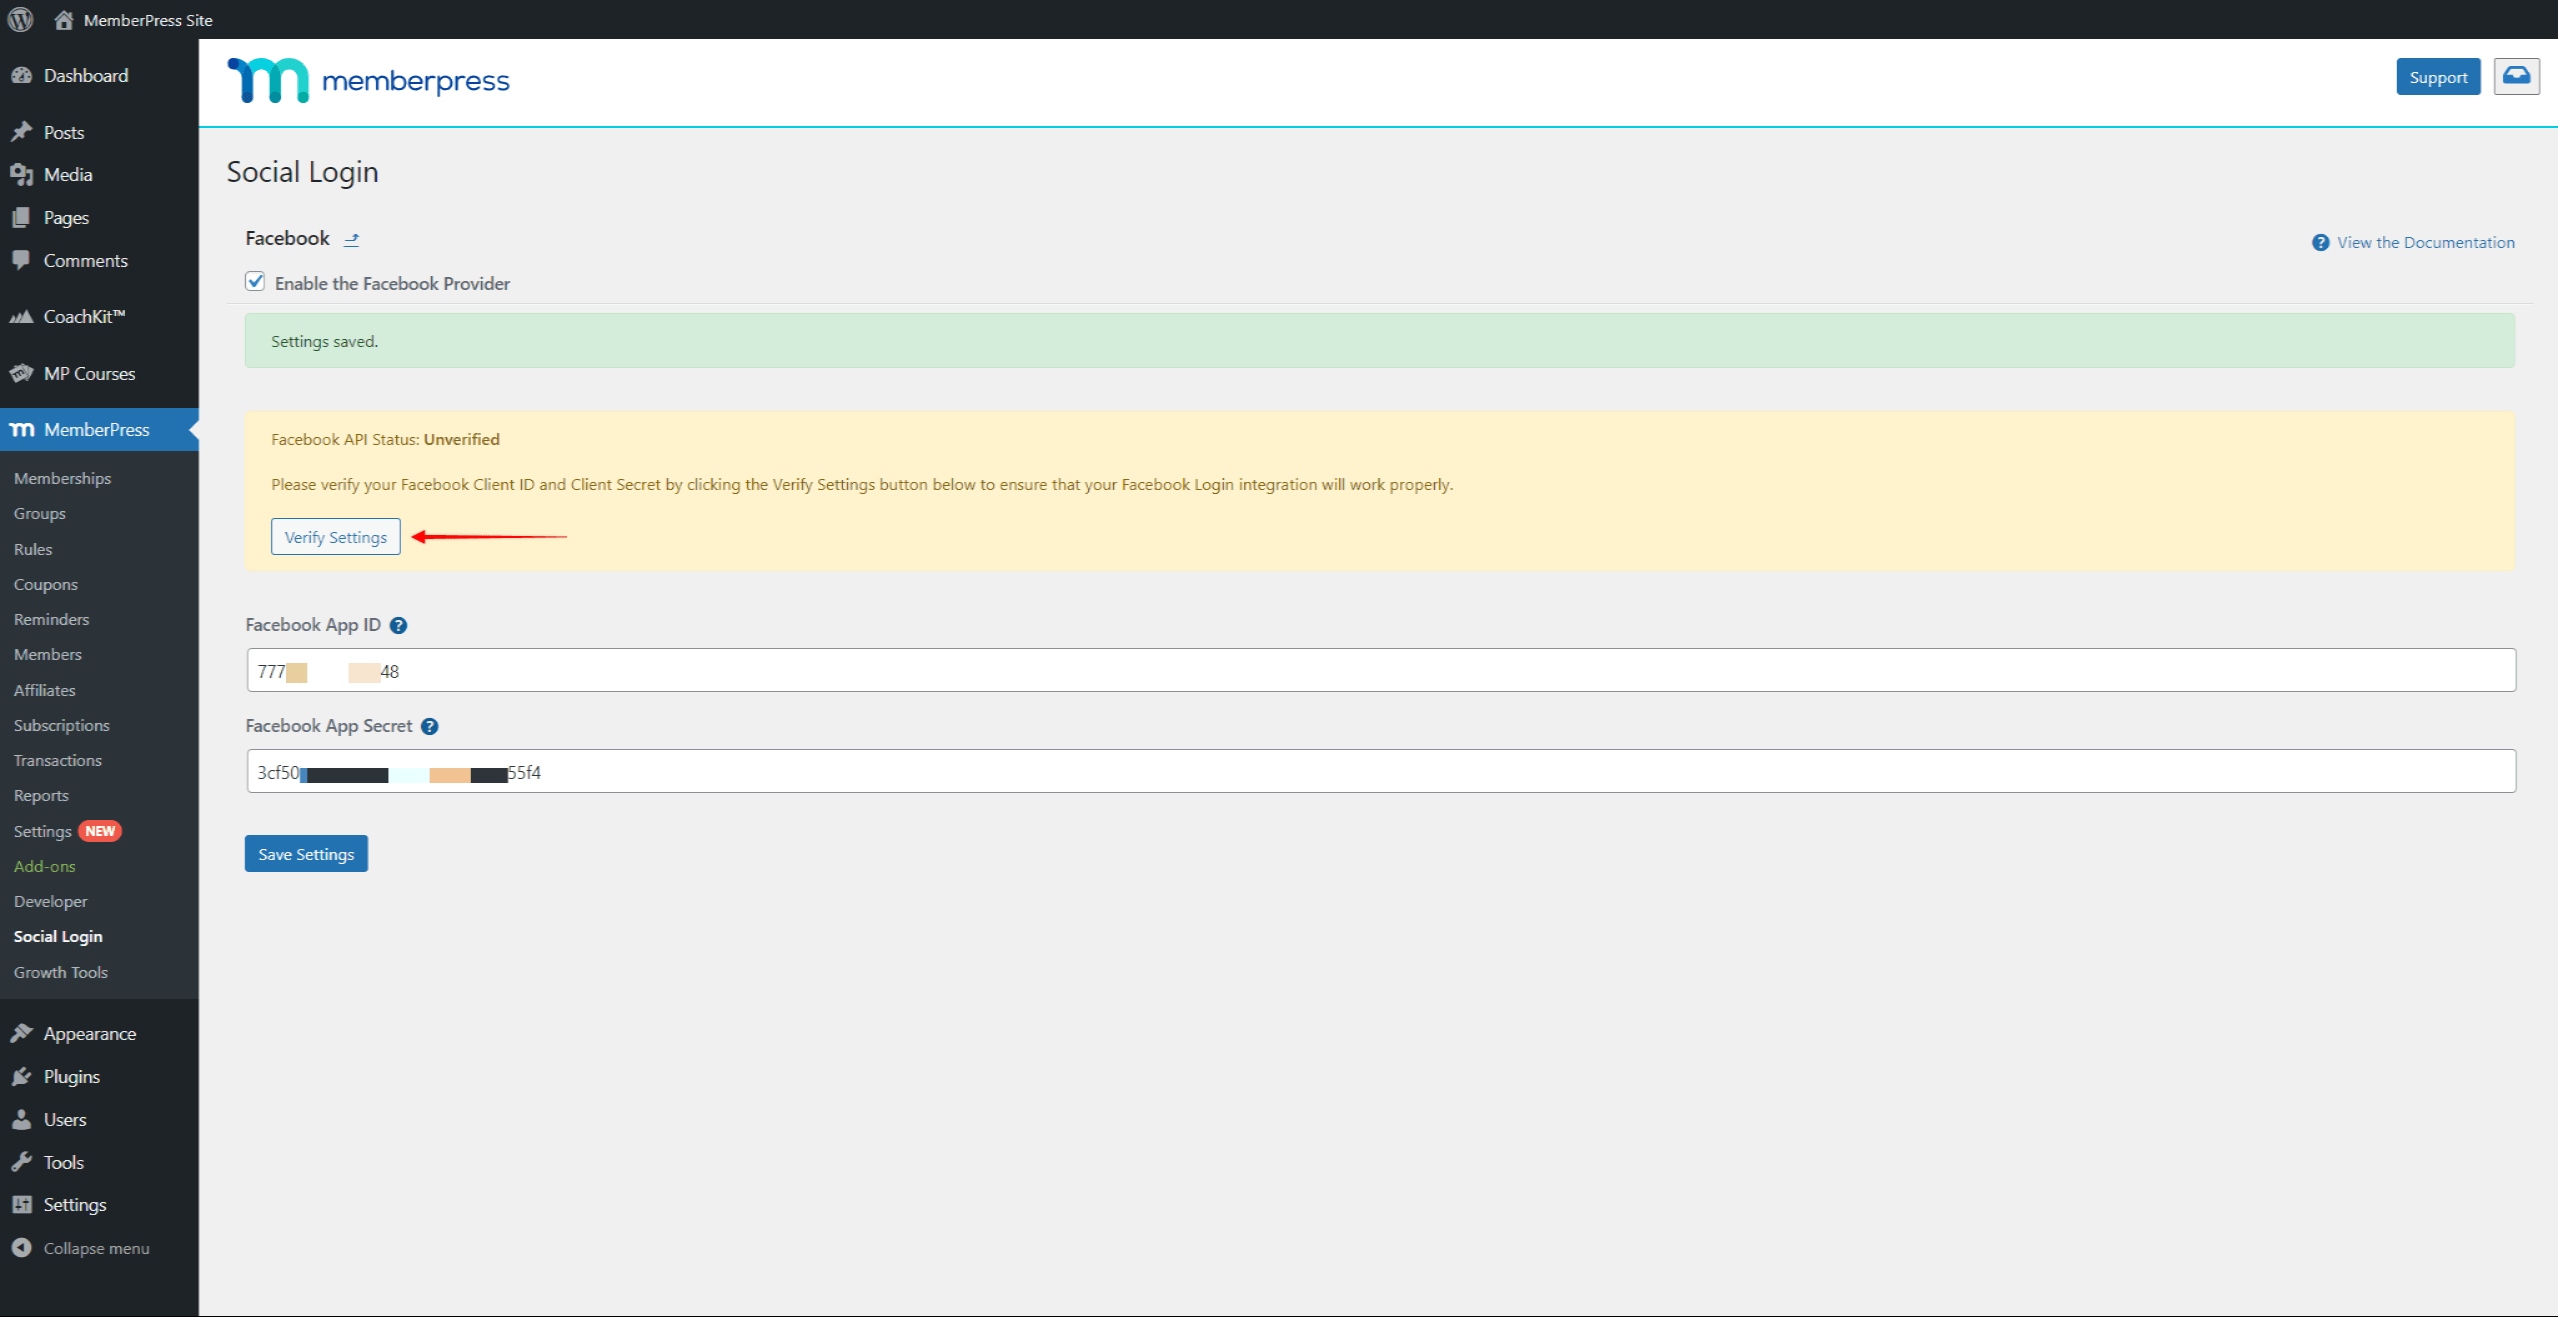
- Check the Enable the Facebook Provider option, and add the App ID and App Secret you previously saved.
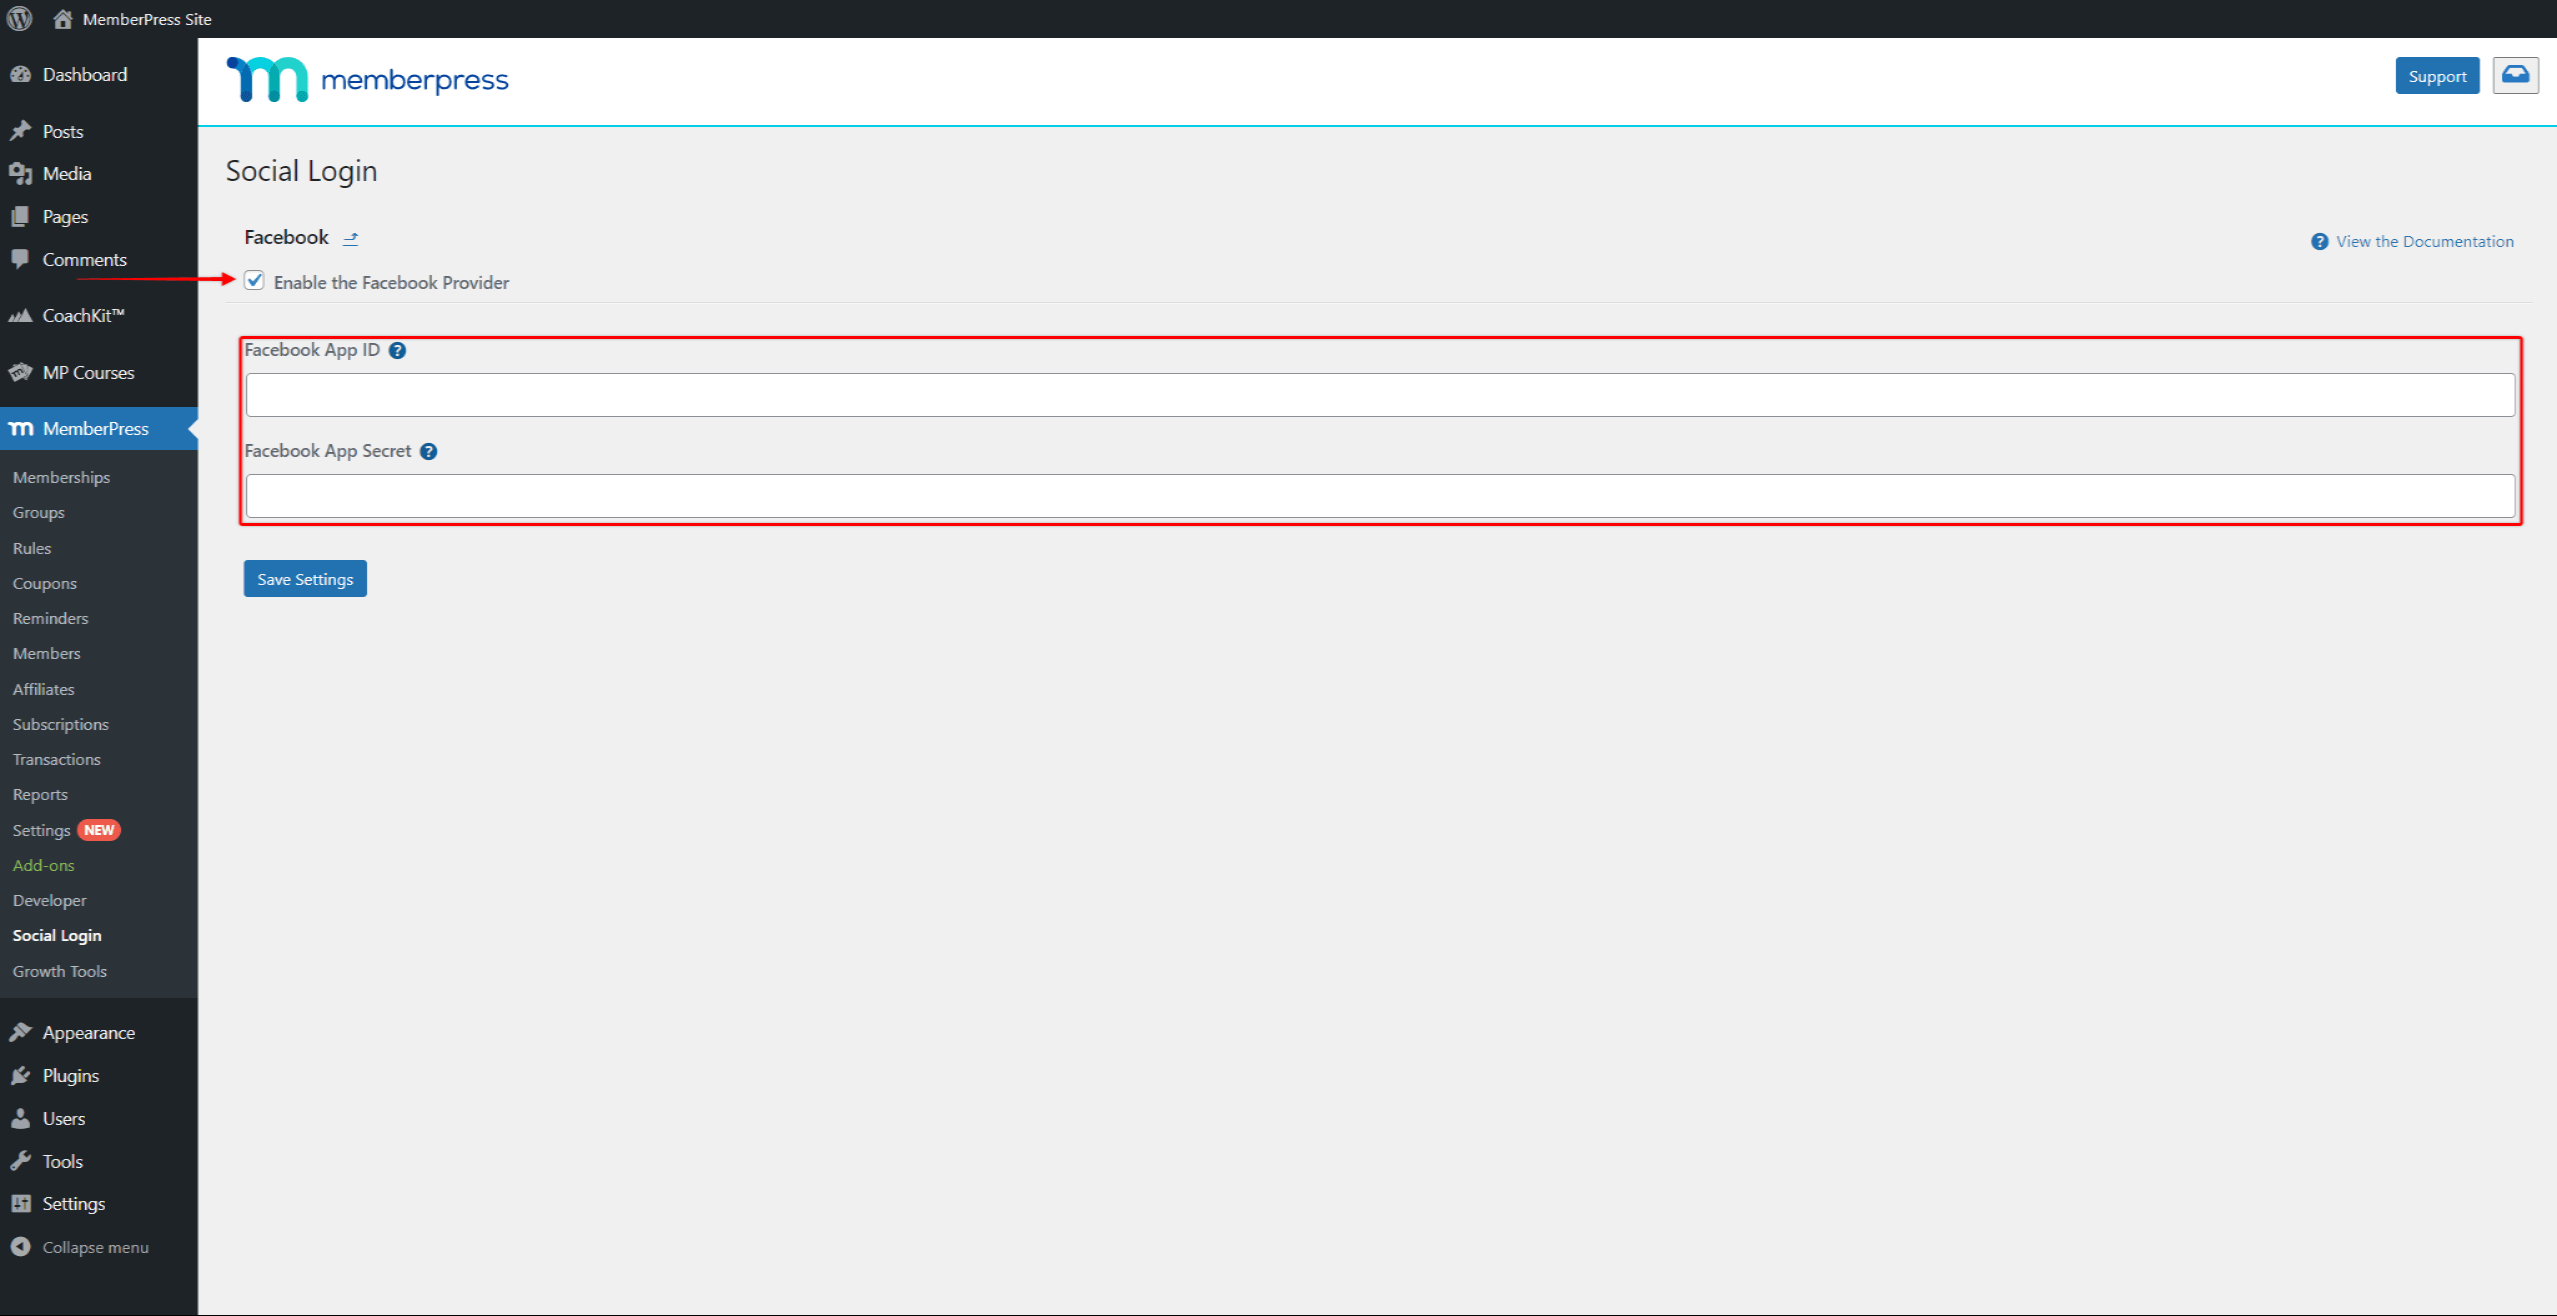
- Click on the Save Settings button to save the credentials.
- Next, you will see a new banner to verify your Facebook credentials. Click on the Verify Settings button. This will take you to the Facebook login page.
- Log in to your Facebook account (the one you used to create the Facebook app).
- After a successful login, you will be returned to the provider settings page on your website's backend. Now, you should see the banner with the “Facebook API Status: Verified” text.
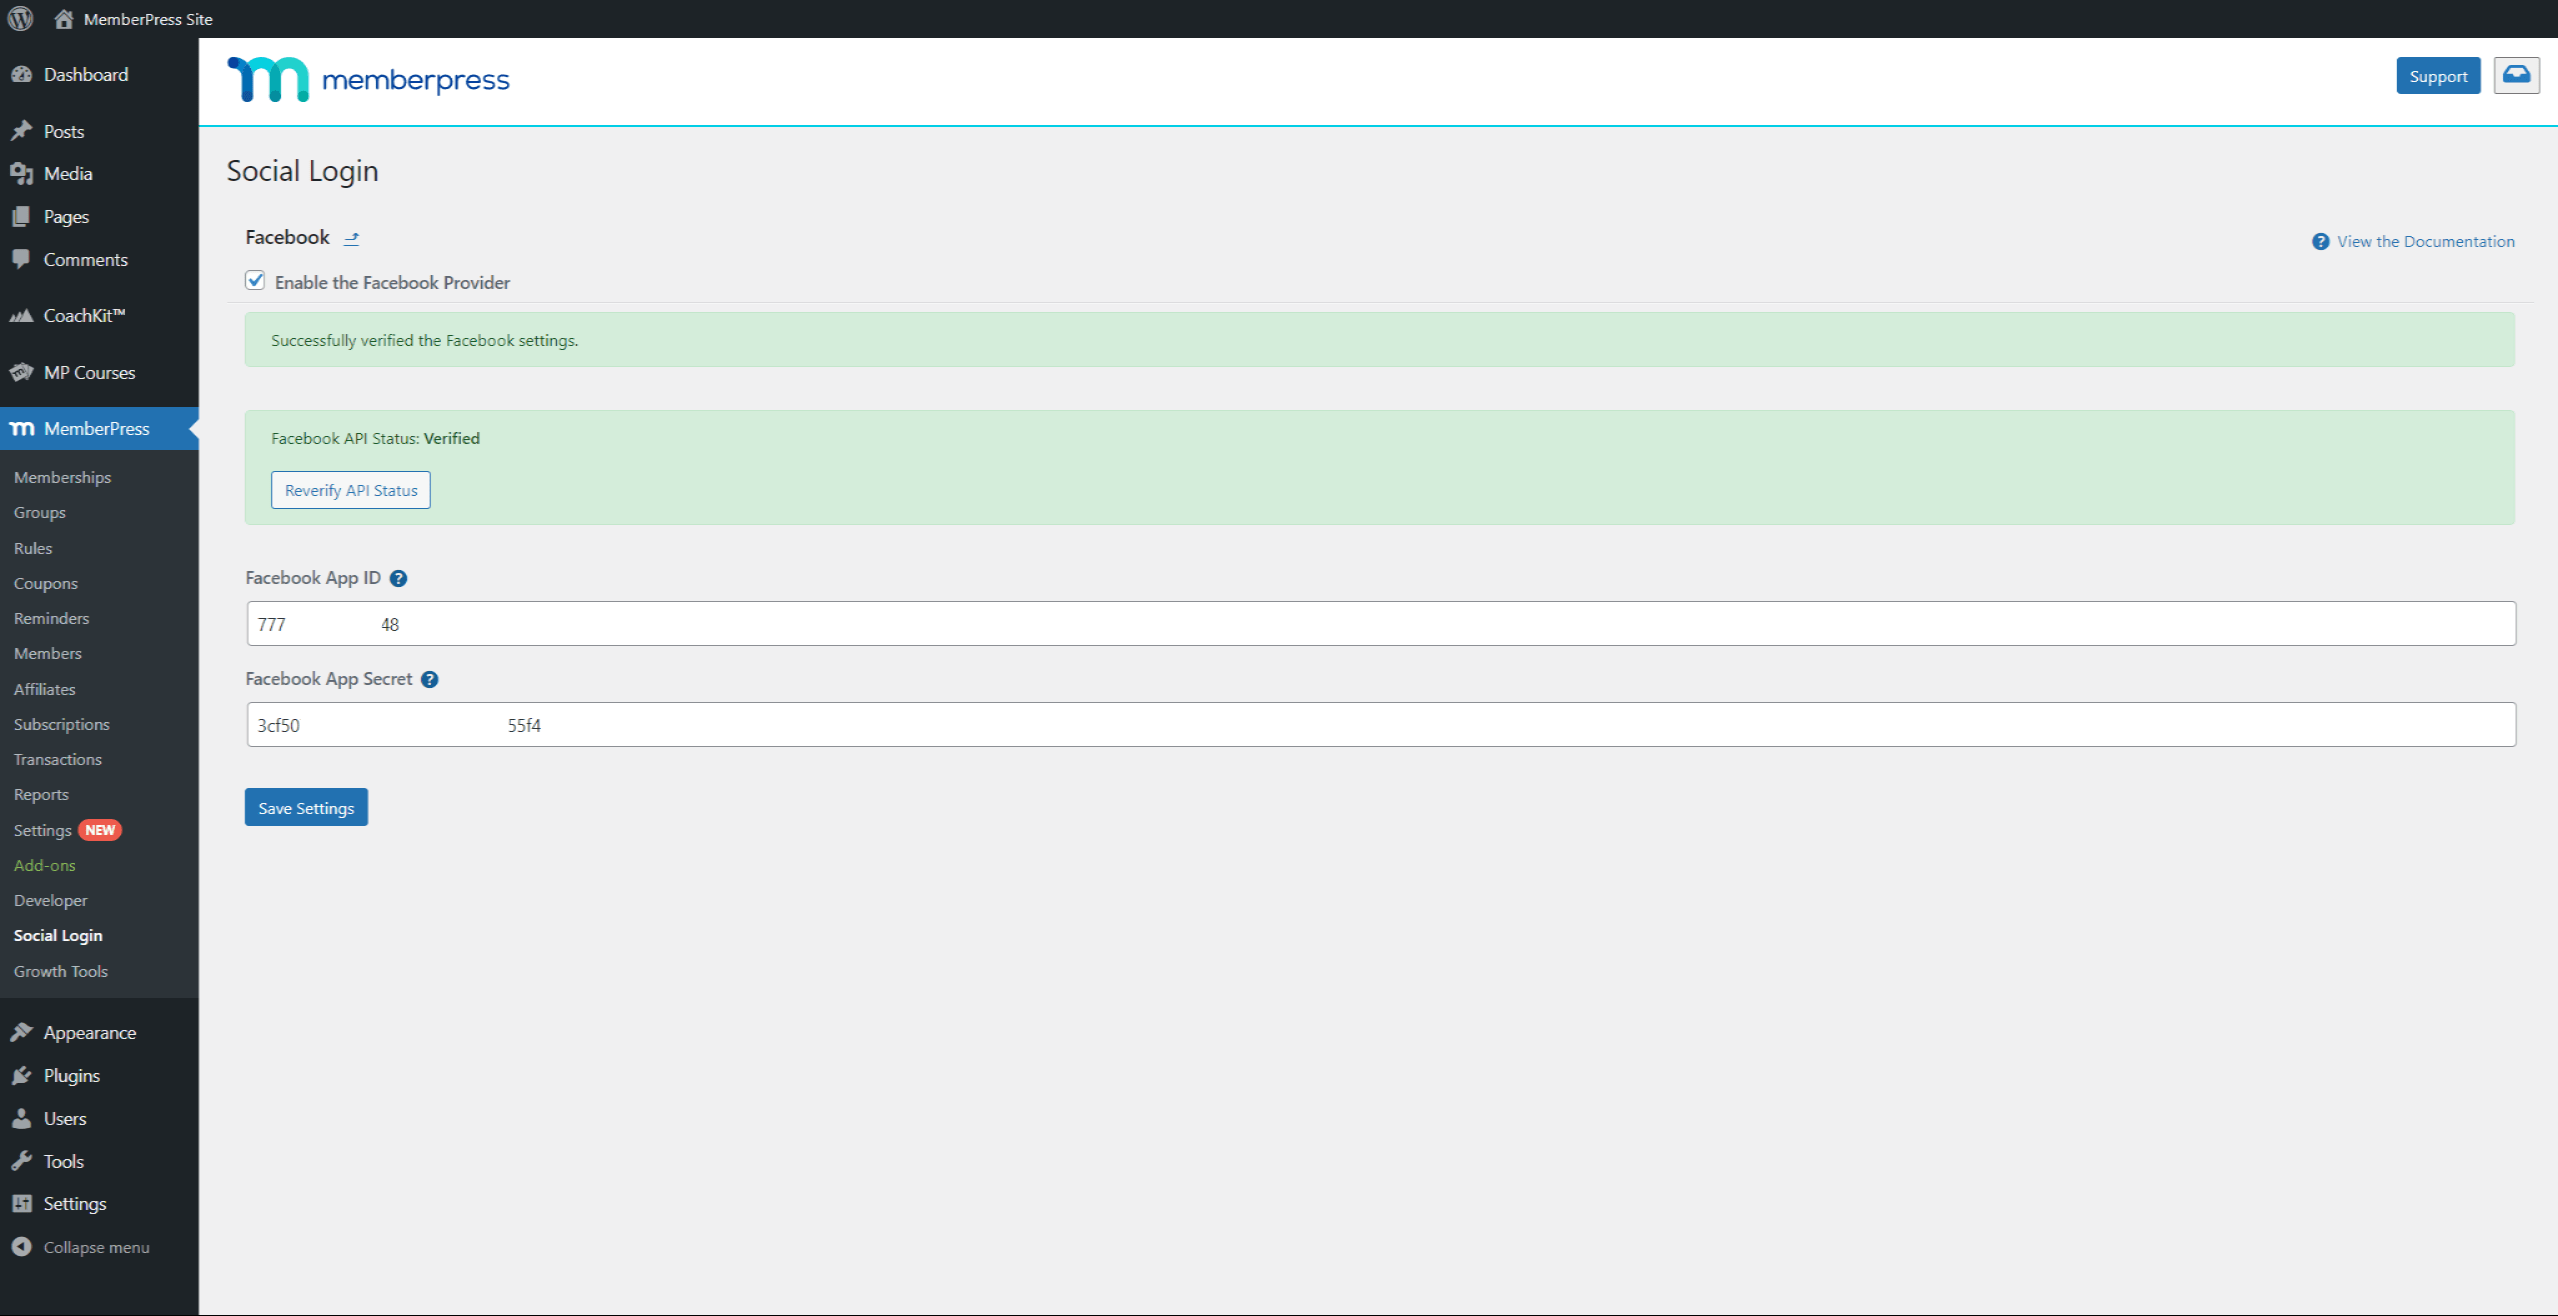
This means your Facebook App is connected to the MemberPress Social Login add-on and working correctly.


