Membership-based websites are primarily built to provide access to specific content based on the membership a user is subscribed to. Once you have created memberships and your membership structure with MemberPress, you should protect content based on membership levels. You can group and protect your content only for your members by adding the membership-based rules in MemberPress.
This document explains how to use MemberPress rules to provide content access to different membership levels on your website. It also explains how to protect various types of content and create the best user experience.
Why Should You Protect Content On Your Website?
By default, when you add content to your website, it is publicly available to everyone. This includes all your posts, pages, courses, images, videos, and any other files you upload to your website.
Depending on your business model, membership structure, and sales strategy, some of this content should be reserved for your members. To limit access to any piece of your content, you will need to protect it using MemberPress Rules.
This will create or increase the value of your memberships or provide security by enabling access only to your members.
To illustrate, you could run an online learning platform with courses for different levels of learning. Here, you would create a membership for each level of learning. Then, you can protect courses by limiting access to each level to a required membership. This way, as your students progress, they need to register for additional memberships to access the higher-level courses.
Or, let’s say you’re running an organization with different authorization levels. You can limit each group’s content access by assigning them different memberships and protecting content accordingly. As a result, you can disseminate your content without worrying about it being accessed by unauthorized members.
Using MemberPress Rules
MemberPress Rules protect your content by checking if a user fulfills the conditions set to access the specific content. You can set a rule condition to:
- Membership – a user must have an active subscription to the membership set as a condition to access the protected content;
- Member – the protected content can be accessed only by a specific member set within the rule conditions;
- Role – only users with the specific user role can access the protected content;
- Capability – Only users with a specific capability can access the protected content.
You can add multiple conditions to each rule.
Further, you can apply MemberPress rules to:
- A single piece of content;
- All content under a specific category;
- All content with a specific tag;
- A specific type of content (e.g., courses, posts, pages, files, etc.);
- Custom URIs;
- Parts of the content (e.g., a paragraph within the post, widgets, etc.).
When you create a rule, the content protected will no longer be publicly available.
In addition, for each rule, you can specify what should happen when an unauthorized user tries accessing that content. Hence, under the Unauthorised Access section, you can specify the following:
- Apply the PayWall – this will allow unauthorized users to access the protected content a specified number of times (free views). After that, the specific user will lose access to any additional protected content;
- Display an excerpt;
- Show the unauthorized message and login form;
- Redirect the unauthorized user to a specific page.
How To Protect Content With MemberPress
As mentioned, you can protect a part of the content, a single piece, or grouped content.
To protect a part of the content, you would need to use the MemberPress partial rules. You can apply a partial rule to your content by using the More Tag or partial content codes. In addition, with the Gutenberg editor, you can protect any block with block-level protection or the Protected Content Block.
However, you must use the appropriate rule type to protect a single piece or grouped content. MemberPress rule types are specific to the content you wish to protect.
To illustrate, to protect a single page, you should follow these guidelines:
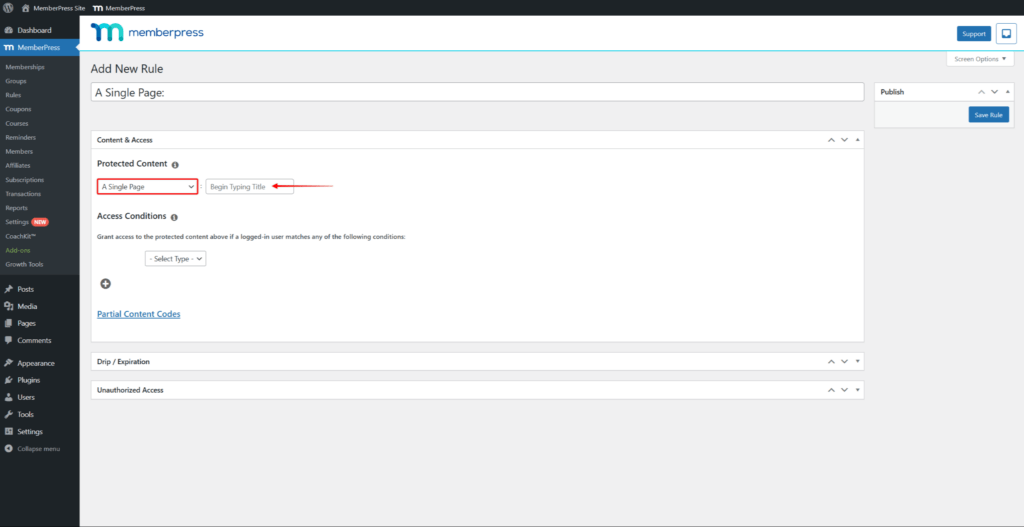
- Navigate to Dashboard > MemberPress > Rules, and click the Add New Rule button. This will open the form for creating new rules.
- Under the Protected Content section, click on the dropdown to select the rule type. In this example, the rule type you should use is A Single Page type.

- Next, type in the page name to search pages, and select the page you wish to protect.
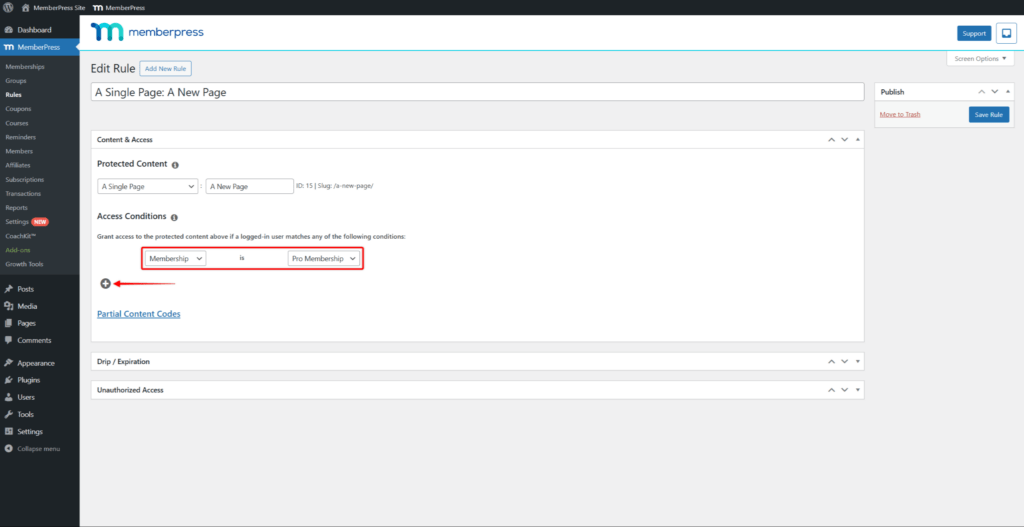
- Now, add an access condition by clicking the + icon.

- Set the condition to Membership, and select which membership should be required to access this page.
- Click Save Rule to apply the new rule to the page.
You can apply this process to other types of content. For example, if you wish to protect a MemberPress course, use the A Single Course rule type. Similarly, you would use the Posts Tagged rule type to protect a group of posts with the same tag.


