For MemberPress to assign membership subscriptions, you must have registered WordPress users on your website. When your clients register using MemberPress registration forms, their user profiles will be created automatically. On the other hand, if you're migrating your website, you need to import your users.
This document will explain how to import your users using the MemberPress Importer add-on.
When to Import Users
The following are the only reasons why you should import a Users CSV file:
- To import users who are not already on your WordPress site. MemberPress does not create its own “users” apart from the WordPress Users section, so if the user can be found in your WordPress Dashboard > Users section, that is enough to associate a subscription to them.
- To update user info for users currently existing on your site. Just make sure that you enter the username and email correctly to properly update a user profile.
Users CSV Format
Click here for a sample Users CSV file. With that as your basic template, please see below for the required and optional columns of your CSV file.
Required Columns:
- username — This is the User's user_login / username field. This is just a small text.
- email — This is the User's user_email. This must be a properly formatted email, or the record could fail.
Optional Columns:
- role — This is the WordPress user role. Can be ‘subscriber', ‘contributor', ‘author', ‘editor', ‘administrator', or any custom role you created on your site. Defaults to ‘subscriber,' even if you don't specify otherwise with this column header.
- password — Allows you to set the users password. This password will be encrypted/hashed and stored in the database.
- first_name — First name of the user. It can be any small string of text. Defaults to blank.
- last_name — Last name of the user. It can be any small string of text. Defaults to blank.
- website — Website for the user. It can be any small string of text. Defaults to blank.
- address1 or mepr-address-one — Address Line 1 for the user. It can be any small string of text. Defaults to blank.
- address2 or mepr-address-two — Address Line 2 for the user. It can be any small string of text. Defaults to blank.
- city or mepr-address-city — City for the user. It can be any small string of text. Defaults to blank.
- state or mepr-address-state — State for the user. It can be any small string of text. Defaults to blank.
- zip or mepr-address-zip — Zip Code for the user. It can be any valid zip code string. Defaults to blank.
- country or mepr-address-country — Country for the user. It needs to be the ISO Alpha 2 country code. Defaults to blank.
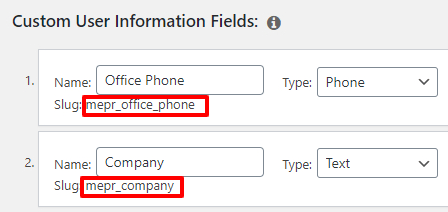
- *usermeta* — Use the slugs for the Custom User Information Fields you created in the options here to import custom meta for your members. Please see our additional instructions for these field types below.
- registered — The registration date of the user. Must be in the format “YYYY-MM-DD hh:mm:ss”. Defaults to the current time during import.
Again, if the username of the user already exists in the system, then the user record will be updated with the information in the CSV file associated with the username.
Additional Instructions for Importing Custom User Information Fields
When Importing Custom User Information Fields, please make a note of the following important items:
- You can ONLY use the slug that is shown for that field as the column header. Here is an example:

- Each unique field you are importing data for needs to be its own unique column header. For example, if you are importing mepr_office_phone and mepr_home_phone, you would have two separate columns for them.
The entry, or value, goes underneath each column header.
Formatting Custom User Information Fields by Field Type
Please use the following guide to know how to format your custom user information fields import:
| Custom Field Type | Import Format |
| Text | Short string of text with or without spaces (no limit) |
| Properly formatted email, e.g., coolguy@gmail.com | |
| URL | Properly formatted URL, e.g.: https://www.google.com |
| Date | “YYYY-MM-DD hh:mm:ss”, e.g.: 2018-03-29 20:15:00 |
| Textarea | String of text with or without spaces (no limit) |
| Checkbox | ‘1' for checked or ‘0' for unchecked |
| Dropdown | The option value for the selected option (only supports one entry per user) |
| Multi-Select | The option values for the selected options, separated by commas with NO spaces |
| Radio Buttons | The option value for the selected option (only supports one entry per user) |
| Checkboxes | The option values for the selected options, separated by commas with NO spaces |
Uploading the File
To upload the file that you have created, simply follow these steps:
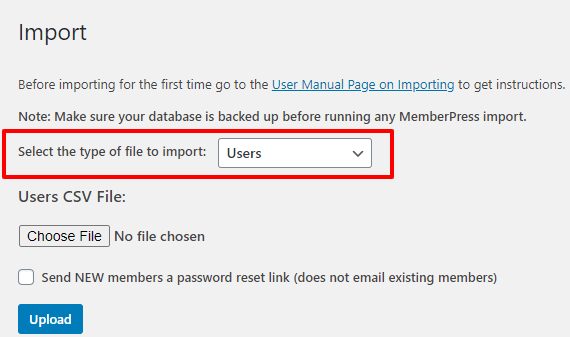
- Go to the MemberPress Plugin > Import. Once there, select Users from the type of file to import drop-down menu:

- Next, use the “Choose File” button to upload your file.
- If you are importing any new users to your site, click the option to send NEW members a password reset link. This is extremely important to check because MemberPress cannot send users their passwords through an automated email.
- Finally, click the upload button.
Importer Messages
After you import your file, the importer will show you a couple of different lines and boxes to let you know how your import went. Below these are outlined.
X Rows Successfully Imported – Here, the importer will tell you how many rows (in place of X) were successfully imported.
X Rows Failed to be Imported – Here, the importer will tell you how many rows (in place of X) failed to import.
X Total Rows Processed – Here, the importer will tell you how many total rows (in place of X) were processed.
Row Success Messages: – In this box, you will see any success messages related to your most recent import.
Row Errors: – In this box, you will see any errors related to any rows from your most recent import. The message should be detailed enough for you to be able to know what you need to fix, so your file works properly upon import.
CSV for failed rows … copy these, fix and reimport: – Here, you will be given the exact rows that need to be fixed. Make a note of them to fix the rows with the errors.


