Perhaps you already have a website with good traction, or you expect your visitors to increase soon. Either way, your next step may be to monetize that traffic. One of the easiest ways to make money from your site is to offer paid memberships. You might wonder how to convert your site to a membership model like this.
Fortunately, the MemberPress plugin makes it easy to convert your existing site to a membership model. You don’t even need technical expertise to do it. All this requires of you is valuable content for your members; MemberPress can handle the rest.
In this post, we’ll discuss why you might want to convert your site to the membership model. Then we’ll go through the four steps to get your site converted. Let’s get started!
Why Convert Your Site to a Membership Model
The subscription model has been around for nearly 400 years. But over the last 10 years, it’s seen an incredible 437% growth.

The subscription model’s variant, the membership model, is even more valuable because it adds belonging to a group to the equation.
By having paying members on your site, you can earn recurring passive income. This may even become your primary or secondary monetization strategy.
A successful membership site shows that others trust and respect you enough to pay for your work. That can give you authority and credibility in your niche.
Furthermore, the membership model encourages continued member engagement and a sense of community. That means you can promote your product to a pre-qualified audience that’s already invested in what you have to offer.
One great example of a membership site is Skillcrush, which uses the MemberPress plugin:
Fortunately, converting to a membership model is easy and affordable. But it does take time and patience.
Key Features Your Membership Site May Need
To support the membership model, your existing website may need at least a few features. At a minimum, those should include:
- A secure member signup form
- A way to safely accept payments
- A tool to restrict content behind a paywall
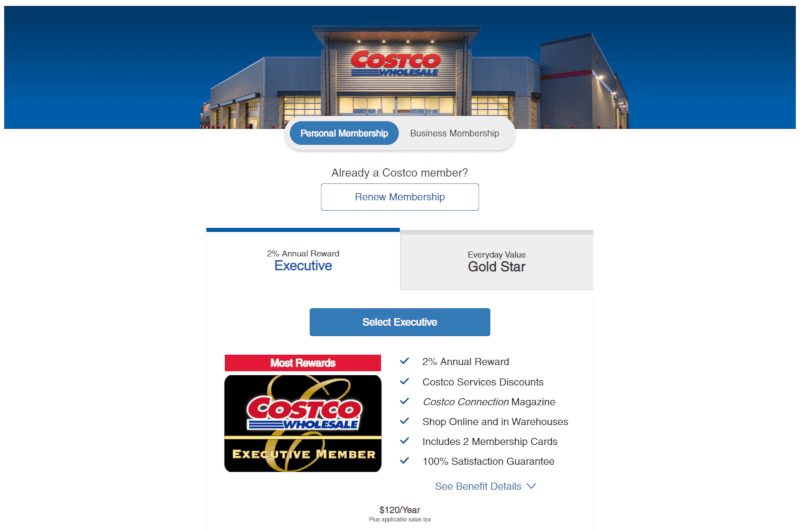
For an example of a good, full-featured membership site, take a look at Costco’s membership signup screen:
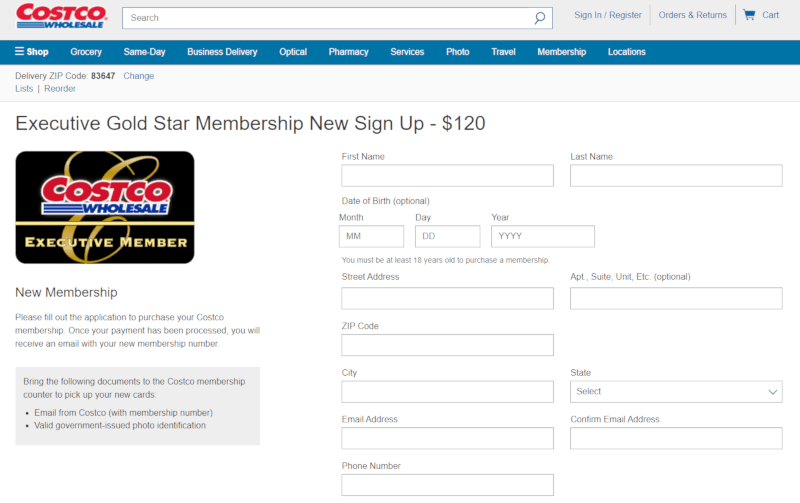
When you select a membership tier, the site offers you a signup form:
While Costco’s membership model doesn’t live exclusively online, the site does illustrate what a good start to the signup process could look like.
How to Convert Your Site to a Membership Model (In 4 Steps)
These steps below are meant to help you convert an existing WordPress site to a membership model. However, the process of starting a Membership site from scratch is very similar.
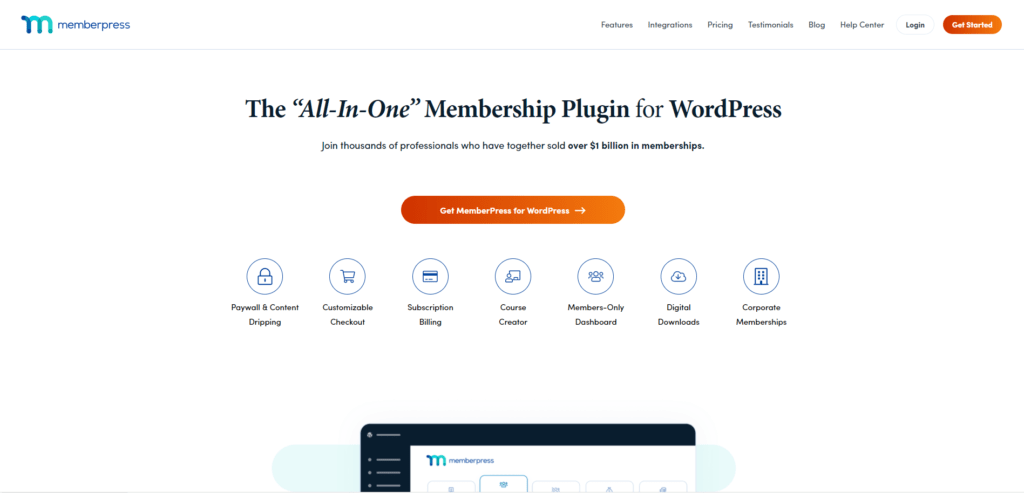
For the conversion, we’ll use our MemberPress plugin for WordPress, which has all the features you’ll need:
MemberPress is easy to use and enables you to start charging users instantly. It includes out-of-the-box integrations with many popular third-party services, such as Mailchimp and Stripe.
It also comes with a learning management system (LMS) you can use to build and sell online courses.
If you need inspiration for your own site, you may want to check out some MemberPress website examples.
1. Create High-Quality Members-Only Content
To encourage people to pay for your content, you’ll want to make sure your content adds real value to their lives. Furthermore, that value should be recurring. When people see no future benefits to what you’re offering, they’re unlikely to stay.
If you create your own content, you could hide the best of it behind a paywall, as many online publications do. Here’s a message from the Medium platform, for example:
However, not all great content has to be created by you. User-generated content (UGC) can be just as valuable. Your site could be a private community with active members who enjoy posting pictures and videos. You’ll often see this sort of content on platforms such as Facebook and Slack.
2. Configure the MemberPress Plugin
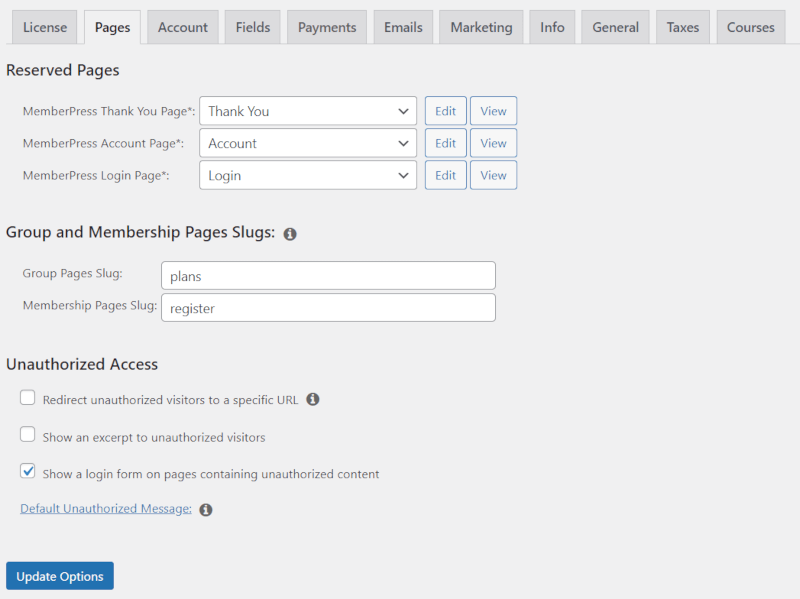
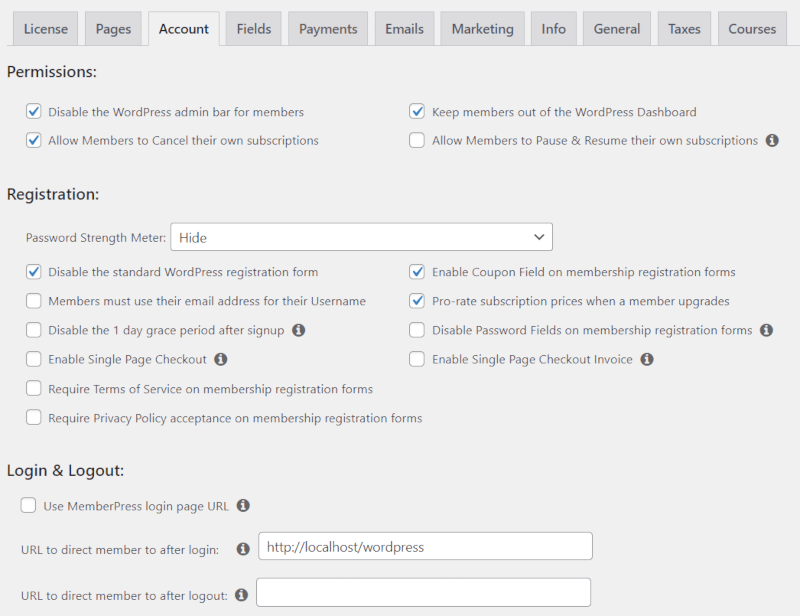
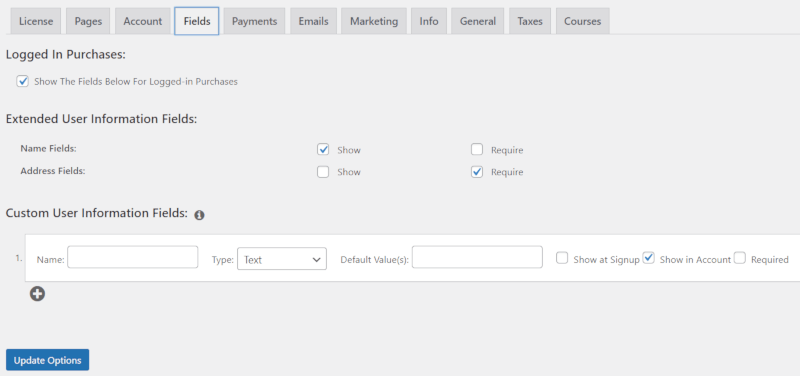
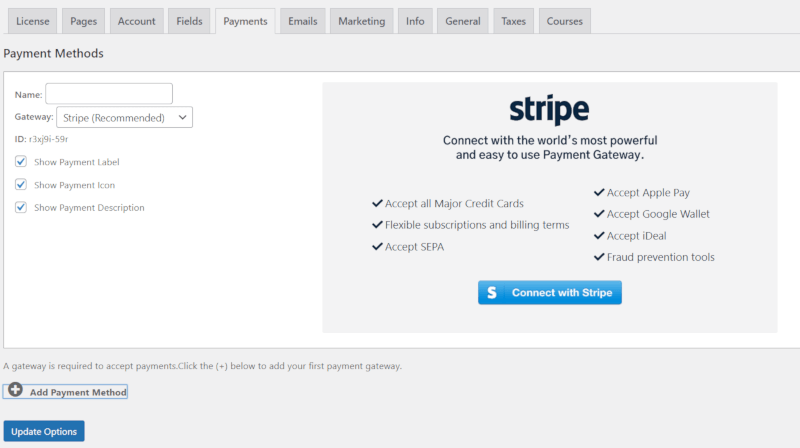
After installing MemberPress, you can configure it to fit your needs. This often means at least visiting the Pages, Account, Fields, and Payments tabs under MemberPress > Settings.
Under the Pages tab, you can configure what basic MemberPress pages will be included on your site. You can set base URL slugs for groups and memberships, and restrict unauthorized access:
Next, the Account tab lets you configure permissions and registrations, as well as login and logout settings:
The Fields tab lets you create custom fields and requirements for certain information during signup or a logged-in purchase:
The Payments tab lets you add payment methods, such as Stripe:
With these settings in place, your site is ready for membership plans and rules.
3. Add Memberships and Create Rules
Memberships are what users purchase to become part of your site. MemberPress lets you create multiple memberships to give users options.
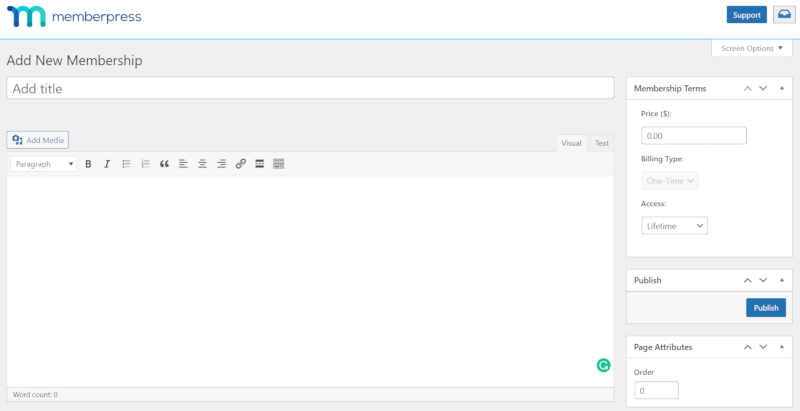
To create a membership, go to MemberPress > Memberships. At the top of the page, click on the Add New button. The resulting page looks very similar to a regular WordPress page:
From here, you can configure all the membership attributes, including title, price, and terms. Click on Publish when you’re finished
Since you’re creating your exclusive content, you’ll want to think carefully about which membership model you’ll use. The same applies to your pricing and membership terms.
Next, you can configure rules. These enable you to stipulate who has access to what content.
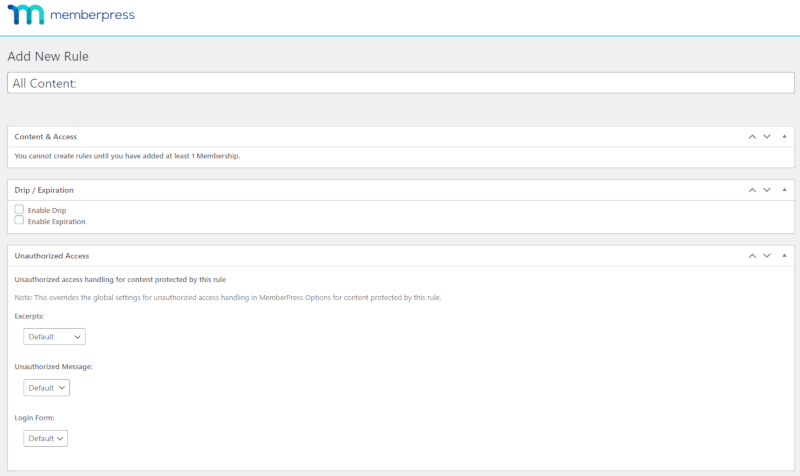
Go to MemberPress > Rules and click on the Add New button:
From here, you can configure your rule in a way that makes the most sense for your business. Click on Save Rule when you’re finished, then rinse and repeat as necessary.
4. Add Registration and Login Links to Your Site Navigation
Once you’ve set up memberships and rules, your users need to be able to register. An effective way to make it easy for them is to add a registration link to the main navigation menu of your site.
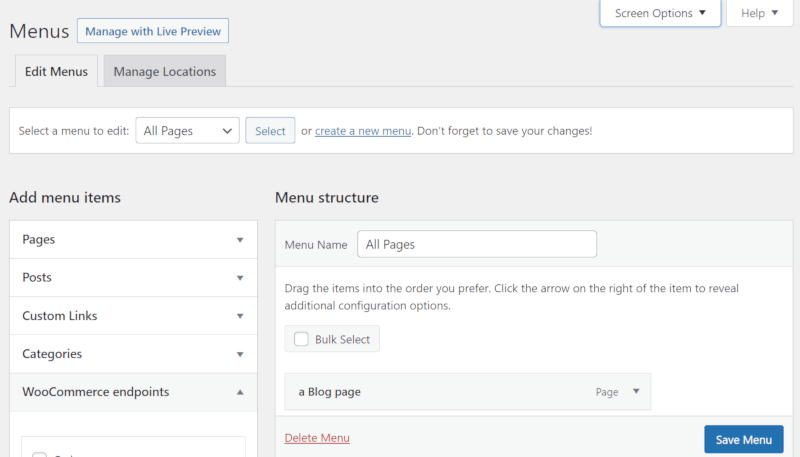
You can point to a specific registration page or a page with your registration links. To do this, go to Dashboard > Appearance > Menus:
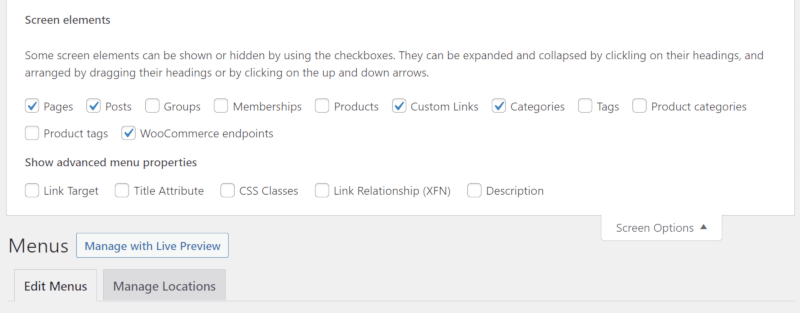
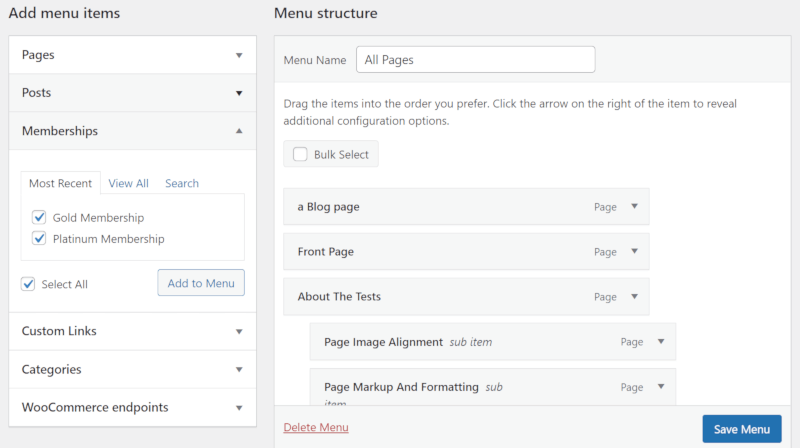
Then, click on Screen Options in the top-right corner of the screen. Enable the Memberships checkbox, so that menu items will be available to configure:
Expand the Membership menu item you just enabled. It will be under Add menu items on the left side of the page, below the tab title. Select the memberships you want to add to your menu, and click on Add to Menu:
In the screenshot above, you can see the Menu structure widget on the right side. It enables you to move menu items by dragging them to the positions you like. You can do that now for the item(s) you added if you’d prefer for them to be higher than the bottom.
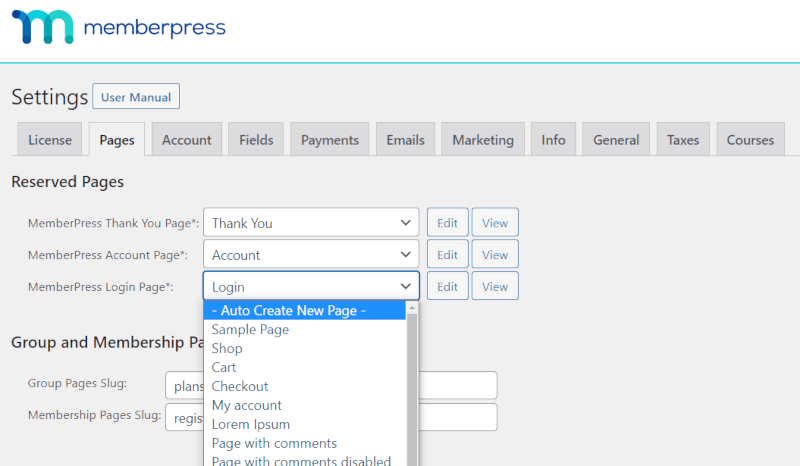
In addition to registering, users will need a way to log on to your site. To create a login page, go to MemberPress > Settings > Pages:
To the left of the MemberPress Login Page item, click on the drop-down menu and select Auto Create New Page. Now your site should be ready to go!
Need Help Getting Set Up? Leave It To The Pros
Launching a WordPress membership site with MemberPress is straightforward—but not everyone has the time to do it themselves.
Whether you’re a busy entrepreneur or prefer to leave the tech details to the experts, we’re here to help.
Our Done For You membership site services take the work off your plate.
Count on our MemberPress Pros to set up your site quickly and professionally, so you can get to business with the world’s leading membership platform.
Conclusion
Converting your site to accept members requires multiple features, but the MemberPress plugin can simplify the process a lot. With a little time investment, you can start accepting new members very quickly.
To recap, the steps required to convert your site are:
- Create high-quality members-only content.
- Configure the MemberPress plugin.
- Add membership plans and create rules.
- Add registration and login links to your site navigation.
Do you have any questions about converting your site to a membership model? Let us know in the comments section below!
If you liked this article, be sure to subscribe to our newsletter in the box up to your right!





Add a Comment