Providing the right resources to support the learning process is essential, whether it's for students or staff. However, it can be difficult to find the right way to do this. Online training materials can be overly complex, bloated with unwanted features, and above all, costly.
Fortunately, there’s a better alternative. While WordPress is often used to set up blogs, business sites, and online stores, the platform also has the capability to become an efficient learning management system (LMS). The WordPress software is streamlined, high-powered, and cost-effective – making it an ideal way to deliver online training.
In this article, we’ll explore how to create an LMS website with WordPress and MemberPress. Let’s get started!
An Introduction to Learning Management Systems
An LMS is a website that hosts online learning programs and/or courses. It provides employees or students with the option to learn and conduct training over the web.
In other words, an LMS is a modern-day replacement for more traditional methods of providing information, such as training days and lectures. When done right, this setup offers an easy-to-manage way to run a class.
The actual role of an LMS depends on your objectives. Most commonly, though, an LMS is used to offer relevant resources or full classes that your students can access and complete. A quality LMS solution will also help you deploy and track those classes, meaning you can easily monitor students' progress.
Using an LMS for your training needs presents a number of benefits for you and your team. An LMS is:
- Time saving. LMS sites are much more convenient than traditional face-to-face methods of instruction, as they enable users to complete training wherever they happen to be. LMS systems can also can be easily automated, saving you a lot of time and repetition.
- Cost effective. Traditional training days are often expensive to carry out – the price of instructors and venue rentals can really add up. An LMS is a low-cost alternative, which can be set up once and then run indefinitely.
- Easily adapted. LMS solutions vary and are typically flexible enough to support multiple approaches to training. This means you’ll easily be able to find a setup that suits your team.
- Easy to track. You can collect data on each employee or student’s training history, course progress, and more.
In the next section, we’ll walk you through how to create an LMS website that is efficient and streamlined using a WordPress website and MemberPress Courses.
How to Create an LMS Website with WordPress and MemberPress Courses (in 3 Steps)
If you're looking to set up your own LMS, we highly recommend WordPress. It's a free, flexible, and powerful platform that's very accessible for beginners. While you can adapt to an existing site, it's best to start out with a new, clean installation.
Once you create your course, you'll need a way to restrict access to it. The great thing about MemberPress is that it's both a full-featured membership and LMS plugin, so you get everything you need in one place.
Step 1: Install MemberPress on Your Website
MemberPress is our own membership plugin for WordPress users:

The platform offers a ton of features. But most importantly for our purposes here, the Courses Add-on enables you to create an LMS with WordPress and restrict access to relevant learning materials and courses. You can even add a payment option for some or all of your LMS's content.
Therefore, the first step in creating your LMS is setting up and configuring MemberPress, which is a simple process. After you do this and create your course, you can begin to add payment methods, create membership levels, and add other members-only content.
Step 2: Install the MemberPress Courses Add-on
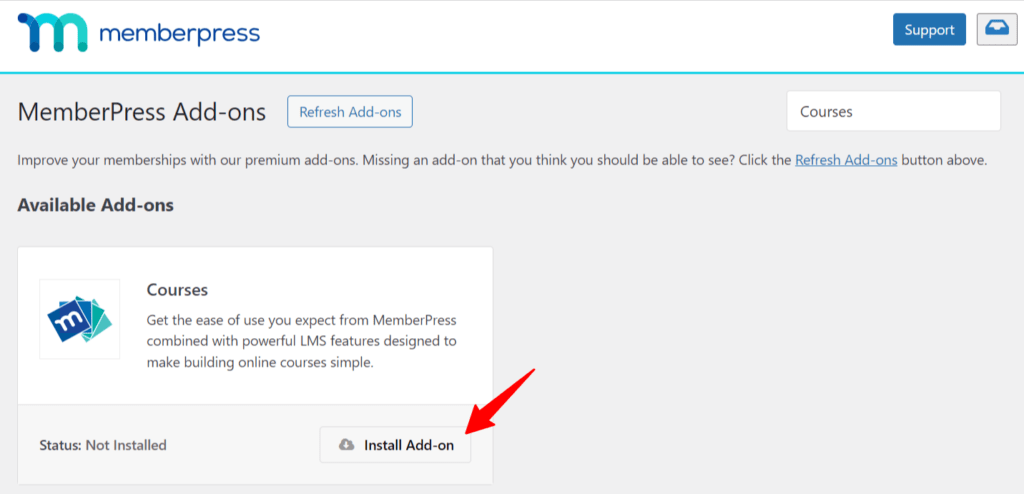
Next, install the MemberPress Courses Add-on by visiting MemberPress > Add-ons in your WordPress dashboard.
Then locate the Courses Add-on and click to install it.

After installing the add-on and activating the add-on on your site, you'll see a new MP Courses menu in your WordPress Dashboard.
Step 3: Create Your First Course
If you don't have your content/layout fully put together yet, pause and take a few minutes to write down your course title, section headings, and a name for each lesson.
Once you've wrapped that up, visit your new MP Courses > Courses page, and you'll see the following buttons at the top:

Click on Add New to add a new Course.

Course Page
Give your Course a catchy title and some descriptive content below the title. This content will show up as the course overview/description on the front-end. Don't add your curriculum or Course layout here; we'll do that in the next step below.

Curriculum
Once you've created your course title and description, click on the “Curriculum” tab at the top to add your Sections and Lessons.
The first thing you'll do here is add a Section. Think of Sections as containers or modules that help you organize your Lessons into groups.

Below is a sample of how you might layout your Sections:

Expend each Section to add Lessons as shown below:

Once a Lesson is created, it will show up in a list on the right side of the page:

You can search for existing Lessons and use the grid icon on the left to drag them into a Section within your Course. If the Lesson already exists in another Course or Section, it will be moved to the new location.
To View a Lesson, click the view button next to it. This will open the lesson for viewing on the front-end in a new window or tab in your browser:

Conclusion
That's how easy it is to create an LMS with WordPress using MemberPress Courses! To really dial things in, check out our support doc, Getting Started with MemberPress Courses. There, you'll learn how to do things like tag, categorize, and protect your courses, as well as add images or videos.
You might also want to check out this comprehensive tutorial video on how to use MemberPress Courses:
Whether it's for your employees or students, implementing an LMS is a perfect way to provide a streamlined and efficient learning resource. Traditional face-to-face methods of instruction can be costly and time-consuming, so switching over to an LMS can be beneficial for both you and your team.
What's more, creating an LMS is simple as long as you have a WordPress site and MemberPress. You'll just need to:
- Install and set up the MemberPress plugin on your WordPress site.
- Install the MemberPress Courses Add-on.
- Set up your courses, lessons, and other learning materials.
Do you have any questions about how to build an effective LMS? Let us know in the comments section below!
If you liked this article, be sure to follow us on Facebook, Twitter, Instagram, and LinkedIn! And don't forget to subscribe in the box below.


I use Memberpress plugin for my subscription website. I want to begin adding courses for my members to take. If I use LifterLMS or something similar, how does the LMS plugin integrate with Memberpress? If I use LifterLMS, do I still have to purchase their stripe add-on or can I charge through Memberpress? Not sure if I am asking the right question or not.
There are integrations with MemberPress created by LearnDash developers and WP Courseware developers. I’m not aware of any other integrations with LMS plugins outside of those two.