Crowdfunding can help you make your dream a reality. However, platforms like Kickstarter and Indiegogo take a share of your money. What’s more, you have to adhere to their terms and conditions.
Wouldn’t it be great if you could collect money on your own terms?
Well, you can! Using WordPress and MemberPress, you’ll be able to create a website that operates as your very own crowdfunding platform.
In this post, we’ll show you how to create your own crowdfunding site with these two tools. Let’s jump right in!
The Tools You’ll Need

Setting up your own crowdfunding site is easy. You'll only need a couple of super affordable tools to get started:
- WordPress: a free Content Management System (CMS) that can help you build your site more efficiently.
- MemberPress: our plugin has all the features you need to monetize your site and collect funds.
Using these tools, you'll be able to create a platform that can help you kickstart your project!
ARE YOU RUNNING A NONPROFIT? Apply to see if you qualify for discounted pricing through the MemberPress for Nonprofits Program!
How to Create Your Own Crowdfunding Platform with WordPress (In 4 Steps)
Now that you know what tools you'll need to launch your crowdfunding platform, let's take a look at how you can do so in a few simple steps.
Step 1: Get WordPress and Install MemberPress
The first step is to create the foundation for your crowdfunding platform. WordPress is a flexible CMS that enables you to build any website you can imagine.
It's easy to navigate, plus it comes up with many customization options. To get started, you'll need to choose a hosting provider and domain name.
Providers such as WP Engine offer various hosting plans, so you can choose the one that fits your needs and budget.
Some hosting plans include a domain name. However, you can always use a domain registrar service like Domain.com to get one for your site.
Additionally, your web hosts might offer 1-click WordPress installs to help simplify the process for you.
If you're totally new to WordPress, this excellent WPBeginner Guide will help you get going:
Once your site is up and running, you can go ahead and install MemberPress.
Our tool has all the features you need for your crowdfunding project. For example, you can set up memberships and subscription billing, create paywalled content, and lots more.
Once you've activated MemberPress on your site, you can start working on your crowdfunding campaign.
Step 2: Create a Membership for Your Crowdfunding Project
If you create content on a regular basis, offering memberships could be the right solution for you. It can provide you with a steady stream of income that helps fund your project.
Let's say you run a YouTube channel about baking. You probably put a lot of time and effort into finding new recipes, interviewing other bakers, and putting each episode together.
Your followers love your show and want to support your efforts.
A membership website enables them to sign up and access exclusive content – things like…
- Digital recipe books
- Online cooking classes
- A private, dedicated community, and so on
These elements can serve as passive income streams on into the future.
Once you've uploaded your paywalled content to your WordPress site, you can create your first membership.
To do so, navigate to MemberPress > Memberships and click on Add New:

This will take you to a page where you can create a new membership. Start by giving it a title and description:
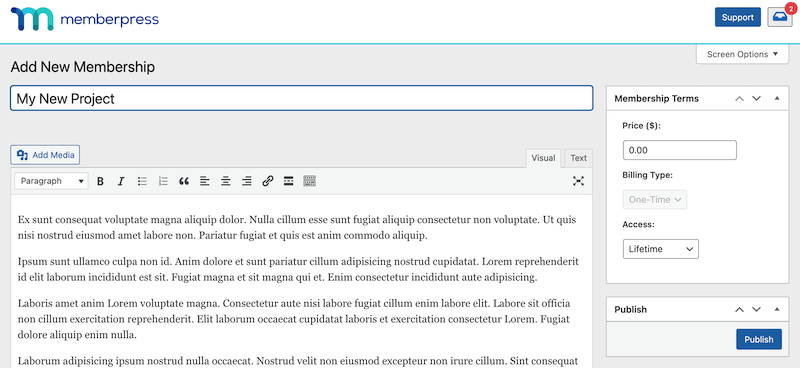
On the right side of the page, you'll see a Membership Terms box. Here, you can enter a price for your membership and choose a Billing Type.
If you want to choose the One-Time payment option, you can select lifetime access or set an expiration date. In that case, users will pay a one-time fee to access your paywalled content.
If you choose the Recurring payment option, you can select the type of subscription you want to offer, such as monthly or yearly. You can also give users a trial period or enable Limit Payment Cycles.
Once you're done, hit Publish. You can now use this membership to collect payment for your crowdfunding project.
Step 3: Set Up Rules to Determine Access
Now that you've created a membership page, you'll need to protect your content by setting up access rules. On your dashboard, navigate to MemberPress > Rules and click on Add New:
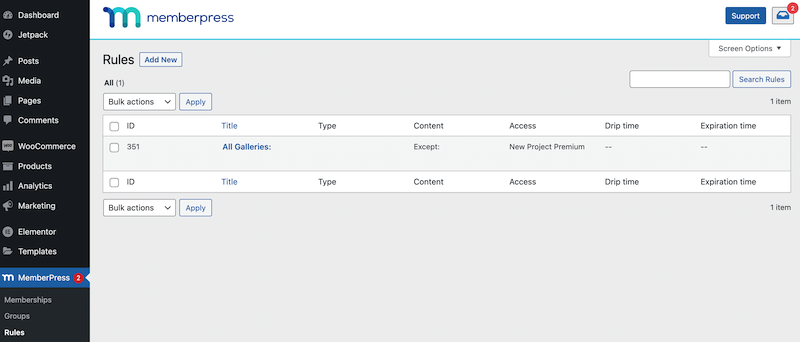
Here, you'll be able to limit access to your paywalled content. Click on the dropdown menu below Protected Content, and select the type of material you wish to protect:
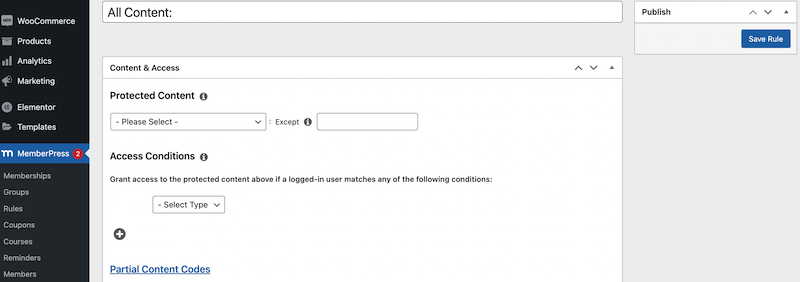
This might include posts in a particular category, quizzes, certificates, and more. Under Access Conditions, just select the membership that gives access to this protected content.
For a full rundown on how to protect your crowdfunding content, check out the Rules video tutorial above.
As you can see, you can restrict access for different types of members or subscribers. This can be particularly useful if you want to create tiered memberships. Users who pay higher subscription fees can get access to more content.
Step 4: Configure Your Login and Registration Pages
The last step is to customize your login and registration pages so users can access and manage their accounts.
To do this, go to MemberPress > Settings > Pages on your WordPress dashboard:
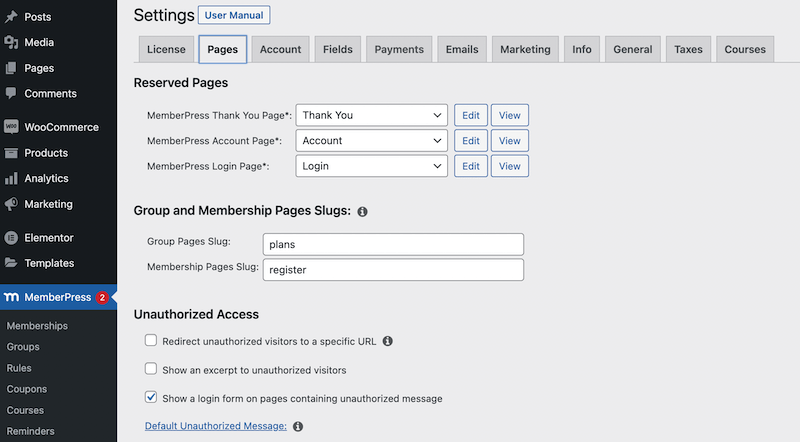
In the MemberPress Login Page field, the dropdown menu will have Login automatically selected. Clicking on the Edit button will take you to the block editor, where you can customize your login page:

In this video, we show you how to create a unique MemberPress login page:
You may also want to customize your registration page. To do this, navigate to MemberPress > Settings > Fields:
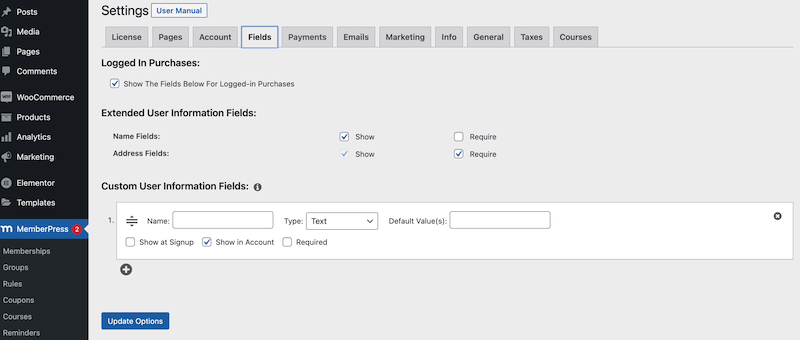
Here, you can add custom fields and make other modifications. We recommend you watch this video to learn more about how you can customize the registration page:
That's it. You should now have a fully functional crowdfunding platform! Now get ready to start raising money for your project!
Conclusion
Third-party crowdfunding platforms come with rules and restrictions. By creating your own site, you’ll be able to raise the money you need without having to pay fees or follow strict guidelines.
You can literally maximize the return on your efforts.
To recap, here’s how to create your own crowdfunding platform in 4 steps:
- Install WordPress and MemberPress.
- Create a membership for your crowdfunding project.
- Set up rules for your site so that only registered members can access your content.
- Configure your login and registration pages so that your audience can sign up.

Get MemberPress Today!
Eliminate third-party fees, and maximize your fundraising efforts with MemberPress.



Add a Comment