Need to keep your content exclusive? A login page is your answer. Good news! Learning how to build a WordPress login page has never been this easy. No tech skills needed!
Want only the right eyes on your content? Or aiming to make your WordPress site a hub of user activity?
It all begins with your login page.
A well-made login page is key. It draws in users and makes handling who sees what a breeze.
What’s the easiest way? Use a membership plugin.
So what’s the deal with login pages? It’s just a utility feature, right?
Well, it’s time to rethink that.
In fact, every time you build a login page on your WordPress site, you’re doing more than providing a necessary function.
You are:
- Shaping users’ first interactive experience,
- Fostering trust, and
- Setting the stage for customer engagement and retention.
Now that sounds like it’s a lot for one tiny login page to accomplish.
But with MemberPress, it’s completely achievable.
This comprehensive guide will show you how vital a good login page is and how to make one easily, no coding needed.
With a tool like MemberPress, you’ll create a safe login page, control memberships, keep your content safe, and more.
Follow along as we guide you from start to finish, making your login page ready in no time.
Ready? Let’s go!
Why are Login Pages Important for Membership Sites?
There are lots of good reasons to have a login page on your site.
Let’s check out some big wins a login page can bring to your WordPress site.
1. Keep Out Unwanted Guests ⛔
You wouldn’t let just anyone peek into your private stuff, right?
One of the primary reasons for implementing a login page is security. It provides a primary defense mechanism against unauthorized access.
Good login pages are designed with mechanisms to detect and prevent suspicious activities.
Think of a login page as your site’s own bouncer. 💪
It helps makes sure only the right people can get to the good stuff.
2. Put a Lock on Your Treasure Chest 🔒
Got important stuff like customer details or unique content on your site? A login page is like a strongbox for it.
A key function of login pages is ensuring the security of your members’ data.
By integrating technologies like two-factor authentication, your login page can help build trust among members, ensuring their information stays secure.
Only those users with the right combination (username and password) can get to it.
Plus, users appreciate a site that cares for their data and are more likely to return to it.
3. Unlock New Revenue (And Keep It Rolling In) 🤑
If you’ve got killer content worth paying for a login page is your ticket to earning more.
It’s not just a one-time thing.
You can set up subscriptions that keep money coming in regularly.
The world of subscriptions is booming – they say it’ll hit a whopping $1.5 TRILLION by 2025 (all caps for emphasis!).
More and more folks love the ease of subscribing to all sorts of things – whether that be learning, lifestyle, or leisure.
This is great for you, as subscriptions mean your customers keep coming back, making your income steady and strong.
Setting up a well-planned login page is your first step toward turning your WordPress website into a revenue-generating dream machine!
4. Personalize, Don’t Generalize 👤
A login page allows you to tailor the user experience like never before.
With every unique user login, you have an opportunity to provide a personalized user experience.
Since a login page identifies the user, it allows them targeted content, recommendations, and user-specific alerts to be displayed.
This significantly improves user engagement and satisfaction.
Login pages can also provide an opportunity for you to communicate important information or updates to their members.
5. Turn Casual Visitors Into Loyal Fans 🫶🏻
How do you make casual visitors come back for more?
Easy. Offer special deals and cool stuff just for members, all through your login page.
You can even run loyalty programs, special offers, and present members-only content.
6. Get Smart with Analytics 📊
One of the major advantages of login pages is the opportunity it gives you to do data-driven marketing.
The login process often involves asking users to provide certain information about themselves.
A login page tracks all this info, making your decisions sharper and smarter.
In addition, this data can be incredibly helpful in understanding your audience better.
You can leverage these insights for devising marketing strategies, creating user profiles, and more.
This targeted approach can dramatically improve your conversion rates and overall business profitability.
The big takeaway here? Know your visitors – who they are and what they want.
7. Create Targeted User Journeys 🗺️
Dealing with a diverse set of visitors? No problem.
A login page helps you direct them on their unique paths.
Say, for instance, you sell clothes online and in-store. And you’re looking to set up an onboarding hub for your employees on your website.
With a login page, you can sort everyone just right.
You can easily separate your customers from your employees, and create totally different user experiences for the two groups.
The more focused the journey and content, the happier your users, all the way around.
No matter your goal, a login page opens doors to lots of perks. Your membership site can tap into any number of these benefits.
A login page is the key to a safer, more custom-fit, and money-making WordPress site.
Good news – getting these advantages is easy peasy. Pick the right tool and tweak a few settings, and your membership site will be up and running super fast.
How to Build a Membership Site with a Login Page in WordPress (In 3 Steps)
Without further ado, let’s get your login page set up! Make sure you have a WordPress website set up and ready before you begin.
Step 1: Set Up MemberPress on Your WordPress Website
First things first, you’ll need a dependable tool to create your membership infrastructure.
Your tools can mean the difference between a frustrating experience and a fast, effective launch.
For solopreneurs and 7-figure creators, MemberPress is the #1 monetization, LMS, membership, and coaching plugin for WordPress.
MemberPress is #1 for a lot of reasons, but the most significant of these are…
- how incredibly easy it is to use, and
- the fact that it rolls so many functions into one powerful plugin
Want to sell courses on your site or paywall blog content like The New York Times? Or maybe you want to do something like create a community on your site.
Whatever your goal, you can make it happen with MemberPress.
Even better, it’s designed for super streamlined setup. That way, you can start taking advantage of your membership site’s benefits right away.
Here’s how to set it up on your site:
- Choose the pricing plan that’s right for you
- Download your license
- Install and activate your license on your site
With that, you’re a third of the way there already!
Step 2: Create Your Membership Levels
Simply put, Membership levels are how you manage who has access to what.
The simplest way to set things up is to add just one level to distinguish between members and non-members.
Or instead, you can put on your strategic cap and go all out by creating multiple tiers.
Setting things up this way gives you more fine-grained control of content access. But there are a lot of other benefits to multiple membership tiers. You can…
- Offer different benefits, features, or premium content to different membership levels, from basic subscribers to VIPs
- Give your users choices that fit their needs and budgets
- Maximize revenue opportunities
If you run the MemberPress setup wizard, you’ll be guided through the process of adding membership levels.
But if you skipped this step, don’t worry, here’s how it’s done:
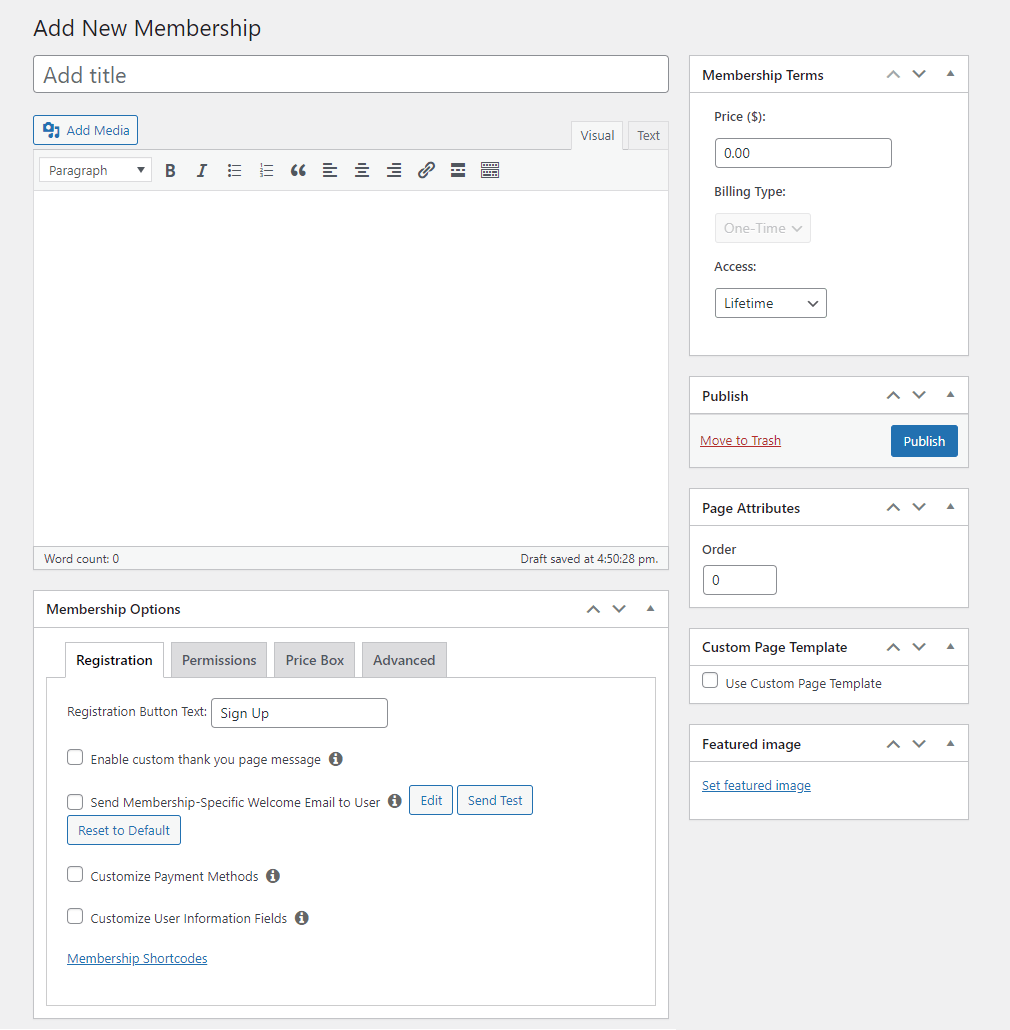
Start by going to MemberPress > Memberships > Add New. You should see the following screen:
From here, you can fill in the fields to fit your needs.
First up is the membership title. This will be the main way users can identify your plans, so we recommend keeping it short and effective.
You may also want to adjust the pricing settings. If you just want to restrict access to your site for registered users only, you can simply create a free plan.
Otherwise, go ahead and choose the billing cycle and total cost.
After that, you can scroll down to find a few other membership options. For example, you might choose to provide newly registered users with a custom thank-you or welcome email.
We recommend that you take advantage of these features to personalize the membership experience.
You might also want to fill out the Price Box tab. This can be an easy way to highlight what you have to offer.
The Price Box tab can be useful resource for influencers you collaborate with. They’ll find it easy to showcase this info on their own web pages.
When you’re all done, save your work. Then repeat this step as many times as you need to in order to create a full suite of pricing plans.
After you have your tiers set up, you can continue on to the last stage.
Enhance Your Membership Site with Order Bumps
You can further optimize your membership site to a new level of profitability with the Order Bumps by MemberPress.
This innovative add-on feature is designed to simplify the upselling process into a seamless experience both for you and your customers.
With Order Bumps, your customers are can bundle up when they add items to their carts.
The items could be anything from additional services, exclusive membership perks, or digital downloads, all available in a single click at checkout.
It’s an effortless way to enhance the value of each transaction on your site.
Step 3: Customize Important Membership Pages
A website with membership and user login features is a bit different from its open-access counterparts. There are a few important pages to consider adding/editing before you go live.
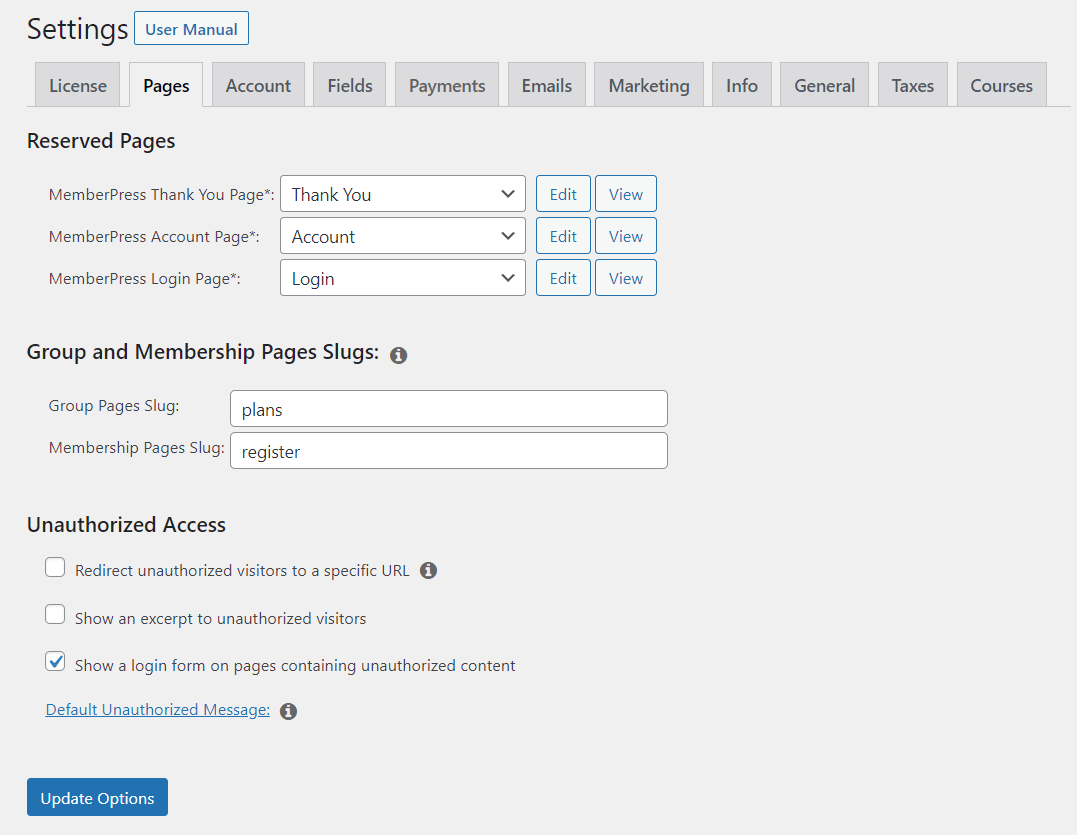
Fortunately, MemberPress comes complete with pre-made pages all ready to go. Just go to MemberPress > Settings > Pages:
From here, you can choose which pages MemberPress uses as your thank you, login, and account areas.
These should be automatically generated. However, you can always visit those pages to change them, or use your own custom pages instead. More on that later.
As for the other settings, the defaults will work just fine for most sites. However, there are a few features you might want to enable.
For example, your site will normally show unauthorized users a default message and a login screen.
This is convenient for your already signed-up members who just need to enter their information.
However, you might want to check the Redirect unauthorized visitors to a specific URL box instead.
Checking this box will enable you to show visitors something specific, such as your pricing page (to encourage signups).
You might also want to take this time to create a members-only page with information on your affiliate program. That way, you can advertise influencer opportunities to users who are already invested in your content.
Optional: Set Up Some Access Rules
As we said, the default settings should get you up and running just fine. But you’ll eventually want to customize access to your content.
You can fine-tune your paywalls with MemberPress Rules.
To find Rules, navigate to MemberPress > Rules > Add New:
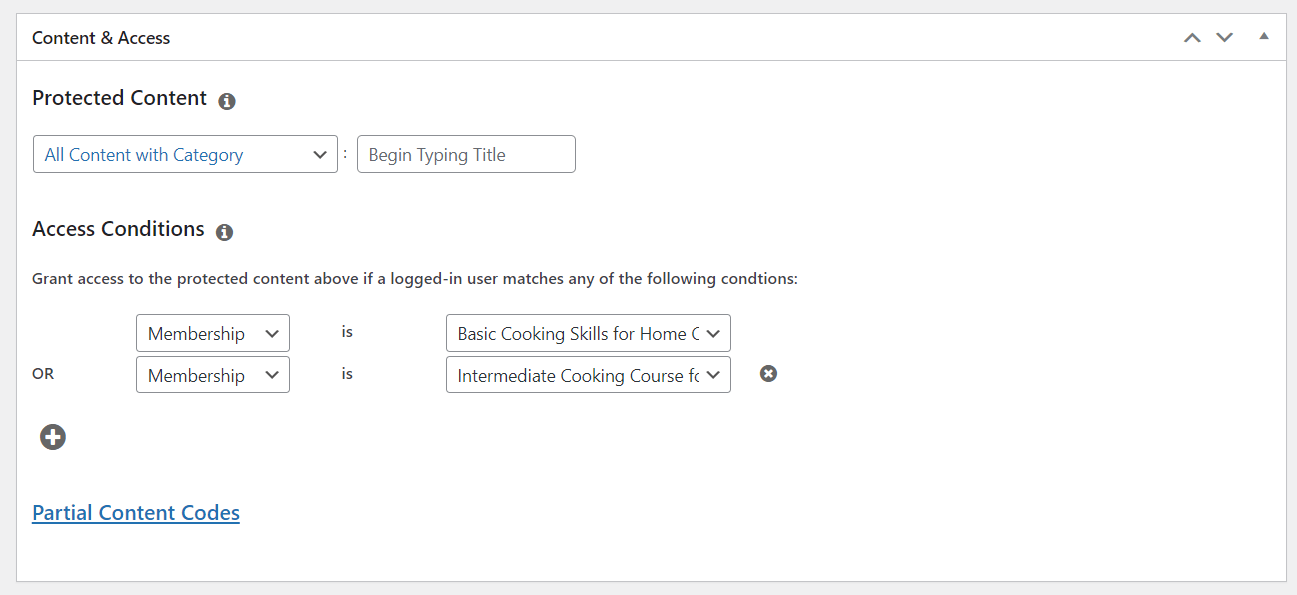
Here, you can choose the content you want to protect. Just click on the drop-down and choose from the various options (things like categories, tags, page types, and post types).
Next, select the membership category or specific members that’ll have permission to access the content you selected. When you’re ready, click on Save Rule.
For example, you might want to only allow higher-level members to access your online courses.
Anytime you want to adjust your paywall or add new rules, just head back to this page and make updates. It’s easy!
Get There Quicker With ReadyLaunch™
So far, we’ve looked at how to add a login page to your existing WordPress site, but what if you’re starting your website from scratch?
ReadyLaunch™ is designed to get you from no-site to sale-ready in minutes.
Designed with ease of use in mind, this feature empowers you to create mobile-responsive, branded pages (including a login page) STAT!
All you need to get started are your brand’s logo, signature color, and some images (if you want them).
Here’s how it’s done:
Like everything with ReadyLaunch™, customizing your login page is a breeze.
With ReadyLaunch™, your brand color is automatically set as the page background and your logo serves as the login form header.
However, these settings are fully adjustable. You even have the option to add a welcome image for a more engaging user experience MISSING PUNCTUATION
- Go to MemberPress > Settings.
- Choose the ReadyLaunch™ tab, and
- Click the Customize link next to the Login option.
From this point, you’ll be able to upload your welcome image and adjust other settings to align with your brand.
And you’re ready to go!
Let’s shift gears a bit now and delve into the pitfalls that can trip you up while you’re building login pages.
It’s easy to think that creating such a simple page is foolproof. But believe it or not, the devil’s in the details.
What are the common mistakes to avoid when building a login page?
There are many missteps that look small in the beginning but can lead to frustrating experiences for your users if they’re not avoided.
Here are some of the most common mistakes that you should steer clear of when designing a login page.
1. Poor Error Messages
Ever tried to login and met with a cryptic error message? It’s perplexing and leaves users with a sense of frustration.
Aim for clear, understandable error instructions.
Instead of displaying “Error 404,” explain in a user-friendly language why the login attempt failed.
Let them know if it’s due to incorrect credentials or a system glitch.
2. Forgetting about convenience:
Users appreciate easy, swift logins.
Think things like one-click logins via social media, or consider a “show password” checkbox. The easier the process, the happier the user, leading to better user retention.
3. Ignoring Security
Security should never be compromised.
A login page without https may lead users to think twice about entering their details.
You want your members to trust that your site is secure.
Employ SSL encryption on your login pages to ensure the safe transmission of login details.
4. Overlooking Mobile Optimization
We live in an era where a majority of users access the internet via mobile devices.
A login page that isn’t mobile-friendly is a common error that can lead to user frustration, poor UX, and ultimately, a drop in user activity.
Check out Spotify’s login page for an example of mobile-friendly design.
5. Complex Passcode Requirements
It’s important to encourage your customers and members to set strong passwords for security reasons.
However, be careful with going overboard on password requirements.
If your password requirements are too complex, your users may end up forgetting their passwords. Balance is key.
More Login Page Tips & Best Practices
Got a minute to spare?
We’ve gone through the basics of setting up a login page on your WordPress site.
But, hey, if you want to really nail the user experience, check out the following handy tips and tricks.
Add a Login/Logout Menu Item
Making things easy for your users is super important.
Pop in a login/logout option in your menu, and boom – your members can sign in or out smoothly from anywhere on your site.
This isn’t just convenient, it makes moving around your site a breeze.
Want to know how you can make site navigation feels more fluid and intuitive? The video below shows you just how to add a login/logout item to your menu. Take a look!
Redirect Users After Login
Keeping users hooked and guiding them right where you want is crucial.
Here’s a cool move: After they log in, send them straight to a certain page. Maybe it’s your latest content, some sweet deals, or their own dashboard.
This smart trick automates their experience, makes everything flow better and helps you and your users get exactly what you need.
How to Redirect Users After Login
From your WordPress dashboard navigate to MemberPress > Settings, and click on the Account tab.
Scroll to the Login & Logout section, and paste the URL of the page you want to direct members to after login in the corresponding field. MAKE 2 SENTENCES

Don’t forget to scroll down and click Update Options to save the changes.
You can also configure redirects depending on membership level. For example, your VIP, top-tier users can be directed to a page with special offers.
Go to MemberPress > Memberships and click on the level you want to edit.
Scroll down to Membership Options and click on the Advanced tab.
Check Custom Login Redirect URLs.
Paste the URL you want to direct members of this membership level to after login in the Default Login Redirect URL field.
Personalize Your Login Page
What’s the first thing your users see when they land on your membership site? Yep, it’s your login page.
Modifying this page by adding a special message can make users feel welcome and valued.
This small touch reinforces your brand’s identity and shows you care about the little details.
Oh, and guess what? MemberPress gives you a login page right off the bat. Customizing it with your words? Piece of cake!
Just go to MemberPress > Settings > Pages then click Edit next to the MemberPress Login Page field.
You’ll then be redirected to this page.
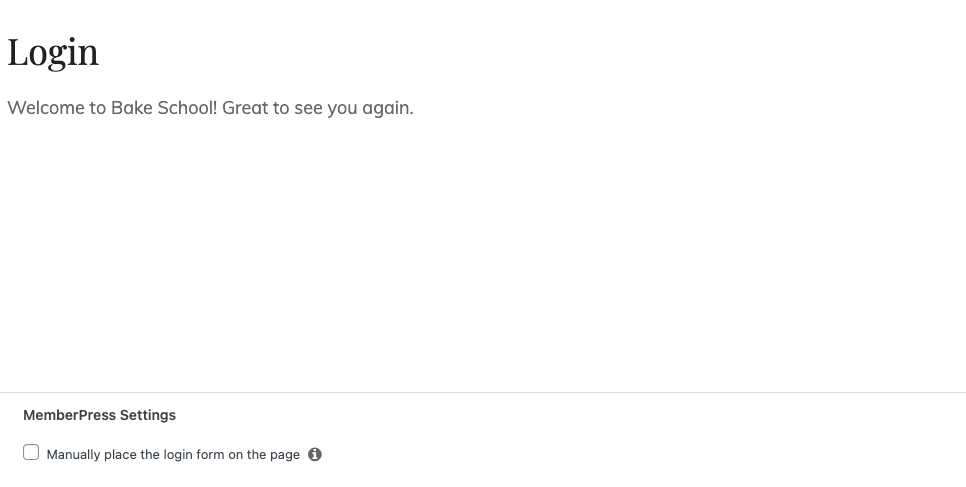
To add text above the login fields, simply type it in the text box.
You might also want to add text below the login field. For example, it’s good practice to add a “subscribe” link under your login page to invite non-members to sign up.
To add text at the bottom, you’ll need to check the box under MemberPress Settings that says Manually place the login form on the page.
Doing so will reveal this shortcode:
If you have redirect after login enabled, you’ll see this shortcode instead:
Copy and paste this shortcode into the textbox to place it where you want within your text. You can also use this shortcode on any page or post on your site.
Add a Login Widget
Versatility is a valuable asset in user experience design.
Pop in a login widget, and voilà – users can get into their accounts fast, without extra clicks.
Need a speedy login? The widget’s perfect for those who want to get in quickly without navigating to a separate page.
The MemberPress Login Widget is super easy to add.
But remember, the steps vary a bit depending on your WordPress version.
👉 To add widgets in WordPress version 5.7 or earlier, follow these instructions.
👉 To add widgets in WordPress 5.8 using Gutenberg Blocks, follow these instructions.
Examples of Successful Login Pages (and what you can learn from them)
We’ve discussed the importance of a well-designed login page and shared some key guidelines and practices to follow.
Now let’s shift our focus toward real-world examples.
These standout login pages serve as a great source of inspiration and learning.
Let’s take a look at 3 examples of how industry giants achieved the following:
- Use their login pages to engage users,
- Build trust and loyalty, while
- Ensuring user convenience and security
And all right from the first interaction.
Apple
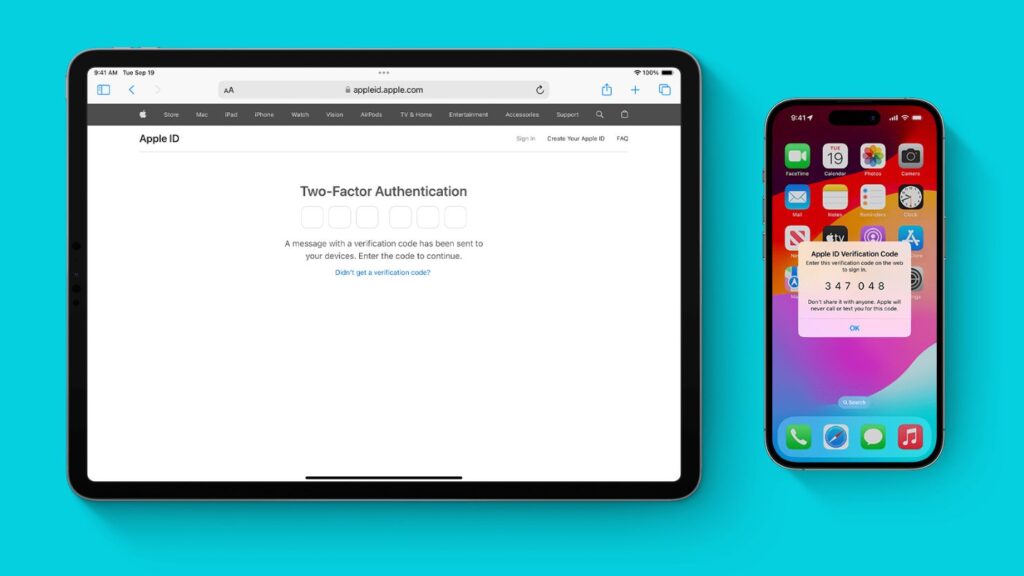
In the lineup of effective login experiences, the Apple ID authentication stands out due to its password-free features.
Instead of entering a password, users must access a trusted device they’ve already confirmed with Apple, or receive a phone call or text message with a verification code.
It manages to create a safe, fast, and straightforward login process, enhancing a user’s journey and reducing friction points.
This innovative concept of a password-free experience can be a game-changer for membership-based sites seeking to boost user retention, security, and overall user experience.
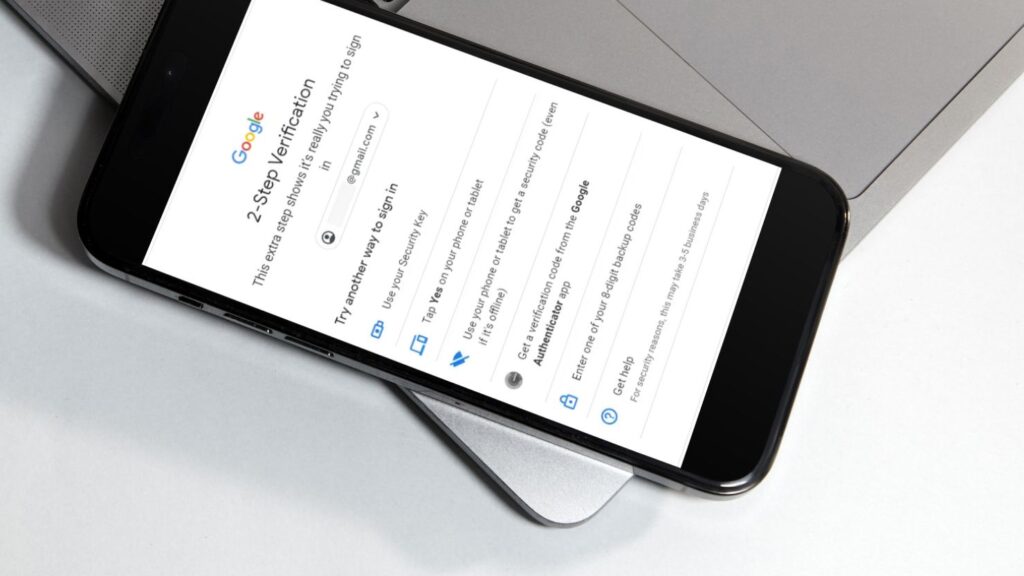
Google takes a progressive approach by enabling secure 2FA (two-factor authentication) alongside traditional password entry for improved security.
Their lively and minimalist design is not laden with excess details and promotes ease of use.
2FA (two-factor authentication) is a method where a user can only gain access after successfully presenting two different proofs of identity.
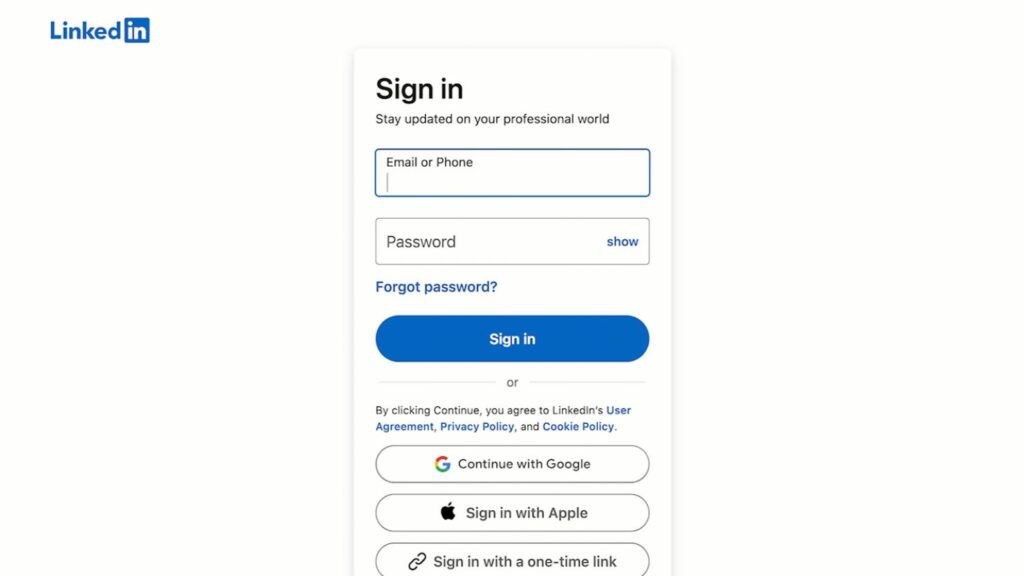
Taking a more professional approach, LinkedIn’s clean, clear interface enhances its credibility and authority.
The login form only asks for an email and password, while also offering a simple password reset tool for users who need it.
Conclusion
Membership sites can be an excellent way to control who has access to your content.
Luckily for you, MemberPress has made starting a membership site super easy to do.
With MemberPress and its custom add-ons, you’ll have your own site with member logins ready before you know it.
Here’s how you can get your membership site up and running in three simple steps:
- Get MemberPress on your site and start it up.
- Decide who gets what by setting your membership levels.
- Make your key pages, like your login page, your own.
And don’t stop there. Be sure to maximize your paywalling power by setting up MemberPress Rules.
Stick to these steps, and you’ll see the benefits in no time.

Get MemberPress Today!
Start getting paid for the content you create.
Do you have any questions about starting a membership site with login features? Let us know in the comments section below!
If you liked this article, be sure to follow us on Facebook, Twitter, Instagram, Pinterest, and LinkedIn!




Nice post, will come back here for my next MemberPress project!
I didn’t realize how easy this could be. This is a really useful post.
Iba a escribir una guía en mi blog sobre Memberpress, pero me parece que este post resume muy bien el paso a paso 😉
Ya son 7 años usándolo y estoy encantado, sobre todo por las constantes mejoras y actualizaciones.
As a new member to using the Memberpress plugin for my membership website, I found this article especially insightful for building my login page for our website. And the notes on how to side-step the possible mistakes one can make when building a login page.
Thank you!
Appreciate the post about login pages!