So, you’re ready to launch a monetized website with WordPress + MemberPress. Good choice!
And, heck, it’s easy enough with a free WordPress theme, right?
Zzzz. Boring!
This ain’t your grandma’s internet no more (unless, of course, you’re Shirley Curry or Iris Apfel).

Your site needs to look top-notch to stand out. And, this is where WordPress page builders come in.
Here at MemberPress, one of our favorites is DIVI!
You can use the DIVI plugin to:
- Start a brand new website on WordPress
- Upgrade your existing site with better design and functionality
Yup, even if you already have a MemberPress site up and running, you can use DIVI to spruce up its posts and pages.
What is Divi?
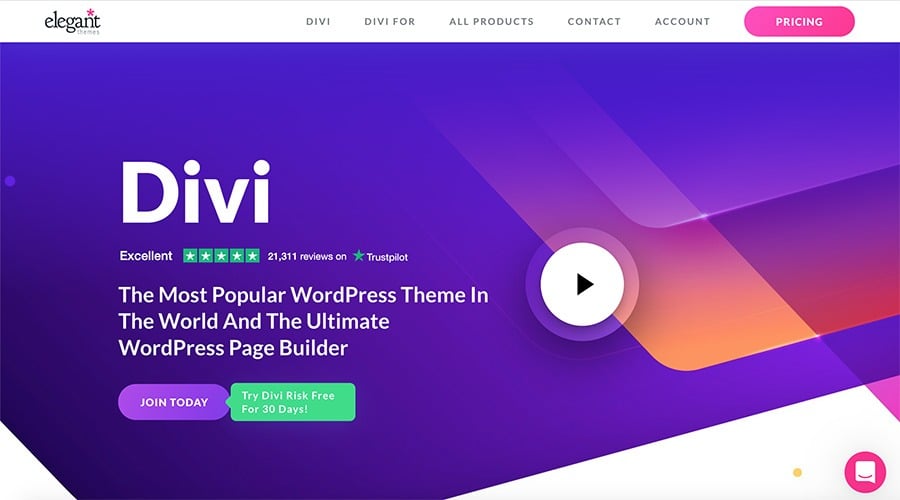
DIVI is a WordPress page builder and theme from Elegant Themes. It makes building and designing an absolutely stunning website super fast and easy.
Now, I will admit, the default WordPress Gutenberg editor has gotten a lot better over the years. You could even say it’s a little fancy (like Applebee’s on a date night).
But, DIVI is like Mastro’s, and you’re the master chef.
Fire up its drag-and-drop builder and you’ll be whipping up sleek designs with ease. Even if you’re a newbie, its many pre-built modules and layouts make your design job simple.
Why should I care if my site looks modern?
There are many benefits to creating a fresh new website with DIVI. But, I want to highlight a big one:
You’ll increase traffic and improve SEO
Good site design, layout, and functionality help your site rank up in the complex world of SEO.
While its algorithm is constantly evolving, Google likes sites that are “trustworthy” and “authoritative.”
Having a great looking site with a smooth user experience helps you look less spammy in the eyes of visitors, and ultimately, Google.
Think about it. Would you feel comfortable giving your credit card to the web-equivalent to a seedy motel off the highway? Or, would you get sketched out and run to the more clean, polished Holiday Inn down the street?
There are many other factors that boost SEO, which brings us to our first choice feature.
Favorite DIVI features
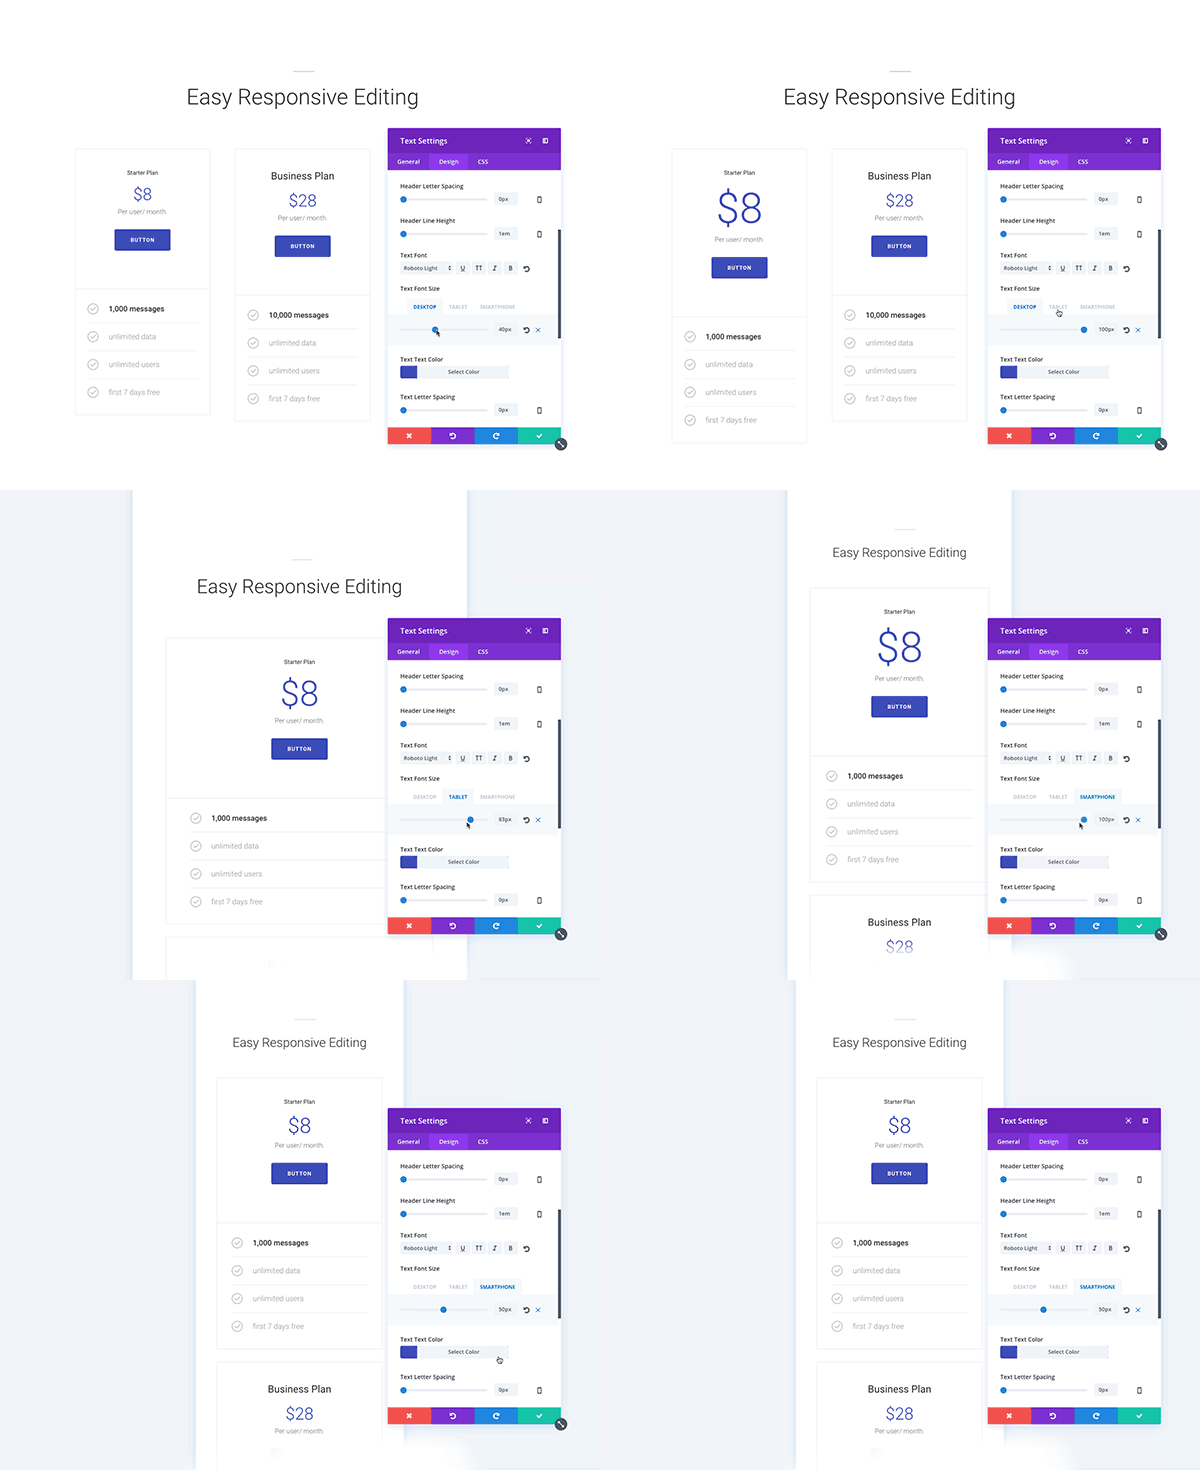
Mobile responsive editing
Google takes a mobile-first approach to site indexing. So, having a mobile-friendly site helps your SEO, which can lead to more conversions and sales.
DIVI makes mobile editing a breeze. You can edit for different devices and breakpoints to make sure your site looks great on smartphones, tablets, and desktops.
And soon, probably even VR goggles.
While editing, DIVI automatically switches between different device views, so you can focus more on design and less on the technical stuff.
Edit MemberPress pages
Creating a smooth membership experience is key to retaining customers. DIVI can directly edit many MemberPress pages, such as those for membership registrations.
This feature:
- Saves time
- Avoids work-arounds that complicate the backend
It’s as easy as enabling a setting, creating a membership, and clicking edit. I’ll show you how later.
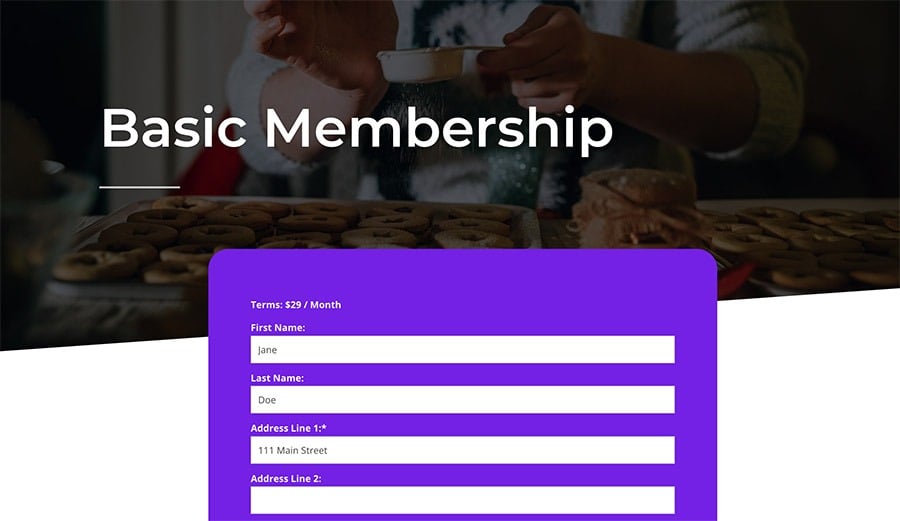
With the on-page editor, you can spiff up the default MemberPress registration process using DIVI’s many modules and layouts.
You can also add things like testimonials, videos, and features right on a sign up page, giving users an extra nudge to hit the buy button.
Protect specific content on pages with the MemberPress DIVI add-on
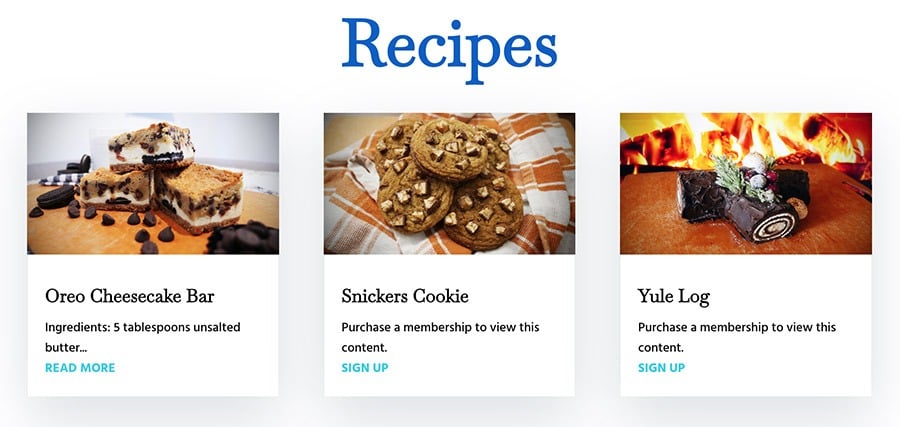
Once installed, the MemberPress DIVI add-on lets you show or hide whatever page elements you want based on membership level.
You can apply a MemberPress rule to specific content, right inside the DIVI page builder, so only paying members can see it.
Using this integration, you can:
- Have a members-only section that teases premium content
- Create custom messages to persuade people to sign up
- Give away freebies to convince visitors to buy your exclusive stuff
Want to try it out? Learn how to install the add-on and protect page content in the video below.
Visual editing: a no-code solution
You’re busy running an online business. The last thing you want to do is browse Stack Overflow until 2 AM to find a snippet of code that’ll get your site working.
With DIVI, you don’t have to.
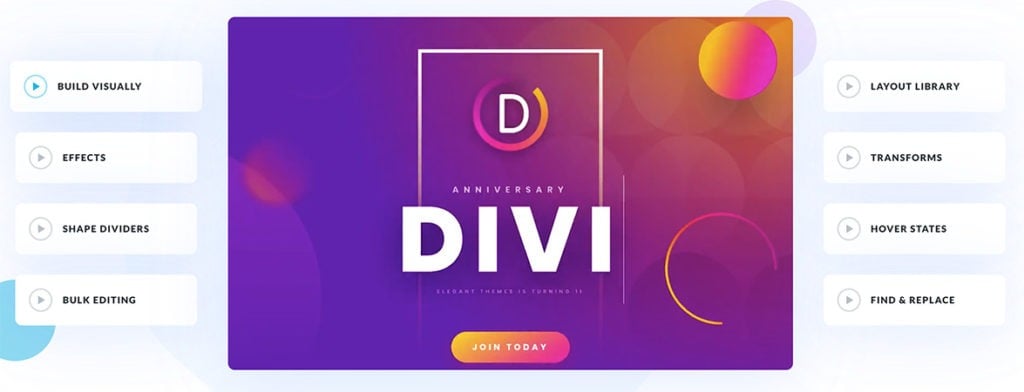
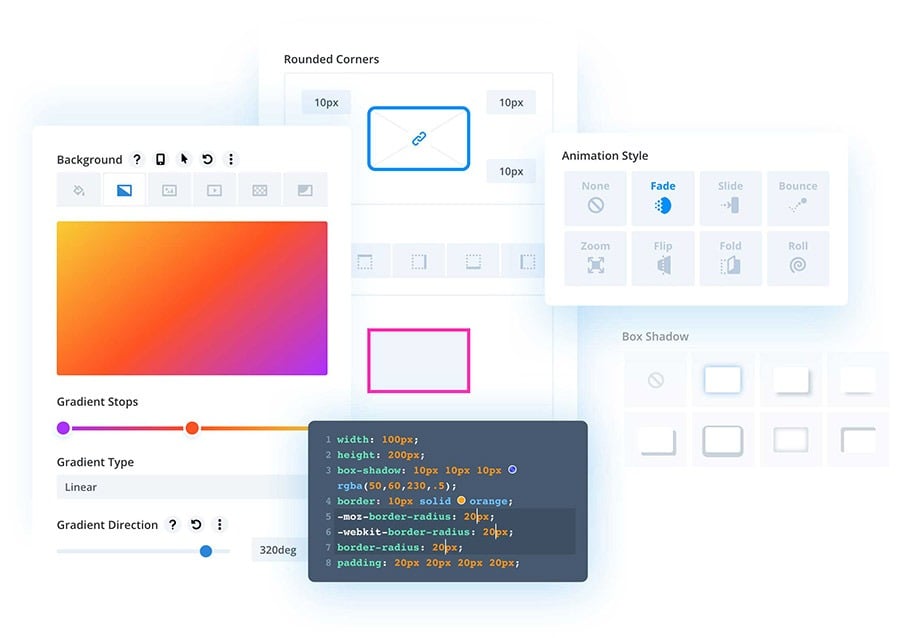
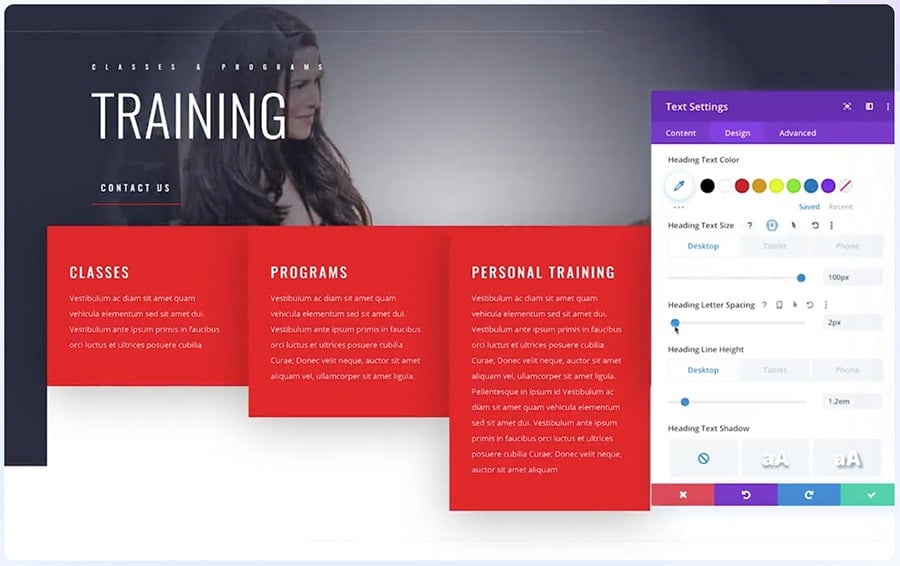
It’s a 100% visual editor. So you can easily change design settings like color, font, and margins. And, the drag-and-drop interface lets you arrange elements until everything looks just right.
Don’t even think about hopping on W3Schools to learn CSS. DIVI takes care of that grunt work for you.
Pre-built layouts
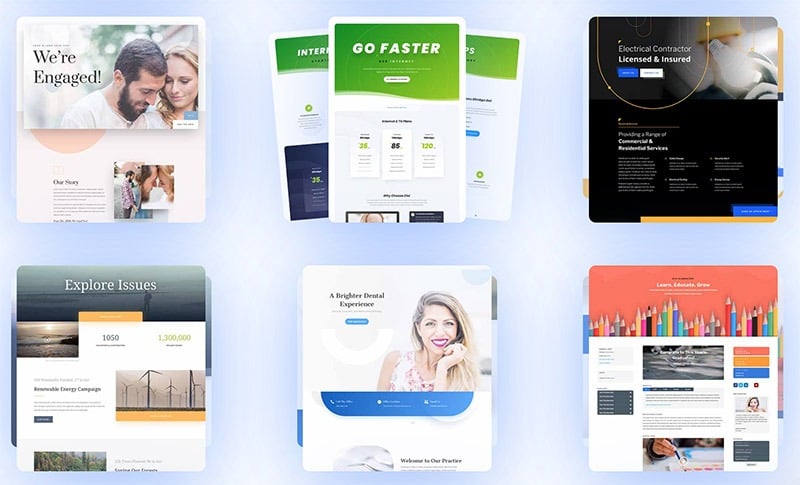
DIVI has a huge library of pre-made layouts. Building a site can be as simple as inserting your logo, changing some placeholder text, and switching up some colors.
There are layouts for just about every type of niche, from online courses to yoga.
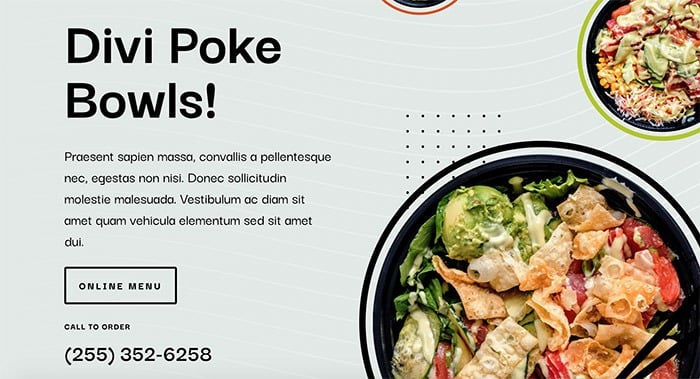
Have a more obscure idea? DIVI just might have you covered. You can even find templates for things like soap making, flower farms, and poke restaurants.
Each layout pack comes with most of the essential pages – like contact, about us, blog post, and landing pages.
You can also mix and match pages from different layouts throughout your site. You’re not limited to using just one!
Bulk editing
Building websites can be hella tedious. Sometimes, you want to make a small change to many components all at once. But, manually changing each one is likely more painful than Nickelback on slo-mo.
With DIVI, you can highlight multiple elements on a page and change them all at the same time.
Dynamic content
This is another feature that cuts down on the drudge work.
Have a bunch of memberships, but don’t want to design each registration page individually?
Create a template with dynamic content instead.
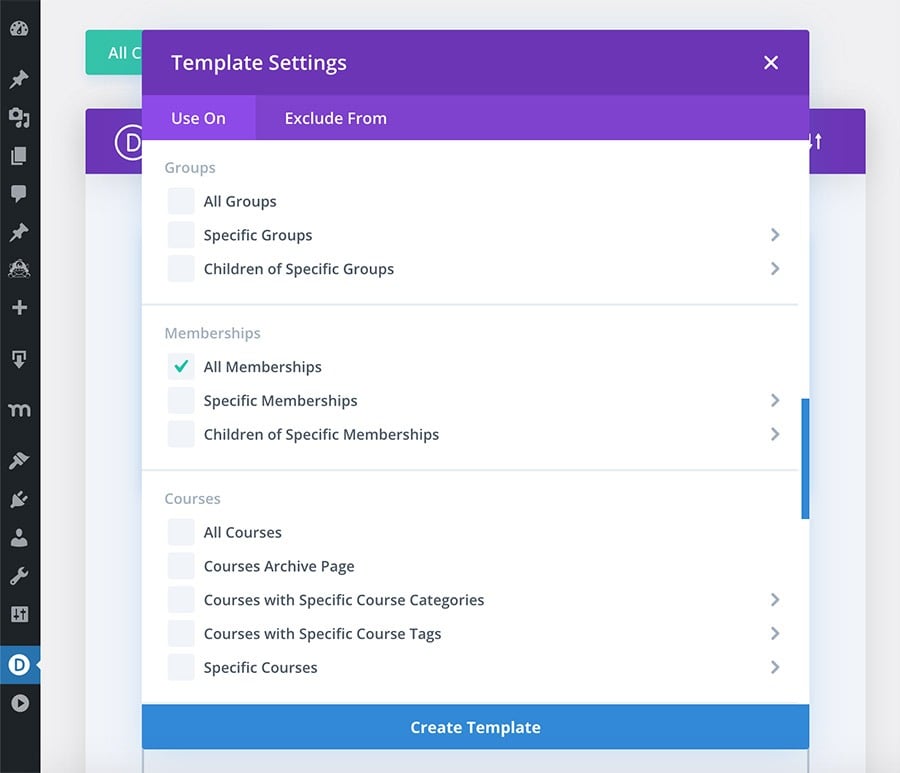
Then, when you create a new membership, your styles are already applied to it.
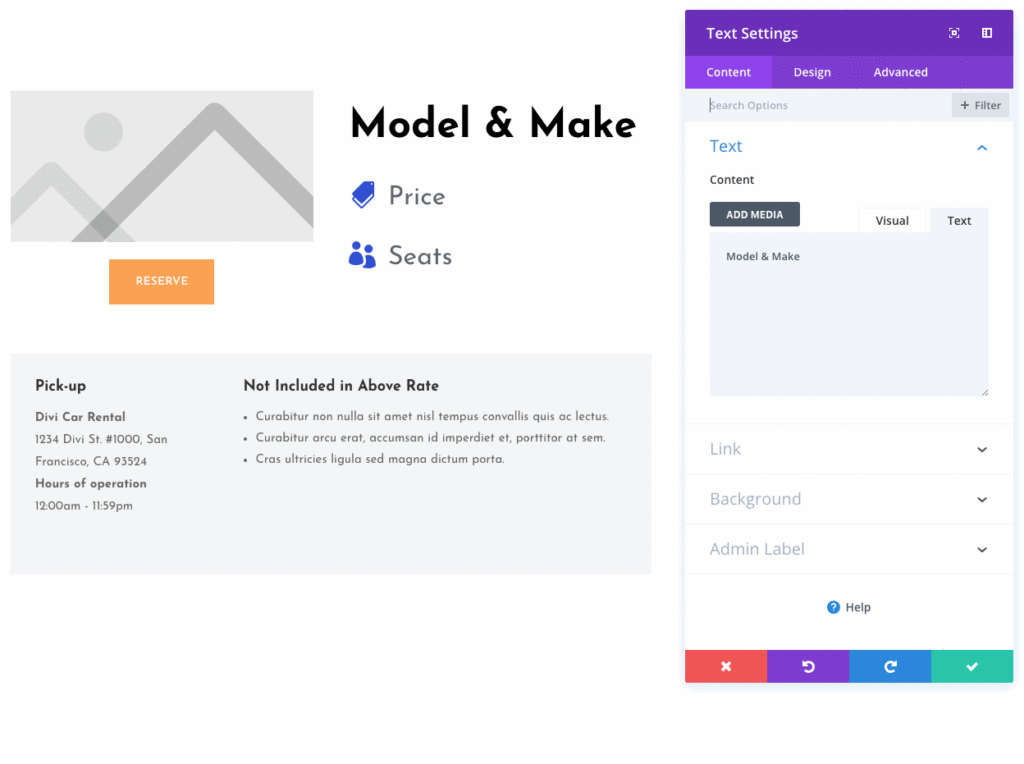
And, your dynamic placeholder text will be replaced automatically with your membership title, price, and whatever else you choose to display. Magic.
Okay, I could list out cool features until I’m DIVI-purple in the face. But at this point, you probably want to get started. So, let’s go!
How to create a MemberPress site with DIVI
So, you’re ready to launch a brand new site. Even though it may seem daunting, you’ll be up-and-running in no time. Here’s what you need to do:
Set up a WordPress site
First thing’s first, you need a website. To do that, you’ll need to:
- Get a domain name
- Buy some web hosting
- Install WordPress on your web host.
For this how-to, I’ll be building a basic sample site called Legit JavaScript. The site will teach coding through online courses. And it’ll need a few pages:
- Homepage
- Blog
- Course listings
- Pricing
- Contact
Map out your site pages like I did in the list above. You can always add more later, so no pressure to have it all figured out just yet.
Now, once you know what pages you need, it’s time to hop on WordPress and make them.
Create your pages
First, we’ll start with the homepage.
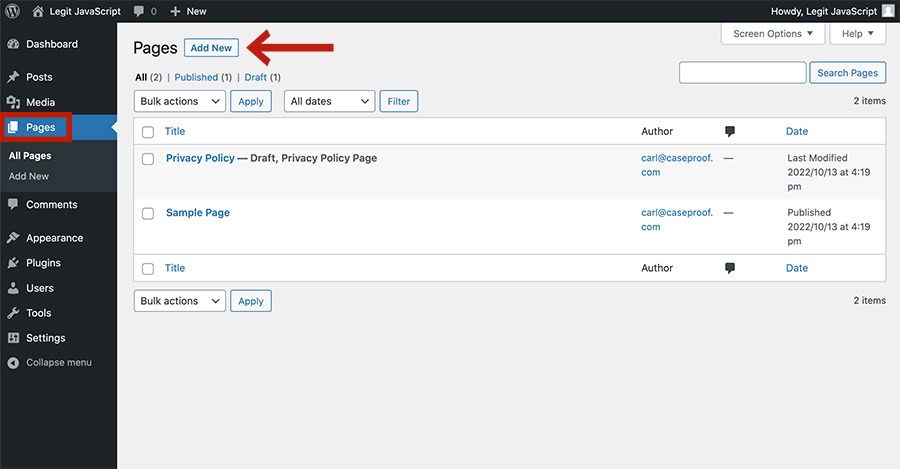
From the WordPress Dashboard, go to Pages > Add New.
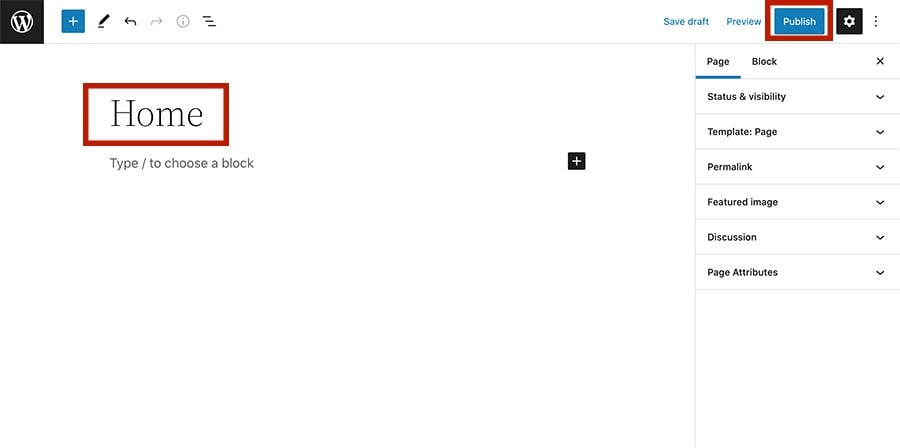
Name the page Home.
Then, click Publish.
Don’t worry about content right now. You’ll edit your pages later with DIVI.
Repeat the instructions above to create your other pages (blog, contact, about, etc).
Set your homepage displays
Now, you need to set the Home page you just created as the actual homepage on your WordPress site. That way, when people go to the site URL, they’ll see your Home page.
Also, if you created a blog page, you need to set it as your Posts page on WordPress.
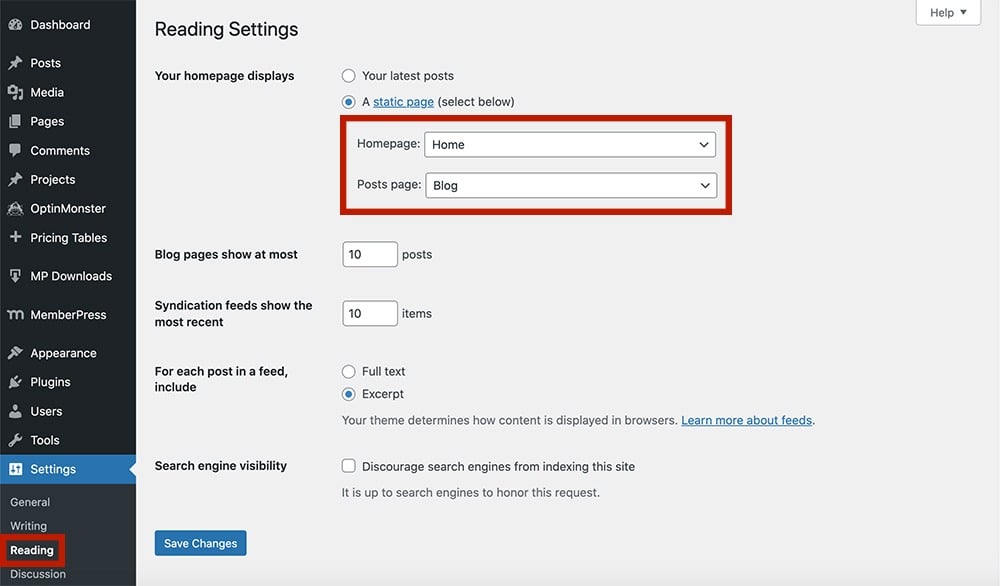
To do this, go to Settings > Reading.
Then, under Your homepage displays, select A static page.
Next, in the dropdown beside Homepage, select Home.
Then select Blog next to Posts page.
Finally, click Save Changes.
Now, when visitors go to your site URL, the Home page will appear.
Create a navigation menu
Once you have the site pages made, and your URL is pointing to your homepage, create a navigation menu so visitors can easily find their way around your site.
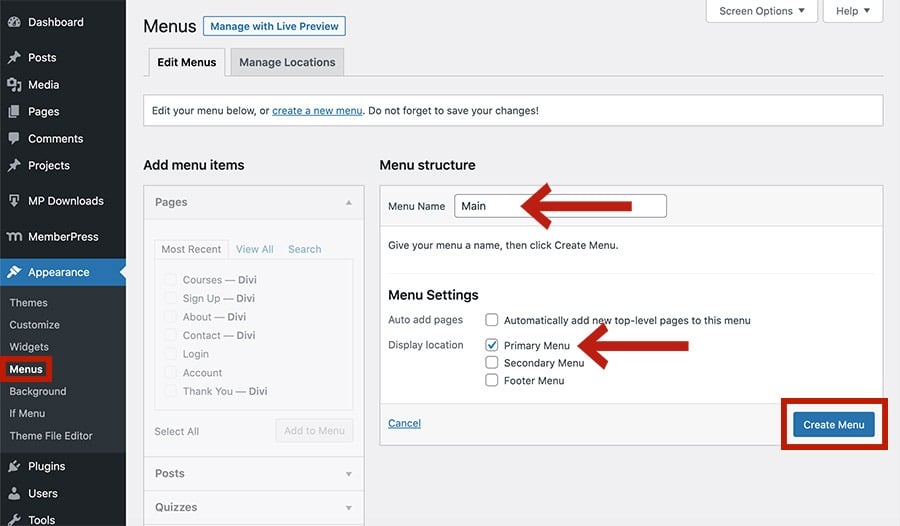
First, go to Appearance > Menus.
Now, give your menu a name. Then, under Menu Settings, check Primary Menu as the display location.
Then, select Create Menu.
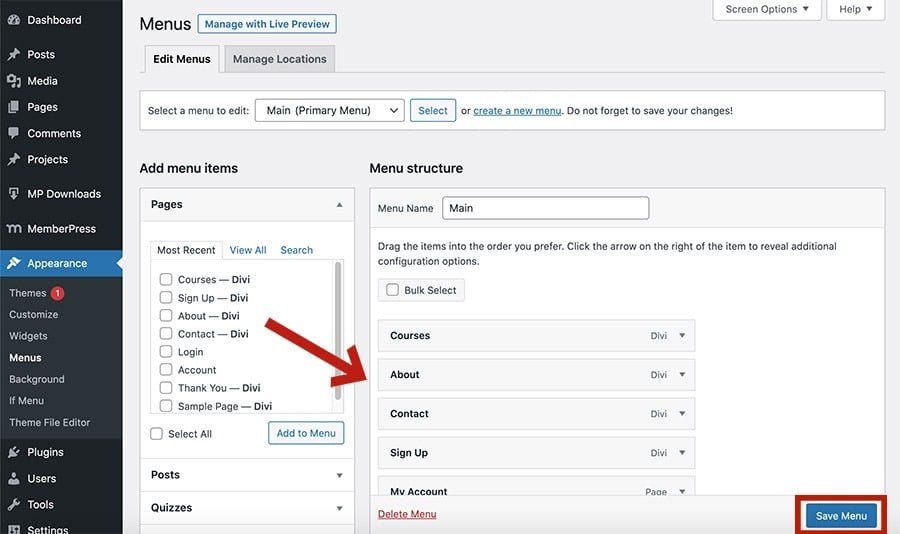
Next, select your pages under Add menu items on the left. Then, click Add to Menu.
Once your pages are added, look under Menu structure, and click-and-drag items to change their order. The links (shown top-to-bottom) will display left-to-right.
You can also expand the menu items using the down caret symbol (▼) to change the link text under Navigation label.
When you’re done, click Save Menu.
If you run into any snags, refer to this article for an in-depth tutorial on creating a menu in WordPress.
BONUS: You can also add a login/logout menu item and make items appear when certain conditions are met, such as when a member is logged in.
Now, the basic structure of your WordPress site is set up. Next, you need to deck it out with some plugins.
Install MemberPress
To monetize content on WordPress, you’ll need a plugin. And, in my totally unbiased opinion, MemberPress is by far the best option.
Head over to MemberPress.com and purchase a plan. The DIVI integration works with all of them.
Then, download the plugin zip file from the Account page of the MemberPress website.
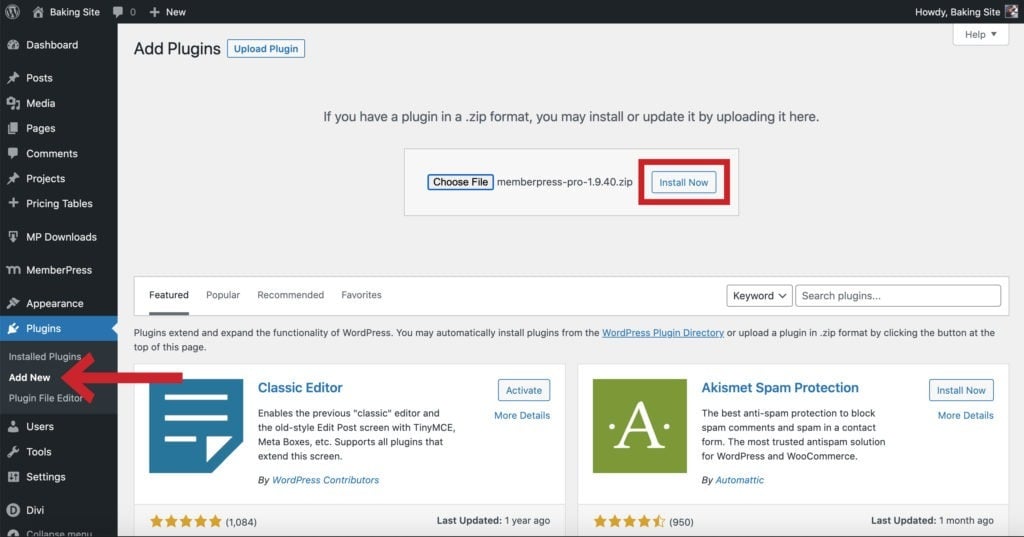
Now, upload the plugin from your WordPress Dashboard.
Once installed, the MemberPress Setup Wizard will guide you through the basics, such as adding a payment method.
Once you finish the Setup Wizard, you’re ready for next step.
One plugin down, one to go!
Install DIVI
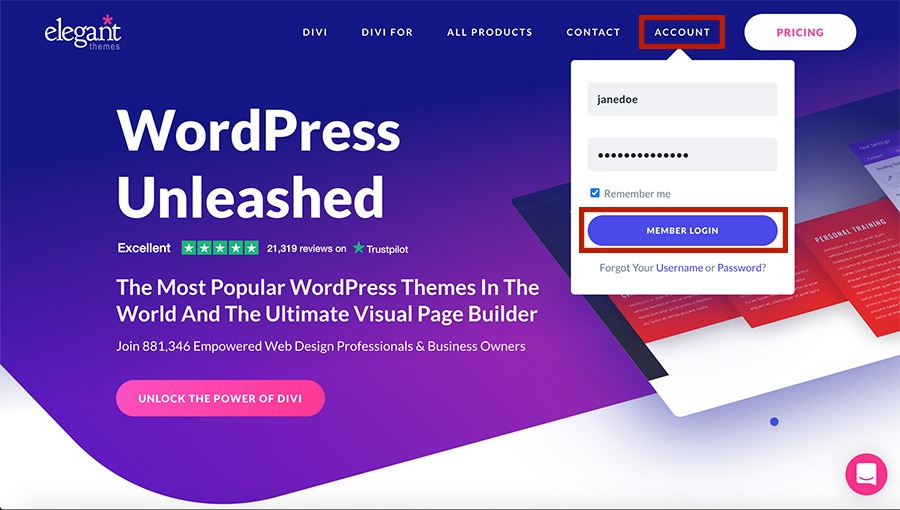
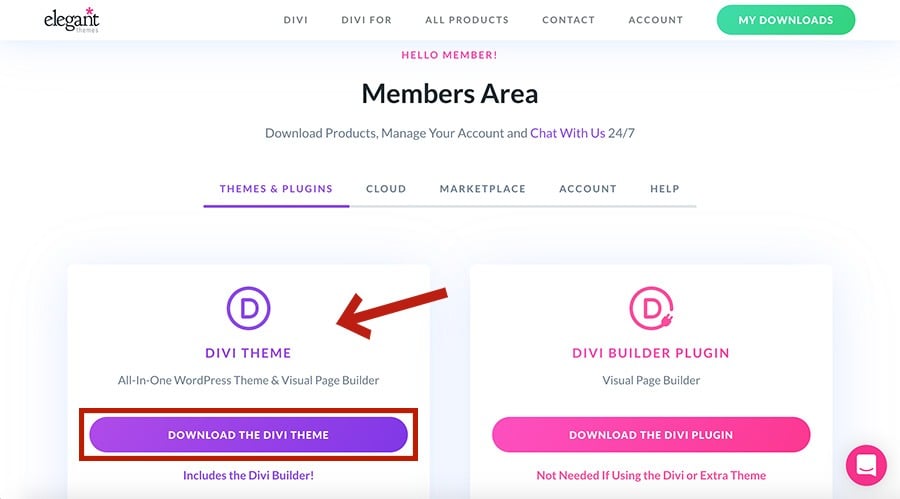
To get DIVI going, head to the Elegant Themes website and purchase a DIVI plan.
Then, click Account, and login with your credentials.
Then, you’ll be taken to the Members Area. Here, choose to Download the DIVI Theme.
It will download the DIVI zip file to your computer. This file includes both the DIVI page builder and theme.
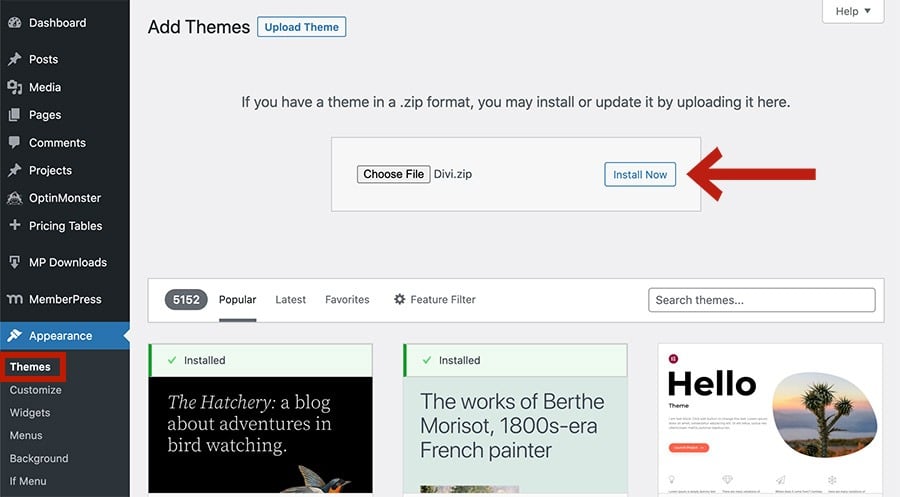
Once it’s downloaded, head to your WordPress Admin Dashboard.
On the left sidebar, go to Appearance > Themes.
Next, select Add New > Upload Theme > Choose File.
Find the Divi.zip file on your computer. Then, click Install Now.
And that’s it, the DIVI plugin and theme are now installed.
But, there’s one more step to finish the setup.
You need to link the plugin to your Elegant Themes account so you receive software updates (this is an important step!).
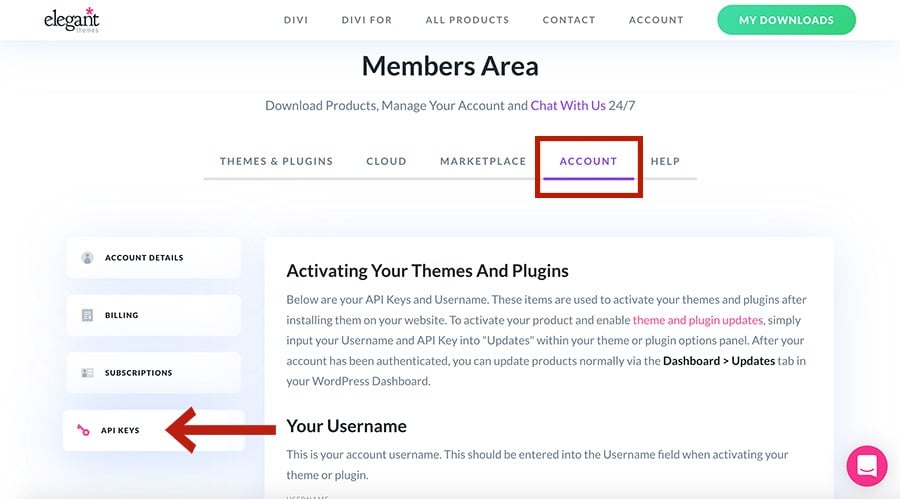
To activate the link, head back to the Members Area of the Elegant Themes website.
Then, click Account > API Keys.
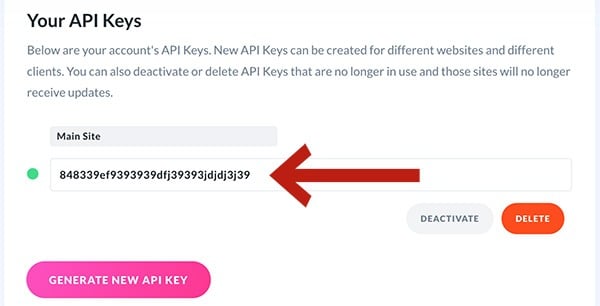
Next, copy the API key that’s generated. Or, choose Generate New API Key to make a separate one for your site.
Now, go back to WordPress.
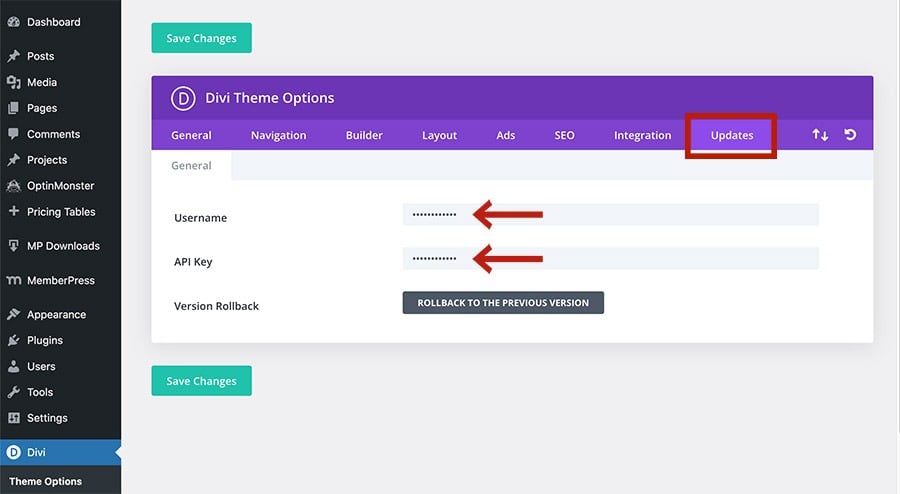
Then, go to DIVI > Theme Options > Updates tab.
Enter your Elegant Themes username. Then, paste your API key.
Finally, click Save Changes.
Your Elegant Themes account is now linked to your WordPress site.
Now that the boring stuff out of the way, it’s time to start building!
Make your paywalled content
Load your site with the content you’re going to sell. This is just to get you started – you can always add more later as your site grows.
For example, you can sell stuff like…
Online Courses
For Legit JavaScript, I’m going to create online courses with MemberPress Courses.
It lets you create courses 100% visually with a drag-and-drop curriculum builder. You can also offer quizzes, track student progress, offer certifications, and much more.
Watch the video below to see how to create courses in MemberPress.
Digital products
Upload files with MemberPress Downloads to sell digital products!
You can sell:
- Ebooks
- Templates
- Videos
- Music, audio, and podcasts
- and much more!
See our article on why and how to sell digital products for a detailed guide.
Also, watch the tutorial video below to see how to sell files with MemberPress:
Anything else!
Insert whatever content you want on WordPress pages and posts. You can embed videos, text, download links, and more.
Need some ideas? See what MemberPress creators are selling right now:
Once you have some content on your site, you can use MemberPress to add some monetization features.
Create a membership
Next, create one or more memberships to sell your paywalled content.
This is an important step because it’ll allow people make purchases on your site.
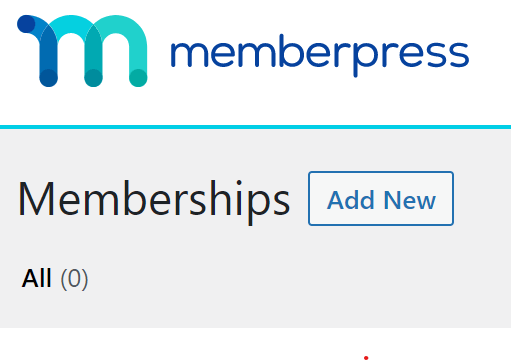
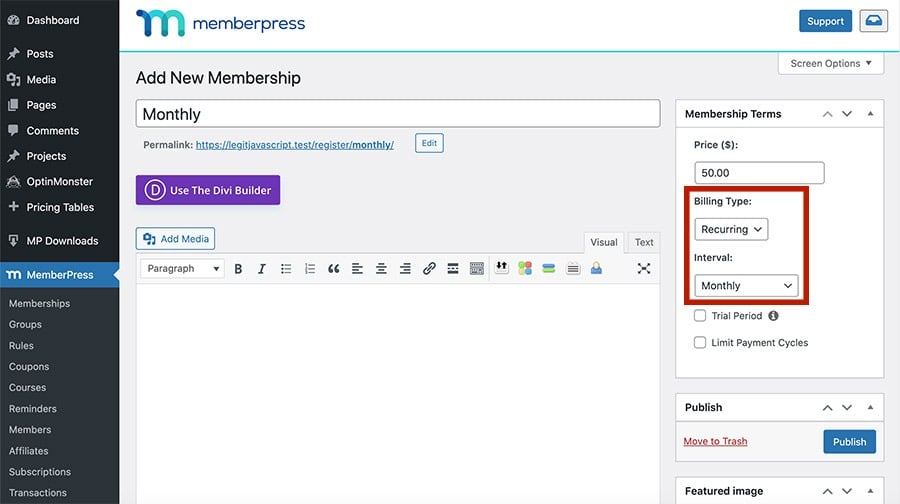
Go to MemberPress > Memberships. Then click Add New.
Then, choose your Membership Terms. The Billing Type can be:
- One-time, where customers are only billed once
- Recurring, which is billed every month, year, or whatever you choose
For Legit JavaScript, once someone buys a monthly or yearly membership, they’ll have access to all of my courses.
So, I’ll create two recurring memberships. Monthly and yearly. Members will get a slight discount for paying yearly.
Once created, be sure to click Publish to save your membership.
Now people can buy a membership on your site. Next, you’ll need to make your content exclusive by protecting it.
Set up a rule
To protect content, you’ll make one or more rules in MemberPress. This will ensure only those who buy your membership(s) can get their hands on your premium stuff.
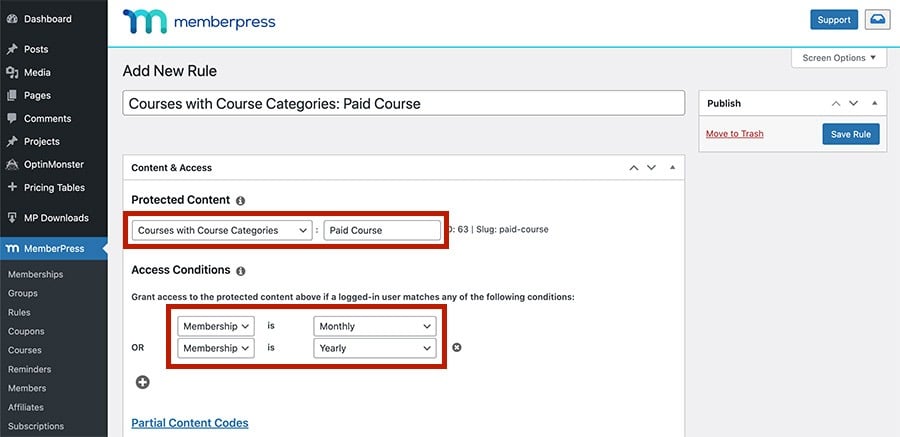
First go to MemberPress > Rules > Add New.
Then, in the dropdown under Protected Content, select one of MemberPress’ many rule types. Wherever your content is on your site, you can protect it.
On Legit JavaScript, all of my courses have a category applied to them. So, I’ll select Courses with Course Categories. Then, I’ll select my category name, Paid Course.
Now, under Access Conditions, select your membership(s).
Then, click Save Rule.
That’s it! Now, on Legit JavaScript, only people who buy a membership can take my courses.
If you have multiple pieces of content, like courses, videos, and files – you can create multiple rules to protect them all.
Okay, now the basics of the back-end are set up. That means it’s time for the front-end baby!
Design your header and footer
Finally, it’s time to get the party started!
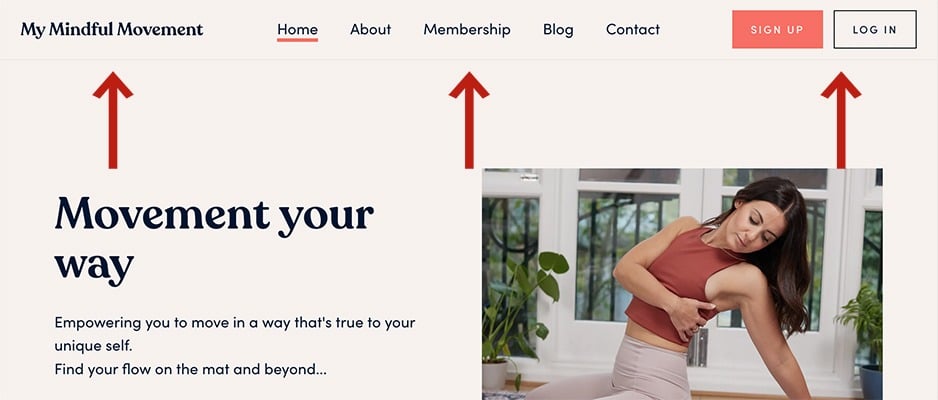
While this step is optional, most websites at least have a header. Usually, with a logo and navigation menu.
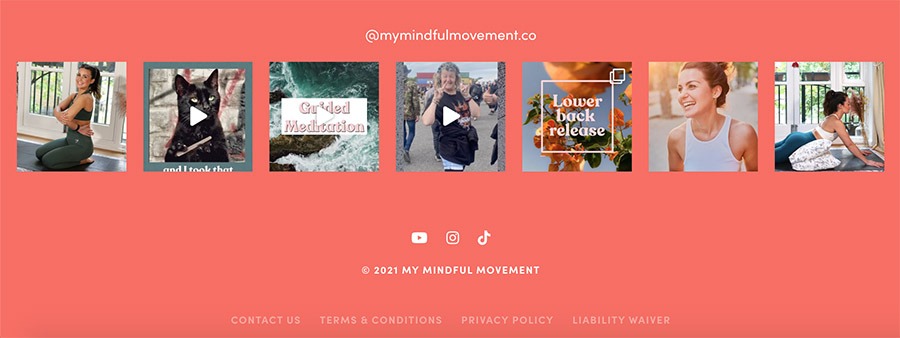
The footer typically has another navigation menu, a link to a terms of service page, social media links, and other things like that.
Here’s how to create a header and footer with DIVI. We’ll start with the header.
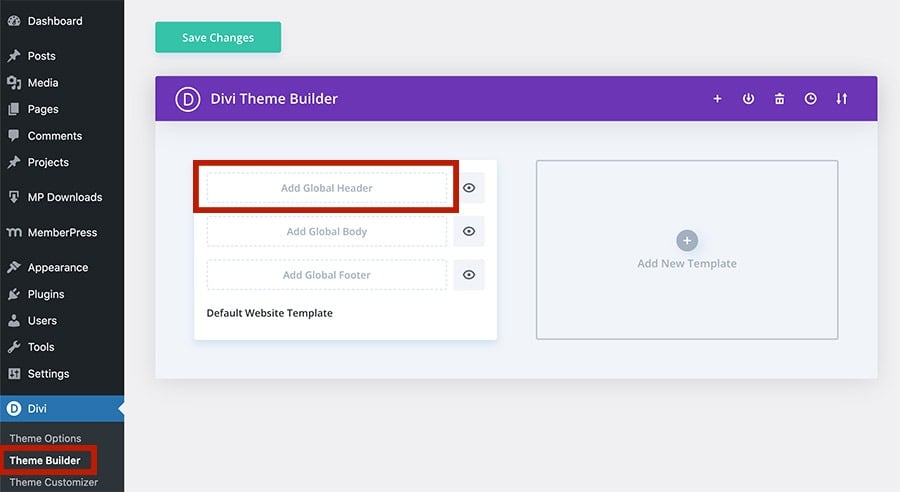
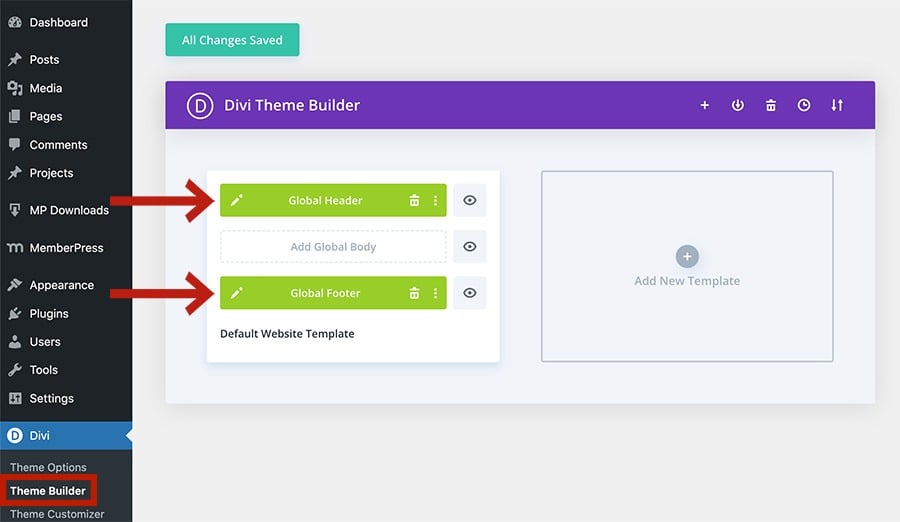
Go to DIVI > Theme Builder.
Then, select Add Global Header.
NOTE: It’s called the “Global” Header because it’ll appear at the top of every page on your site by default (unless you specify otherwise).
You’ll see two options.
- Build Global Header – This lets you build from scratch.
- Add From Library – Build from a pre-built header on a layout.
Since headers are simple, it’s easy to build one from scratch.
So, select Build Global Header.
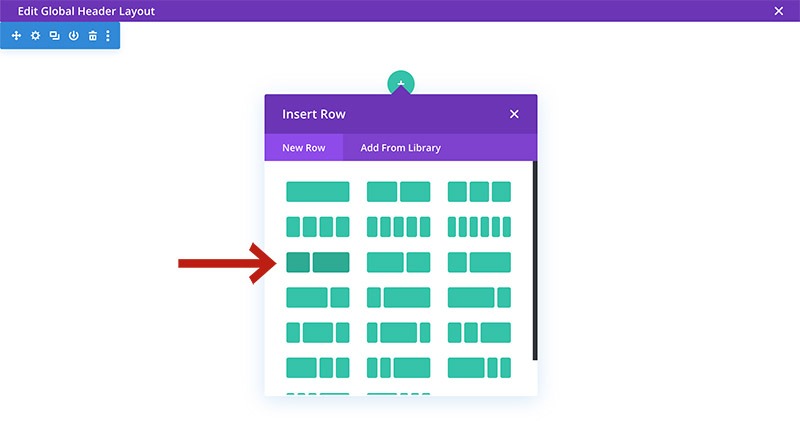
Then, click the green (+) icon to insert a row.
The header for Legit JavaScript will have a logo on the left and navigation menu on the right. So, I’ll select the row type below.
The row you select will depend on how many elements you want to include in your header.
Now, click the grey (+) icons to add modules.
For my header, I’ll select Image for the left column module, and Menu for the right.
Once your modules are in place, adjust size, padding, margins, and color until you’ve designed the header of your dreams.
Here’s mine:
Be sure to click Save when you’re finished.
Now that the global header is complete, let’s hop down under to tackle the footer.
Back in the DIVI Theme Builder, select Add Global Footer.
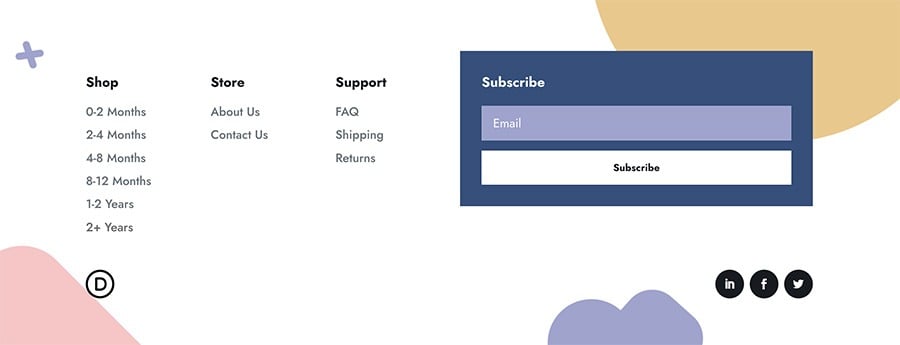
When building a footer, it’s easier to use one on a pre-made layout.
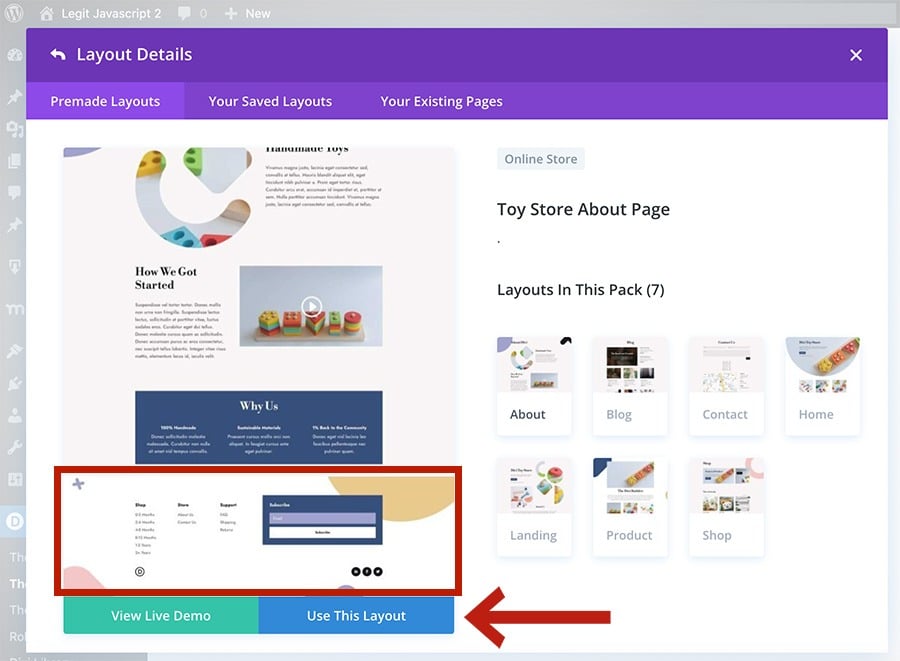
In this case, select Add Global Footer > Add From Library.
Then, a library of pre-made DIVI layouts will appear.
Look through pages within layout packs until you find a footer style you like.
Then, select the page and choose Use This Layout.
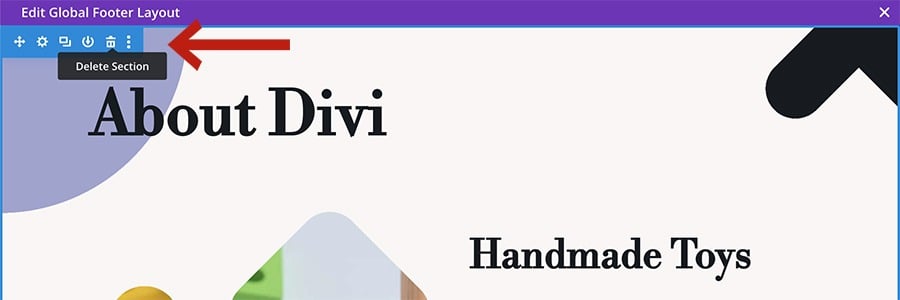
The layout will then populate in the editor.
Now, use the trash icon to get rid of every section except the footer.
Now, only the footer section should remain.
Next you’ll want to modify your footer. Change the text, add your navigation menu, social icons, privacy policy link, and more.
Just click Save when you’re done.
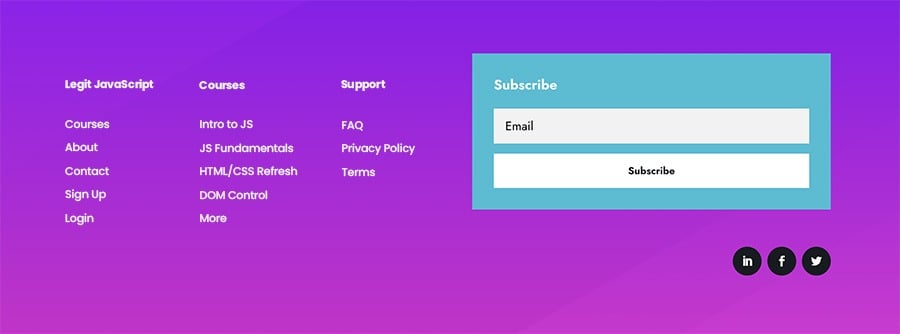
Here’s what the footer for Legit JavaScript looks like now:
Congrats! Your site should now have a global header and footer.
Now, any page you make will have this header and footer applied to it.
To edit your header and footer, just go back to the DIVI Theme Builder and click the pencil icon to make changes.
Okay, so making the header and footer was actually just the pre-game. Let’s get this party started for real this time.
Build your pages with DIVI
I recommend designing your homepage first, and then the rest.
For Legit JavaScript, I’m going to use the Learning Management (LMS) pre-built layout pack.
Built for online course sites, it even has a course listings page. So, I won’t have to design it manually.
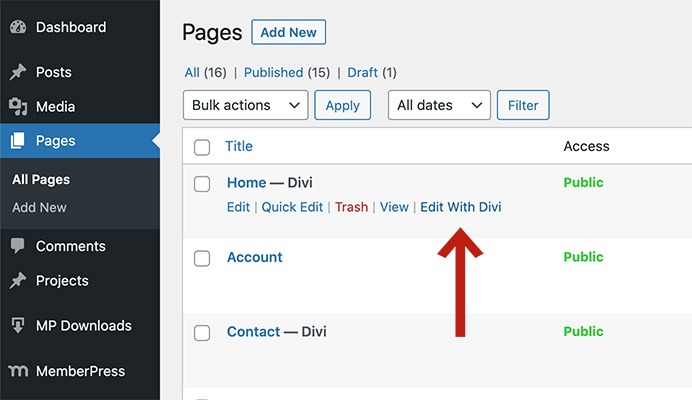
To edit a page with the DIVI builder, go to Pages. Then, hover over your page and select Edit With DIVI.
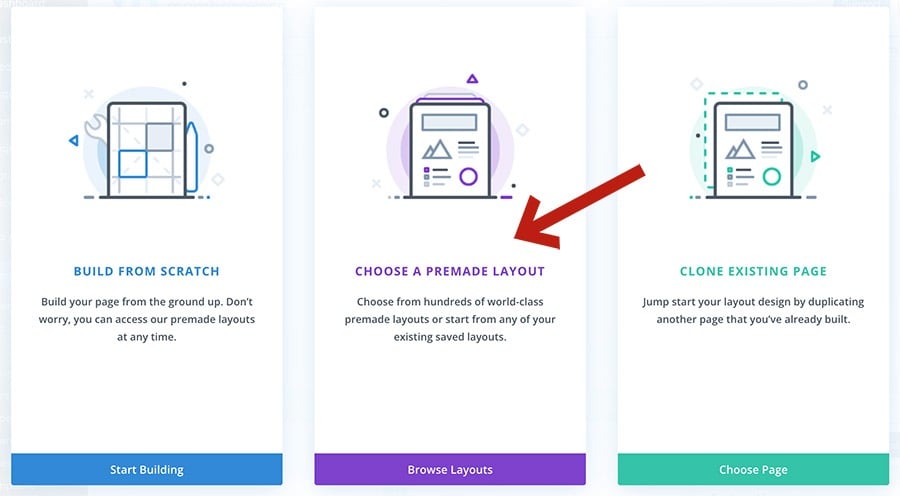
Then, click Choose a Premade Layout.
Next, browse through the layout packs until you find one you like.
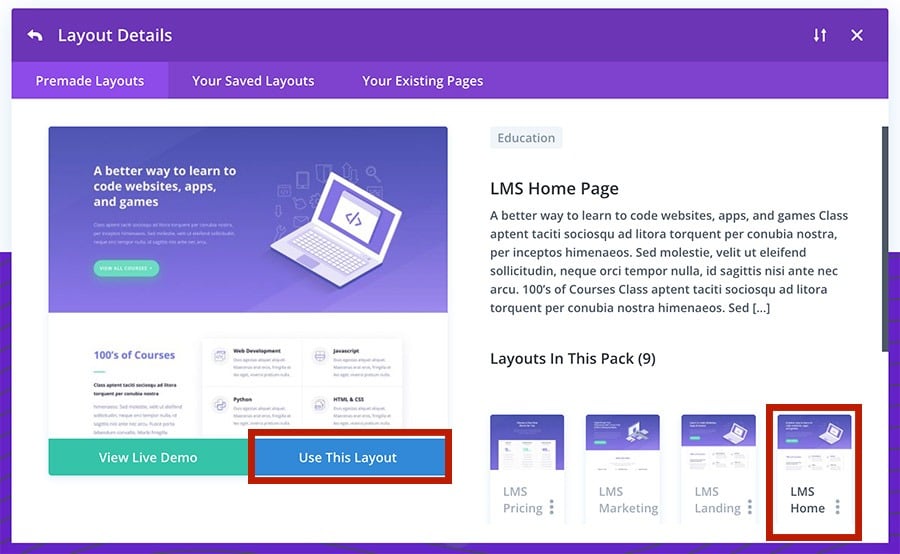
In my case, I’m going to search for the LMS pack.
Now, I’ll select LMS Home Page.
When you have your page selected, click Use This Layout.
Once the layout is loaded up, use the DIVI builder to edit the page.
See the DIVI builder plugin documentation page to learn how to use its many features.
When you’re finished designing your homepage, click Save.
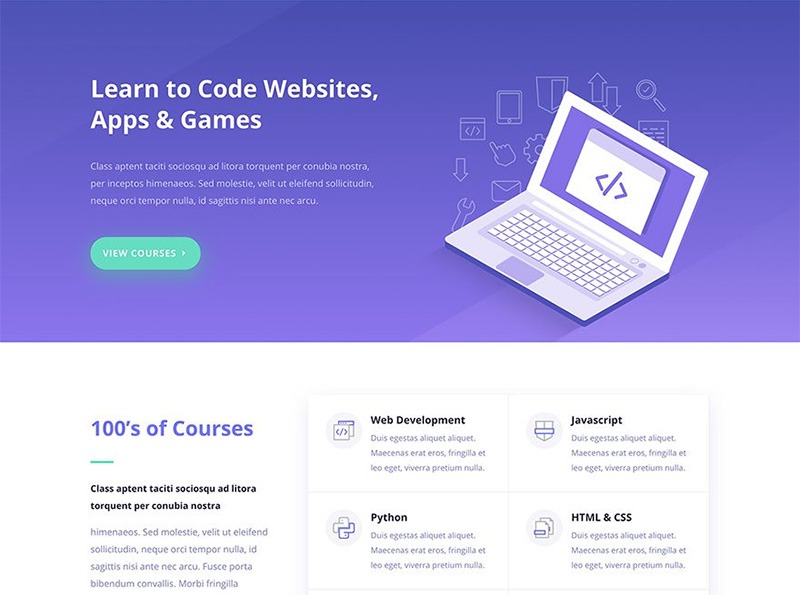
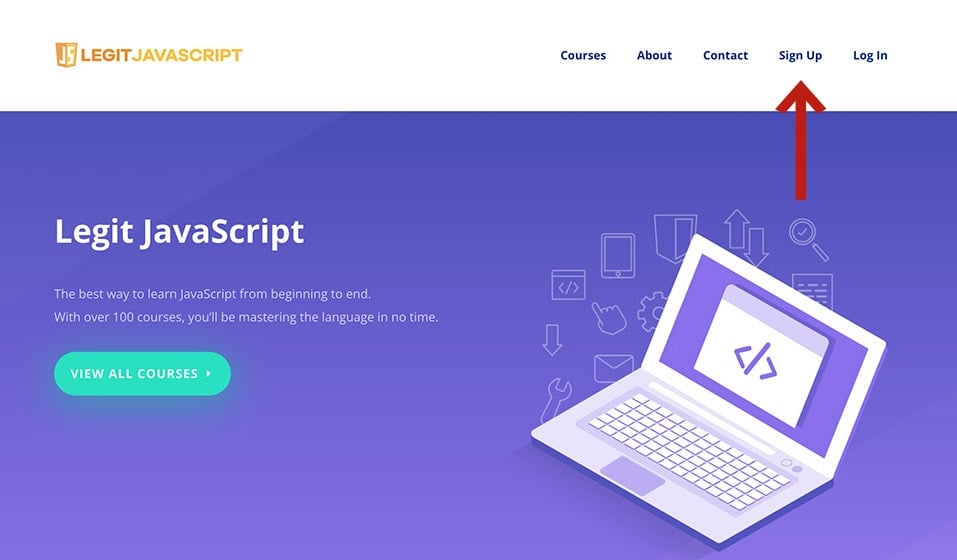
Here’s what the Legit JavaScript homepage looks like:
Once your homepage is done, repeat these steps for your about, contact, and other non-MemberPress related pages.
Now, let’s talk about the membership-related sections of your site.
Since I have 2 different memberships on Legit JavaScript, I need 3 pages that are essential for making a sale:
- Pricing page, listing my two membership options
- Monthly registration page
- Yearly registration page
The two registration pages are where people will actually buy the plans. These are generated by MemberPress when you create memberships.
So, let’s get to styling.
Design your membership registration pages
You already have your memberships made, but now it’s time to spruce up their registration pages.
Go to MemberPress > Memberships, and then click View under a membership.
This will take you to that membership’s registration page, where you can see the default styling.
While the page does look nice and clean, you’ll want it to match the fancy new look of your other pages.
Fortunately, DIVI lets you style registration pages directly! But first you’ll need to enable a setting.
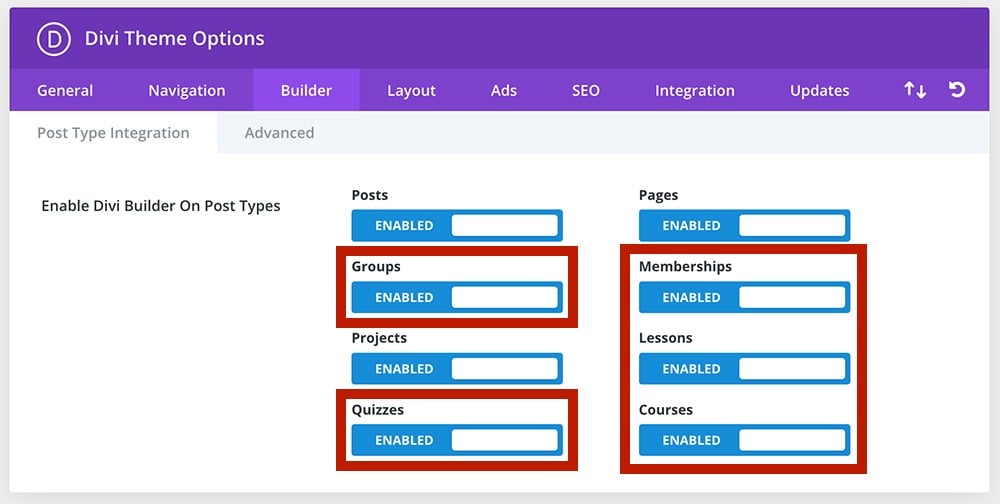
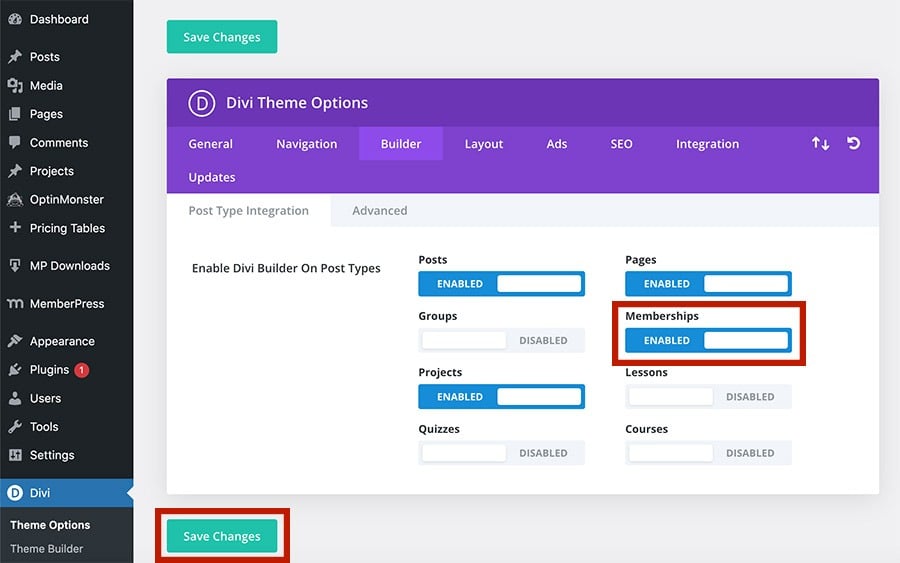
Go to DIVI > Theme Options > Builder.
Enable Memberships.
Then, click Save.
Now, go back to MemberPress > Memberships. Then, hover over the membership, and click Edit.
Before you open the registration page in the builder, you’ll need to enable a few settings here on the membership edit page.
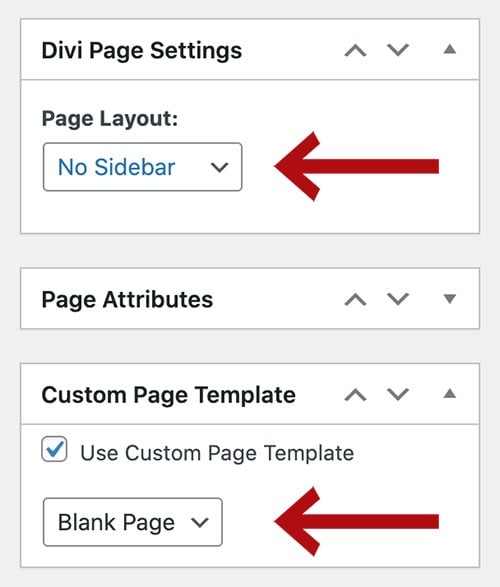
On the right side of the page, under Divi Page Settings, set the Page Layout to No Sidebar.
Then, enable Use Custom Page Template, and set it to Blank Page.
Now, click Update to save these changes.
One more thing before designing the page.
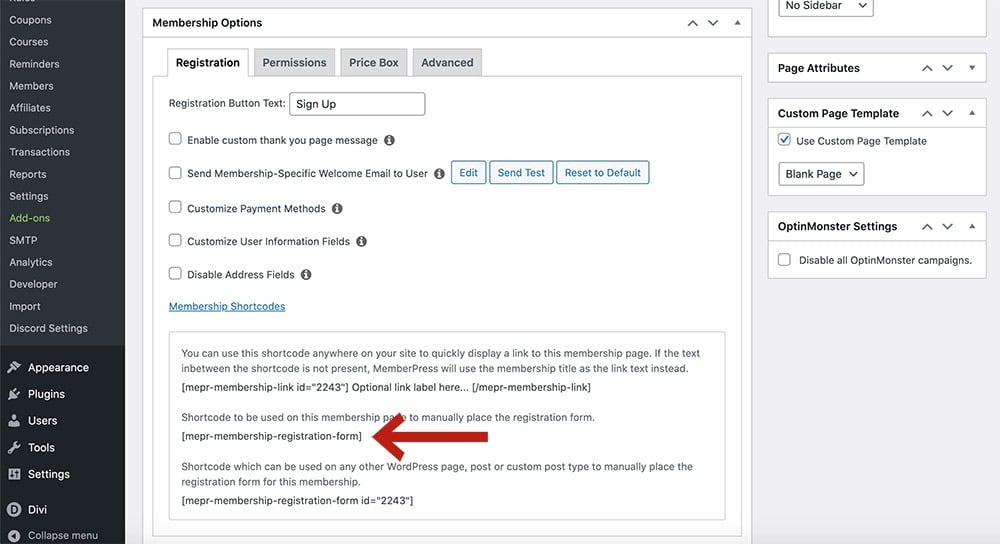
Under Membership Options > Registration tab, click Membership Shortcodes.
Then, copy the second shortcode.
This will allow you to place the registration form wherever you want using the DIVI builder.
Now, style that page!
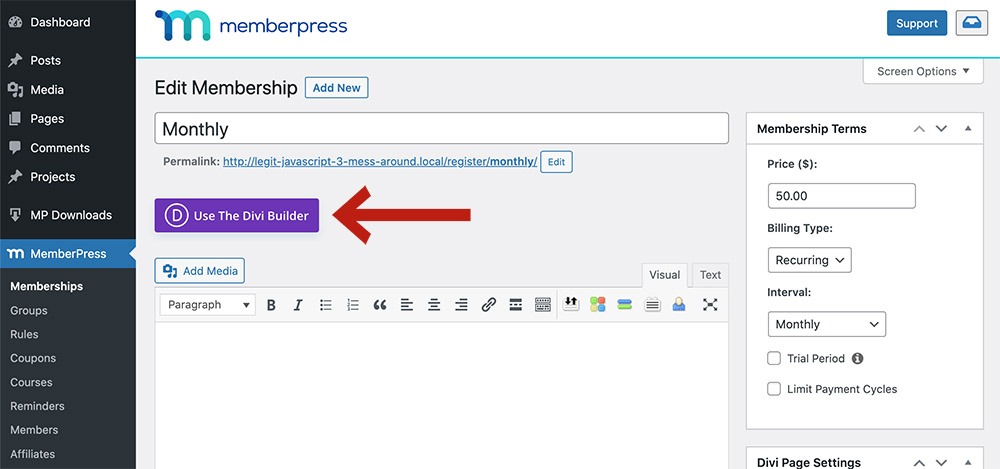
Back at the top of the membership edit page, click Use The DIVI Builder.
Then, select Choose a Premade Layout.
NOTE: Chances are, you won’t find a pre-built page in DIVI that’s specifically designed for registration pages. Find one that can be edited to include a form and some basic info.
And remember, you don’t have to stick with the same layout pack you built the rest of your site with. You can change the font and colors from another layout’s page to match the rest of your site.
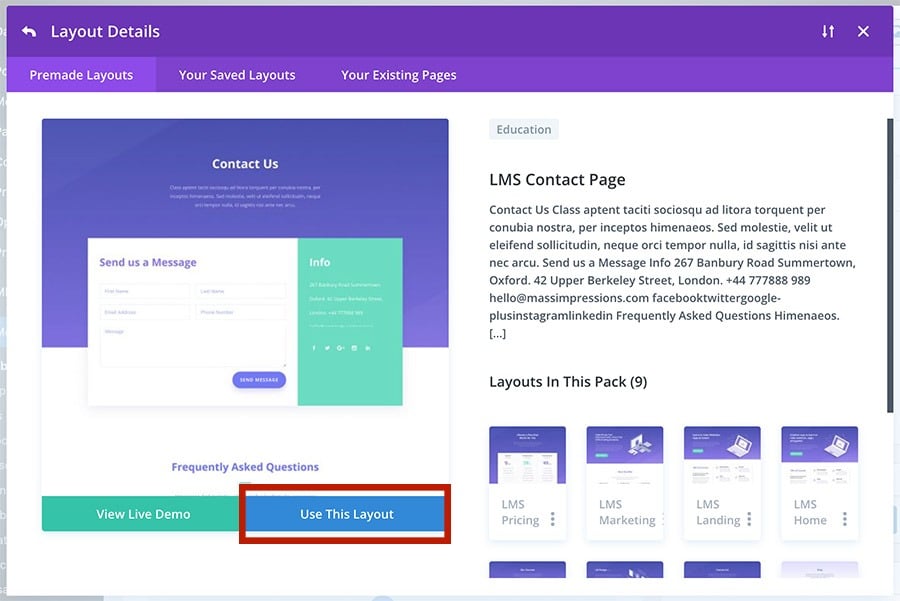
For Legit JavaScript, I’m going to use the contact page layout that’s included in the LMS pack.
So, I’ll select the LMS Contact Page, and click Use This Layout.
DIVI will populate this layout and redirect you back to the membership edit page. Once there, click Build On The Front End.
You’ll then be taken to the builder.
First, insert the registration form shortcode (that you copied earlier) onto the page.
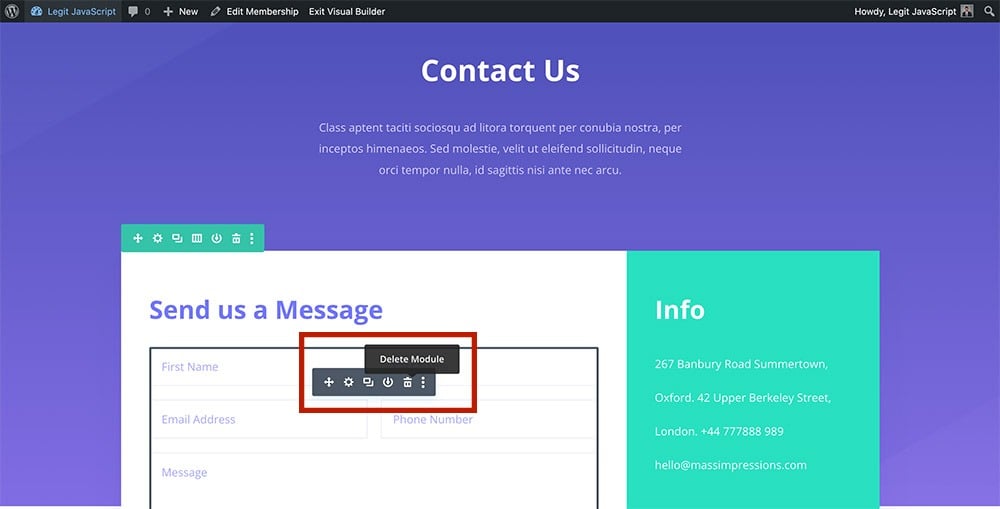
For my example, there’s a contact form. I’ll hover over that module and click the trash icon to delete it.
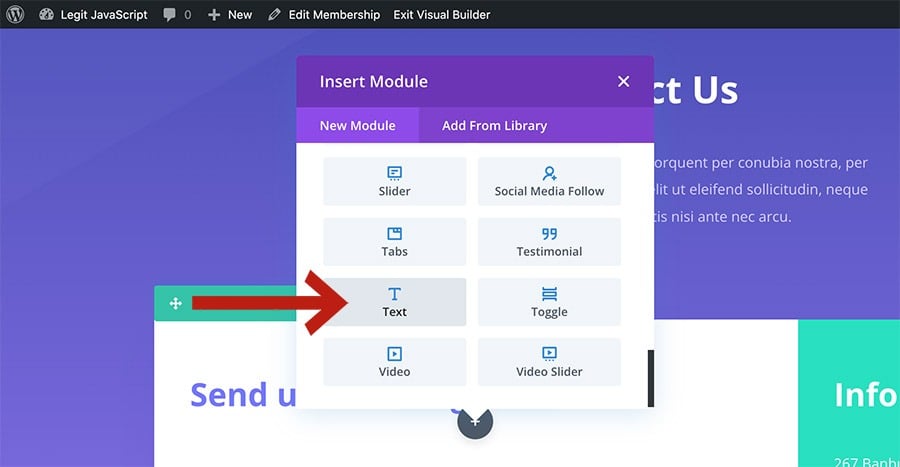
Then, I’ll click the grey (+) icon to insert a new module, and select Text.
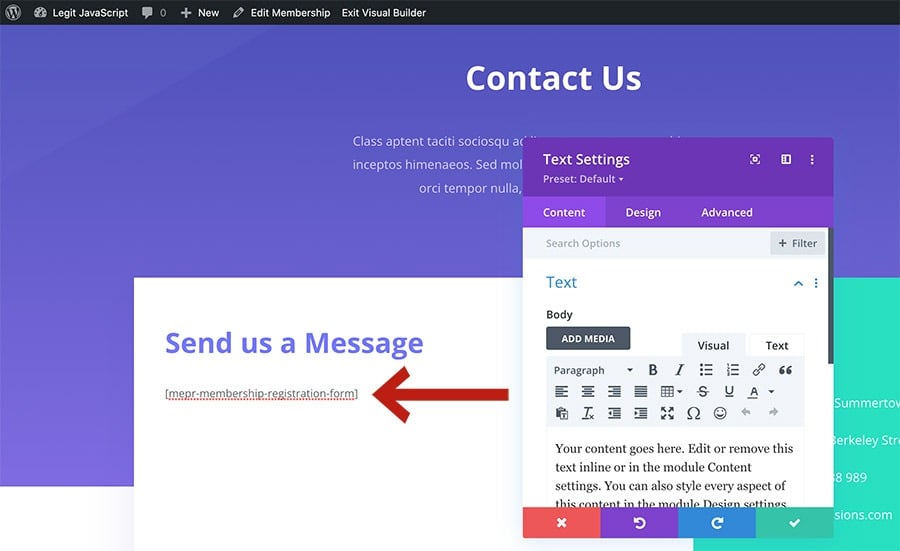
Now, I’ll paste the shortcode to replace the placeholder text.
Once you’ve taken these steps to insert the shortcode, click Save.
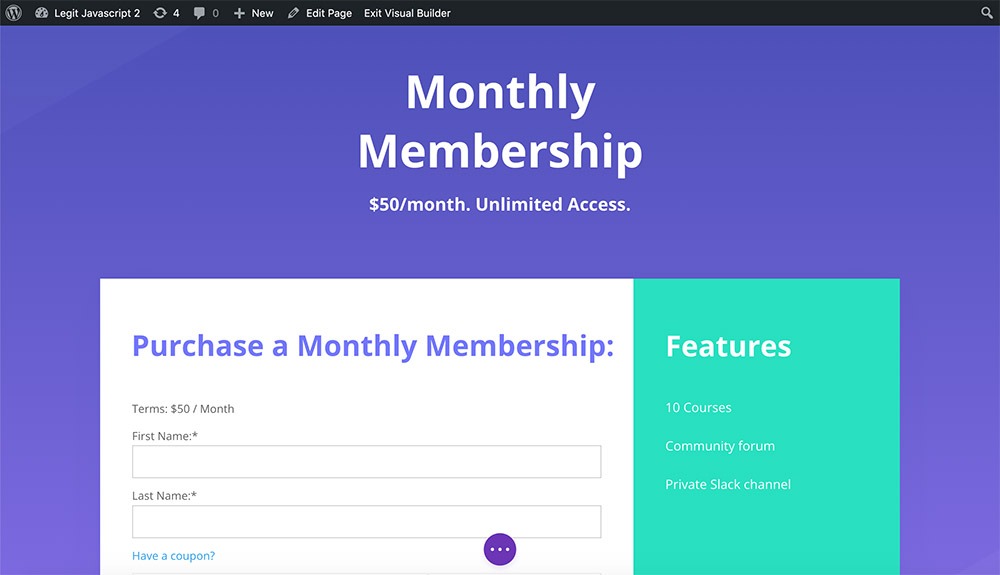
Now, your registration form is embedded!
Continue editing the page, and click Save when you’re done.
For a more in-depth look at editing membership registration pages in DIVI, watch our tutorial video below.
BONUS: You can modify which fields show up on your registration forms globally (in the MemberPress settings) or per-membership.
Visit our Knowledge Base page and watch our tutorial on custom fields below to see how.
ALSO: If you’re offering many membership tiers, consider creating a template instead of designing each registration page individually.
Doing so will save you a lot of time. It’ll style all of your membership pages, and use dynamic content to display membership-related information.
Watch this video to learn more about using templates with MemberPress + DIVI.
Create a pricing page
This step is optional, especially if you only have 1 membership on your site.
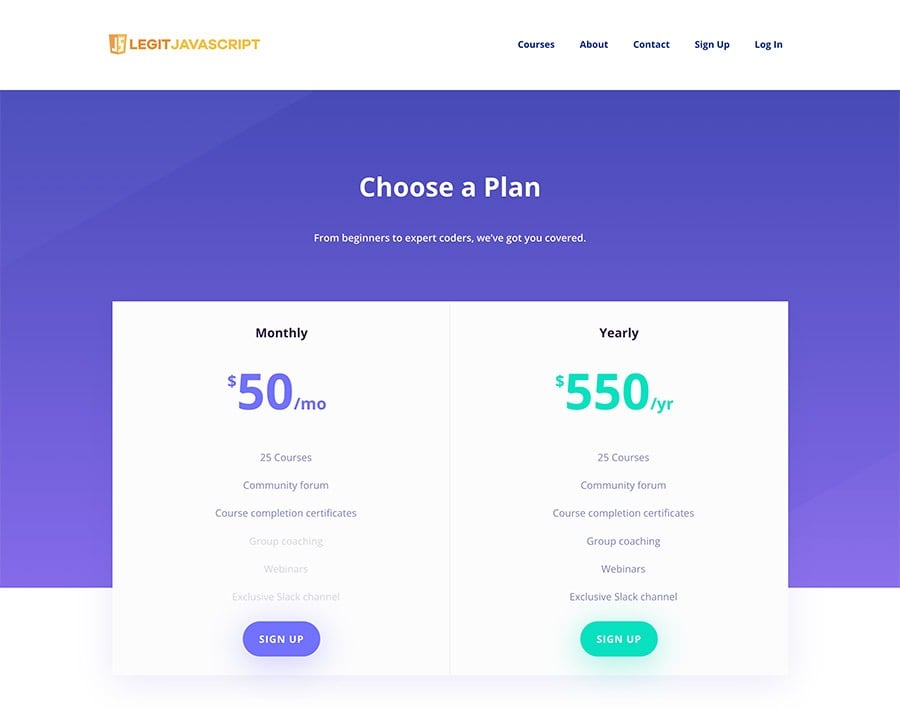
But, if you have 2 or more, a pricing page lets visitors compare your plans in a sleek, side-by-side view.
Repeat the steps outlined earlier in the article to create a new page and design it with DIVI.
A lot of DIVI layouts have a pricing page included, which makes things even simpler.
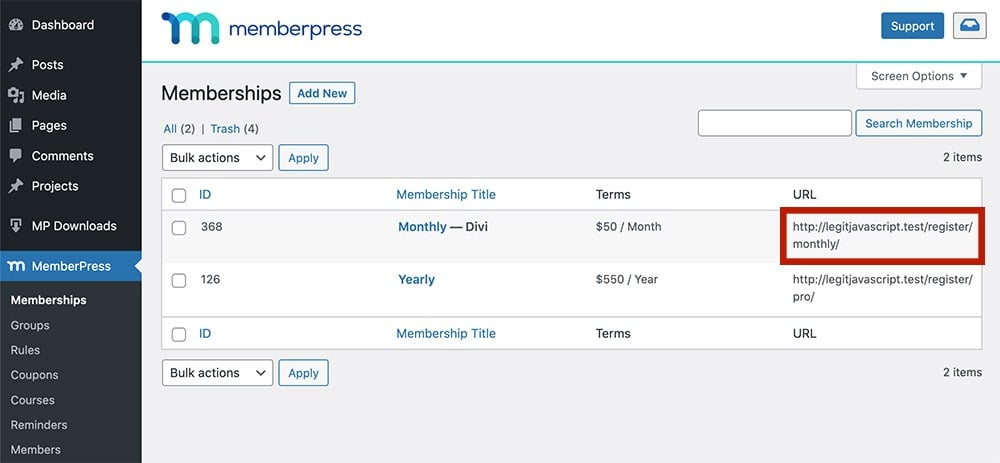
Once the page is designed, link your individual membership registration URLs to your pricing tables.
Go to MemberPress > Memberships. Then, copy a membership’s URL.
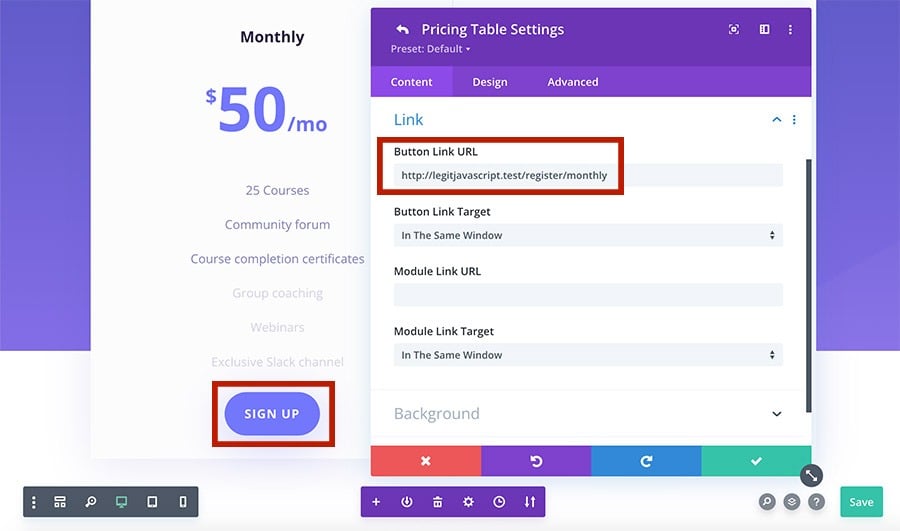
Now, go back to the pricing page in the DIVI builder.
Click your Sign Up button and find the Link property.
Then, under Button Link URL, paste the registration page URL.
Repeat these steps if you have more than one membership.
Then, click Save when you’re finished linking.
Now, back in the WordPress Dashboard, go to Pages.
Find your pricing page, then hover over its name and right-click on View. Then click Copy Link Address to copy the pricing page URL.
You’ll need the URL for the next step.
Create a group in MemberPress + link the pricing page
A group is a way to link memberships in MemberPress. Members can upgrade or downgrade between them (if you enable it in the settings), and more.
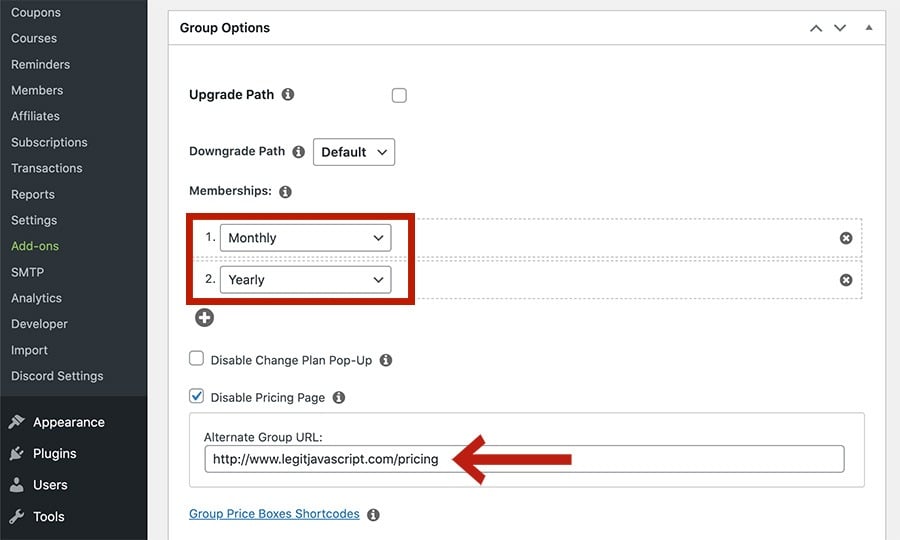
Go to MemberPress > Groups > Add New.
Give it a name. In my case, Monthly and Yearly.
Then, locate Memberships under Group Options.
Select your memberships to be included in this group.
Then, check Disable Pricing Page. Next, paste your pricing page’s URL in the Alternate Group URL field.
Then, click Publish to save the group.
See our Knowledge Base page on MemberPress groups for a more detailed guide on setting up groups.
Now, people can compare your plans and buy your stuff. Next, you need to make sure they can do that from the homepage.
Make your pricing page easy to find
The last thing you need when you’re growing an online business is frustrated site visitors.
You want it to be as easy as possible for people to make a purchase. One way to do that is to add your pricing page to the navigation menu.
The Sign Up link on Legit JavaScript leads to my pricing page.
To add a sign up link to the nav menu, go to Appearance > Menus.
Now, on the left, expand the Groups item. If you don’t see Groups, click Screen Options at the top and enable Groups.
Next, select your group and click Add to Menu.
Then, drag-and-drop it to the position you want.
Expand the item and change the Navigation label to “Sign Up.” You could also label it Pricing, Memberships, or something else.
Lastly, click Save Menu.
And there you go, you’ve got a link to the pricing page on your header.
Now, everything’s set up to make your first sale! Guess it’s time for that party GIF again:
BONUS STEPS!
It ain’t last call yet – you need to keep building your site to attract new visitors. There’s a lot more things you can do to enhance your membership and sale experience.
Here are just a few…
Design other MemberPress pages
Design other MemberPress pages to match the site’s style. These include the:
- MemberPress Account page
- Thank you page
- Login page
Beyond design, MemberPress also offers a wide variety of tools to keep your site running smooth. Let’s check them out.
Grow your business with built-in MemberPress features
MemberPress has many features you can use right out of the box to do all sorts of things, like:
- Choose where members are redirected to after buying or logging in
- Customize the unauthorized message seen by people who haven’t paid when trying to access protected content
- Offer discounts with the coupons feature
- Let users know when things like subscriptions and free trials are ending with reminders
- Track site metrics with MemberPress Reports
Make use of MemberPress’ many add-ons and third party integrations
MemberPress also has many add-ons and integrations with third-party services that can take your business to the next level. You can use these tools to:
- Offer corporate membership packages with the Corporate Accounts add-on
- Reduce spam and fraudulent sign-ups with the Math CAPTCHA add-on
- Provide PDF invoices to customers with the PDF Invoice add-on
- Automate tasks between MemberPress and over 5,000 services with Zapier
- Stay in touch with subscribers using an email marketing tool like Mailchimp, ConvertKit, or ActiveCampaign
See our integrations and add-ons page for a full list.
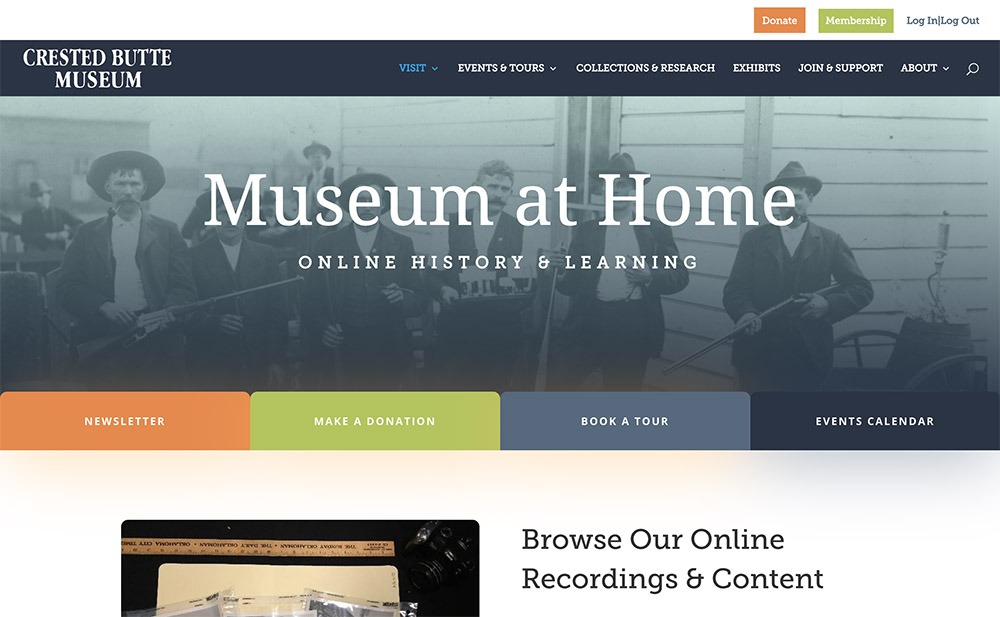
Need some inspiration? Here’s a MemberPress site using DIVI right now!
In the sleepy mountain town of Crested Butte, a small museum is set on educating visitors about the Colorado ski destination’s past.
The Crested Butte Museum has been around since 1993, and has since expanded to the metaverse! (Well, not yet, but they have grown their digital footprint big-time.)
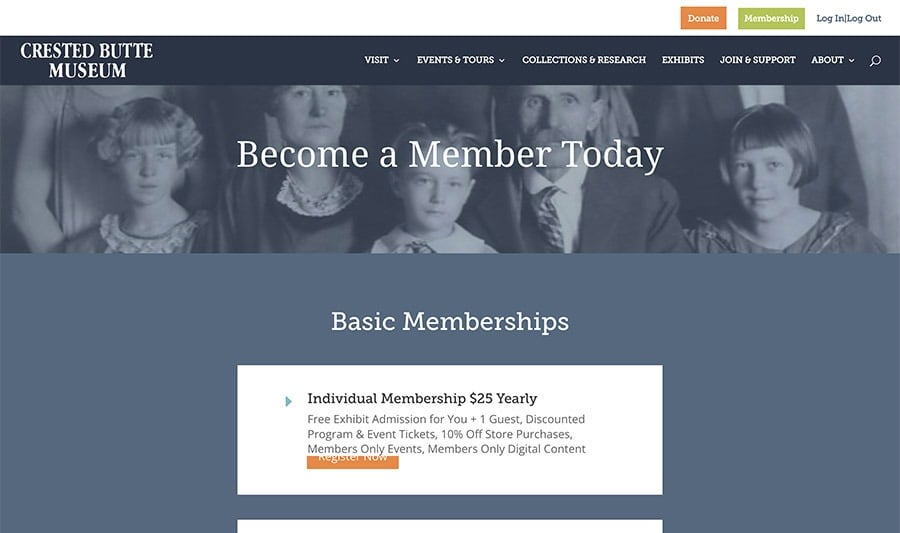
The site first started as a way to collect museum membership dues online, but quickly turned into a virtual learning experience.
Their formula for success is simple.
WordPress + MemberPress + DIVI!
In our conversation with Anna-Marie Davidson, the museum’s Events and Marketing Coordinator, she shared her experience using WordPress.
“We do use the DIVI plugin, which MemberPress integrates with. That makes it really easy to edit the visual layout.”
“We’re able to build the custom pages that look really nice within DIVI. That’s been really helpful to not have to have a bunch of coding knowledge.”
To learn more about Crested Butte Museum’s success, watch the customer story video below!
Takeaway
Having a modern user experience is critical to thriving in the online business world. So don’t settle for some lame-o, free WordPress theme.
Invest in standing out from the snooze-fest with DIVI.
In summary, to get an awesome MemberPress site off-the-ground with the DIVI page builder, you need to:
- Set up a WordPress site
- Install MemberPress
- Install DIVI
- Upload and/or insert content to sell
- Create a membership
- Set up a rule
- Build a header and footer
- Design your pages with DIVI
- Offer new content and get the word out!
So, what are you waiting for? Snag MemberPress + DIVI and get building!
Use DIVI and got some additional tips? Let us know in the comments below.

Get MemberPress Today!
Start getting paid for the content you create.
















Hi Trey,
Just a note to say how much I enjoy your photo and bio paragraph. Your bio is so well done and hits a wonderful tone. It made my day.
Thanks.
Michael (in Canada).